Welcome to Agoda!
India payroll requirements and instruction
 by
Data Management Team

Internal Confidential © 2022 Agoda. All rights reserved. 1
General India’s payroll requirements for new hires

• Personal Information
• National IDs
• Payment Election
• Contact Information
• Payroll Documents
• Payroll cutoff Instruction

Internal Confidential © 2022 Agoda. All rights reserved.
2
General India’s payroll requirements for New Hires
Please go to your Workday inbox to complete onboarding tasks in order to proceed with the India payroll setup.
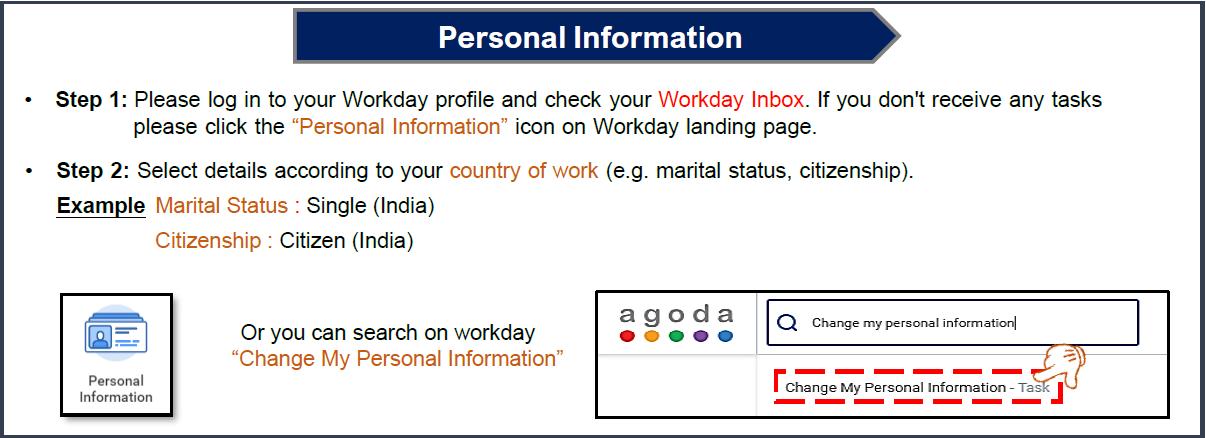
• Personal Information: Log in to your Workday profile and check your Workday inbox to complete the Personal Information task.
Remarks: Don’t forget to input Father's Name in the Relatives' Names part
Internal Confidential © 2022 Agoda. All rights reserved.
3
General India’s payroll requirements for New Hires
• India National IDs: - Go to your Workday inbox to update 4 National IDs.
- And attach Aadhaar Card, PAN Card, UAN Card and EPF Passbook for data verification.
What are 4 National IDs?
Aadhaar (National ID)
– Local required
Aadhaar is a number that can be obtained voluntarily by residents or passport holders of India which is based on their biometric and demographic data.
Contains : 12-Digits
Permanent Account Number (PAN)
– Expat & Local required
PAN is alphanumeric identifier, issued in the form of a laminated "PAN card“ by the Indian Income Tax Department.
Contains : 10-Digits
If you never have PAN Number before, please proceed the registration HERE.
Universal Account Number (UAN)


- Expat & Local required
UAN is a number provided to each member of the Employees’ Provided Fund Organization through which employee can manage their PF accounts
Contains : 12-Digits
Employee PF Account Number (EPF)
- Expat & Local required
EPF is an account number that can be used by employees to check the status of their EPF, the balance in the EPF account, etc. The number is mandatory for withdrawals from EPF.
Contains: 22-Digits
Please click HERE for your EPF passbook. If you can't get EPF passbook from the website, you can try to get it from Umang app.
Internal Confidential © 2022 Agoda. All rights reserved.
4
General India’s payroll requirements for New Hires
Please follow these steps to complete Edit Government IDs Task.
• Step 1: Log in to your Workday profileand check Workday inbox. If you don’t receive any tasks, type “Change My Government IDs” in the search box.

• Step 2: Click “+” to add country of work (India). Select “National ID type”. Then, fill in the IDs in the fields.


Internal Confidential © 2022 Agoda. All rights reserved.
5
General India’s payroll requirements for New Hires
Please follow these steps to complete Edit Government IDs Task.
• Step 3: Attach Aadhaar Card, PAN Card, UAN Card and EPF Passbook that show your ID numbers for data verification.
• Step 4: After completing Step 1-3, click “Submit” to complete the task.


Internal Confidential © 2022 Agoda. All rights reserved.
6
General India’s payroll requirements for New Hires
• Payment Election: Please follow the instruction below.
Step 2: Fill your bank account details into all mandatory fields

Remarks: For supporting document, please make sure that it shows
1. Bank name
2. Account number


3. Account name
4. IFSC Code For further information, please click HERE

Internal Confidential © 2022 Agoda. All rights reserved.
7
General India’s payroll requirements for New Hires
• Contact Information: Go to your Workday inbox to add your contact information:

1. India address 2. Phone number 3. Emergency contact
Note: Please make sure to set effective date to be your “start working date” or “effective relocation date”.
For those who are an expat, you can add a temporary address in India first. Once you have permanent residence, please update it again in Workday.
Internal Confidential © 2022 Agoda. All rights reserved.
General India’s payroll requirements for New Hires

• Payroll Documents
To facilitate accurate processing of your income tax amounts for the current financial year and for the employees' provident fund registration, please upload the system generated India Payroll Form 11, Form 12B, and Form 12BB to your worker documents.
• Form 11 is a self-declaration form that requires all new hires to fill out and submit to payroll which is covered under the Employees Provident Fund (EPF) scheme as per the EPF Act.
• Form 12B is an income tax form to declare details of your income from previous employment. Payroll will calculate your tax based on your total income for the physical year and deduct TDS (Tax Deducted at Source) accordingly.
Ensure that you fill in the correct details and provide a Full and final settlement statement (F&F Form) as proof to IN.Payroll@agoda.com.
In case you have not received a F&F Form, fill out the information from your last payslip as much as you can for now and put N/A in the column that you have no details yet. Once you received your F&F, please provide the updated Form 12B and F&F to IN.Payroll@agoda.com again.
• Form 12BB is a provisional statement that provides details about your proposed investments and expenses that are income-tax deductible. Payroll requires this information in order to calculate your final taxable income correctly.
Internal Confidential © 2022 Agoda. All rights reserved.
9
General India’s payroll requirements for New Hires
Please follow these steps to complete India Payroll Forms Task or you can follow this MyAgoda article.
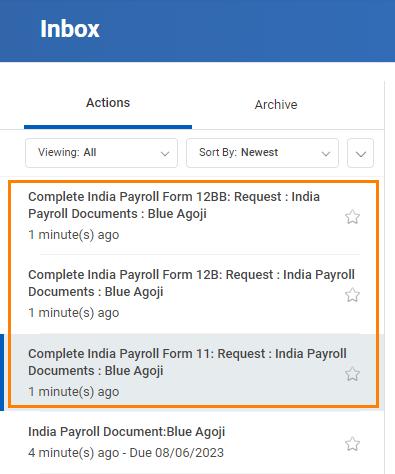
Before proceeding, please verify that all your Onboarding tasks have been successfully completed.

Step 1: Start this task by clicking on this link.
Step 2: Complete the initial questionnaire. Based on your responses, form questionnaires will be triggered, up to a maximum of three. Ensure that you complete all triggered questionnaires sent to your Workday inbox.
Note:
• If question 1 or 2 is answered as "Yes", the Form 11 questionnaire will be triggered.
• If question 3 is answered as "No", the Form 12B questionnaire will be triggered.
• If question 4 is answered as "Old Regime", the Form 12BB questionnaire will be triggered.
Internal Confidential © 2022 Agoda. All rights reserved.
General India’s payroll requirements for New Hires

Step 3: After completing the form questionnaire(s), allow Workday up to 30 seconds to generate your payroll form(s).
You should find task(s) in your Workday inbox containing the generated form(s).
Step 4: Thoroughly review your payroll form(s) and click on the "Submit" button to proceed.
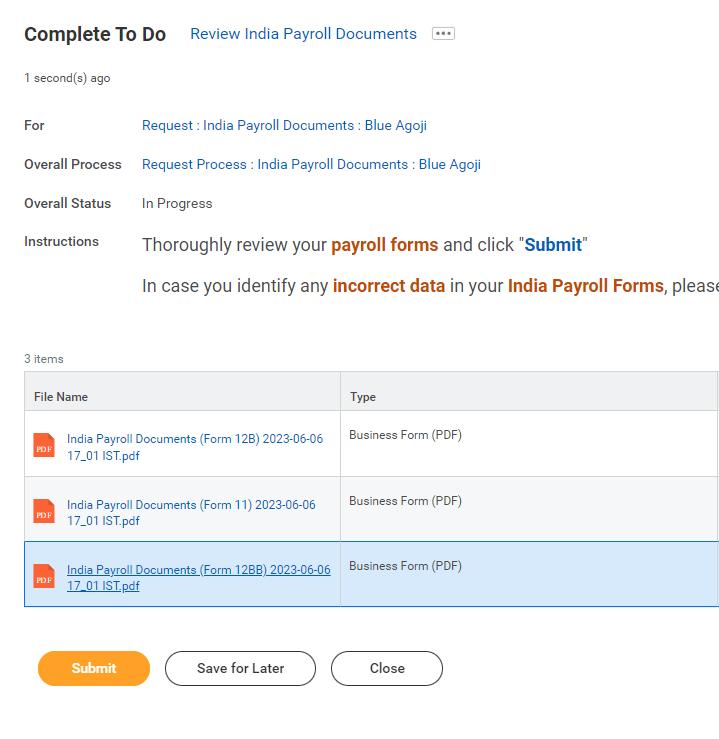
Note:
In case you identify any incorrect data in your form(s), please refer to the "How to Correct My Payroll Form" section within this MyAgoda article.
Internal Confidential © 2022 Agoda. All rights reserved.
General India’s payroll requirements for New Hires

Step 5: If all the information on your payroll form(s) is accurate, search and select "Your Name" in the Worker box and select "Done" in the Resolution box. Then, click "Submit".

Internal Confidential © 2022 Agoda. All rights reserved.
General India’s payroll requirements for New Hires

Step 6: You will find a separate task To Do: Download and Upload India Payroll Documents. Follow the steps provided to download and upload your India payroll documents to your worker documents.

Internal Confidential © 2022 Agoda. All rights reserved.
General India’s payroll requirements for New Hires
Step 7: Download the PDF copies of your payroll form(s)by following these steps:
• Navigate to the top right-hand corner.
• Click on "Your Workday Profile Photo." From the dropdown menu, choose"My Reports". You can also click on this provided link.
• Right-click on the desired payroll form(s).
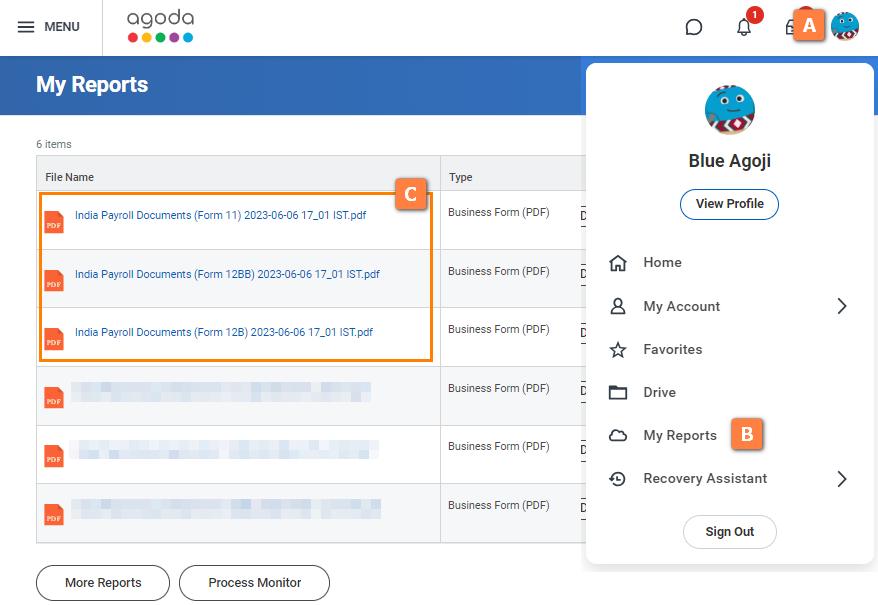
• Select "Download" from the context menu.
• Locate the download icon, situated at the top left corner. Click on it to initiate the download.

Note:
The latest version of forms are the first three lines.
Internal Confidential © 2022 Agoda. All rights reserved.
General India’s payroll requirements for New Hires

Step 8: Upload the PDF copies of your payroll form(s) by following these steps:
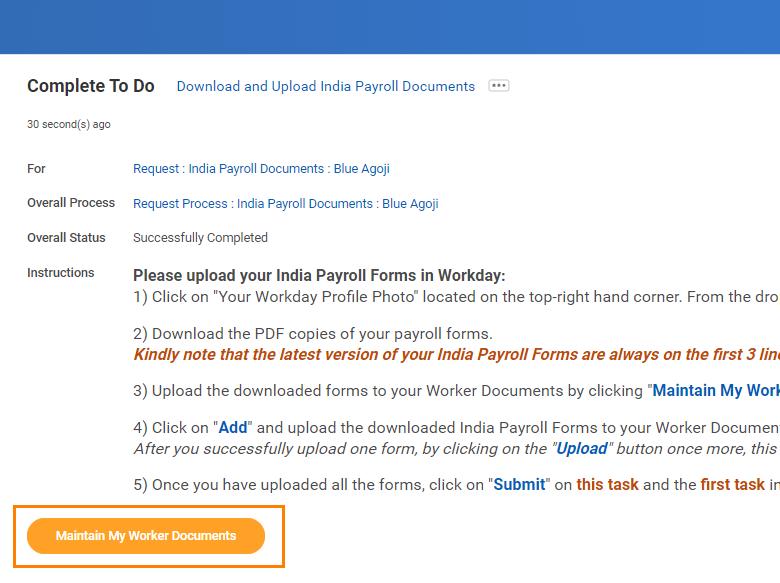
• Click on Maintain My Worker Documents button from the To Do: Download and Upload India Payroll Documents task.

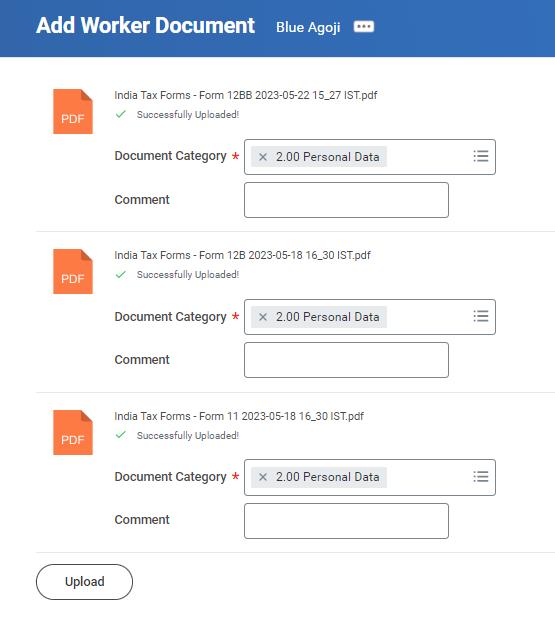
• Click on "Add" and upload the downloaded payroll form(s) to your Worker Documents. For the document category, select "2.00 Personal Data."
Internal Confidential © 2022 Agoda. All rights reserved.
General India’s payroll requirements for New Hires

• Once you have uploaded all the forms, click on "Submit" and return to the first task in your Workday inbox then click "Submit" to successfully complete this task.

Internal Confidential © 2022 Agoda. All rights reserved.
General India’s payroll requirements for New Hires

• In order to prevent a delay on your first payment, please make sure that there is no task pending in your Workday inbox
• Please find the payroll cut off instruction below;
Got any issues or questions about instructions, please reach out to our team: Data-Management@agoda.com

Internal Confidential © 2020 Agoda. All rights reserved. 17

Internal
Thank you
 by
Data Management Team


