This guidebook is designed to educate you and your family about what to expect throughout your surgical experience. It seeks to prepare you for what’s ahead and to help you understand some of the steps that can be taken to improve your odds for a successful recovery. We encourage you and your caregivers to use this book as a source for pre-surgical preparedness and post-surgical rehabilitation.
Please keep this guidebook with you during education classes and bring it with you to the hospital on the day of your surgery.
If you have any questions before or after your surgery, please call one of our spine care coordinators.
About the AdventHealth Spine Center
This includes a team of experts specializing in orthopedic surgery, pain management, rehabilitation and care coordination. We participate with a national database to achieve quality metrics. We’re here to make your road to recovery as easy as possible. Every patient is unique. Our surgeons provide care specific to each individual person’s needs. What is recommended for one patient may not be what is best for another. This material will give you general information about your surgery, but should not replace what your surgeon has already explained to you. If you have specific questions regarding your surgery, contact your surgeon’s office.
The Role of the Spine Care Coordinator
Together your Spine Care Coordinator and the Spine Center will walk you and your family through each step of the treatment process.
The spine care coordinator will:
• Provide a central point of contact
• Help you navigate through the surgical process
• Provide pre-operative education to prepare you for surgery
• Follow up with you after discharge from the hospital
You may contact the spine care coordinator at any time before or after your surgery to ask questions or share concerns.
Your Plan of Care Map
Begins Here
Surgical Consultation with your surgeon, an introduction to your surgical coordinator and next steps in your plan of care
Understanding Your Plan of Care
Obtain Medical Clearance Insurance Authorization
You will receive a phone call from your surgical coordinator to discuss the next steps in your plan of care. This will include reviewing your surgery date, pre-testing date, surgery class and tour date as well as scheduling your follow-up appointments and reviewing what medications you will need to discontinue.
Attend Pre-Surgery Class and Appointment
Surgery Class:
Pre-testing Appointment: Bring your surgical handbook with you.
You will receive a follow-up phone call from your care coordinator after your surgery to see how you are feeling and to answer any questions you may have at this time.
Day of Surgery
Date of Surgery:
Arrival Time:
Scheduled Surgery Time:
Bring your:
• Imaging results
• Surgical handbook
• Medication list
• Insurance card and ID
2 – 3 WEEK Post-Op Appointment
Date:
Time:
Preparing for Spine Surgery
There are a number of steps you must take to prepare for your spinal surgery.
1-2 Weeks Prior to Surgery
• Stop all medications that can increase bleeding unless otherwise instructed by your physician.
• Attend your pre-operative appointment with pre-admission testing. Preadmission testing may include a series of tests to make sure you are healthy for surgery; this may include blood and urine testing, an electrocardiogram to test heart function and possibly and X-ray.
• Complete pre-operative education.
• Complete pre-operative exercises.
• Prepare your home for your return from the hospital.
The Day Before Surgery
• Avoid alcoholic beverages.
• Pack clothes and items you will need during your hospitalization such as shorts, shirts and deodorant.
The Night Before Surgery
• Do not eat or drink anything after midnight (or at least eight hours before your operation) unless instructed to do so. Even water is not allowed. Failing to adhere to this may cause your surgery to be cancelled.
• Wash with the chlorhexadine prep using the instructions provided at your pre-admission testing appointment.
• Do not chew gum.
The Day of Surgery
• Wash with the chlorhexadine prep as instructed.
• Arrive at the hospital on time, and report to the surgical check-in desk.
• You will be asked to come to the hospital two or three hours before the scheduled surgery to give the nursing staff sufficient time to start IV’s, prep for your procedure and answer questions. It is important that you arrive on time to the hospital because sometimes the surgical time is moved up at the last minute, and your surgery could start earlier. If you are late, it may create a significant problem with starting your surgery on time. In some cases, lateness could result in moving your surgery to a much later time.
What to Bring to the Hospital
Your surgeon will decide if you are going to be staying in the hospital or going home the day of surgery.
You must bring the following to the hospital.
• Your insurance card and prescription card
• Your license or photo ID
• Your X-rays, MRI and CT images, if your surgeon requires them. Failure to bring these images may result in your surgery being cancelled
• Your collar, if your physician prescribed one for you
• Your patient guidebook
• A copy of your advance directives
You may want to bring the following items to the hospital.
• Comfortable clothing such as shorts, t-shirts and pajamas
• Well-fitted slippers or tennis shoes
• A list of medications you are currently taking
• A laptop or tablet (we are WIFI compatible)
Additional Details
• You will be instructed by your surgeon about medications, skin care, showering, etc.
• Do not take medication for diabetes on the day of surgery. You will receive special instructions from the pre-op nurse.
• Please leave jewelry, valuables and large amounts of money at home.
• Makeup and nail polish must be removed before your procedure.
• Do not smoke or drink alcohol a week before surgery.
• If you develop a cold, fever, persistent cough, infection or become ill within 48 hours of your procedure, notify your surgeon immediately.
Your Coach
• Your coach is chosen b y you as your support person to help you prepare and recover from your spine procedure. A coach can be a spouse friend, or family member who will provide help and positiv encouragement along the way.
Appointments and Paperwork
Medical Clearances
Prior to being scheduled for surgery, you may receive a medical-clearance letter from your surgeon. The letter will tell you whether you need to see your primarycare physician and/or a specialist. Please follow the instructions in the letter.
Pre-Operative Education
It is very important that you understand each step in the surgical process. We provide education to inform you of what will happen before, during and after surgery. Preoperative education should be completed prior to the surgical day. Please refer to the education insert and ask your care coordinator if you have any questions.
Pre-Operative Visit to Surgeon
This will serve as a final check-up and a time to ask any questions you may have.
Pre-Registration
After your surgery has been scheduled, you will be asked to provide some pre-registration information including:
• Full legal name, address and phone number
• Marital status
• Insurance card information
• Driver’s license or photo identification
Pre-Operative Testing
You should have an appointment for pre-admission testing prior to your surgery. At this appointment the staff will draw your labs and follow up with any additional testing ordered by your surgeon.
Days Prior to Surgery
Days before your surgery, all medications that may cause thinning of the blood should be stopped. This includes prescription and non-prescription drugs such as:
• Blood thinners (as directed)
• Non-steroidal anti-inflammatories (NSAIDs)
• Over-the-counter supplements
These medications may cause increased bleeding. If you are taking a blood thinner, you will need special instructions from your doctor on how to stop taking the medication.
* Always check with your doctor before stopping or starting any medications, or over-the-counter drugs or supplements. Special instructions will be given to you at your doctor’s appointment if you are taking any of the above medications.
Narcotic pain-medications, muscle relaxants, and Tylenol (acetaminophen) are okay to take until midnight unless otherwise directed by your doctor. Most multivitamins, vitamins A, B, C and D, and calcium may be continued. Always check with your surgeon if you have questions.
Pain Management
If you are being treated by a pain-management doctor, discuss your current pain medication with your surgeon. If you are taking long-acting pain medication, your surgeon will need to plan for pain management for you during your hospitalization. It is very important to share this information ahead of your surgery so your surgeon can manage your post-operative pain.
Arranging for a Caregiver and Driver
After your spinal surgery, you will need someone to help you during your recovery period. Arrange for someone to drive you home from the hospital. Once home, you will need help until you are strong enough to care for yourself. You will need someone to help you get in and out of bed, exercise and manage your overall care.
Quit Smoking
Research shows that smoking increases the risk of post-operative complications. Smoking slows down the healing process. This includes nicotine gum, patches, and vaporizers. All of these should be stopped. Smoking is not allowed in the hospital or anywhere on the hospital property. If you are a smoker, now is the time to stop to ensure the best possible outcome from your surgery.
Tips for Quitting Smoking
• Make a list of reasons why you want to quit smoking. Keep it handy and look at it often.
• Stick to the date you decide to quit smoking.
• Make a list of things that make you want to smoke.
• Think of ways to change the triggers that make you smoke.
• Set goals for yourself such as going for a day, a week or more without smoking. Reward yourself when you are successful.
• Join a quit smoking group.
• The state of Florida has many tips to help you quit smoking at TobaccoFreeFlorida.com.
If you do not quit the first time, keep trying. Many people have to try more than once before they stop smoking for good.
Tips to Prepare Your Home for Your Return From the Hospital
• Remove all clutter.
• Clean, do the laundry and put it away.
• Put clean linens on the bed.
• Arrange drawers and closets so that most-frequently worn items can be reached easily.
• Prepare meals and freeze them in single-serving containers.
• Cut the grass, tend to the garden and finish other yard work.
• Pick up throw rugs and tack down loose carpeting.
• Remove electrical cords and other obstructions from walkways.
• Install night-lights in bathrooms, bedrooms and hallways.
• Arrange to have someone collect your mail and take care of pets or loved ones, if necessary.
• Purchase any required medical equipment — such as bathtub grab-bars, elevated toilet seats, and bath or shower benches — and have it installed. Our case-management staff can help with these arrangements when you are in the hospital if needed.
• Avoid walking on uneven surfaces such as lawns, sidewalks and driveways.
Pre-Operative Exercises
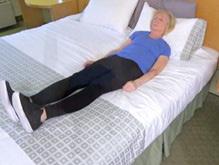
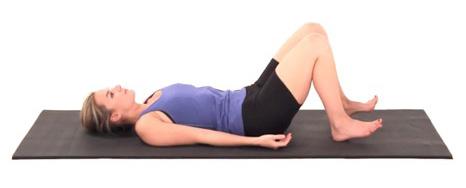
Log Roll Technique
The most important technique you will be taught is the “log roll.” This involves bending your knees and keeping your spine straight (shoulders in line with your knees at all times) as you roll side to side and get out of bed.
When transferring from sitting on your bed to lying down, it's important to remember proper form to make your movements easier and prevent injury.
• Begin in a seated position on the edge of your bed. (Image 1)
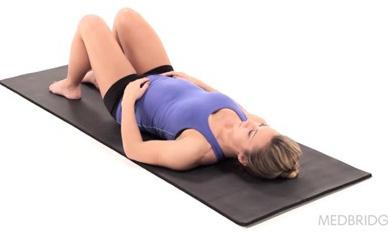
• Slowly ease down onto your side with your knees bent, moving your head towards the pillow. (Image 2)
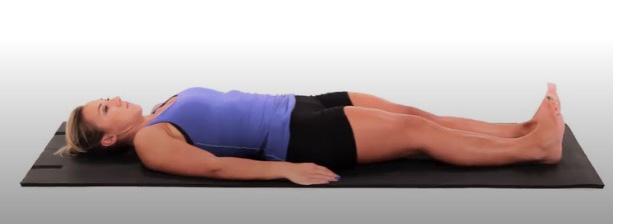
• Once you are lying on your side, roll onto your back, keeping your spine in a neutral position and making sure your torso does not twist. (Image 3)
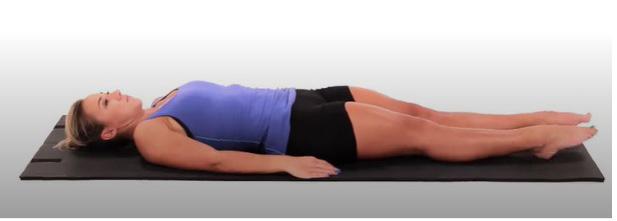
• Straighten your legs one at a time. (Image 4)
To return to a seated position:
• Bend your legs one at a time.
• Slowly roll to your side so you are facing the edge of the bed.
• At the same time, lower your feet towards the floor and push your torso up with your arms until you're in a seated position on the edge of the bed.
Dietary Guidelines With MyPlate
Make half your plate fruits and vegetables. Focus on whole fruits.
Healthy eating is important at every life stage, with benefits that add up over time, bite by bite. Small changes matter
Vary your veggies.
Limit
Choose foods and beverages with less added sugars, saturated fat, and sodium.
Move to low-fat or fat-free dairy milk or yogurt (or lactosefree dairy or fortified soy versions)
Make half your grains whole grains.
Vary your protein routine
Activity
Being active can help you prevent disease and manage your weight
FNS-921
January 2022
USDA is an equal opportunity provider, employer, and lender
Source: U.S. Department of Agriculture
Pre-Surgery Diet
It is important to eat properly before and after surgery so your body has the nutrition needed to heal. A proper diet will give you more strength to move, sit up and walk after surgery, and will increase your ability to resist any potential infection.
Follow these guidelines to prepare yourself nutritionally for surgery.
• Eat balanced meals using MyPlate as a reference for choosing a healthy diet. The MyPlate Guide recommends the following:
Focus on whole fruits
• Include fruit at breakfast! Top whole-grain cereal with your favorite fruit, add berries to pancakes, or mix dried fruit into hot oatmeal.
Vary your veggies
• Cook a variety of colorful veggies. Make extra vegetables and save some for later. Use them for a stew, soup, or a pasta dish.
Vary your protein routine.
• Next taco night, try adding a new protein, like shrimp, beans, chicken, or beef.
Make half your grains whole grains.
• Add brown rice to your stir-fry dishes. Combine your favorite veggies and protein foods for a nutritious meal.
Move to low-fat or fat-free dairy milk or yogurt (or lactose-free dairy or fortified soy versions).
• Enjoy a yogurt parfait for breakfast made with low-fat dairy milk or fortified soymilk. Top with fruit and nuts to get in two more food groups.
Drink and eat less added sugars, saturated fat, and sodium.
• Cook at home more often to limit added sugars, saturated fat, and sodium. Read the ingredients lists and use Nutrition Facts labels to compare foods.
• Be sure you get enough calories and protein. If necessary, use a supplement such as Ensure, Boost or Carnation Instant Breakfast to add to your caloric and protein intake.
• If you are on a special diet — such as a low-fat diet for heart disease or a calculated-calorie diet for diabetes — continue to follow it. Please be sure to inform your nurse of any dietary needs.
• Do not try to lose weight in the weeks immediately prior to surgery. If you have been instructed by your surgeon to lose weight, please make an appointment with the dietitian to get information about the best way to lose weight without putting yourself at risk.
• In the days prior to your surgery, eat a well-balanced diet. The day before your surgery, eat light, low-fat meals during the day, but be sure to get enough calories. Avoid foods that can cause constipation or those that can produce gas.
• To help minimize discomfort or constipation after surgery, try to have a bowel movement on the day prior to your surgery.
Avoid common, gas-forming foods including:
• Apples
• Avocados
• Kidney, lima and navy beans
• Broccoli
• Brussel sprouts
• Cabbage
• Cantaloupe
• Cauliflower
• Corn
• Cucumbers
• Honeydew melon
• Leeks
• Lentils
• Onions
• Split and black-eyed peas
• Green peppers
• Pimentos
• Radishes
• Rutabagas
• Sauerkraut
• Shallots
• Soybeans
• Turnips
Combating Anxiety and Depression Before Surgery
Take an active role in preparing your mental health for surgery. This includes addressing any anxiety, depression or stress you might have and preparing your mind and body for what is to come through other psychological measures.
Relaxation Tools
Preparing your body for surgery and the recovery period using relaxation, music or spiritual awareness can be very helpful. Surgery is physically stressful and you can have some influence or control over this by learning the skills of relaxation or other ways of slowing nervous-system activity.
Diaphragmatic Breathing
Learning how to breathe diaphragmatically is a powerful yet simple way of relaxing at almost any time and place. This involves breathing with the diaphragm muscle — a sheet-like muscle that forms the floor of your chest cavity and separates it from the abdominal cavity. When this muscle contracts, it pulls downward — pulling air in through the nose and mouth into the chest cavity — and pushes the stomach outward. When we breathe diaphragmatically, our stomach rises when we inhale and falls when we exhale. It is best if done gently and easily. The exhale should be slightly longer than the inhale. This allows the exhale to have time to finish, which helps prevent a common tendency to breathe too fast.
Blocking Negative Thinking
Prepare your mind for surgery by suppressing unnecessary negative or frightening thoughts. There are some specific styles of negative thinking that are common and usually lead to unpleasant emotions and stressful physical responses. This negative self-talk can become worse when confronted with any difficult situation including surgery and recovery from surgery. These types of thoughts include:
• Catastrophizing
This involves over-focusing on and expecting the worst possible scenario or playing the "what if" game such as “what if something goes wrong” or “what if I can't be helped.” Try asking yourself the real likelihood of the feared outcome and focus on workable battle-plans for what you are worried about, as opposed to simply picturing the worst-case scenario over and over.
• Awfulizing
This involves getting mental "tunnel vision" — focusing only on the worst elements of the situation and excluding the positives. For example, thinking about the loss of ability to do certain future activities while ignoring the expected improvements in overall functioning and reduction in pain. Try to keep the big picture in mind. Including the positives is an important part of preparing for and coping after surgery.
• All or Nothing Thinking
This is when you think only in terms of opposites or extremes — "Either I'm fixed or I am not.” This type of thinking typically leads to more stress or disappointment. If people or situations are only all good or all bad, it makes it hard to appreciate positives and developing progress. Try to think in terms of percentages of success.
• Shoulds
This way of thinking is defined by a feeling of being stuck with rigid rules about how we or others should act, or how situations should go. For example, "I should've been more careful.” or "They should be more supportive." Feelings of anger arise when people, situations or your own actions are not how they should/must/ought to be. To lessen anger and distress, try to think in terms of “better ifs” or preferences rather than demands.
Affirmations
Affirmations can be used to help combat depressing and anxiety-producing thinking. These are short, simple, coping-oriented statements that remind us of our longterm ability to cope with adversity.
They reaffirm our value as a human being and as being separate and above externals like physical appearance and financial success such as:
• I’ve been through a lot, and I can handle this too.
• It is okay to have these feelings.
• I can do it.
• I am acceptable and worthy just as I am.
Make a list of affirmations in advance, practice them daily, and even take them to the hospital to help in the preparation and recovery from surgery.
Prioritizing Your Time
Prioritizing how you will spend your time, making sure you set aside time for rest/relaxation/rehabilitation and not expecting too much of yourself in the postsurgical period will help you cope successfully with the challenges ahead.
Being Assertive
Taking control of your environment by using time management and effective communication can reduce your overall stress. Don’t be afraid to assert yourself when needed — firmly, but in a way that respects the other person. The following techniques can make you feel more in control, reduce stress, and help maximize your recovery.
• Set limits on the number of or timing of visitors.
• Ask for help getting things ready at home or the office before surgery.
• Insist that staff wash/sterilize their hands upon entering your room.
• Keep requests specific and simple.
• Don’t apologize for your requests.
• Using “I” statements (“I feel frustrated that this has to be rescheduled again”) rather than blaming or becoming aggressive with “you” type statements (“you make me so mad when you screw up like this”) causes less defensiveness on the other persons part.
Remember you have the right to say what you feel, change your mind, say “no”, be happy, not be responsible for other’s actions or feelings and follow your own values.
Anesthesia
Spinal surgery requires the use of anesthesia. The type of anesthesia used is driven by the type of surgery you are having. The following will give you a general idea of what to expect about anesthesia. If you have more questions, please contact the spine care coordinator or your surgeon’s office.
Side Effects of Anesthesia
Your anesthesiologist will discuss the risks and benefits associated with the different anesthetic options, as well as any complications or side effects that can occur with each type. Nausea or vomiting may occur as a result of anesthesia or the type of surgical procedure. Medications to treat nausea and vomiting will be given if needed. The amount of discomfort you experience will depend on several factors, particularly the type of surgery you are having. Your pain should be minimal, but do not expect to be totally pain-free. The staff will teach you the pain scale, so you can properly communicate your pain level.
Before Surgery
You will meet your anesthesiologist immediately before your surgery. They will review all information about your general health. This will include your medical history, laboratory test results, allergies and current medications. With this information, the anesthesiologist will determine the type of anesthesia best suited for you. If a regional anesthetic is to be used, it will be done in the pre-operative area. He or she will also answer any further questions you may have.
During Surgery
An anesthesiologist with a certified registered nurse anesthetist (CRNA) will provide your care while in the operating room. They will monitor your vital signs (blood pressure, heart rate, and oxygen level) during surgery and administer any medications necessary to provide you a safe surgical procedure.
After Surgery
You will be taken to the Post Anesthesia Care Unit (PACU) immediately following your surgery where specially trained nurses will watch you closely until the anesthesia has worn off.
Patient’s Rights
It is our policy to place patient’s wishes and individual considerations at the forefront of their care and to respect and uphold those wishes. We encourage every patient to put their health care decisions in writing.
Advance Medical Directives
Advance medical directives are a way to communicate to all caregivers your wishes regarding health care. A living will or health care agent are helpful when the patient is no longer able to express their wishes. The hospital staff is committed to honoring the patient's wishes as documented when they were able to make decisions. There are different types of advance directives and you may wish to consult your attorney concerning the legal implications of each.
Upon admission to the hospital, you will be asked if you have an advance directive. If you do, please bring copies to the hospital with you so they can become a part of your medical records. Advance directives are not a requirement for hospital admission.
Appointment of a Health Care Agent
Sometimes called a medical power of attorney, this document lets a patient name a person (an agent) to make medical decisions for them, if they become unable to do so.
Health Care Instructions
These are specific choices about the use of lifesustaining equipment, hydration and nutrition, and use of pain medications.
What to Expect on the Day of Spine Surgery
Please arrive at the surgery check-in desk on time. You will be checked in and brought back to the pre-operative waiting area. The operating-room nurse and the anesthesiologist will ask you a series of questions. Then you will be escorted to the operating room. Following surgery, you will be taken to a recovery area where you will remain until you are fully recovered. During this time, pain control is typically established and your vital signs are monitored.
• If you are having an outpatient surgery, you will be moved to a recovery area and a close family member will be able to join you.
• If you are having an inpatient surgery and are staying in the hospital, you will then be taken to the Medical/Surgical Unit where a nurse will care for you. Only one or two very close family members or friends should visit on this day.
You may see some of the following devices or equipment after surgery.
• A brace, if ordered by your physician
• Sequential compression devices (SCDs) that help to prevent blood clots
• Compression stockings that help to prevent blood clots and minimizes swelling
• Surgical dressing and drains that a nurse will check frequently
• A Foley catheter in your bladder to drain urine
After Spine Surgery
What to Expect During Your Hospital Stay
Following your surgery, there are a number of steps taken by your care team to get you on the right path to recovery. The following is a list of some of what to expect while you’re recovering in the hospital.
• You will require assistance getting out of bed and with bathing.
• A nurse will draw your blood for testing and record your vital signs periodically.
• Early and frequent mobilization; out of bed for meals, walking to the restroom, and other activity as tolerated
• You will receive visits during the day from your surgeon or the physician’s assistant.
• Your surgeon will order initial physical and/or occupational therapy evaluations. You will be seen by therapy during your stay.
• You will be required to exercise your lungs by coughing and deep breathing or use of an incentive spirometer ten times per hour if ordered.
• Your pain will be managed by oral pain medications and muscle relaxants.
• You may experience a sore throat, and can ask your nurse for throat lozenges if necessary.
• No smoking or nicotine patches are allowed because it decreases the fusion process and slows healing.
Activity
Early activity is extremely important after surgery to prevent complications such as pneumonia, blood clots and fever. It also relieves muscle stiffness and decreases the amount of time needed in the hospital. Our goal to have you out of bed and mobile within 6 hours following surgery.
Physical therapy usually begins the day of surgery. Your physical therapist will review spinal precautions with you and will start teaching you how to move safely in bed, how to get out of bed and begin walking. Physical therapy will educate your caregiver on how to assist you safely at home; therefore, it is helpful to arrange for your caregiver to be present for physical therapy sessions.
Physical therapy will make discharge recommendations and equipment needs based on your individual progress and discuss these recommendations with you. If your surgeon orders a brace for you to wear, your therapist will teach you how to apply and remove the brace. You will need to wear your brace whenever you get out of bed. Your physical therapy will focus on promotion of your independence with your daily activities.
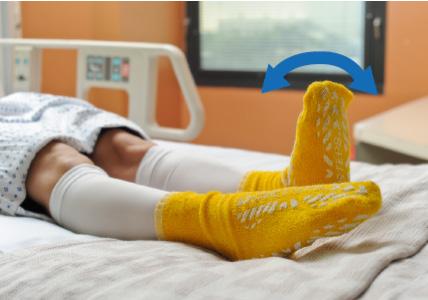
Exercises While in the Hospital
Ankle Pump Exercises
Simple leg exercises called ankle pump exercises help prevent blood clots. It is helpful to practice these exercises at home before surgery.
Ankle Pumps:
Bend your ankles up and down.
Assessing and Controlling Pain
Successful management of your post-operative pain is important to facilitate your recovery from surgery. You have been informed about the importance of deep breathing, turning, and participating in exercises and physical therapy in the post-operative period to promote recovery from surgery and prevent complications. Adequate pain-control helps to allow you to perform these activities.
Our goal in the post-operative period is to minimize your pain while avoiding side effects that can be associated with pain medications. Side effects from these medications include nausea, itching, constipation and excessive drowsiness or sedation. If you experience side effects from pain medication, you should inform your spine-care team so adjustments or changes in your medication regimen can be considered.
Use the numerical pain rating scale below to communicate your level of pain to your care team.
You play a vital part in managing your pain after surgery. Be prepared to:
• Notify your spine care team of any pain medications that you were taking previously
• Ask your spine-care team what to expect regarding pain and pain management
• Ask for pain relief when pain first begins
• Inform your spine-care team about any concerns you have about taking pain medications
• Be specific when describing your pain (throbbing, aching, shooting, cramping, etc.)
• Understand that you will not be totally pain-free after surgery and during the recovery period
You may also be prescribed muscle relaxants along with your pain medicine. Muscle relaxants are used to treat muscle spasms.
In addition to medications, there are many other methods that can be used to reduce pain. Some examples include cold packs, music therapy, relaxation techniques, distraction, and imagery.
Controlling Your Discomfort and Pain Medication
• Take your pain medication at least 30 minutes before physical activity.
• Change your position every 45 minutes throughout the day.
• Upon discharge, you will be given pain and/or muscle relaxant prescriptions. Take them as needed and directed. Do not begin taking non-steroidal, anti-inflammatory drugs (NSAIDs) — such as Advil, Motrin, Ibuprofen, Nuprin, Aleve, Celebrex, Bextra — until your surgeon says it is ok to do so (usually 8-12 weeks after surgery).
Diet After Surgery
Your diet will start with ice chips, then liquids, and will gradually include solid foods. Your bowel (intestines) has been put to sleep along with the rest of your body. Allowing enough time to pass after the surgery will give the intestines time to “wake up” and recover its normal function. Your nurse will listen to your bowel sounds to determine when it will be safe for you to eat. Eating solid foods too soon after surgery can cause nausea, abdominal pain, or other abdominal problems and increase your time spent in the hospital. Check with your nurse before starting to eat solid foods to determine if your intestines have recovered from the anesthesia.
Bowel and Bladder Function
During your surgery, a Foley catheter may be placed to drain urine. After the surgery this will be removed. It is important that you can urinate prior to discharge from the hospital.
Constipation almost always occurs after surgery because of the effects of anesthesia, medication and inactivity. Your nurse will provide you with laxatives or stool softeners to help return your bowel function to normal. If you have a specific bowel routine you follow at home, discuss this with your nurse. Use of constipation medication is highly recommended prior to surgery.
Post-Operative Symptoms
After surgery, you will experience pain in the area of your incision. You may also have a sore throat, which is from the tube inserted in your throat to help you breathe during surgery. Your nurse will frequently ask about your throat pain and ability to swallow. You will be thirsty after surgery. The nurse will first give you ice chips until the threat of nausea has passed. You will then progress to clear liquids. Most people return to a full diet the morning after surgery.
There may be some pain associated with the incision site. Your physician will discuss what you can expect regarding relief of your symptoms such as numbness and tingling. If you experience weakness prior to surgery, it may take weeks, or even months, to get better.
Home-Care Management
Make plans for someone to assist you when you return home after surgery. Whether it is family, friends, neighbors or hired help, decide what each person can do to help you. Find out when and how long they will be available to help you.
Even if you are having outpatient, same-day surgery, you will not be allowed to drive home on your own. Your surgery will be cancelled if these arrangements are not made. Your caregiver will learn how to assist you with your self-care, exercise programs, getting in and out of bed and moving around.
Discharge Plans
The decision to go home or to a sub-acute rehab facility after your hospital stay will be made collectively by you, the spine-care team, your surgeon, the physical therapist and your insurance company. During time of discharge it is important to have your coach present to hear discharge instructions and your plan of care.
If you are going directly home:
• Decide who will be driving you home
• Make sure you have your written, discharge instructions concerning medication, physical therapy, activity, etc.
• We will arrange for any medical equipment that you need at home
• Take this guidebook with you
• Your surgeon's office and care manager will work together to arrange home-health services for you if required.
If you are going to a sub-acute rehab facility:
• Arrange for someone to drive you, or the hospital can arrange for paid transportation
• Your transfer papers will be completed by the spinecenter staff
• Expect to stay three to seven days, based upon your progress
• Take this guidebook with you
Know your zone. Recovery From Surgery
DAILY CHECK
• Do not smoke.
• Keep dressing clean, dry and intact if you have one.
• Continue to take your medications as prescribed.
• Eat a balanced diet.
• Do your exercises as prescribed by your provider.
• Apply ice as ordered by your physician.
GREEN ZONE
Your symptoms are under control if:
• Your Incision or dressing is clean, and there is little to no drainage
• You have mild pain that can be controlled with medications
YELLOW ZONE
Call your health care provider if:
• You notice lots of bruising or bleeding
• You are having nose bleeds
• You are bleeding from the gums or see blood in your urine or stool
• It’s hard to urinate or you are unable to have a bowel movement for three days in a row or longer
Call your surgeon/orthopedic doctor’s office if:
• You have new numbness or tingling
• Walk several times a day using a walker, cane or other assistive devices as instructed by a physician or physical therapist.
• Follow your physician’s prescribed activity precautions including bracing if applicable.
• Continue doing your breathing exercises.
• You can do exercises and activities of daily living
• You are not having shortness of breath, chest pain or fever
• You have regular frequency in bowel movements
• You have more swelling or pain than normal since surgery
• You have a fever greater than 101°F for more than 24 hours
• You have drainage, redness or odor at the incision site
• You feel calf tenderness, swelling or warmth in either leg RED ZONE | Call 911 immediately.
Call 911 if:
• You have stroke symptoms including: loss of balance, blurred vision, face drooping on one side, arm and/or leg weakness or speech difficulty.
• You have severe headache
• You have chest pain
• You have pale, gray or blue nail, lip or skin color
• You are coughing up blood
• You have a rapid heart rate
• You have severe shortness of breath
• You experience sudden wheezing
Preventing Surgical-Site Infections
What is a surgical-site infection (SSI)?
A surgical-site infection is an infection in the part of the body where the surgery took place. Most patients do not develop an infection. However, about one-to-three out of every 100 patients who have surgery do develop infections.
Some of the common signs of a surgical site infection are:
• Redness and pain around the area where you had surgery
• Drainage of cloudy fluid from your surgical wound
• Fever Prevention is the KEY.
How do I prevent a SSI?
Before your surgery:
• Tell your doctor about other medical problems you may have.
• Consider removing acrylic nails or trimming long natural nails. They are full of bacteria. Sometimes patients itch near the site, without washing hands. The mindless itching can pass the bacteria from the nails to the wound.
• Quit smoking. Patients who smoke get more infections. Talk to your doctor about how you can quit before surgery.
• Do not shave near where you will have surgery. Shaving with a razor can irritate your skin and make it easier to develop an infection.
• Use Hibiclens or CHG soap the night before and morning of surgery to cleanse skin of ALL bacteria, as directed by your surgeon.
• The day of surgery, you may also have povidone iodine or mupirocin applied to nostrils. This will reduce the chance of bacteria from your nose spreading to your surgical wound.
At the time of your surgery:
• Ask if you will get antibiotics before surgery.
• Make sure that your health care providers clean their hands before examining you, either with soap and water or an alcohol-based hand rub. If you don’t see your providers clean their hands, ask them to.
What should I do when I go home?
• Your doctor or nurse should explain what you need to know about taking care of your wound. Make sure you understand how to care for your wound before you leave the hospital.
• Always wash your hands before and after caring for your wound.
• If you have any symptoms of an infection, call your doctor immediately.
• If you don’t see your providers clean their hands, ask them to.
• No one should touch the surgical wound or dressings, including you.
• Anyone who visits should clean their hands with soap and water or an alcohol-based hand rub. If you do not see them clean their hands, ask them to.
• Do not let your incision get wet or dirty. No hot tubs, pool or ocean swimming.
• Cleanliness at home should include freshly laundered towels and clothes after a daily shower. Clean linens on your bed.
Wound Healing Well
Caring for Yourself at Home
Caring for Your Incision
Watch for redness, swelling and drainage from your incision site. Report any changes to your surgeon’s office. Follow your surgeon’s instructions for dressing changes and incision care given to you at discharge from the hospital.
• Take your temperature if you feel warm or sick. Call your surgeon if it exceeds 101° Fahrenheit.
• Report any redness or persistent drainage to your surgeon’s office.
• You may shower according to the physician’s specific discharge instructions.
• Do not apply ointments or solutions to the incision. Mild soap and water will suffice.
• If you develop blisters, redness or irritation from the tape, discontinue use. If you develop blisters, do not pop them. If they pop, keep them covered and guard against infection.
• When in doubt, call the surgeon’s office with any concerns.
Recognizing and Preventing Potential Complications
Call your surgeon’s office immediately if you experience any of the following symptoms.
• Increased swelling and redness at incision site
• Change in color, amount or odor of drainage
• Fever greater than 101.5° Fahrenheit
• Swelling in thigh, calf or ankle that does not go down with elevation
• Pain in excess of your pre-operative pain
• Pain, heat and tenderness in calf, back of knee or groin area
• Any loss of bladder or bowel function
• Any weakness or painful swelling in your legs
Call 911 immediately if you have loss of bowel or bladder function, chest pain, difficulty breathing, shortness of breath, or pain when breathing.
Home Care at a Glance
Reasons to Call Your Doctor’s Office
• Significant drainage or change in color, amount and odor at the incision site (this indicates an infection)
• Temperature greater than 101° Fahrenheit
• Uncontrolled pain
• New development of tingling or numbness in your arms or legs
• Calf pain that is tender with pressure or warm to the touch
Follow-Up Appointment
• If you do not already have an appointment before discharge from the hospital, please call your surgeon’s office to make a follow-up appointment.
Activities
• Do not drive until you are cleared by your doctor and you are no longer taking narcotics.
• Do not lift anything greater than five pounds.
• Ask your doctor when you can return to work.
• Walk as much as possible. You may walk up and down steps as tolerated.
• Follow your doctor’s instructions about wearing your collar or brace.
• Do not soak in water (bath, pool or spa) until cleared by your surgeon to do so.
• Do not do any repetitive bending, pushing, pulling or twisting.
Additional Instructions
• Arrange your house to keep frequently used items within reach.
• Move things that may cause you to fall, such as electrical cords and throw rugs.
• Take pain medications exactly as directed.
• Perform ankle pumps.
• Avoid sitting or lying in bed for extended periods of time.
• Do your deep breathing exercises 10 times an hour while awake using your incentive spirometer if ordered.
• Do not take anti-inflammatory medications, such as Motrin and Advil, until your surgeon gives you permission.
Recovery Timeline
Week One After Surgery
Your goals for this period are to:
• Increase activity
• Walk two to three times per day for 10-20 minutes per session. Increase as tolerated.
• Exercise at home for 20 minutes, twice a day according to the program given to you — with or without the therapist.
Weeks Two to Four After Surgery
At weeks two to four, you will gain a little more independence. Even if you are receiving outpatient therapy, you will need to be very faithful to your home exercise program to achieve the best outcome.
Your goals for this period are to:
• Walk at least one quarter mile per day.
• Climb and descend a flight of stairs (12–14 steps) more than once daily.
• Independently shower and dress.
• Slowly resume homemaking tasks.
• Exercise at home for 20 minutes, twice a day according to the program given to you — with or without the therapist.
Weeks Four to Six After Surgery
At weeks four to six, you will nearly regain full independence. Your home exercise program will be even more important as you receive less supervised therapy.
Your goals for this period are to:
• Walk one quarter to one half mile per day.
• Begin progressing on stairs from one foot at a time to regular stair climbing (foot over foot).
• Continue with your home exercise program twice a day.
Weeks Six to Twelve After Surgery
At weeks six to twelve, you should be able to begin resuming all of your normal activities.
Your goals for this period are to:
• Walk one half to one mile.
• Walk around your home frequently — at least six times per day.
Use an exercise logbook to track your progress.
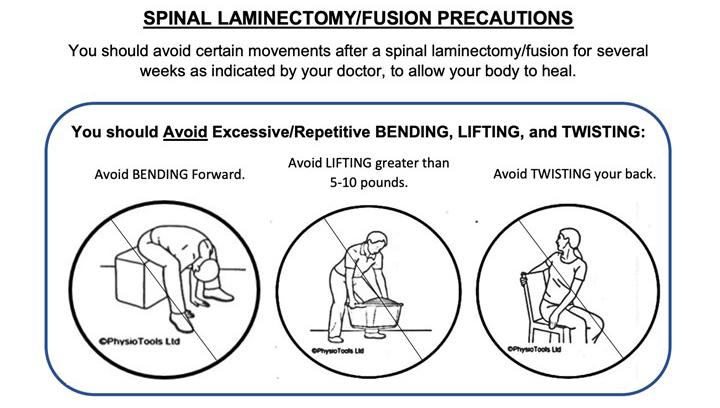
Simple Do’s and Don’ts for a Successful Recovery
In general, if any activity increases discomfort, don’t do it. Your first post-operative visit will be scheduled 10-14 days after surgery.
• Wear your collar/brace at all times unless instructed otherwise.
• Do not use time at home as an excuse to do physically demanding work.
• Do not stay confined to bed during the day. Walk as much as you comfortably can. You may climb stairs. If you sit or stand for more than 20-30 minutes, you should walk for a few minutes.
• Avoid exaggerated bending or twisting, or lifting more than five pounds until your follow-up appointment with your surgeon.
• Avoid pulling, pushing or quick jerky movements.
• Do not start any exercise program until you are released by your surgeon to do so.
• Do not drive until cleared by your surgeon. You may ride in a car as a passenger. Minimize long trips for a week or two.
• It is okay to sleep on your side, back, or in a reclining position.
• Use the log roll technique to get in and out of bed. Keep both knees bent when rolling. Refer to the section in this guidebook for the proper log roll technique on pages 14-15.
• Do not sit at a computer for more than 20 minutes at a time. Take frequent breaks by walking for a few minutes.
Everyday Positions and Activities After Surgery
Getting Into a Chair
• Sit in chair
• Position yourself with:
• Hip above knees
• Feet planted on floor
• Buttock back into chair
• Slide forward with buttock to edge of chair
Getting Out of a Chair
• Feet should be behind your knees, pressing down into floor about shoulder width apart, feet one in front of the other.
• Place hands on arm of chair. If no armrests, place hands on your thighs.
• Hip Hinge = Bend forward slightly higher at your hips — NOT AT YOUR SPINE.
• Keep your back straight, with head and chest up while moving forward over your feet.
• Push feet into floor. Straighten your knees. Squeeze buttocks together. Push down with hands and stand up.
Do not allow yourself to drop down into the chair, which can jar your back.
Standing Up From Chair If You Have a Walker
Do not pull up on the walker to stand. Sit in a chair with arm rests when possible.
1. Scoot to the front edge of the chair.
2. Push up with both hands on the armrests. If sitting in a chair without armrests, place one hand on the walker while pushing off the side of the chair with the other.
3. Balance yourself before grabbing for the walker.
Correct Sitting Posture
• Whenever possible, sit in a chair that has armrests with your hips higher than your knees (or at least hips level with knees)
• Move your hips all the way back in the chair seat, making certain that your hips are higher than your knees.
• Place a lumbar roll or small pillow in the small of your back, just above your hips.
• Lift your sternum while relaxing your shoulders and avoid rounding your shoulders.
• Rest your feet firmly on the ground.
• Use pillows on your lap to rest arms if armrests are not available.
• Avoid recliners and soft, low couches when possible.
Transfer to an Automobile
• Push the car seat all the way back; recline it if possible, but return it to the upright position for traveling.
• Place a plastic trash bag on the seat of the car to help you slide and turn frontward.
• Back up to the car until you feel it touch the back of your legs.
• Reach back for the car seat and lower yourself down. Duck your head so that you do not hit it on the doorframe.
• Turn frontward, leaning back as you lift your legs into the car.
Walking With a Walker
• Move the walker forward one arm length away at a time.
• With all four walker legs firmly on the ground, step forward with your weaker leg. Place the foot in the middle of the walker area. Do not move it past the front feet of the walker.
• Step forward with the stronger leg.
NOTE: Take small steps. DO NOT take a step until all four walker legs are flat on the floor.
Climbing Stairs With a Walker
• Ascend with the stronger leg first (Up with the good).
• Descend with the weaker leg first (Down with the bad).
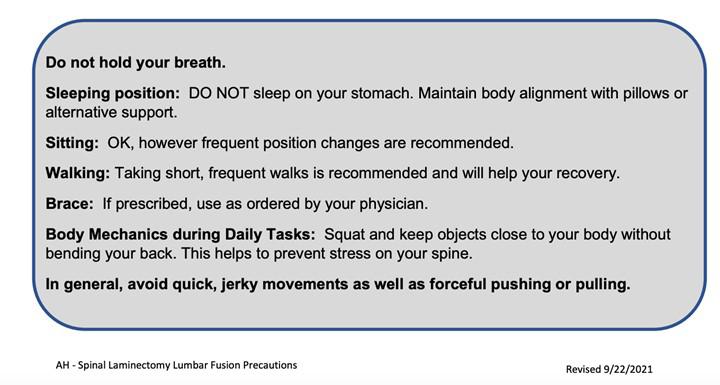
Proper Sleep or Resting Positions
If you are having difficulty getting comfortable lying down, one or more of the following positions may be helpful.
On Your Side
Body Position
• Bring your hips and knees into a slight bent position (don’t curl up into the fetal position) and place a pillow between your legs from your groin to your feet. This prevents you from dropping one knee forward and twisting your spine as you sleep.
• If your pelvis is considerably wider than your waist, you may want to fill in the space between your pelvis and ribs with a folded towel or soft foam. This keeps your spine from bending to one side.
Pillow
• The size of your pillow should be adequate to support your head so that your neck is aligned with the rest of your spine and your head does not tilt to one side.
On Your Back
Body Position
• Reduce the curve in your lower back (if needed) by propping pillows under your upper thighs so that your knees are bent. This should relax your back.
Pillow
• Use a pillow that keeps your neck in alignment with the rest of your spine. Be sure your head is not bent forward or tilted back.
• If you cannot achieve this position with your pillow, try a smaller or larger one. Use the pillow or a rolledup towel or foam to fill in the gap where your neck curves in.
• Ideally, do not pull the pillow under your shoulders.
• If you can pull the pillow up and into your neck, your shoulders can relax back instead of being pushed forward.
Getting Dressed and Undressed
Putting Pants and Underwear On
• Sit down.
• Put your surgical leg in first and then your nonsurgical leg.
• Pull your pants up over your knees, within easy reach.
• Stand with the walker in front of you to pull your pants up the rest of the way.
Taking Pants and Underwear Off
• Back up to the chair or bed where you will be undressing.
• Unfasten your pants and let them drop to the floor. Push your underwear down to your knees.
• Lower yourself down, using your upper extremities to lower yourself.
Wear sturdy slip-on shoes or shoes with Velcro closures or elastic shoe laces. DO NOT wear high-heeled shoes or shoes without backs.
Cleaning and Cooking
• Do not get down on your knees to scrub floors. Use a mop and long-handled brushes.
• Plan ahead. Gather all your cooking supplies at one time, then sit to prepare your meal.
• Place frequently used cooking supplies and utensils where they can be reached without too much bending or stretching.
• To provide a better working height, use a high stool or put cushions on your chair when preparing meals.
• Avoid lifting or carrying heavy items. Slide them across a countertop as much as possible before you have to pick them up.
The following is a list of items to increase ease and safety while bathing.
• Long-handled bath brush if needed
• Soap-on-a-rope or liquid soap in a hanging bottle
• Shower caddy that hangs over the shower head
• Non-skid mat in tub
• Non-skid rubber mat on tile floor outside the shower
• Grab bars inside the shower
• Hand-held shower head
• Shower chair or 3-in-1 Commode
Getting In and Out of the Bathtub
Use a step-in shower if one is available. Otherwise, stand next to the bathtub and step in sideways one leg at a time.
• Take off your t-shirt and brace/collar and hand it to your caregiver or hang on a nearby hook.
• Use a shower chair if you feel you need more support.
• A hand-held showerhead may also be helpful.
• Use a bath brush or sponge to reach your feet.
• Keep soap and other hygiene items in an easy-toreach shower caddy.
• Dry off in the shower.
• Put your t-shirt and brace/collar on.
• Exit the shower.
Post-Surgery Exercise
Rest was the old-fashioned treatment of choice for back pain. We now know that bed rest can harm the spine in the following ways.
• Bones, muscles and ligaments weaken
• The spine stiffens and loses control and coordination
• General physical fitness declines
• Inactivity can lead to depression and pain
You should try to keep active after surgery. You will have good days and bad days. This is a normal part of the rehab process. Choose a low-impact activity like walking.
Lumbar and Cervical Fusion Exercises
Common Exercises After Lumbar
Spinal Fusion
Ankle Pumps
Setup
• Begin lying on your back with your legs straight.
Movement
• Slowly pump your ankles by bending and straightening them.
• Complete 10 repetitions. Repeat this for 3 sets.
Tip
• Try to keep the rest of your legs relaxed while you move your ankles.
Diaphragmatic Breathing
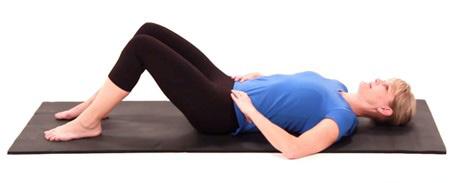
Setup
• Begin lying on your back with your knees bent and feet resting on the floor.
Movement
• Exhale, drawing in your abdominals as if you are pulling your belly button toward the floor, then inhale, focusing on expanding your belly instead of your chest.
• Complete 5 deep breaths, with a few seconds rest between breaths. Repeat this for 3 sets
Tip
• Make sure to keep your low back flat on the ground during the exercise.
Transverse Abdominus Palpation
Setup
• Begin lying on your back with your legs bent and feet resting on the ground.
Movement
• Place your fingers just inside the bones on the front of your pelvis. Exhale, and gently pull the muscles under your fingers in. Relax and repeat.
• Complete 10 repetitions, holding for 5 seconds. Repeat this for 2 sets.
Tip
• Make sure to draw in rather than push out your muscles. This should be a subtle movement.
Gluteal Sets
Setup
• Begin lying on your back with your knees bent and heels on the floor.
Movement
• Tighten your buttock muscles, digging your heels into the floor, then release and repeat.
• Complete 10 repetitions, holding for 5 seconds. Repeat this for 2 sets.
Tip
• Make sure to keep your low back flat on the floor during the exercise.
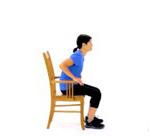
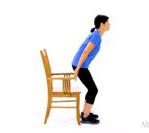
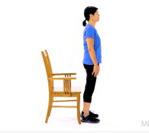
Proper Technique
Setup
• Begin sitting upright in a chair with armrests with your feet flat on the floor.
Movement
• Place your hands on the armrests and scoot to the edge of the chair. With your feet tucked underneath you, lean your torso forward so your head is over your toes, then press into your feet and hands to push up into a standing position.
• Complete 10 repetitions, resting as needed. Repeat this for 2 sets.
Tip
• Make sure to maintain your balance and try to keep your weight evenly distributed between both legs. Do not lock your knees when you are standing.
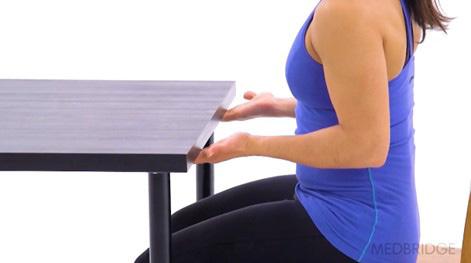
Seated Multifidi Isometric
Setup
• Begin sitting upright in front of a table with your fingertips resting on the bottom of the table.
Movement
• Gently press up against the table, engaging your core muscles, then relax and repeat.
• Complete 10 repetitions, holding for 5 seconds. Repeat this for 2 sets.
Tip
• Make sure to keep your trunk upright and not press too hard during the exercise.
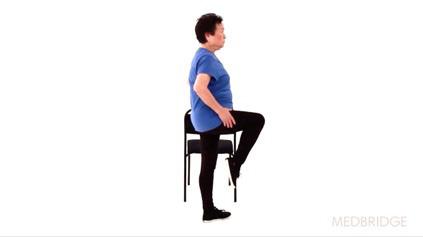
Standing Hip Flexion
Setup
• Begin in a standing upright position holding on to a stable object for support.
Movement
• Lift your leg off the ground with your knee bent, then slowly return to the starting position and repeat.
• Complete 10 repetitions, holding for 5 seconds. Repeat this for 2 sets.
Tip
• Make sure to keep your back straight, hips level and maintain your balance during the exercise.
Common Exercises After Cervical Spinal Fusion
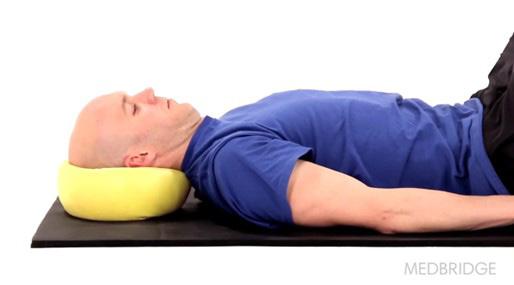
Chin Tucks on a Flat Ball or Pillow
Setup
• Begin lying on your back with your knees bent and your head supported by a flat ball.
Movement
• Slowly bend your upward to look overhead, then bend it down toward your chest and repeat.
• Complete 10 repetitions, holding for 5 seconds. Repeat this for 2 sets.
Tip
• Make sure to keep your neck relaxed and move slowly.
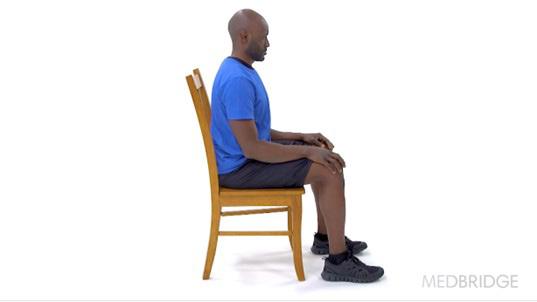
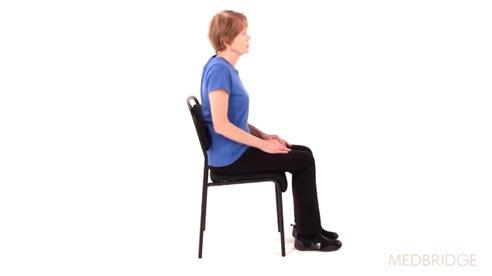
Correct Sitting Posture with Chin Nod
Setup
• Begin sitting upright in a chair with your feet resting flat on the floor.
Movement
• Imagine a string attached to the top of your head. Straighten your back as if the string is being pulled directly up to the ceiling. Tuck your chin down slightly during the exercise and repeat.
• Complete 10 repetitions, holding for 5 seconds. Repeat this for 2 sets.
Tip
• Make sure to keep your shoulders back and relaxed during the exercise.
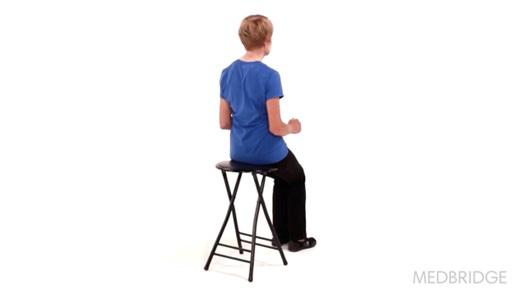
Seated Shoulder Blade Squeeze
Setup
• Begin sitting in an upright position.
Movement
• Squeeze your shoulder blades together and downwards, then relax and repeat.
• Complete 10 repetitions, holding for 5 seconds. Repeat this for 2 sets.
Tip
• Keep the rest of your arms and shoulders relaxed and make sure to focus the movement on your shoulder blades.Seated Shoulder Blade Squeeze
Seated Shoulder Rolls
Setup
• Begin sitting upright with your hands resting on your lap.
Movement
• Move your shoulders forward, then upward, backward, and down. Repeat, continuing to move your shoulders in a circular motion.
• Complete 10 repetitions. Repeat this for 2 sets.
Tip
• Make sure to keep your back straight during the exercise.
Doorway Chest Stretch
Setup
• Begin in a standing upright position in the center of a doorway.
Movement
• With your elbows bent, place your forearms on the sides of the doorway at roughly a 60-degree angle from your sides, then take a small step forward until you feel a stretch in the front of your shoulders. Hold this position.
• Complete 3 repetitions, holding for 20 seconds each.
Tip
• Make sure to maintain a gentle stretch and do not shrug your shoulders during the exercise.
Patient Resource Materials
Putting Good Posture in Motion
Poor posture starts as a comfortable habit, but eventually it hurts not just your back, but your entire body. While learning good posture may feel strange at first, you will be surprised at how quickly it becomes a comfortable habit and how good it looks and feels.
Putting good posture in motion means maintaining your spine’s three curves in their neutral alignment. To achieve this, keep your ears in line with your shoulders, your shoulders in line with your hips and don’t slouch. You will have less chance of backaches, stiffness or injury.
Activity Do
Lifting
Sitting
Bending
Walking
Physical Activity
• Think about what you are doing.
• Know your strength. Lift what you can control. Always lift and carry close to your body and tighten your abdominal muscles.
• Keep your back and neck in line, bend at the hips and lift with your buttocks and legs.
• Use an upright chair that supports your spine.
• Get up and stretch every 20-30 minutes.
• Using your legs, keep your back and neck in line as you bend at the hips and knees.
• Tighten your abdominal muscles to protect your lower back.
• Walk tall, pull your abdominal muscles in and hold your shoulders back.
• Include aerobic (walking, cycling, etc.) and muscle activity in your daily program.
• Gradually increase physical activity.
Don't
• Don't lift anything greater than 10 pounds until cleared by your surgeon.
• A low, soft chair
• Lack of back support
• Sitting for a long period
• Sitting with head dropping
• Bending, lifting and twisting in one motion
• Slouching
• Exercising before cleared by surgeon
Frequently Asked Questions
Below is a list of some of the most frequently asked questions about spinal surgery. If you need more information, ask your surgeon or spine care coordinator.
Why do I have to stop taking my arthritis medicine or NSAIDs?
These medicines affect blood clotting and may cause excess bleeding during surgery. They can also slow down bone healing after your surgery. Do not resume anti-inflammatory medications until cleared by your surgeon.
Why is my activity restricted? Why can’t I drive?
With any spinal fusion, there is a risk of it not healing properly. Restriction of activity will reduce stress on the implants. This will improve the healing process. Sometimes patients feel like they are ready to perform tasks before their bodies are ready. For your safety follow your surgeon's instructions — no matter how well you feel. Driving is not a safe activity before the first post-operative visit. Also, many patients are still taking narcotic medication, which cannot be taken while driving.
How will my pain be managed?
Most patients will be given oral narcotics and muscle relaxers. These medications will be given on a schedule to help with pain management during your hospital stay. You will learn how to manage your pain once you return home.
Will I get addicted to the pain medication?
Our team takes every precaution to ensure you receive enough pain medicine and slowly reduces the amount you take to prevent addiction.
What about nutritional and calcium supplements?
Nutrition is an important part of healing. Patients usually have a poor appetite after surgery. It is important to eat as much as you can. A diet high in protein and calcium is best. If you are not getting the recommended, daily amount of protein and calcium, a supplement may be needed.
I have terrible constipation from the narcotics. What can I do?
Constipation is a normal side effect of many pain medications. Drink plenty of fluids, eat a high-fiber diet and use over-the-counter remedies if needed.
Can I call on the weekend?
There is someone available 24-hours-a-day for emergencies. If you have a non-emergent question, call your surgeon’s office during normal office hours.
Should I exercise before the surgery?
Yes, consult your surgeon about exercises that are right for you.
How long will I be in the hospital?
There are goals that need to be met prior to you leaving the hospital. You will need to be cleared by your surgeon and physical therapist for safety. Your pain will need to be managed.
Will I need a walker or cane once I am discharged?
Some patients need additional assistance once they return home. If this is the case for you, we will make sure you have all the appropriate equipment for your home prior to discharge.
Where will I go after I am discharged from the hospital?
Most patients can go home directly after discharge. Some patients may transfer to a sub-acute facility, where they will stay for three to five days or until it is safe to go home. The case manager will help you with this decision and make necessary arrangements for you. You should check with your insurance company to see if you have sub-acute rehab benefits.
Will I need 24-hour home care?
Each person has their own situation to consider. Upon returning home, most patients are independent and able to walk, dress, bathe and fix a light meal. However, for the first several days or weeks — depending on your progress — we recommend asking someone to assist you with meal preparation and daily activities.
Will I need physical therapy when I go home?
Yes. Your best therapy will be walking. Your care team will decide if in-home physical therapy is needed. Until your first post-operative appointment, you should try to increase your general activity and walking distance each day.
How often will I need to be seen by my surgeon following surgery?
You will be seen for your first post-operative visit 10-14 days after discharge. Your surgeon will assess your need for future visits at that time.
Will my implants set off alarms at the airport?
Possibly. Depending on how high the sensitivity is set on the machine. You can request to use the body-scan machine, which will reveal your implants and avoid a pat down.
Should I put antibiotic cream on my incision?
No topical ointments, creams, or lotions should be applied to your incision. Please follow your surgeons discharge instructions regarding incision care.
What if I wake up in terrible pain?
Everyone has a bad day. Generally, if you look back on your activities from the day before, you may find that you increased your activities too much or did something you probably should not have done. If this is the case, decrease some of your activities, then slowly work back up to them. If your pain is excessive or you have several bad days in a row, call your surgeon.
When will I be able to return to work after surgery?
The date you return to work will depend on your job duties. Most return between three weeks to three months after surgery. Speak with your surgeon regarding your job and your rate of healing.
Why can’t I smoke?
Science has clearly shown that smoking slows or prevents bone healing.
Why is my throat sore? How long will it last?
Sore throat, hoarseness and difficulty swallowing are common side effects in the first few days following surgery. Hoarseness should improve over time. If you had a cervical fusion, swallowing will improve as swelling decreases. It is best to eat a diet consisting of soft food for the first week or two after surgery to avoid difficulty. If breathing becomes or swallowing becomes more difficult, go to the emergency room. If you have any questions, call the office number and ask to speak to the on-call provider.
Glossary of Terms
Anterior: A relative term indicating the front of the body
Allograft: Graft derived from another person
Annulus: The outer rings of rigid fibrous tissue surrounding the nucleus in the disc
Autograft: Graft derived from a patient
Bone Spur: An abnormal growth of bone, usually present in degenerative arthritis or degenerative disc disease
Cervical Spine: The group of seven bones (vertebrae) that form the upper and most flexible part of the spinal column. It is located between the skull and the thoracic spine
Computed Tomography Scan (CT Scan): A computer technique in which a computer reads X-rays to create a three-dimensional map of bones and soft tissue
Disc: A cushion of cartilage found between the vertebrae of the spine. It acts as a shock absorber and when damaged, may bulge the vertebrae and compress a nerve root causing pain.
Degenerative Arthritis: The inflammatory process that causes gradual impairment and loss of use of a joint
Disk: The complex fibrous and gelatinous connective tissues that separate the vertebrae in the spine. They act as shock absorbers to limit trauma to the bony vertebrae.
Discectomy: Removal of a portion of the disc
Electromyography (EMG): A method of recording the electrical currents generated in a muscle during contraction
Extension: Backward arching
Facet: Where two vertebrae meet
Flexion: Forward bending
Foramen: A small opening between vertebrae where the nerve exits
Fusion: The joining of vertebrae by bone, rods, screws, etc.
Instrumentation: The use of rods, screws, plates and wires to provide stability to the spine
Lamina: The flattened or arched part of the vertebral arch that forms the root of the spinal canal
Laminectomy: Excision of one or more laminae of the vertebrae
Laminotomy: An opening made in the laminae
Ligaments: Bands of tissue that connect vertebrae
Lumbar: The portion of the spine lying below the thoracic spine and above the pelvis
Lumbar Discectomy: The removal of a protruding or free fragment of intra-vertebral disc material
Magnetic Resonance Imaging (MRI): A diagnostic test that produces a three-dimensional image of body structure by using powerful magnets and computer technology rather than X-rays
Nerve Root: The portion of a spinal nerve that lies closest to its origin from the spinal cord
Nucleus Pulposis or Nucleus: The relatively soft center of the disc that is protected by the rigid fibrous outer rings
Posterior: A relative term indicating that an object is to the rear of or behind the body
Radiculopathy: Pain, motor or sensory symptoms from nerve compression
Sciatica: Term used to describe pain down the leg and buttocks
Spine: The flexible column of 24 vertebrae, disks, ligaments and muscle that lie between the head and pelvis and behind the rib cage. Also referred to as the spinal column.
Spondylolisthesis: Forward displacement of one vertebrae on another
Spondylosis: Degenerative bone changes in the spine usually marked at the vertebral joints
Stenosis: Narrowing
Vertebra(e): The bone or bones that form the spine
CREATION Life: A Whole-Person Lifestyle That Helps
People Live a Healthier, Happier Life
Each letter of the word CREATION stands for one of the eight principles of health found in the Bible’s creation story — Choice, Rest, Environment, Activity, Trust, Interpersonal Relationships, Outlook and Nutrition. You can use this philosophy as a guide to personal fulfillment, health and healing.
C R
E
A T
I
O
N
CHOICE
Own your path. Choice is the power to control your life. Consistently making wise decisions is key to becoming the person you were created to be.
REST
Refresh and restore. Rest is the restoration of your body, mind and spirit. Your best rest includes a good night’s sleep and making time to relax daily, weekly and yearly.
ENVIRONMENT
Influence your surroundings. Environment is what lies outside your body and affects what takes place inside you. What you perceive through your senses impacts your well-being.
ACTIVITY
Move your body, work your mind. Activity is the movement of your body and the development of your mind. Exercising both can keep you alert and energized.
TRUST IN GOD
Experience His love. Trust in God is knowing that God loves you unconditionally. This trusting relationship brings peace during tough times and gives hope for the future.
INTERPERSONAL RELATIONSHIPS
Connect, belong and support. Interpersonal relationships are the social connections you have with others. Healthy relationships bring happiness and make life better.
OUTLOOK
Be optimistic, express gratitude. Outlook is the way you view your world. A positive attitude shapes your choices and how you interact with others.
NUTRITION
Eat smart. Nutrition is nourishment for the body and energy for the mind. Understanding your relationship with food can lead to better choices and improved wellness.
Our Health Equity Promise
Patient Protection and Affordable Care Act: Section 1557
AdventHealth Hendersonville complies with applicable federal civil rights laws and does not discriminate on the basis of race, color, national origin, age, disability or sex. This facility does not exclude people or treat them differently because of race, color, national origin, age, disability or sex.
AdventHealth Hendersonville provides free aid and services to people with disabilities to communicate effectively with us, such as:
o Qualified sign language interpreters
o Written information in other formats (large print, audio, accessible electronic formats, other formats)
AdventHealth Hendersonville provides free language services to people whose primary language is not English, such as:
o Qualified interpreters
o Information written in other languages
If you need these services, please call 828-681-2781
The statements below direct people whose primary language is not English to translation assistance:
ATENCIÓN: si habla español, tiene a su disposición servicios gratuitos de asistencia lingüística. Llame al número siguiente.
CHÚ Ý: Nếu bạn nói Tiếng Việt, có các dịch vụ hỗ trợ ngôn ngữ miễn phí dành cho bạn. Gọi theo số điện thoại dưới đây.
注意:如果您使用中文,您可以免费获得语言协 助服务。请拨打下面电话号码
Atansyon: Si ou pale kreyòl Ayisyen, gen sèvis asistans nan lang ou ki disponib gratis pou ou. Rele nimewo ki anba an.
주의: 한국어를 사용하시는 경우, 언어 지원 서비스를 무료로 이용하실 수 있습니다 아래의 번호로 전화하십시오
UWAGA: Jeżeli mówisz po polsku, możesz skorzystać z bezpłatnej pomocy językowej. Zadzwoń pod numer podany poniżej.
ﺧﺪﻣﺎتﻓﺈناﻻﻧﺠﻠﯿﺰﯾﺔاﻟﻠﻐﺔﻻﺗﺘﺤﺪثﻛﻨﺖاذاﻣﻠﺤﻮظﺔ:
ATTENTION : Si vous parlez français, des services d'aide linguistique vous sont proposés gratuitement. Appelez le numéro ci-dessous.
PAUNAWA: Kung nagsasalita ka ng Tagalog, maaari kang gumamit ng mga serbisyo ng tulong sa wika nang walang bayad. Tawagan ang numero sa ibaba.
If you believe that this facility has failed to provide these services or discriminated in another way on the basis of race, color, national origin, age, disability or sex, you can file a grievance or request that someone assist you with filing a grievance at 828-681-2781 or camy.horrell@adventhealth.com
File complaints (sometimes called “grievances”), including complaints about the quality of care
• You can file a complaint about the services you got, other concerns or problems you have in getting health care, or the quality of the health care you got.
• IF you are concerned about the quality of the care you received, you have the right to file a complaint.
• IF you have Original Medicare, call your Beneficiary and Family Centered Care Quality Improvement Organization (BFCC -QIO). Visit Medicare.gov/contacts or call 1-800-MEDICARE to get your BFCCQIO’s phone number.
• If you have a Medicare Advantage plan (like an HMO or PPO), Medicare drug plan, or other Medicare health plan, call the BFCC-QIO, your plan, or both.
ACHTUNG: Wenn Sie Deutsch sprechen, stehen Ihnen kostenlos sprachliche Hilfsdienstleistungen zur Verfügung. Rufen Sie die untere Nummer an.
ATENÇÃO: Se você fala português, disponibilizamos serviços lingüísticos gratuitos. Ligue para o número abaixo.
You can also file a civil rights complaint with the U.S. Department of Health and Human Services, Office for Civil Rights, electronically, through the Office for Civil Rights Complaint Portal, available at ocrportal.hhs.gov/ocr/portal/lobby.jsf, or by mail or phone at: