Installation and Care Guide
IMPORTANT NOTICE TO INSTALLERS!:
Please leave these instructions for the consumer. Please retain for future reference.
NOTE: Some installation parts might not be provided.
NOTE: The toilet pictured in the installation steps may differ from the model being installed.
Fixture dimensions are nominal and conform to tolerances established by Standards AS1172.1-2014, ASME/CSA A112.19.2/B45.1, BS:EN 997-2012, GB 952-2015, MS 1552:2011, PNS 156:2010, SS 574:2012, SASO-1473-2016, SNI 03-0797:2006, and TIS 792-2554.
For Australia and New Zealand: Installation shall be in accordance with AS/NZS 3500 and AS/NZS 6400.
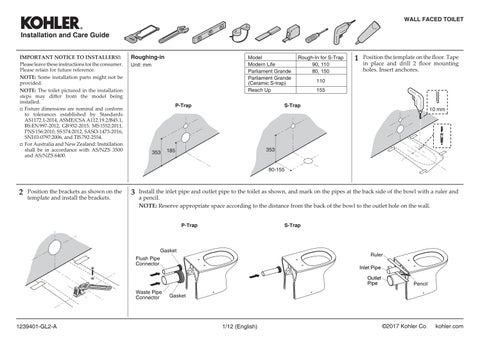
Model Rough-In for S-Trap
Modern Life 90, 110
Parliament Grande 80, 150
Parliament Grande (Ceramic S-trap) 110 Reach Up 155
Position the template on the floor. Tape in place and drill 2 floor mounting holes. Insert anchores.
Position the brackets as shown on the template and install the brackets.
Install the inlet pipe and outlet pipe to the toilet as shown, and mark on the pipes at the back side of the bowl with a ruler and a pencil.
NOTE: Reserve appropriate space according to the distance from the back of the bowl to the outlet hole on the wall.
Eliminate excess part of the inlet pipe and outlet pipe according to the marks of reserved space, and rasp a smooth surface with files.
Apply mild soap and water around the gasket. Position the bowl over the floor fixings and connect the waste pipe.
Carefully thread the screws into the brackets, until toilet is secure. Alternately tighten left and right sides to prevent pulling the toilet off center.
Apply silicone around base. Install the seat.
Care and Cleaning
WARNING: Risk of property or product damage. Do not use in-tank cleaners in your toilet. Products containing chlorine (calcium hypochlorite) can seriously damage fittings in the tank. This damage can cause leakage and property damage.
For best results, keep the following in mind when caring for your product:
• Carefully read the cleaner product label to ensure the cleaner is safe for use on the material.
• Always test your cleaning solution on an inconspicuous area before applying to the entire surface.
• Wipe surfaces clean and rinse completely with water immediately after cleaner application. Rinse and dry any overspray that lands on nearby surfaces.
• Do not allow cleaners to sit or soak on the surface.
• Use a soft, dampened sponge or cloth. Never use an abrasive material such as a brush or scouring pad to clean surfaces.
• Be careful not to leave staining materials in contact with the surface for extended periods of time.
• The ideal cleaning technique is to rinse thoroughly and blot dry any water from the surface after each use.
ผลิตภัณฑ์ผลิตภายใต้มาตรฐาน
AS1172.1-2014, ASME/CSA A112.19.2/B45.1, BS:EN 997-2012, GB 952-2015, MS 1552:2011, PNS 156:2010, SS 574:2012, SASO-1473-2016, SNI 03-0797:2006 และ มอก. 792-2554.
มาตรฐานผลิตภัณฑ์สําหรับประเทศ
AS/NZS 3500 และ AS/NZS 6400.
Recommended tank
In-wall Tank K-9310X or K-9311X. (Install the tank system per tank's installation instructions).
1 Mark and drill the mounting holes on the wall. Install the stud.
Leave 10 mm space for the nut strictly according to the picture.
3 Connect inlet and outlet connector.
• ล้างนํ�าออกทันทีหลังจากใช้ผลิตภัณฑ์ทําความสะอาดและเช็ดผิวสุขภัณฑ์ให้แห้งสะอาด
Installations- und Wartungsanleitung
WICHTIGER HINWEIS ZUR INSTALLATION!:
Bitte lassen Sie diese Anleitung beim Anwender. Bitte für späteren Gebrauch aufbewahren.
HINWEIS:Einige Installationsteile sind möglicherweise nicht vorhanden.
HINWEIS: Die in den Installationsschritten abgebildete Toilette kann sich von dem Modell unterscheiden, das installiert wird. .
Die Befestigungsabmessungen sind nominal und entsprechen den von Normen akzeptierten Toleranzen AS1172.1-2014, ASME / CSA A112.19.2 / B45.1, BS: EN 997-2012, GB 952-2015, MS festgelegten Toleranzen 1552: 2011, PNS 156: 2010, SS 574: 2012, SASO-1473-2016, SNI 03-0797: 2006 und TIS 792-2554.
Für Australien und Neuseeland: Die Installation muss in Übereinstimmung mit AS/NZS 3500 und AS/NZS 6400 erfolgen.
Einschruppen
Einheit: mm
Modell
Modern Life
Parlament Grande
Parlament Grande (Keramik S-Auslauf)
Hochreichen
Einschruppen für S-Auslauf 90, 110 80, 150
1
Positionieren Sie die Schablone auf dem Boden. Befestigen Sie sie mit Klebeband an Ort und Stelle und bohren Sie 2 Bodenmontage löcher. Befestigen Sie die Anker.
Positionieren Sie dieKlammern wie in der Vorlage gezeigt und installieren Sie die Klammern.
Setzen Sie das Einlassrohr und das Auslassrohr wie abgebildet in die Toilette ein und markieren Sie die Rohre an der Rückseite der Schüssel mit einem Lineal und einem Stift.
HINWEIS: Lassen Sie ausreichend Platz entsprechend der Entfernung von der Rückseite der Schüssel zum Auslassloch in der Wand.
Dichtung
Spülrohr anschluss
Ablaufrohr anschluss Dichtung S-Auslauf
Einlassrohr
Auslassrohr
7 Apply Sealant.
Beseitigen Sie den überschüssigen Teil des Ein- und Auslassrohrs gemäß den Markierungen für den reservierten Platz und raspeln Sie die Oberfläche glatt.
Einlassrohr
Reservierter
Platz
Auslassrohr
Tragen Sie Silikon um die Basis herum auf.
Bringen Sie milde Seife und Wasser rund um die Dichtung auf. Positionieren Sie die Schüssel über den Boden befestigungen und schließen Sie das Ablaufrohr an.
P-Auslauf
Wipe away excess.
S-Auslauf
Drehen Sie die Schrauben vorsichtig in die Klammern, bis die Toilette fest ist. Alternative ziehen Sie die linke und die rechte Seite fest, um zu verhindern, dass die Toilette aus der Mittegezogen wird.
8
Montieren Sie den Sitz.
Wartung
und Reinigung
WARNUNG: Gefahr von Sach- oder Produktschäden Verwenden Sie in Ihrem WC keine Reiniger im Wasserbehälter. Produkte mit Chlor (Calciumhypochlorit) können die Beschläge im Wasserbehälter ernsthaft beschädigen. Dieser Schaden kann zu Leckagen und Sachschäden führen.
Behalten Sie Folgendes im Auge, wenn Sie Ihr Produkt warten:
• Lesen Sie sorgfältig das Etikett des Reinigers, um sicherzustellen, dass der Reiniger für den Gebrauch mit dem Material sicher ist.
• Testen Sie Ihre Reinigungslösung immer an einem unauffälligen Bereich, bevor Sie sie auf die gesamte Oberfläche auftragen.
• Wischen Sie die Oberflächen sauber und spülen Sie sie sofort mit Wasser, nachdem der Reiniger aufgetragen wurde. Entfernen und trocknen Sie alle Sprühreste, die auf nahegelegenen Flächen landet.
• Lassen Sie keine Reinigungsmittel für längere Zeit auf der Oberfläche einwirken oder einweichen.
• Verwenden Sie einen weichen, feuchten Schwamm oder Tuch. Verwenden Sie niemals ein schmirgelndes Material, wie einen Pinsel oder Scheuerschwamm, um Oberflächen zu reinigen.
• Achten Sie darauf, dass Flecken-bildendes Materialien nicht für längere Zeit mit der Oberfläche in Berührung kommt.
• Die ideale Reinigungstechnik besteht darin, gründlich auszuspülen und jegliches Wasser auf der Oberfläche nach Gebrauch abzutrocknen.
Guida di installazione e manutenzione
AVVISO IMPORTANTE PER GLI INSTALLATORI!:
Si prega di lasciare le presenti istruzioni all’utilizzatore. Si prega di conservarle per riferimenti futuri.
NOTA: Alcuni componenti di installazione potrebbero non essere forniti.
NOTA: Il gabinetto raffigurato nelle fasi di installazione potrebbe differire dal modello in corso di installazione.
Le dimensioni dei sanitari sono nominali e conformi alle tolleranze stabilite dalle Normative AS1172.1-2014, ASME/CSA A112.19.2/B45.1, BS:EN 997-2012, GB 952-2015, MS 1552:2011, PNS 156:2010, SS 574:2012, SASO-1473-2016, SNI 03-0797:2006, e TIS 792-2554.
Per Australia e Nuova Zelanda: l’installazione deve essere conforme a AS/NZS 3500 e AS/NZS 6400.
Unità: mm
Modello
Modern Life
Assemblaggio 185 353 353
Parliament Grande
Parliament Grande (Sifone a S in ceramica)
Reach Up
a P
Posizionare le staffe sul modello e installare le stesse come mostrato in figura.
Assemblaggio Sifone a S 90, 110 80, 150 110 155
ASIAN EMERGING MARKETS
1
Posizionare il modello sul pavimento. Fissare lo stesso in posizione con del nastro adesivo ed effettuare 2 fori di montaggio. Inserire i tasselli.
No.158, Jiang Chang San Road, Zhabei District, Shanghai, PRC. 200436. Tel: +(86) 21 2606 2572 Fax: +(86) 21 6107 8900
KOHLER (THAILAND) PUBLIC COMPANY LIMITED 16th FL. Jasmine City Bldg., 2 Soi Sukhumvit 23, Sukhumvit Road, Wattana, Bangkok 10110 Thailand Call Center Tel. +(66) 2204 6222 Fax. +(66) 2204 6224
E-mail: callcenterthailand@kohler.com
www.kohler.com
a S 80-155 10 mm
NOTA: Lasciare lo spazio necessario considerando la distanza dal retro della tazza al tubo in uscita dal muro. 3
Installare il tubo in ingresso e il tubo in uscita al gabinetto come mostrato, e segnare i tubi sul retro della tazza, mediante righello e matita.
P
Guarnizione
Connettore tubo di risciacquo
Righello
Tubo in ingresso
Tubo in uscita
Matita
Connettore tubo di scarico Guarnizione
Eliminare la parte in eccesso del tubo in ingresso e del tubo in uscita, in base ai segni dello spazio riservato, e levigare mediante lima.
Applicare sapone delicato e acqua attorno alla guarnizione. Posizionare la tazza sui fissaggi a pavimento e collegare il tubo di scarico.
Introdurre attentamente le viti nelle staffe, fino ad assicurare la stabilità del gabinetto. Serrare alternativamente a sinistra e a destra per evitare di decentrare il gabinetto.
Applicare del silicone attorno alla base.
7 8
Installare il sedile.
Manutenzione e Pulizia
ATTENZIONE: Potenziale danno per oggetti o prodotto. Non utilizzare detergenti da vasca nel gabinetto. I prodotti contenenti cloro (ipoclorito di calcio) possono danneggiare gravemente gli attacchi nella vasca. Questo tipo di danno può causare perdite e danni materiali.
Per risultati migliori, durante la manutenzione del prodotto, tenere presente quanto segue:
• Leggere attentamente l’etichetta del detergente per assicurarsi che sia adatto all’utilizzo sul materiale.
• Prima dell’applicazione della soluzione detergente sull’intera superficie, testare la stessa su una piccola area.
• Strofinare le superfici pulite e risciacquare completamente con acqua subito dopo l’applicazione del detergente. Risciacquare ed asciugare eventuali spruzzi sulle superfici adiacenti.
• Non lasciare i detergenti sulla superficie.
• Utilizzare una spugna morbida e inumidita o un panno. Per la pulizia delle superfici non utilizzare mai materiali abrasivi come le spazzole o le spugnette abrasive.
• Attenzione a non lasciare sostanze coloranti a contatto con la superficie per lunghi periodi di tempo.
• La tecnica ideale di pulizia consiste nel risciacquare a fondo e asciugare l’acqua dalla superficie con la carta assorbente dopo ogni utilizzo.
AS1172.1-2014, ASME/CSA
A112.19.2/B45.1, BS:EN 997-2012, GB 952-2015, MS 1552:2011, PNS 156:2010, SS 574:2012, SASO-1473-2016, SNI .TIS 792-2554 و ,03-0797:2006
.AS/NZS 6400 و AS/NZS 3500