10 minute read
10 Traditional Climbing


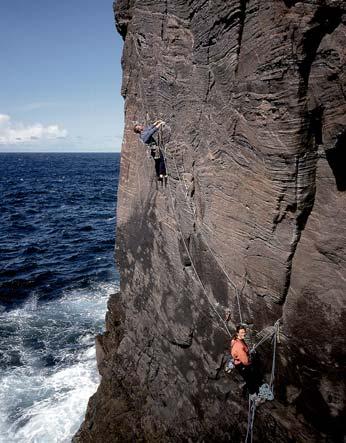
Britain is a small island with no glaciated terrain and famous for its wet climate! So how come it continues to produce world-class rock climbers and alpine mountaineers? Well it is not called the home of adventure climbing for nothing. Our crags, mountains and sea cliffs are easily accessible, and the more you climb our changeable weather simply becomes another factor to take into account. Traditional (trad) climbing in which the leader places protection as they climb is alive and well, and the climbing community takes pride in the fact that this style of ascent means thataseven-metre crag can feel as adventurous asamulti-pitch mountain route.
Advertisement
Why trad?
By accident or design some climbers end up leading from the word go, but most take time to reach this stage. Until recently all first leads were trad, since sport climbing is a relatively recent development. With the wealth of sport routes abroad and some developed areas in the UK you could have a long climbing career without placing a runner, but this will start to limit your options. Plus if you have any aspirations to head to the Alps or get stuck into some American cracks then you will need to know your RPs from your Camalots.
When trad climbing you are entering a very different arena to the indoor wall, and with your experience you are at both an advantage and disadvantage. You like climbing; you feel pretty confident about your ability; you have an idea what to expect; you should know how to tie on and belay safely. These are all positive points.
Your major disadvantage is that you are now responsible for everything, but with little or no experience of managing these new risks. An easy ‘mistake’ to make is to view your technical climbing ability as the mainstay for a successful transition to climbing outside. Think of yourself as beginning a completely new sport, because in many ways you are. It is no longer a question of green route or red route? Instead it is, ‘Will that gear hold a fall?’ or ‘Is that anchor safe?’
When making decisions that impact upon your safety, it is essential to appreciate the limits of your knowledge and expertise.
First steps
On your first visit outside it would be best to join a more experienced climber and for you to watch them placing protection and constructing belays. Choose a small cliff no higher than half a rope length as in this setting any problem can usually be solved by lowering to the ground, and verbal communication from the top to the bottom should be possible. Acliff with an accessible flat top where it is possible to walk around in relative safety means that your attention can be focused on developing new skills, as opposed to being worried about walking off the edge.
Successful trad lead climbing is obviously closely linked to acquiring the skills of placing natural protection – gear. It’s one thing to have every camming device and nut on the market dangling off your harness, and another to know exactly how to place them properly.
Gear
Gear falls into two broad categories: passive and camming. Passive protection is wedged into a constriction, whilst camming devices convert their downward force into a sideways pressure. They can even work in flaring cracks!
Wedge shaped chocks, often referred to as wires or nuts, are the most common pieces of protection used. These have curved sides and when placed with three points of contact in a crack are very stable. They should be ’seated’ with a firm tug in the direction the force will be applied, at the same time watching if they move.


In larger cracks hexagonally shaped chocks work well. Before the days of camming devices hexes were the only gear available for parallel-sided cracks, the offset attachment of their sling means they cam in a crack as a force is applied.
As a general rule the larger the protection the stronger it is, assuming the rock is sound. Look out for cracks or friable patches that suggest suspect rock. Larger nuts and cams have more surface area to grip with, and therefore more in reserve if the edges of a crack crumble slightly.
Utilising natural rock features such as threads and spikes can also make very secure anchors.
When using spikes you need to be sure that the sling will not ride up when a force is applied from below. The shape of the block will give a good indication: does it have positive edges that will hold the sling in place, or is it rounded with a whaleback shape? As a test, a simple tug is insufficient. What is necessary is to slide the sling backwards and forwards in the direction that the force will be applied, and to check it does not ride up and off.
Camming devices are easy to place badly, easily enough such that they are gone forever – an expensive loss – or provide no security at all. Think of the following three points when using them: open the cams to about the middle of their range; make the stem point as best as possible in the direction the force will be applied; make the cams symmetrical on either side of the stem. As opposed to passive devices that are tugged to seat them, camming devices are assessed in a more visual way. Ifyou start pulling them around you are likely to move them, and will only have to reposition them again.


Experiment by removing, testing and placing gear at ground level to get a feel for what works. It is often surprising what works –and fails!

What gear to have
Shops will be keen to sell you a hefty rack of gear and it will all come in useful one day. However, for your early leads, chunky items of gear such as hexes and medium to large wires provide reassuring strength and are relatively easy to appraise once placed. About ten quickdraws of different lengths should be adequate to begin with and a few longer slings are needed too, for extending runners, and threading spikes or chockstones.
Organising your gear
Develop a system for racking gear on your harness that works for you and keep to it. This will allow you to quickly locate gear when you need it with minimum angst. Generally gear such as wires should be placed close to hand on your stronger side, with larger items such as cams further back. It can be helpful to bundle wires according to size: small, medium and large. Quickdraws can be stored even further back. Test yourself by locating gear with your eyes closed before setting off.
Ropes
If you’ve got a rope from indoor climbing, this should be fine for easier trad climbs, but for climbs of more than half a rope length abseil retreat becomes an issue, and on wandering lines friction from rope drag will make your life a misery. So sooner or later you may want to use double ropes. Two full ropes would be extra safe but heavy, so it’s normal to use half ropes, usually between 8 and 9mm in diameter. The good news is that you’ll only need one since it’s normal practice for your climbing partner to have one also.


Controlling the rope
Belay devices such as Sticht Plates, Reversos, Bugs, ATCs etc are much more suited to handling dynamic loadings with gradual deceleration, than a grabbing device like the Grigri which will shock load the runners. There are also some lightweight devices available such as Bugettes and Reversinos. These are designed for thin double or twin ropes, 8.5mm and less. They will dissipate heat less effectively often getting very hot when abseiling, but with thin ropes can make holding a fall easier, especially if the climber is heavier than the belayer. So there is a range of belay devices for a reason, and when making your choice consider the ropes you use and your weight relative to your partner’s – don’t just buy a device because your mate bought it!
First leads
Before embarking on your first leads, you should have gained plenty of experience at the other end of the rope, have recruited a competent belayer and it would be best to lead on an indoor wall first.
Do not be too ambitious; choose wellprotected climbs that are comfortably within your technical abilities as you learn the craft. Look through the guidebook for clues to identify the right climb. If the route is relatively technical for the grade (e.g. Severe4b) then you can usually expect good protection. On the other hand, if the climb looks like a blank featureless wall from below, leading to a bold roof, then it’s probably not a very sensible proposition at this stage, or perhaps ever!
Whatever grade you have managed prior to trad leading, be realistic on your first excursions. A good idea is to stick to classic climbs – look for quality star ratings or adjectives like ‘excellent’ or ‘enjoyable’ within the Diff to V Diff grade range. On these routes you will generally be able to stand comfortably whilst placing runners, and not get too distracted by the technicalities of the moves.
The normal goal of trad climbing is the onsight lead. To take the sting out of your first leads why not lead a route you have climbed before? Or when seconding routes try placing protection as you climb, in this way you will develop the essential skill of standing – or hanging! – inone place whilst selecting a suitable piece of gear. A more experienced friend could then give you feedback about the reliability and positioning of yourrunners.
Strategies
Leading a route requires a strategic approach; the climber needs to make best use of their strength and equipment to reach the top before either runs out, and coping strategies are needed for the occasions when they are in short supply!
Before leaping on a climb, take a good look at it beforehand, something that’s often forgotten in the excitement. If it follows a hairline crack all the way you can leave your hexes and large cams behind. Try and match the amount of gear with what you will need.
Always try to belay where you can see your partner Photo – Alex Messenger


Guidebooks
Using a guidebook to find climbs is an acquired art. Develop a good climbing vocabulary and learn to find routes described in relation to one relatively easily identified feature or route. The guidebook will also provide information about the descent from the top of the climb. This is particularly important for multi-pitch climbs and you should have planned the basic outline of your descent before starting these routes.
Fourteen quickdraws may be fine for a long mountain route, but do you really need that many on a short Gritstone classic? Ask others who know the route, as there may be crucial or trick placements you cannot anticipate from the ground. Take time to inspect the route from below, hopefully you will be able to read some of the moves and spot potential recovery spots, thus saving maximum energy.

Plan where you will be getting that crucial first runner in, and try to spot where the hardest move might be. It’s always a good idea to arrange a cluster of runners before a hard sequence so that you have a failsafe in case one fails or gets knocked out. Eliminating this kind of worry helps you focus on the climbing instead of fussing about the gear.
Psychology
Ensure that you fully understand and accept the risks of leading traditional climbs. Before leading climbs you will also need to have developed the ability to find opportunities to rest and recover.
Hanging on long enough to place a natural runner takes a lot more effort than clipping a bolt. A positive frame of mind is essential for leading climbs, so regular practice is essential, particularly if you want to progress to harder routes.
Desire is essential for leading climbs, so do not try a climb unless you really want to get up it. On the other hand try not to get despondent if you fail – it happens to the best climbers, you just don’t hear about it! Failure is useful, it shows a good climber how to improve through working on their weaknesses.
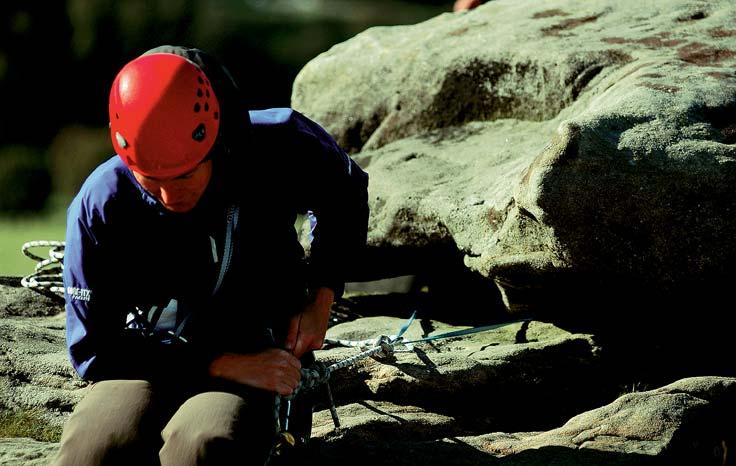
Building belays
You are at the top of the crag, first lead in the bag, time for some self-congratulation! But it’s not over yet – you have to build a belay so your second can follow the climb.

If belaying off nuts, hexes and cams, you must always use two or more to construct your belay, and it is often necessary to link these multiple anchors together to a single point.
There are many ways to do this and what is important is not the system used, but the way in which it is done. The two concepts to be clear about are whether the individual anchors when linked together are independent and equalised.
Anchors are independent of each other if, should any individual one fail, then the others are not shock loaded. The anchors are equalised if once connected together, they are all pulled with an equal force. Both of these requirements can be achieved using simple knots such as clove hitches or overhand knots. Having more than one anchor shares the load between them, but keep the angle between any two to 60°or less. Once equalised with a sling attach yourself to the anchor with a clove hitch.
Instead of using slings to attach to anchors it is sometimes easier to use your rope instead. Once attached to your anchors belay your partner by attaching your belay plate to the rope loop, not the central loop. There is a good reason for this concerning the forces applied to the system should your partner fall. With the belay plate attached to the rope loop and you appropriately positioned, the weight of the second should go directly through to the anchors.
Whereas even though completely safe, attaching the belay plate to the central loop


NOT

If you belay off a single anchor make sure it’s big!
Clove Hitch

Useful for tying on to anchors due to itssimplicity and adjustability (1 & 2).
The load rope should be positioned next to the back bar ofthe karabiner (3).
When tying a clove hitch on a stake, the cross should rest at the back of the stake so it will tighten up when loaded (4 & 5).
can be more uncomfortable should the second fall – their weight will pass more directly through your harness.


You must be aware of the potential forces involved should the climber fall, as being poorly prepared can lead to an accident. This is especially true should the climber be a lot heavier than the belayer. Your position at the top of the cliff is very important, and it is often safer to sit down than stand up. Go through ‘What if?’ questions. Can you see your partner, or at least clearly communicate with them? Are you in line between your anchors and your partner, such that should they fall youwill not get ‘pulled about’? Is the rope passing over your leg? Is there space for your arms to move freely such that you can belay safely?
Ask your partner to put their weight slowly on the rope before they leave the ground. In this way you will know if you are able to hold them should they fall when climbing. If you are unsure then reposition yourself or tighten the rope to your anchors. Remember, people fall off without warning, so be 100% confident about your ability to belay effectively.