5 minute read
NEW GARDEN SEEDING IDEAS

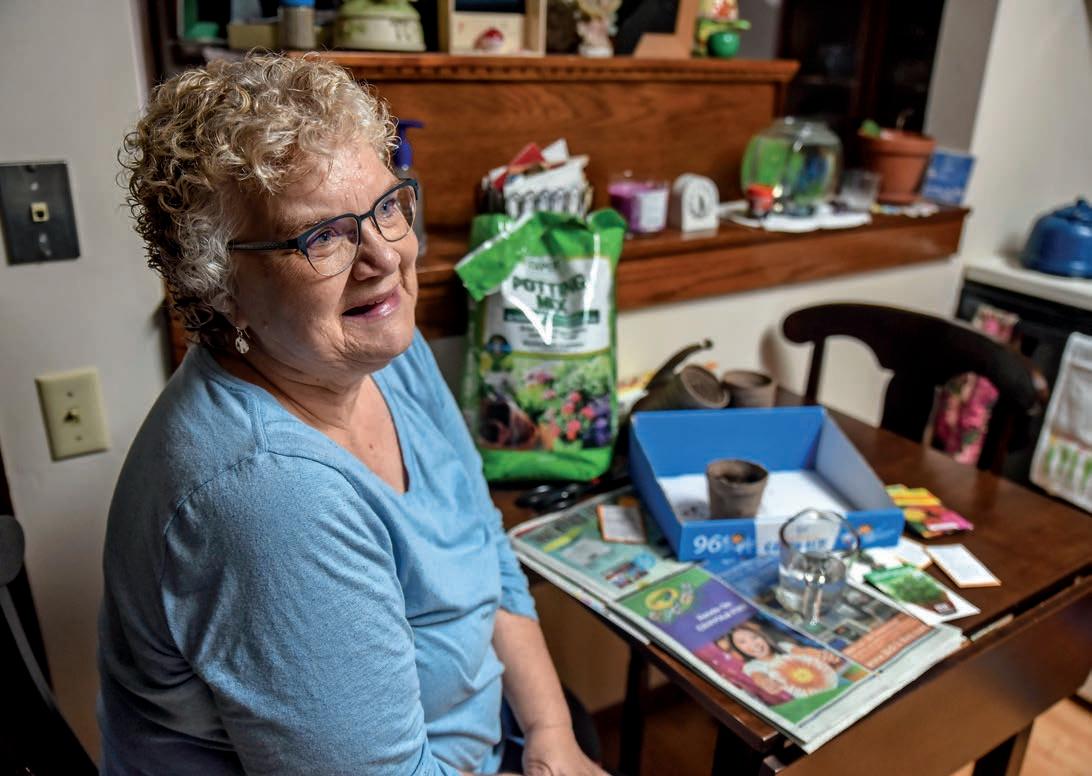
Photo by Erica Dischino
Etta Johnson prepares to plant seeds from the Seed Exchange at the Willmar Public Library at her home in Willmar.
Grow it!
Garden seeds can be ‘borrowed’ from the library
By Carolyn Lange clange@wctrib.com
Etta Johnson is growing several different types of herbs this year to add some flavorful spice to her meals.
It’s part of her strategy for cutting back on salt, said Etta, who was inspired to grow something new this spring while on one of her many trips to the Pioneerland Public Library in Willmar.
She’s an avid reader, belongs to a book club and admits she sometimes wanders around the library to “see what’s going on.”
That’s when she noticed the sign promoting the “seed library” amongst the shelves of books and rows of computers at the Willmar library.
Inside a file cabinet drawer there were packets of seeds she could “borrow” and grow with the promise she’d harvest and return seeds at the end of the season for others to use next year.
It’s part of a program that started in 2017 at the library, designed to encourage people to garden, said Syrena Maranell, adult librarian at the library in Willmar, who coordinates the program.
People who sign up for the program get a membership number and can take up to five packets of seeds each week. They simply record what they took in the logbook on top of the seed drawer. It’s an anonymous program that requires a membership number, not their name, be written in the log book, said Syrena.
Last year about 450 packets of seeds were “lent” out from the seed library.

The packets of seeds are – of course – in alphabetical order in the drawer.
Ideally, Syrena said, people who use the seeds to grow flowers or vegetables this year will become “seed savers” to help gardeners next year. Seeds from string beans, tomatoes and some flowers that are relatively easy to harvest can be dried, put in an envelope, labeled and returned to the library this fall.
But don’t fret, said Syrena, if you eat your last tomato without remembering to save seeds, participants can purchase seed packets to donate to the library “to replenish and help it keep going.”
Etta planted lemon basil, rosemary and dill seeds she got from the library that she hopes will thrive in pots on her patio in Willmar.
“Gardening is the one time I don’t mind getting dirty,” she said. “It’s very therapeutic to get in with nature and dig in the dirt.”
She doesn’t claim to be an expert gardener and knows where she can find some answers if she has questions about growing the herbs.
“The library has so many resources. If you don’t know how to grow something, there’s books there,” she said. “There’s nothing like a good book to lead you in the right direction.”

Syrena Maranell

Make your own seed tape
By Carolyn Lange clange@wctrib.com
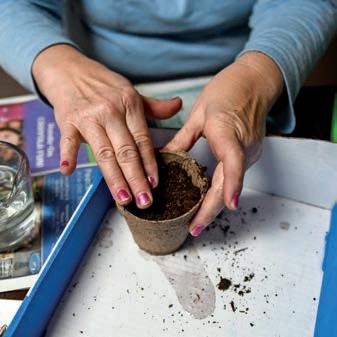
Whether it’s chubby little fingers that haven’t mastered the ability to pinch and hold tiny objects or older, arthritic hands that cause their owners pain, planting tiny seeds in soil can be a challenge.
Small seeds, like carrots, can be especially difficult to plant without globs of seeds ending up in one spot, resulting in over-crowded baby carrots that need to be thinned. But who wants to kill cute little baby carrots?
One option for improving plant growth is using seed tapes that have seeds – properly spaced – glued in a straight line and sandwiched between two strips of biodegradable paper. There are commercial seed tapes available, which can be helpful for beginning gardeners.
But a simple DIY version is far cheaper, allows greater flexibility in the variety of seeds you can plant and can create opportunities for family time activities.
There are numerous examples of online videos and written directions on how to assemble homemade seed tapes.
Instructions that involved rulers, scissors, ink dots, calculators, abacuses and special waist-high work tables were immediately discarded from my how-to rolodex. I’m more of an eye-ball-it and that-looksgood-enough-for-me type of a person.

However, using rulers and ink dots to teach math and measurement skills and scissors to improve dexterity could be a great exercise for little ones.
Here’s how I made my seed tape with scarlet nantes coreless carrot seeds. I used seeds leftover from 2019. The seeds were kept cold and dry over the winter and should grow just fine this year.
What you need: • Toilet paper (cheap, single-ply. Yes,
I have that type of TP in my house, much to my family’s dismay.) • Glue (I made a paste with flour and water but school glue works too) • Seeds • Toothpick, artists paintbrush or Q-tip
What to do:
• Tear off a section(s) of TP the length of your garden space. A yard-long section keeps it manageable. You can make multiple sections to fill your garden row. • Fold the TP lengthwise, crease it, and unfold • Read the seed packet to determine how far apart seeds should be. • Put dots of glue at the appropriate spaces – typically 1 to 3 inches apart – all along one of the narrow sides of the TP. • Place 1 or 2 seeds on each dot of glue. For carrot seeds, put two seeds to ensure germination. For larger seeds, like beets or radishes, one seed is enough. • Re-fold the TP lengthwise to cover the seeds, patting it down to secure the seeds inside. It’s kind of like making ravioli. • Write the name of the seeds on the paper, gently roll up (using an empty TP core works great) and store in a dry container until ready to plant. Planting
To plant your seed tape, you can either dig a shallow trench and cover the paper with dirt, or lay the tape on top of the soil and sprinkle dirt on top. Give the dirt a drink of water and pat the soil down well to prevent the seed tape from blowing away in the wind.