2.4 INSTALL: Rubix The following product specific installation instructions are applicable for both direct fix (timber frame) and cavity fix (timber frame). Installation instructions in this section are to be used in conjunction with information and requirements given in previous sections and all national and state building codes. Stud spacing to be selected by the building designer using the wind tables based on the wind classification to a maximum of 600mm.
2.4.1 FRAME PREPARATION The stud frame must be arranged so that all edges of the Rubix Panel are supported on double studs and double noggings (or rotated 90mm nogging). Check and straighten sub-structures as required. Plan sheet layout with one of the face rebated edges at the top. All panels must be orientated in the same direction i.e. the second face rebate always on the right or left of the panel. Starting position may be altered or the first panel trimmed to maintain symmetry or to align the groove with a specific feature e.g. windows, other installed cladding etc. For cavity installation see cavity systems (section 1.9)/steel frames (section 1.8). For direct fix install compatible wall sarking prior to installation, refer to AS 4200.2. Back Rebated edge Face Rebated edge
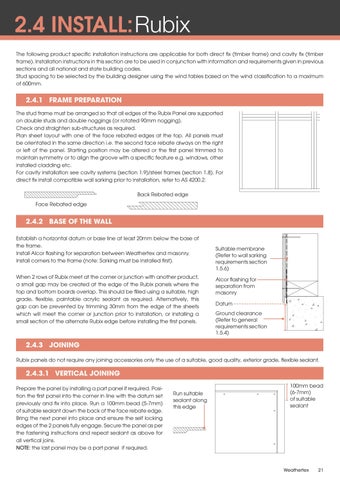
2.4.2 BASE OF THE WALL Establish a horizontal datum or base line at least 20mm below the base of the frame. Install Alcor flashing for separation between Weathertex and masonry. Install corners to the frame (note: Sarking must be installed first). When 2 rows of Rubix meet at the corner or junction with another product, a small gap may be created at the edge of the Rubix panels where the top and bottom boards overlap. This should be filled using a suitable, high grade, flexible, paintable acrylic sealant as required. Alternatively, this gap can be prevented by trimming 30mm from the edge of the sheets which will meet the corner or junction prior to installation, or installing a small section of the alternate Rubix edge before installing the first panels.
Suitable membrane (Refer to wall sarking requirements section 1.5.6) Alcor flashing for separation from masonry Datum Ground clearance (Refer to general requirements section 1.5.4)
2.4.3 JOINING Rubix panels do not require any joining accessories only the use of a suitable, good quality, exterior grade, flexible sealant.
2.4.3.1 VERTICAL JOINING Prepare the panel by installing a part panel if required. Position the first panel into the corner in line with the datum set previously and fix into place. Run a 100mm bead (5-7mm) of suitable sealant down the back of the face rebate edge. Bring the next panel into place and ensure the self locking edges of the 2 panels fully engage. Secure the panel as per the fastening instructions and repeat sealant as above for all vertical joins. NOTE: the last panel may be a part panel if required.
Run suitable sealant along this edge
100mm bead (6-7mm) of suitable sealant
Weathertex
21