

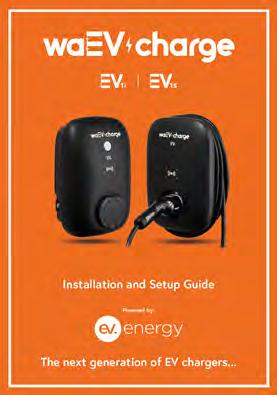
Installation and Setup Guide & The next generation of


Installation and Setup Guide & The next generation of
This charger complies with Mode 3 (IEC61851 and CE-LVD).
When using electric chargers, basic precautions should always be followed. This manual contains important instructions, including the following, that must be followed during installation, operation and maintenance.
• Do not install or use the charger near flammable, explosive, corrosive, or combustible materials, chemicals, or vapors.
• Turn off the mains power to the charger before performing any maintenance.
• The device is designed only for vehicles that are compatible with the Mode 3 charging standard.
• Do not use the charger if it is defective, appears cracked, frayed, broken or damaged.
• Do not attempt to open, disassemble, repair, tamper with, or modify the charger. Contact waEV-charge Customer Service or your installer for any repairs.
• Do not use the charger when you are in the vehicle, or the charger is exposed to severe rain, snow, or other severe weather.
• When transporting the charger, handle with care and do not drag or step on the device.
• Do not touch the charging connector terminal with sharp metallic objects to prevent damage.
• Do not forcefully pull the charging cable, damage it with sharp objects, put fingers, or insert foreign objects into any part of the charging connector.
• Risk of explosion: This device has arcing & sparking parts that should not be exposed to flammable vapors.
• Risk of electric shock. Do not remove cover or attempt to open the enclosure or the device when power is on.
• To reduce the risk of serious injury or death and damage to the charger, this device should be installed, adjusted, and serviced by a qualified electrician, familiar with the construction and operation of this type of charger and the dangers involved. Failure to observe these precaution could result in death or severe injury.
• Incorrect installation and testing of the charger could potentially damage either the vehicle’s battery and/or the device itself. Any resulting damage is excluded from the warranty for the charger.
• Ensure that the charging cable is well positioned during charging so it will not be stepped on, tripped over, or subjected to damage or stress.
• Do not use this charger with a frayed charging cable that has damaged insulation or any other signs of damage.
• Install according to the local electrical regs, confirm the wire diameter and wire type corresponds to the current rating and the temperature rating required.
• Before starting the installation, ensure all power is turned off at source.
The waEV-charge EV1i & EV1s charger can be safely installed without an earthrod and features integrated 6mA DC RCD leakage protection. Only type A RCD + 32/40A MCB or equivalent protection is normally required at source.
A DC leakage fault in the vehicle will render ineffective a type “AC” RCD. You should never wire the waEV-charge EV1i & EV1s into an existing upstream Type “AC” RCD.
Model Name waEV-Charge EV1
Rated Input Voltage
Rated Output Current
AC Power Frequency
Input Protection
Output Protection
Charging Connector
Operating Humidity
Operating Temperature
Charging Protocol
Safety/Charging Compliance
Version
Wi-Fi Function**
Cable Length
Protection Level
Installation Type
Shipping Weight
Status Light Indication
AC220~240V / Single Phase AC400±10% / Three Phase 50/60 Hz
UVP, OVP, SPD, 6mA DC RCD & Ground Fault Protection
OCP, OTP, Control Pilot Fault Protection
waEV-charge EV1i & EV1s , DLB
Tethered, IEC 62196/Type 2
Up to 95% RH -30°C to +50°C
Mode 3 (EN/IEC 61851)
EN 61851-1:2019 / IEC 62955:2018 / TUV CE / UKCA
LAN Version / Wi-Fi/LAN Version / Solar CT Version 10M/100M Base-T
RJ45 Cable lnlet* 802.11 b/g/n / 2.4GHz
Wall-Mounted/Pile 4.4 Kg
Red, Green, Blue LED
* LAN Version & Wi-Fi Version ** Wi-Fi Version 7.4kWh - 5.3kg / 22kWh - 6.6kg
Standby - Blue Light
The READY light stays illuminated in standby mode.
Waiting for Charging - Green Light After the charger plug is connected to the vehicle inlet, the CHARGE light is constantly lit
Charging - Green Light Flashing
The CHARGE light flashes while charging.
The red light is lit the charger is in fault mode. Please refer to section “8 Error and Warning Messages” for detailed information.
• Be sure to read the installation manual in full and ensure local building and electrical regs are reviewed before installing the AC charger.
• The AC charger should be installed by a qualified electrician according to the install manual and local safety regulations.
• Use appropriate protection when connecting to the main power distribution cable.
The waEV-charge EV1i & EV1s charger can be safely installed without an earth-rod and features integrated 6mA DC RCD leakage protection. Only type A RCD + 32/40A MCB or equivalent protection is normally required at source.
A DC leakage fault in the vehicle will render ineffective a type “AC” RCD. You should never wire the waEV-charge EV1i & EV1s into an existing upstream Type “AC” RCD.
For safe installation, it is recommended to install a double pole isolator on the input part of the EV charger. Connect the L1 lead to the grid L1, connect the L2 lead to the grid L2, connect the L3 lead to the grid L3, connect the N lead to the grid N, connect the PE lead to the grid PE (for Three Phase)
For safe installation, it is recommended to install a double pole isolator on the input part of the EV charger. Connect the L1 lead to the grid L1, connect the L2 lead to the grid L2, connect the L3 lead to the grid L3, connect the N lead to the grid N, connect the PE lead to the grid PE (for Three Phase)
Tools required before installing the Wall-Mounted EV1i & EV1s charger, gather the following tools:
• Wire stripper
• Crimpers
• Security TORX screwdriver for M5
• Slotted screwdriver for 4~5.5MM
• Adjustable Wrench M6
• Head gasket screw 10-10.5mm
• EV Voltmeter/Digital multi-meter testing equipment
• It is recommended to use 3 core/6mm cable for Single Phase / 5 core/6mm cable for three phase (XLPE or equivalent cable) to pull the cable from the distribution box.
• Power Drill
• Pencil or marker
Installer Notes
It is recommended the charger is installed at a height of 500mm-1500mm as per building regulations BS8300:2018.
An isolator switch (rated 45 Amps) is a mandatory requirement for “new builds”, but optional for existing dwellings.
The isolator switch (if fitted) should be mounted between 500mm and 1500mm above finished floor level to comply with regulations. All installations must comply to BS7671: 2018.
The waEV-charge EV1i & EV1s charger is designed to be connected to a dedicated AC supply only. The property must comply with minimum BS7671 standards before installation commences and the supply must be adequately rated for the additional load required for EV charging.
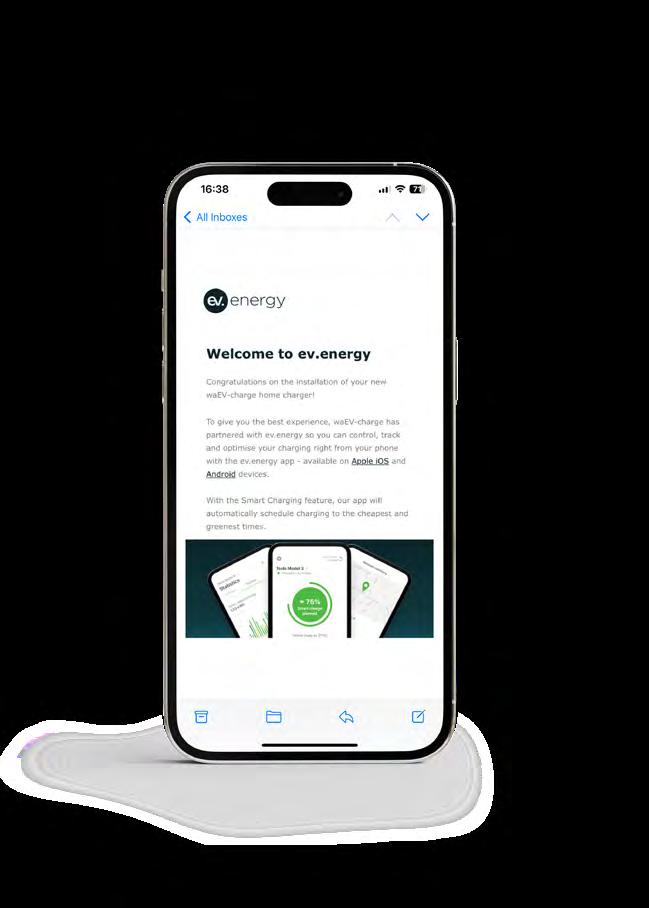
The waEV-charge EV1i & EV1s charger must be connected to a strong WiFi signal in order to function correctly with the ev.energy app. If the WiFi signal strength is 2 bars or lower, we strongly advise the use of a WiFi booster or alternatively the charger to be hardwired via the external LAN socket, directly into a router/hub.
Step 1:
• Set the positions of the 4 screw holes and drill them, with a diameter of 8mm and a depth of 52mm.
• Use 4 sets expansion screw and M6 screw to fix the wall-mounted bracket on the wall.
Step 2:
Align the rear notch of charger into the wall-mounted bracket and fit the screw holes of the right and left side.
Step 3:
Fix the two M5 security TORX screws to complete the installation.
Overall outlook picture after installation: CT Clamp (Optional):
Wall-mounted cable winding
Input OVP
Input UVP
Output OCP OTP
RCD Abnormal
Ground Fault
Control Pilot Fault
MCU Self -Test Fail
RCD Self-Test Fail
Relay Self-Test Fail
RCD Abnormal Stop Charging
Output OCP Stop Charging
OTP Stop Charging
1 flash followed by 3 sec pause
2 flashes followed by 3 sec pause
3 flashes followed by 3 sec pause
4 flashes followed by 3 sec pause
5 flashes followed by 3 sec pause
6 flashes followed by 3 sec pause Flicker
Constantly Bright
Constantly Bright
Constantly Bright
Constantly Bright
Constantly Bright
Constantly Bright
1 4
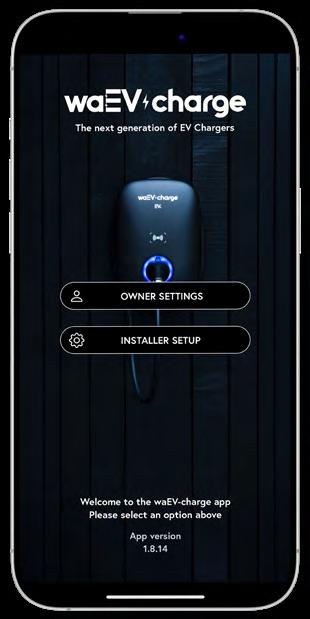
Open the waEV App and Select Installer Setup Select WiFi Setup Select “Installer Setup”. To connect the charger to WiFi.
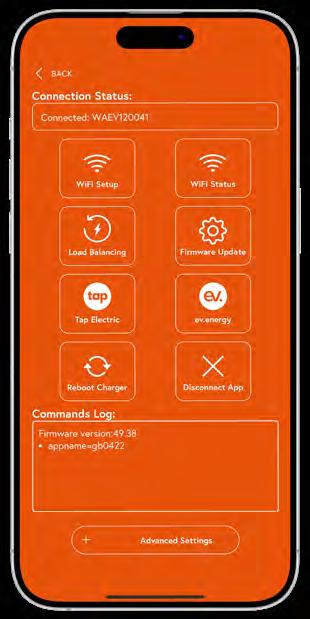
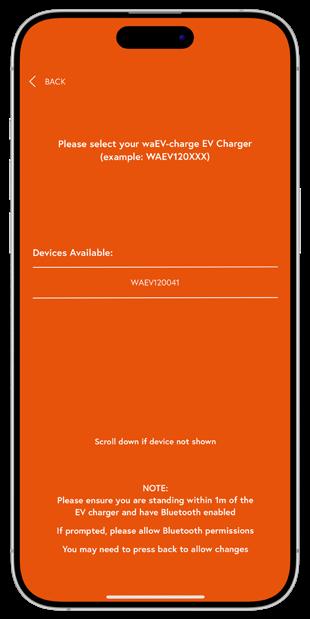
Select the Charger to Configure
2 5
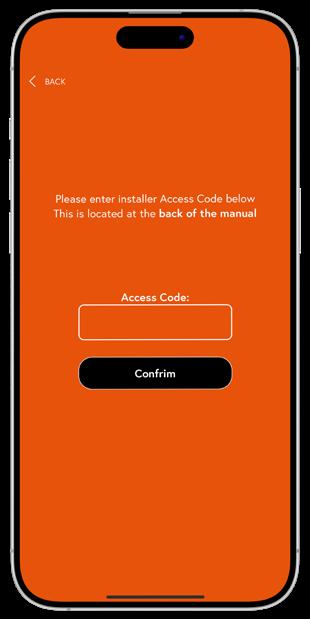
Enter the Access Code and Press Confirm
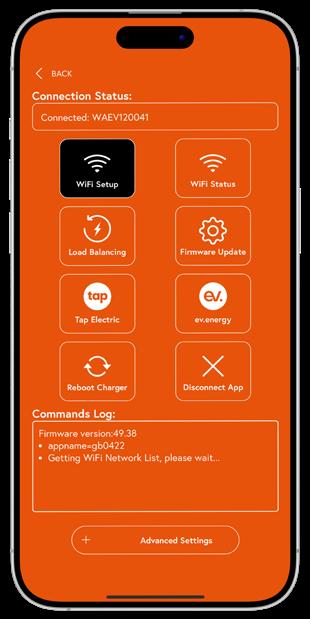
Wait for the WiFi List to Pop-up
Click on the relevant CPID. Click “WiFi Setup” to scan for nearby WiFi networks.
Located on the back of the Installer Guide.
3 6
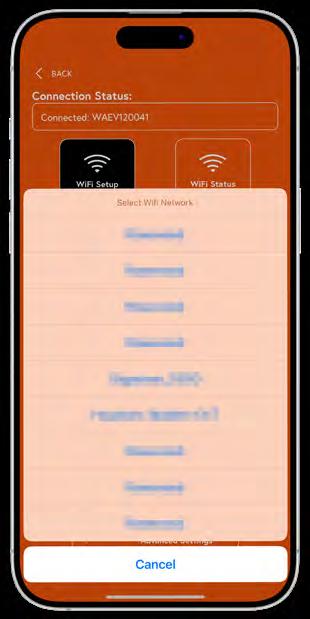
Select the Correct WiFi Network
Select the customer’s WiFi network. Make sure to select the 2.4Ghz when connecting.
If
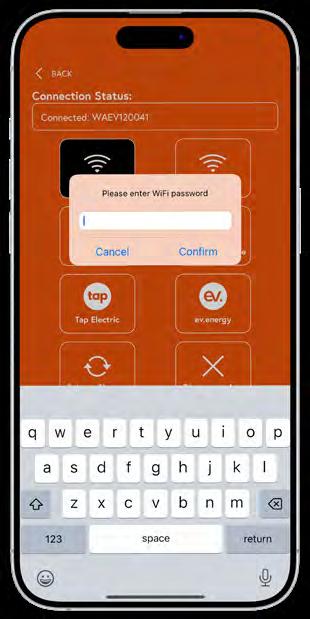
Enter the WiFi Password.
The WiFi password will be located on the customer’s router or access point. (unless it has been changed)
7 10
Select Load Balancing Setup
Alternatively,
8
Wait for the Charger to Connect to WiFi
Once connected, the charger status light will flash 5 times, and confirmation of connection will be shown in app.
Select the Main Fuse Rating
Check the fuse rating of the install location.
Check Log for Connection Success
Connection successful will be displayed in the Commands Log.
Reboot the Charger
Press Reboot and OK, and wait for the charger to restart.
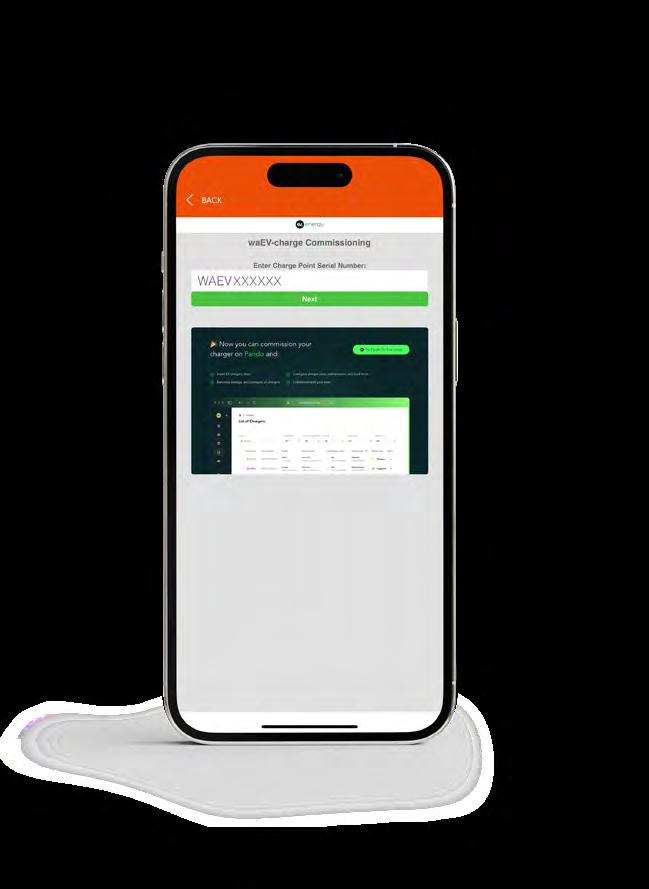
Scan QR Code
or head to: https://app.ev.energy/commissioning/waev-charge/activate/
1
IMPORTANT: You must reboot the charger before commissioning. Select “Installer Setup”.
Open waEV-charge App and Select Installer Setup
2
Select the Charger to Configure
Please Note:
The EV1i & EV1s chargers need to be commissioned to be compliant with The Electric Vehicles (Smart Charvge Points) Regulations 2021.
3
Enter the Access Code and Press Confirm Click on the relevant CPID.
Located on the back of the Installer Guide.
4
Select the ev.energy Portal
5
6
Check the Charger’s Serial Number waEV-charge Status Screen
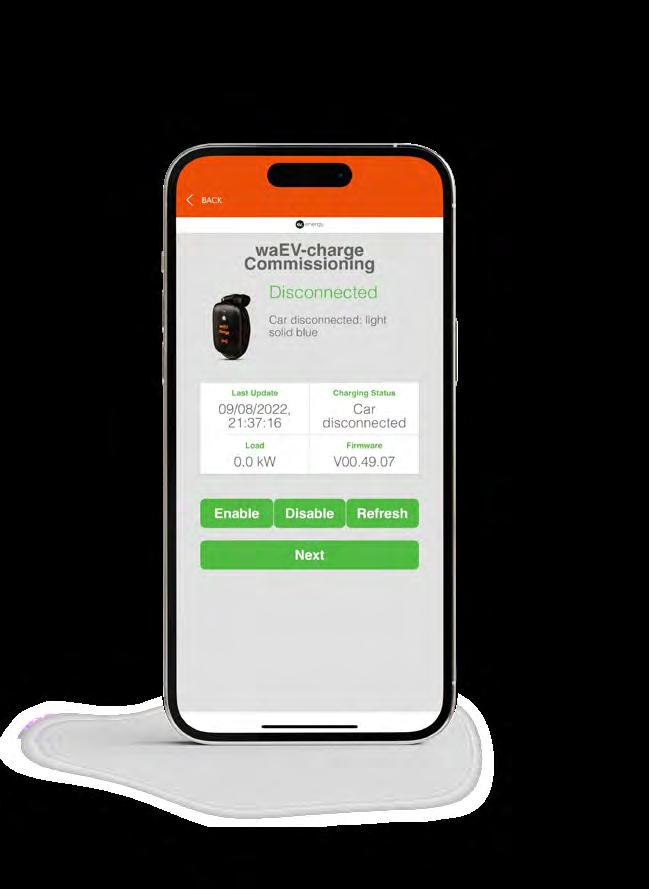
This should be automatically populated, otherwise please find CPID on the side of charger label.
8
You can click Enable if you need to test the charger.

9
7
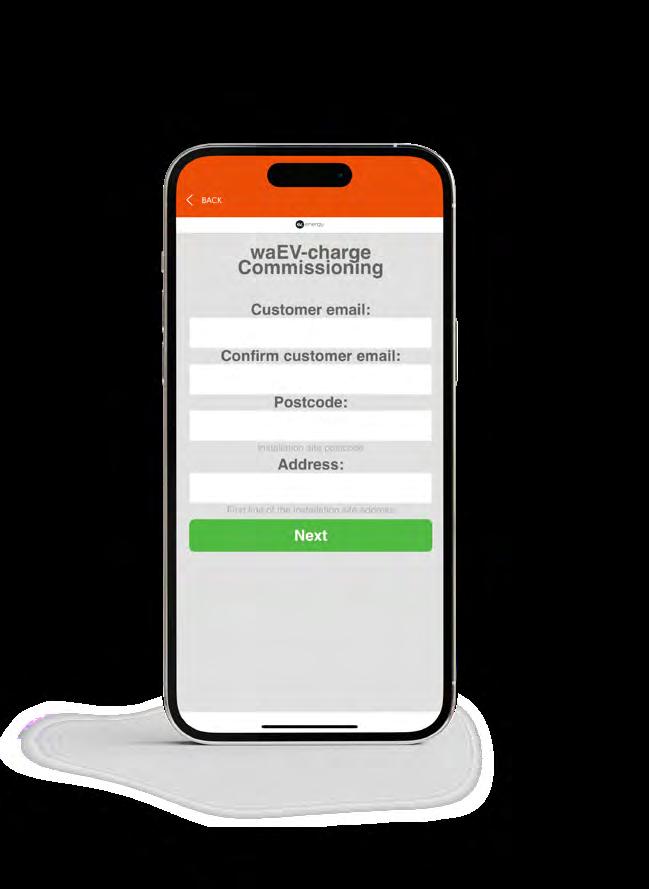
Enter the Customer’s Details
Email must match the customers’ ev.energy account.
10
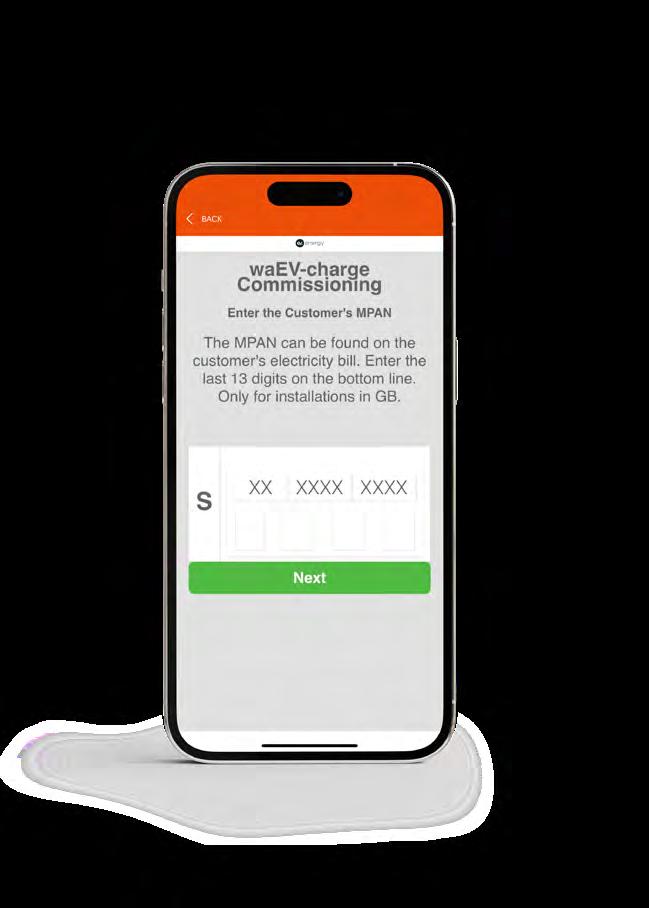
Enter the Customer’s MPAN Commissioning Complete! Customer E-mail
This step is optional during commissioning.
You have successfully completed the commissioning.
After completion, the customer should receive an email as above.
2
1. Please ensure the WiFi name (SSID) & password are correct (both are case sensitive so must be entered carefully). We advise connecting another device, such as a mobile phone to the WiFi network from where the EV charger is located to check the WiFi signal is strong, within range and the details are correct.
2. The waEV-charge EV1i & EV1s charger MUST be connected to the 2.4GHz WiFi network only. Dual band or 5GHz networks do not provide a strong & stable connection therefore the charger will not appear online if the 5Ghz/Dual-band WiFi SSID & password is used. All routers can be setup to transmit a standalone 2.4Ghz network. If the customer is unsure of how to set this up, please contact us and we will assist.
3. Once the WiFi SSID & Password are input using the Installer app, ensure that you see SET SUCCESS under both SSID & Password in the bottom status box. Once confirmed, please ensure you REBOOT the device and then wait 2-3 mins before opening the ev.energy commissioning portal.
4. If you are still having connection issues, please reboot the customers WiFi router.
5. Ensure the vehicle is not plugged in when the commissioning process is being completed. The status LED should remain BLUE during all commissioning, except during reboot.
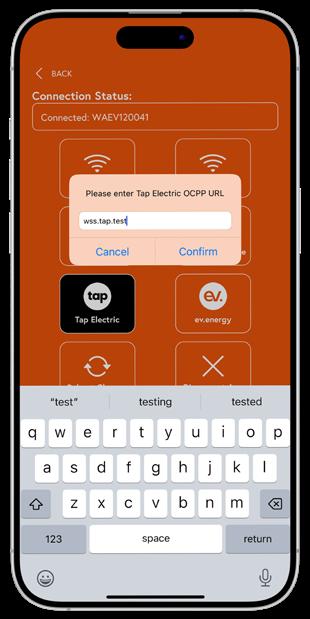
6. Selecting “get device info” will display the WiFi details and OCPP URL, this should match the customer WiFi SSID & password and URL.
7. If the customer has already signed up for the ev.energy app, please ensure you use the same email address for the ev.energy commissioning portal. Once complete, ask the customer to fully close the ev.energy app (or reboot phone if unsure) then reopen and the waEV-charge EV1i & EV1s charger will appear within the app.
Please keep the charger clean and keep in a clean area with low humidity. Do not install it in an environment near the sea, high humidity or high levels of dust.
• Avoid moisture or water in the charger. If there is water or moisture ingress into the charger, it is necessary to immediately power off to avoid immediate danger, and notify your installer to carry out a full safety inspection before future use.
• If there is any damage or dirt on the vehicle connector, charging cable, or vehicle connector holder, please contact the maintenance installer immediately.
• Please use the charger carefully. Do not hit or press hard on the case. If the case is damaged, please contact your installer.
• Avoid placing the charger near hot objects or in directly sunlight, away from dangerous substances such as flammable gases and corrosive materials.
• Do not place external objects or heavy objects on the charger to avoid danger.
• The warranty period for this charger is three years.
• After the event of any repair or maintenance under the warranty period, if there is no purchase to extend the warranty period, waEV-charge shall provide a threemonth warranty period for any subsequent paid repair work.
During the warranty period for any malfunction caused by normal use according to the User Manual and Service Instructions (to be determined by certified maintenance technicians of waEV-charge), the product shall be repaired free of charge. Except for the following situations, the charger shall be subject to the above warranty terms:
1. The warranty certificate cannot be provided or the contents of the warranty certificate are modified or inconsistent with the label indication of the repaired product.
2. Those who are unable to provide valid proof of purchase.
3. Those who exceed the manufacturer’s specified warranty period.
4. Those who damage the product due to not following the product service instruction for use, maintenance and storage.
5. Damage or malfunction caused by foreign object entering.
6. Unauthorized repair, disassembly or modification.
7. Damage caused by force majeure (such as lightning, excessive voltage, earthquake, fire, flood, etc.).
8. Malfunction and damage caused by other unavoidable external factors. Malfunction and damage caused by improper use of equipment, such as water or other solutions entering into the equipment.
9. Malfunction and damage caused by the grid power supply and voltage which is not specified for use with the charger equipment.
The above guarantees shall be made solely, and no other express or implied warranties shall be made (including the implied warranties of merchant ability, particular and applicable reason ability and adaptability, etc.) whether in the contract, civil negligence, or other aspects, the Company shall not be responsible for any special, incidental or consequential damages.
Problem connecting to the ev.energy app? Contact us: support@ev.energy Alternatively, for business-hours support call ev.energy: 01202 078 000 OR E - support@waevcharge.co.uk W - waevcharge.co.uk/support