AW-03744 Rev 11.0
Revised February 2026
Medical 100 Cummings Center Suite 436 Beverly MA 01915 USA
Phone: +1 (978) 232-8370
Website: www.veli.co
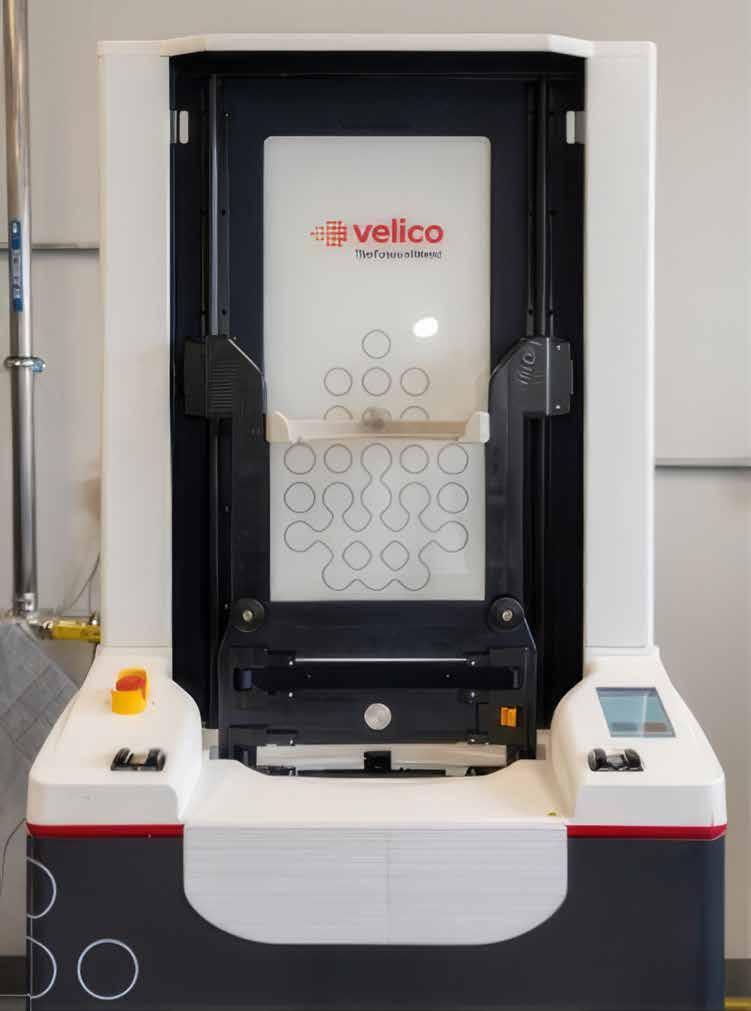
Velico

AW-03744 Rev 11.0
Revised February 2026
Medical 100 Cummings Center Suite 436 Beverly MA 01915 USA
Phone: +1 (978) 232-8370
Website: www.veli.co
The FrontlineODP™ System for spray drying plasma produces a single unit of spray dried plasma from a single donor unit of plasma. The dried plasma is expected to simplify storage and transport options (refrigerated/ambient temperature rather than frozen). Once rehydrated, the FrontlineODP Unit maintains potency and improves availability of plasma for therapeutic transfusion use in a pre-hospital or hospital setting.
The FrontlineODP Unit is manufactured using sterile, single-use consumables, sterile liquid plasma connections and equipment that includes redundant bacterial retentive filters.
The FrontlineODP System is intended to be used in a blood center setting and operated by technicians trained in the use of the system. The system is designed for easy integration into routine blood banking manufacturing processes.
The FrontlineODP Unit is intended to be used for transfusions in prehospital, rural/austere hospitals or military settings to replenish plasma proteins that are consumed during coagulopathy that may accompany traumatic injuries.
FrontlineODP Unit is indicated in the management of traumatic hemorrhage where conventional plasma is unavailable or impractical for use, such as pre-hospital transfusions, rural/ austere hospitals, or military applications.
Where conventional plasma (such as Fresh Frozen Plasma or Plasma Frozen within 24 hours of phlebotomy) is available.
To correct for coagulopathy in cases where a specific therapy would be more effective, such as vitamin K, cryoprecipitate AHF, prothrombin complex concentrates used to reverse warfarin, or specific coagulation factor concentrates.
When blood volume can be safely and adequately replaced with other volume expanders.
The design of the Frontline Dryer and Frontline Sealer prioritizes the safety of the operator throughout normal operations, cleaning, and maintenance. The design does this through a variety of methods:
• Protecting electrical power connections
• Protecting moving parts in the Dryer (drying nozzle) and in the main body of the sealer (agitation mechanism, seal and separation assemblies, air evacuation system)
• Requiring operator action for shuttle movement (finger safety buttons)
• Fully securing the enclosure prior to drying run
• Plasma Drying Chamber integrity testing before and after a drying run
• Labeling on the device
• Warnings provided on the User Interfaces (UI’s)
• Warnings and cautions provided throughout this Operator’s Manual
Despite the mitigation of risk through the use of the design and documentation, there remain risks when using the FrontlineODP System. Operators must read and understand the warnings and cautions listed at the front of this Operator’s Manual prior to operating the system. Operators must follow procedural documentation as written, obeying all written warnings and cautions.
The following warnings alert the operator to a hazard, condition, and/or consequence that has the potential to do harm to the operator or to another person. This includes conditions that would impact the final spray dried FrontlineODP Unit. The hazard may be associated with the proper or improper conduct of the manufacturing process.
• If the Frontline Dryer is moved, the cleat becomes a tripping hazard. Consideration should be made to remove the cleat depending on how long the Dryer will be out of position.
(Applies to Section 2.3 Frontline Dryer)
• If the Frontline Sealer is moved, the cleat becomes a tripping hazard. Consideration should be made to remove the cleat depending on how long the Sealer will be out of position.
(Applies to Section 2.4 Frontline Sealer)
• Only use Plasma Pretreatment Containers (PPC), Plasma Drying Chambers (PDC), Frontline storage pouches, and desiccant supplied or approved by Velico Medical.
(Applies to Section 3.2 Supplies and Equipment List)
• Do not open the Tyvek lid of the PDC container until it is ready to use.
(Applies to Section 3.3 Pretreatment Process)
• Keep fingers and objects clear of the hole at the top of the PDC plenum to avoid damage to the exposed filter.
(Applies to Section 3.3 Pretreatment Process)
• Do not release the PDC manual clamp or hemostat until the PDC is fully loaded into the Dryer. The Dryer UI will prompt the operator to release the clamp. This mitigates the risk of liquid plasma being introduced into the drying chamber prior to the drying process.
(Applies to Section 3.3 Pretreatment Process)
• While the PDC and PPC are connected, keep the PDC cap assembly higher than the PPC to prevent liquid plasma from being introduced into the drying chamber prior to the drying process.
(Applies to Section 3.3 Pretreatment Process)
• At the end of the drying operation, re-clamp the PDC plasma tubing clamp to prevent residual liquid plasma from entering the drying chamber.
(Applies to Section 3.4 Drying Process)
• The drying nozzle remains hot after drying runs. When removing or installing new PDCs following a drying run, take care not to touch the drying nozzle. Do not attempt to clean the drying nozzle while the nozzle is still hot.
(Applies to Section 3.4 Drying Process)
(Applies to Section 4.2.2 Frontline Dryer Cleaning)
(Applies to Section 5.4.1 Frontline Dryer)
• If a seal-and-separate cycle is interrupted before both seal inspections have occurred due to a fault or a loss of power, discard all parts of the PDC and the FrontlineODPTM Unit in accordance with facility biohazard policy.
(Applies to Section 3.5 Seal-and-Separate Process)
• Never attempt to restrict any moving part of the Frontline Dryer or Frontline Sealer.
(Applies to Section 3.5 Seal-and-Separate Process)
• Keep hands clear of the Frontline Sealer shuttle while it is in motion. Interfering with shuttle movement can lead to injury.
(Applies to Section 3.5 Seal-and-Separate Process)
• Keep hands clear of the inside of the Frontline Sealer during sealing and separating operations. Sealing and separating jaws are a pinch hazard, and the jaw surfaces heat up and can cause burns to exposed skin.
(Applies to Section 3.5 Seal-and-Separate Process)
• Do Not remove any service or access panels. These are only to be removed by trained Velico Medical personnel.
(Applies to Section 4.1 Maintenance Responsibilities)
• Use the power cords supplied with the Frontline Dryer or Frontline Sealer. If these cords are damaged or destroyed, they must be replaced. Do not attempt to repair a damaged power cord. Replacement of these power cords must be conducted by trained Velico Medical personnel.
(Applies to Section 4.1 Maintenance Responsibilities)
• If the Clean Dry Air (CDA) system dewpoint is greater than – 40°C, do not conduct drying operations. Check the dewpoint regularly to verify the desiccant dryer is working to bring the dewpoint equal to or below – 40°C. If it is not capable of maintaining the dewpoint at or below – 40°C, notify Velico Medical and the CDA system manufacturer for guidance and service.
(Applies to Section 4.2.1 CDA System)
• Never attempt to restrict any moving part of the Frontline Dryer or Frontline Sealer.
(Applies to Section 4.2.3 Frontline Sealer Cleaning)
• Keep hands clear of the Frontline Sealer shuttle while it is in motion. Interfering with shuttle movement can lead to injury.
(Applies to Section 4.2.3 Frontline Sealer Cleaning)
• Blood plasma is a biohazardous material. Follow approved facility guidelines for use of personal protective equipment when handling plasma.
(Applies to Section 5.4 Cleaning Procedure following Service Code)
• Frontline Dryer retains pressure in some compressed air lines when nonoperational and when powered down. Fully purge air from the system prior to disconnecting the device from the CDA system or performing maintenance.
(Applies to Section 6.3 Depressurizing the Dryer)
The following cautions alert the operator to a condition or consequence that is likely to damage equipment or property or cause equipment to malfunction or fail. The condition may be associated with the proper or improper conduct of the manufacturing process.
• After turning the Frontline Dryer or Sealer off, wait at least 5 seconds before turning the device back on. Powering up the system too quickly after shutdown can lead to a failure of the bootup sequence.
(Applies to Section 2.4 Frontline Sealer)
• Verify plasma transfer tubing is free of kinks that can obstruct plasma flow during processing. Attempting to dry plasma with kinked tubing may result in loss of the product.
(Applies to Section 3.3 Pretreatment Process)
• Before performing a drying run, always ensure the system has completed the wake process and the Dryer is in the Ready mode before proceeding with additional steps. Loading the PDC and PPC prior to the Dryer being Ready can lead to control failures or draw fluid from the PPC into the PDC.
(Applies to Section 3.4 Drying Process)
• Do not tamper with the PPC hanging on the scale during a drying cycle. Abrupt weight changes can cause an error and a failure of the drying run, resulting in loss of the product.
(Applies to Section 3.4 Drying Process)
• Verify the aerosol connection is not cross threaded. A leaking aerosol line can prevent the start of drying.
(Applies to Section 3.4 Drying Process)
• Once the peristaltic pump is closed on the plasma tubing at the start of a drying run, do not open it until directed at the end of the run. Opening the peristaltic pump will cause an error and a failure of the drying run, resulting in loss of product.
(Applies to Section 3.4 Drying Process)
• Verify PDC bag and tubing is clear of the edges of the enclosure prior to closing the enclosure door. Verify gasket is properly seated prior to closing the enclosure door.
(Applies to Section 3.4 Drying Process)
• When cleaning the Frontline Dryer or Frontline Sealer, only use 70% isopropyl alcohol solution or 10% Bleach solution. Do not spray cleaning agents directly onto the Frontline Dryer or Frontline Sealer. Spray on low-lint wipe and apply with wipe. Do not allow cleaning agents to pool or collect on surfaces.
(Applies to Section 4.2.2 Frontline Dryer Cleaning and 4.2.3 Frontline Sealer Cleaning)
• After turning the Frontline Dryer or Sealer off, wait at least 5 seconds before turning the device back on. Powering up the system too quickly after shutdown can lead to failure of the bootup sequence.
(Applies to Section 5.5 Actions for an Unresponsive Dryer UI or Sealer UI)
1.8 Notes
Notes are used throughout this manual to emphasize important details that do not warrant a warning or caution.
During operation, maintenance, and repair of the Frontline Dryer and Sealer, the following basic safety notes should be observed. Failure to follow these instructions or the warnings, cautions, and notes indicated within may result in the impairment of the basic protection provided by the instruments, the safety criteria of design and manufacture, and the predicted use range. If the equipment is used in a manner not specified by the manufacturer, the protection provided by the equipment may be impaired.
The manufacturing environment includes redundant filters in the Dryer and in the Plasma Drying Chamber. Equipment cleaning is performed per standard good laboratory practices.
• The Frontline Dryer and Frontline Sealer come equipped with a red Emergency Stop (E-Stop) button prominently displayed on the front of each device. The E-Stop button is used by the operator in any situation deemed to be hazardous or unsafe in which the device remains operational.
• Pressing the E-Stop button on the Dryer stops the spray drying process. On the Sealer, pressing the E-Stop button stops the device from operating. In both devices, the User Interface will instruct the operator to dispose of the plasma and the Plasma Drying Chamber.
• Installation of the Frontline Dryer and Frontline Sealer shall be performed only by qualified Velico Medical personnel.
• Blood center personnel must not open the Frontline Dryer or Frontline Sealer other than as prescribed by normal operations and routine maintenance.
• Use only the power cable that comes attached to the Frontline Dryer and Sealer. Do not place items or equipment on the power cable while the instrument is in operation.
• Do not pull the power cord to remove the plug from the power source. Grasp the plug itself and firmly remove it from the wall socket. To connect the plug to the power source, grasp the plug and firmly and fully insert it into the wall socket.
• If the Frontline Dryer and Frontline Sealer are not used as intended, the electrical, mechanical, and/or software protections provided by the Dryer and Sealer may be impaired.
Performance of daily maintenance requirements by trained blood center technicians is necessary to keep the Frontline Dryer and Frontline Sealer functioning properly.
More involved preventative maintenance requirements are planned and recorded on a Preventative Maintenance Schedule and maintained by Velico Medical. These maintenance requirements must be conducted by trained Velico Medical field service personnel.
For technical support, contact Velico Medical at support@veli.co.
Address: Velico Medical 100 Cummings Center Suite 436 Beverly MA 01915 USA
Hours of operation: 9:00 – 17:00 ET (GMT-5) Phone: +1 (978) 232-8370 Website: www.veli.co
Specifications – Frontline Dryer
Physical Specs Dimensions (D x W x H)
32.0 x 25.2 x 77.5 inches (81.3 x 64.0 x 196.9 cm)
Weight 550 lbs (250 Kg)
Clearance 18 inches (46 cm) on sides and to the rear
Electrical Rating Voltage 208 VAC – 240 VAC +/– 10%
Overvoltage Category CAT II
Frequency 50/60 Hz
Current ≤ 30 A
Phase Single
Connector L6-30P
Air Requirements1 Air Flow (per Dryer) 800 SLPM
Air Quality
Exhaust1
ISO 8573-1 class 2.2.1 or better
Dew Point ≤ – 40°C
Operating Pressure 90-120 psi
Maximum Pressure 125 psi
Temperature 15-35°C
Connector 304SS or 316SS sanitary fitting
Exhaust Dedicated only, do not connect to facility exhaust
Pressure 0.25 psi restriction at 1,000 SLPM
Connector 304SS or 316SS sanitary fitting
1 Air supply and exhaust must be maintained by the user to ensure proper performance.
Specifications – Frontline Dryer
Operating Environment
Operating Temperature
Safe: 5-40°C
Recommended: 15-35°C
Humidity ≤75% RH non-condensing
Safe Operating Altitude 2,000 m (6,562 ft.)
Recommended Operating Pressure
0.95-1.05 atm/ 75-106 Kpa
Operating Noise ≤60dB
Indoor/Outdoor Use Indoor use only
Ingress Protection IP20
Pollution Degree Pollution Degree 2
Storage Environment (1-yr.)
Temperature 0-40°C
Humidity 10-85% RH non-condensing
Specifications – Frontline Sealer
Physical Specs Dimensions (D x W x H) 34.7 x 29.3 x 77 inches (88.1 x 74.5 x 195.6 cm)
Weight 545 lbs (247 Kg)
Clearance 18 inches (46 cm) on sides and to the rear
Electrical Rating Voltage 208 VAC – 240 VAC +/– 10%
Overvoltage Category Cat II
Frequency 50/60 Hz
Current ≤ 20 A
Phase Single
Connector L6-30P
Air Requirements Operating Pressure 90-105 psi (piped off clean dry air)
Maximum Pressure 125 psi
Temperature 15-35°C
Connector Quick disconnect
Specifications – Frontline Sealer
Operating Environment
Operating Temperature
Safe: 5-40°C
Recommended: 15-35°C
Humidity ≤75% relative humidity
Safe Operating Altitude 2,000 m (6,562 ft.)
Recommended Operating Pressure 0.95-1.05 atm/ 75-106 Kpa
Operating Noise ≤ 70 dB
Indoor/Outdoor Use Indoor use only
Ingress Protection IP20
Pollution Degree Pollution Degree 2
Storage Environment (1-yr.)
Temperature 0-40°C
Humidity 10-85% RH non-condensing
Symbol
Name Definition
Biohazard Warning This warns of the presence of biological materials that may pose a threat to human health or the environment. It alerts operators to take necessary precautions to follow safety protocols to prevent exposure and contamination.
Hot Surface Warning
This warns of surfaces with enough residual heat to cause burns or other injuries upon contact. The label alerts operators of the potential danger and is a reminder to take precautions such as allowing the surface to cool.
Protective Earth Grounding
Line Voltage Warning
This indicates the device must be properly grounded for safety reasons. It serves as a reminder to ensure the equipment is connected to a suitable grounding source as per manufacturer’s instructions and relevant electrical safety standards.
This warns of the presence of high voltage electrical current and alerts the operator of the potential danger of electrical shock or other electrical hazards even while the power switch is in the off position. It serves as a reminder to take appropriate precautions before servicing.
Read the Instruction
Pinch Hazard Warning
This label is found on top of the Frontline Dryer. It is a reminder to an operator to consult the Operator’s Manual and/or other documentation before attempting to connect or disconnect the Dryer to the CDA system or to the air exhaust ducting.
This label is found on the peristaltic pump on the Frontline Dryer and on the cover of the Frontline Sealer. It is a reminder to the operator that the clamp on the peristaltic pump, the movement of the shuttle, and the jaw bars inside the Sealer are pinch hazards.
WEEE Disposal
Indicates that the equipment is subject to directive 2012/19/EU concerning waste electrical and electronic equipment (WEEE) and must be disposed of accordingly.
Manufacturer Indicates the medical device manufacturer.
Manufacture Date Indicates the date when the medical device was manufactured (or sterilization date, if the product is sterile).
Reference Number Indicates the manufacturer’s catalog number so that the medical device can be identified.
Serial Number Indicates the manufacturer’s serial number.
Lot number Indicates the manufacturer’s lot number so that the lot can be identified.
Instructions for Use Indicates that the operator should consult the instructions for use.
Caution Indicates that caution is necessary when operating the device or control close to where the symbol is placed, or that the current situation needs operator awareness or operator action in order to avoid undesirable consequences. Manufacturers are required to state that documentation must be consulted in all cases where this symbol is marked.
Sterilized using steam or dry heat Indicates a medical device that has been sterilized using steam or dry heat.
Sterile Pathway Identifies the presence of a sterile fluid path within the medical device when other parts of the medical device are not necessarily supplied sterile.
Sterilized using irradiation Indicates a medical device that has been sterilized using irradiation.
Symbol
Nonpyrogenic
Do not use if package is damaged and consult instructions for use
Indicates a medical device that is non-pyrogenic.
Indicates that a medical device should not be used if the package has been damaged or opened and that the operator should consult the instructions for use for additional information. When a sterile barrier system is present, it indicates not to use if the product sterile barrier system or its packaging is compromised.
Do not re-use Indicates a medical device that is intended for one single use only.
Temperature limit Indicates the temperature limits to which the medical device can be safely exposed.
Do not resterilize
Indicates a medical device that is not to be resterilized.
Use-by date Indicates the date after which the medical device is not to be used.
This way up Indicates correct upright position of the transport package.
Symbol Name Definition
Contains or presence of phthalate: bis (2 –ethylhexyl) phthalate (DEHP)
Medical device is derived from or manufactured from products containing phthalate: bis (2 – ethylhexyl) phthalate (DEHP).
Do not vent Instruction indicating not to vent.
Single sterile barrier system with protective packaging outside
Indicates a single sterile barrier system with protective packaging outside.
Consumables associated with the FrontlineODP system must be obtained from Velico Medical. These consumables include the following:
Catalogue number
Description
Quantity
02070 Plasma Pretreatment Container Box of 48
02004 Plasma Drying Chamber
01901 Overwrap pouch
02050 Desiccant
Box of 4
Box of 550
Bag of 150
It is the facility’s responsibility to obtain plasma units for use with the FrontlineODP system. Hemostats or clamps are needed for pretreatment.
Installation and qualification of the following equipment is required for the FrontlineODP system to be fully operational:
Velico Equipment
• Frontline Dryer REF 02370
• Frontline Sealer REF 02985
Ancillary Equipment
• Clean Dry Air (CDA) system
• Sterile Connection Device (SCD)
• Blood Collection Monitor or scale
• Tube sealer
• Impulse sealer
The Frontline Dryer and Frontline Sealer include OSS components that are licensed under various open-source licenses. For more details about copyright and licensing information, please reference www.veli.co/frontlineODP/oss.
The Velico Medical FrontlineODP System is a 4-stage process for spray drying human blood plasma. The process produces a single unit of packaged plasma powder that can then be rehydrated with sterile water for injection (SWFI) as an alternative to conventional plasma products. The system is intended to be installed and used in a blood center.
The four stages of the FrontlineODP System are:

At the Pretreatment Station, the operator mixes a fixed quantity of donor plasma into a Plasma Pretreatment Container (PPC) in preparation for the drying process. The solution stabilizes plasma proteins for the drying process and offsets manufacturing impacts on pH to yield a final rehydrated product that is at normal physiologic pH.
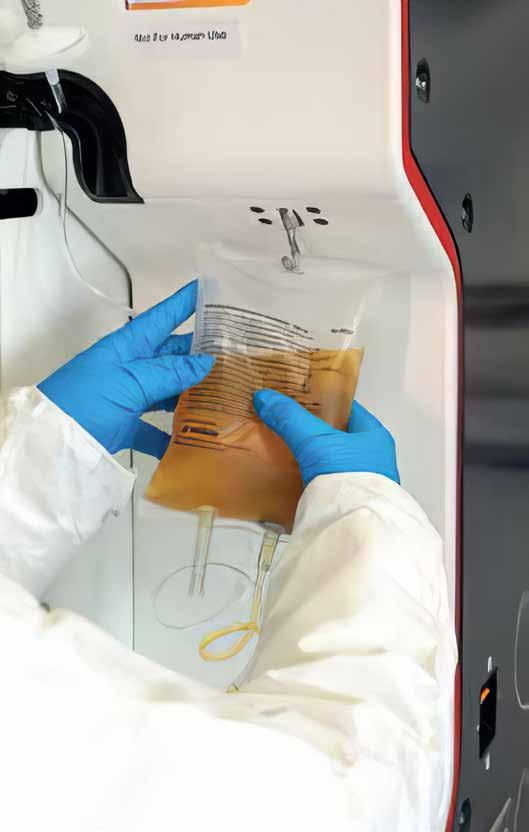
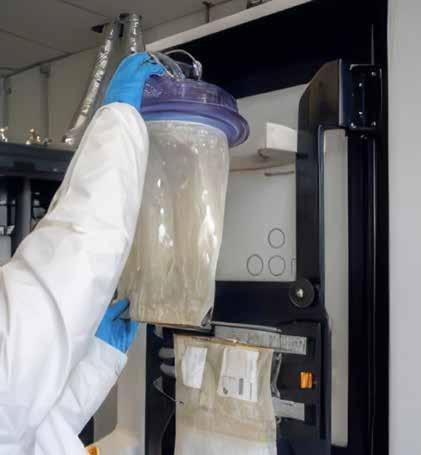
At the Frontline Dryer, the operator mounts the PDC and the pretreated plasma. The drying process is initiated by the operator. Liquid plasma is introduced at a moderated rate and converted into a spray dried powder. The plasma powder collects in the lower portions of the PDC.
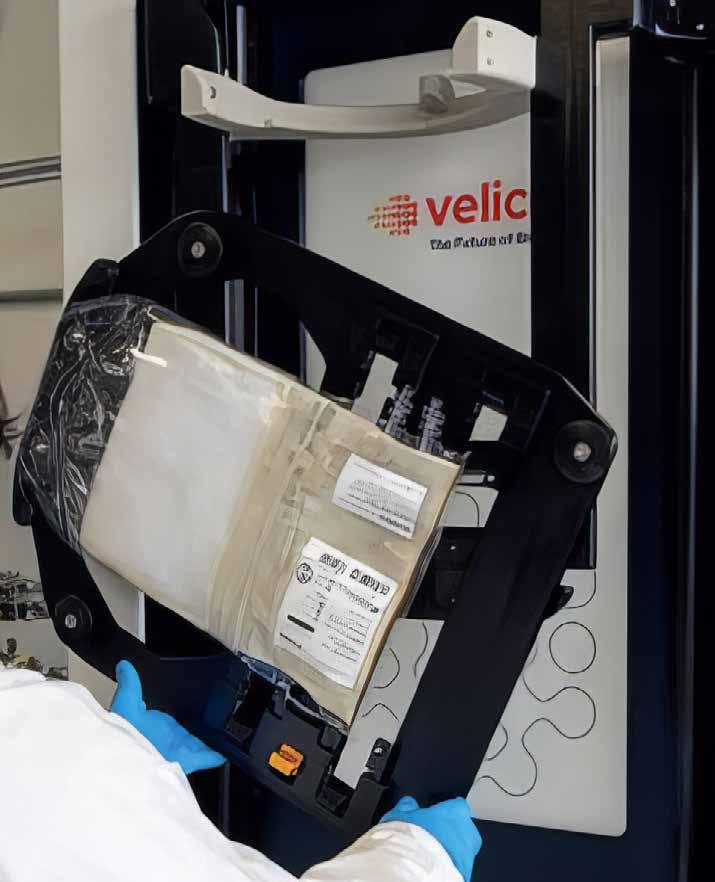
The operator mounts the PDC on the Frontline Sealer. The sealer shuttle lowers the PDC into the sealer. The sealer agitates the top section of the PDC to aid the collection of dried plasma in the lower sections. It then heat seals and separates the top section. The sealer raises the PDC to allow the operator to inspect the seal and remove the separated section. The operator then rotates the shuttle 180° and initiates the second sealing process. When the PDC filter is removed, the remaining middle portion of the PDC, now containing the dried plasma, is the FrontlineODP Unit, the final product of the process.
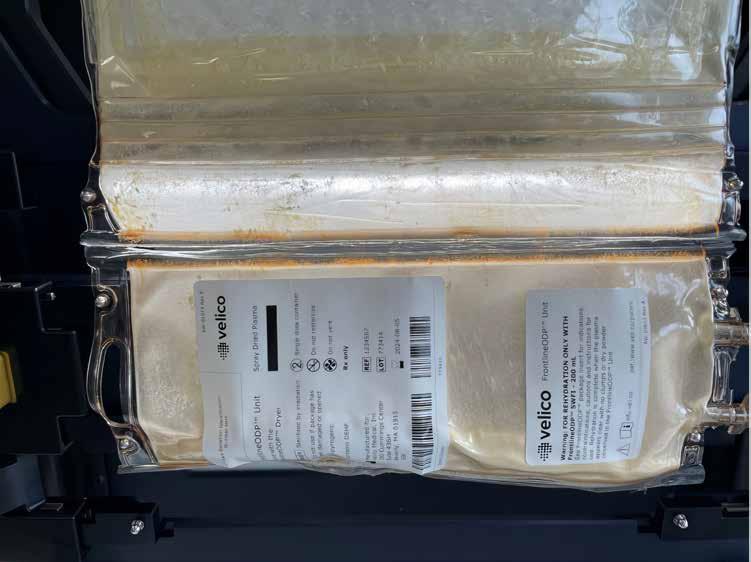
FrontlineODP Unit

The operator places the FrontlineODP Unit into a protective Frontline storage pouch with a desiccant packet and seals it shut with a standard heat sealer.
FrontlineODP Storage Kit
Several specialized consumable items are used during the FrontlineODP process.
2.2.1
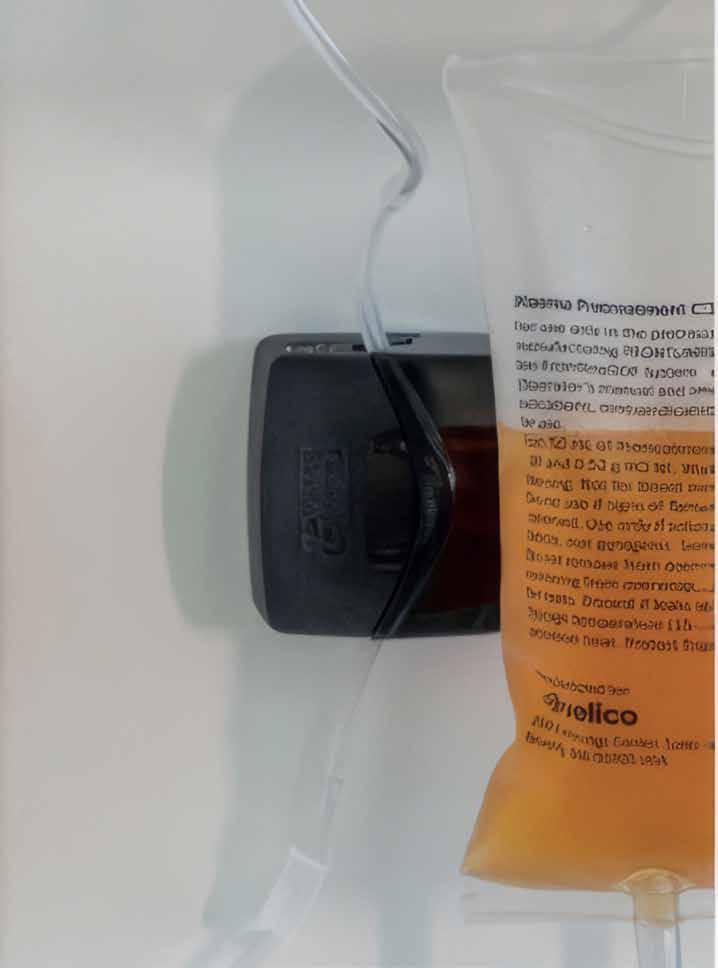
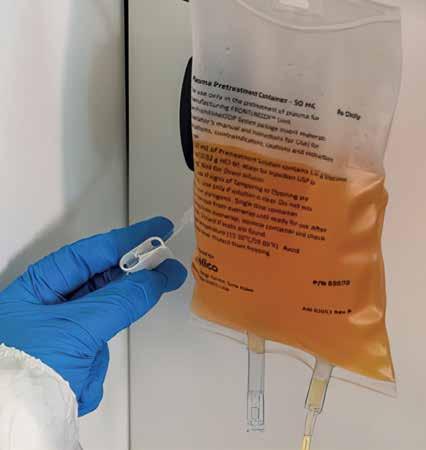
The PPC is a sterile, non-pyrogenic, single-use container with 50 mL plasma pretreatment solution packaged in a 500 mL container within an overwrap pouch. This is used for pretreating the plasma prior to the spray drying process.
Plasma Pretreatment Container (PPC)
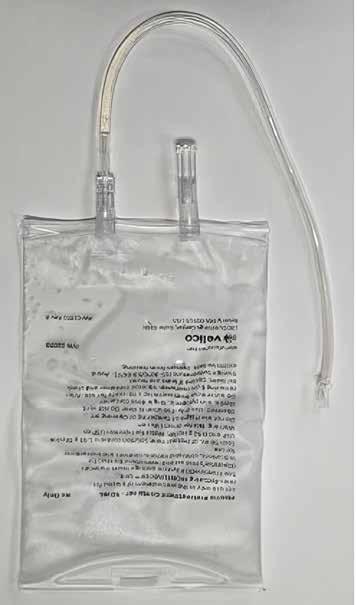
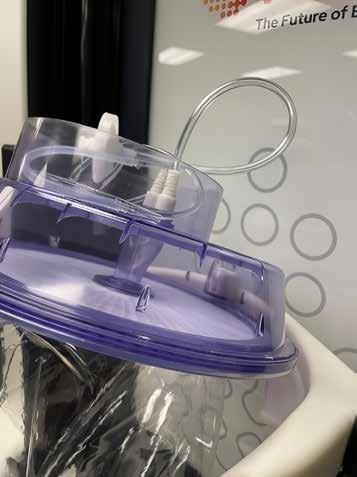
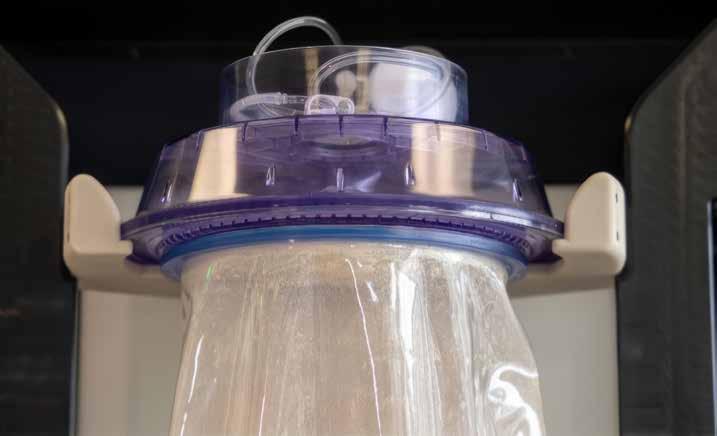
The PDC is a sterile, single use, dual purpose chamber. Prior to the drying process, the PDC is connected to the PPC. During the drying process, plasma is spray dried within the Drying Chamber and collects in the collection filter. During the sealing process, dried plasma is collected and stored in the middle chamber, called the Plasma Collection Bag. When the upper and lower parts of the PDC are discarded, the Plasma Collection Bag becomes the FrontlineODP Unit.
A more detailed functional description of the PDC and its parts is covered in Section 2.5.
Plasma Drying Chamber (PDC)

This kit is comprised of the Frontline Storage Pouch and Frontline Desiccant for storage of the FrontlineODP Unit. The FrontlineODP Unit is sealed within the Storage Pouch with a desiccant packet and placed in refrigerated quarantine. When testing of the donor sample is complete, the FrontlineODP Unit is removed from the Storage Pouch, final labelling is added, and it is resealed into the Storage Pouch for shipment.
The Frontline Dryer facilitates spray drying pretreated plasma. Plasma is atomized into liquid droplets by a clean dry air stream. The droplets then pass through a second heated air stream within a secure drying chamber to become dried plasma powder.
This switch applies and removes power to the Dryer. After applying power to the device, it takes a few seconds for the user interface to display a splash screen indicating the system is starting. Key operator Operators of the BCS XP that have gone through thorough training for the operation of the instrument.
After turning the Frontline Dryer or Sealer off, wait at least 5 seconds before turning the device back on. Powering up the system too quickly after shutdown can lead to a failure of the bootup sequence.
The Dryer user interface provides the operator with status information and a mechanism to initiate a drying run. It prompts the operator for specific actions, including in the case of errors. If an error occurs, the UI also provides the operator with an error code that service personnel can use during troubleshooting.

The red E-Stop button on the front of the Frontline Dryer is used when the operator deems a situation to be hazardous. Pressing the E-Stop button shuts down operation of the Dryer. Dryer operations remain secured until the E-Stop button is released.
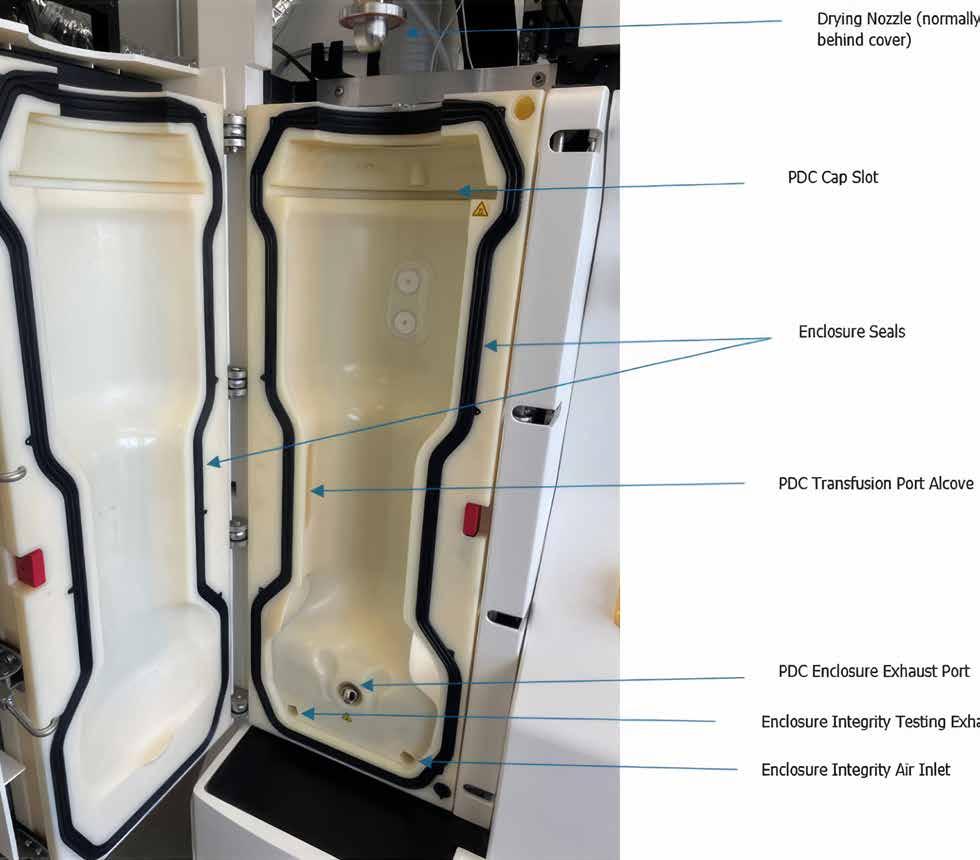
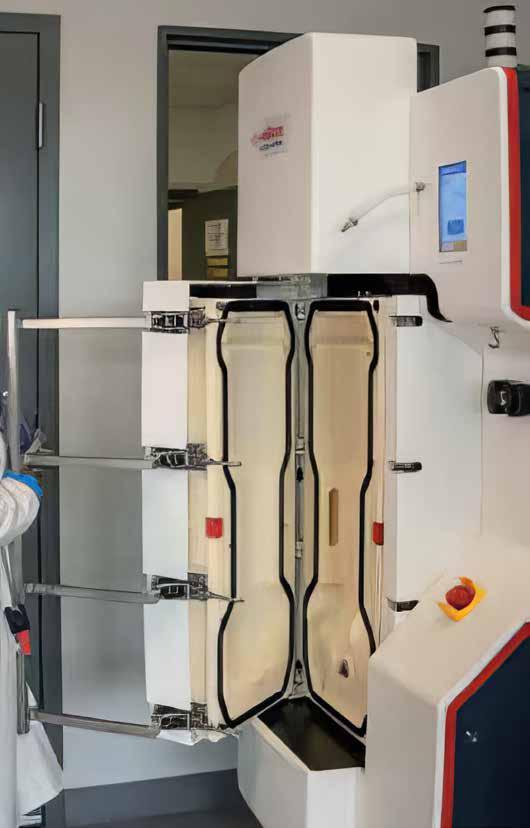
The Dryer enclosure is a two-part mounting surface for the PDC. Half the enclosure is set into the Dryer. The other half is on the inside of the enclosure door. With a PDC installed, the door clamped shut, and the drying nozzle lowered into position, the enclosure is a fully sealed environment for the spray drying process.
At the top of the enclosure, the PDC cap fits into a rounded slot with a notch to help lock it in place. The aerosol air tubing and plasma tubing extend out the top of the enclosure. The transfusion ports of the PDC Plasma Collection Bag fit into a small alcove on the left side of the enclosure. The PDC exhaust port fits snuggly onto the enclosure exhaust port.
At the beginning of the drying process, the Dryer runs an integrity check on the PDC.
Located to the left of the enclosure door, the lock prevents the door from opening during drying operations. The lock engages when the key is inserted. The lock prevents the key from releasing until after the drying is completed. Under certain error conditions, the lock will not release the key to allow the door to be opened until the operator is ready and acknowledges the condition on the UI.
The key is affixed to the end of the lanyard connected to the enclosure door handle.
Frontline Dryer Enclosure
Frontline Dryer Controls
During the drying process, clean dry air is provided to the PDC through the aerosol air connection. The aerosol air stream atomizes liquid plasma, which is then dried by the drying air stream.
The operator connects the PDC air filter to the aerosol air connection. At the start of the drying process, the aerosol air stream is tested to verify the connection. When the drying process is complete, the operator disconnects the PDC from aerosol air prior to removing the PDC from the Dryer.
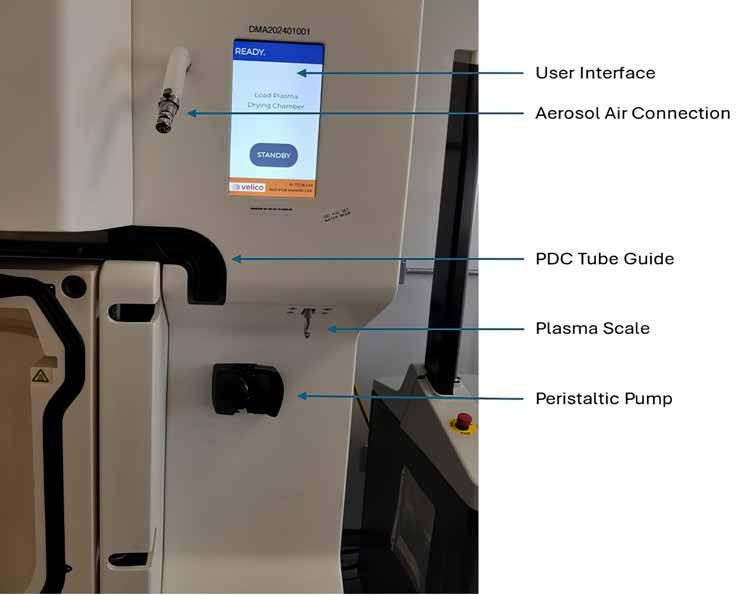
The operator feeds the PDC plasma tube and the aerosol air tube through the guide to keep them out of the way while the enclosure door is clamped shut and to provide a fixed point of support to the plasma tube during the drying process.
The peristaltic pump supplies pretreated plasma from the PPC to the PDC. The pump controls the rate of plasma flow into the drying chamber.
Drying Nozzle in lowered position, without PDC
During pre-drying integrity checks, the Dryer checks the PPC mass is within the permissible weight range. At the completion of drying, the Dryer determines the amount of processed plasma and compares this against the minimum process limit.
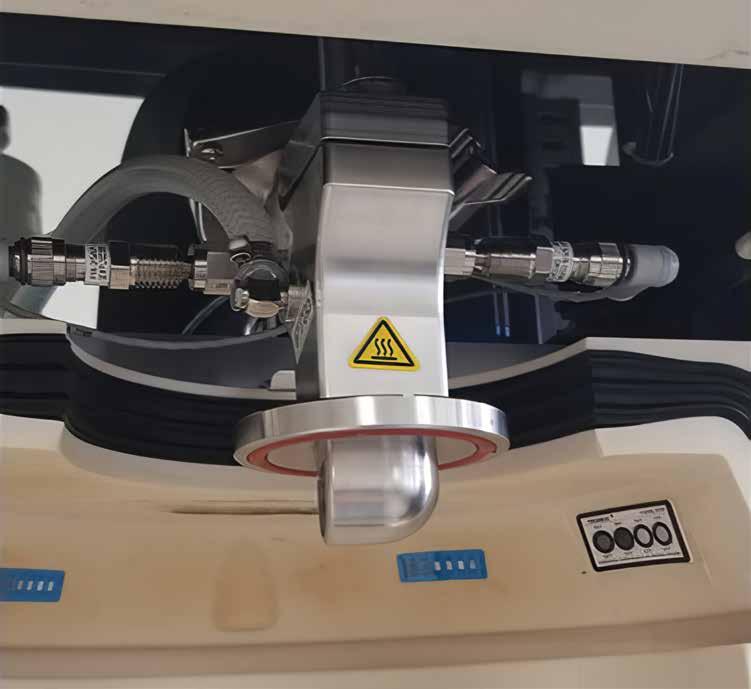
During the drying process, heated, clean dry air is provided to the PDC through the drying nozzle.
The drying nozzle begins in the raised position to allow installation of the PDC into the enclosure. At the start of the drying sequence, the drying nozzle is pneumatically lowered into the top of the PDC. In its lowered position, the drying nozzle makes the final seal that fully secures the interior of the PDC. The PDC integrity test verifies the seal is secure. When the drying sequence is complete, the PDC integrity test is repeated to verify the seal remained secure throughout the process.
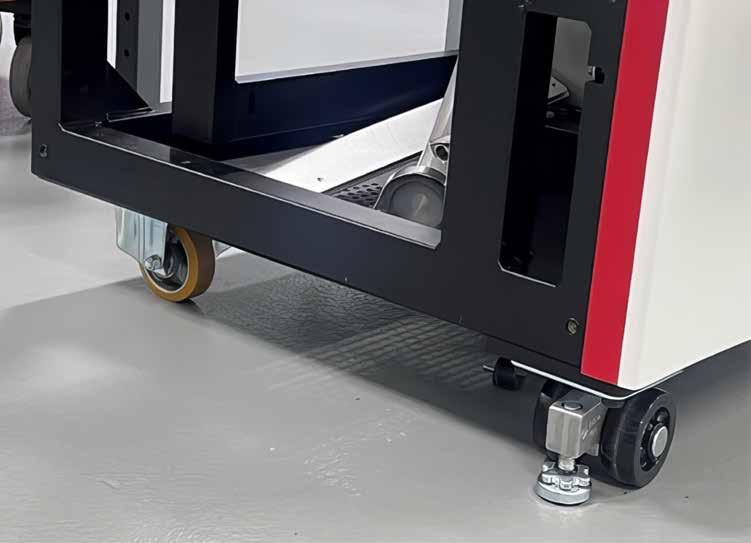
During Frontline Dryer installation, a cleat is mounted to the floor. A large bolt under the Dryer fits into the cleat, preventing the Dryer from moving or tipping over. If the Dryer needs to be moved, it can be rolled forward to disengage it from the cleat.
If the Frontline Dryer is moved, the cleat becomes a tripping hazard. Consideration should be made to remove the cleat depending on how long the Dryer will be out of position.
Note
The Frontline Dryer and Sealer use the same cleat. However, the bolt is in a different position in the undercarriage of each device. On the Dryer, the bolt is centered at the rear of the device.
The Frontline Dryer’s front casters have inclusive leveling feet. Once in position, the leveling feet are lowered to secure the Dryer.
Frontline Dryer status light
This indicator is found at the top of the Frontline Dryer. The light can be steady or blinking in three colors, green, yellow, and red. The meaning of each condition is as follows:
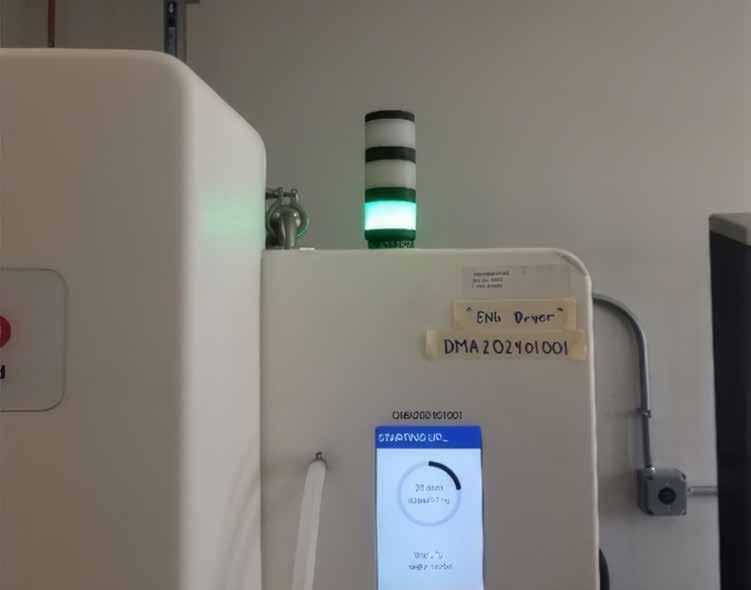
Light Tower
Indication
Meaning
Steady green Device is idle
Blinking green Device completed processing successfully
Steady yellow Device is operating automatically without issue
Blinking yellow Device requires operator input
Steady red Device has experienced a fault and cannot complete processing
Blinking red Device has experienced a fault and dried plasma may have escaped the PDC
Any other color, including no light Device is no longer reporting status
The Frontline Sealer consolidates dried plasma powder within the drying chamber and isolates the Plasma Collection Bag by heat sealing. The upper and lower sections of the drying chamber are cut, separated and discarded, leaving the final dried plasma unit (FrontlineODP Unit) as the final product.
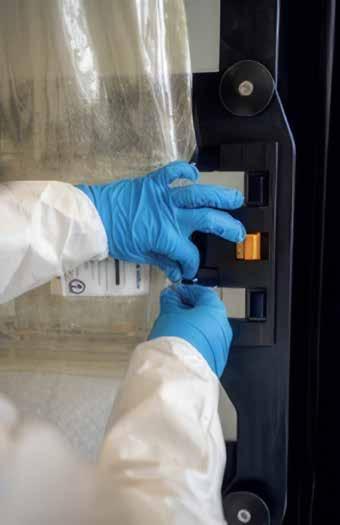
At the start of the sealing sequence, the Frontline Sealer positions the shuttle and prompts the operator to install the PDC. Once the PDC is fully installed, the operator initiates the first automated seal-and-separate process. The operator must press two fingers on the safety buttons for the shuttle to descend into the Sealer. The Sealer positions the PDC for plasma collection. The Sealer agitates the upper portion of the PDC. It then heat seals and separates the upper portion from the rest of the PDC. The shuttle ascends to the top position to allow the operator to inspect the seal and remove the upper portion of the PDC from the shuttle and dispose.
The Sealer UI prompts the operator to rotate the shuttle 180° to reposition the PDC. The operator then initiates the second sealing process. The process is repeated with the Sealer agitating the filter assembly. The Sealer evacuates air from the bag and filter. The sealer heat seals and separates the filter from the Plasma Collection Bag. When the shuttle ascends to the top position, the operator is again prompted to inspect the seal. The filter is removed and disposed leaving only the Plasma Collection Bag, now called the FrontlineODP Unit.
This switch applies and removes power to the Sealer. After applying power to the device, it takes a few seconds for the user interface to display a splash screen indicating the system is starting.
After turning the Frontline Dryer or Sealer off, wait at least 5 seconds before turning the device back on. Powering up the system too quickly after shutdown can lead to a failure of the bootup sequence.
The Sealer UI provides the operator with status information to initiate a sealing process step or a cleaning operation. The UI prompts the operator for specific actions. In the case of an error, the UI provides the operator with a service code that a Velico service personnel can use during troubleshooting and, depending on the error, may also prompt the operator for actions.
The red E-Stop button on the front of the Frontline Sealer is used when the operator deems a situation to be hazardous. Pressing the E-Stop button shuts down operation of the Sealer. Sealer operations remain secured until the E-Stop button is reset.
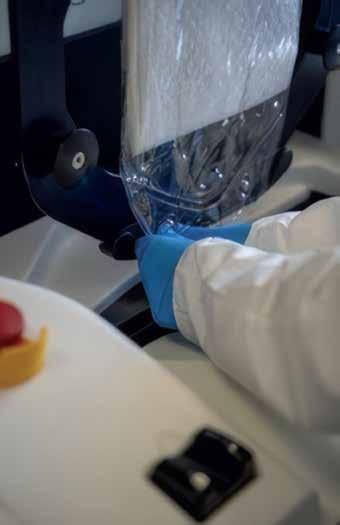
The Sealer shuttle is a platform for the PDC throughout the seal-and-separate process. The shuttle provides a mounting surface for the PDC cap that supports the rest of the PDC. The U-shaped exhaust port fixture keeps the PDC fully extended, and 10 pins at the base and along the sides stretch the PDC bag out for better agitation and sealing. The shuttle can be rotated 180° and has sensors to determine which rotated position the shuttle is in.
The gantry provides a support platform for the shuttle. Electric motors on both sides of the gantry drive the shuttle up and down along rails to the positions required for mounting the PDC, agitation, sealing, separation, air evacuation and seal inspection. The gantry also has sensors to determine the position of the shuttle at certain points.
These two buttons are used when the shuttle is in downward motion to confirm the operator’s hands are away from the potential pinch hazard. The shuttle will not move without fingers on both buttons and will stop moving if one or both fingers are removed. The buttons are also used throughout the Sealer’s homing routine when it is first turned on and activated.
The panel at the front of the Sealer is a door that remains electronically locked during normal operation. During cleaning operations, the door will unlock to provide access to the Sealer internal parts. When the door is open, all actuators are disabled.
These air-actuated paddles agitate the PDC during the first seal-and-separate sequence to release dried plasma from the sides of the bag into the lower sections of the bag and the collection filter. The paddles agitate the collection filter during the second seal-and-separate sequence to release dried plasma from the filter into the Plasma Collection Bag.
This assembly consists of a pair of sealing bands mounted on a pair of jaws driven by a pair of pneumatic pistons. The pistons extend to squeeze the PDC between the bands. The bands are heated to create a seal across the PDC.
The separator assembly consists of a pair of jaws driven by a pair of pneumatic pistons. The pistons extend to squeeze the PDC between the heating bands. A wire mounted to one set of jaws is heated to fully separate the PDC at the seal made by the sealer assembly.
After agitation of the collection filter, the air extraction mechanism evacuates air from the PDC through a filter in the sealer. Once the target vacuum pressure is achieved, the Sealer initiates the second sealing cycle.
During Frontline Sealer installation, a cleat is mounted to the floor. A large bolt under the sealer fits into the cleat, preventing the sealer from moving or tipping over. If the sealer needs to be moved, it can be rolled forward to disengage it from the cleat.
If the Frontline Sealer is moved, the cleat becomes a tripping hazard. Consideration should be made to remove the cleat depending on how long the Sealer will be out of position.
Note
The Frontline Dryer and Sealer use the same cleat. However, the position of the bolt is in a different position in the undercarriage of each device. On the Sealer, the bolt is centered on the machine.
The Frontline Sealer’s front caster wheels come with a footoperated brake. These brakes are used at any time the Sealer isn’t moving to keep it from rolling, including when the Sealer is installed in the cleat to prevent it from becoming disengaged from the cleat.
The Sealer’s front wheels also come with adjacent level feet. Once the Sealer is in a fixed position, the level feet can be screwed down to provide a more stable base and prevent the Sealer from moving.
Sealer Rear Panel


Sealer Panel Indication Meaning
Steady green
Blinking green
Steady yellow
Blinking yellow
Steady red
Blinking red
Any other color, including no light
Device is idle
Device completed processing successfully
Device is operating automatically without issue
Device requires operator input
Device has experienced a fault and cannot complete processing
Device has experienced a fault and dried plasma may have escaped the PDC
Device is no longer reporting status
Plasma Drying Chamber
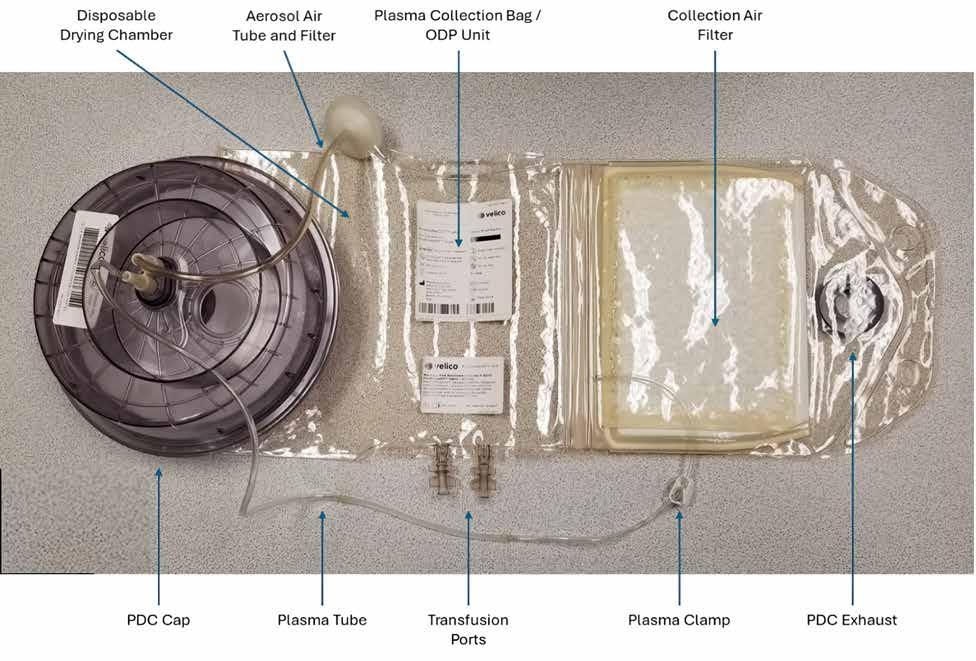
The plenum subassembly is the round, hard plastic section at the top of the PDC. It provides the plasma tube used to connect the PDC to the PPC and the aerosol air tube and air filter used to connect to the Dryer aerosol air. It also provides an interface to the Dryer’s drying nozzle. With the PDC fully installed, and the drying nozzle lowered, the PDC is fully sealed.
The Disposable Drying Chamber is the uppermost section of the PDC assembly, just below the cap subassembly. The spray drying process takes place in this drying chamber. The dried plasma powder is collected in the Plasma Collection Bag.
Some of the dried plasma adheres to the sides of the Disposable Drying Chamber. In the Frontline Sealer, the first seal-and-separate sequence agitates the drying chamber to release this plasma into the Plasma Collection Bag. It then seals off this chamber and separates it from the remainder of the PDC. The operator then discards the PDC cap and the Disposable Drying Chamber together in accordance with facility biohazard policy.
The Plasma Collection Bag is the middle section of the PDC. It is easily identified by its two transfusion ports. During the seal-and-separate sequences, dried plasma from the upper part of the PDC and from the collection filter is collected in the Plasma Collection Bag.
Upon completion of the second seal-and-separate sequence, the Plasma Collection Bag is fully separated from the rest of the PDC. At this point, it becomes the FrontlineODP Unit, the final product of the FrontlineODP System.
Located in the base of the PDC, the Collection Air Filter prevents any dried plasma powder from escaping as air is exhausted out of the PDC.
This port is located at the bottom of the PDC. When the operator installs the PDC into the Frontline Dryer, this port fits snugly to the enclosure exhaust port.
The CDA system provides pressurized, clean, dry air to the Frontline Dryer and Frontline Sealer to spray-dry plasma and to actuate pneumatic controls.
The major components of the CDA system include an air compressor, one or more air receiving tanks, and a desiccant dryer. The compressor delivers high-pressure air to the CDA system. The receiving tank maintains a quantity of compressed air for immediate use by the FrontlineODP System. The desiccant dryer removes humidity from compressed air, reducing the dew point to – 40°C or less.
Ancillary equipment associated with the CDA system includes filters, valves, gauges, connections, test fittings, and the piping that connects all the components of the CDA system with the FrontlineODP System.
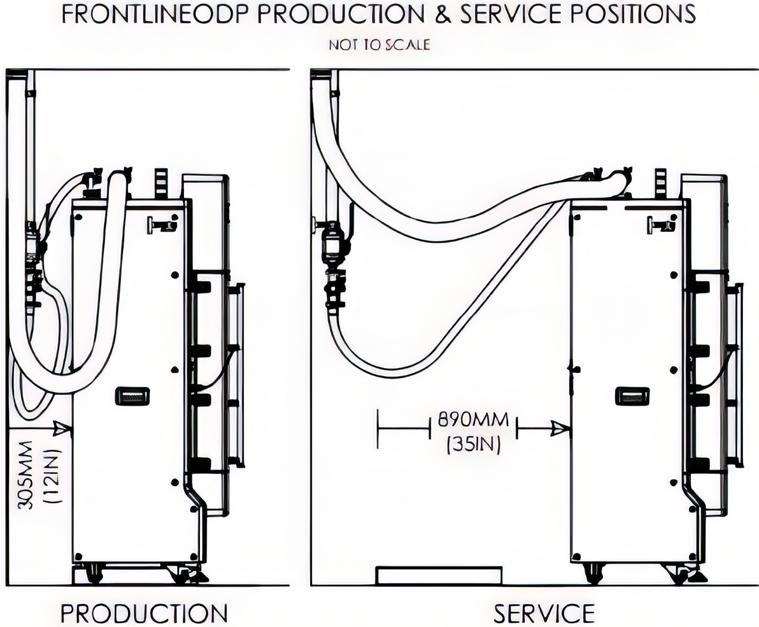
In the production spaces, CDA flexible connections for the Frontline Dryer and Frontline Sealer have extra play so the devices can be moved 35 inches (89 cm) forward for maintenance and maintain operability.
Air provided by the CDA system to the Frontline Dryer is heated and can maintain a temperature of up to 70°C when it exits the device. As a result, the Dryer requires a dedicated HVAC system to exhaust the air beyond the envelope of the building. Multiple Dryers can be tied to the same exhaust system, but it cannot be tied to any existing HVAC infrastructure on-site.
Purification of exhaust air is accomplished within the Frontline Dryer by 0.1 µm filters. There is no need for additional filtration downstream in the dedicated facility exhaust air ducting.
Flexible exhaust air connections for the Frontline Dryer have a service loop so the devices can be moved 36 inches (91 cm) forward for maintenance and to maintain operability (see Figure below).
3.1 Introduction
This chapter describes the process to manufacture a spray dried plasma unit, which includes pretreating a unit of plasma, spray drying pretreated plasma on the Frontline Dryer, packaging in its final configuration on the Frontline Sealer, and storing the product in a protective overwrap before placing it in refrigeration.
3.2
Supplies
• Unit of plasma – Never Frozen Plasma (NFP), Plasma frozen within 24 hours of phlebotomy (PF24), or Fresh Frozen Plasma (FFP)
• From whole blood derived with citrate phosphate dextrose (CPD) or citrate phosphate double dextrose (CP2D) anticoagulant or apheresed with anticoagulant citrate dextrose, solution A (ACD-A)
• Minimum 270 mL of plasma
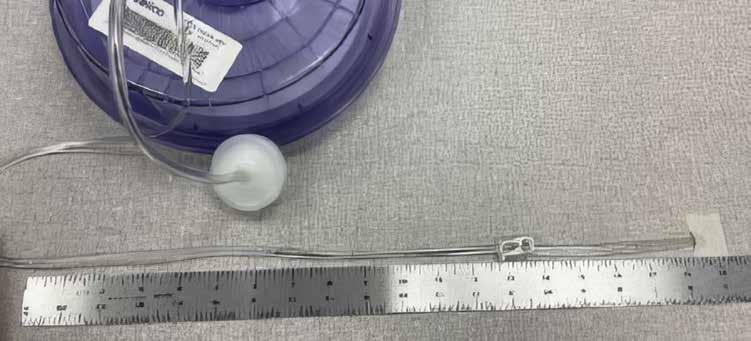
• Sterile connection compatible pigtail length, a minimum of 6 inches (15 cm) is recommended
• Hemostat or manual clamp
• Personal Protective Equipment (PPE)
• Tape measure at least 24” long (61 cm)
Commercially available equipment
• Sterile Connection Device (SCD)
• Fresenius Kabi CompoGuard blood collection monitor (optional)
• Tube sealer
• American International Equipment impulse sealer, AIE-305HIM
• Digital scale (range: 1-100g minimum; tolerance: +/-0.01g minimum)
• Clean Dry Air (CDA) system (see Section 2.6)
• Frontline Dryer
• Frontline Sealer
Consumable products required
Warning
Only use Plasma Pretreatment Containers (PPC), Plasma Drying Chambers (PDC), Frontline storage pouches, and desiccant supplied by Velico Medical.
• Plasma Pretreatment Container (PPC)
• Plasma Drying Chamber (PDC)
• Frontline Storage Pouch
• Frontline Desiccant Packet
1. Inspect the PPC for tears or leaks. If any are identified, discard the PPC and use a replacement.
Verify plasma transfer tubing is free of kinks that can obstruct plasma flow during processing. Attempting to dry plasma with kinked tubing may result in loss of the product.
2. Apply a hemostat or clamp to the PPC tubing.
3. Connect the PPC tubing to the plasma unit tubing using a SCD.
Ensure that the total tubing length between Plasma Unit and PPC, after sterile connection, does not exceed 20 inches (51 cm).
Note
Following the creation of the sterile connection, confirm proper flow is possible without observable leaks. If any leaking liquid plasma is observed, discard the plasma unit and the PPC.
4. Transfer a target volume of 275 mL of plasma (range of 265-285 mL) into the PPC using a Fresenius Kabi CompoGuard blood collection monitor or manually using a scale.
• The set points of 260 and 270 mL can be used with the Fresenius Kabi CompoGuard Data to transfer 266 and 277 mL of plasma, respectively.
• Seal and separate the plasma unit from the PPC when the target volume is transferred.
• Gently invert the PPC a couple of times to ensure the plasma and pretreatment solution are thoroughly mixed.
5. Inspect the Tyvek lid of the PDC container. If the lid is compromised in any way, discard the PDC and replace it with a new PDC.
Warning
Do not open the Tyvek lid of the PDC container until it is ready to use.
Warning
Keep fingers and objects clear of the hole at the top of the PDC plenum to avoid damage to the exposed filter.
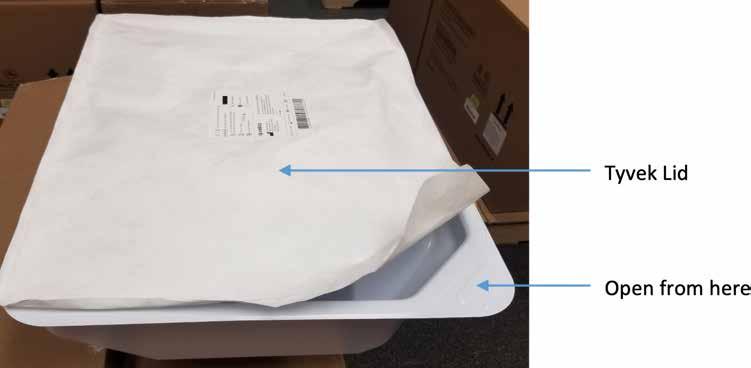
6. Remove the PDC from its container and inspect it for tears or holes. If any are identified, discard the PDC and use a replacement.
Verify plasma transfer tubing is free of kinks that can obstruct plasma flow during processing. Attempting to dry plasma with kinked tubing may result in loss of the product.
7. Verify the PDC tubing manual clamp is closed.
Warning
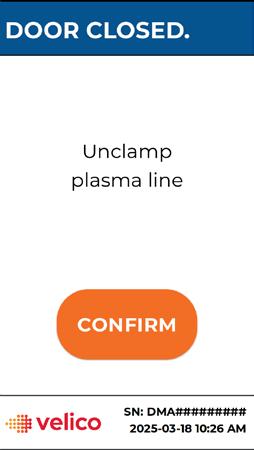
Do not release the PDC manual clamp or hemostat until the PDC is fully loaded into the Dryer. The Dryer UI will prompt the operator to release the clamp. This mitigates the risk of liquid plasma being introduced into the drying chamber prior to the drying process.
8. Connect the PDC plasma tube to the PPC tubing using a SCD.
Note
Ensure tubing length between end of PDC opaque tubing section to PPC, after sterile connection, is approximately 10-16 inches (25-41 cm) to facilitate installation in Dryer.
Note
Following the creation of the sterile connection, confirm proper flow is possible without observable leaks. If any leaking liquid plasma is observed, discard the PDC and the PPC.
Warning
While the PDC and PPC are connected, keep the PDC cap assembly higher than the PPC to prevent liquid plasma from being introduced into the drying chamber prior to the drying process.
Note
If any situation occurs during the drying process that the operator deems to be hazardous or unsafe and the Frontline Dryer remains operational, immediately press the E-Stop button.
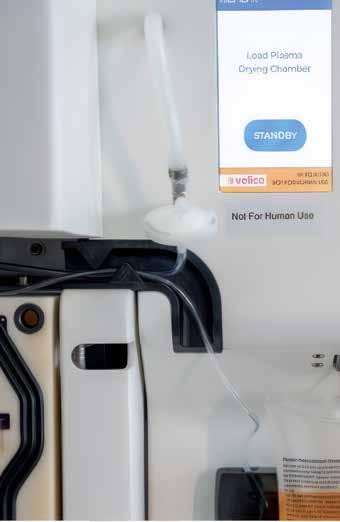
1. If the UI reads WAKE which means Dryer is in Standby, press WAKE. Ensure the UI displays READY and LOAD DRYING CHAMBER as seen below.
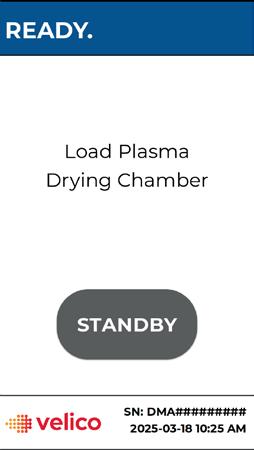
Before performing a drying run, always ensure the system has completed the wake process and the Dryer is in the Ready mode before proceeding with additional steps. Loading the PDC and PPC prior to the Dryer being Ready can lead to control failures or draw fluid from the PPC into the PDC.
2. Installation of the PPC and PDC into the Dryer:
• Hang the PPC on the Dryer Plasma Scale.
Warning
The drying nozzle remains hot after drying runs. When removing or installing new PDCs following a drying run, take care not to touch the drying nozzle. Do not attempt to clean the drying nozzle while the nozzle is still hot.
• Open enclosure door.
Warning
The drying nozzle remains hot after drying runs. When removing or installing new PDCs following a drying run, take care not to touch the drying nozzle. Do not attempt to clean the drying nozzle while the nozzle is still hot.
Top portion of the enclosure
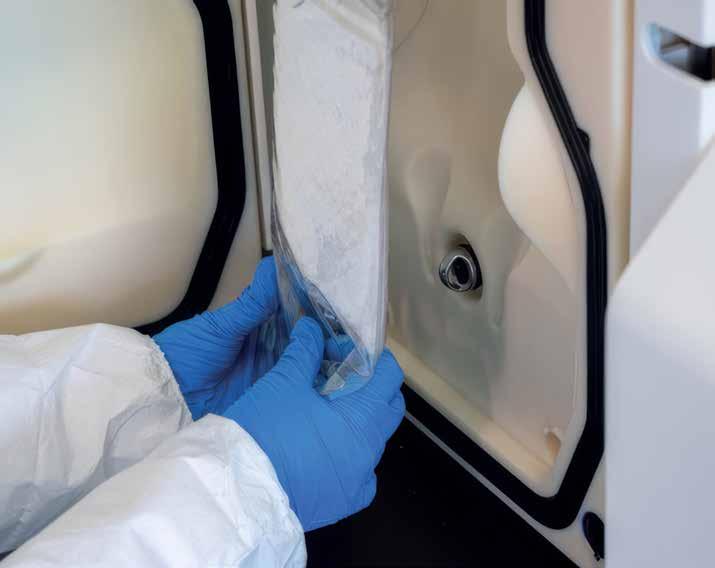
• Insert the PDC into the enclosure by aligning the notch in its circular cap into the top portion of the enclosure, with the PDC transfusion ports on the left.
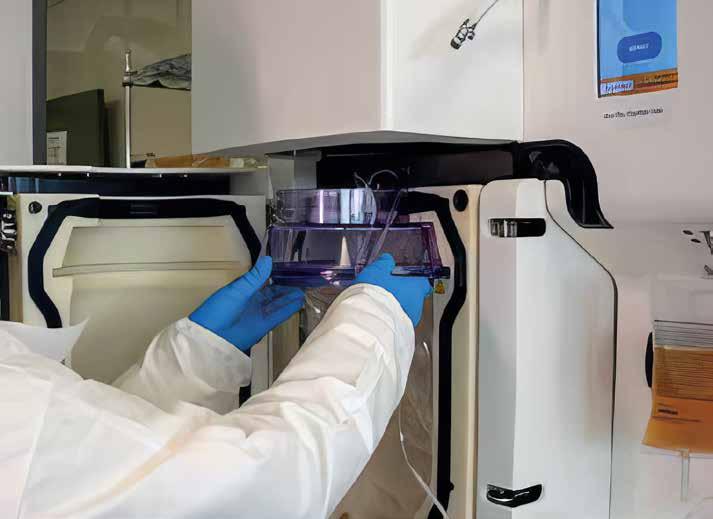
• Feed the PDC transfusion ports into the recess in the left side of the enclosure.
Left side of the enclosure

Lower portion of the enclosure
• Tuck the corners and edges of the PDC fully into the enclosure cavity.
• Connect the PDC exhaust port to the metal fitting on the lower portion of the enclosure. Push firmly until it’s seated flat against the enclosure and the metal fitting extends into the PDC.
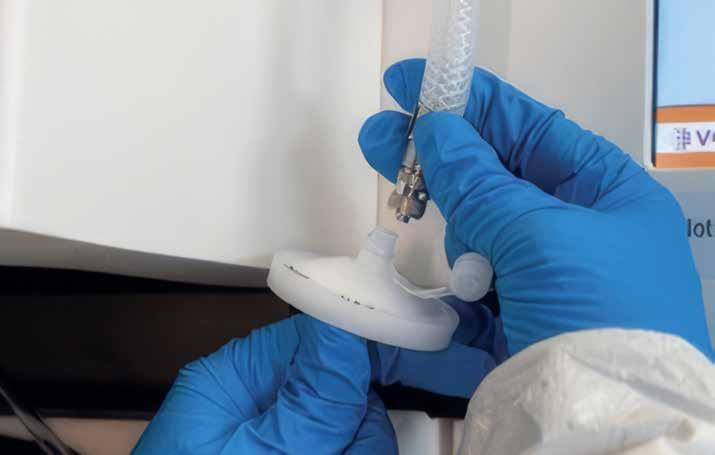
• Remove the PDC’s aerosol filter cap from the aerosol filter. Attach it to the Dryer aerosol line by twisting a quarter turn. Ensure the connection is flush and secure.
Verify the aerosol connection is not cross threaded. A leaking aerosol line can prevent the start of drying.
Aerosol connection
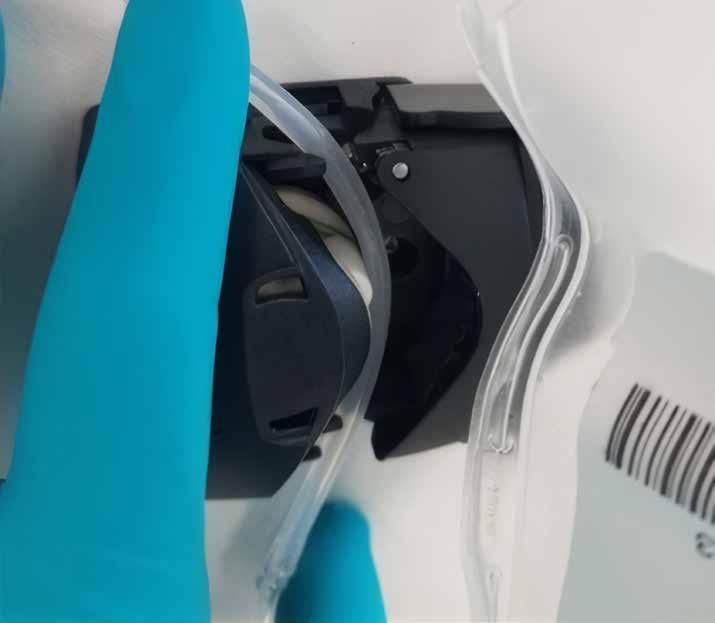
• Open the peristaltic pump to the right of enclosure.
• Route the PPC-PDC’s tubing up through the peristaltic pump to the PDC. Ensure the opaque section of tubing is routed within the body of the pump.
Peristaltic pump
Peristaltic pump closed on the plasma tubing
• Clamp the peristaltic pump on the tubing. Ensure the tubing is not pinched within clamp.
Once the peristaltic pump is closed on the plasma tubing at the start of a drying run, do not open it until directed at the end of the run. Opening the peristaltic pump will cause an error and a failure of the drying run, resulting in loss of product.
Dryer routing feature
• Route both the aerosol and plasma tubing through the Dryer routing feature.
Verify PDC bag and tubing is clear of the edges of the enclosure prior to closing the enclosure door. Verify gasket is properly seated prior to closing the enclosure door.
• Close the enclosure door.
• Pull the hinged handle to the right to close the enclosure door.
• Press the enclosure door towards the enclosure and pull the handle to the left to latch the enclosure door
Manual safety lock
3. Initiate Drying sequence as follows:
• Insert the key attached to the enclosure door handle, arrow side up, into the manual safety lock on the left side of the Dryer.

• If the UI displays maintenance upcoming, record the Frontline Dryer number and date displayed, and press CONFIRM.
Note If maintenance is upcoming, notify Velico Medical and provide the Frontline Dryer number and date displayed.
Plasma line clamp and UI prompt
• Open the plasma line clamp per Dryer UI prompt and then press CONFIRM.
Note
The Frontline Dryer automatically runs integrity checks before the drying cycle begins. Integrity checks take 8 minutes, after which the drying process begins automatically. The UI displays the time remaining. A typical drying process takes approximately 35 minutes. The Dryer beacon will remain yellow during the drying process and flash green when complete.
UI time remaining display


• When the drying cycle is complete, remove the PPC and PDC from the Dryer:
• Close the PDC clamp and remove the PPC when prompted by the Dryer UI.
UI prompt
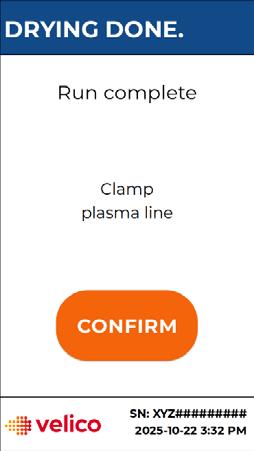
At the end of the drying operation, re-clamp the PDC plasma tubing clamp to prevent residual liquid plasma from entering the drying chamber.
Note
If a tube sealer is available, seal and separate the PDC from the PPC, then discard the PPC in accordance with facility biohazard policy and continue with the procedure.
• Press CONFIRM on the Dryer UI. The Dryer UI prompts the operator to remove the plasma drying chamber. UI prompt
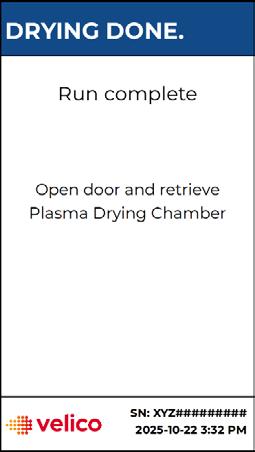
• Remove the key and open the enclosure door. Inspect the enclosure and outside of PDC for any dried plasma.
• Disconnect and remove PDC from enclosure as follows:
• Disconnect the PDC exhaust port from the enclosure exhaust port.
• Disconnect the PDC aerosol filter from the Dryer aerosol line and replace the cap on the filter.
• Open the peristaltic pump and remove the tubing from the pump. Close the peristaltic pump.
• Remove the PDC from the enclosure by pulling the circular cap gently but firmly from the top portion of the enclosure.
The drying nozzle remains hot after drying runs. When removing or installing new PDCs following a drying run, take care not to touch the drying nozzle. Do not attempt to clean the drying nozzle while the nozzle is still hot.
• Close the enclosure door.
Note
Close the enclosure door as soon as possible after PDC removal to maintain heat within enclosure.
Note
Velico recommends not to wait more than 15 minutes between the end of the drying run and the start of seal-and-separation process. The PDC stiffens when it cools down, making it more difficult to load the PDC into the Frontline Sealer. Keeping the Enclosure closed after spray drying will help keep the PDC warm.
• Carry the PDC and PPC to the tube sealer.
• Using a tube sealer, seal and separate the PDC from the PPC as close to the PDC cap as possible.
• Discard the PPC in accordance with facility biohazard policy.
Note
If any situation occurs during the seal-and-separate process that the operator deems to be hazardous or unsafe and the Frontline Sealer remains operational, immediately press the E-Stop button.
Note
While the Sealer UI is displaying Hold safety buttons, the shuttle motion stops immediately if the operator removes one or both fingers from the safety buttons. Motion will begin when fingers are replaced on the safety buttons
Warning
If a seal-and-separate cycle is interrupted before both seal inspections have occurred due to a fault or a loss of power, discard all parts of the PDC and the FrontlineODPTM Unit in accordance with facility biohazard policy.
Warning
Never attempt to restrict any moving part of the Frontline Dryer or Frontline Sealer.
Warning
Keep hands clear of the Frontline Sealer shuttle while it is in motion. Interfering with shuttle movement can lead to injury.
UI prompt
1. Prepare Frontline Sealer as follows:
• If the Sealer UI prompts operator to “Load Plasma Drying Chamber,” go to Step 2).
• On UI, press WAKE.

• UI displays time remaining on self-checks.
• When self-checks are complete, verify the shuttle is in the middle of the gantry, UI prompts operator to load the Plasma Drying Chamber.
2. Installation of the PDC into the Frontline Sealer:
• Insert the PDC circular cap onto the Sealer shuttle from the top in a downward motion. UI prompt
PDC cap and Sealer shuttle

UI maintenance prompt
• Coil the remaining PDC tubing into the top of the cap.
• Press CONFIRM on the UI.
• If UI displays maintenance is upcoming, notify Velico Medical (support@veli.co). Provide the Frontline Sealer number and date displayed. Press CONFIRM to proceed.

• UI displays a warning of shuttle movement, and shuttle rises to upper position.

• UI displays CONFIRM and prompts operator to Load Plasma Drying Chamber, insert exhaust port, and mount onto pins.
• Insert the PDC exhaust port into the U-shaped exhaust port fixture at the base of the shuttle and attach the two large grommets at the base of the shuttle.
Attaching grommets (left) and pins (right)
• Attach the eight small pins along the sides of the shuttle to the matching holes in the PDC.
• Attach two large grommets at the base of the shuttle
• Attach 8 small pins along the sides of the shuttle
PDC fully mounted on Sealer shuttle
3. Conduct the first seal-and-separate process as follows:
If a seal-and-separate cycle is interrupted before both seal inspections have occurred due to a fault or a loss of power, discard all parts of the PDC and the FrontlineODPTM Unit in accordance with facility biohazard policy.
• Press CONFIRM on Sealer UI.
• The Sealer UI displays a warning of shuttle movement and the prompts operator to hold the safety buttons.
• Place fingers on safety buttons and keep them there as the shuttle descends.
Note
If operator removes one or both fingers from safety buttons, shuttle motion stops immediately. Motion will begin when fingers are replaced on safety buttons.

UI time remaining display
• The shuttle descends into the Sealer, consolidation of plasma begins automatically, and the UI displays time remaining.
• When the first seal-and-separation process is complete, the UI displays a warning of shuttle movement and the shuttle rises to its upper position.

UI display buttons
4. Conduct the first seal-and-separate process as follows:
• The shuttle inspection light is on and the Sealer UI prompts the operator to inspect the first seal. Press ACCEPT for seals that look good (see below).
Note
The “Reject” button should only be pressed if there is an equipment failure of the Sealer resulting in a burned seal, an incomplete (including wrinkled) seal, or exposed plasma.
• Visually inspect for completeness of seal across the width of the PDC, the absence of ODP powder on the outside of the seal, and the seal is not overlapping on the FrontlineODP Unit label.
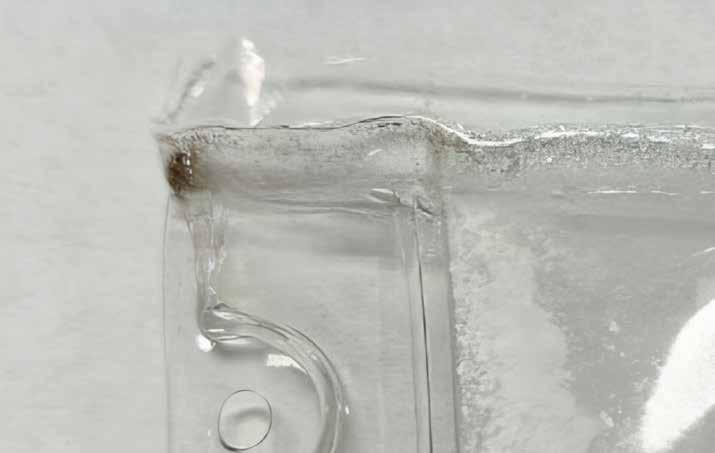
Typical welds
Unacceptable welds
• Press ACCEPT for typical welds as shown in the image below.
• Complete seals have a roughly uniform width along their length, do not show signs of incomplete melting where the seal is formed, do not intersect with any labels, and do not have any exposed plasma showing.
• Loading the PDC into the Sealer without attaching the 2 grommets and 8 small pins will result in seals in the incorrect location as shown in the figure below. The unacceptable weld is not caused by a Sealer equipment failure. If this occurs, follow instructions in step 5 below to reject seal.
Burned, discolored seals
• A Sealer failure can result in a burned (black or green) seal (as shown in the figure below), incomplete seal, or exposed plasma. The unacceptable weld is caused by a Sealer equipment failure. Press REJECT and discard the ODP Unit.
UI display buttons
5. Rejecting a seal:
• Press REJECT on UI.
• UI displays CANCEL and CONFIRM.

• Reinspect the seal to confirm if the acceptance criteria is met or if it is unacceptable due to incorrect PDC loading or a possible equipment failure.
• If the seal is acceptable press CANCEL on the UI and ACCEPT the seal.
• If the seal is unacceptable, press CONFIRM and follow the UI instructions.
UI display and prompt
• UI displays TERMINATED and prompts the operator to discard the rejected PDC (in accordance with facility biohazard policy).
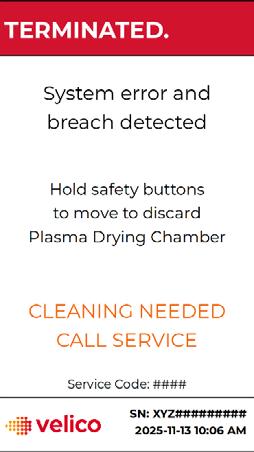

• Fill out a Velico Observation Report Form PP-025-F3, available electronically. Record the date and time of rejection, Frontline Sealer serial number, rejection criteria, and other pertinent information. Contact Velico.
• If practical, take pictures of the rejected seal to assist field service personnel in their troubleshooting process.
Note
Notify Velico Medical field service staff and provide recorded information.
• Once the PDC has been discarded, press CONFIRM to continue with Sealer cleaning per Section 5.4.2, Frontline Sealer cleaning procedure following a breach.
UI prompt and removal of upper chamber
6. Prepare for the second seal and separation process as follows:
• UI displays First Cycle Complete and prompts the operator to remove the upper chamber.
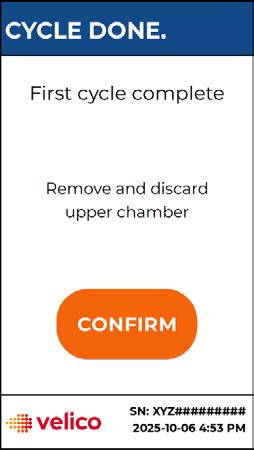
• Remove the upper part of the PDC from the shuttle and discard in accordance with facility biohazard policy.
• Press CONFIRM on the Sealer UI.
• The Sealer UI displays a warning of shuttle movement and the shuttle rises to its top position.
• UI prompts the operator to rotate the shuttle.
Removing the PDC
• Disengage the rotation latch on the right side of the shuttle. Grasp the rotation knob and rotate the shuttle clockwise 180°. Release the rotation latch.
• Verify that the exhaust port remains fully seated and the shuttle pins remain fully inserted in the PDC.
7. Conduct the second seal-and-separate process as follows:
• Press CONFIRM on the Sealer UI.
• The Sealer UI displays a warning of shuttle movement and prompts the operator to hold safety buttons.
• Place fingers on safety buttons and keep them there as the shuttle descends.
• The shuttle descends into the Sealer, consolidation of plasma begins automatically, and the Sealer UI displays the time remaining.
Keep hands clear of the inside of the Frontline Sealer during sealing and separating operations. Sealing and separating jaws are a pinch hazard, and the jaw surfaces heat up and can cause burns to exposed skin.
• When the Second seal and separation process is complete, the Sealer UI displays a warning of shuttle movement and the shuttle rises to its upper position.
Sealed PDC and label
8. Inspect second seal as follows:
• Verify that the shuttle inspection light is on and the UI prompts operator to inspect second seal.
• Visually inspect for completeness of seal across the width of the PDC, the absence of ODP powder on the outside of the seal, and the seal is not overlapping on the FrontlineODP Unit label.
• If seal is rejected, follow Step 5).
• If seal is accepted, Press ACCEPT on UI.
9. Complete the seal and separation process as follows:
• The Sealer UI displays Run Complete and prompts the operator to retrieve the unit and to remove the lower chamber.
• Remove the FrontlineODP Unit from the shuttle.
• Remove the PDC filter from the shuttle and discard in accordance with facility biohazard policy.
• Press CONFIRM on UI.
• The UI prompts the operator to rotate the shuttle.
• Disengage the rotation latch on the left side of the shuttle. Grasp the rotation knob and rotate the shuttle counterclockwise 180°. Release the rotation latch.
• Press CONFIRM on UI.
• The UI displays a warning of shuttle movement and prompts the operator to hold the safety buttons.
• Place fingers on safety buttons and keep them there as the shuttle descends.
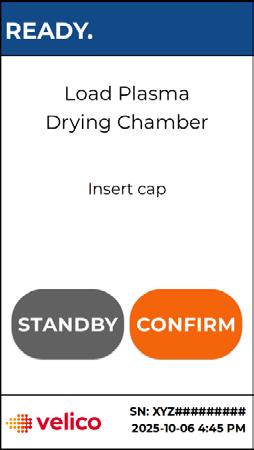
• The shuttle descends to its middle position, and the UI prompts the operator to load the plasma drying chamber and to insert the cap.
Note
Package FrontlineODP Unit in Frontline Pouch within 30 minutes of completing seal-and-separate process on the Sealer.
1. Weigh the FrontlineODP Unit with a scale.
Note If the FrontlineODP Unit weighs 48g or more, the unit is suitable. Continue with the storage process. Discard units that weigh 47 g or less.
2. Prepare the FrontlineODP Unit for storage as follows:
• Place the FrontlineODP Unit in the Frontline Storage Pouch with the label visible through the clear side of the pouch. The ports on the FrontlineODP Unit should be pointing towards the open end of the pouch.
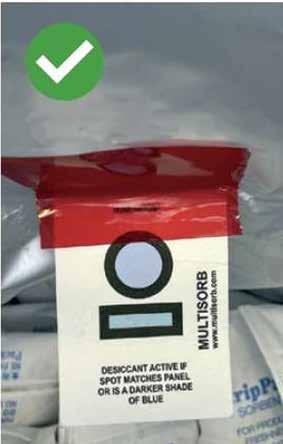
• Open the Frontline Desiccant package and check the moisture.
• If the moisture indicator is blue, remove one desiccant packet from the package. Immediately close the package to maintain shelf life.
• If the moisture indicator is pink, discard the entire desiccant package and begin this step with a new package.
Moisture indicator

• Place the desiccant packet in the storage pouch between the FrontlineODP Unit and the foil side of the pouch. Ensure the desiccant packet does not block the label on the ODP Unit.
Placing the desiccant package
Inspecting the pouch seal
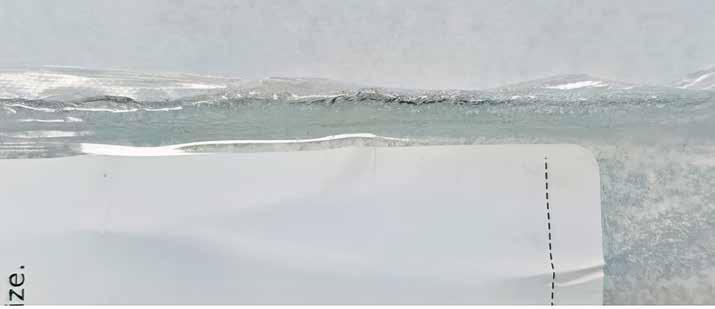
3. Seal the Frontline Storage Pouch.
• Set the impulse sealer to the following parameters: Heating 6; Cooling 1.
• Position the Frontline Storage Pouch with the top of the pouch across the welding plane of the impulse sealer, above the first notch of the pouch.
• Use the impulse sealer to create a seal in the Storage Pouch above the first notch.
• Inspect the seal. Verify the seal is complete across the width of the Frontline Storage Pouch.
• If the seal is acceptable, continue the procedure. If the seal is not acceptable, remove the FrontlineODP Unit from the pouch. Discard pouch. Repeat with a new Frontline Storage Pouch.
• Store the Frontline Pouch at 1 – 6°C refrigeration for long term storage (up to 24 months), or 20 – 24°C (up to 6 months).
• If necessary to open the Frontline Storage Pouch, tear at the first notch (do not use scissors). Do not leave open for longer than 15 minutes. Be sure to remove old desiccant and replace with new desiccant before resealing.
Normal operations and daily cleaning are the responsibility of facility staff trained to the following procedures.
All maintenance, troubleshooting, inspections, and testing outside normal operations and daily cleaning must be conducted in a safe manner by trained Velico Medical field service personnel. Verification of safe, proper operation of the system will be ensured prior to turning the system back over to the facility.
Do Not remove any service or access panels. These are only to be removed by trained Velico Medical personnel.
Use the power cords supplied with the Frontline Dryer or Frontline Sealer. If these cords are damaged or destroyed, they must be replaced. Do not attempt to repair a damaged power cord. Replacement of these power cords must be conducted by trained Velico Medical personnel.
Both the Frontline Dryer and Frontline Sealer require annual maintenance from the date of manufacture. If the annual maintenance period has elapsed, neither device will conduct a drying or sealing run until maintenance is conducted. One month prior to the required maintenance date, the devices will provide a Maintenance Upcoming notification screen at the start of a drying or sealing run. If not already scheduled, contact Velico Medical at support@veli.co and schedule maintenance with field services.
When cleaning the Frontline Dryer or Sealer, use only a solution of 70% isopropyl alcohol or 10% Bleach.
Upon notification of a fault, Velico Medical may request facility personnel to carry out actions as part of a troubleshooting plan to help identify the cause or to fix the fault.
All replacement parts for the Frontline Dryer and Frontline Sealer must be supplied by Velico Medical or by the manufacturer through Velico Medical.
If facility staff has any questions about the FrontlineODP system maintenance plan, policies, or procedures, contact Velico Medical at support@veli.co.
The facility is responsible for maintaining the Clean Dry Air system output to meet ISO 8573-1 class 2.2.1 or better.
The facility is responsible for setting up and tracking a service contract or planned maintenance agreement for the Clean Dry Air system with the system manufacturer.
At the start of each day, complete the following procedures.
4.2.1
At the CDA desiccant dryer, check that the dewpoint is – 40°C or lower.
Warning
If the Clean Dry Air (CDA) system dewpoint is greater than – 40°C, do not conduct drying operations. Check the dewpoint regularly to verify the desiccant dryer is working to bring the dewpoint equal to or below – 40°C. If it is not capable of maintaining the dewpoint at or below – 40°C, notify Velico Medical and the CDA system manufacturer for guidance and service.
Caution
When cleaning the Frontline Dryer or Frontline Sealer, only use 70% isopropyl alcohol solution or 10% Bleach solution. Do not spray cleaning agents directly onto the Frontline Dryer or Frontline Sealer. Spray on low-lint wipe and apply with wipe. Do not allow cleaning agents to pool or collect on surfaces.
Warning
The drying nozzle remains hot after drying runs. When removing or installing new PDCs following a drying run, take care not to touch the drying nozzle. Do not attempt to clean the drying nozzle while the nozzle is still hot.
• Ensure the following areas on the Frontline Dryer are wiped down:
• Enclosure door handle
• Enclosure lock key
• Peristaltic pump and the area around the pump
• Area around the UI screen
• PDC air exhaust port
• Enclosure inlet air port and enclosure exhaust air port
• Drying nozzle
When cleaning the Frontline Dryer or Frontline Sealer, only use 70% isopropyl alcohol solution or 10% Bleach solution. Do not spray cleaning agents directly onto the Frontline Dryer or Frontline Sealer. Spray on low-lint wipe and apply with wipe. Do not allow cleaning agents to pool or collect on surfaces.
• Ensure the following areas on the exterior of the Frontline Sealer are wiped down:
• Shuttle handles
• Seal inspection light
• Tensioning assemblies
• Exhaust port fixture
• Top cover
• Finger safety buttons
• Press STANDBY on the UI, then press CLEAN on the UI to unlock the lower door.
• When self-checks are complete, the shuttle ascends to the top position, and the UI displays Door Unlocked and prompts the operator to perform cleaning.
• Open the door on the front of the Frontline Sealer.
Note
Once open, do not close the door until cleaning is complete. The door locks upon closing.
Note
If the sealer prohibits cleaning/inspection of the seal and/or separate bands, call Velico Medical for service.
• Ensure these other areas on the interior of the Frontline Sealer are inspected and wiped down:
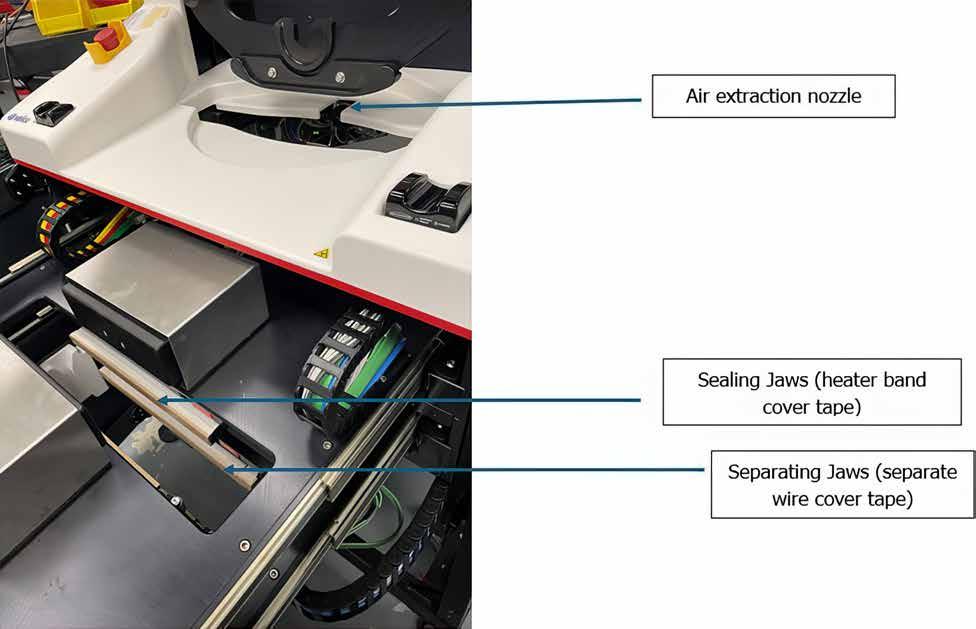
• Air extraction gasket
• Inside face of sealing jaws (heater band cover tape)
• Inside face of separating jaws (separate wire cover tape)
• Visually inspect the heater band and separate wire cover tape for burn marks, scratches, tears, and or deep-set creases. If there is any damage, contact Velico Medical at support@veli.co to schedule maintenance.
Sealer jaw bar cleaning is conducted regularly to prevent the buildup of plastic debris from sealing and separating operations. To access sealing and separating jaws, slide out the seal-and-separate module.
• When cleaning is complete, slide the seal-and-separate modules back into place. Ensure that the drawer lock handles are locked into place behind the frame and are returned to the vertical position. Drawers are locked into the correct position when tugging on the drawer yields no movement.
• Close the door firmly to properly engage the door lock. Errors can occur if the door is not fully closed or if the door lock has not been fully engaged. The UI provides warning of shuttle motion and prompts operator to hold safety buttons.
If the Frontline Sealer loses power while the door is open, on power up, the UI will display error code 3206. Ensure the door is closed and press Confirm. If the door is closed and the error persists through power cycles, contact Velico Medical for service.
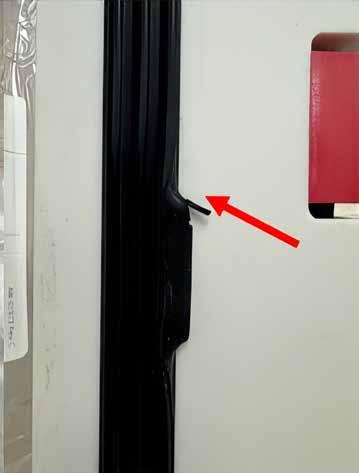
Example of dislodged gasket (left) and dislodged and damaged gasket (right)
• Place fingers on safety buttons and keep them there as shuttle descends.
Note If the operator removes one or both fingers from the safety buttons, shuttle motion stops immediately. Motion will begin when fingers are replaced on safety buttons.
• The shuttle descends to its fully lowered position and the UI displays WAKE.
• Check Dryer gasket alignment at the beginning of each day and when persisting enclosure integrity service codes 4604 or 4605 occur.
• Open the Dryer door and inspect for any dislodged gasket. If dislodged, manually tuck the gasket back into the groove.
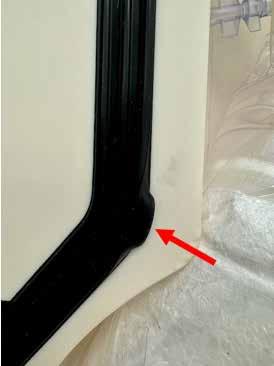
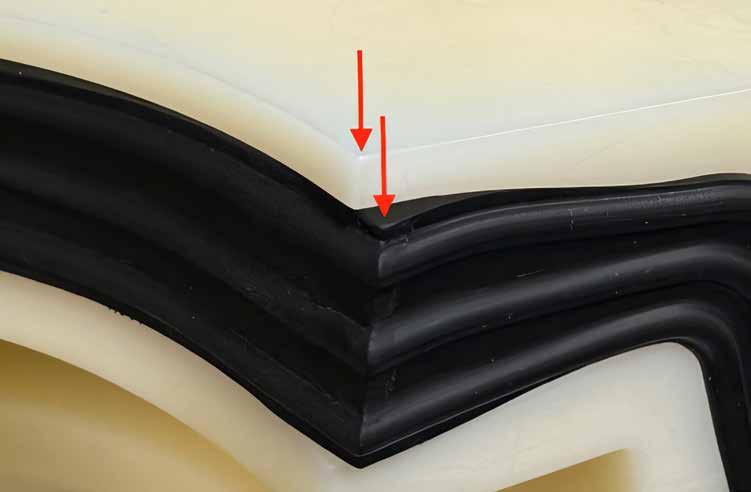
Gasket and door/enclosure corners aligned
• Check the gasket alignment on the corner on the door and enclosure side. The corner of the gasket should be aligned with the corner of the door/enclosure.

• If the gasket is not aligned, manually adjust the gasket to align the corners.
Gasket and door/enclosure corners misaligned
In any emergency situation, take appropriate actions based on facility emergency protocols to deal with the situation prior to following the steps listed here to troubleshoot the Frontline Dryer or Frontline Sealer.
If any situation occurs involving the Frontline Dryer or Frontline Sealer that the operator deems to be hazardous and the device remains operational, immediately press the E-Stop button.
If necessary, turn power to the device off, and/or isolate the device from the CDA system.
If fault is with the Frontline Dryer and occurs during initial enclosure integrity checks, clamp the plasma tube to prevent plasma from migrating to the PDC. This may allow either the plasma and/or the PDC to be reused. See Section 5.3, Recoverable Faults.
• Enclosure integrity checks (i.e., verification of the enclosure door seal) can FAIL if the black rubber seals (see Section 4.2.4) of the door and main Enclosure become dislodged. Visually inspect the seals for damage, raised sections, or other signs of improper seating and attempt to re-seat the seals. A service call may be required to properly reseat the seals if Enclosure integrity failures persist.
Notify additional personnel in accordance with facility policy.
Identify if there is a plasma breach:
• The Dryer UI will display a breach warning or the operator may recognize a plasma breach. Follow the steps in Section 5.4.1.
• The operator will recognize a plasma breach while operating the Sealer. Follow steps in Section 5.4.2 of this chapter.
Take pictures, if practical, including but not limited to a UI display and error code, PPC and tubing, PDC in the enclosure or on the shuttle, etc.
In any fault situation concerning the FrontlineODPTM System, record the following information as early as possible:
• Date and time of the fault and the time the run began
• Dryer/Sealer number and the run number
• PDC and/or PPC lot numbers, if applicable
• Error code (if applicable)
• Operator(s) involved
• If there was a plasma breach or if the plasma was discarded
• Description of operation at the time of the fault
• Fault conditions and a description of the fault
• Actions taken
Complete FrontlineODP Observation Report (PP-025-F3) and email to support@veli.co
Assist Velico Medical troubleshooting efforts.
If necessary, schedule Velico Medical for service in any of the following situations:
• Any unrecoverable fault, including but not limited to, operator rejection of a seal on the Frontline Sealer
• The Frontline Sealer prohibits cleaning or inspection of seal-and-separate bands
• Velico Medical troubleshooting efforts determine that field service personnel are required on site
• The UI Info screen shows a Maintenance Needed date approaching or a Maintenance Upcoming screen during drying or sealing runs
• The preventive maintenance schedule shows an upcoming maintenance due date
A recoverable error on the Frontline Dryer is a disruption in the normal processing that can be corrected by the operator to potentially reuse the PPC and PDC. A recoverable error can be identified by the orange highlights on the Dryer UI.
Recoverable error example with orange highlights

The following table covers the recoverable error codes (four-digit service codes that will display on the UI) for the Dryer and a brief description of the expected cause of the error:
Error Code Fault Display Cause
5105 No plasma flow PDC clamp or hemostat engaged on plasma tube
4701 Aerosol line disconnected
Aerosol line disconnected or improperly connected
4200 Plasma bag or scale disturbed PPC disturbed on scale
4700 Aerosol pressure too high
4604 Door not sealed
4605 Door not sealed
Aerosol line pinched or clamped
Dryer gasket misalignment/ possible damage
Exhaust port not seated/ Dryer gasket misalignment
The following table covers the recoverable error codes (four-digit service codes that will display on the UI) for the Dryer and a brief description of the expected cause of the error:
Error Code Fault Display Cause
7011
Workflow Shuttle Not Rotated
7012 Workflow Shuttle Not Extended
7013
Workflow Vacuum Target Timeout
The shuttle is not in the correct orientation. The operator forgot to rotate the shuttle.
The shuttle is not in the correct orientation. The operator forgot to extend the shuttle.
Exhaust port seated incorrectly. Obstruction/debris on air extraction nozzle.
Warning
Blood plasma is a biohazardous material. Follow approved facility guidelines for use of personal protective equipment when handling plasma.
Some service codes on the Frontline Dryer indicate either a breach occurred or the possibility of a breach. Refer to AW-03744-1, FrontlineODP System Service Codes to identify the service code type.
When service codes indicate a possible breach or the Status Light is flashing red, the Frontline Dryer was unable to perform the post spray drying integrity test. Follow the cleaning procedures below and contact Velico at support@veli.co
Cleaning after a breach service code on Frontline Dryer:
• When a fault occurs, the Dryer will stop processing and depressurize. The UI will indicate “Remove and Discard the PDC”.
• Clamp the tube between PDC and PPC to prevent liquid plasma from exiting the PPC.
• Once the Dryer has depressurized sufficiently, the key lock will disengage (you may hear a click). This should take a few seconds.
• When able, remove the key and open the enclosure door.
• Disconnect the PDC aerosol air filter from the Dryer aerosol air connection.
• Open the peristaltic pump door to release the tubing. The UI now displays a “CONFIRM” button – but DO NOT press until cleaning is completed.
• Disconnect the PDC exhaust port from the enclosure exhaust port.
• Remove the PDC and PPC from the Dryer.
• Seal the tubing between the PDC and PPC and separate the tubing.
• Discard the PDC and PPC in biohazard waste in accordance with facility biohazard policy.
Perform the procedure in 4.2.2 under Frontline Dryer Cleaning, specifically cleaning the following areas:
• Full interior of the enclosure
• Drying nozzle
• Exhaust port
• Any operator touch surfaces
Warning
The drying nozzle remains hot after drying runs. When removing or installing new PDCs following a drying run, take care not to touch the drying nozzle. Do not attempt to clean the drying nozzle while the nozzle is still hot.
Press CONFIRM on the UI.
Some service codes on the Frontline Sealer indicate the possibility of a breach. Refer to AW-03744-1, FrontlineODP System Service Code Appendix to identify the service code type.
For service codes indicating breach, possible breach, or if ODP powder is visible on the outside of the seal during the Frontline Sealer operation, follow the cleaning procedures below and contact Velico at support@veli.co.
Discard all sections of the PDC in biohazard waste in accordance with facility biohazard policy.
Perform the procedure in 4.2.3 under Frontline Sealer Cleaning, specifically cleaning the following areas:
• Top cover
• Inside face and top side of sealer welding+ bars
• Shuttle
• Horizontal surfaces on the sealing and separating drawers
• Any operator touch surfaces
The Dryer and Sealer are designed to operate safely even if their UI becomes unresponsive. A status indicator (red/yellow/ green light) is provided for both each Dryer and Sealer device. On the Dryer, status is indicated with a light tower on the top of the device. On the Sealer, the rear panel of the device lights up with status information about the state of the device. If the UI becomes unresponsive, the status indicator continues to report the device status.
There are three ways the UI can become unresponsive:
• It can go blank;
• It can stick on a connecting screen with a spinning wheel; or
• It can freeze on a screen and become non-responsive.
Operator actions vary based on the color and blinking behavior of the status indicator as follows:
Status
Indicator
Steady green
Blinking green
Operator Action
Device is idle
• – With a PDC in the Dryer, if the PPC is empty, and there is no plasma in the plasma line, the unit has been processed successfully.
• – With a PDC in the Dryer, if the PPC is not empty, or if there is plasma in the plasma line, contact Velico Service to determine next steps, or discard the PDC.
Turn the device off, wait 5 seconds, and turn the device on to attempt to restore the User Interface.
Device completed processing successfully
Follow the normal processing completion steps of section 3.4 for the Dryer or section 3.5 for the Sealer and proceed with processing. Turn the device off, wait 5 seconds and turn the device back on to attempt to restore the User Interface.
Steady yellow
Blinking yellow
Device is operating automatically without issue
Allow enough time for the spray drying to complete. When the status indicator changes color and/or blinking pattern, follow the instructions for the new color/pattern.
Device requires operator input
Press the E-Stop button, wait 3 seconds, and then release the E-Stop button. When the status indicator changes color and/or blink pattern, follow the instructions for the new color/pattern.
Steady red Device has experienced a fault and cannot complete processing
Remove and discard PDC. Turn the device off, wait 5 seconds, and turn the device on to attempt to restore the User Interface.
Status Indicator Operator Action
Blinking red Device has experienced a fault and dried plasma may have escaped the PDC Don appropriate PPE before proceeding. Remove and discard PDC. Follow the instructions of the “Cleaning Procedure following Service Code” section of this manual. Turn the device off, wait 5 seconds, and turn the device on to attempt to restore the User Interface.
Any other color, including no light
Device has is no longer reporting status
If any other color is indicated, or the status indicator is off, assume the Blinking Red status and follow those instructions.
If the UI does not respond after cycling power, contact Velico at support@veli.co
After turning the Frontline Dryer or Sealer off, wait at least 5 seconds before turning the device back on. Powering up the system too quickly after shutdown can lead to failure of the bootup sequence.
When enclosure integrity service codes 4604 or 4605 occur, complete the Dryer gasket inspection in 4.2.4.
When enclosure integrity service codes 4604 and 4605 persist, troubleshoot the gasket alignment with the Dryer door closed.
Close the Dryer door without a PDC and inspect the gasket. A light source may be required.
Dryer Gasket inspection area
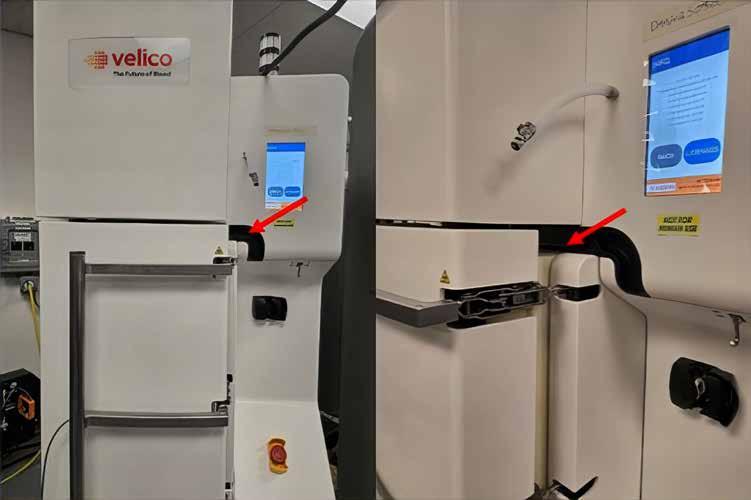
Check the gasket alignment on the door and the enclosure. The gasket on each side should align to the opposite side. If the gasket is not aligned, manually adjust the gasket to align both sides.
Aligned gaskets (top); Slightly off set gaskets (middle); Misaligned gaskets (bottom)
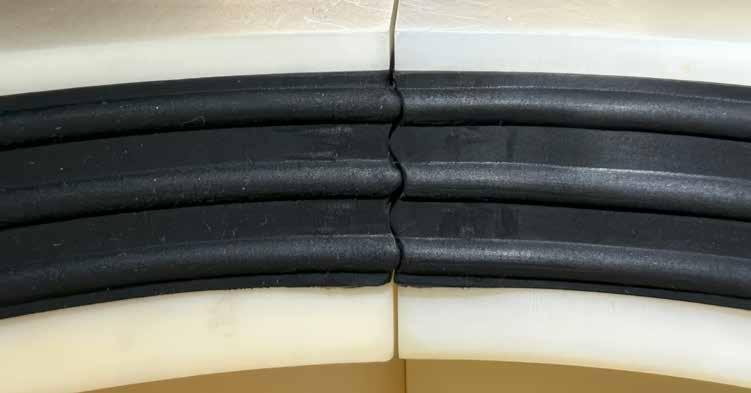
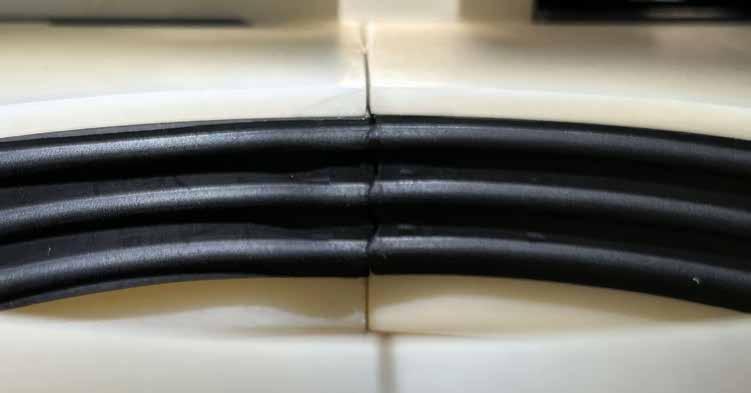
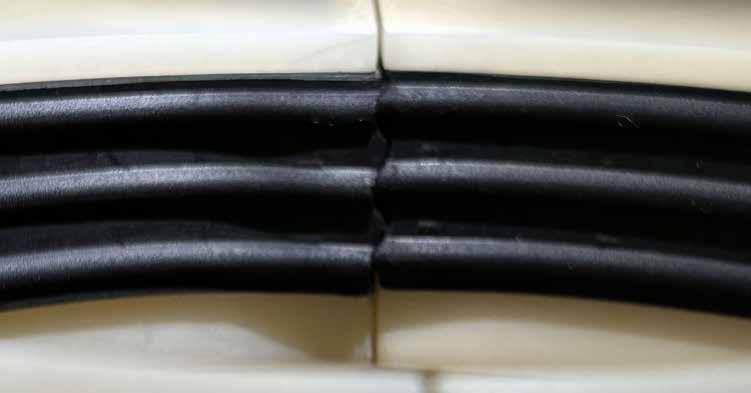
Movement of the Frontline Dryer and Frontline Sealer and all steps of the installation and operational qualifications must be performed by trained Velico Medical personnel.
The Frontline Dryer and Frontline Sealer will be installed in a location with the following considerations:
• The floor must be solid and flat. A cleat will be anchored to the floor for each device. Both Dryer and Sealer will be mounted on cleats to mitigate the tipping hazard.
• 18 inches (46 cm) of clearance to the rear and both sides.
• Clearance in front of the device to allow movement for maintenance, cleaning operations, and in case of emergency.
• Power, Clean Dry Air, and Exhaust Air (Dryer only) connections must allow movement of the devices up to 3 feet (91 cm) forward to retain operability during maintenance.
Once installed, movement of the Frontline Dryer or Frontline Sealer should be minimized. Connections to both devices allow movement of the device up to 3 feet (91 cm) to allow for maintenance, cleaning operations, and in the case of emergency. Any movement of the Frontline Dryer or Frontline Sealer beyond 3 feet or any handling that requires disconnection of utilities from the device should only be performed by trained Velico Medical personnel.
When a Frontline Dryer or Frontline Sealer is removed from service either temporarily or permanently, trained Velico Medical personnel will be on hand to disconnect connections and move the device to local storage or remove it from the facility.
Both Frontline Dryer and Frontline Sealer are connected to the CDA high pressure air piping via flexible connections. These connections allow movement of the Dryer or Sealer a short distance (3 feet) to facilitate maintenance activities, cleaning, or in the case of an emergency.
Prior to disconnecting the Frontline Dryer or Frontline Sealer from the CDA system, shut the CDA isolation valve in the production space, bleed air pressure from the system, then shut the associated Dryer or Sealer isolation valve.
For procedural steps to depressurize the Dryer, see Section 6.3 at the end of this chapter.
Both Frontline Dryer and Frontline Sealer are connected to facility power by power cables. These cables allow movement of the Dryer or Sealer a short distance (3 feet) to facilitate maintenance activities, cleaning, or in case of an emergency.
Prior to disconnecting the Frontline Dryer or Frontline Sealer from facility power, secure the associated circuit breaker at the power panel.
Note
The Dryer or Sealer may be hardwired to facility power. In this case, the device will not be able to be disconnected and moved without an electrician.
The Frontline Dryer is connected to facility air exhaust by flexible air ducts. These ducts allow movement of the Dryer a short distance (3 feet) to facilitate maintenance activities, cleaning, or in case of an emergency. This ducting must be removed from its connection to the Dryer prior to moving the Dryer further.
Both Frontline Dryer and Frontline Sealer present tipping hazards. When fully installed, each is mounted to a cleat to mitigate this risk. If the Dryer or Sealer must be removed from their cleat for maintenance, transport, or in the case of an emergency, caution should be taken to avoid sudden movements that could cause the devices to tip.
Without the Frontline Dryer or Frontline Sealer installed, the cleat is a tripping hazard. The cleat should be installed immediately before the Dryer or Sealer is installed. If the Dryer or Sealer is removed, remove the cleat to mitigate this risk.
The front wheels of both the Frontline Dryer and Frontline Sealer are equipped with foot-operated wheel locks and adjacent screw-down leveling feet. Both wheel locks and leveling feet should be engaged whenever the device is in a stationary position to prevent the device from moving unexpectedly, including when the device is mounted on its cleat.
Warning
Frontline Dryer retains pressure in some compressed air lines when nonoperational and when powered down. Fully purge air from the system prior to disconnecting the device from the CDA system or performing maintenance.
Always perform these steps prior to disconnecting the Frontline Dryer from the Clean Dry Air (CDA) system:
• Power off the Dryer
• Shut the CDA Dryer Isolation Valve
• Manually purge air from the CDA Dryer Test Connection until the line is depressurized
AW-03744-1 Rev 11.0
Revised February 2026
The following service codes are applicable to both the FrontlineODP Dryer and FrontlineODP Sealer. The term “Device” in the general description column below indicates commonality between both Dryer and Sealer devices.
Service Code General Description
0001: UIC_SW_Failure
1000: Invalid_ Controller_State
1001: System_Reset_ Assert
1002: Database_Failure
An internal failure has occurred in the User Interface Computer Software and the Device cannot operate.
Contact Velico service.
An internal failure has occurred in the software and operation must be halted.
Contact Velico service.
An internal failure has occurred in the software and operation must be halted.
Contact Velico service.
An internal failure has occurred in the database used to store operational parameters and logging data.
Switch the Device power switch off, wait 5 seconds, then switch the Device power switch on.
Possible Breach?
No
No
No
1004: Maintenance_ Date_Missing
1005: Current_Date_ Missing
1006: Serial_Number_ Missing
If the problem persists, contact Velico service. No
The Device has detected a problem with the maintenance date.
Contact Velico service.
The Device has detected a problem with the reported time.
Contact Velico service.
The Device has detected a problem with the device serial number.
Contact Velico service.
No
No
No
Service Code
1007: Maintenance_ Required
1008: Versions_ Incompatible
1009: Calibration_ Values_Missing
1010: Current_Date_ Invalid
1011: Logging_Start_ Failure
The Device is one year beyond the date of last maintenance.
1012: Fault_Handling_ Failure
2000: CDA_Pressure_ High
2001: Regulator_ Pressure_High
Possible Breach?
Contact Velico service. No
The Device has detected a software compatibility problem.
Contact Velico service. No
The Device has detected missing or incorrect calibration values.
Contact Velico service. No
The Device has detected a problem with the maintenance date.
Contact Velico service. No
An internal failure has occurred in the database used to store operational parameters and logging data. Switch the Device power switch off, wait 5 seconds, then switch the Device power switch on. If the problem persists, contact Velico service. No
An internal failure has occurred while the device was attempting to recover from an existing fault.
If the problem occurs again after turning the power off and back on again, contact Velico service.
The Device has detected excessive inlet air pressure from the CDA system.
Check the output pressure from the CDA system.
Possible
If the problem persists, contact Velico service. No
The internal regulated air pressure has exceeded the acceptable threshold.
Verify the Device is receiving pressure in the range indicated in the air supply label.
If the Device is receiving correct air pressure, contact Velico service. No
Service Code
2002: Regulator_ Pressure_Low
The internal regulated air pressure has dropped below the acceptable threshold.
Verify the CDA system has power and the Device is receiving pressure in the range indicated in the air supply label.
Possible Breach?
If the Device is receiving sufficient air pressure, contact Velico service. No
2003: Voltage_Out_of_ Range
2004: Switched_24V_ Lost
2005: User_Cancel
The Device has detected a problem with the internal 5-volt power supply.
This indicates a problem with the Device, contact Velico service. No
The Device has detected a problem with the internal 24-volt power supply.
This indicates a problem with the Device, contact Velico service. No
The Device has been interrupted after Plasma Drying Chamber loading has started and the system must be re-initialized before continuing.
Unless this problem persists, there is nothing wrong with the Device and the Plasma Drying Chamber may be reloaded after the device completes re-initialization.
If the problem persists, contact Velico service. No
3000: ASWISS_ Corrupted
3001: ASWISS_ Unconfigured
3002: ASWISS_ Uncalibrated
There is a problem with the safety system software, contact Velico service. No
There is a problem with the configuration of the safety system software, contact Velico service. No
The Device requires Calibration. Contact Velico service. No
Service Code
3003: ASWISS_User_ EStop
3004: ASWISS_ASW_ Timeout
3005: ASWISS_Timeout
General Description
Whenever an Operator presses the E-Stop button, this service code will be displayed. Operation will remain paused until the E-Stop button is released.
Release the E-Stop button, switch the Device power switch off, wait 5 seconds, then switch the Device power switch on.
Possible Breach?
If the problem persists, contact Velico service. No
The Device has detected a communication problem with the safety system.
This indicates a problem with the Device, contact Velico service. No
The Device has detected a communication problem with the safety system.
This indicates a problem with the Device, contact Velico service. No
3006: ASWISS_Device_ Type_Mismatch
3007: ASWISS_Failsafe_ Held
3008: ASWISS_Relay_ Failure
3009: ASWISS_Door_ Not_Closed
The Device has detected a problem with configured device type.
Contact Velico service. No
An internal failure has occurred in the software and operation must be halted.
Contact Velico service. No
The Device has detected a problem with the safety system relay.
This indicates a problem with the Device, contact Velico service. No
The Device Safety System has detected the door has opened at an unexpected time.
Check that the door is closed, switch the Device power switch off, wait 5 seconds, then switch the Device power switch on.
If the problem persists, contact Velico service. No
3090: ASWISS_Check_ SW24_Failure
The Device has detected a problem with the safety system’s reading of the internal 24-volt power supply.
This indicates a problem with the Device, contact Velico service. No
Service Code
3091: ASWISS_Not_ Detected
3092: ASWISS_Check_ EStop
The Device has detected a communication problem with the safety system.
This indicates a problem with the Device, contact Velico service. No
The Device has detected the E-stop is active during power up.
Release the E-stop button, switch the Device power switch off, wait 5 seconds, then switch the Device power switch on.
If the problem persists, contact Velico service. No
The following service codes are applicable to only the Dryer component of the FrontlineODP System.
Service Code
1100: PV01_ShutOff_ Failure
1101: System_Reset_ Breach
General Description
The Dryer has detected a problem with the Inlet Valve.
This indicates a problem with the Dryer, contact Velico service.
The Dryer detected a problem in the previous drying run that prevented the completion of post drying Plasma Drying Chamber integrity checks. Remove and discard the Plasma Drying Chamber.
If the problem persists, contact Velico service.
See “Cleaning Procedure following Service Code” in the Operators Manual (AW-03744).
Possible Breach?
No
1102: Deflector_ Started_Lowered
Note: This fault will occur if the dryer lost power during a drying operation. If power is lost, the Dryer did not complete post-drying Plasma Drying Chamber integrity checks. The Plasma Drying Chamber should be removed and discarded as if there is a breach. Yes
The Dryer has detected that the dryer nozzle is lowered during self-checks.
This can occur if the Device lost power during the previous drying run or could indicate a problem with the nozzle position sensors.
Press Confirm to raise the nozzle and return to the wake screen.
If the nozzle does not raise, or the problem persists, contact Velico service.
No
1106: Scale_Tare_ Failure
The scale has detected an out-of-range value.
If a Plasma Pretreatment Container is hanging on the scale hook, remove and press Confirm. Switch the Device power switch off, wait 5 seconds, then switch the Device power switch on.
If the problem persists, contact Velico service.
No
Service Code
1108: User_Terminate
1110: MFC_Ambient_ Pressure_Expired
General Description
The drying process was interrupted by pressing the Terminate button on the User Interface during Drying.
Follow the on-screen prompts to return the Dryer to a usable state. No
The Dryer has detected inconsistent readings for ambient pressure.
This can occur if more than 5 minutes has passed between closing the enclosure door and pressing the confirm on the User Interface that appears after unclamping the plasma line or it could indicate a problem with the Dryer.
If a Plasma Drying Chamber is loaded, clamp the plasma tubing, remove the Plasma Drying Chamber, switch the Device power switch off, wait 5 seconds, then switch the Device power switch on. It is acceptable to continue processing the Plasma Drying Chamber.
If the problem persists, contact Velico service. No
1111: Calibration_ Regression_ Failure
2100: PT06_ OverPressure
The Dryer has detected a problem with the calibration calculations.
The Dryer needs to be re-calibrated, contact Velico service.
The Dryer has detected excessive pressure in the Plasma Drying Chamber exhaust path.
This could be a problem with the facility exhaust path or a problem with the Dryer.
Contact Velico service.
2101: PT07_ OverPressure
No
No
2104: TT04_05_ OverTemperature
The Dryer has detected excessive pressure in the Enclosure exhaust path.
This could be a problem with the facility exhaust path or a problem with the Dryer.
Contact Velico service. No
The Dryer has detected a drying gas temperature that is above a safety limit.
This indicates a problem with the Dryer, contact Velico service. No
Service Code
2106: Enclosure_Door_ Sensor_Failure
2107: Nozzle_Position_ Sensor_Failure
2108: Exhaust_ Temperature_ Mismatch
2109: MFC01_Comms_ Failure
2110: MFC02_Comms_ Failure
2111: FS01_Comms_ Failure
2112: Pump_Control_ Failure
2113: PT05_Zero_Offset
The Dryer has detected a discrepancy between redundant Enclosure door sensors.
This indicates a problem with the Dryer, contact Velico service.
The Dryer has detected a problem with the drying gas nozzle position sensors.
Possible Breach?
This indicates a problem with the Dryer, contact Velico service. No
The Dryer has detected a discrepancy in the redundant measurements of the exhaust temperature sensors.
This indicates a problem with the Dryer, contact Velico service.
The Dryer has detected a communication problem with the aerosol flow controller.
This indicates a problem with the Dryer, contact Velico service.
The Dryer has detected a communication problem with the drying gas flow controller.
This indicates a problem with the Dryer, contact Velico service. No
The Dryer has detected a communication problem with the flow sensor.
This indicates a problem with the Dryer, contact Velico service.
The Dryer has detected a problem with the plasma pump.
This indicates a problem with the Dryer, contact Velico service.
The Dryer has detected an unexpected offset on the pressure sensor in the drying gas inlet line.
This indicates a problem with the Dryer, contact Velico service. No
Service Code
2114: PT06_Zero_Offset
The Dryer has detected an unexpected offset on the pressure sensor in the Plasma Drying Chamber Exhaust path.
2115: PT07_Zero_Offset
2116: DryingGas_ Pressure_ Mismatch
2117: Aerosol_Pressure_ Mismatch
2118: Pump_Door_ Opened
2119: CDA_Pressure_ Low
2120: Regulator_ Pressure_ Excessive
Possible Breach?
This indicates a problem with the Dryer, contact Velico service. No
The Dryer has detected an unexpected offset on the pressure sensor in the Enclosure Exhaust path.
This indicates a problem with the Dryer, contact Velico service. No
The Dryer has detected a discrepancy in the redundant measurements of the drying gas pressure sensors.
This indicates a problem with the Dryer, contact Velico service.
The Dryer has detected a discrepancy in the redundant measurements of the aerosol pressure sensors.
This indicates a problem with the Dryer, contact Velico service. No
The Dryer has detected that the plasma pump door is open.
This could be caused by an operator opening the pump door after starting a drying operation or could be a problem with the pump door sensor.
If the pump door is closed, contact Velico service. No
The Input air pressure is too low.
This could be a problem with the CDA system, a closed piping valve, or the dryer sensor that measures input air pressure.
If the supply pressure is within range, contact Velico service. No
The Dryer has detected that the pressure relief switch has activated.
This indicates a problem with the Dryer, contact Velico service. No
Service Code
2121: DryingGas_ Temperature_ Gross_Mismatch
3100: ASWISS_PT05_ OverPressure
General Description
The Dryer has detected a large discrepancy in the redundant measurements of the Drying Gas temperature sensors.
Possible Breach?
This indicates a problem with the Dryer, contact Velico service. No
The Dryer safety system has detected excessive drying gas pressure.
This indicates a problem with the Dryer, contact Velico service.
See “Cleaning Procedure following Service Code” in the Operators Manual (AW-03744).
Note: Due to the Plasma Drying Chamber experiencing excessive drying gas pressure, post drying checks were not completed, and the Plasma Drying Chamber should be removed and discarded as if there is a breach.
Possible
3101: ASWISS_PDC_ OverPressure
3102: ASWISS_PT10_ OverPressure
The Dryer Safety System has Detected excessive Drying Plasma Drying Chamber Pressures.
This indicates a problem with the Dryer, contact Velico service.
See “Cleaning Procedure following Service Code” in the Operators Manual (AW-03744).
Note: Due to the Plasma Drying Chamber experiencing excessive chamber pressures, post drying checks were not completed, and the Plasma Drying Chamber should be removed and discarded as if there is a breach.
The Dryer Safety System has Detected excessive Aerosol Pressures.
This indicates a problem with the Dryer, contact Velico service.
See “Cleaning Procedure following Service Code” in the Operators Manual (AW-03744).
Note: Due to the Plasma Drying Chamber experiencing excessive aerosol pressure, post drying checks were not completed, and the Plasma Drying Chamber should be removed and discarded as if there is a breach.
Possible
Possible
Service Code
3103: ASWISS_Heater_ OverTemperature
3104: ASWISS_PT05_ Mismatch
General Description
The Dryer Safety System has detected an excessive Heater Temperature.
3105: ASWISS_PT10_ Mismatch
3106: ASWISS_TC_ Mismatch
3107: ASWISS_PT08_ Mismatch
3108: ASWISS_PT09_ Mismatch
3190: ASWISS_ Reconnect_ Failure
Possible Breach?
This indicates a problem with the Dryer, contact Velico service. No
The Dryer has detected a discrepancy in the redundant pressure measurements in the Drying Gas pathway.
This indicates a problem with the Dryer, contact Velico service. No
The Dryer has detected a discrepancy in the redundant pressure measurements in the aerosol gas pathway.
This indicates a problem with the Dryer, contact Velico service. No
The Dryer has detected a discrepancy in the redundant temperature measurements in the heater.
This indicates a problem with the Dryer, contact Velico service. No
The Dryer has detected a discrepancy in the redundant sensors that measure the Plasma Drying Chamber pressure.
This indicates a problem with the Dryer, contact Velico service. No
The Dryer has detected a discrepancy in the redundant sensors that measure the Plasma Drying Chamber pressure.
This indicates a problem with the Dryer, contact Velico service. No
The Device has detected a communication problem with the safety system.
This indicates a problem with the Device, contact Velico service. No
Service Code
3191: ASWISS_Relay_ Test_Failure
4000: Drying_Air_Valve_ Failure
4001: Aerosol_Air_ Valve_Failure
4002: MFC_Ambient_ Pressure_ Mismatch
4100: Aerosol_Pressure_ Test_Out_of_ Range
4101: DryingGas_ Pressure_Test_ Low
4200: Mass_Check_ Disturbed
General Description
The Device has detected a problem with the failsafe relay operation.
Possible Breach?
This indicates a problem with the Device, contact Velico service. No
The Dryer has detected a failure of the main inlet valve during initial checks.
This indicates a problem with the Dryer, contact Velico service. No
The Dryer has detected a failure of the aerosol inlet valve during initial checks.
This indicates a problem with the Dryer, contact Velico service. No
The Dryer has detected a discrepancy between ambient pressure sensor readings during initialchecks.
This indicates a problem with the Dryer, contact Velico service. No
The Dryer has detected an unexpectedly low aerosol pressure during initial self-checks.
This indicates a problem with the Dryer, contact Velico service. No
The Dryer has detected an unexpectedly low drying gas pressure during initial self-checks.
This indicates a problem with the Dryer, contact Velico service. No
The Dryer has detected that the Plasma Pretreatment Container is moving when attempting to record starting plasma mass.
Wait until the Plasma Pretreatment Container has stopped swinging and press Confirm.
If the problem persists after switching the Dryer power switch off, waiting 5 seconds, then switching the Dryer power switch on, contact Velico service. No
Service Code
4201: Plasma_Mass_ Low
4202: Plasma_Mass_ High
General Description
The Dryer has detected a low Plasma Pretreatment Container starting mass.
This could be caused by the Plasma Pretreatment Container not being on the bag hook, an incorrect amount of plasma in the Plasma Pretreatment Container, or a problem with the scale.
Ensure the Plasma Pretreatment Container is hanging on the scale hook when confirming the start of the drying operation.
Possible Breach?
If the problem persists across multiple Plasma Pretreatment Containers, contact Velico service. No
The Dryer has detected a high Plasma Pretreatment starting mass.
This could be caused by an incorrect amount of plasma in the Plasma Pretreatment Container, or a problem with the scale.
If the problem persists across multiple Plasma Pretreatment Containers, contact Velico service. No
4301: Enclosure_Door_ Lock_Failure
4400: Deflector_Stuck_ Up
4401: PDC_Not_Found
The Dryer has detected a failure of the Enclosure door lock during the pre-drying checks.
This indicates a problem with the Dryer, contact Velico service. No
The Dryer has detected a problem while actuating the drying gas nozzle.
This indicates a problem with the Dryer, contact Velico service. No
The Dryer has detected a problem while actuating the drying gas nozzle.
This can occur if there is no Plasma Drying Chamber loaded when drying is initiated or could indicate a problem with the Dryer.
If the Plasma Drying Chamber is loaded and this problem persists, contact Velico service.
Service Code
4500: Prime_Check_ Disturbed
The Dryer has detected the Plasma Pretreatment Container has been disturbed during pre-drying plasma mass checks.
Wait until the Plasma Pretreatment Container has stopped swinging and press Confirm.
If the problem persists after switching the Dryer power switch off, waiting 5 seconds, then switching the Dryer power switch on, contact Velico service. No
4501: Prime_Check_ Failure
4601: FS01_Zero_Offset
The Dryer has detected the inability to pump plasma during pre-drying checks.
Make sure the plasma line is installed in the pump, the clamp has been released, the line is oriented in the correct direction with the opaque tubing clamped in the pump, and that the sterile dock connection has been pinched to ensure the line is open.
If the problem persists after switching the Dryer power switch off, waiting 5 seconds, then switching the Dryer power switch on, contact Velico service. No
The Dryer has detected an issue with the PDC leakage sensor during pre-drying checks.
This indicates a problem with the Dryer, contact Velico service.
No
4602: FS01_Flow_Test_ Failure
4603: Encl_Check_ DeflateGas_ OverPressure
The Dryer has detected an issue with the PDC leakage sensing system during pre-drying checks.
This indicates a problem with the Dryer, contact Velico service. No
The Dryer has detected unexpected pressure in the deflate line during the pre-drying checks.
This indicates a problem with the Dryer, contact Velico service. No
Service Code
4604: Enclosure_ Pressurize_Failure
General Description
The Dryer has failed to achieve target integrity pressure in the Enclosure during pre-drying checks.
This could be caused by a-leaking Enclosure door seal, something caught in the Enclosure door, a defective Plasma Drying Chamber or a-problem with the Dryer.
Check the Enclosure seal is not dislodged and that the Plasma Drying Chamber is not caught in the Enclosure door.
If the problem persists, contact Velico service.
No
4605: Enclosure_Leak
4606: Enclosure_ Exhaust_ Occluded
The Dryer has detected pressure decay in the enclosure that exceeds the allowable limit during pre-drying checks.
This could be caused by a leaking Enclosure door seal, something caught in the Enclosure door, an improperly connected aerosol line, a defective Plasma Drying Chamber or a problem with the Dryer.
Check the Enclosure door seal is not dislodged, the Plasma Drying Chamber is not caught in the Enclosure door, and that the PDC aerosol connection is securely made.
If the problem persists across multiple Plasma Drying Chambers, contact Velico-service.
The Dryer has detected an occluded Enclosure exhaust line during pre-drying checks.
This indicates a problem with the Dryer, contact Velico service.
No
No
Service Code
4607: Gross_Enclosure_ Leak
4630: ASWISS_ Enclosure_Lock_ Test_Failure
4700: Aerosol_Line_ Occluded
General Description
The Dryer has detected pressure decay in the enclosure that exceeds the allowable limit during pre-drying checks.
This could be caused by a leaking Enclosure door seal, something caught in the Enclosure door, an improperly connected aerosol line, a defective Plasma Drying Chamber or a problem with the-Dryer.
Check the Enclosure seal is not dislodged, the Plasma Drying Chamber is not caught in the Enclosure door, and that the PDC aerosol connection is securely made.
If the problem persists across multiple Plasma Drying Chambers, contact Velico service.
The Dryer has detected a problem with the safety systems monitoring of the Enclosure door lock.
Possible Breach?
No
4701: Aerosol_Line_ Disconnected
This indicates a problem with the Dryer, contact Velico service. No
The Dryer has detected excessive aerosol pressure during pre-drying checks.
Verify the aerosol line on the Plasma Drying Chamber is properly routed and connected to the Dryer.
If the problem persists with a correctly routed line, replace the Plasma Drying Chamber.
If the problem persists across multiple Plasma Drying Chambers contact Velico service.
The Dryer has detected low aerosol pressure during pre-drying checks.
Verify the aerosol line on the Plasma Drying Chamber is securely connected to the-Dryer.
If the problem persists with a correctly connected line, replace the Plasma Drying-Chamber.
If the problem persists across multiple Plasma Drying Chambers, contact Velico service.
No
No
Service Code
4800: PDC_Check_
Aerosol_Pressure_ High
The Dryer has detected excessive aerosol pressure during pre-drying checks.
Verify the aerosol line on the Plasma Drying Chamber is properly routed and connected to the Dryer.
If the problem persists with a correctly routed line, replace the Plasma Drying Chamber.
If the problem persists across multiple Plasma Drying Chambers, contact Velico service. No
4801: PDC_Check_
Aerosol_Pressure_ Low
The Dryer has detected low aerosol pressure during pre-drying checks.
Verify the aerosol line on the Plasma Drying Chamber is securely connected to the Dryer.
If the problem persists with a correctly connected line, replace the Plasma Drying Chamber.
If the problem persists across multiple Plasma Drying Chambers, contact Velico service.
No
4802: PDC_Check_ Exhaust_ Pressure_Low
The Dryer has detected unexpectedly low pressure in the process exhaust during pre-drying checks.
This may be caused by a defective Plasma Drying Chamber or could be a problem with the Dryer.
If the problem persists across multiple Plasma Drying Chambers, contact Velico service.
No
4803: PDC_Check_ DryingGas_ Heating_Failure
4804: PDC_Check_ Exhaust_Heating_ Failure
The Dryer has failed to achieve the drying gas temperature during pre-drying checks.
Clear the notification and restart the drying operation. If the problem persists, contact Velico service. No
The Dryer has failed to achieve the required exhaust temperature during pre-drying checks.
This indicates a problem with the Dryer, contact Velico service. No
Service Code
4805: Gross_PDC_Leak
4806: PDC_Check_ Enclosure_Vent_ Failure
4807: PDC_Leak
General Description
The Dryer has detected a large leak from the Plasma Drying Chamber during pre-drying checks.
Verify the exhaust port is fully installed on the exhaust nozzle and restart the drying operation.
If the problem persists, transfer the Plasma Pretreatment Container to a new Plasma Drying Chamber.
If the problem persists across multiple Plasma Drying Chambers, contact Velico service. No
The Dryer has detected an occluded Enclosure exhaust line during pre-drying checks.
This indicates a problem with the Dryer, contact Velico service.
The Dryer has detected a leak in the Plasma Drying Chamber during pre-drying checks. The Plasma Drying Chamber is defective and must be replaced.
Transfer the Plasma Pretreatment Container to a new Plasma Drying Chamber and restart the drying operation.
If the problem persists across multiple Plasma Drying Chambers, contact Velico service. No
4808: PDC_Check_ Sensor_Failure
4809: FS01_Flow_ Sensor_Leak
5000: DryingGas_ Heating_Failure
The Dryer has detected a discrepancy in exhaust pressure measurements.
This indicates a problem with the Dryer, contact Velico service. No
The Dryer has detected a pneumatic leak in the flow sensor pathway.
This indicates a problem with the Dryer, contact Velico service. No
The Dryer has failed to achieve the drying gas temperature.
Clear the notification and restart the drying operation, if the problem persists contact Velico service. No
Service Code
5001: Exhaust_Heating_ Failure
5002: Priming_Failure
The Dryer has failed to achieve the required exhaust temperature.
This indicates a problem with the Dryer, contact Velico service.
The Dryer has not detected the start of drying within the expected time period. This is likely a defective Plasma Drying Chamber.
Transfer the Plasma Pretreatment Container to a new Plasma Drying Chamber and restart the drying operation.
If this problem persists across multiple Plasma Drying Chambers contact Velico service.
Possible Breach?
No
5100: DryingGas_ Temperature_ Mismatch
5101: Heater_ Controller_Failure
5102: Exhaust_ Controller_Failure
5105: No_Plasma_Flow
The Dryer has detected a discrepancy in the drying gas temperature during drying.
This indicates a problem with the Dryer, contact Velico service.
The Drying gas temperature is outside of the allowed tolerance during drying.
No
No
5107: Aerosol_Flow_ Out_of_Range
This indicates a problem with the Dryer, contact Velico service. No
The Dryer has detected a discrepancy in the exhaust temperature during drying.
If the problem persists across multiple Plasma Drying Chambers, contact Velico service.
The Dryer has detected that insufficient plasma has been processed during the drying operation.
If this problem persists across multiple Plasma Drying Chambers, contact Velico service.
The Dryer has detected that the aerosol flow rate is outside of expected tolerances during drying.
No
No
This indicates a problem with the Dryer, contact Velico service. No
Service Code
5108: Aerosol_Pressure_ High
General Description
The Dryer has detected high aerosol pressure during drying.
This may be an issue with the Plasma Drying Chamber or the Dryer.
5109: Aerosol_Pressure_ Low
5110: DryingGas_Flow_ Out_of_Range
5112: DryingGas_ Pressure_Low
Possible Breach?
If this problem persists across multiple Plasma Drying Chambers, contact Velico service. No
The Dryer has detected low aerosol pressure during drying.
This may be an issue with the Plasma Drying Chamber or the Dryer.
If this problem persists across multiple Plasma Drying Chambers, contact Velico service.
The Dryer has detected that the drying gas flow rate is outside of expected tolerances during drying.
This indicates a problem with the Dryer, contact Velico service.
The Dryer has detected a leak in one of the Plasma Drying Chamber’s filters during drying. The Plasma Drying Chamber must be removed and discarded.
If the problem persists across Multiple Plasma Drying Chambers, contact Velico service.
See “Cleaning Procedure following Service Code” in the Operators Manual (AW-03744).
No
No
Yes
5113: PT08_PT09_ Mismatch
The Dryer has detected a discrepancy in the drying chamber pressure during drying.
This indicates a problem with the Dryer, contact Velico service. No
5114: Collection_Filter_ Failure
The Dryer has detected a leak in the collection filter of the Plasma Drying Chamber during drying. The Plasma Drying Chamber must be removed and discarded.
If the problem persists across multiple Plasma Drying Chambers, contact Velico service.
See “Cleaning Procedure following Service Code” in the Operators Manual (AW-03744).
Note: This indicates a failure of the collection filter, and it is expected that plasma could be present in the lower portion of the dryer enclosure.
Possible Breach?
Yes
5115: Plenum_Filter_ Failure
5116: PDC_Exhaust_ Pressure_Low
5117: PDC_Pressure_ High
The Dryer has detected a leak in the plenum filter of the Plasma Drying Chamber during drying. The Plasma Drying Chamber must be removed and discarded.
If the problem persists across multiple Plasma Drying Chambers, contact Velico service.
See “Cleaning Procedure following Service Code” in the Operators Manual (AW-03744).
Note: This indicates a failure of the plenum filter, and it is expected that plasma could be present in the upper portion of the dryer enclosure.
The Dryer has detected unexpectedly low pressure in the process exhaust during drying.
This indicates a problem with the Dryer, contact Velico service.
The Dryer has detected excessive pressure within the drying chamber during drying. The Plasma Drying Chamber must be removed and discarded.
Yes
Possible
If the problem persists across multiple Plasma Drying Chambers, contact Velico service. No
Service Code
5118: Collection_Filter_ Slope_Failure
The Dryer has detected a leak in the collection filter of the Plasma Drying Chamber during drying. The Plasma Drying Chamber must be removed and discarded.
If the problem persists across multiple Plasma Drying Chambers, contact Velico service.
See “Cleaning Procedure following Service Code” in the Operators Manual (AW-03744).
Note: This indicates a failure of the collection filter, and it is expected that plasma could be present in the lower portion of the dryer enclosure.
Possible Breach?
Yes
5119: Plenum_Filter_ Slope_Failure
The Dryer has detected a leak in the plenum filter of the Plasma Drying Chamber during drying. The Plasma Drying Chamber must be removed and discarded.
If the problem persists across multiple Plasma Drying Chambers, contact Velico service.
See “Cleaning Procedure following Service Code” in the Operators Manual (AW-03744).
Note: This indicates a failure of the plenum filter, and it is expected that plasma could be present in the upper portion of the dryer enclosure.
Yes
5121: Pump_Velocity_ Mismatch
6000: Gross_PDC_ Damage
The Dryer has detected a problem with the plasma pump.
This indicates a problem with the Dryer, contact Velico service. No
The Dryer has detected a large leak from the Plasma Drying Chamber during post-drying checks. The Plasma Drying Chamber must be removed and discarded.
If the problem persists across multiple Plasma Drying Chambers, contact Velico service.
See “Cleaning Procedure following Service Code” in the Operators Manual (AW-03744).
Note: This indicates a substantial leak in the plasma drying chamber, and it is expected that plasma could be present at any location within the dryer enclosure.
Service Code
6001: Integrity_ Enclosure_Vent_ Failure
6002: PDC_Damaged
General Description
The Dryer has detected an occluded Enclosure exhaust line during post-drying checks and could not confirm the integrity of the Plasma Drying Chamber. The Plasma Drying Chamber must be removed and discarded.
This indicates a problem with the Dryer, contact Velico service.
The Dryer has detected a leak from the Plasma Drying Chamber during post-drying checks. The Plasma Drying Chamber must be removed and discarded.
If the problem persists across multiple Plasma Drying Chambers, contact Velico service.
See “Cleaning Procedure following Service Code” in the Operators Manual (AW-03744).
Possible Breach?
Possible
Note: This indicates a leak in the plasma drying chamber, and it is expected that plasma could be present at any location within the dryer enclosure. Yes
6100: DeflateGas_ OverPressure
6101: Deflation_Failure
The Dryer has detected excessive pressure in the deflation pathway during post-drying checks.
Moving the Plasma Drying Chamber to the Sealing operation may lead to reduced dried plasma yield. The Plasma Drying Chamber must be removed and discarded.
This indicates a failure of the Dryer, contact Velico service.
The Dryer has detected that the Enclosure exhaust line is not reaching target pressure during the post-drying deflate sequence.
Moving the Plasma Drying Chamber to the Sealing operation may lead to reduced dried plasma yield. The Plasma Drying Chamber must be removed and discarded.
No
This indicates a problem with the Dryer, contact Velico service. No
Service Code
6102: Deflation_ Enclosure_Vent_ Failure
The Dryer has detected an occluded Enclosure exhaust pathway during post-drying checks.
Moving the Plasma Drying Chamber to the Sealing operation may lead to reduced dried plasma yield. The Plasma Drying Chamber must be removed and discarded.
This indicates a problem with the Dryer, contact Velico service.
6103: DeflateGas_Flow_ Out_of_Range
6200: Deflector_Stuck_ Down
The Dryer has detected an occluded Enclosure exhaust pathway during post-drying checks.
Moving the Plasma Drying Chamber to the Sealing operation may lead to reduced dried plasma yield. The Plasma Drying Chamber must be removed and discarded.
This indicates a problem with the Dryer, contact Velico service.
The Dryer has detected a problem with the position of the drying gas nozzle when attempting to raise post-drying.
If the nozzle has retracted, freeing the Plasma Drying Chamber from the enclosure, it is acceptable to move the Plasma Drying Chamber to the Sealing operation.
This indicates a problem with the Dryer, contact Velico service.
6201: Deflector_ Locked_High_ Pressure
The Dryer has detected excessive pressure in the Plasma Drying Chamber after the Drying Gas Nozzle is raised after drying
This indicates a problem with the Dryer. Contact Velico service. No
Service Code
6300: Enclosure_ Locked_High_ Pressure
6301: Enclosure_Door_ Stuck_Locked
General Description
The Dryer has detected an occluded Enclosure exhaust pathway during post-drying checks.
It is acceptable to move the Plasma Drying Chamber to the Sealing operation.
Possible Breach?
This indicates a problem with the Dryer, contact Velico service. No
The Dryer has detected a problem with the Enclosure door lock.
It is acceptable to move the Plasma Drying Chamber to the Sealing operation.
If unable to remove the door key, follow instructions for manual lock release. This indicates a problem with the Dryer, contact Velico service. No
The following service codes are applicable to only the Sealer component of the FrontlineODP System.
Service Code
1200: PV101_ShutOff_ Failure
1201: Temperature_ Mismatch_Failure
General Description
The Sealer has detected a failure of the inlet pressure valve to close, leaving the device pressurized when it should not be.
1202: System_Reset_ Breach
1203: System_Reset_ Clean
Possible Breach?
This indicates a problem with the Sealer, contact Velico service. No
The Sealer has detected an error while trying to confirm proper configuration of the Seal or Separate controller. Wait 1 minute before attempting to continue waking the Sealer.
If the problem persists, contact Velico service.
The Sealer detected a problem in the previous sealing run that could have led to a Plasma Drying Chamber breach. Remove and discard the Plasma Drying Chamber.
If the problem persists, contact Velico service.
See “Cleaning Procedure following Service Code” in the Operators Manual (AW-03744).
Note: This fault will occur if the Sealer lost power during a sealing operation. If power is lost during sealing, Plasma Drying Chamber integrity may have been affected. The Plasma Drying Chamber should be removed and discarded as if there is a breach.
The Sealer was unable to confirm the cleaning cycle was performed completely and must be repeated. If necessary, remove and discard the Plasma Drying Chamber.
If the problem persists, contact Velico service.
See “Cleaning Procedure following Service Code” in the Operators Manual (AW-03744).
Note: This fault will occur if the Sealer dryer lost power during the cleaning process. If a Plasma Drying Chamber is still in the sealer, it should be removed and discarded as if there is a breach.
Service Code
2200: PT102_Zero_Offset
The Sealer has detected unexpected pressure from the vacuum generator during initial self-checks.
This indicates a problem with the Sealer’s vacuum sub-system, contact Velico service.
No
2205: TOSS_Failure
The Sealer has detected a failure of either the sealing or separating sub-system.
This indicates a problem with the Sealer, contact Velico service. No
2207: Plasma_Slides_ Position_ Unknown
2208: Plasma_Slides_ Position_ Impossible
The Sealer has detected a failure with the Plasma Release Slide position sensors.
There may be an obstruction preventing the Sealer from moving the Plasma Drying Chamber to a position where it can be easily removed.
If the problem persists, contact Velico service.
The Sealer has detected that the Plasma Release Slides are in an unexpected position.
There may be an obstruction preventing the Sealer from moving the Plasma Drying Chamber to a position where it can be easily removed.
If the problem persists, contact Velico service.
No
No
2209: Seal_Slides_ Position_ Unknown
2210: Seal_Slides_ Position_ Impossible
The Sealer has detected a failure with the Seal Slide position sensors.
There may be an obstruction preventing the Sealer from moving the Plasma Drying Chamber to a position where it can be easily removed.
If the problem persists, contact Velico service.
The Sealer has detected that the Seal Slides are in an unexpected position.
There may be an obstruction preventing the Sealer from moving the Plasma Drying Chamber to a position where it can be easily removed.
No
If the problem persists, contact Velico service. No
2211: Separate_ Slides_Position_ Unknown
The Sealer has detected a failure with the Separate Slide position sensors.
There may be an obstruction preventing the Sealer from moving the Plasma Drying Chamber to a position where it can be easily removed.
If the problem persists, contact Velico service. No
2212: Separate_ Slides_Position_ Impossible
2213: Shuttle_ Orientation_ Unknown
2214: Shuttle_ Orientation_ Impossible
2215: ASWISS_Seal_ Current_Low
2216: ASWISS_ Separate_ Current_Low
2217: Air_Extract_ Slide_Position_ Unknown
The Sealer has detected that the Separate Slides are in an unexpected position.
There may be an obstruction preventing the Sealer from moving the Plasma Drying Chamber to a position where it can be easily removed.
If the problem persists, contact Velico service.
The Sealer has detected a shuttle orientation fault. Remove and discard the Plasma Drying Chamber.
If the problem persists, contact Velico service.
The Sealer has detected a fault with the Shuttle orientation sensors. Remove and discard the Plasma Drying Chamber.
No
No
If the problem persists, contact Velico service. No
The Sealer safety system has detected a fault during the sealing operation. Remove and discard the Plasma Drying Chamber.
If the problem persists, contact Velico service. No
The Sealer safety system has detected a fault during the separating operation. Remove and discard the Plasma Drying Chamber.
If the problem persists, contact Velico service. No
The Sealer has detected a failure with the Air Extraction Slide position sensor.
There may be an obstruction preventing the Sealer from moving the Plasma Drying Chamber to a position where it can be easily removed.
If the problem persists, contact Velico service. No
Service Code
3200: ASWISS_PT102_ OverPressure
3201: ASWISS_Seal_ Timeout
3202: ASWISS_ Separate_Timeout
3203: ASWISS_PT102_ Mismatch
3209: ASWISS_Seal_ Disconnected
General Description
The Sealer safety system has detected a positive pressure in the evacuation line.
This indicates a problem with the Sealer, contact Velico service. No
The Sealer safety system has detected a fault during the sealing operation. Remove and discard the Plasma Drying Chamber.
If the problem persists, contact Velico service. No
The Sealer safety system has detected a fault during the separating operation. Remove and discard the Plasma Drying Chamber.
If the problem persists, contact Velico service. No
The Sealer safety system has detected a fault during the initial checks.
If the problem persists, contact Velico service. No
The Sealer safety system has detected a fault with the sealing sub-system.
If this occurs during the Sealer operation, remove and discard the Plasma Drying Chamber.
If the problem persists, contact Velico service. No
3210: ASWISS_ Separate_ Disconnected
7001: Vacuum_Filter_ Check_Failure
The Sealer safety system has detected a fault with the separating sub-system.
If this occurs during the Sealer operation, remove and discard the Plasma Drying Chamber.
If the problem persists, contact Velico service. No
The Sealer has detected out of range vacuum pressures from the vacuum generator while active during initial self-checks.
This indicates a problem with the Sealer’s vacuum sub-system, contact Velico service. No
7010: Internal_Surface_ Temperature_ High
The Sealer has detected internal surface temperatures on either the Seal or Separate jaws that are too high to open the door and provide access for cleaning. Once the temperature has dropped to an acceptable level, the Sealer will allow access.
7011: Shuttle_Not_ Inverted
7012: Shuttle_Not_ Upright
7013: Vacuum_Target_ Timeout
Possible Breach?
If the problem persists, contact Velico service. No
The Shuttle is not in the correct, inverted orientation for the subsequent operation. Rotate the Shuttle to the inverted orientation and press Confirm.
If the problem persists, contact Velico service.
The Shuttle is not in the correct, upright orientation for the subsequent operation. Rotate the Shuttle to the upright orientation and press Confirm.
No
7014: Operator_Seal_ Rejected
If the problem persists, contact Velico service. No
The Sealer has not achieved the target vacuum pressure within the allotted time.
If the problem persists, contact Velico service.
See “Cleaning Procedure following Service Code” in the Operators Manual (AW-03744).
Note: This may be caused by a leak in the Plasma Drying Chamber. The Plasma Drying Chamber should be removed and discarded as if there is a breach.
The Operator has confirmed that a malformed seal has been created.
Contact Velico service.
See “Cleaning Procedure following Service Code” in the Operators Manual (AW-03744).
Note: When a seal is rejected, there could be a leak in the Plasma Drying Chamber. The Plasma Drying Chamber should be removed and discarded as if there is a breach.
Possible
Possible
7015: Vacuum_Not_ Maintained
The Sealer has detected a failure to maintain proper air evacuation conditions during sealing. Contact Velico service.
See “Cleaning Procedure following Service Code” in the Operators Manual (AW-03744).
Note: When air extraction cannot be performed correctly, there could be a leak in the Plasma Drying Chamber. The Plasma Drying Chamber should be removed and discarded as if there is a breach.
Possible Breach?
Possible
7016: Air_Extract_Slide_ Extend_Timeout
7017: Air_Extract_Slide_ Retract_Timeout
The Sealer has detected a failure to extend the air extraction slide within a reasonable time limit.
There may be an obstruction preventing the Sealer from moving the Plasma Drying Chamber to a position where it can be easily removed.
If the problem persists, contact Velico service. No
The Sealer has detected a failure to retract the air extraction slide within a reasonable time limit.
There may be an obstruction preventing the Sealer from moving the Plasma Drying Chamber to a position where it can be easily removed.
If the problem persists, contact Velico service.
No
8102: Plasma_Slides_ Retract_Timeout
8104: Plasma_Slides_ Extend_Timeout
The Sealer has detected a failure while attempting to retract the plasma release slides.
There may be an obstruction preventing the Sealer from moving the Plasma Drying Chamber to a position where it can be easily removed.
If the problem persists, contact Velico service. No
The Sealer has detected a failure while attempting to extend the plasma release slides.
There may be an obstruction preventing the Sealer from moving the Plasma Drying Chamber to a position where it can be easily removed.
If the problem persists, contact Velico service. No
Service Code
8202: Seal_Slides_ Retract_Timeout
8204: Seal_Slides_ Extend_Timeout
General Description
The Sealer has detected a failure while attempting to retract the seal slides. There may be an obstruction preventing the Sealer from moving the Plasma Drying Chamber to a position where it can be easily removed.
If the problem persists, contact Velico service. No
The Sealer has detected a failure while attempting to extend the slides for sealing.
There may be an obstruction preventing the Sealer from moving the Plasma Drying Chamber to a position where it can be easily removed.
If the problem persists, contact Velico service. No
8205: Seal_Initial_ Pressure_Fault
8208: Seal_WarmUp_ Timeout
The Sealer has detected a problem with the low seal pressure measurement.
Remove and discard the Plasma Drying Chamber.
If the problem persists, contact Velico service. No
The Sealer has not reached an adequate seal temperature within the allowable time limit.
Remove and discard the Plasma Drying Chamber.
If the problem persists, contact Velico service. No
8209: Seal_Pressure_ Not_Maintained
8211: Seal_Final_ Pressure_Timeout
The Sealer has detected an out of range sealing pressure.
Remove and discard the Plasma Drying Chamber.
If the problem persists, contact Velico service. No
The Sealer has taken too long to achieve the required seal pressure.
Remove and discard the Plasma Drying Chamber.
If the problem persists, contact Velico service. No
8212: Seal_ Temperature_ Not_Maintained
The Sealer has detected a seal temperature that is outside of allowable tolerances.
Remove and discard the Plasma Drying Chamber.
If the problem persists, contact Velico service. No
Service Code
8213: Seal_Duration_ Failure
General Description
The Sealer has detected the duration of the sealing process is outside of allowable tolerances.
Contact Velico service.
See “Cleaning Procedure following Service Code” in the Operators Manual (AW-03744).
Note: When the Seal operation duration is outside of defined limits, the seal may be compromised. The Plasma Drying Chamber should be removed and discarded as if there is a breach.
Possible Breach?
Possible
8214: Seal_CoolDown_ Timeout
8216: Seal_Slide_Delay_ Failure
The Sealer has taken too long to cool down after completing the seal operation.
Remove and discard the Plasma Drying Chamber. If the problem persists, contact Velico service. No
The Sealer detected a failure in the timing of the seal jaws closing which could affect the quality of the formed seal.
Contact Velico service.
See “Cleaning Procedure following Service Code” in the Operators Manual (AW-03744).
Note: When the Seal slides do not close correctly, the seal formation can be affected. The Plasma Drying Chamber should be removed and discarded as if there is a breach.
Possible
8302: Separate_Slides_ Retract_Timeout
8304: Separate_Slides_ Extend_Timeout
The Sealer has detected a failure while attempting to retract the separate slides.
There may be an obstruction preventing the Sealer from moving the Plasma Drying Chamber to a position where it can be easily removed. Contact Velico service. No
The Sealer has detected a failure while attempting to extend the separate slides.
There may be an obstruction preventing the Sealer from moving the Plasma Drying Chamber to a position where it can be easily removed. Contact Velico service.
No
Service Code
8305: Separate_ WarmUp_ Timeout
8306: Separate_ Temperature_ Not_Maintained
8307: Separate_ Duration_Failure
General Description
The Sealer has not reached an adequate separate temperature within the allowable time limit.
Remove and discard the Plasma Drying Chamber.
Possible Breach?
If the problem persists, contact Velico service. No
The Sealer has detected an out-of-range separate temperature.
Remove and discard the Plasma Drying Chamber.
If the problem persists, contact Velico service. No
The Sealer has detected the duration of the separate process is outside of allowable tolerances.
Contact Velico service.
See “Cleaning Procedure following Service Code” in the Operators Manual (AW-03744).
Note: When the Separate operation duration is outside of defined limits, the seal may be compromised. The Plasma Drying Chamber should be removed and discarded as if there is a breach.
Possible
8308: Separate_ CoolDown_ Timeout
8310: Separate_Slide_ Delay_Failure
The Sealer has taken too long to cool down after completing the separate operation.
Remove and discard the Plasma Drying Chamber.
If the problem persists, contact Velico service. No
The Sealer detected a failure in the timing of the separate jaws closing which could affect the quality of the formed seal.
Contact Velico service.
See “Cleaning Procedure following Service Code” in the Operators Manual (AW-03744).
Note: When the Seal slides do not close correctly, the seal separation can be affected. The Plasma Drying Chamber should be removed and discarded as if there is a breach.
Possible
8400: Door_Not_ Closed_Error
The Sealer has detected an error while attempting to close the door. Try closing the door again.
If the problem persists, contact Velico service. No
Service Code
8401: Door_Not_ Locked_Error
8500: Door_Not_ Opened_Error
8501: Door_Not_ Unlocked_Error
8502: Door_Unlock_ Sensor_Failure
General Description
The Sealer has detected an error while attempting to close the door.
This can occur if the Seal or Separate Slide drawers are not fully seated following cleaning. Open the door, confirm the drawers are fully seated, and try closing the door again.
If the problem persists, contact Velico service. No
The Sealer has detected an error while attempting to open the door. Check for an obstruction preventing the door from opening and try again.
If the problem persists, contact Velico service. No
The Sealer has detected an error while attempting to unlock the door. Try to unlock the door again. If the problem persists, contact Velico service. No
The Sealer has detected a failure of the Door Lock Sensor to accurately detect operation of the door lock.
This indicates a problem with the Sealer, contact Velico service. No
8503: ASWISS_PV101_ Inhibit_Test_ Failure
8504: Unlock_PV101_ ShutOff_Failure
The Sealer has detected a failure of the Safety System to ensure the inlet air valve is closed when the Sealer door is not closed and locked.
This indicates a problem with the Sealer, contact Velico service. No
The Sealer has detected a failure of the air inlet valve to properly close before the door can be unlocked and opened for cleaning.
This indicates a problem with the Sealer, contact Velico service. No
9201: Shuttle_Motion_ Fault
The Sealer has detected a fault while attempting to move the Shuttle.
There may be an issue preventing the Sealer from moving the Plasma Drying Chamber to a position where it can be easily removed.
If the problem persists, contact Velico service. No
Service Code
9202: Shuttle_Not_ Locked_Error
The Sealer has detected the shuttle orientation is not properly locked and shuttle motion has been disabled.
The shuttle orientation may have been unlocked accidentally and must be returned to a locked orientation before motion can occur.
If the problem persists, which may be a problem with the shuttle orientation sensors, contact Velico service. No
9203: Shuttle_Motion_ Impossible
9204: Shuttle_Motion_ Timeout
The Sealer has detected a fault while attempting to move the Shuttle.
There may be an obstruction preventing the Sealer from moving the Plasma Drying Chamber to a position where it can be easily removed.
If the problem persists, contact Velico service. No
The Sealer has detected a failure of shuttle motion to complete within a reasonable time limit.
Switch the Device power switch off, wait 5 seconds, then switch the Device power switch on.
This indicates a problem with the Sealer, contact Velico service. No