VELCO Cottage
11/24
I N S TA LL ATI O N I N S TRU C TI O N S INCLUDES:
VT-100 thermostat-controlled valve S-100/26 filter and structure wires
VR-100 wall pipe FR-100 extension pipe
YG-100 outside grille
We provide a ten-year warranty for Velco thermostatic valves. The manufacturing date of the valve can be found on the thermostat, so there is no need to keep the purchase receipt.
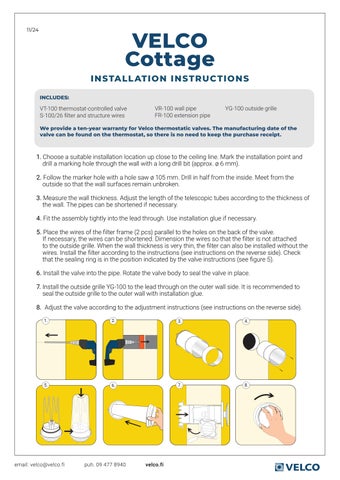
1. Choose a suitable installation location up close to the ceiling line. Mark the installation point and drill a marking hole through the wall with a long drill bit (approx. ø 6 mm). 2. Follow the marker hole with a hole saw ø 105 mm. Drill in half from the inside. Meet from the outside so that the wall surfaces remain unbroken. 3. Measure the wall thickness. Adjust the length of the telescopic tubes according to the thickness of the wall. The pipes can be shortened if necessary. 4. Fit the assembly tightly into the lead through. Use installation glue if necessary. 5. Place the wires of the filter frame (2 pcs) parallel to the holes on the back of the valve. If necessary, the wires can be shortened. Dimension the wires so that the filter is not attached to the outside grille. When the wall thickness is very thin, the filter can also be installed without the wires. Install the filter according to the instructions (see instructions on the reverse side). Check that the sealing ring is in the position indicated by the valve instructions (see figure 5). 6. Install the valve into the pipe. Rotate the valve body to seal the valve in place. 7. Install the outside grille YG-100 to the lead through on the outer wall side. It is recommended to seal the outside grille to the outer wall with installation glue. 8. Adjust the valve according to the adjustment instructions (see instructions on the reverse side). 1.
2.
3.
4.
5.
6.
7.
8.
email: velco@velco.fi
puh. 09 477 8940
velco.fi