ervix Sampling Card
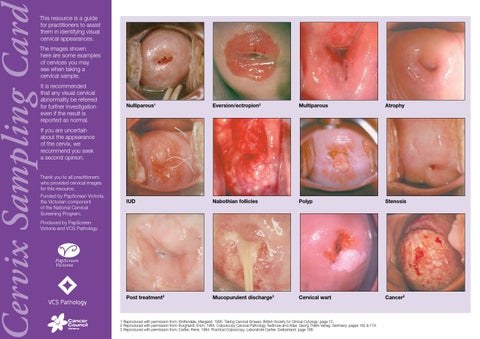
This resource is a guide for practitioners to assist them in identifying visual cervical appearances. The images shown here are some examples of cervices you may see when taking a cervical sample. It is recommended that any visual cervical abnormality be referred for further investigation even if the result is reported as normal.
Nulliparous1
Eversion/ectropion2
Multiparous
Atrophy
IUD
Nabothian follicles
Polyp
Stenosis
Post treatment2
Mucopurulent discharge3
Cervical wart
Cancer2
If you are uncertain about the appearance of the cervix, we recommend you seek a second opinion.
Thank you to all practitioners who provided cervical images for this resource. Funded by PapScreen Victoria, the Victorian component of the National Cervical Screening Program.
Produced by PapScreen Victoria and VCS Pathology.
1 Reproduced with permission from: Wolfendale, Margaret, 1995. Taking Cervical Smears. British Society for Clinical Cytology: page 12. 2 Reproduced with permission from: Burghardt, Erich, 1984. Colposcopy Cervical Pathology Textbook and Atlas. Georg Thiem Verlag. Germany: pages 162 & 174. 3 Reproduced with permission from: Cartier, RenĂŠ, 1984. Practical Colposcopy. Laboratoire Cartier. Switzerland: page 168.
ervix Sampling Card
A guide to taking a high-quality Pap test
Recommended techniques & instruments to be used when taking a Pap test For pre-menopausal women Cervical sampler broom: rotate 3–5 times or Cervex-Brush® Combi: insert central part of the brush into os and rotate clockwise twice or Spatula: rotate once or twice, taking care to keep contact with the ecto-cervix plus Endocervical brush: insert ensuring that you can see the lower row of the bristles and make a quarter rotation
Taking a Pap Smear and other Cervical Samples: Instructional DVD
Synopsis Dr. Siobhan Bourke discusses and demonstrates correct technique for taking Cervical Samples: conventional Pap tests, liquid based samples for cytology, HPV and the Compass Trial. Chlamydia testing using FLOQ and UriSwabs is also discussed.
VCS Pathology, Aug 2014 Running time 10.59
Produced by VCS Pathology
www.vcspathology.org.au
For peri & post-menopausal women
To order a free copy of Taking a Pap Smear and other Cervical Samples: Instructional DVD contact VCS Pathology on (03) 9250 0300. Alternatively, watch the video online at the VCS Pathology website: www.vcs.org.au If you wish to discuss sampling techniques, ring VCS Pathology and ask to speak to a Liaison Physician. For more information about Pap tests, HPV testing or cervical cancer visit www.papscreen.org.au or call the Cancer Council on 13 11 20.
© September 2015 Cancer Council Victoria
Cervical sampler broom: rotate 3–5 times plus Endocervical brush: insert ensuring that you can see the lower row of the bristles and make a quarter rotation
Making the Pap slide
Sampling instruments
After taking the sample/s they must be placed promptly onto the slide. Wipe both sides of the spatula, cervical sampler broom or Cervex-Brush® Combi onto the slide.
Spatula
Endocervical brush
If you have taken an endocervical brush sample, roll this gently onto the remaining half (see diagrams). Fix the slide within 5 seconds, spraying from a distance of around 20cms. The cells expand if they are not fixed quickly and any degree of dysplasia might be underestimated.
Cervical sampler broom Cervex-Brush® Combi
Techniques
Watch the instructional DVD Taking a Pap Cervical sampler broom Smear and other Cervical Samples to see the & Cervex-Brush® Combi correct technique for making and fixing the slide.
Spatula & Endocervical brush
Pap test & liquid-based cytology (LBC) Check the expiry date on the LBC vial. Make the Pap test slide as indicated above then immediately place the instruments into the LBC and agitate to release cells. Ensure the lid is tightened so black line on the cap passes the black line on the vial.
Testing for HPV (test of cure) Make the Pap test slide as usual then immediately place the instruments into the LBC and agitate to release cells.
LBC & Compass Clinical Trial
or Cervex-Brush® Combi: insert central part of the brush into os and rotate clockwise twice or Spatula: rotate once or twice, taking care to keep contact with the ecto-cervix plus Endocervical brush: insert ensuring that you can see the lower row of the bristles and make a quarter rotation.
If participating in this trial, please only send a ThinPrep™ brand of LBC sample to VCS. Please take a cervical sample using the usual sampling instruments then immediately place them into ThinPrep. Agitate to release cells.
Special notes Eversion: take care to sample the squamo-columnar junction. This is the junction where the columnar epithelium of the endocervical canal meets the
squamous epithelium of the vagina. It is the area where cell changes occur. Pregnancy: do not use the endocervical brush or Cervex-Brush® Combi.
Disclaimer T his resource is a guide for practitioners only. Neither PapScreen Victoria nor any other persons associated with the preparation of this resource accept any liability whatsoever from consequences arising from the use of this resource.