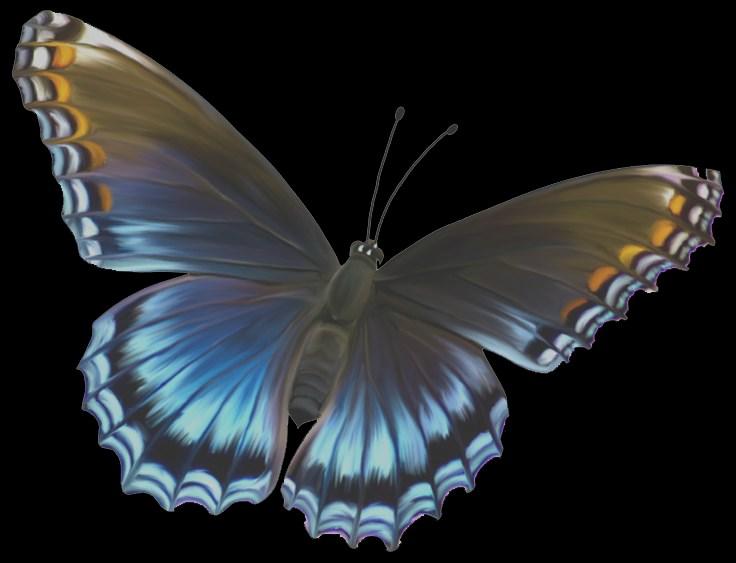
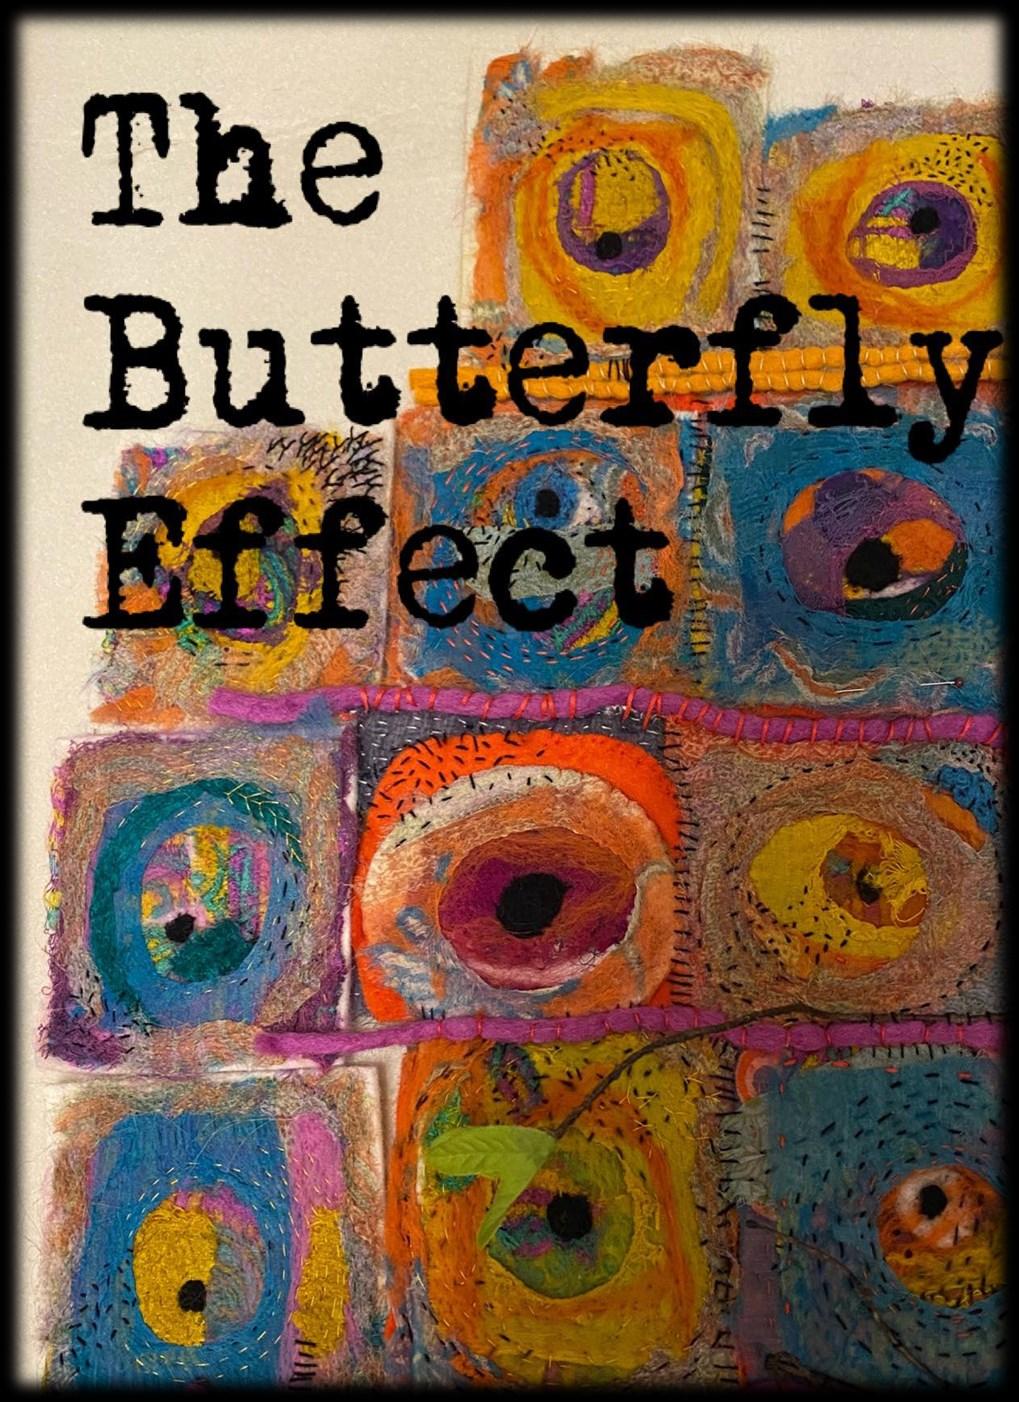
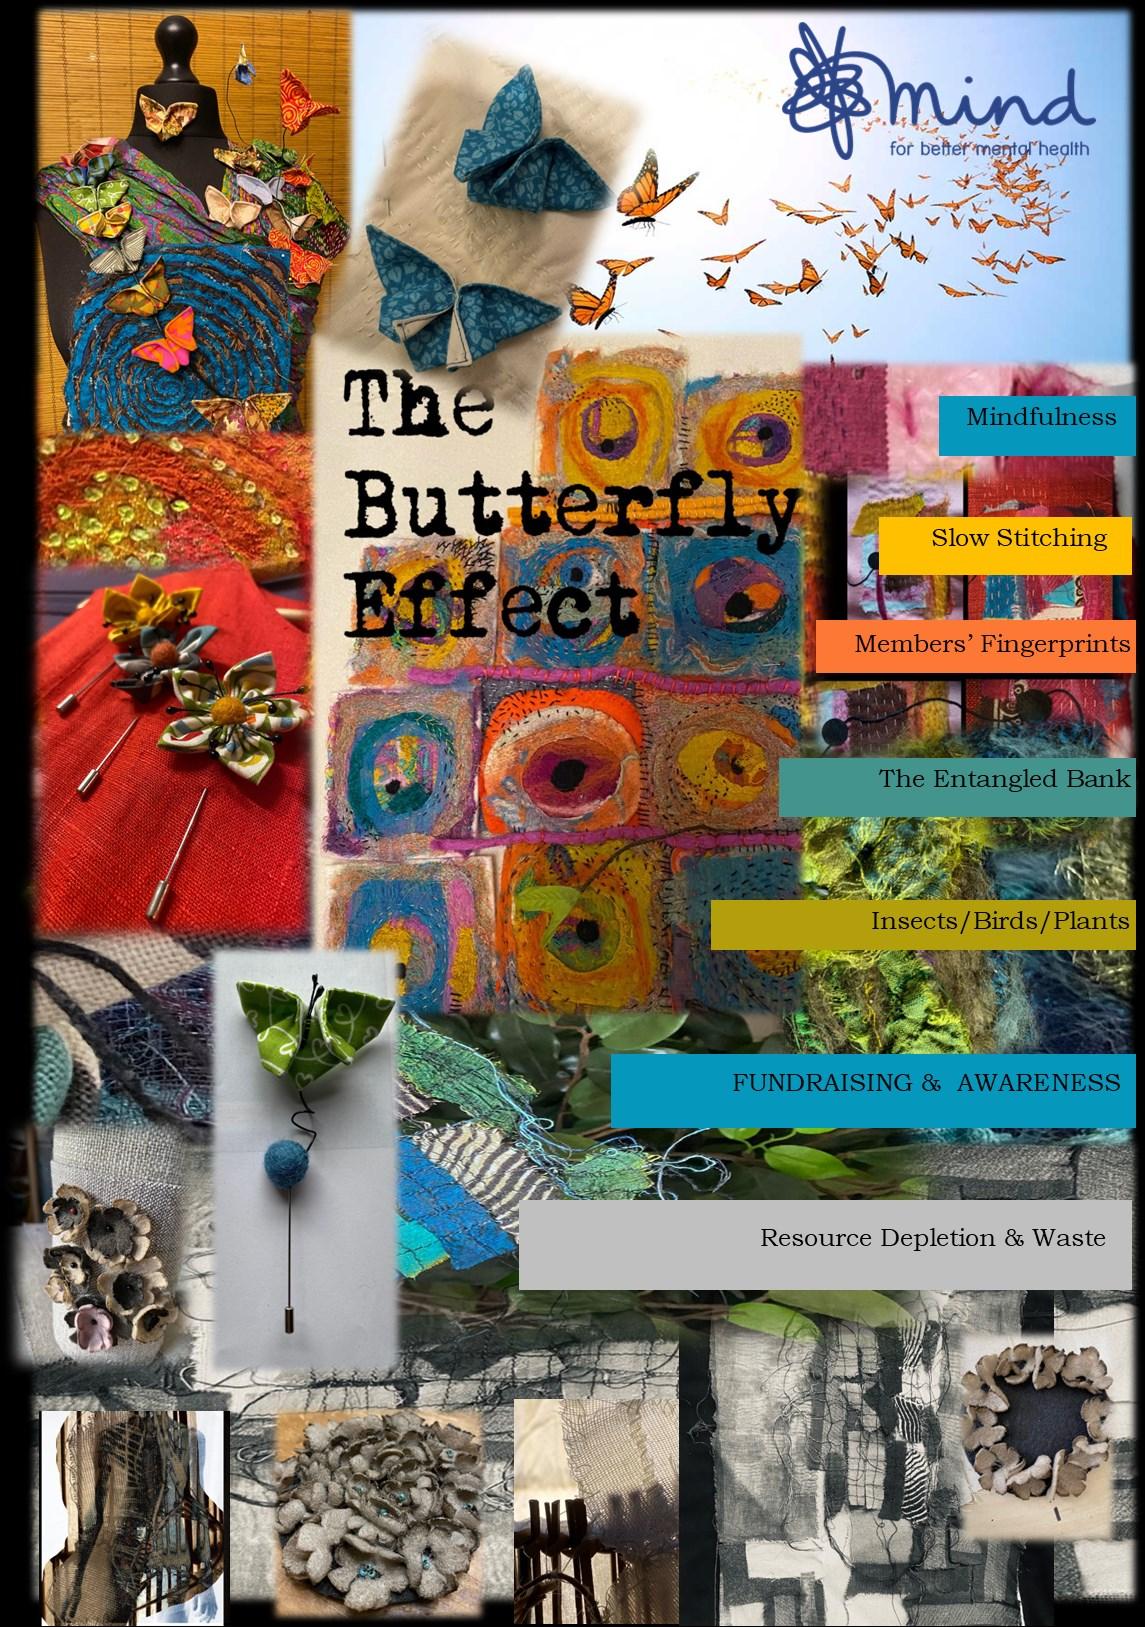
The Butterfly Effect
PROJECT DETAILS
Project
Timetable
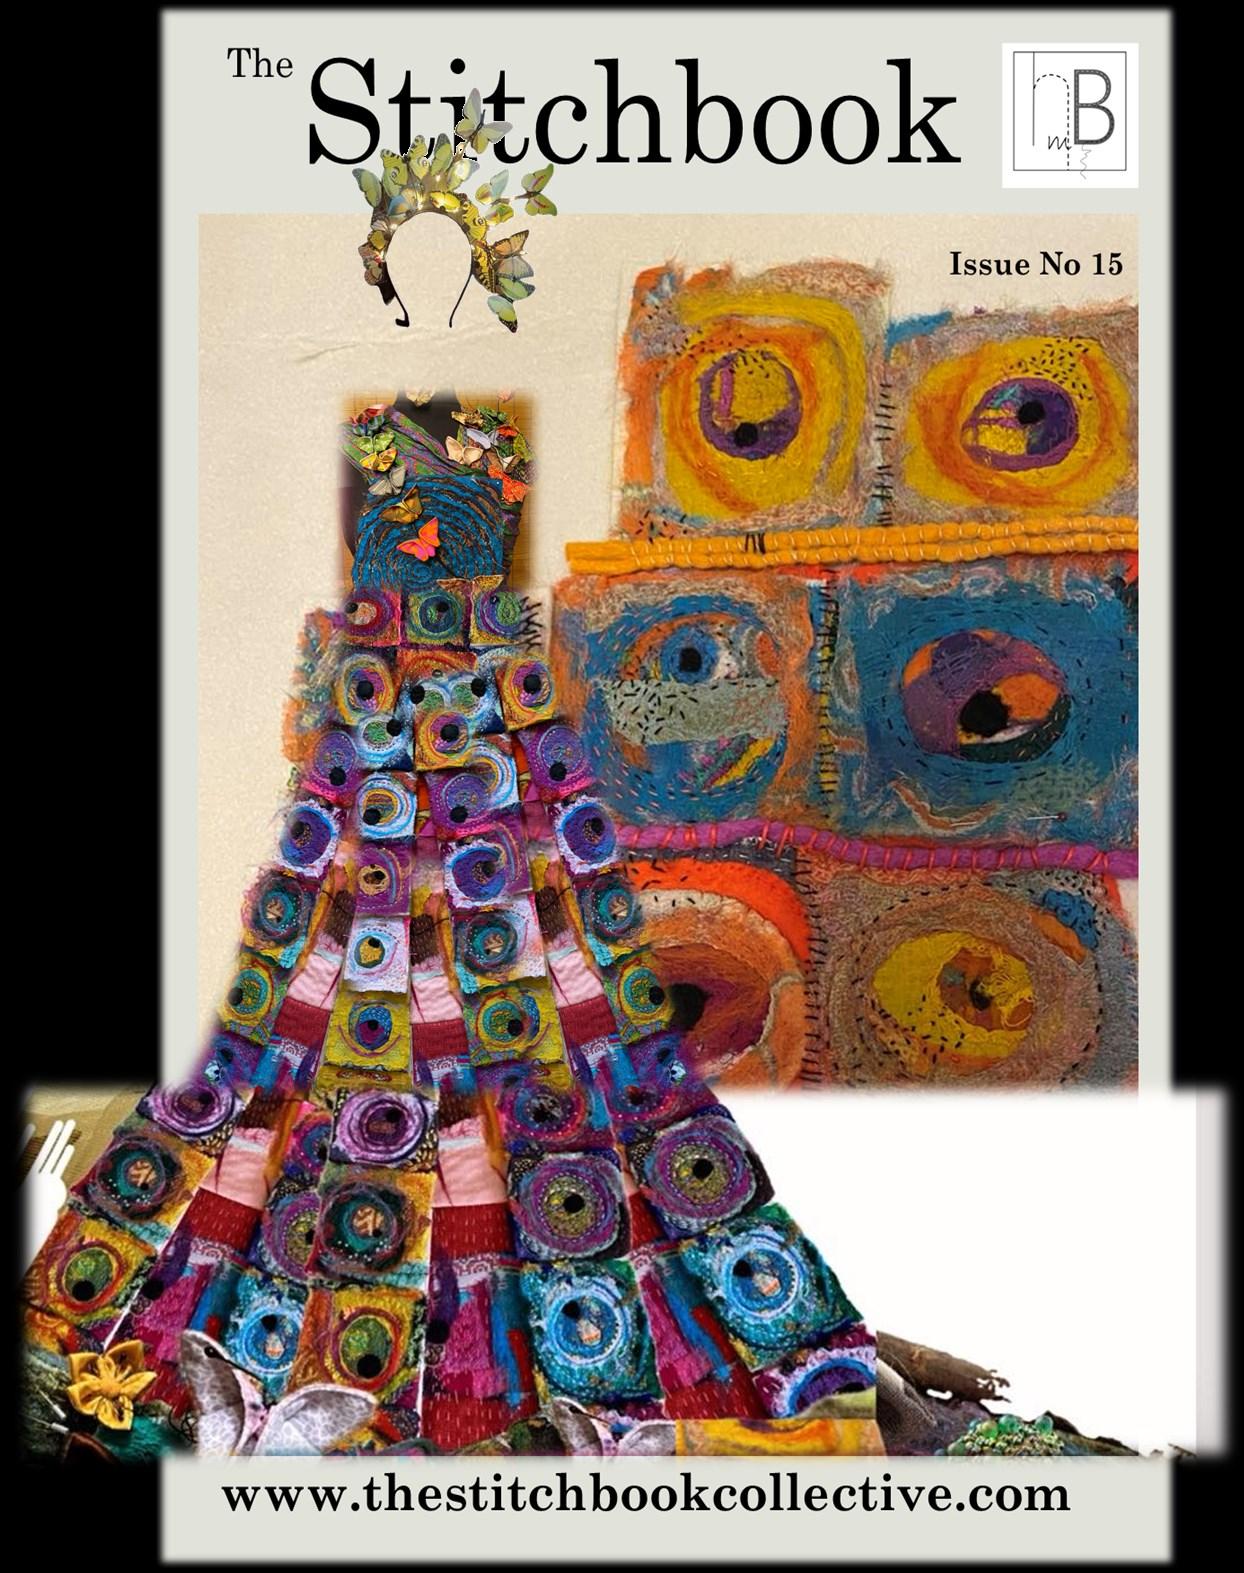
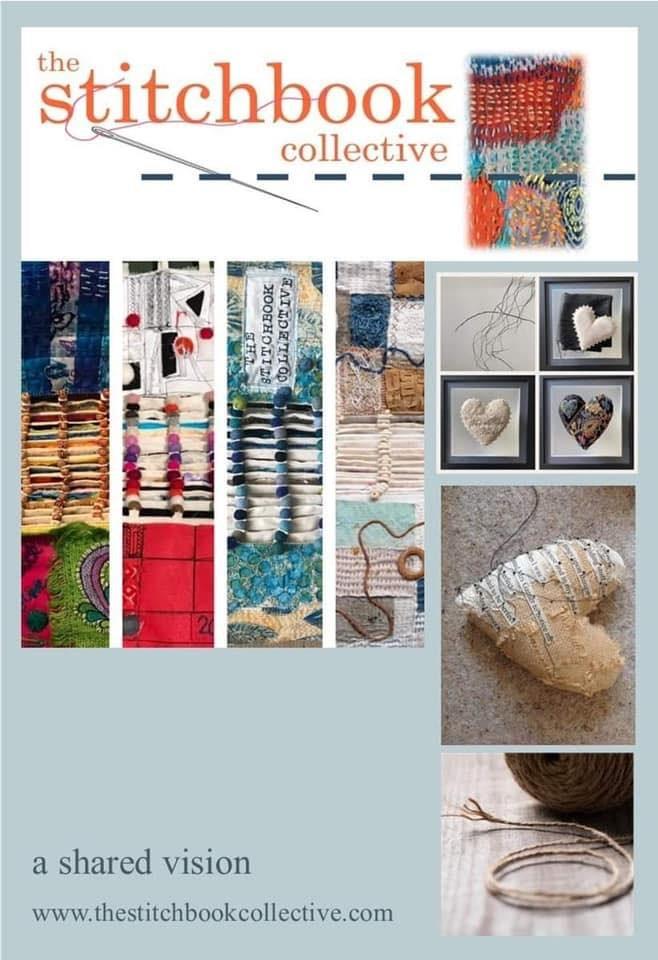
1 Issue No 17 www.thestitchbookcollective.com The Stitchbook
FULL
Launch
How to order FUNDRAISING KITS More MEMBERS ONLY KITS
Exhibition Update PLUS For your Stitchbook: How to use Water soluble stabiliser for lace patchwork WORKSHOP and FREE SAMPLES
Workshops
This month we are looking at water soluble stabiliser. This product was originally designed to be used for embroidery on fine or translucent fabric. It is particularly useful for machine embroidery. It firms up the fabric while you stitch on it, then washes away completely when you have finished, just leaving the stitching in place. It comes in paper and different thicknesses of films and meshes. I suppose it is the ‘new kid on the block’ in place of tearaway or cutaway stabiliser, but can obviously only be used on fabric which is not affected by the process of washing.
It is BRILLIANT for making fine ‘ open’ patchwork, where your stitched lines become independent of the background fabric. It is great for stitching into/onto 3D pieces AND any scraps can be used to create pieces of ‘fabric’ made up of the tiniest offcuts and even ends of threads or yarns. (Orts)
It is a non-toxic water soluble, temporary stabiliser that is made of a polyvinyl alcohol film so it dissolves in water like magic !!
2
Water soluble stabiliser and lace patchwork www.thestitchbookcollective.com Page 4 Featured Artist 9 Food for Thought 10 The Butterfly Effect KITS 12 PROJECT TIMETABLE 14 MEMBERS PAGES 16 This month’s FREE GIFT Samples of watersoluble stabiliser

SOLUBLE STABILISER
3 WORKSHOP
WATER
www.thestitchbookcollective.com
presented by Helen Birmingham
Issue No 17: first published May 2024
MY THOUGHT PROCESSES
Well!! Those of you who keep up with the facebook group will already know what a difficult month it has been. I can’t tell you how much I treasure the support which The Stitchbook Collective generates, so thank you x
In case you weren’t aware, my daughter, who suffers with epilepsy, had an unusually extended seizure which stopped her breathing, meaning she had to be placed in an induced coma in ICU for 10 days before they managed to get her meds balanced correctly! The immediate crisis is over. It’s a really horrid thing for anyone to have to deal with, as those of you who experience epilepsy in your family will already know. Thankfully, life goes on, and we count our blessings, AND she would be the first to insist that her condition isn’t allowed to negatively affect the future so big girl pants on, and here we go again!
I have been working very hard on getting The Butterfly Effect project off the ground, and there is some tentative news about the progress I’ve made with K&S on page 15.
As you know, the fundraising kits and charity appeal for this project are due to be launched on 15th May. I have included a run-down of how you can get involved, and how I see the fundraising and exhibition progressing as a whole in this issue. There are also links to online information via the websites and social media channels for you to share.
AND of course, there is a new workshop for this month. Creating another page, or more samples for your Stitchbook. Next month will be halfway through this subscription year (!!) , and I’d love to see some of what you have been up to … and to hear if there is any topic which you are desperate for us to cover?
Send words, images and/or suggestions to: thestitchbook@aol.com
WATER SOLUBLE STABILISER
Don’t forget to watch the workshop video
Example 1:
Lace Patchwork with machine stitching
Example 2::
Turning your waste threads (orts) into useable fabric
Example 3:
Incorporating your samples into more comprehensive pieces of work
If you look up water soluble or wash-away stabiliser online, you will find lots of articles about fairly traditional embroidery techniques. There’s lots of information about using it with a hoop for hand and/or machine embroidery, but not so much about using these dissolvable fabrics for a more texturally expressive result.
Two books I can highly recommend are :
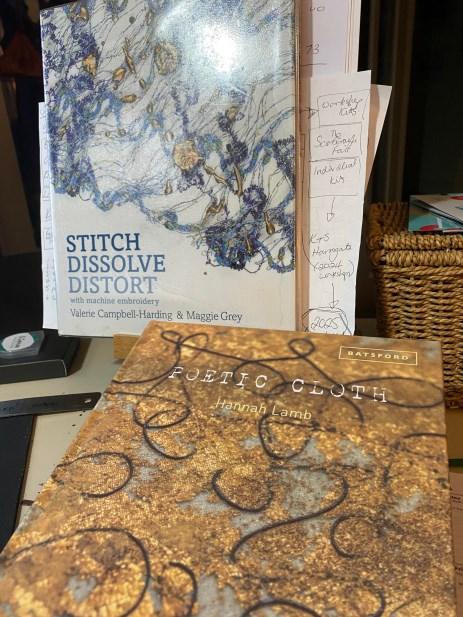
Stitch, Dissolve, Distort by Valerie Campbell-Harding & Maggie Grey
ISBN 978-0-7134-8996-5
Poetic Cloth by Hannah Lamb
ISBN 978-1-84994-536-3
Both of these books really focus on the element of ‘play’ and ‘experimentation’.
Hopefully this workshop will encourage you to explore some of the possibilities which come with modern fibres and techniques. Once you become familiar with how some of these fabrics and fibres might react, you can begin to use those results in a more deliberate way: using materials to add to and enhance any narrative you are trying to get into a piece of work.
Examples 1 and 2 from this workshop are intended to create samples which you can stitch into your Stitchbook for future reference.
Example 3 shows how I took one of these workshop samples and began adding areas of ‘mindful stitching practice’ to help keep me calm during difficult hours!.
For me, this way of working tends to lead to more defined ideas, which I can then deliberately enhance and use to add narrative or intent, whilst working towards a ’finished’ piece of work.
You already know how much I enjoy overlaying pieces of textile, and finding unexpected connections or interaction of ideas and images. For this workshop you need to forget what you ‘think’ the result may look like, and be open to explore and interpret what you create.

4 WORKSHOP
THREE SAMPLES
Water soluble stabiliser comes in several different forms. I know that it sound obvious, but which type you use will depend on what you are trying to achieve. For ‘traditional embroidery’ there are lots of comprehensive guides to different stabilisers on the internet.
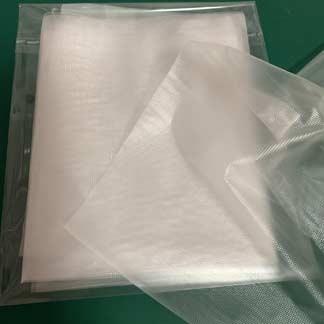
To be honest, I find all of this a bit too technical, and I prefer to just play, but of course this means investing in different types of product to play with, SO, you will see in your SAMPLE pack that you have 3 different types of water soluble stabiliser:
1) Film topper* (thin plastic sheet)
2) Mesh (non woven fabric)
3) Self adhesive printable paper
This is by no means a comprehensive selection, but it will at least get you started, and hopefully help you to work out which product suits you best.
The film is my favourite and I’ve used it for both examples this month, because it is so versatile, and quite a lot cheaper to buy than the mesh or paper. But I hope you will enjoy playing with the mesh and the paper too.
The film is made from Polyvinyl Alcohol (PVOH). This is NOT the same as Polyvinyl Acetate or PVA glue). PVOH is completely non-toxic, colourless and odourless, and is the stuff they make those dissolving washing liquid pods from. It is also a vital component of papermaking and is widely used in the textile industry. You can get it for industrial use in powder or granule form, but the easiest way of dissolving it for craft use is to start with PVOH film.
(See example 2) The trick is not to wash it out completely, so that the residue acts rather like a starch stiffener if you are wanting to make 3D forms.
The mesh stabliser is great if you are wanting to make several passes over one area with your sewing machine, and create areas which are JUST thread, (rather than linking areas of fabric together.)
The extra thickness of the mesh will prevent the rucking and scrunching which tends to happen with the film version. It is also much easier to keep the mesh tight in an embroidery hoop for machine or hand stitching.
The selfadhesive paper stabiliser is great if you want to draw or print designs before you start stitching. It will go into an inkjet printer, or you can trace through it. The fact that it is also self-adhesive means that it will stick to your background fabric without leaving any residue, and there is no chance of the design shifting as you work on it.
This is particularly useful if you are wanting to stitch onto a sheer or very fine fabric.
* If you are looking online to buy water soluble stabiliser, the word topper is generally used to describe the thin film type, as its original purpose was to be able to embroider onto ‘fluffy’ or raised surfaces (like towels or velvet) without flattening the pile.
5
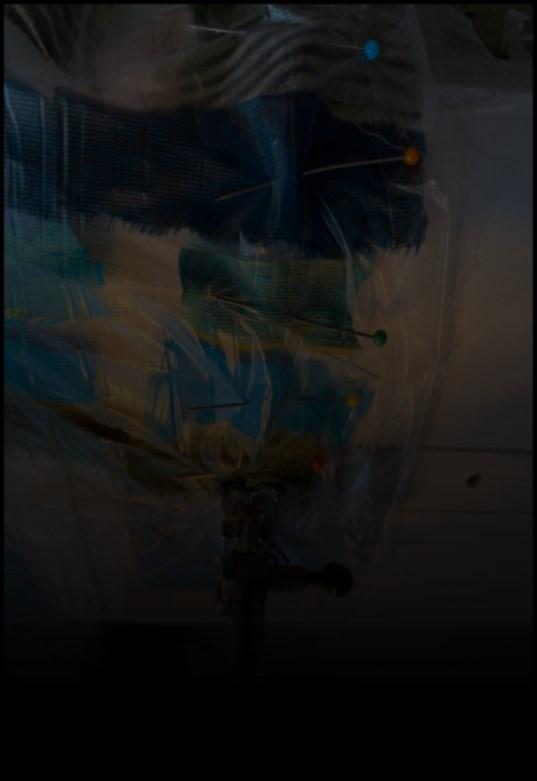
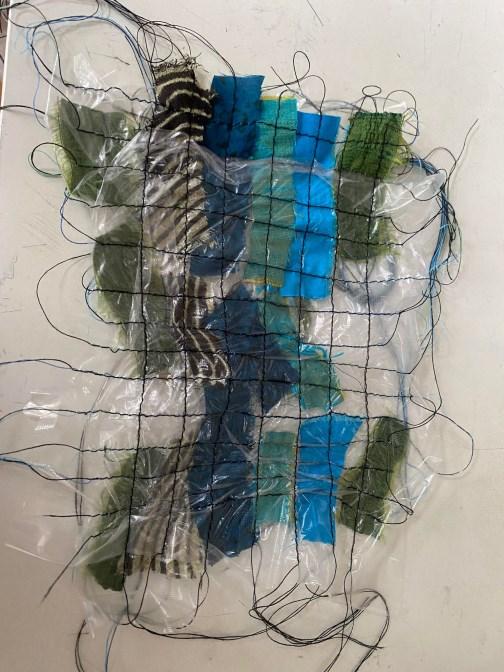
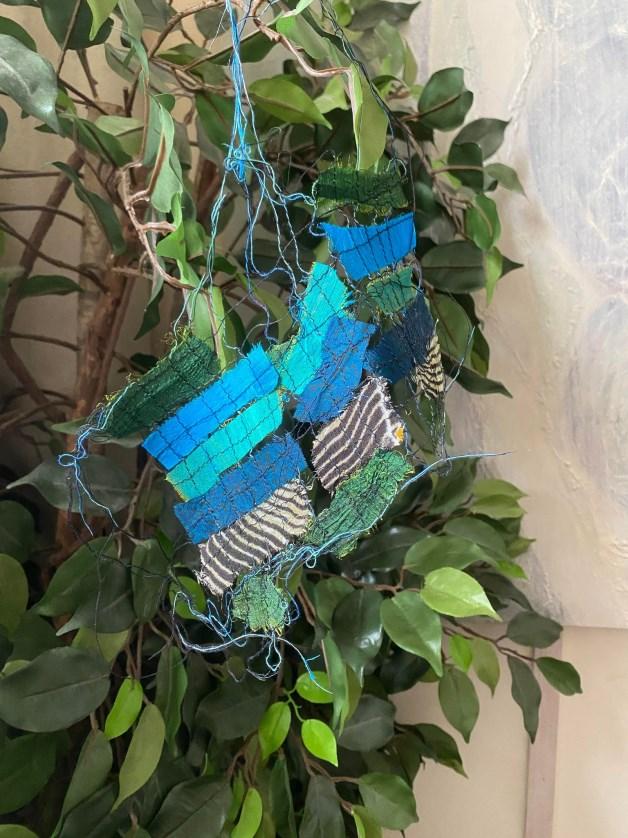
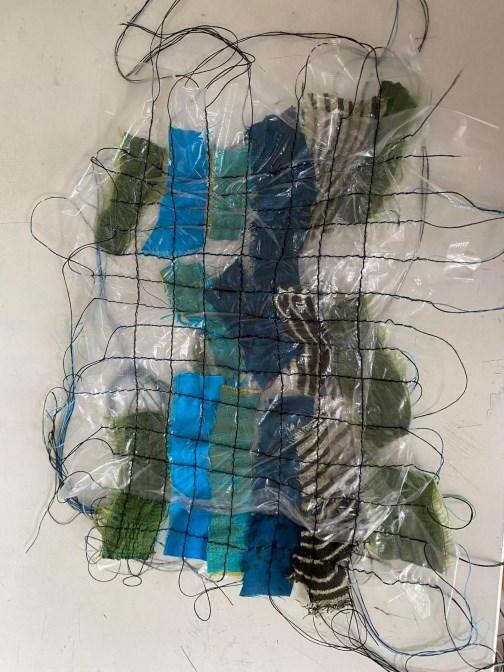
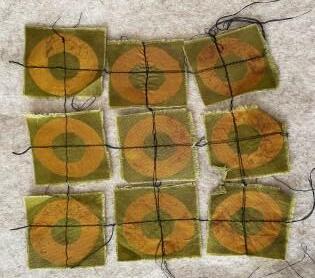
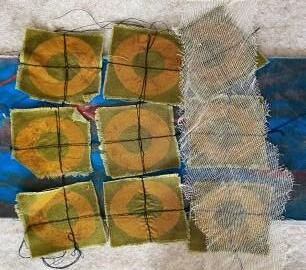
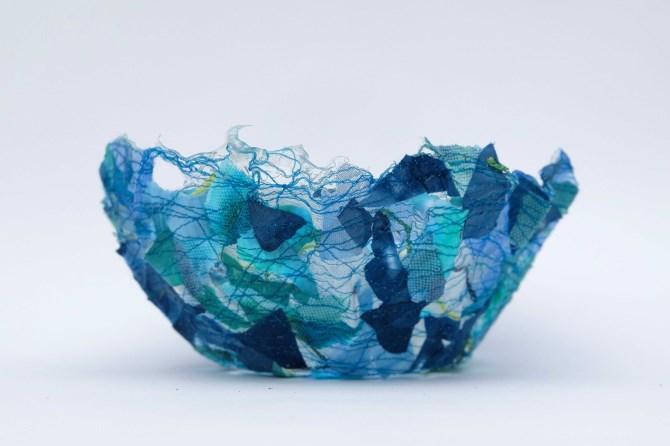
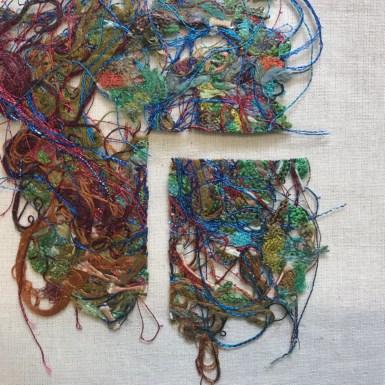
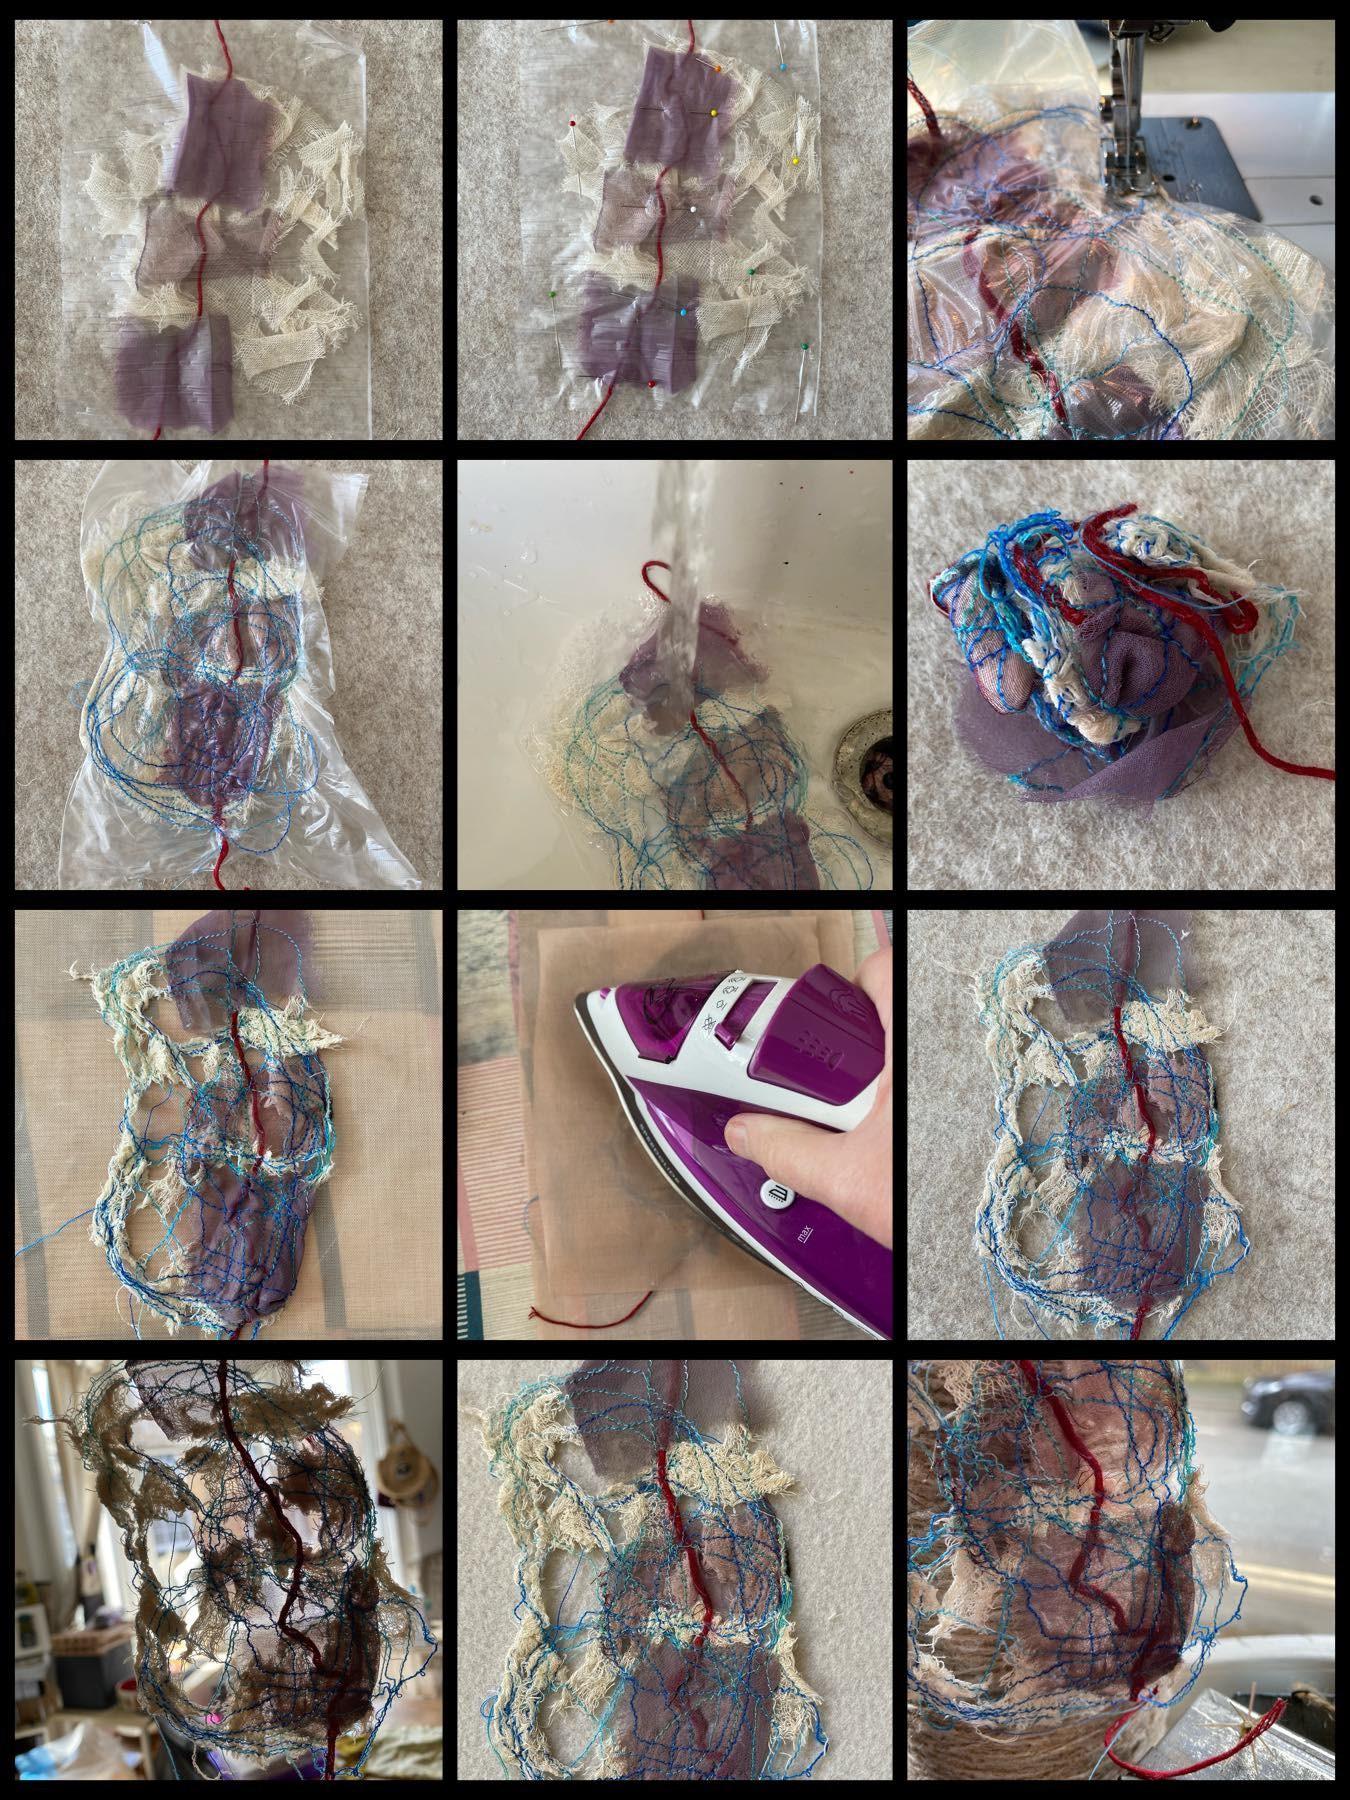
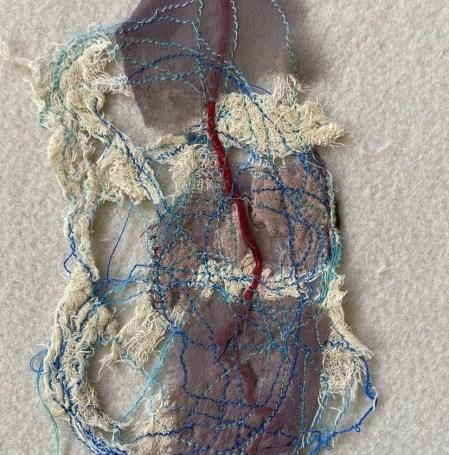
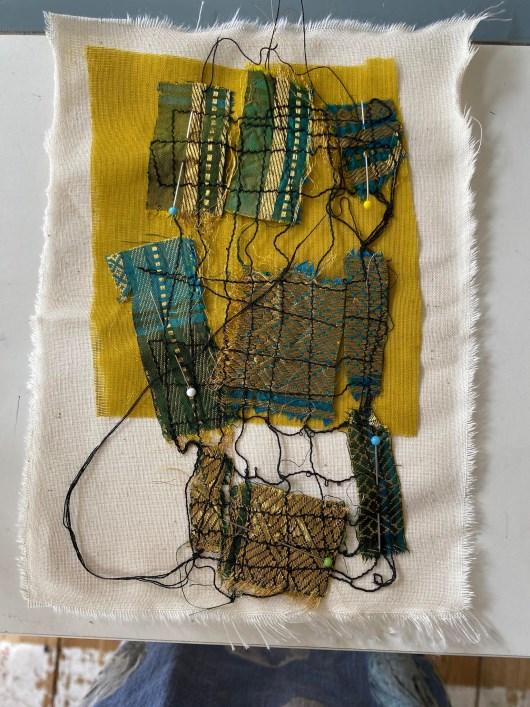
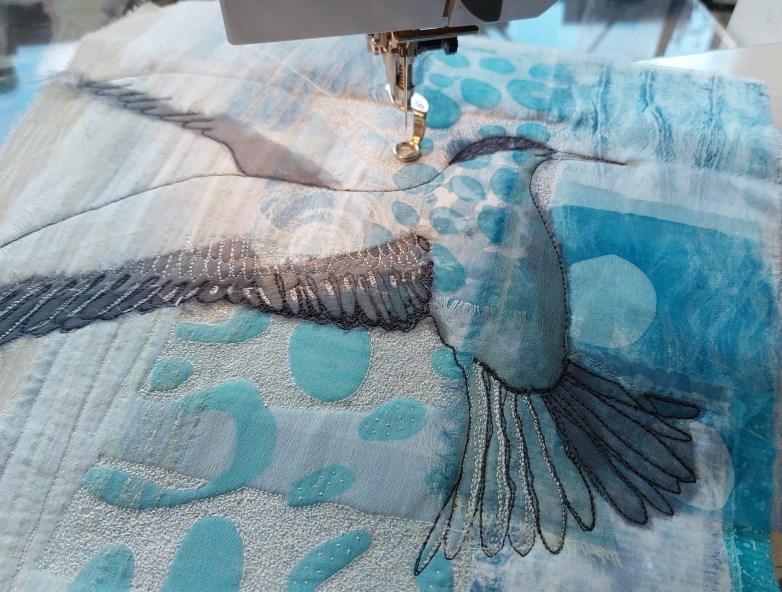
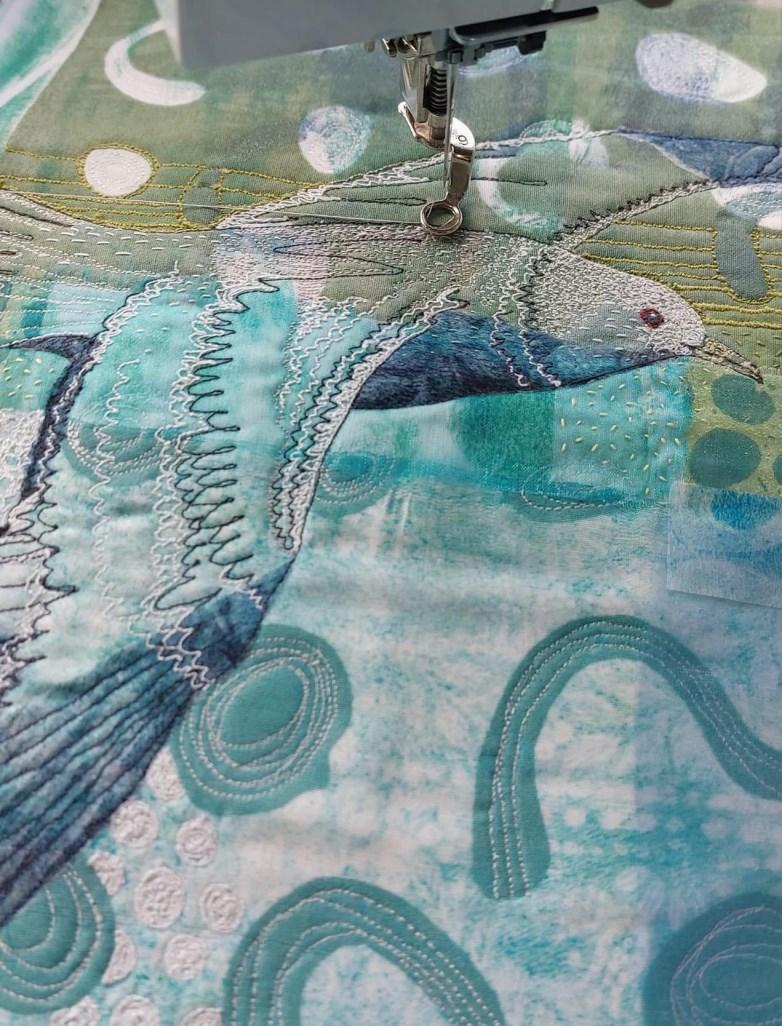
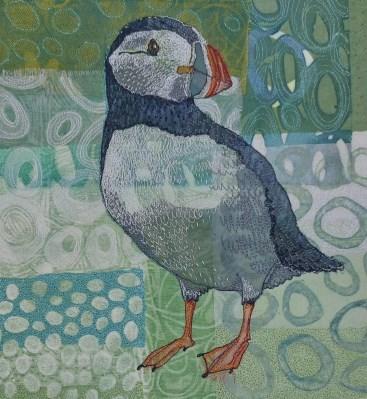
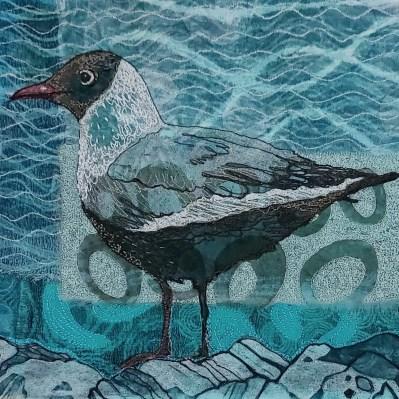
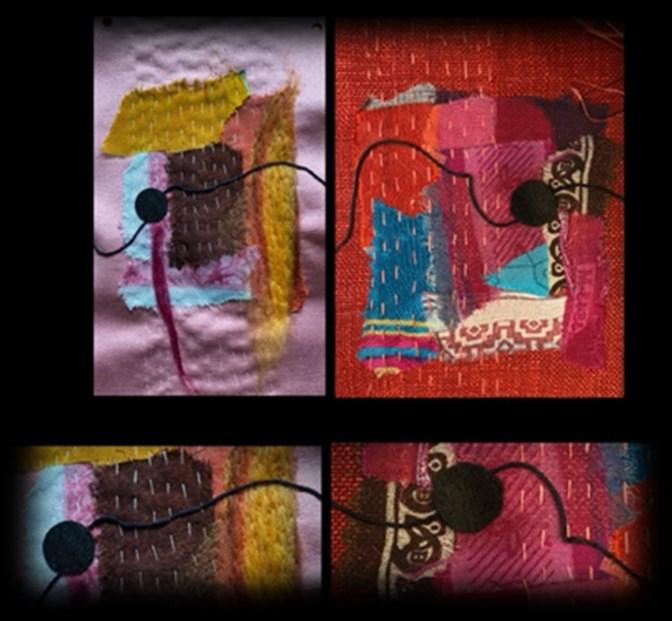
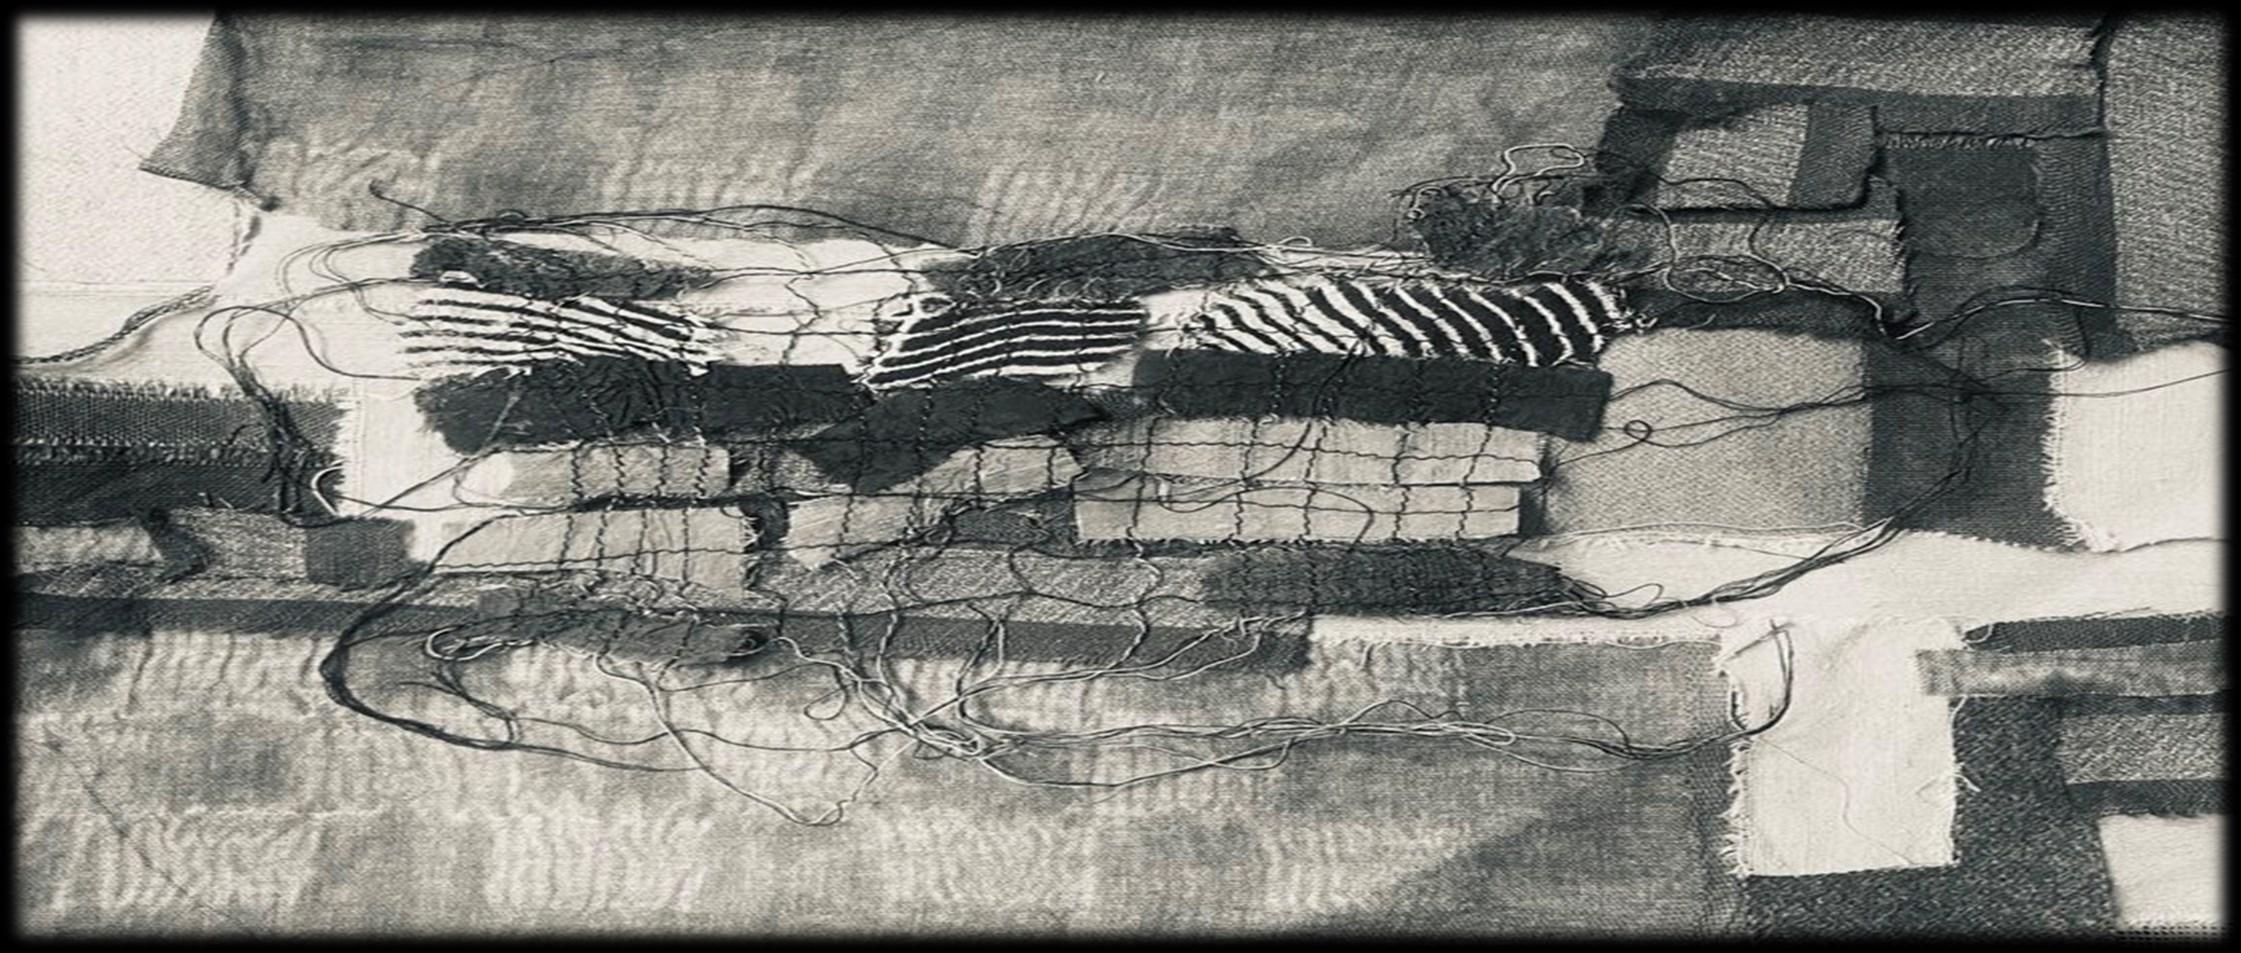
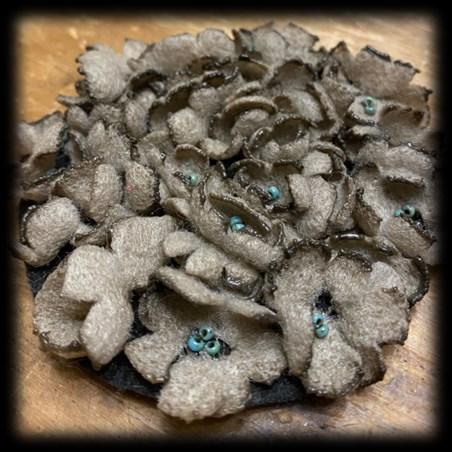
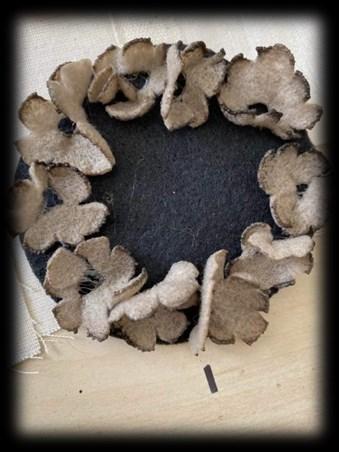
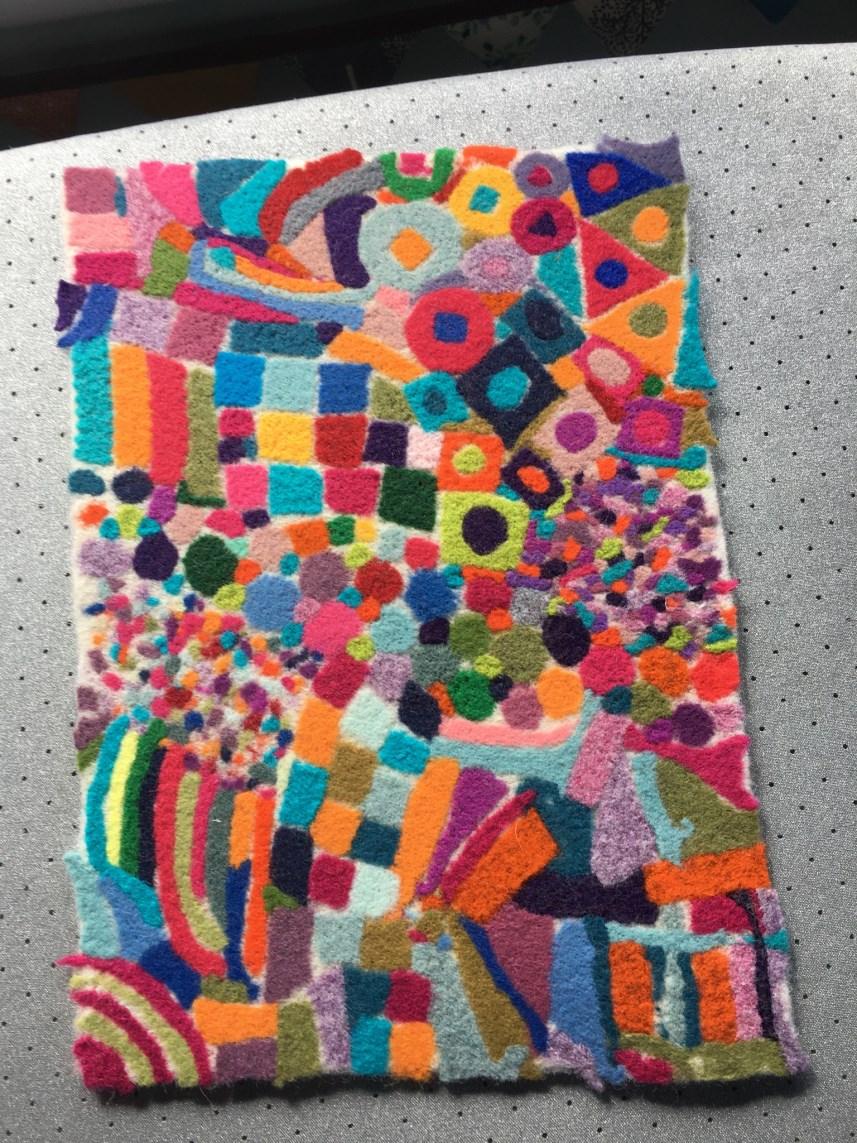
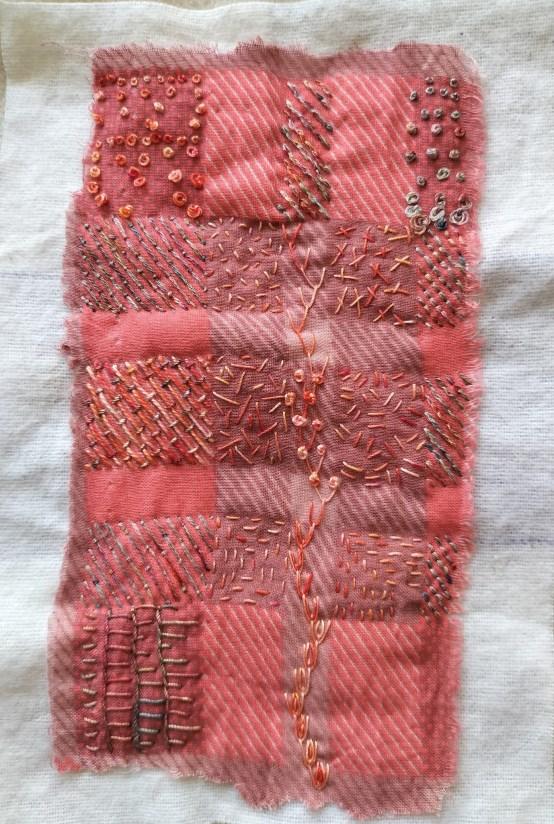
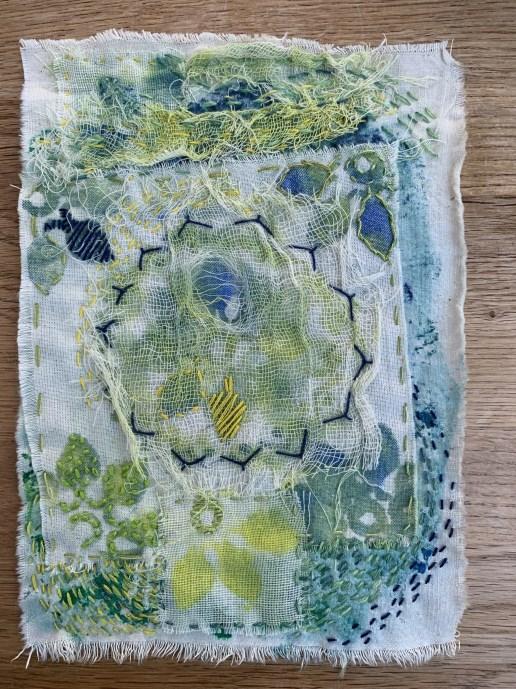
Example 1 - Lace Patchwork with machine stitching
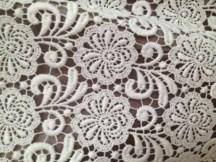
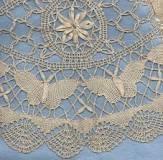
I have learnt a new term this month traditional guipure lace like me, you may know what it is, but might not have known the ’proper’ word for it. Guipure lace is a type of bobbin lace characterised by dense areas joined by chain stitches, with significant spaces in between. The technique in this first workshop example can be most closely likened to Guipure Lace . As you experiment you may decide to cut your initial fabric pieces into more deliberate ‘shapes’ like flowers or leaves for example. If you are proficient at freemachine embroidery, you can put your work into a hoop to sew it .. but I never do!
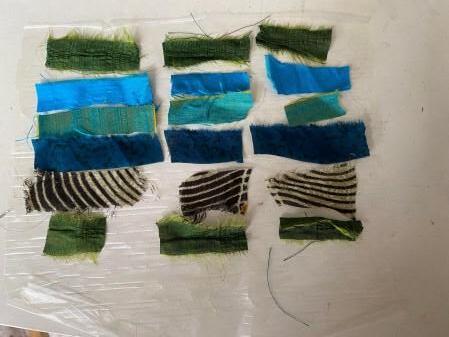
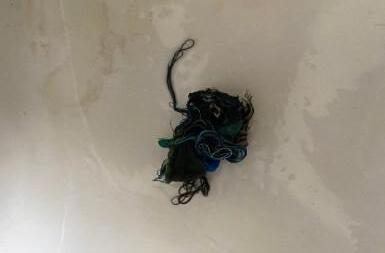
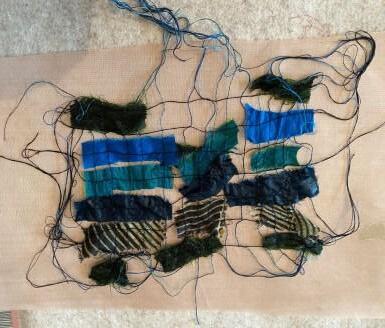

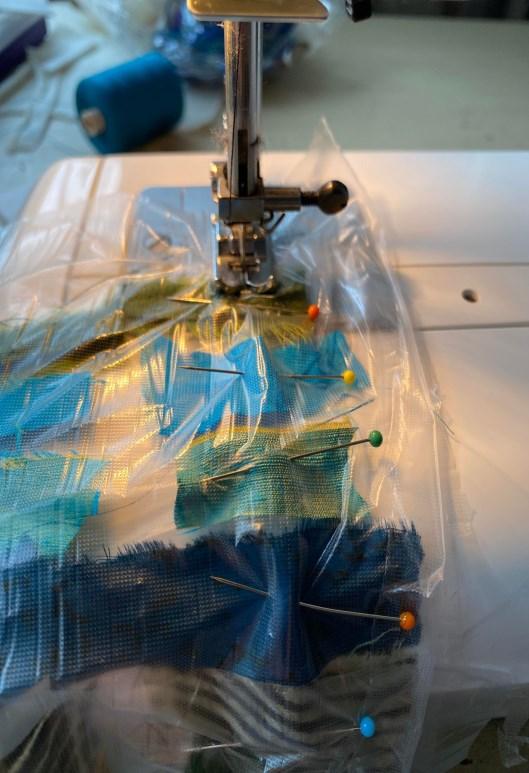
Take 2 pieces of the soluble film. Place one piece down onto a dry surface and then lay your pieces of fabric on top. You can overlap the pieces if you like, but the technique is more impressive if there are gaps between at least some of them.
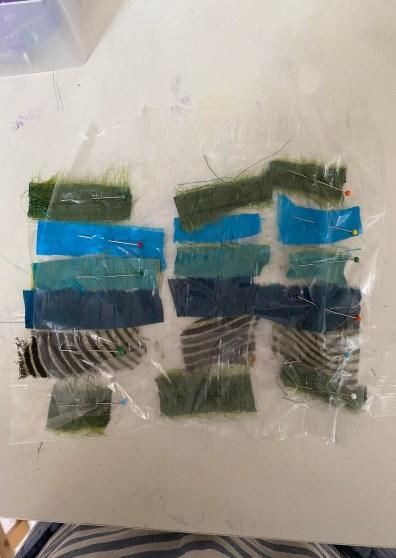
Place the other half of the film over the top, and pin the fabric into place through both layers of film. It’s best to have at least one pin for each piece of fabric. So in this case I’ve used 18 pieces of fabric, so 18 pins. BE CAREFUL not to run over the pins as you sew .. remove them as you go along!
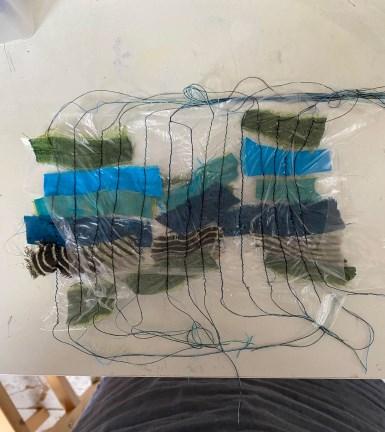
Using a fairly long stitch length, stitch lines in one direction, about 1cm apart. Don’t worry if the film scrunches up. Just pull it flat before the next pass of the machine. If you would prefer to hand-stitch, make sure than you trail the thread between the pieces of fabric. Remember that is all that will be holding the work together when the film is dissolved.
When you have finished sewing, you should be able to hold the work up and make sure that none of the pieces of fabric are still loose. I quite like the fact that some of them shift slightly when the machine passes over them and they sit irregularly .. but it is important that they are all held down and attached to at least one other piece.
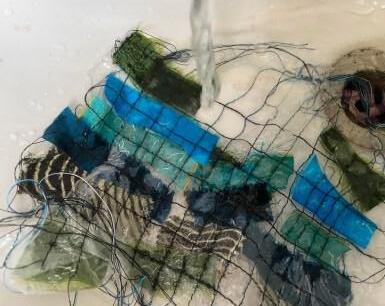
Hold your work under a running tap and the water soluble film with dissolve (a bit like magic, and it makes me smile every time!) You will be able to see when the film has disappeared. My suggestion is not to over rinse it! If there is a slight residue left, it will dry clear and acts almost like a starch, making the sample fairly rigid. Of course if you want the final result to be loose and floppy, keep rinsing!
Give your work a bit of a squeeze to get rid of most of the water. I know that what you are left with looks a little like something the cat might have coughed up, but have faith! As you open the work up again, you should be able to lay it flat into roughly the pattern it was in before you stitched it, but now the pieces of fabric are held together with threads.
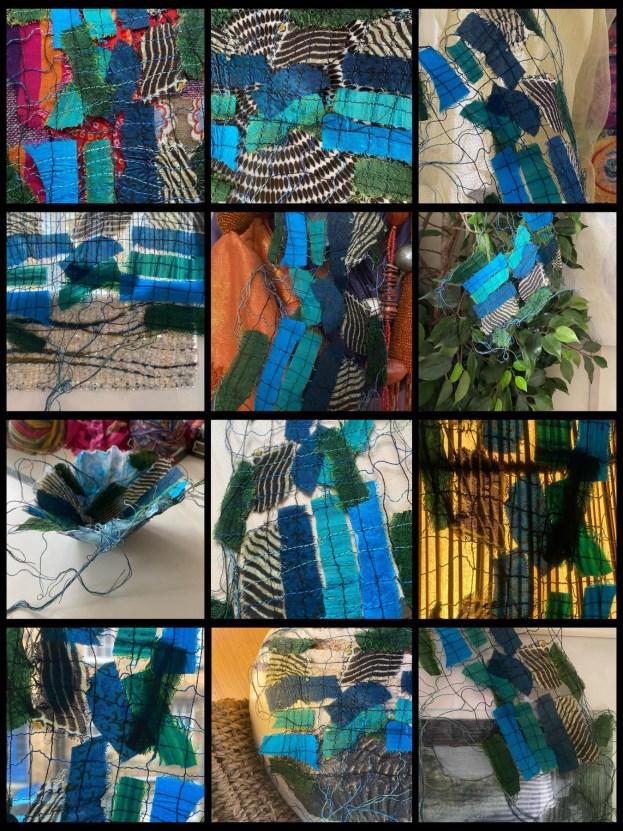
If you want the piece to end up drying into a 3d form, this is the time to manipulate into the shape you require (i.e. lay it over the top of a bowl to dry for example). I am completely impatient when it comes to projects like this, and I like to iron the work dry. Please be aware that while it is still wet, the fabric is inevitably holding some residue, so it will be sticky!!! Make sure that you protect the plate of your iron AND the ironing surface.
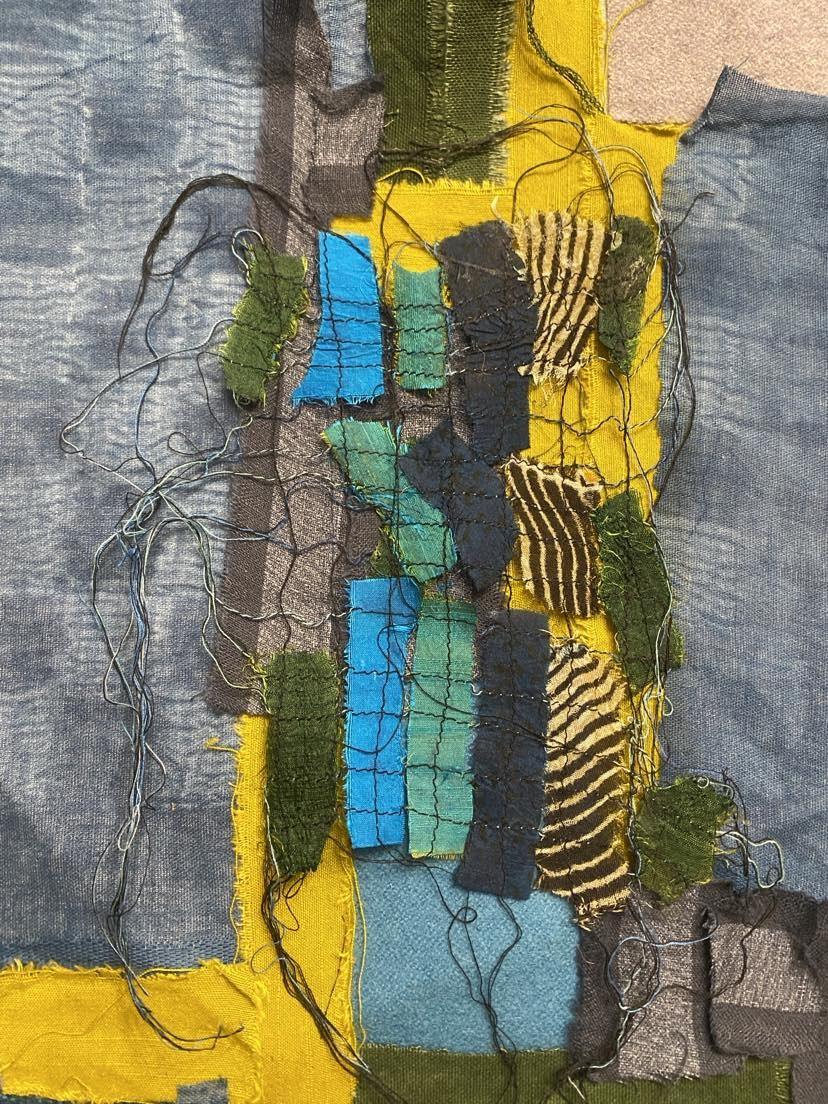
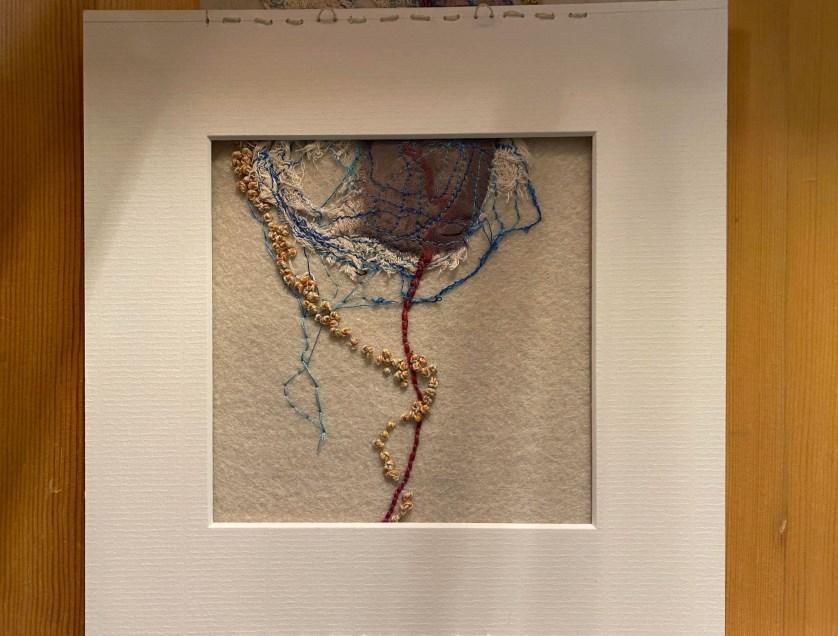
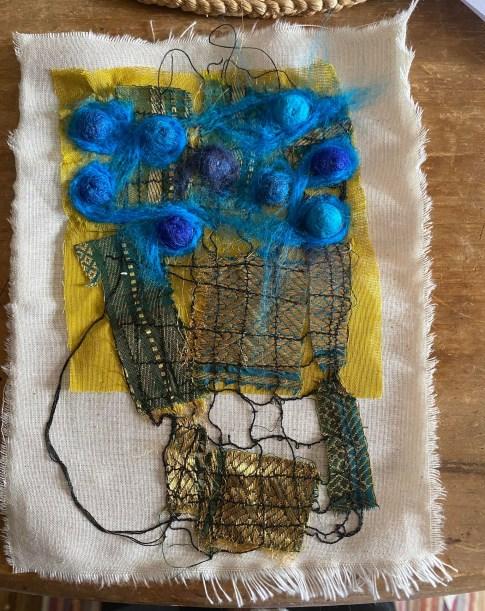
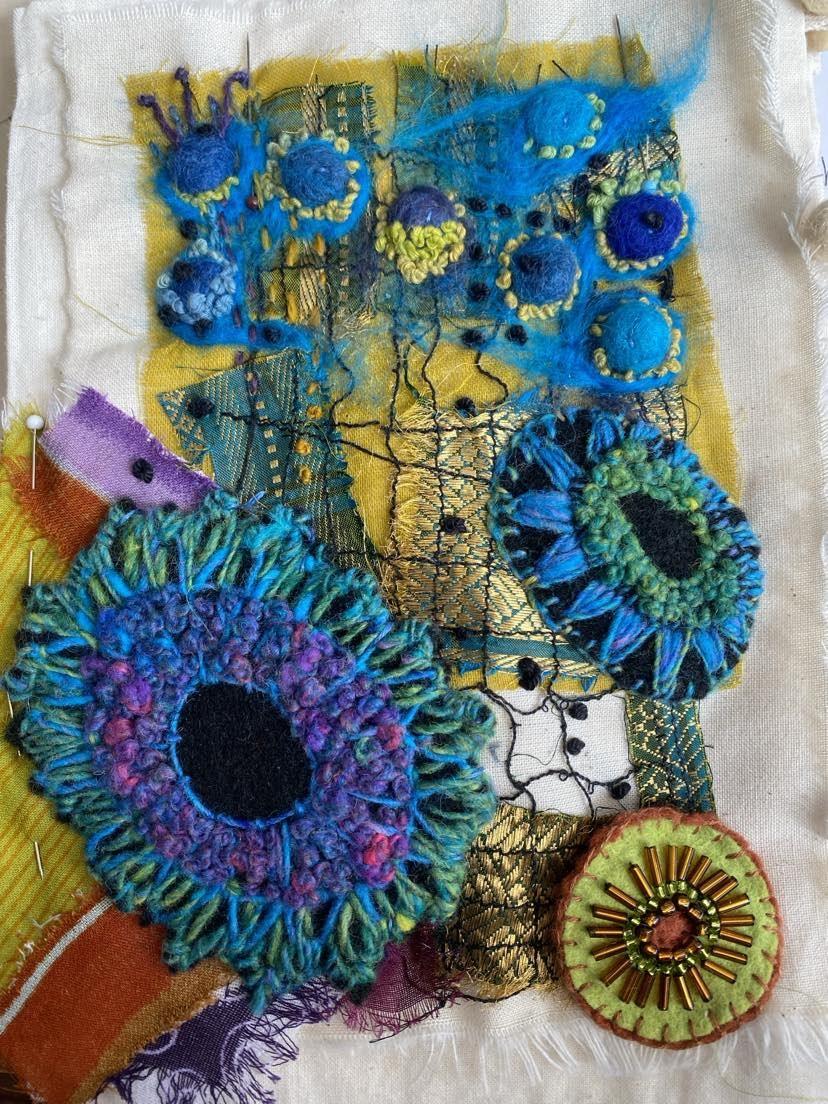
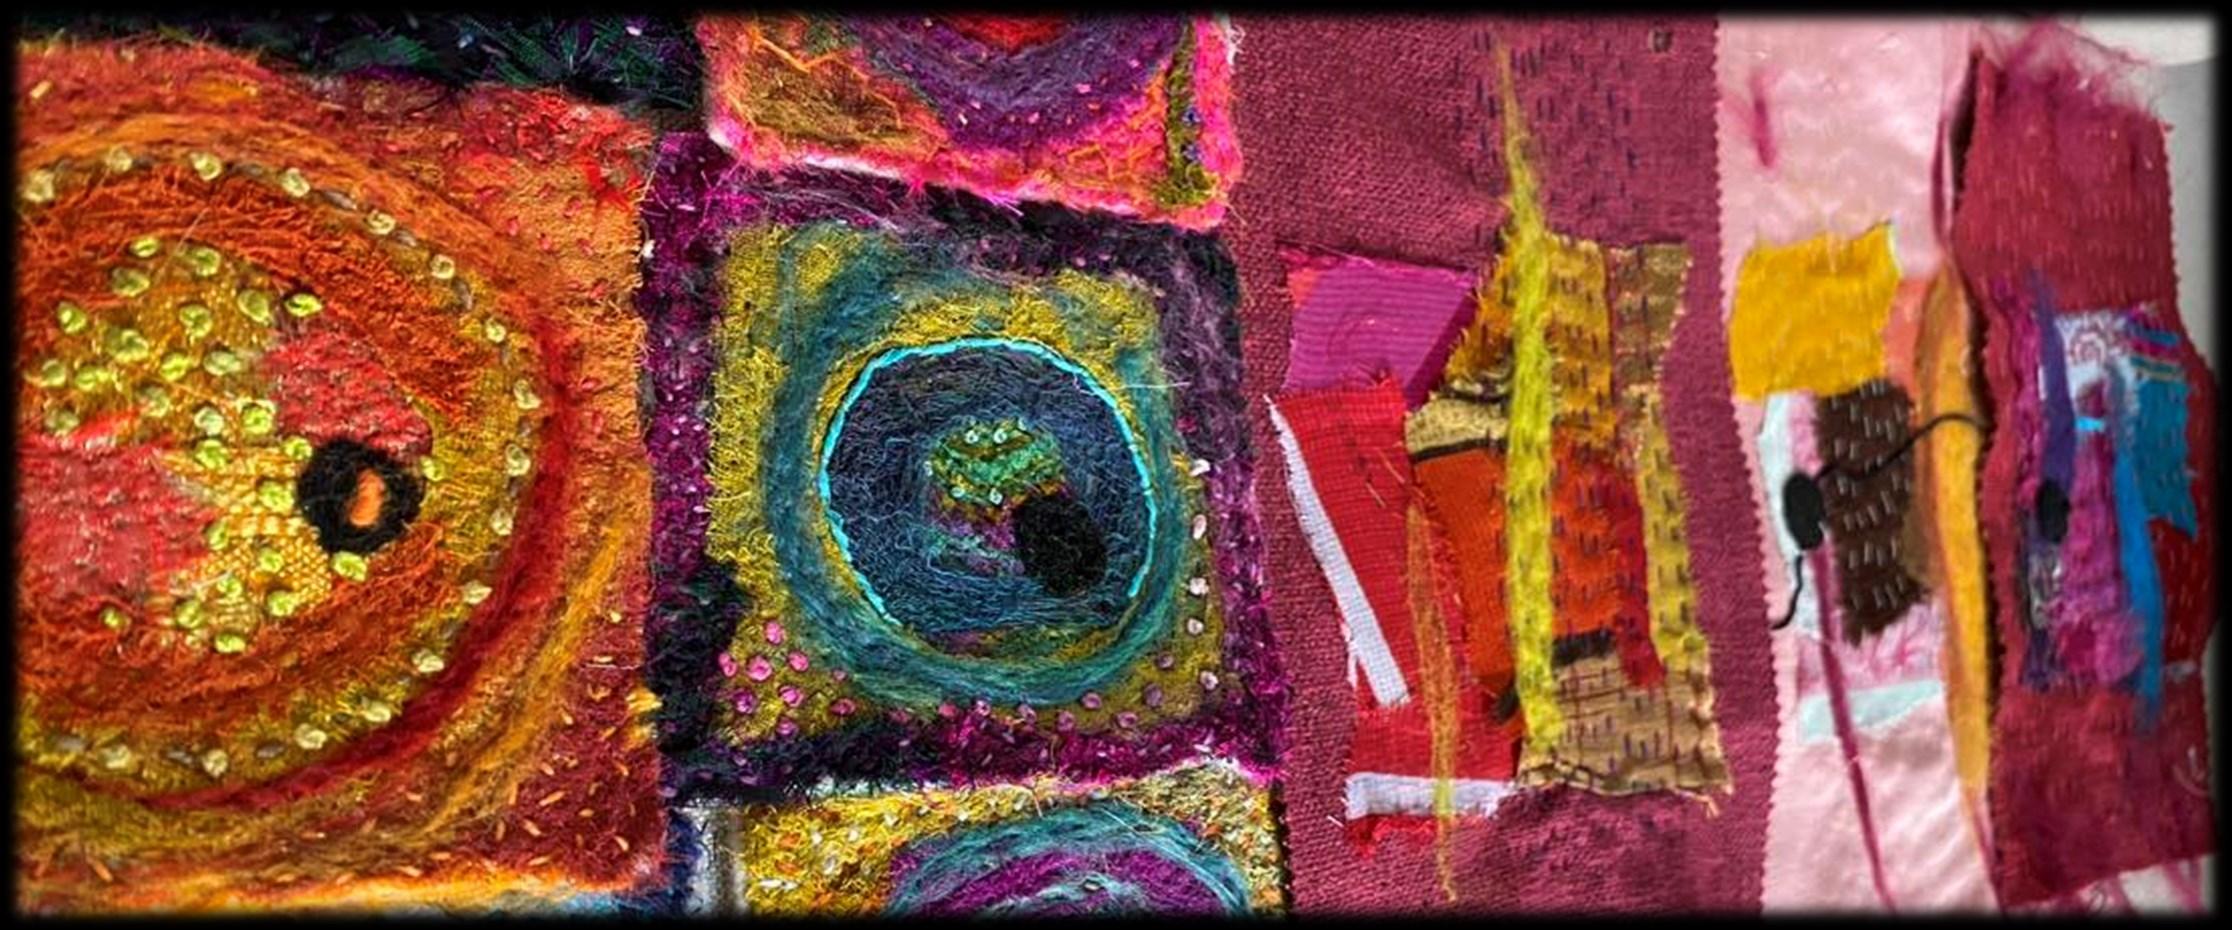
When the work is completely dry it is ready to combine with other pieces or simply stitch it into your Stitchbook as a sample. You could embellish the surface with stitches or beads. See my example on Page 9 where I used the lacework as a sort of trellis background to support some other samples.
6
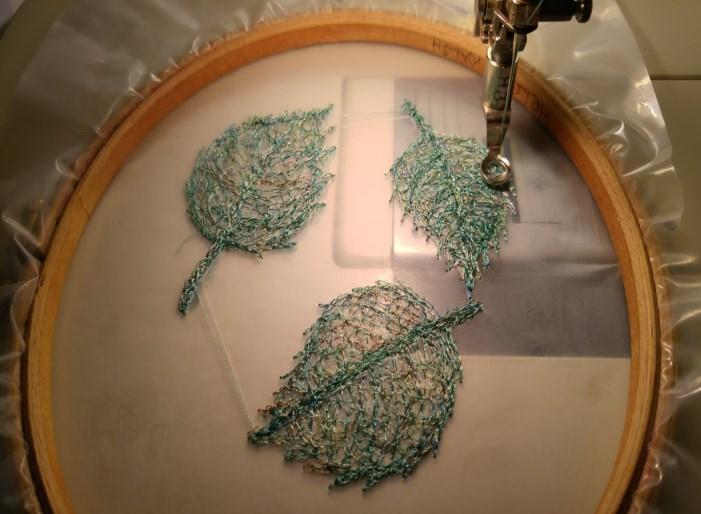
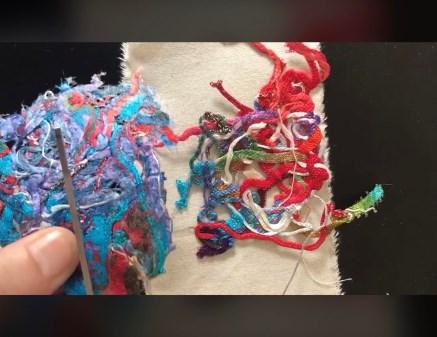
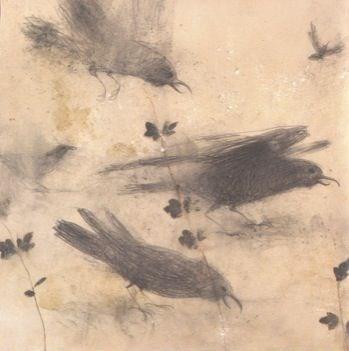
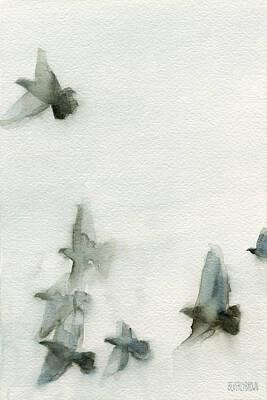
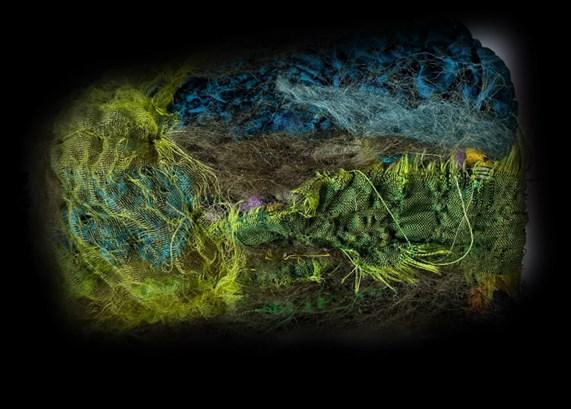
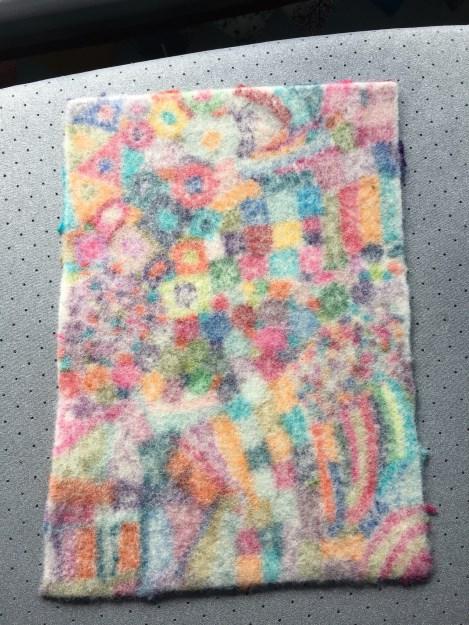
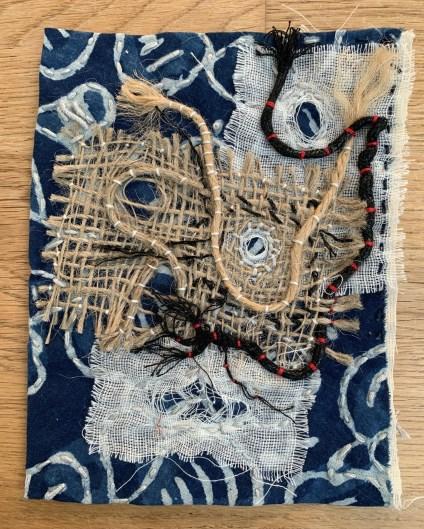
Example 2 - Turning orts* into useable fabric
This example is taken from one of my 2019 workshops. The original video can be found in the archive under ‘Textural Stitching‘. Vimeo Ref No: 356951501 on www.vimeo.com
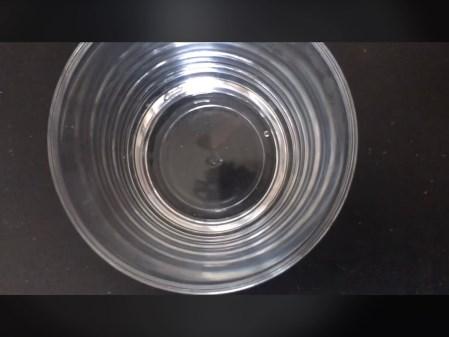
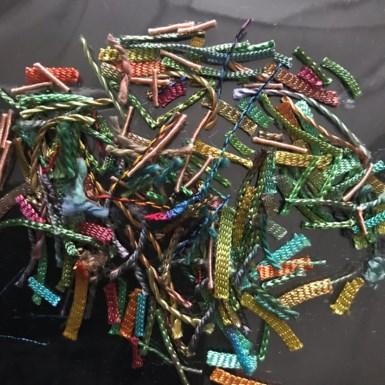
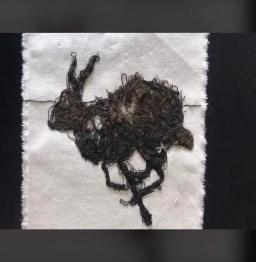
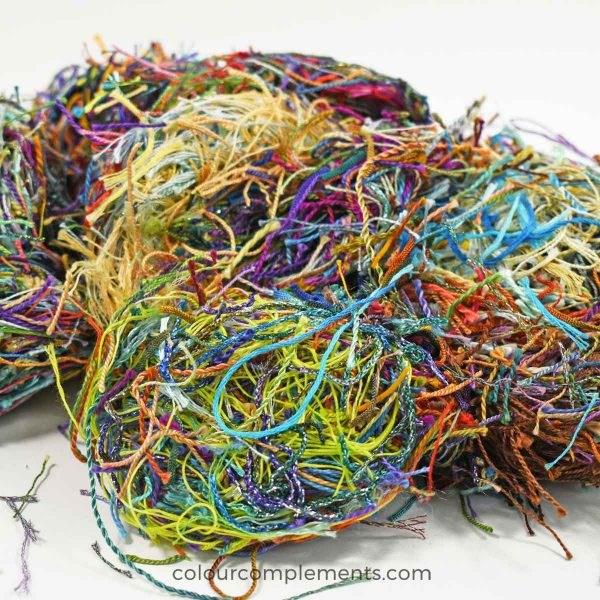
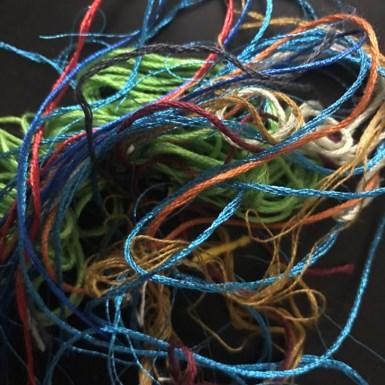
This is a brilliant way of ‘making something out of nothing’! Whenever you use water soluble film and you have any scraps left over, pop them into a clean dry jam jar, and keep for this project!

Put about 3 tsps. of water into a glass (a tumbler is good). Drop pieces of film into the water and stir well. How thick your gluey water is will depend on the balance between water and film. It is not critical. Generally, the thicker the mixture is, the ‘firmer’ your end result will be, a bit like adding starch!
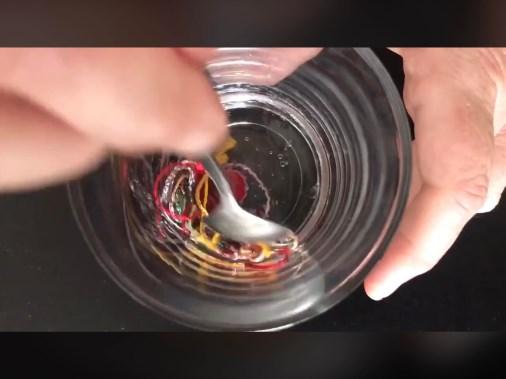
Once the film is dissolved, drop some fibres into the mixture. Really agitate so that the liquid gets into all of the fibres. Place a piece of baking parchment onto a flat surface.

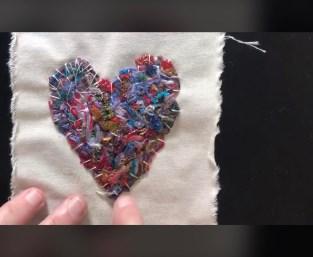
Take the wet fibres and lay them out onto the parchment. If you want to make a specific shape or design this is the time to do it. You could draw a design onto the parchment as a guide. (See the examples above of a heart, a bird and a running hare.)

Once the fibres are placed where you want them, take a 2nd piece of parchment , and lay it flat on top of the fibres. Now you must be patient and wait for it to dry completely (overnight is great). You can iron it dry but you will get a very smooth, almost glassy finish to the work rather than it looking like the original fibres.
If the parchment doesn’t peel off easily, it means that the work is still damp. Leave it! At this stage it is very easy to ruin it, BUT it is possible to re-soak and start again, just be aware that the more water you add, the weaker your resulting piece of fabric will be.
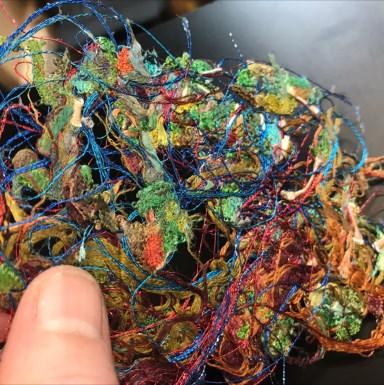
The resulting fabric (once dry) is firm enough to cut with scissors, and behaves rather like a piece of paper, but you can stitch into it easily or combine it with other fabric pieces.


* Orts are the leftover snips of thread that remain when you are done stitching. They may be tiny bits clipped when you run out of thread, or longer lengths you no longer need.
The word ort reportedly comes from Middle Low German and means leftover. It was used starting in the 15th century to refer to food scraps. No word on when or why stitchers reappropriated it for leftover thread, but some say in stitching parlance ort is actually an acronym for "old ratty threads" or "odd random threads" or similar variations.
Many stitchers save these random bits of thread, often in jars appropriately named ort jars.
7
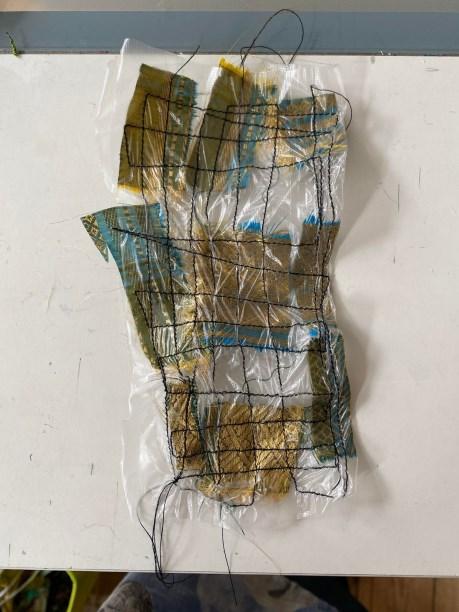
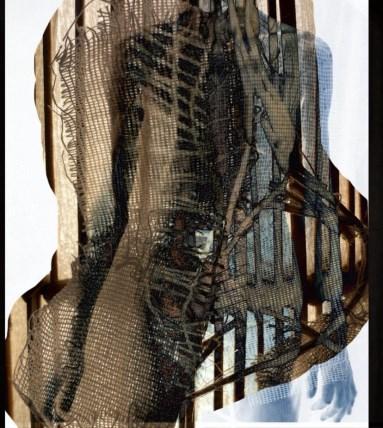
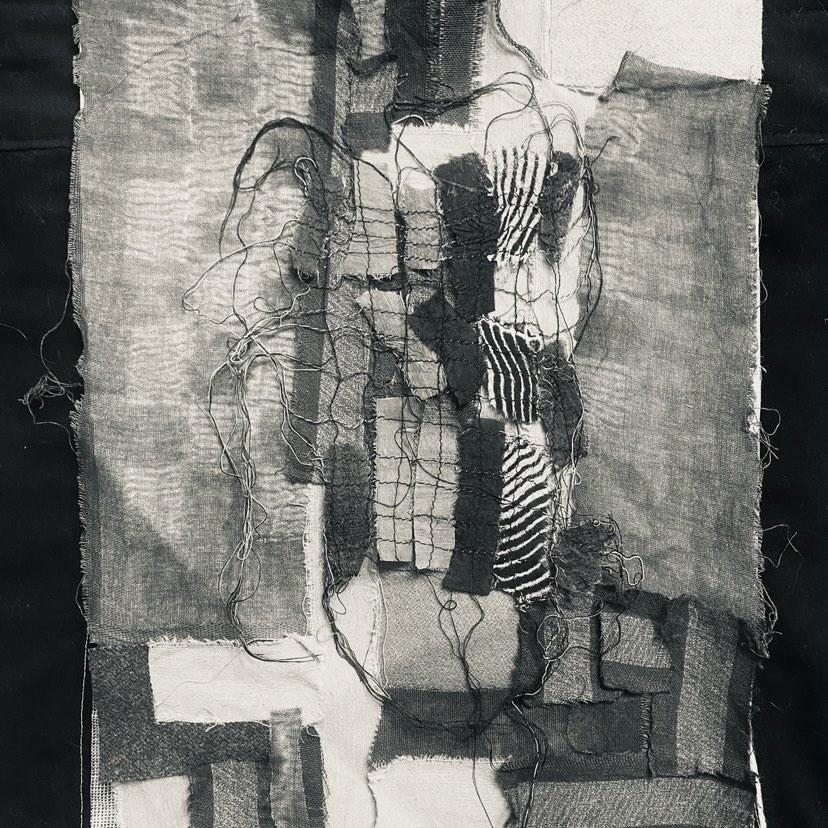
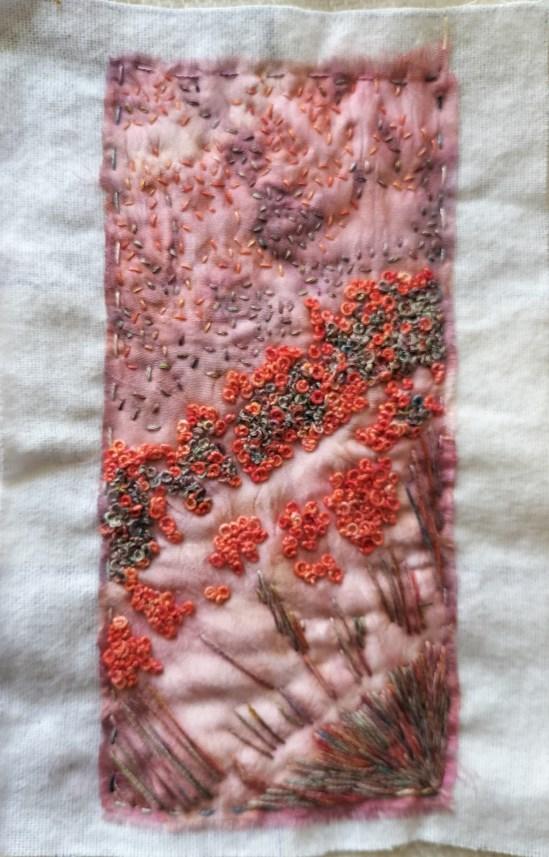
Example 3‘Incorporating samples into ongoing series of work/thoughts/investigations/experiments/ narrative etc‘
by Helen Birmingham
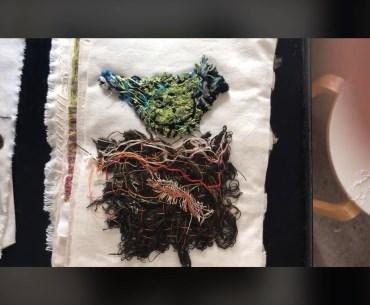
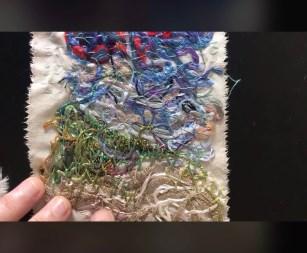
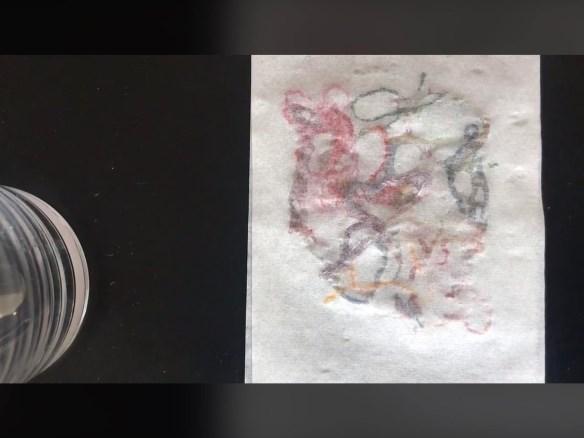
I began this piece of work without knowing just how important and significant it would become. I started it as a sample for this workshop, in the same way as Example 1, but this time with ‘scribbled’ sewing machine lines instead of the straight gridwork.
The more I played with it, and fought with it, the more I disliked it. Then I got the phone call telling me that my daughter had suffered a seizure and was on life support.
To be honest, over the next few days with her life in the balance I wasn't really thinking about anything, but my hands were still moving and my subconscious found its own outlet in this piece of sewing. I spent literally hours stitching: mostly couching and French knots: adding elements, removing them again, unpicking, sewing and unpicking sleeping but still wide awake
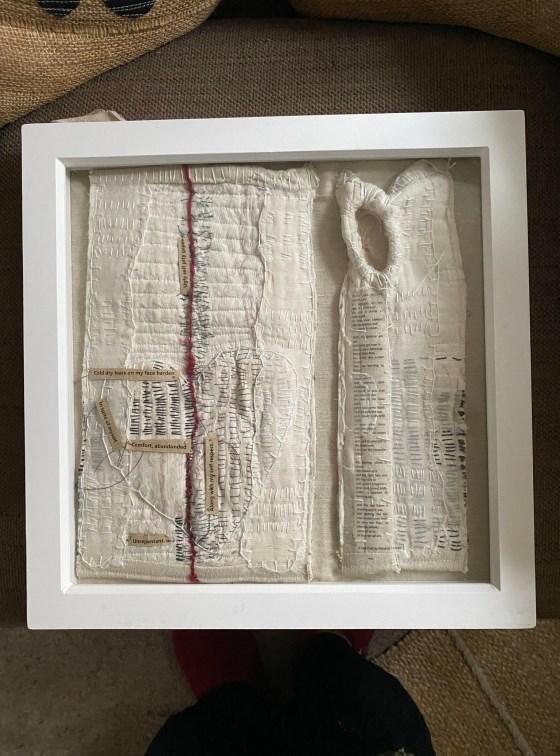
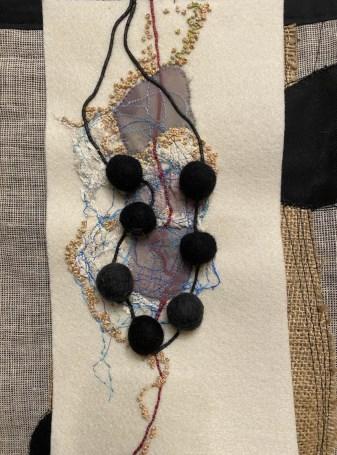
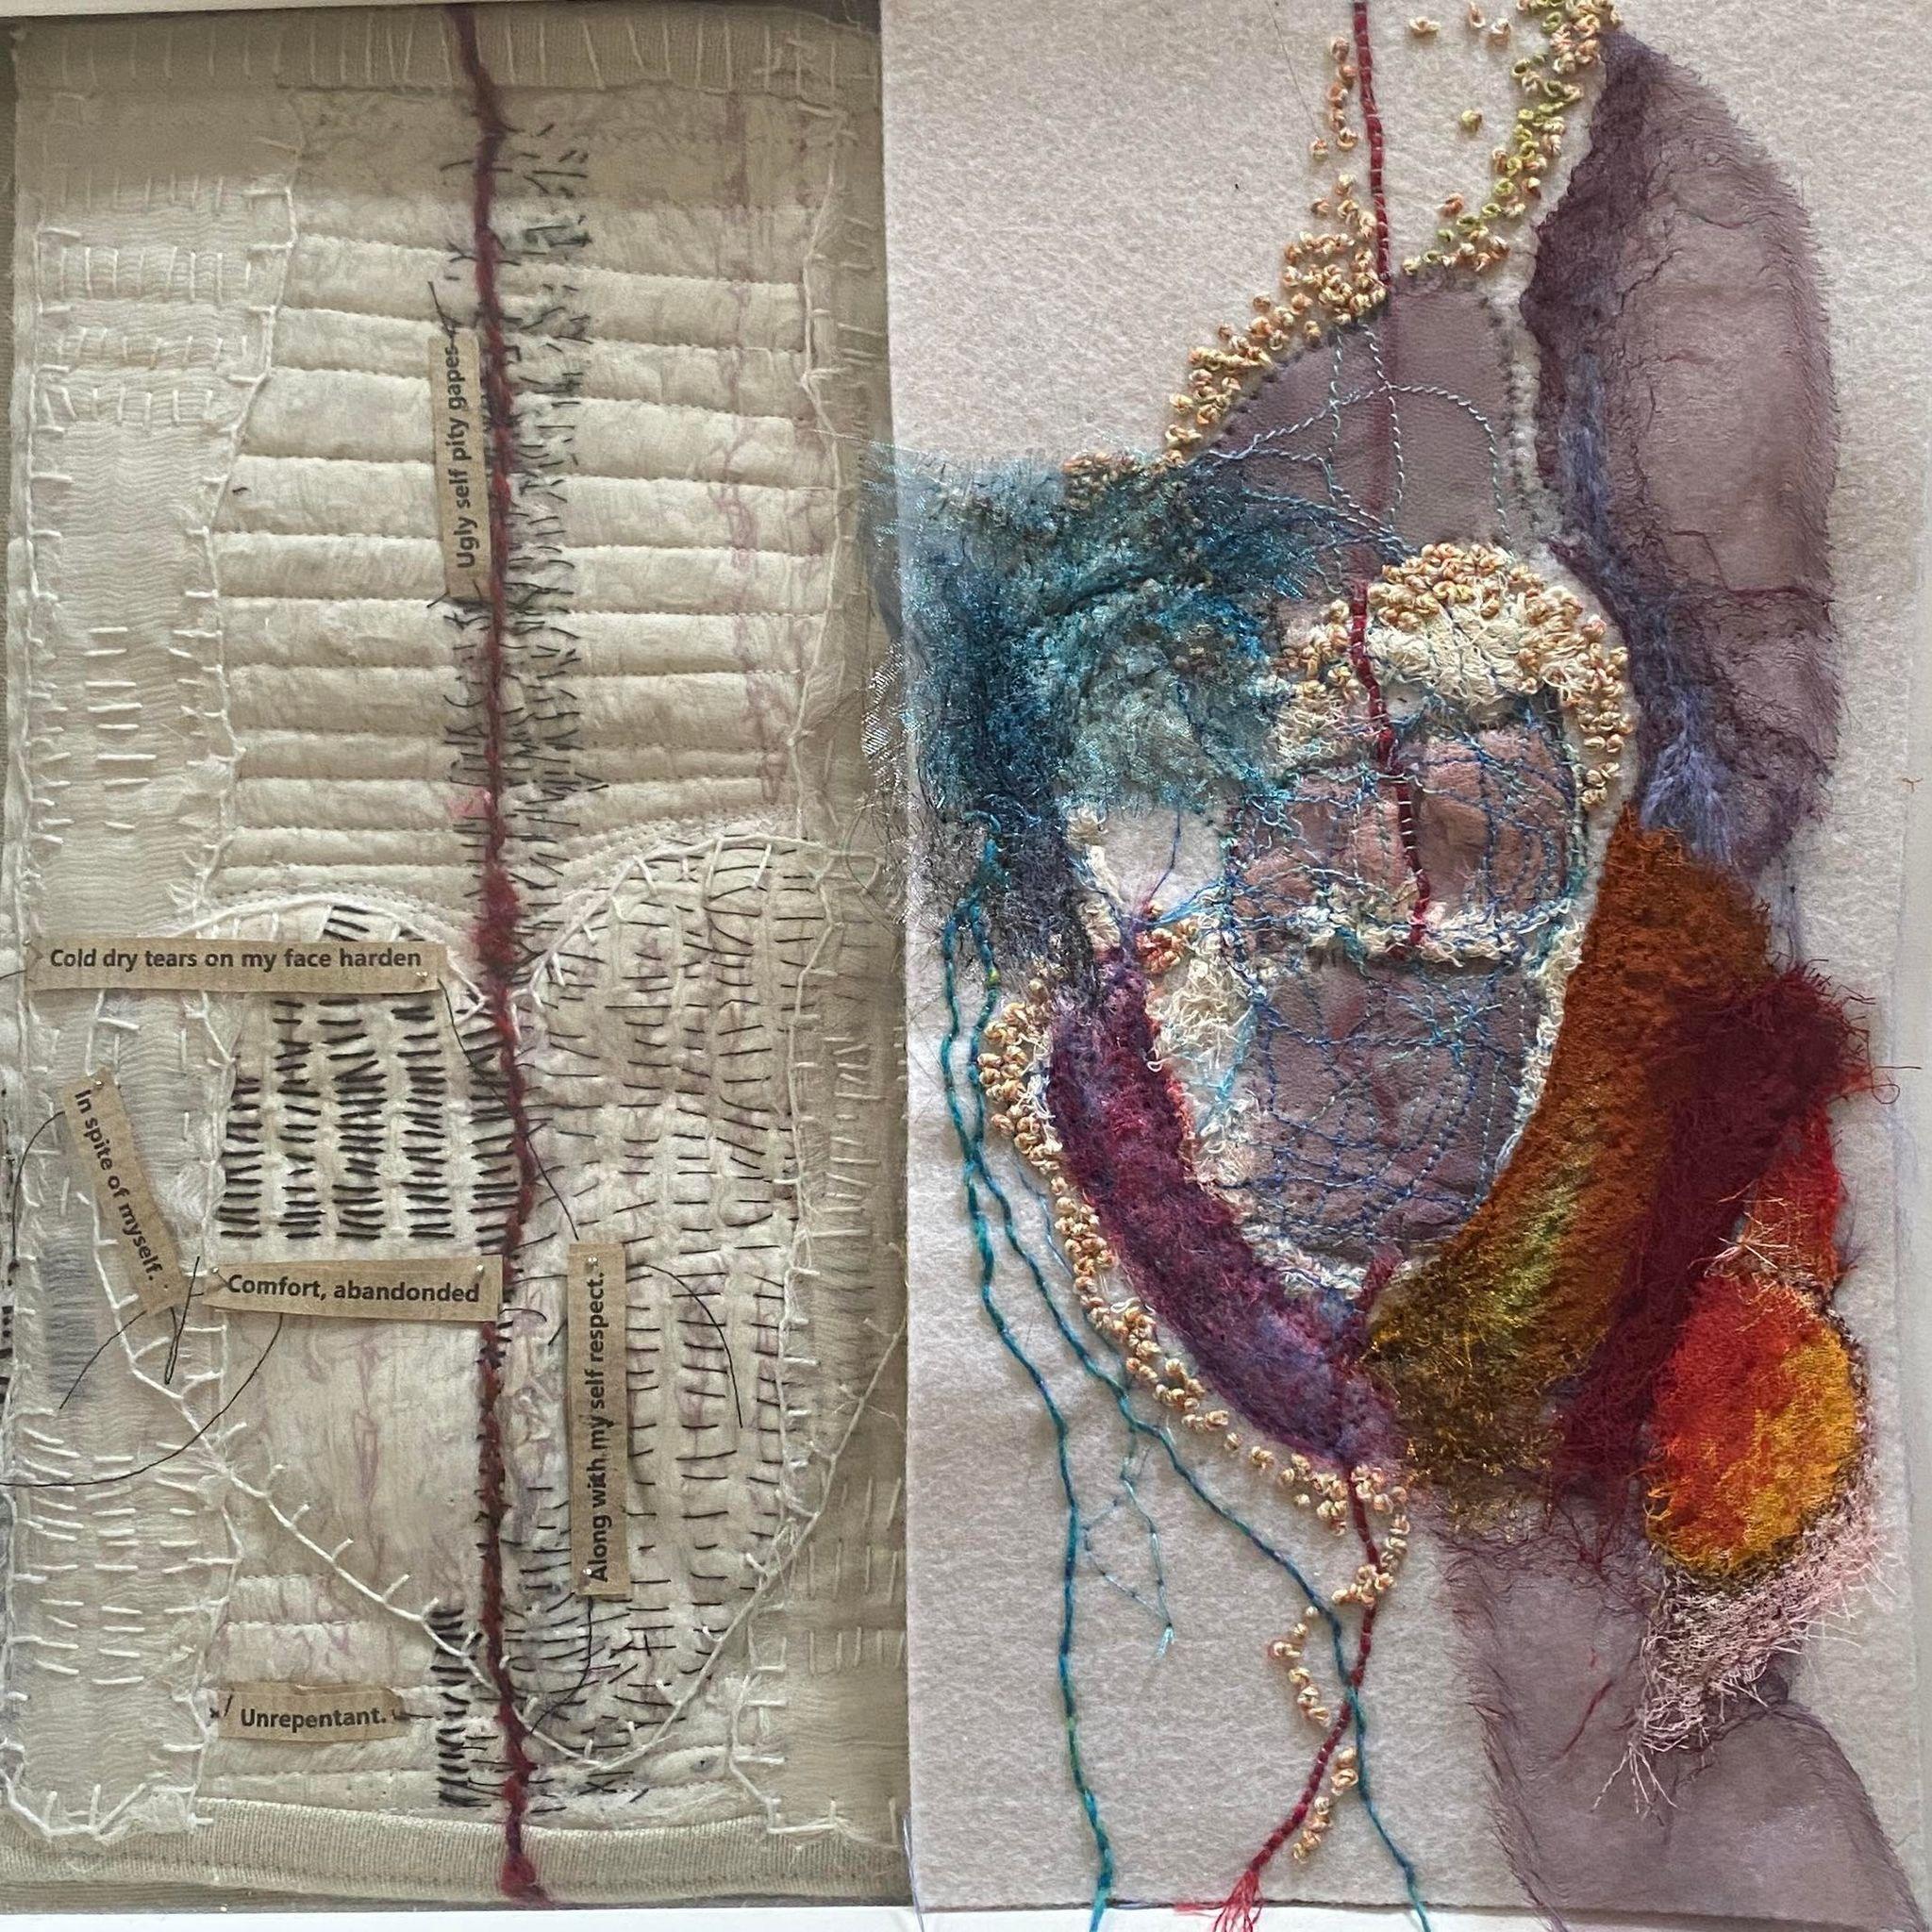
The turning point with this piece of work was not deliberate. By chance, I had also recently been working on the tubes for the Entangled Bank, and the needle-felting mat and needle, and some chindi, were still out on the table. Without any plan, or real awareness of what I was doing, I began very aggressively needle-felting the chindi onto the piece of stitching. The rhythmic stabbing became a comforting pulse.
Somehow a heart shape started to form in the fabric, or rather, in the shape that wasn’t the fabric!
Negative space: what fills the form and shape of nothing?
And then something struck me! This piece of work was incredibly familiar although I couldn’t put my finger on why yes the red line is a repeated motif in my work, but it was more than that.
Then I made the connection! I had made a piece of work about my daughter and our relationship a few years ago, when I was looking at how things which are integral to the ‘look’ of something might not actually be visible. When I placed the two pieces of work together, there was absolutely no doubt where my subconscious mind had been leading my fingers I think that this may be the opposite of Mindful Stitching .. something to ponder at a later date!
8

https://www.hannahlamb.co.uk/
Hannah's first solo book, Poetic Cloth; Creating Meaning in Textile Art, was published by Batsford in 2019.
ISBN 978-1-84994-536-3
Lamb is a textile artist,
and lecturer and a member of the prestigious 62 Group.
Hannah’s description of her work reminds me very much of the ethos behind my own work, and that of my beautiful, much missed, friend Janilaine Mainprize:
“Piecing together scraps of different materials on a theme is an interesting way to develop a narrative through the meanings suggested by different textiles. Using this technique, prints, patterns and textures can be combined to create pieces imbued with personal meaning or narrative. Materials might relate to a particular person, place or time, or join together different parts of something to create a ‘family’ of pieces. Each piece could be different, using precious scraps of antique textile, or swatches from family clothing, or they could simply be snippets from the same textile, torn apart to indicate ideas around fracturing or separation. Depending upon the density of your stitches, the lattice of embroidery will emphasise and strengthen the connections between the textile fragments, or highlight how fragile those links are.”
Hannah’s book, Poetic Cloth is an absolute treasure trove of ideas, images and inspiration.
‘Whether wispy and ethereal, crisp and graphic or blanket-like and comforting, cloth can speak to us intimately.’
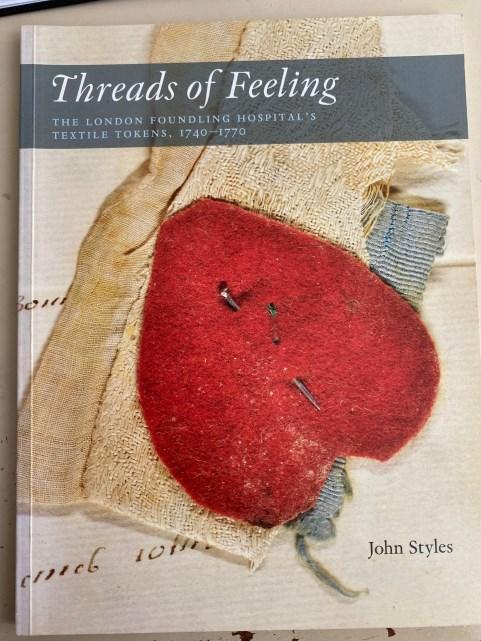
If you haven’t already come across it, you might like to also look at The London Foundling Hospital’s Collection of Textile Tokens, 1740 - 1770
When mothers left babies, the Hospital often retained a small token as a means of identification, usually a piece of fabric. both beautiful and poignant, each scrap of material reflects the life of a single infant child and that of its absent parent.
9
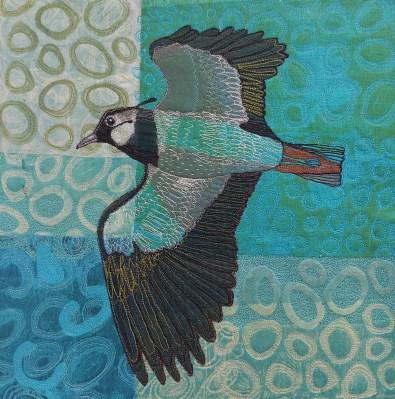
Hannah Lamb
Hannah
maker
the
...
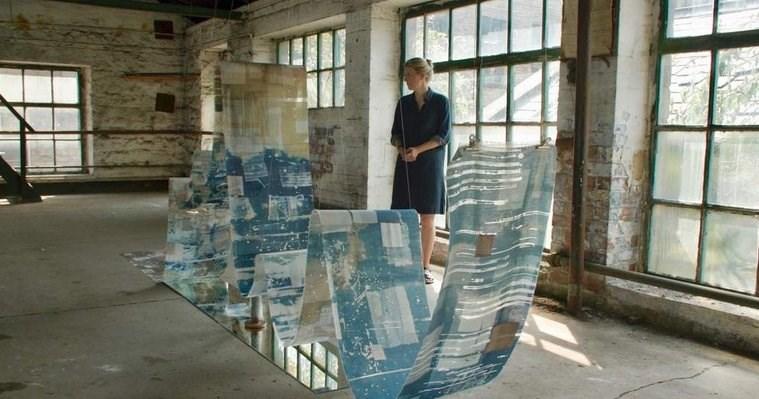
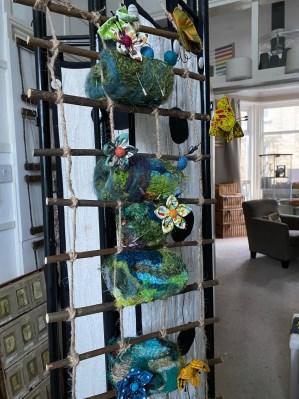
A lace patchwork trellis, holding some flowers against
walled garden of my Stitchbook
Images: by Deborah Campbell
https://www.deborahcampbell.com/
If you find your attention being pulled by the sound of birdsong, let yourself be pulled. And then, no matter how hurried you think you are, stop whatever you’re doing and listen.
Listen as if this moment is all there is, as if every answer to every question you have ever asked rests in the rhythm of inhale and exhale.
Listen until you are so full of song you can’t help but sprinkle it like seed to every hungry heart. And when bird lifts her wings to fly, go, please go fly with her.
10
- Julia Fehrenbacher, Birdsong
Sophie Wake
Mohammad Barangi Pablo Audadell Beverley Brown


FUNDRAISING & AWARENESS
Resource Depletion & Waste
11 DNA Fingerprints Slow Stitching Mindfulness
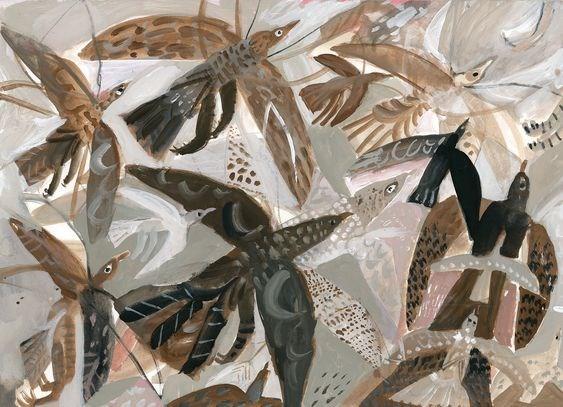
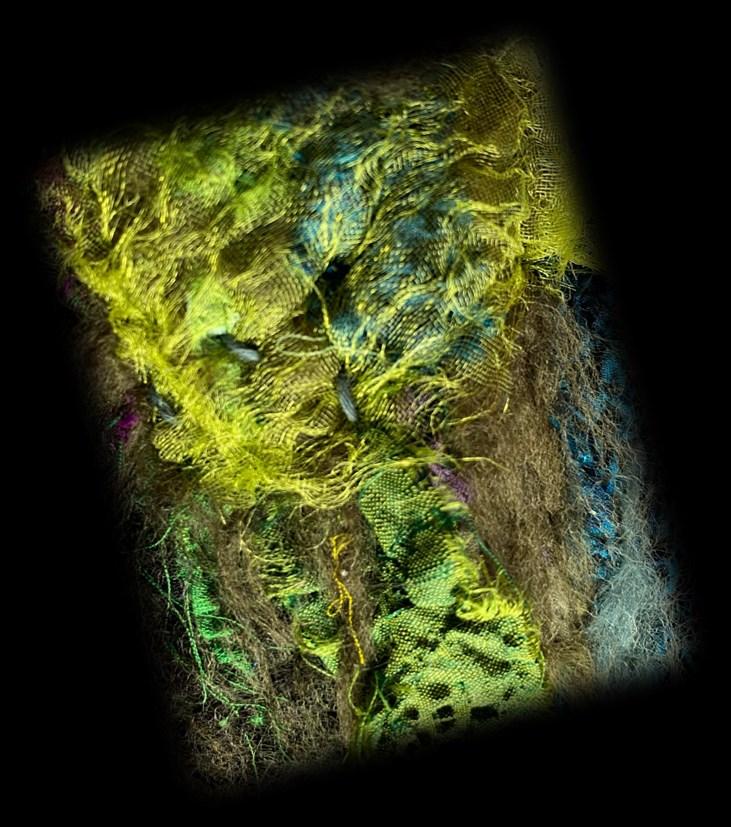
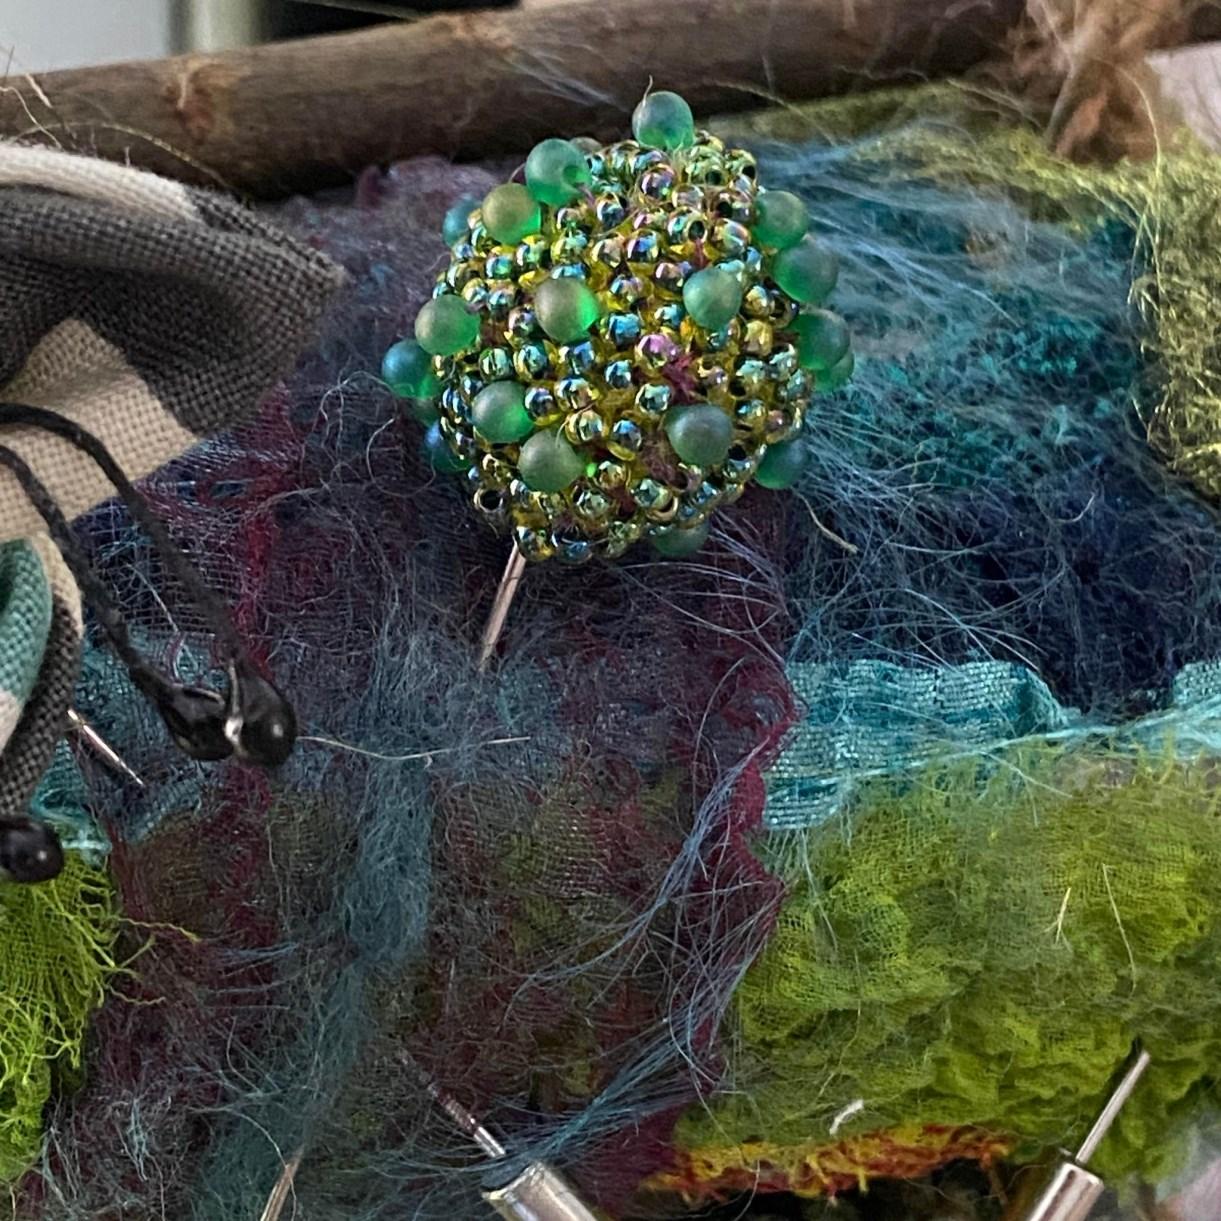
The Entangled Bank Insects/Birds/Plants/Butterflies
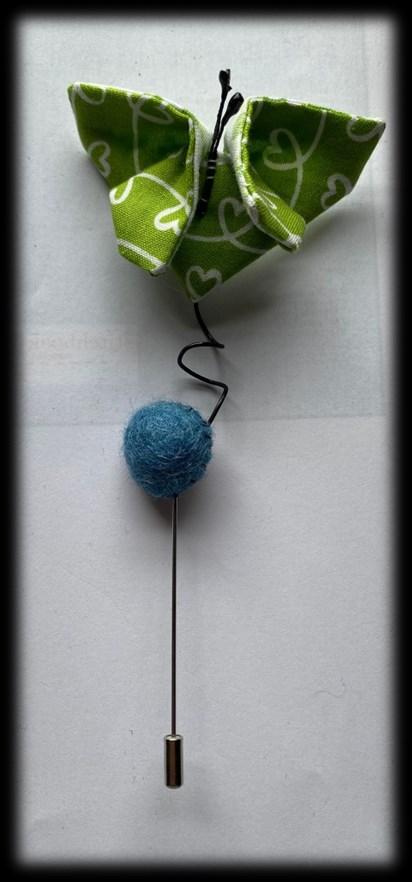
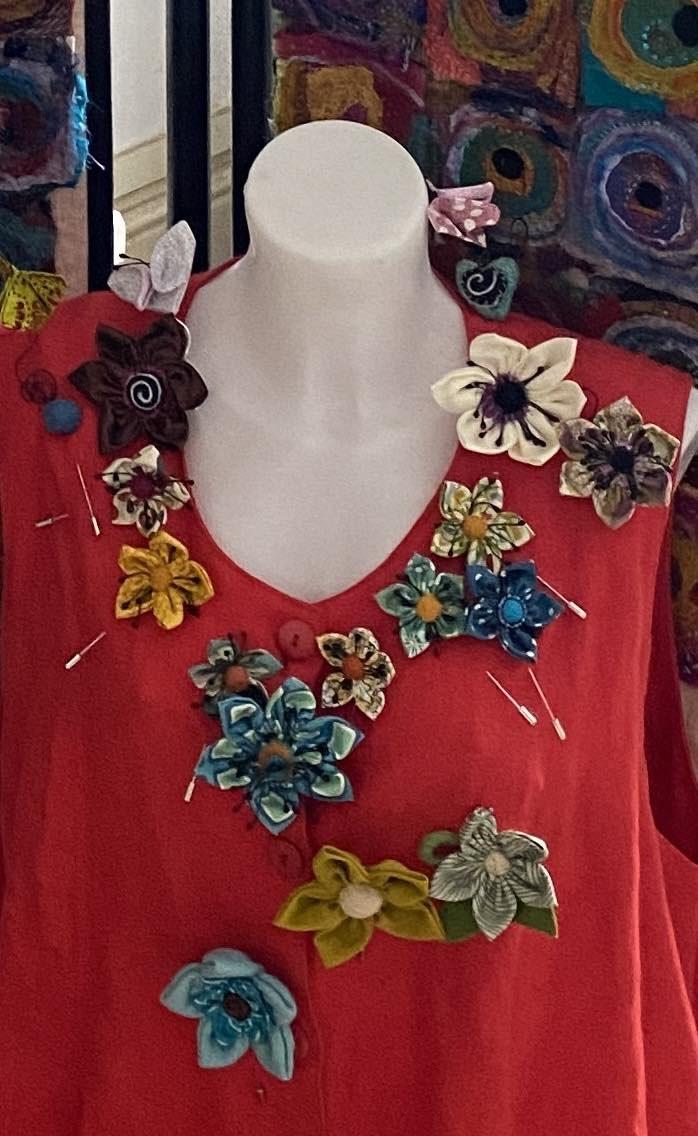
These BROOCH kits are really intended for NON-MEMBERS, however, I have included copies of the instruction sheets for you with this magazine. As a MEMBER you might like to make brooches to donate, using your own fabric. For this reason, there are also kits for sale online which contain JUST pins and stamens (£1.00 per kit will still be donated to MIND). It is important that any brooches returned as part of this project have the same basic design. Please ask if you are in any doubt.
BUT please don’t think that you HAVE to make pin brooches.
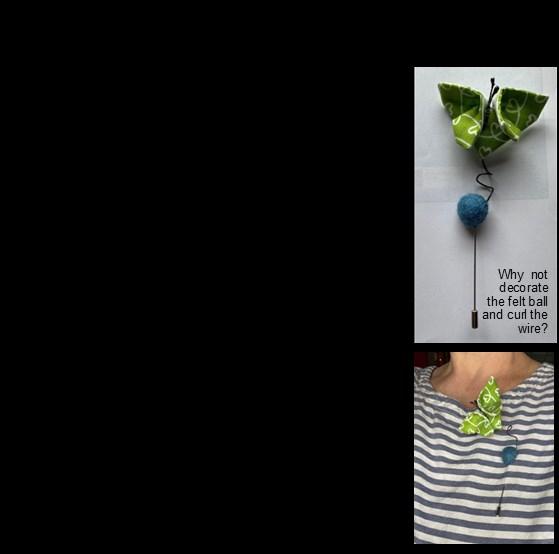
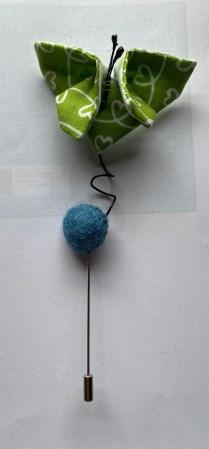
I AM STILL LOOKING FOR FOLDED BUTTERFLIES (without the pin brooch) which will form the bodice and decorate the veil of the installation, and if you look on the following pages, you can see several other ways in which you can get involved with the project over the next year or so.
£1.00 from the sale of EVERY kit is donated to MIND.
Each kit contains written instructions and a link to an online workshop video, together with enough materials to create TWO PIN BROOCHES.
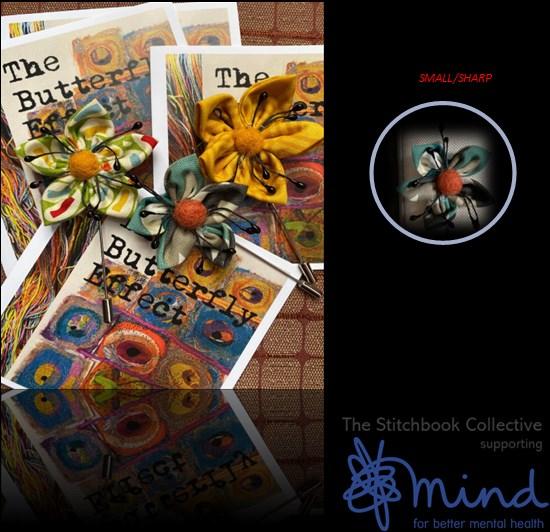
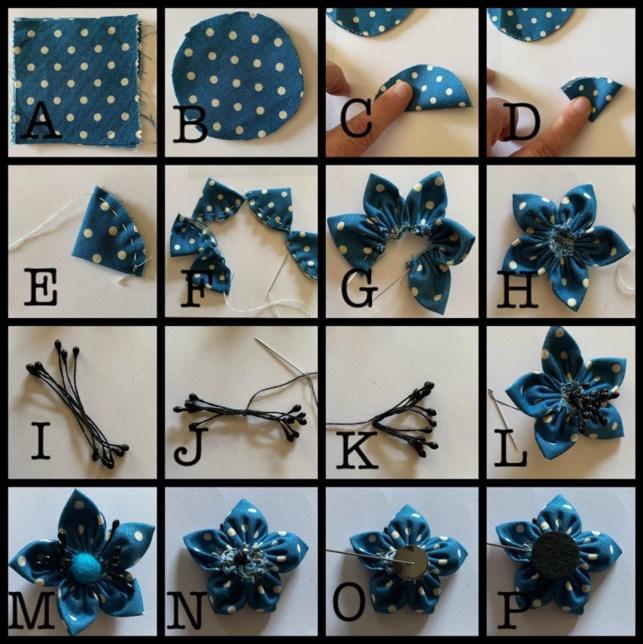
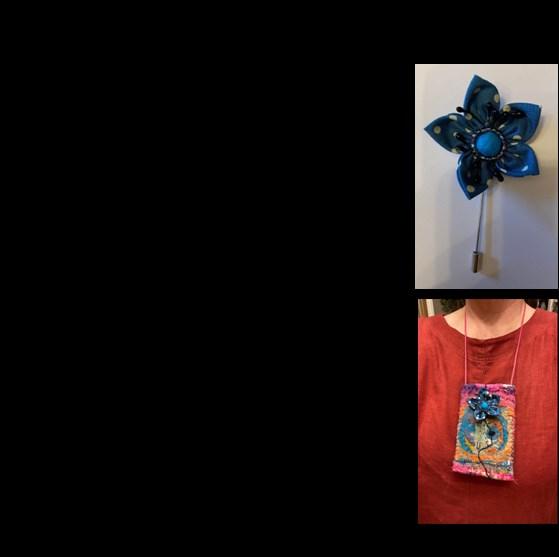

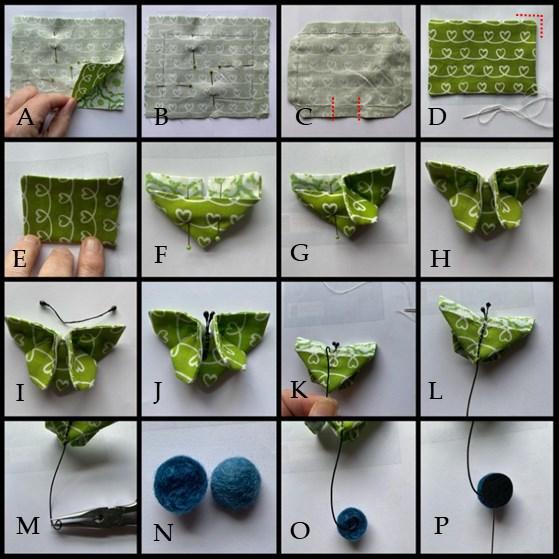
ONE BROOCH for you to KEEP and ONE to RETURN to the project.
Returned brooches will be photographed and included in the project catalogue, and then offered to the public at one of our fundraising events in 2025 in exchange for a donation to MIND.
KITS are for sale online www.untangledthreads.co.uk
RRP £5.00 each (including UK postage and packing)
ANY multiple of 2 KITS posted to the same address:
£9.00 incl UK P&P £2.00 will still be donated to MIND.
ADDITIONAL online DONATIONS ARE WELCOME
12
2024
FUNDRAISING KITS AVAILABLE ONLINE from 15th May
www.untangledthreads.co.uk
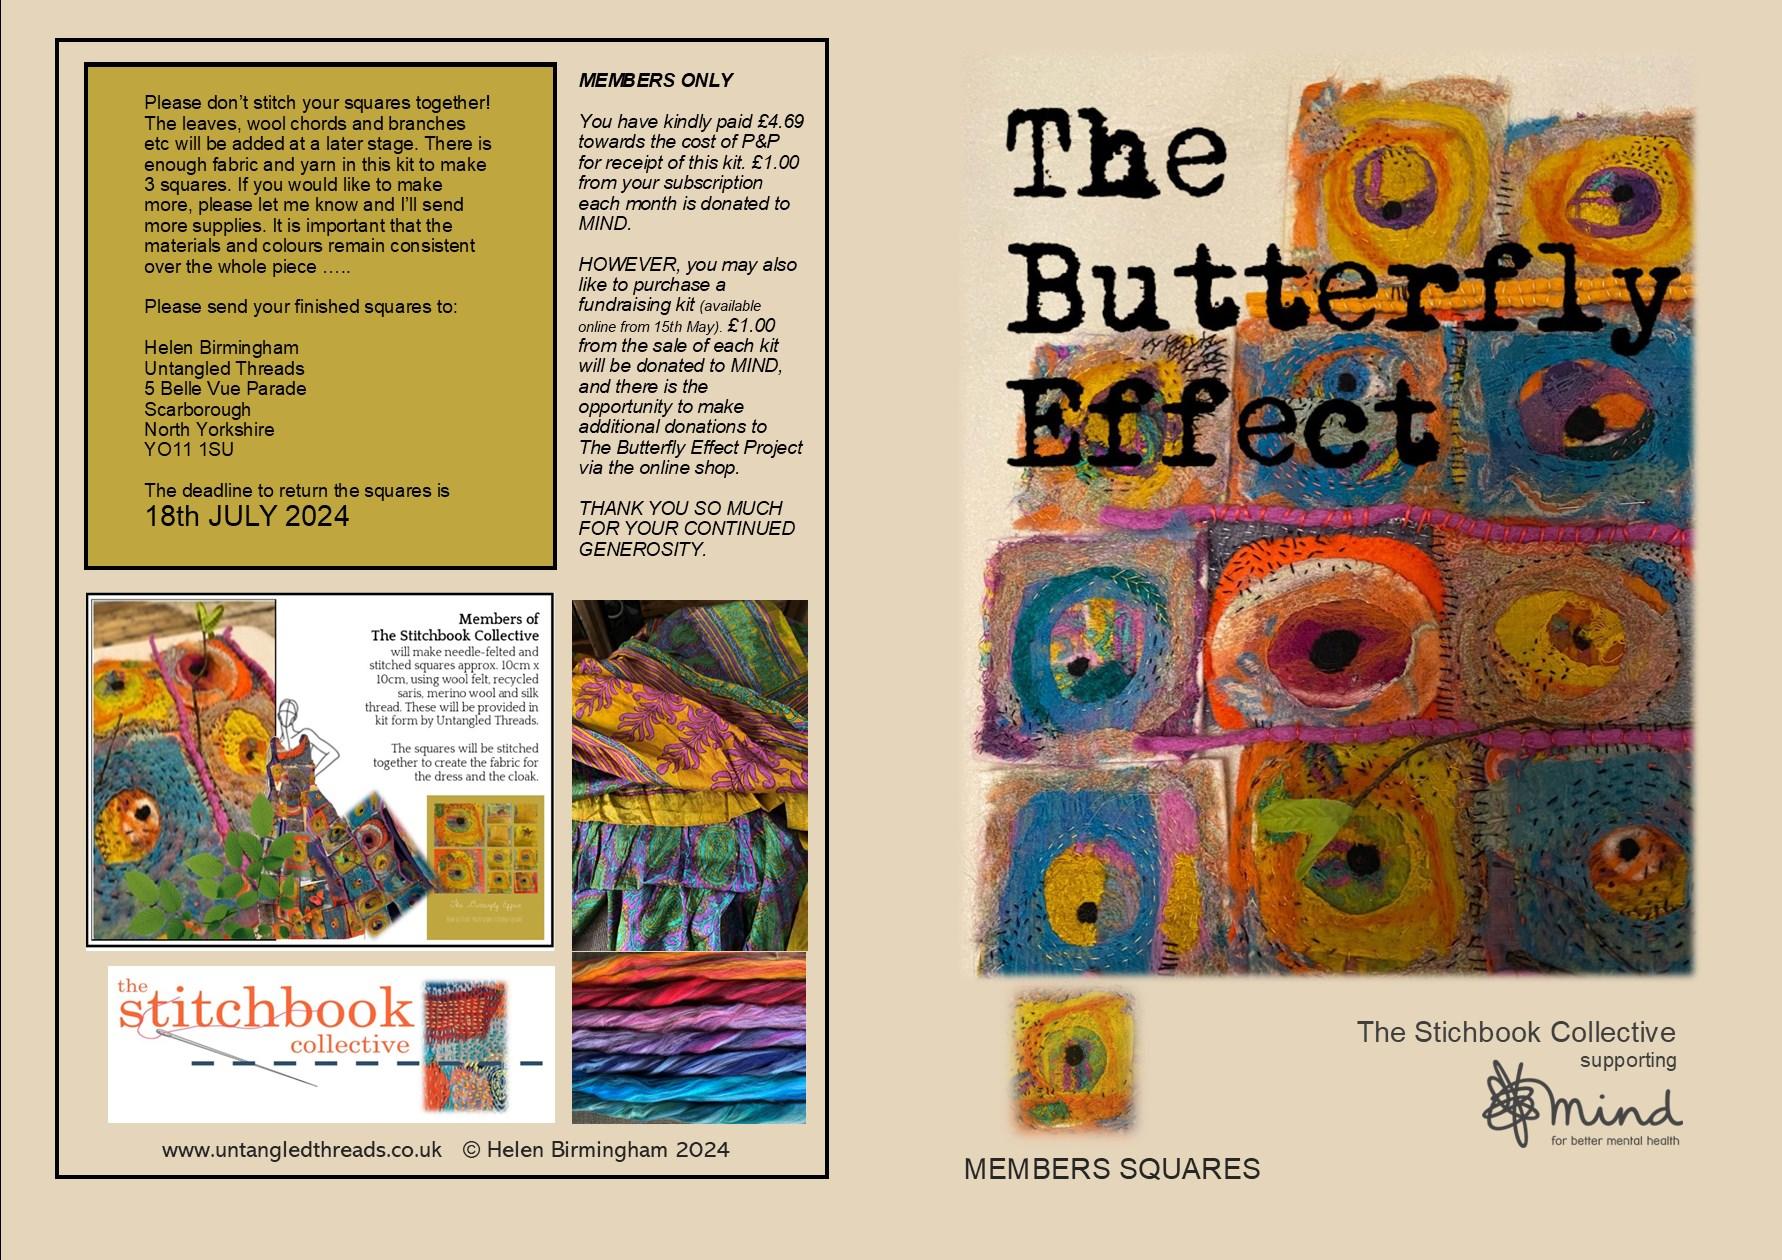
There are still a few MEMBERS’ SQUARES kits available. If you would like to order another please go to the Untangled Threads online shop. They cost £4.69 each (to members only).
From 15th May 2024 I will also be offering the remainder of these kits (by individual invitation) to people who have been members of The Stitchbook Collective in PREVIOUS YEARS. They will be required to pay £9.69 for each kit, to cover some of the material costs. (£1.00 from this will be donated to MIND).
PLEASE DON’T FORGET that your completed squares need to be returned to me by 18th JULY 2024
NEW KITS available from 15th May 2024 . The cost of these kits (to members only) has been subsidised by a private donation. The £4.69 covers the cost of UK postage and packing, so if you order more than one kit to the same address, the donation to MIND can be increased accordingly.
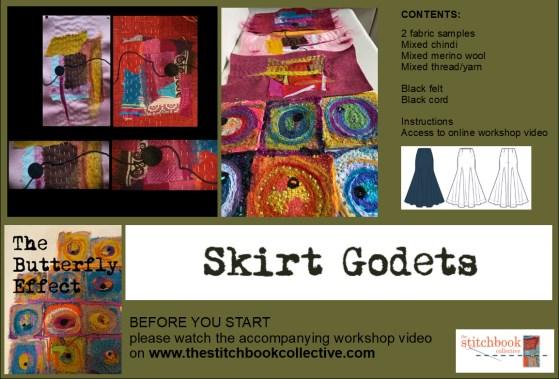
The Skirt Godet panels will help to give the dress better drape. These kits are essentially for slow-stitched panels. I will probably be making them available to non-members as well as members. The stitched sections can be used to decorate any additional spaces in the final exhibition.
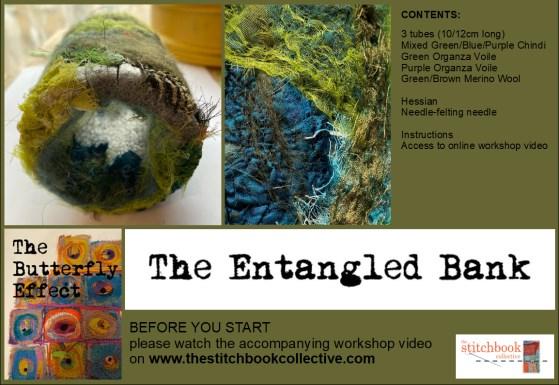
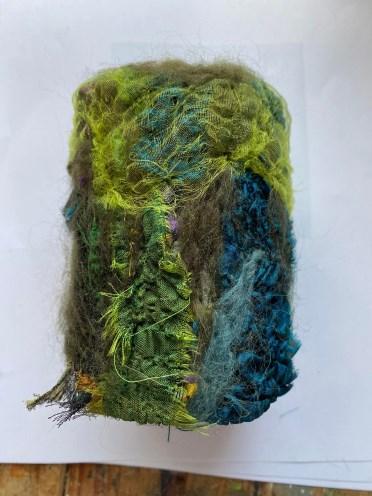
Also available to MEMBERS ONLY from 15th May 2024 are kits for sections of The Entangled Bank.
COMPLETED Godet and Entangled Bank Sections must be returned to me by 18th November 2025
13
PROJECT TIMETABLE
We began discussing this project in Issue 9 of The Stitchbook back in September 2023. The design was finalised in February 2024 and the first MEMBER’S SQUARE kits were launched on 18th March 2024. This is our most ambitious project to date. It will involve not only members of The Stitchbook Collective, but also hundreds of our supporters across the UK.
We are hoping to raise awareness and much needed funds for the mental health charity MIND. A provisional date of November 2025 has been set for exhibition of the final installation
May May 15 FUNDRAISING begins with online launch of Flower & Butterfly Brooch kits
May 15 Entangled Bank & Godet kits available to Members
Jun Jun 16, 21-23, 28-30 The Scarborough Fair: Untangled Threads OPEN STUDIO & EXHIB 11.00-15.00 Including brooch making workshops and sale of kits
Jul Jul 7, 14, 21, 28 The Scarborough Fair: Untangled Threads OPEN STUDIO & EXHIB 11.00-15.00 Including brooch making workshops and sale of kits
Jul 18 Deadline for return of Member’s Squares
Aug Aug 4 The Scarborough Fair: Untangled Threads OPEN STUDIO & EXHIB 11.00-15.00 Including brooch making workshops and sale of kits
Sep
Oct
Nov Nov 18 Deadline for return of Entangled Bank sections
Nov 18 Deadline for return of Godet Panels (members only)
Dec
Jan
Feb
Mar
Apr
May Deadline for return of ALL Butterfly & Flower brooches for donation
Production of PROJECT CATALOGUE and installation
The Stitchbook Workshops
Issue 17 Lace patchwork with water soluble stabiliser
Issue 18 Beaded felt balls and flowers
Issue 19 Sawdust-stuffed pincushions Birds & Hearts
ALL brooches which are returned in response to the FUNDRAISING element of this project will be photographed and appear in the fully illustrated PROJECT CATALOGUE which will be available for sale online and at the final exhibition. The brooches themselves will be given in exchange for a donation at the final exhibition (rather like the poppies/daffodils/ribbons which are such a popular part of many other charity fundraisers.)
14
2024 2025
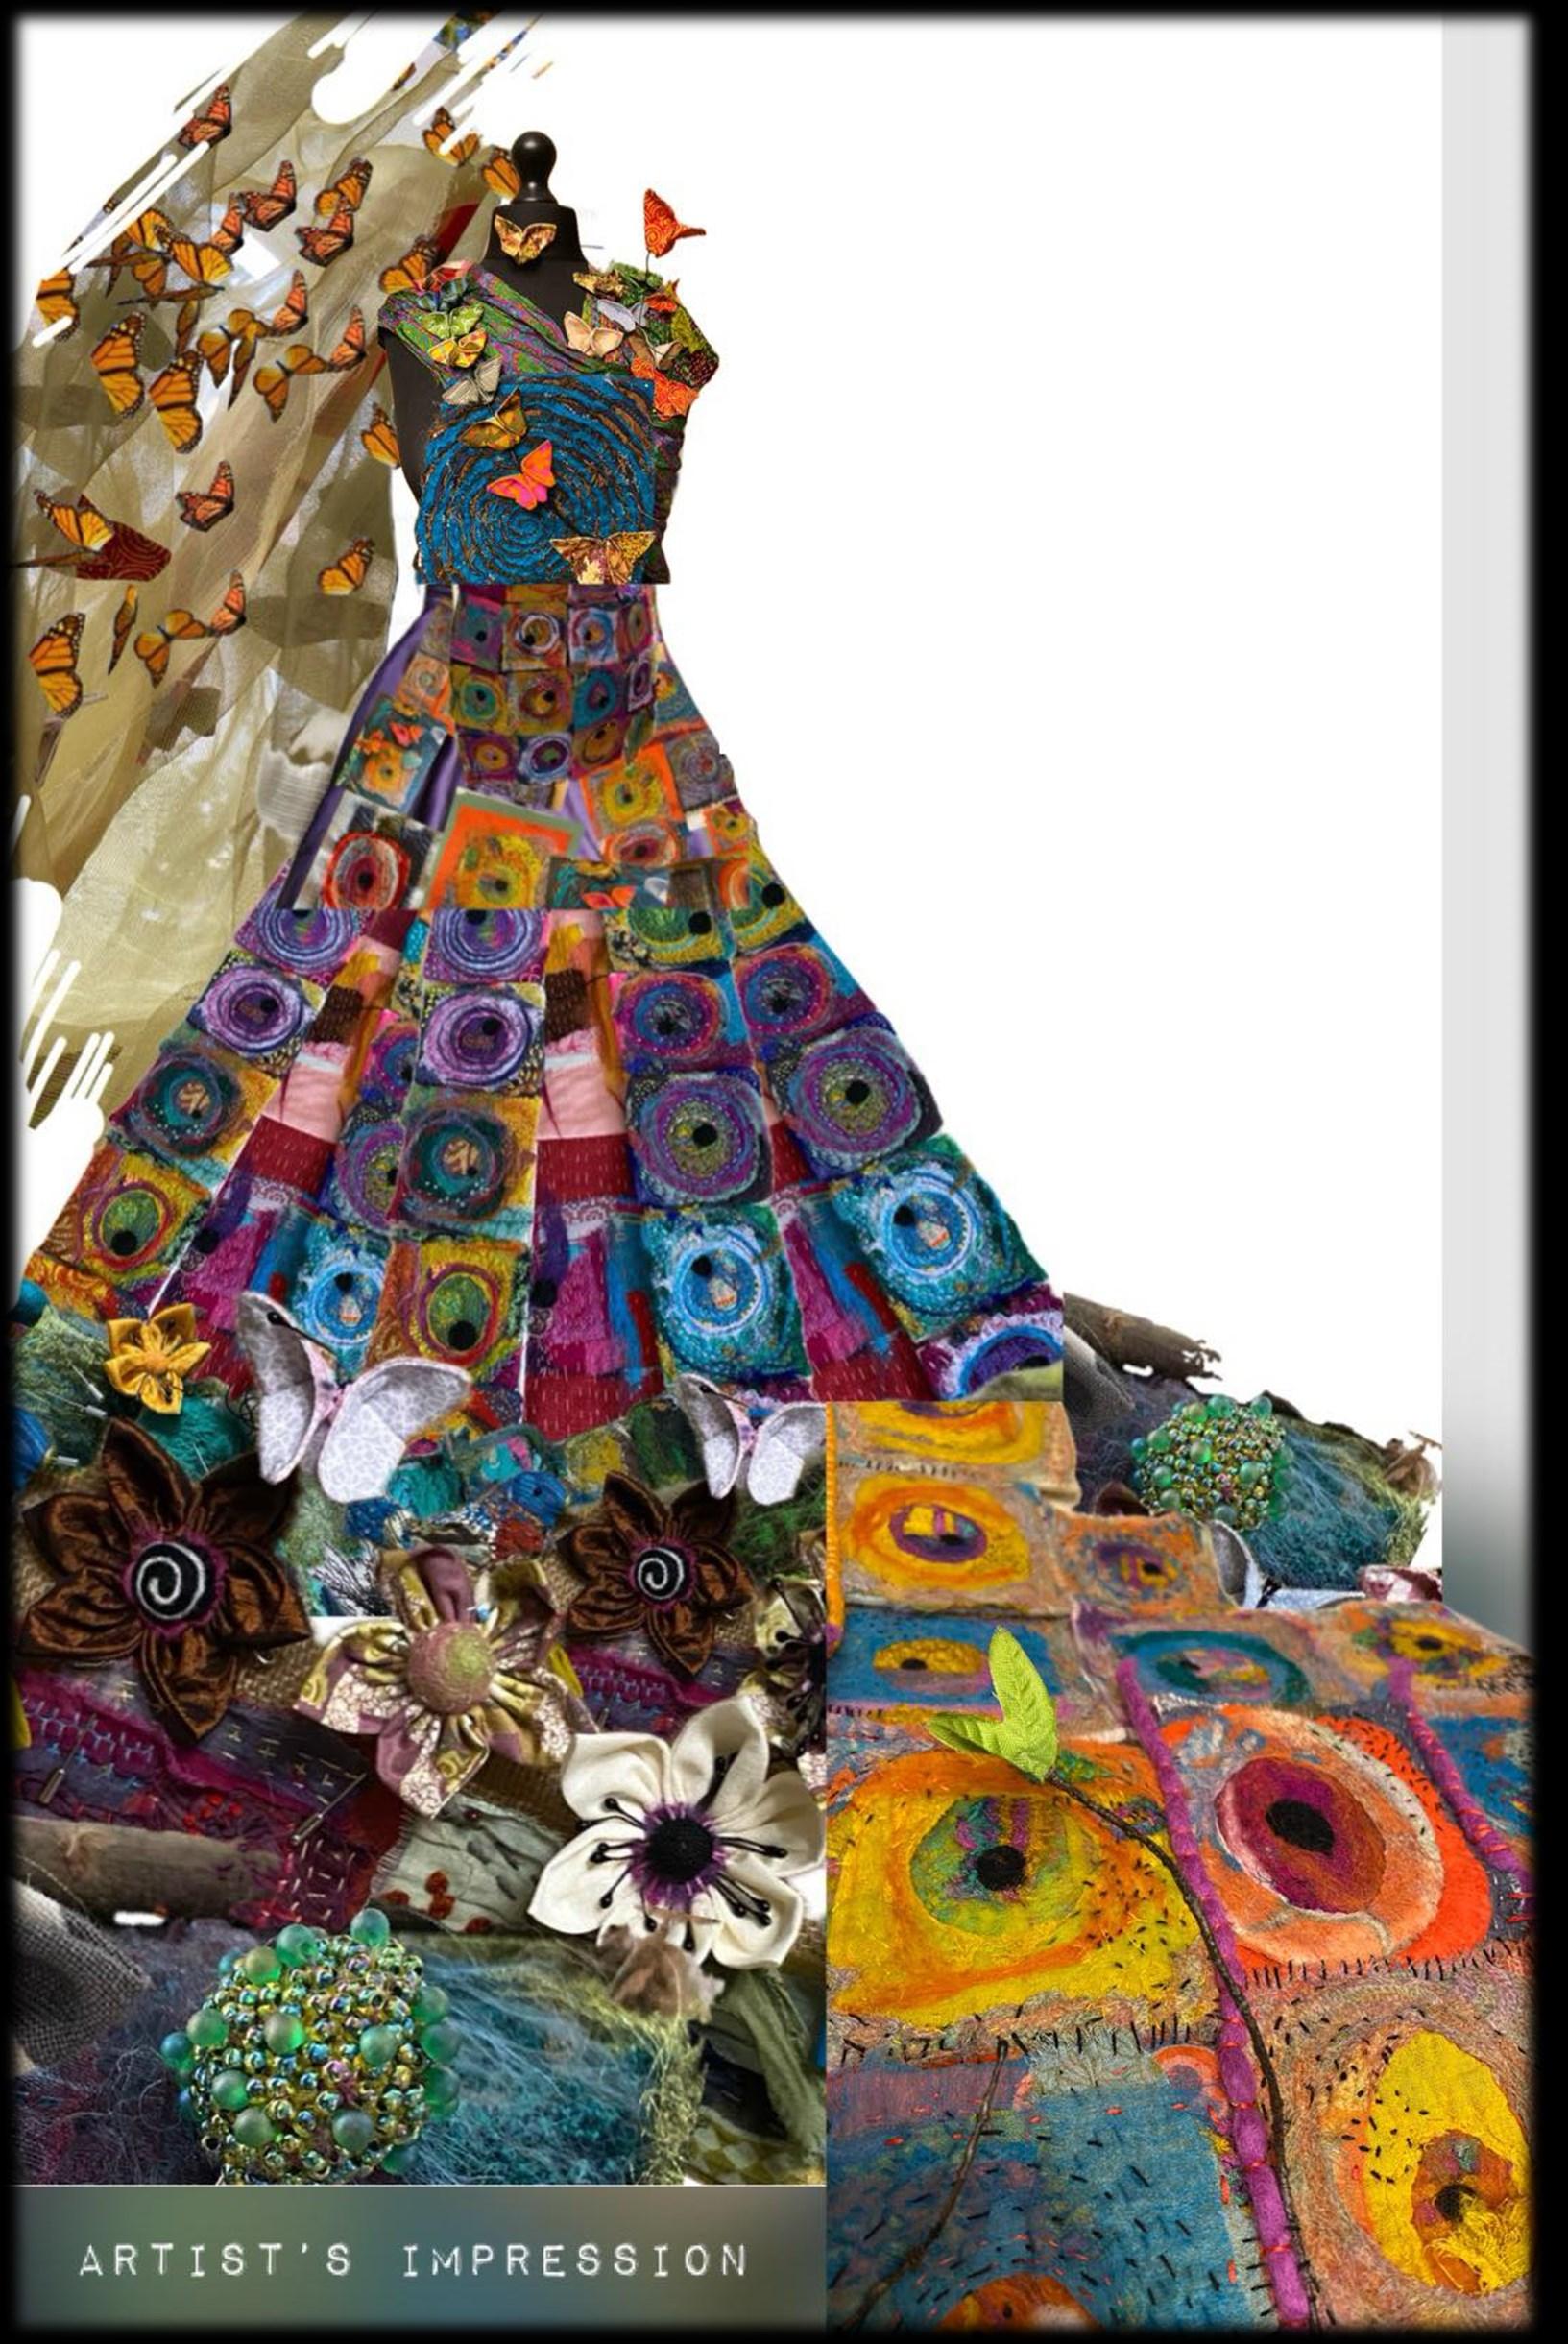
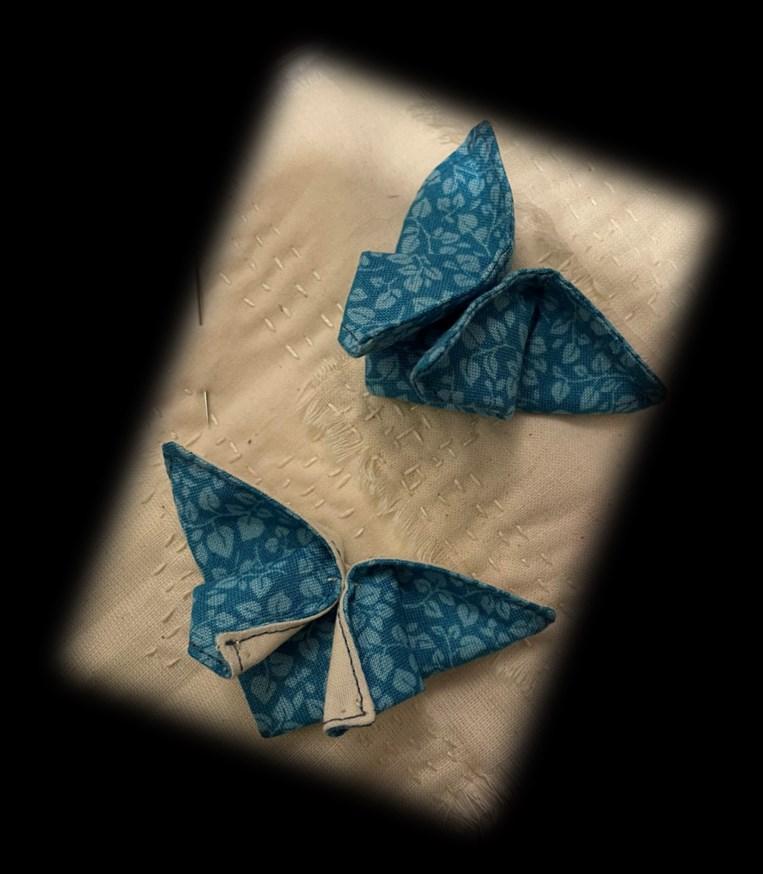
The bodice, headdress and veil will be covered with folded fabric butterflies. wired to give the impression of movement.
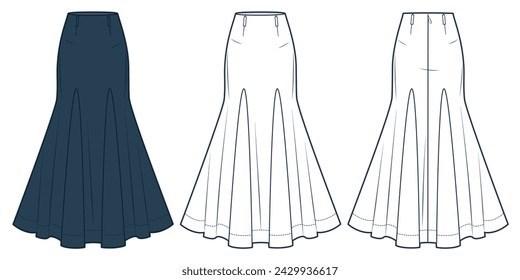
The skirt will be made from the member’s squares and slow stitched godet panels.
The skirt will flow into the Entangled Bank, made from tubes, trellis and needle-felted mossy textures. This will be teaming with representations of flora and fauna.
The Entangled Bank will be emerging from an area which represents a desolate wasteland, devoid of colour and life.
HOW YOU CAN GET INVOLVED
Over the coming months there will be lots of opportunities for you to make items or individual elements to be displayed as part of, and/or donated, to our 2024/25 fundraising project.
I am currently in discussions with Jo Hall, the gallery curator and coordinator for The Knitting & Stitching Shows and The Festival of Quilts. I am really hoping that I will be able to secure an exhibition or gallery space for Harrogate in November 2025, and maybe even some workshops and publicity for 2024. She seems very impressed with our work so far, and of course, our subject matter for this project is absolutely current. As soon as I have finalised my written proposal to her and have any news, I will obviously share it with you all in a newsletter email.
As I have said before, I am very conscious to make sure that there are projects and techniques in our monthly workshops which are NOT solely aimed at this project, but if I can inspire you, not only to make samples for your Stitchbook, but also to create items on our theme, that would be great.
I have included below a list of possible projects which you may like to look at sometime during the next year or so, and I will introduce them surreptitiously a few at a time in the magazine over the next few months.
I had hoped to be a little further on with preparations for these ’extra items and elements’ for Members Only, but as you know its been a difficult couple of months in lots of ways. I do hope that you will want to get your hands on the Godet Panel and Entangled Bank kits this month, and I hope that they will keep you going for a while!
Reminder to self: This is a marathon NOT a sprint!
• Members Squares
• Entangled Bank Tubes
• Godet Panels for skirt
• Slow stitched panels for display
• Butterfly and/or Flower Brooches
• Folded Butterflies
• Birds, insects and flowers for Entangled Bank
• Members brooches
• Beaded Felt balls for Entangled Bank
• Monochrome slow stitching for display
• Kunin felt/burnt flowers for display
• Monochrome lace patchwork for display
15
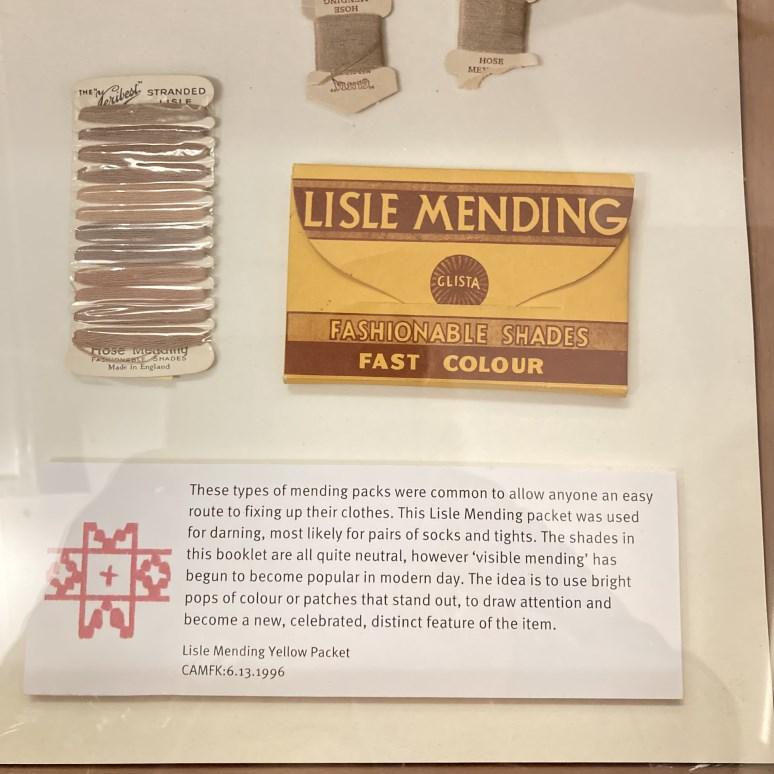
These types of mending packs were common to allow anyone an easy route to fixing up their clothes. This Lisle Mending packet was used for darning, most likely for pairs of socks and tights. The shades in this booklet are all quite neutral, however ‘visible mending’ has begun to become popular in modern day. The idea is to use bright pops of colour or patches that stand out, to draw attention and become a new, celebrated, distinct feature of the item.
By Juliet Bevan
I visited the Museum of Cambridge today for an exhibition and curators talk on ‘Textiles Therapy: Aiding mental health, mourning, disability and injury’.
It was very good considering they are only a small museum.
The exhibition included some of their textile pieces including samplers from the 1800’s and in particular, pieces stitched by soldiers in hospital in Cambridge during World War 1.
Beau Branick is the Collection Officer at the Museum of Cambridge and curator of the exhibition. It came about as she loved a piece of work completed by an unknown soldier that depicted the character Mother Goose. She decided to explore more about the pieces of that time and give a talk.
The talk was interesting, but mostly about Cambridge hospitals during the war.
Beau had not been able to find out very much about these particular soldiers or who introduced them to stitching. She spoke about the link between stitching, mental health and therapy focusing on the Disabled Soldiers’ Embroidery Industry 1918-1955.
This resonated with me from the work that Helen did with the Hearts from World War 1 and our own work as a group for MIND.
If you are in the area the exhibition is worth a look, and the museum itself is interesting.
War and Embroidery
Embroidery became a widespread activity among injured out-of-action (OOA) soldiers during WW1 and WW2. Learning embroidery was a way to help injured and/or disabled soldiers back into employment through the small-scale production of luxury and domestic items. This employment scheme was known as the Disabled Soldiers’ Embroidery Industry which operated between 1918 and 1955. Although the embroideries in the Museum of Cambridge’s collection aren’t necessarily from this, embroidery as a practice for OOA soldiers became common due to this scheme.
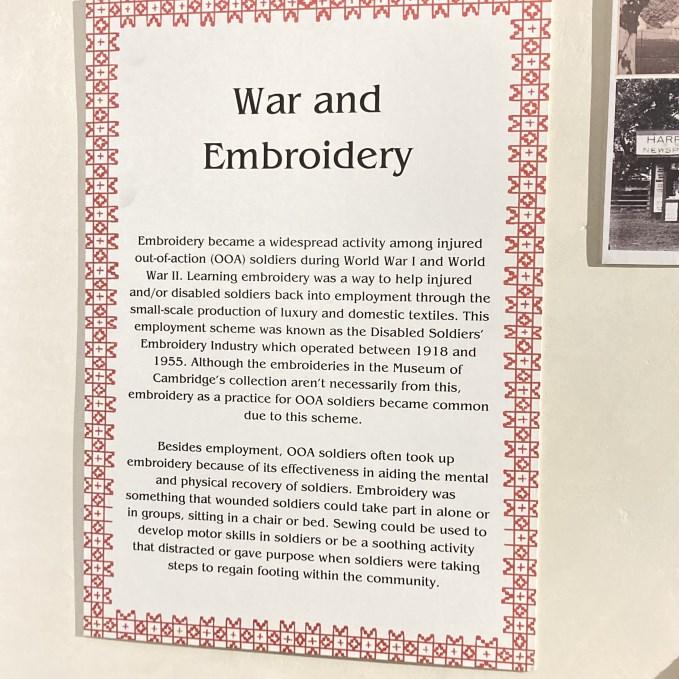
Besides employment, OOA soldiers often took up embroidery because of its effectiveness in aiding the mental and physical recovery of soldiers. Embroidery was something that wounded soldiers could take part in alone or in groups, sitting in a chair or bed. Sewing could be used to develop motor skills in soldiers or be a soothing activity that distracted or gave purpose when soldiers were taking steps to regain footing within the community.
16
by Glennis Walton
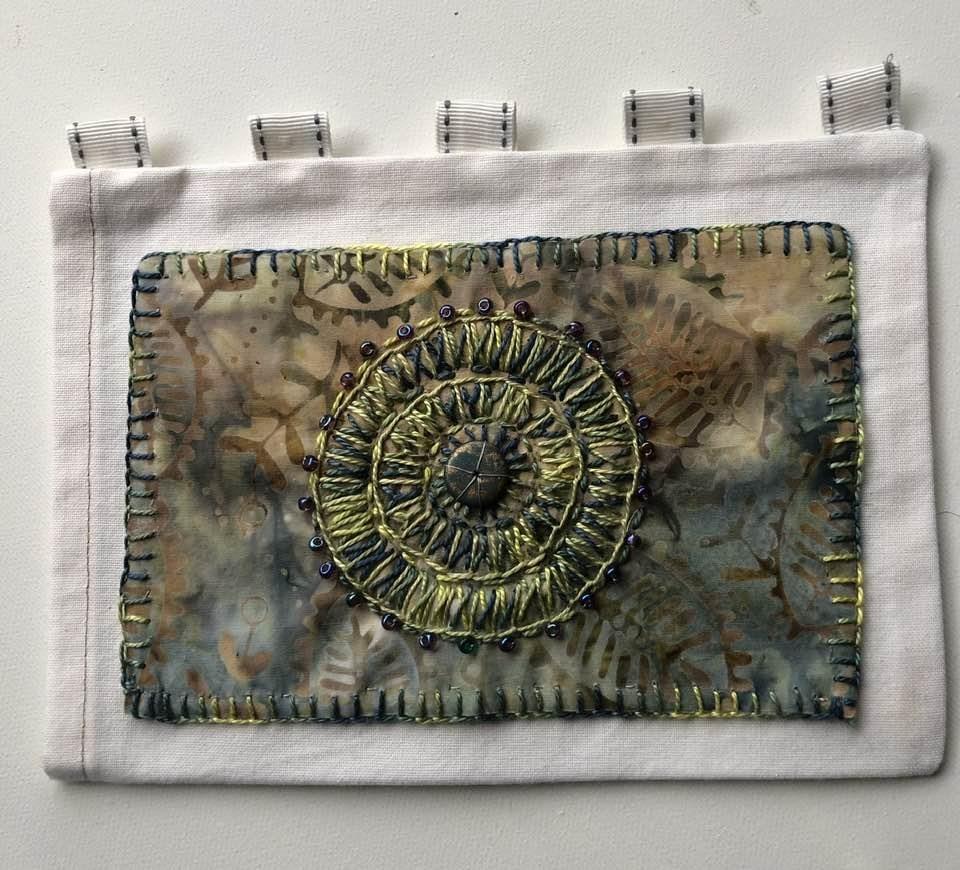
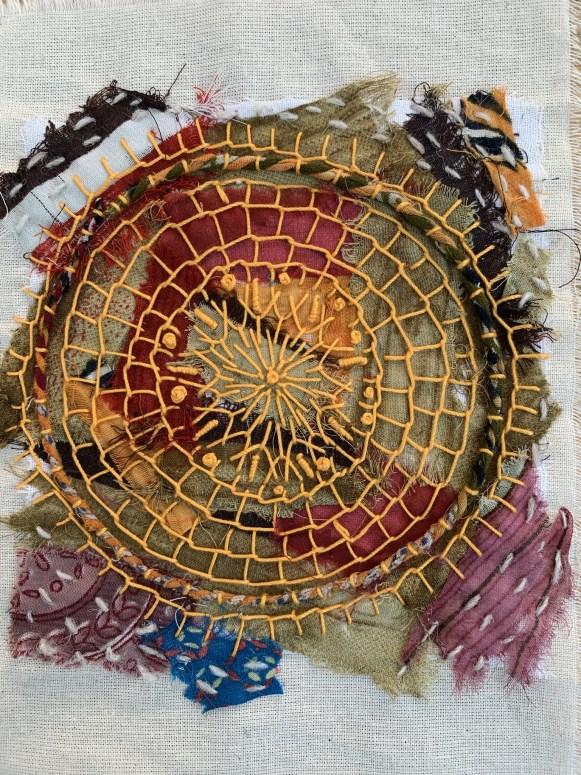
How can you put things away in a safe place and not be able to find them when you want to use them? I am trying to catch up on past activities but have ‘lost’ my Mandala sample packet. But having watched the video again, decided to use what I had in my stash. Having chosen a piece of Bali Batik fabric, I selected some Cotton Perle threads in similar hues, but thought the results were rather coarse. I then repeated the piece using stranded threads it is surprising how different they look.
 By Patricia Hughes
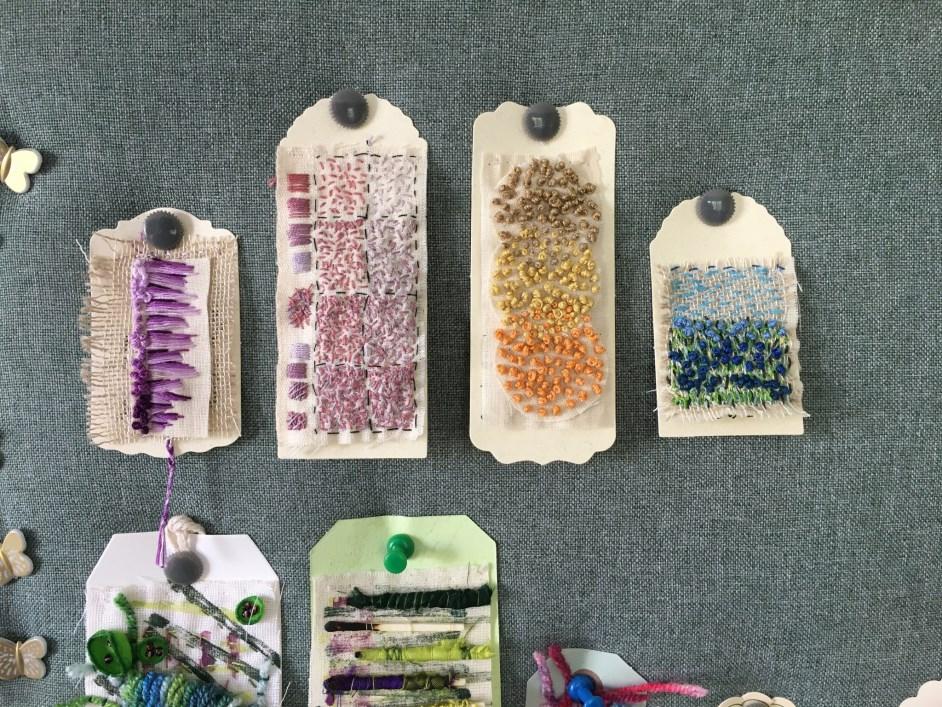
I enjoyed doing this months workshop in miniature to fit onto tags. I also liked the look of Karen Turners stitched sampler work as featured in the magazine so have started a grid design of simple stitches I will post a picture when I have some squares filled. One a day as suggested makes it seem so manageable and it is surprising how quickly it begins to fill up.


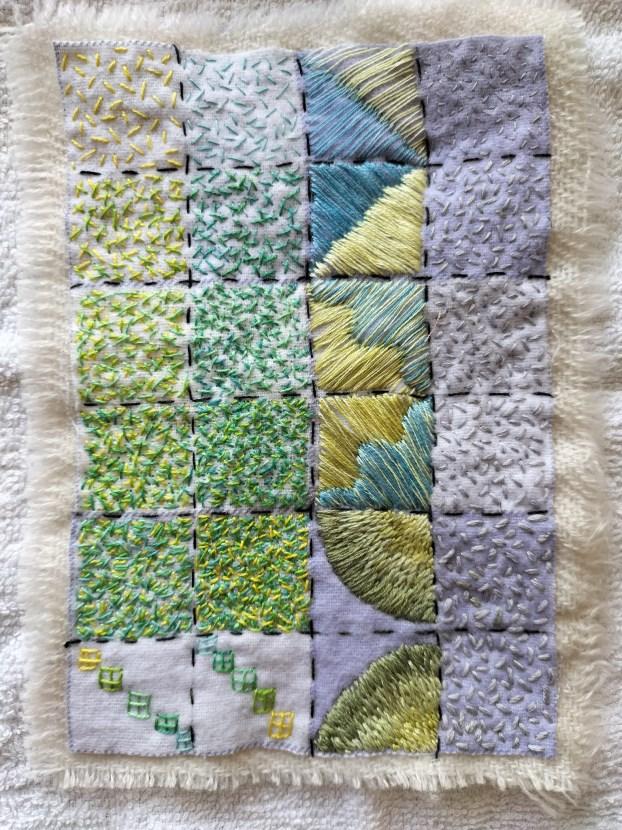
 by Helen Birmingham
I’ve joined a Facebook page called 100 Days of Stitch Meditation, where there are lots and lots of inspirational posts. If you haven’t come across it, take a look. You have to ask to become a member and answer a couple of questions, but I’m glad I did. 100 days of Stitch Meditation®
by Eileen Gibson
The best thing about this lousy weather is that there’s a bit more time for stitching. The samplers have been a load of fun, but making a large Stitchbook this year wasn’t necessarily a great idea - the samples just got bigger x
17
 by Patricia Hughes
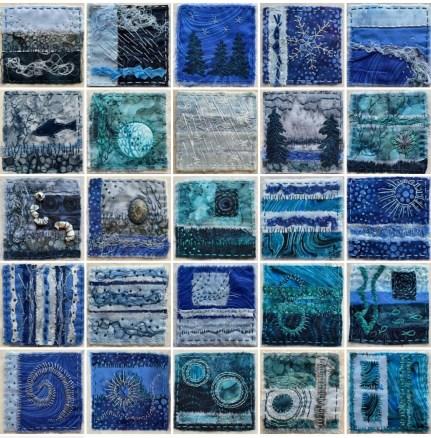
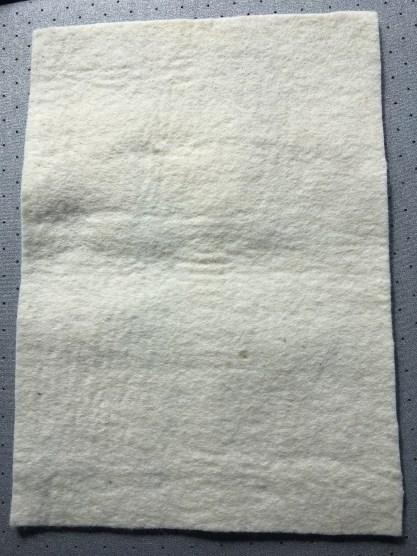
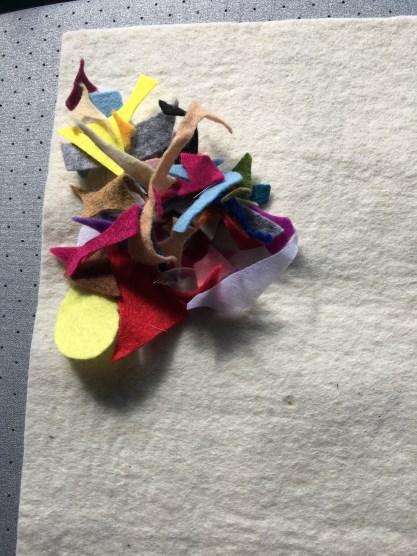
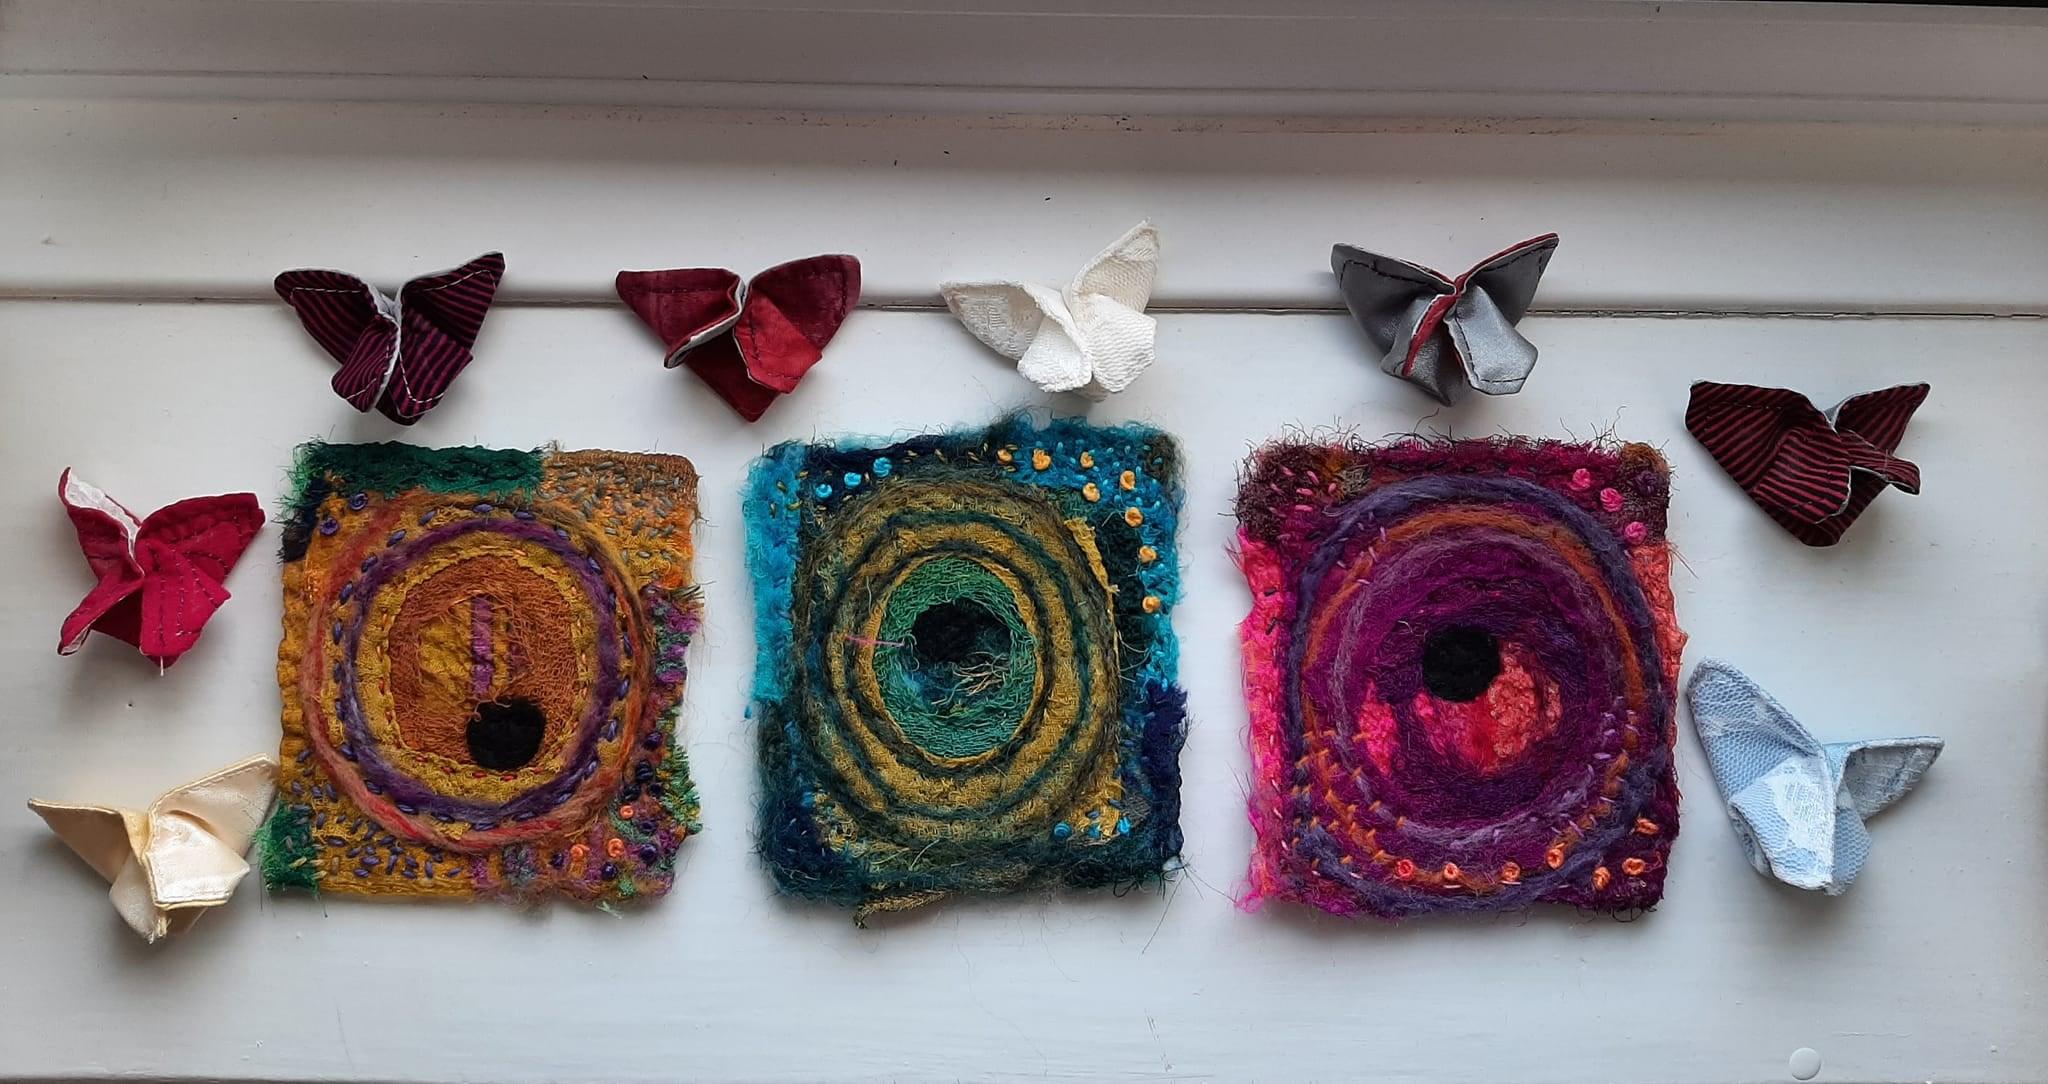
Way back Helen introduced us to Salley Mavor and her wee folk. One of the things she did was joined together lots of small pieces of felt to form larger pieces using a ladder stitch.
Then she showed us Elizabeth Armstrong’s work alongside the growing body of the Butterfly project.. I loved the colours and the shapes so out came a piece of thick felt, then all those scraps of felt I keep in a box ( you just never know when you will need them) and quite a lot of needle felting later I have an A4 sized piece of felt in glorious technicolour.
Don’t forget to look at the back I can hear Helen saying so I do and that is equally pleasing to me. So now my dilema is which side? and do I cut it up or keep it whole?
It did not set out to be anything and I feel that is how it will stay for a while pinned to my board.
by Valerie Dugdale
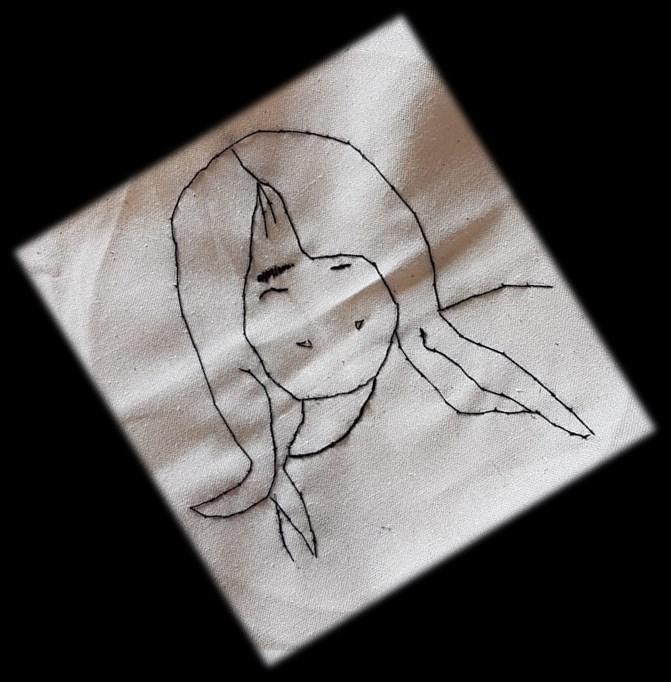
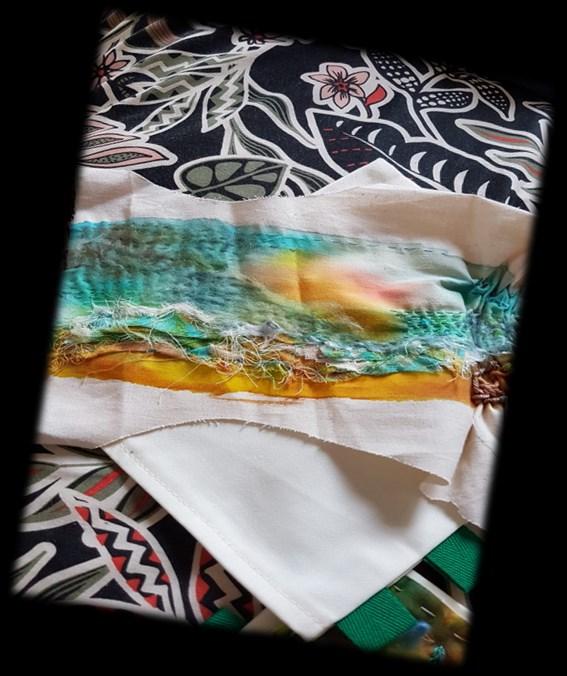
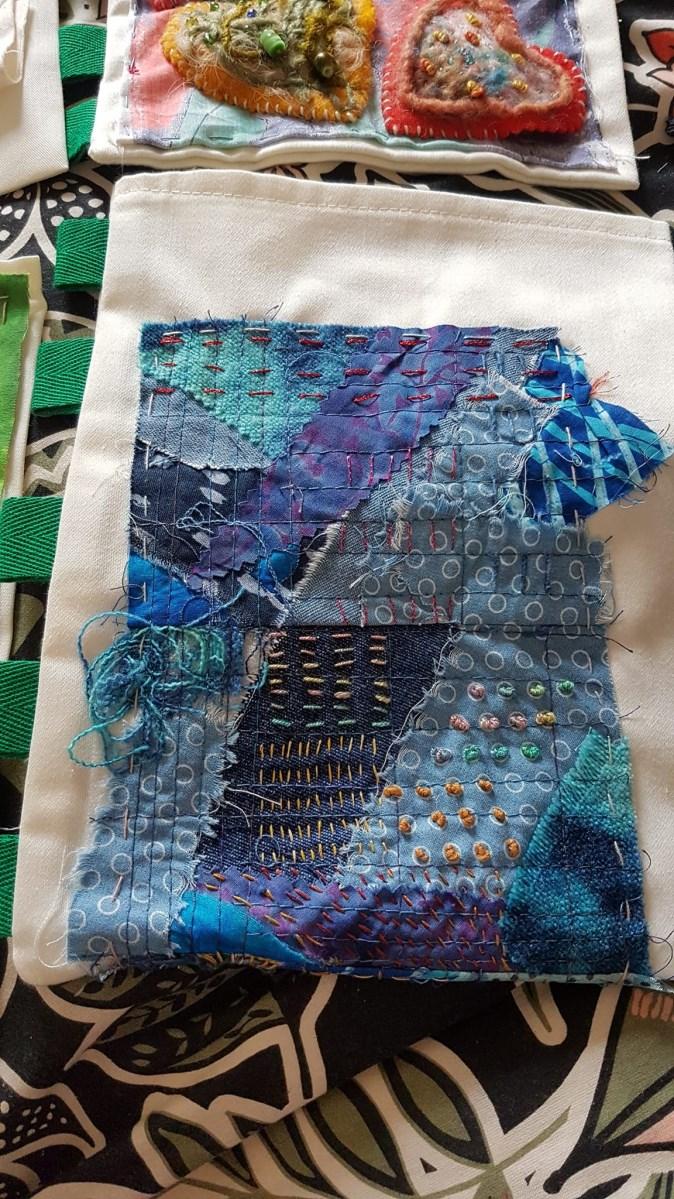
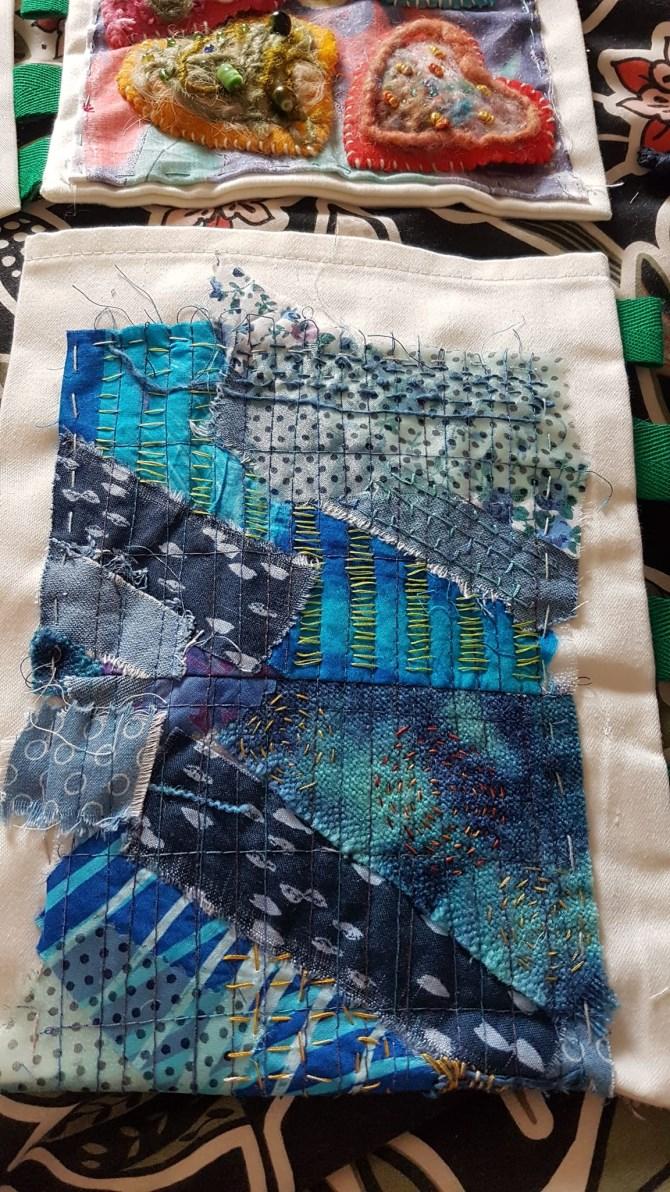
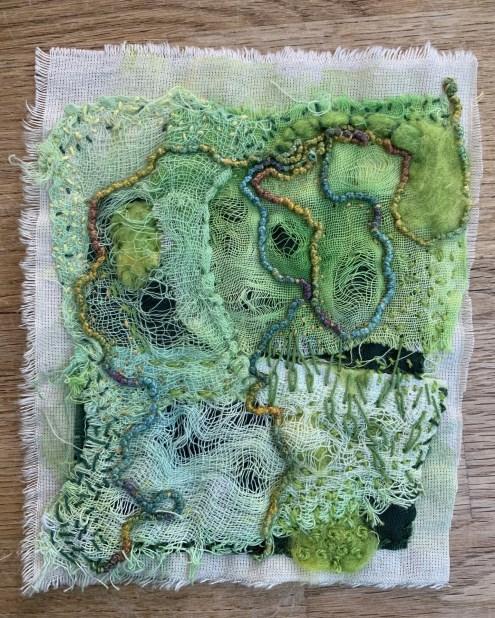
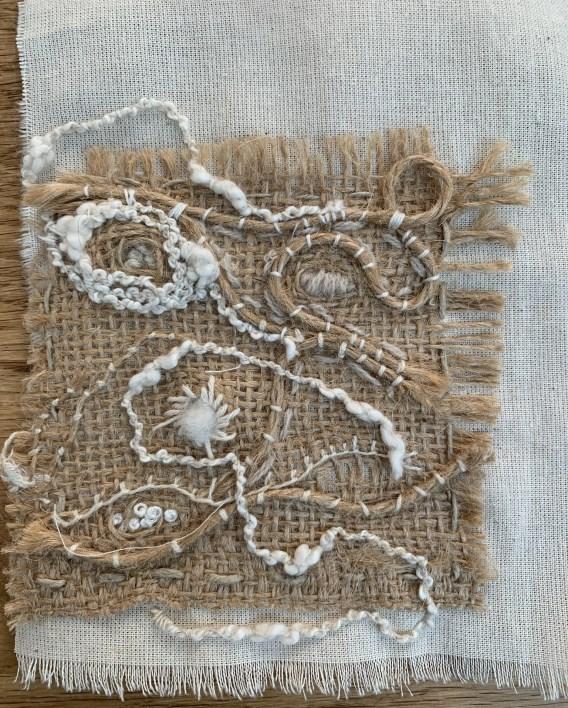
Having spent a few days in Scotland visiting family, it has enabled me sometime to catchup on a few of the workshop projects. I have really enjoyed the "Me time" that has allowed me to do these. Still a few more to do when i get home, but now Looking forwards to doing them.
The landscape still needs some work doing to it.
The stitch portrait is of my 3 year old grand daughter.
The hearts are using felted wool blanket and some threads that I dyed.
The butterflies are using fabric ( red multi) that I have made a dress from, for a wedding i am going to next week.

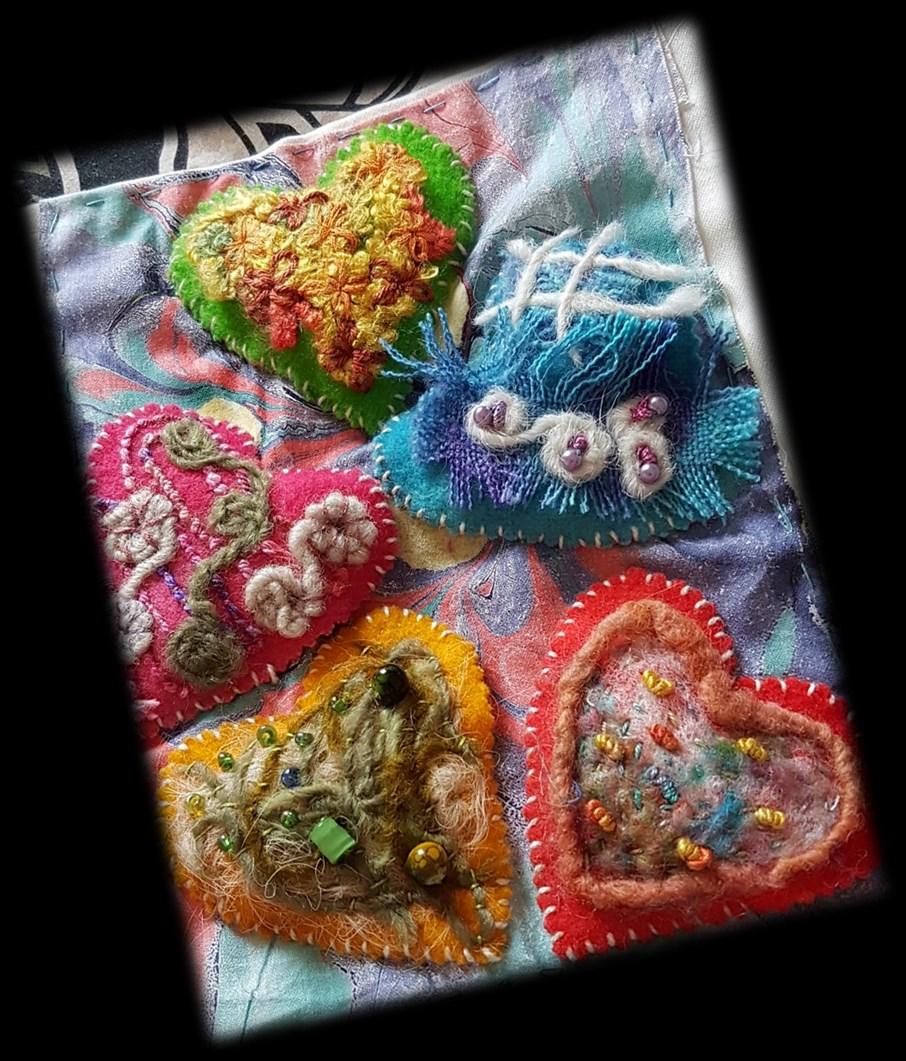
The blue and mustard floral is fabric I used to make my bridesmaid dresses 45 years ago, and the other blue floral I used to make my grand daughter a dress.
The final one is a mix of fabrics from my scrap bag.
18

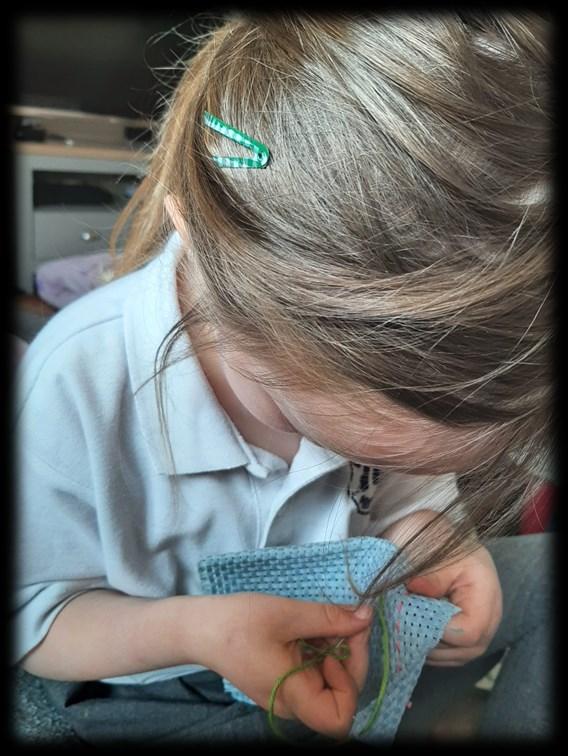
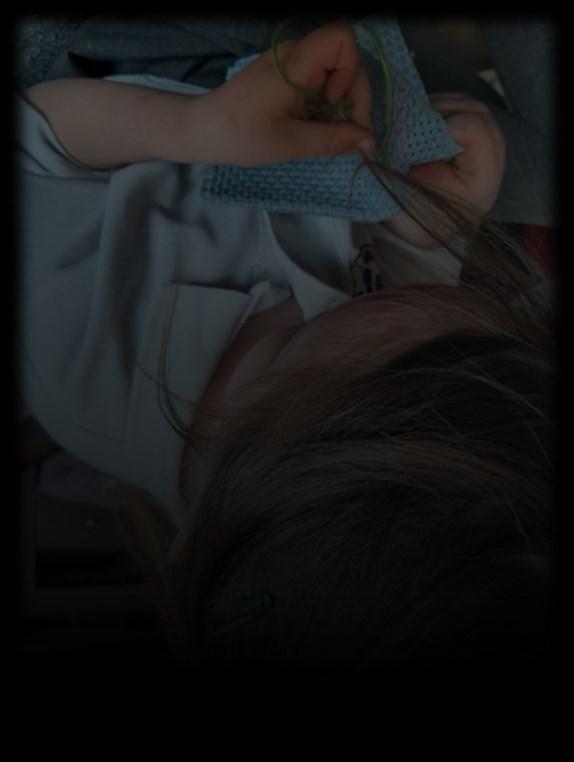
My 5 yr old granddaughter having her 1st go at sewing, rows of running stitch on binka that's been in my stash for longer than I can remember! This could count as her 1st sampler. It's wonderful to be passing these on these skills
19
Butterfly effect - loved making these : Liz Hirst
Andrea Graham
Carol Thomann

20 www.thestitchbookcollective.com DELIVERY ADDRESS: Issue 18: Simple Bead Clusters
