1 The Stitchbook Issue No 8 TEXTILE PORTRAITS Facial Recognition Tracing, Re-sizing & Transferring Images Fabric Collage Tulle Shadows Directional Stitching Using Colour www.thestitchbookcollective.com PLUS FESTIVAL of QUILTS 2023 Our Entry GR-06 EXHIBITION WRITE-UP & PHOTOS
This month :
We are looking at something which I think we all have a tendency to shy away from because it ’looks too hard’ .. making recognizable portraits from textiles.


It’s actually much easier than you

2 CONTENTS WORKSHOP Featured Artist Stitch of the Month 11 Noticeboard 12 FESTIVAL of QUILTS 12 Food for Thought 18 MEMBERS PAGES 20
TEXTILE
PORTRAITS www.thestitchbookcollective.com
TEXTILE PORTRAITS

A LOOK AT:
Facial perception
Tracing images


Re-sizing images

Transferring images
Fabric collage techniques
Tulle shadow techniques
Directional stitching
Using colour
We will be looking at the amazing work of artist:
t matter which direction you take not everything will ll learn from it anyway!
T PANIC or feel stressed! Take a deep breath and just get started ... see where it takes you!
The group is here to support and encourage everyone. We have members with enormously varying levels of expertise remember to share knowledge and ideas generously, and BE KIND. The archive of 12 techniques is permanently available to you whenever you want to try something new, and the monthly workshops and the magazines are there as inspiration
3
WORKSHOP www.thestitchbookcollective.com presented by Helen Birmingham Issue No 7: first published July 2023
SUE STONE
TEXTILE PORTRAITS

Facial Recognition: Why are emojis and facial recognition programs so successful?
Most humans have an instinctive ability to recognise individual faces and even to identify apparent mood, gender and race from facial features. We have an inbuilt program to find and read faces. We can, and do, find them; even in inanimate objects.


We can use this skill to our advantage when we are trying to make an image which represents another human. The saying ‘less is more’ was never truer. Not only will your brain strive to find faces, the fewer clues you give it, the harder it will work to find a face that it ‘knows’.
So, if you want to make a ‘likeness’ go back to basics. It is easy to suppose that a portrait needs to be a sophisticated interpretation, but actually the opposite is true: you need a few well-placed lines, just enough for your brain to latch onto, a skill which you have had virtually from birth. Our brains will do the hard work for us. So how do we pick out the best clues/lines/shapes to use when making fabric portraits …?
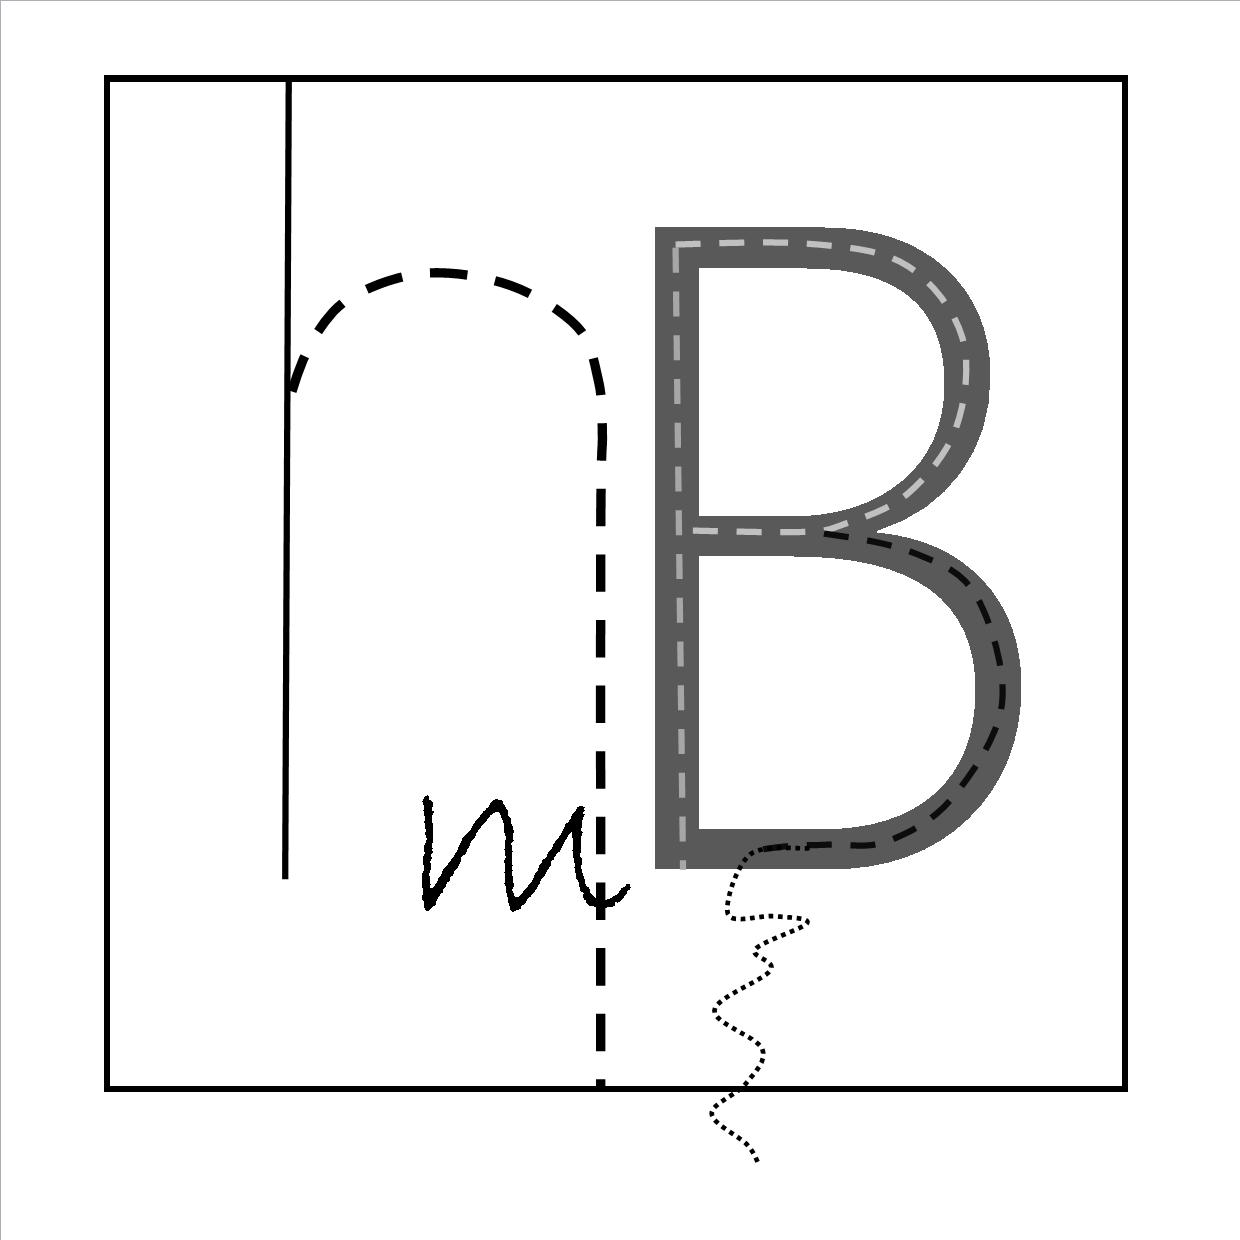
Finding the Right Lines
In this example, those of you who know me and my sister will recognise us. Even if you don’t know us, almost everyone will see two fairly convincing faces in the transferred lines, and your brain will do the rest. Cover over the photograph. Just from the line drawing you will recognise that the two people are relaxed and happy, they know each other well and there is a familial similarity between them. That’s a lot of information from a few lines. Because the photograph I am using was taken on a digital camera, it was possible to upload it to my computer and print it out to whatever size I chose. If you are working from an original photograph it is best to stick to the original size at this stage. I will show you how to increase or decrease the size of your line drawing in the next section.


Tracing paper (or greaseproof/baking parchment) is great for this stage. As you can see from the photograph, there is virtually an infinite number of combinations of lines and marks that you could select. It can take a little practice to select the most advantageous ones. Make a series of tracings and choose which combination of lines looks best. Try to use as few lines as possible to still give a good effect. This stage is probably the most important to get right. Anything else you choose to do with your stitched piece will depend on the selection of these few lines. It is worth taking your time.
However, be aware that it is possible to look at the image for too long and become overly critical of your own work. Asking for a second opinion can sometimes be useful, or take a break and then look again.
Resizing Your Image
If you have been using an image you printed from the computer, you may well have a series of traced lines which are the correct size for the work you want to make. Great! However, if you want to increase or decrease the size of your traced image:
• You could simply photograph your traced drawing, upload it onto your computer and print it out again, the desired size. Great! Or, do it the traditional way
Attach your tracing to a printed grid. In this case the grid is divided into 1cm squares. Draw another grid on a separate piece of paper, the size you want your completed image to be. i.e. if you want to increase it to twice as big, draw a grid of 2cm squares, if you want to decrease it to half the size, draw a grid of 0.5cm squares.

4
• Copy the lines from your original traced drawing onto the new grid. TURN YOUR TRACED IMAGE UPSIDE DOWN! I know that sounds crazy, but your copying will be more accurate if you just see a series of lines. If you can still see a face, you will draw what you THINK is there, not what is actually there!


Tracing Paper: If your image has been made with pencil onto the tracing paper, you can simply turn the paper over, re-draw over the lines on the back, again with pencil, and then, turning the image the right way up again, set it down onto the calico, and shade over the original lines. You will have transferred the pencil lines to the calico.
Carbon Paper: There are several different types of carbon paper, for typing or writing, or an artists’ transfer paper. All are suitable. Simply place the carbon paper face down onto the calico. Place your image onto the top and draw over the lines with a pencil or other pointed implement. The ink will transfer from the carbon paper onto the calico.
Stitching


Transferring Your Lines
All of these techniques are shown in the online video. If this is your first attempt at a textile portrait, I am going to suggest that you keep the whole thing as simple as possibleusing plain calico for the face, with couched or stem stitched lines for the features and layered fabric for the background and clothing. We won’t be looking at shadow techniques at this stage. I will show you that in the next sample.
You will be stitching OVER the top of your transferred line. Make the lines as thin as possible, and just dark enough to see them. Practise on a scrap piece of calico to get the right pressure.
Pencil or Vanishing Marker: These can be air erasable or water soluble. Using a lightbox or a window with daylight, place the calico on top of your image, and simply trace off the lines onto the calico. I also use this method just with an ordinary pencil.
Using an embroidery hoop is optional. I find it much easier to use one at this stage. The idea is that you are simply stitching over your traced lines. I tend to use an adapted couching stitch (see below). I like the freedom this gives me with the laid thread, and I also really like the slight interruption as the line changes direction with the working stitch. What stitch you use is up to you. Back stitch, stem stitch or a very thin chain stitch can also look very effective, as can satin stitch or a series of seed stitches. Vary the number of strands or the thickness of the yarn you use. I tend to begin with a single sewing thread, and build up the number of threads, or the thickness of the thread where I want my lines to appear darker. I would suggest that you make
5
Fabric Collage Techniques Layering
This is an advanced technique which you can use in conjunction with stitched facial features. It is much easier to follow on the video I think!

Here are some REALLY useful tips:
Build up LAYERS starting from the back: in this examplebackground, face/skin and then clothing. Keep it simple but remember, there are no rules! Trace the main shapes from your original picture and make paper templates if necessary, before committing to cutting in fabric. (My advice would be to make lots of paper samples until your confidence builds. Why not stick them into a sketchbook so that you can see your progress.)
If you want a crisp, non fraying edge to the fabric, or need the attachment to be invisible with no stitches showing, use Bondaweb. Use pins, tacking stitches or a glue stick to hold pieces in place while you sew.

When you are working on the layer which contains the facial features, DO NOT CUT THE


Progression of a layered textile self portrait


• Trace the main shapes from your original drawing.


• Cut out the shapes.
• Stick (or stitch) one layer on top of another

6
Layer 1 Layer 2 Layer 3 Layer 4 Layer 5 1 + 2 1 + 2 + 3 1 + 2 + 3 + 4 1 + 2 + 3 +4 +5
Helen Birmingham
Layering with Tulle
other, you can create an interesting tonal background to stitch into. You can pin, then stitch the layers together, or use Bondaweb, spray adhesive or other fabric glue. The glue stick which you may have used for temporarily holding layers of thicker fabric is not recommended, because it leaves an unattractive residue which you can see through the tulle.

Layering tulle can give some quite amazing and unexpected effects.
Before starting a Textile Portrait project I will often iron a length of tulle onto Bondaweb so that I have it ready to hand. When you cut it to the required shapes, DON’T throw away the offcuts. They will often be JUST the piece you needed to add a little hint of a shadow here or there.

ALWAYS USE BAKING PARCHMENT TO PROTECT YOU IRON when using Bondaweb.

bondaweb). Using 3 thicknesses of black thread, I added embroidered details using couching and running stitch. The iris was couched using grey sock wool, the pupil is satin stich and the white thread was added as a highlight. I tend to use a very small embroidery hoop to isolate an area I am working on within a larger image.


Directional Stitching
This is an embroidery by the incredibly talented Sue Stone, who is our featured artist this month.


You can see that all of the layers, including the background, have been collaged using the same fabric. It is the stitching itself which gives the image texture and form.


When you are stitching onto your own collages, make use of directional stitching, contour lines, thickness of thread and how close together you make your stitches. All of these will help to add depth, interest and texture to your image.


This is a pencil sketch by Vincent Van Gogh. You can see how the direction and weight of his lines would translate beautifully into stitch. His mark-making gives a real sense of perspective and movement. Maybe try tracing over some of his lines and replicate them in stitch.


This is an ink drawing by Leonardo Da Vinci. The direction of his lines perfectly describe the hair; there is no doubt that there is a mixture of plait, straight and curled ringlets.

7
If you look at the photograph of Dr Johnson (my cat) you can see that the direction of his fur defines the shape of his body. By following the direction of his fur with my stitches, and using different yarn, it is possible to make the flat outline shape look 3 dimensional.
Cool Colours

Don’t forget that the choice of colour, and the relationships between colours, have a huge influence on how a piece of work looks and feels and the emotions it provokes.
Useful Links
Don’t forget that there is a STEP-by-STEP video on the website which runs through Tracing & transferring line and the basic principles of collage with fabric. www.thestitchbookcollective.com
For a simple reminder of basic embroidery stitches, look at The Royal School of Needlework Stitch Bank www.royal-needlework.org.uk/ rsnstitchbank
Probably one of the most celebrated Textile Portrait Artists is Sue Stone (featured artist on page 10) . She is the founder of www.textileartist.org

Warm Colours
I have gathered together a wide variety of textile and stitched portraits for you to look at on pinterest@helenbirmingham
Once on my home page, you should click on Saved and you will find a board called ‘Portraits’ with over 100 inspirational images.
Just typing ‘textile portraits’ into a search engine like Google will reveal more inspiration that you can possibly handle, and if you then follow any links which appeal to you well where will it end?


8
Health Hope Nature Growth
Earthiness
Support
Spirituality Sophisticated
Freshness Prosperity Serious
Reliability Authenticity Warmth
Lim Cheol
Hee
Pablo Picasso
Francis Bacon
Otto Dix
Frantisek
Kupka
Joseph Lorusso
Posterizing
If you are computer savvy or technically minded, there are lots of programs or apps that you can download onto your computer or tablet which will automatically ‘posterize’ a photograph. This makes working out tonal layers and/or outlines very simple. For this example, I have used


Poster Shine Pro which has a one off fee of £1.79 to download. Please be careful though, some apps have hidden costs and can end up costing a fortune after the initial FREE TRIAL! Don’t get caught out! However, there are lots of apps out there, and you can probably get it FREE if you don’t mind lots of adverts!

3D Tulle Shadow Technique

Tulle is a lightweight, very fine, stiff netting, most often used for ballerina tutus and bridal underskirts. Polyester tulle is the most common, and can be found in a wide variety of colours. It differs from ‘netting’ in that it uses a much lower denier: which means the fibres are finer and the spaces between threads are smaller.
There are some amazing examples of portraits made entirely from tulle. These are by British artist, Benjamin Shine. He uses heat to fuse the layers of tulle together into sculptural yet ethereal forms. www.benjaminshine.com


WARNING: Research for this workshop could take over the rest of your life!

9
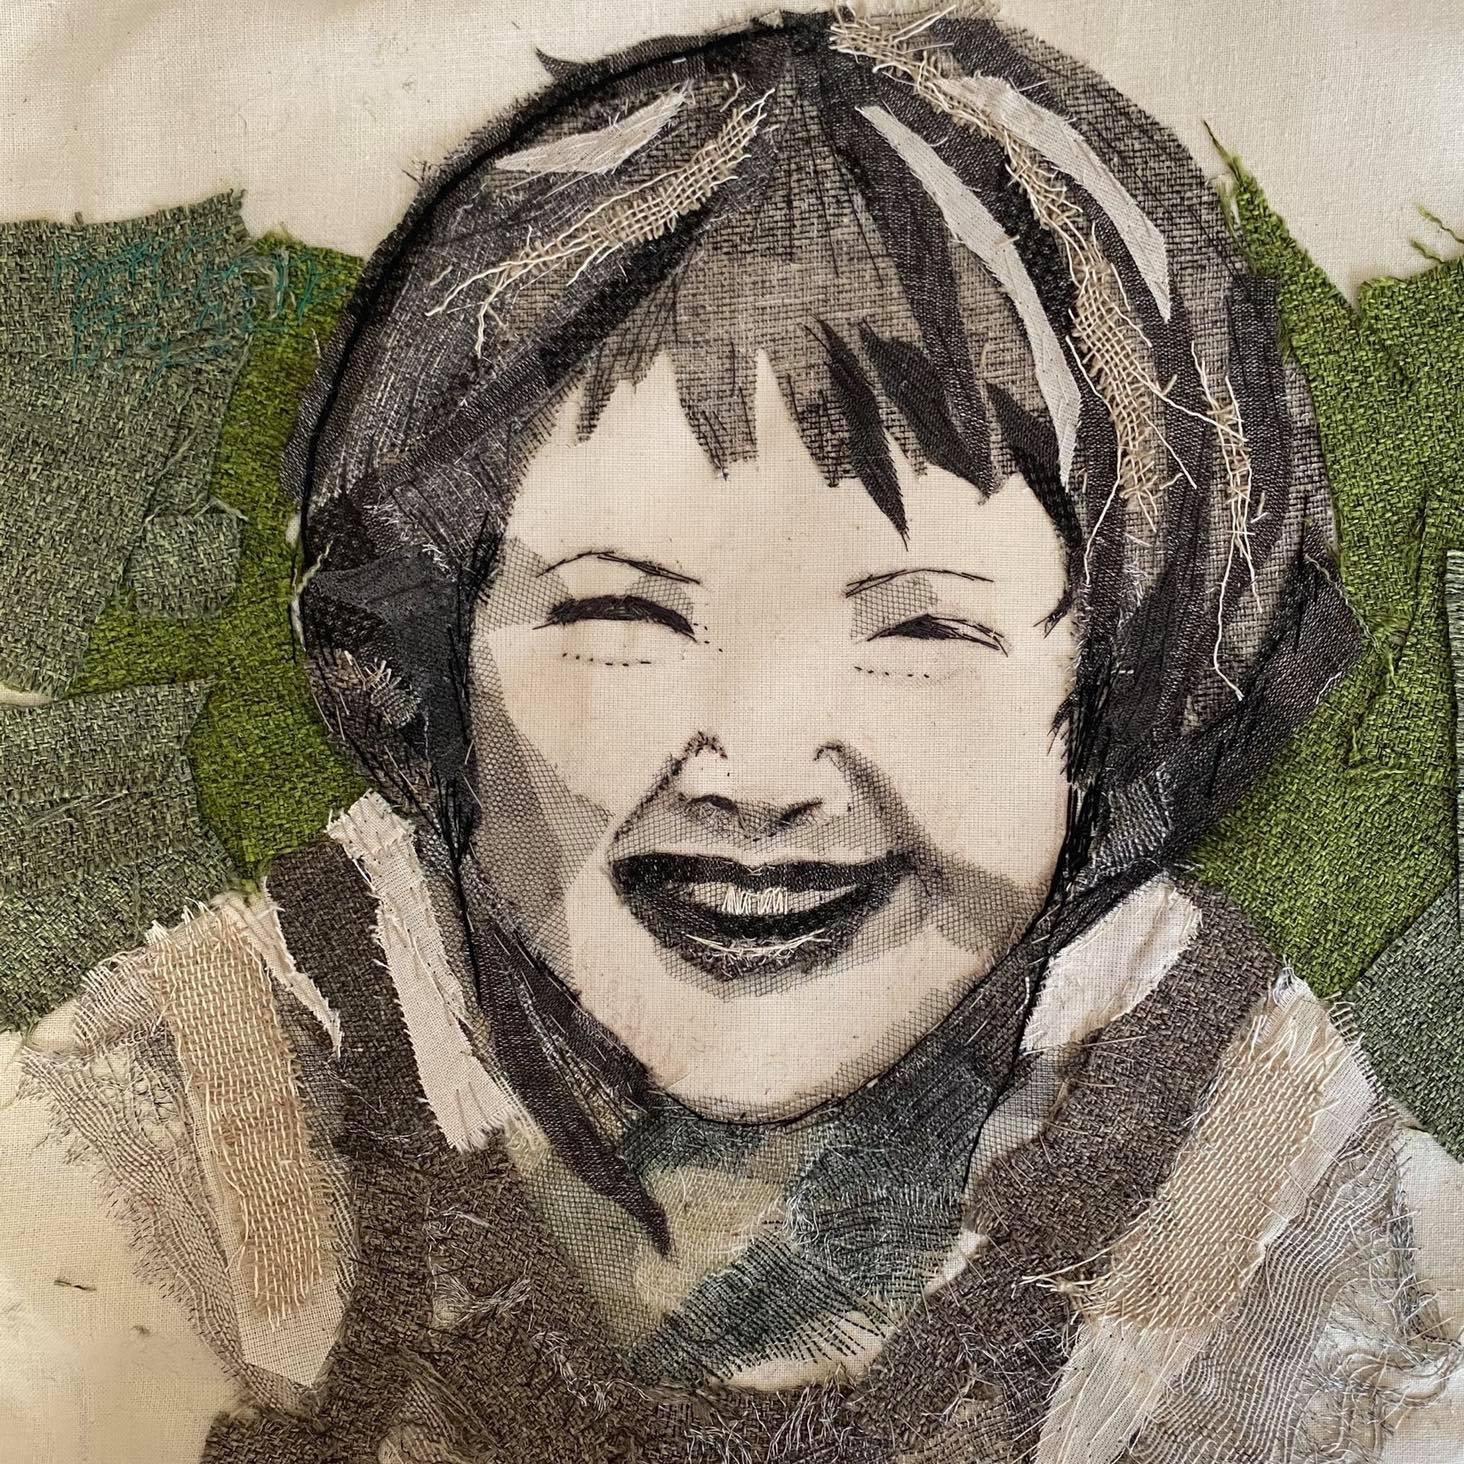
Stitching onto Photographs: These images are by Victoria Villasana
I think that Sue Stone is one of my favourite textile artists. She is a British artist who is best known for textural, figurative compositions that often feature a fish; a symbol of her heritage. She was born and raised in Great Grimsby, Lincolnshire which was once a thriving fishing port on the east coast of England.

Sue is an avid collector of images. The accumulated textures, patterns, colours, texts provide an important source of understanding and awareness of the outside world. The unexpected and the often overlooked become her reference library consisting of many thousands of photographs.

Sue Stone’s practice is made up from several elements; documenting, processing, making, exhibiting, teaching, speaking. Her Ideas are drawn from anywhere and everywhere; the seen, the heard, the experienced, her life observations and her heritage.
The resulting compositions often have a partial narrative which creates the allusion of a journey through life. The techniques used are simple and straightforward; a deliberately limited vocabulary of hand embroidery stitches, often combined with machine stitch, appliqué, sampling, and acrylic paint.


10 Sue Stone www.womanwithafish.com
”
“Cloth in all its forms : woven, printed, dyed, already worn, has passed through the hands of many people before it gets to me. It already has a history and contains memories. When I stitch the cloth I too become part of that history and make new memories.
Sue is founder of Textile Artist (www.textileartist.org) which is now run by her 2 sons. I can’t believe you haven’t come across this amazing venture by now, but if you haven’t what are you waiting for?
STITCH of the MONTH:


STAB STITCH
FREE BONUS VIDEO on the website www.thestitchbookcollective.com
Comparing two methods of stitching: Sewing & Stabbing

11
It takes a village to look after each other. Some like simple, some like green, some like fussy others plain.


It is what makes every heart special and unique. Your heart is beautiful. And anything made with love and enjoyment is precious. Just like all the makers of these hearts.


 Denise Inkson
If you were lucky enough to go to the Festival and took photos of YOU with the quilt I’d love to see them ...


send your notices, questions, comments, letters and articles to: thestitchbook@aol.com

There is also a really good video on YouTube which gives a great unbiased overall impression of the show: Primordial Soup appears at 11.38 Festival of Quilts by Craft House Magic


12 NOTICEBOARD
You can
Competition
www.festivalofquilts.co.uk/ competition
see ALL of the quilts from 2023 and read a little bit about each one in the Festival of Quilts ONLINE
Gallery
-gallery-2023/
https://youtu.be/ YWqpx7FrWKY
With over 700 quilts on show


‘To be sustainable, fashion industry must be also ethical. It is 10 years since the Rana Plaza disaster and still many fashion workers work in dangerous conditions and are poorly paid. This quilt supports the campaign of @labourbeindthelabel to improve the conditions and empower fashion workers.’


13
ST-33 Amanda Duke
PT-11 Geeta Khandlwal
GR-30 ‘Still Standing’ The Golden Bobbins
MD-62 Olga Bocharova
MD-45 Bobby Plows & Hannah Page
ST-29 Wendy Camm
The Festival of Quilts 2023
 by Helen Birmingham
This was my first visit to The Festival of Quilts. I’m not entirely sure what I was expecting… but what I found was an eclectic mix of contemporary and traditional, with an emphasis on machine stitching I think that I had hoped for a little more hand stitching?


Although there was a separate section for ‘sustainable’ quilts, the concept of reusing and recycling doesn't seem to have found a strong foothold yet (surprising really since that is quilting’s heritage). However, in the Textile Galleries, (maybe not so much in the competition work) you could see a really exciting and inspiring move towards expressive and experimental art textiles.
If I’m honest, the majority of the competition quilts left me cold .. for me, the ubiquitous use of the automatic long arm quilting machine, superimposed onto machine stitched patchworked pieces feels distant and unapproachable. I like my textiles with a bit more of a human touch: a visible connection to the maker not the machine, and a tangible sense of meaning as well as technique. BUT this isn’t sour grapes! I was absolutely thrilled with how our quilt looked and how it was received. These were the judges comments :
‘The design gives a feeling of depth to your theme. Appealing colour combinations.’
‘Inspiring idea and I applaud the use of letters for the nucleotides. The chosen colours work well together - a very interesting quilt.’

We scored better for Design than Construction .. I kept thinking of a quote from Star Trek ‘It’s a quilt Jim, but not as we know it.’
All in all though, I was really happyit was a great way to introduce ourselves to the quilting world, and I was delighted to be able to present something a bit ‘different’.
THANK YOU x x x

14
GR-06
Primordial Soup
The Stitchbook Collective
Winner of GROUP QUILT category Cottage Garden stitched by Comberton Quilters
Commercial design by Quilters Patch
Overall BEST in SHOW GR-29
Antics at the Quilt Show stitched by Nine to Five
Do either of these look familiar?
We are obviously on the right lines, just in the wrong category?
SUGGESTIONS for an entry in 2024 are very welcome!
Quilt Creations QC-16


100 Days of Organic Applique

Name Of Quilter: Jo Avery
Height(cm): 24
Width(cm): 24
Depth(cm): 5
Inspiration:
The 100 days project is an online global art project. I chose to make a 4” blocks every day using organic applique with embroidery. Each was a meditative study created from whatever was in my mind and without templates or even a sketch. I compiled these into a fabric book for future inspiration.
Materials: linen and cotton fabric. Cotton and wool/acrylic thread.
Technical Information: Freehand needle-turn applique, embroidery embellishments.
Winner of QUILT CREATIONS category

Jenny
I thought that this was the most extraordinary piece of work. It was exquisitely made and every one of the different squares was a different design. I could only photograph this one page, because the ‘ladies in white gloves’ had to turn to pages to view them. I really think that there is an enormous potential for inspiration for us here. What do you think?
Are any of our members already involved in the 100 days project?
https://www.the100dayproject.org/
A Fusion of Differences
Name Of Quilter: Midori Yusa
Height(cm): 194
Width(cm): 191
Inspiration:
I’m hoping to create quilt works with mixing different materials, which is a full of diversity. This is just the same as us, humans. It is important to understand and respect the individuals to make a better world.

Materials: wool, cotton, linen, embroidery thread
Technical Information: Machine Piecing, Machine Quilting, Applique, Hand Embroidery
Winner of ART TEXTILES category


Annie Henderson-Begg DELIRIUM
Modern Quilts
This piece reminded me of the suggestion I made when we were looking at Bayeux Stitch, and combining it with Kandinsky’s Circle paitings. It interesting that the artist has also made the link with ‘differences coming together for form a new whole..

15
Pudney INDIGO YOGI
MD-05
www.zero3arttextiles.com
TAKE A LOOK AT THE WEBSITE. You won’t be disappointed!
The work displayed in the TEXTILE GALLERIES was, without doubt, the highlight of the festival for me, and none more so than in GALLERY 9. An exhibition called CONTINUUM by a group of artists who go by the name zero3. They have the most amazing website, and each artist in the group has their own page with images of their work and a short biography.
Zero3 was formed in 2003 by graduates of the Stitched Textiles course at Windsor College. The collective was founded to give its members a route to exhibiting their work and to benefit from shared expertise and inspiration. This was their 20th Anniversary Show.


16
THE HABROUR FLOATE by Amanda Duke
FIVE BELLS and MORE by Amanda Duke
CHURCH PEW GRAFFITI by Ali Garrett
Fibres are the most intimate material encounters we experience, cocooning us from birth to death and bearing witness to our life. Ekta is interested in how the act of stitch becomes an act of mapping memory, of connecting to oneself and others across generations, time and geography. This body of work explores the cartography of her life focusing on connection to place, duality of home, memory and identity through cloth and stitch.
www.ektakaul.com
This award celebrates textiles’ rightful place amongst high art. The selected works represent the spectrum on textile media, with works that transcend the craft or making process, and which stand alone as visual art.


17
GALLERY 3: MAPPING MEANING by Ekta Kaul
GALLERY 13: The Fine Art Textiles Award
Dr Ian Nigel Hurlstone (UK) The Terrible Sight of Right & Wrong
Estefania Tarud Karl (Chile) Flashlight Ann Clarke (USA) Loud Silence Three
"A work of art does not need an explanation. The work has to speak for itself. The work may be subject to many interpretations, but only one was in the mind of the artist. Some artists say to make the work readable for the public is an artist’s responsibility, but I don’t agree with that. The only responsibility to be absolutely truthful to the self. “
 Louise Bourgeois

www.tate.org.uk/art/ artists/louise-bourgeois2351/art-louise-bourgeois

“I like to see the long line we each leave behind, and I sometimes imagine my whole life that way, as though each step was a stitch, as though I was a needle leaving a trail of thread that sewed together the world as I went by, crisscrossing others' paths, quilting it all together in some way that matters even though it can hardly be traced. A meandering line sutures together the world in some new way, as though walking was sewing and sewing was telling a story and that story was your life.”
 Rebecca Solnit, The Faraway Nearby.

“
In our busy lives, we makers create many things, yet we don’t always lean into the stillness and quietness that can come from the experience of making. We rush to finish our project, to show it off on social media, to buy more materials to make something else, and the cycle of producing things continues. Yet, wouldn’t it be beautiful if we could bring ‘slow’ into our days and our lives, through the very simple act of learning how to enhance mindful moments in our making? To change our routines into a rhythm, and to replace the rush to finish a project with the quiet slowness of taking time to enjoy it. The process of making can guide us to slow our breath and our bodies, to listen to our minds and connect with the whisper in our hearts.”

Ellie Beck, (from the book, Mindful Thoughts for Makers; Connecting head, heart, hand) FREE

18 NEW MONTHLY FEATURE
Image by Helen Birmingham
WORKSHOP
www. etalplum.thinkific.com/courses/slowstitching-make-a-wrap-up-pouch?ref=9cc66d
'Today I asked my body what she needed, Which is a big deal Considering my journey of Not Really Asking That Much.
I thought she might need more water. Or protein. Or greens. Or yoga. Or supplements. Or movement.
But as I stood in the shower Reflecting on her stretch marks, Her roundness where I would like flatness, Her softness where I would like firmness, All those conditioned wishes That form a bundle of Never-Quite-Right-Ness, She whispered very gently: Could you just love me like this?'
Trying to express that which arises from an inner warmth. And I am almost there.
by Hollie Holden

Ugly self-pity gapes again as wide as the seagull’s unrepentant beak. Curtains billow and lift. Comfort abandoned along with my self respect.


Cold, damp air on my skin, lifts the tiny hairs across the back of my neck and I close my eyes.
The dry tears on my face harden.
19
Jude Hill - Spirit Cloth
by Helen Birmingham
MEMBERS PAGES
Please feel free to send ARTICLES for the magazine

PLEASE DON’T BE SHY!!!!
Exhibition reviews, comments, opinions, obsessions etc will all be considered for publishing. I will do all of the formatting and layout. You just need to send words and pictures!

I hope that this will broaden our horizons into looking at some of the associated art/textile activities which our members undertake in addition to the Stitchbook workshops. I also hope that it will give us the opportunity to express ourselves and to offer feedback and discussion about the work of others in the collective. Between us, we have a huge pool of knowledge, information and opinion. Let’s share it!
You don’t need to be asked ….. please email articles for consideration to :
thestitchbook@aol.com
or by post to:
Helen Birmingham
5 Belle Vue Parade
Scarborough
North Yorkshire YO11 1SU
Star Letter this Month:
 From: Mo Bergson
As a member who has been looking at the new issue each month but not getting much further (new grandson…garden…work..in that order)… I decided this morning to start something to actually sew. I selected issue five at random and found the video. Cup of tea in hand (following Helen’s instructions there), I watched on. Then did the search stash for fabric. At which point I got lost in the shed (keep my stuff there…we grandly call it a workshop…). I came across the leftovers from the Covid stitchbook …all the half finished bits that didn’t make it into the final stitchbook. I had forgotten what a huge range of techniques we learned and some I looked at with surprise at the great results. I had forgotten the one where we printed onto fabric pulling out pieces of muslin printed with photos…and honestly I couldn’t remember how I had done that. Another search and I found the booklet from the February kit image transfer all the instructions are there
This rambling is to say if you are feeling left behind that you aren’t producing pieces to put on Facebook Then just remember the info will still be there when you find that morning when you have time to sew.


Needless to say I haven’t started sewing today but have gathered a few photos ready to have another go at the printing which I may be combing with snippet rolls.
Thanks Helen
20
A common thread by Christine
 Medcalf
“the viewer will walk past it like the Bayeux tapestry, and I hope they will experience in one picture the year in Normandy.”
On a wet Saturday in July 2023, I visited Salts Mill, another of our northern mills which has reinvented itself since the decline in textile manufacture. My purpose: to see the latest exhibition of David Hockney’s work. I did not expect to see a reference to the Bayeux tapestry.
Hosted by the Bayeux Museum in 2022 alongside the tapestry which inspired Hockney, A Year in Normandie is made up of 220 iPad paintings created during Covid lockdowns and depicts his French garden through the seasons; it features many, many trees in all their guises.


Though worked in a totally different medium to our modest efforts and of those who stitched the Bayeux and Last Invasion tapestries, this epic work is worth a visit if only to appreciate the scale of similar undertakings.
saltsmill.org.uk
bayeuxmuseum.com
by Janet Haywood
- Look at this, and repeat after me … ’I am enough!’ HMB
 by Tracey Ingham


Got a bit carried away with this snippet roll - it is 30 inches long but I loved playing about with different threads and bits and pieces to decorate it. This one uses an original bobbin reel bought at a show but my husband has now made me some more so I shall have to make some more snippet rolls. I loved using the G700 vlieselene. feeling happy.

21
These images, with their black edges, make me feel as if I am on a train journey! HMB
Another ‘common thread’ is that we have a tendency to be really harsh and ‘compare’ ourselves to others. Make sure that you talk to yourself as if you were your friend.
By Jan Dowson
Onreceiving Issue No 7of The Stitchbook magazine itwas so lovelyto seetheworkshop was ‘hearts’, as Ihadjust finisheda silver and sparkly heart for my daughter Emma and son-inlaw Graham’s silver wedding anniversary. Such a coincidence!! So I thought itwould be niceto sharewith members.


I have beenmaking decorative hearts for many years, mostlyto familyand friendsas decorative gifts. Thereis something quite special about gifting or receiving a heart. The heart shape, symbolizeslove, also empathy, kindness, sympathyand understanding. A few years agowhen Iwasrecovering from cancer,a friend sent mea very simple felt heart popped inside a note, it meant somuch to me,Iwill alwaystreasure it.

don't go together somehow,"
Villanelle by Roland Leighton
Violets - April 1915
Violets from Plug Street Wood, Sweet, I send you oversea. (It is strange they should be blue, Blue, when his soaked blood was red; For they grew around his head. It is strange they should be blue.)
Violets from Plug Street WoodThink what they have meant to me! Life and Hope and Love and You. (And you did not see them grow Where his mangled body lay, Hiding horror from the day. Sweetest it was better so.)
Violets from oversea, To your dear, far, forgetting land; These I send in memory, Knowing You will understand.
22
"Summer & trenches
Roland Leighton wrote to his sweetheart, Vera Brittain in April 1915.
Pincushion Heart made by Jan Dowson
By Sarah Reed

I’ve been using up some of my snippets to make books, ‘banners’, and snippet rolls, some are on large bobbins and some smaller versions on old wooden cotton reels, inherited from my mum and grandmother. I back the snippets with thin hand sew Vilene which is much kinder to arthritic fingers. I also realised the other day that I had no ‘inchies’ and made a few for various projects. One thing lead to another and the brain box kicked in, I had a wooden tray with divisions which had previously held wooden letters. The tray was just the right size for some of the inchies. They’re not stuck down so I can easily refresh them if I want to. The tray came from The Works.


 By Vicky Fearnley
Went to see this today! Currently holidaying in France and near Angers. So took advantage to go see ‘The Apocalypse Tapestry of Angers’. Absolutely amazing, it’s the biggest tapestry in Europe depicting the book of revelations. The fight between good and evil, commissioned by Duke of Anjou. Was made in the 12th century, and estimated that when it was made was more than 140m long and 6ft high! Due to time and damage it now measures 103m long and about 4.5m high. If ever there it really is worth a look


If you are in BATH, both of these exhibitions are on until 1 October 2023


www.victoriagal.org.uk
Victoria Art Gallery Bridge Street
Bath BA2 4AT
(Thanks to Carol Clancy for the images)
23
BUTTERFLIES


DELIVERY ADDRESS:

24
www.thestitchbookcollective.com In Issue No 9 we will be looking at
