C. Add Favorites 04: Capabilities – Ad-Hoc Treasury Services
A. Standard offerings w/access
B. Reports & Reporting - Deposit Reporting
C. Mobile Capabilities
D. Mobile
GENERAL FORMAT CONSIDERATIONS
1. Do not use apostrophes, question marks, semi-colons, or single quotes when entering data into the system.
2. Numeric fields support the following characters: 0-9.
3. Alphanumeric fields support the following characters: a-z, A-Z, 0-9.
4. Alphanumeric fields, except for passwords and user IDs, can contain spaces.
01: SECURITY
Business Online Banking Plus offers multiple layers of security, including approvals, limits, and additional authentications for login and transaction processing in addition to login credentials: Company ID, User ID, and Password.
Who assigns what:
• Company ID: Assigned by bank (same for all users added to the company)
• User ID: Primary user chooses ID during enrollment
• Password: Primary user chooses their password during enrollment
• Additional Users: See Administration
A. MULTIPLE USER AUTHENTICATION/PASSWORD
User ID Requirements:
Dos and Don’ts:
• Length: User ID’s must be at least four characters and no more than 25.
• Character Considerations: User ID’s should include a combination two of the following
– Letters: A–Z, upper and/or lower-case. User IDs are not case sensitive.
– Numbers: 0–9
– Note: Spaces and special characters are NOT supported.
• Your User ID cannot be the same ID assigned to another user in the same company.
Password Considerations:
Dos and Don’ts:
• Passwords must include the following:
At least 8-12 characters total
– Include at least three lower case letters, upper case letters, numbers, and special characters.
• Passwords cannot include the following:
– Spaces
– Characters that repeats more than 3 times.
• Note: Unlike User ID’s, passwords are case sensitive.
Password aquisition/update process:
• Customers are prompted by the system to change their password every 180 days.
• Any user may change their password at any time but only once per day (See Administration).
• Users added by the Primary User or other Administrator are assigned a temporary password and will be prompted to change the password during first login.
– Note: Temporary passwords expire 10 days from the date they were issued/created by Administrative users.
– Note: Passwords created by the Primary user at enrollment expire 90 from the date they were created.
• Password Alerts: Company users are notified by email when they change their password, or their password is changed by an Administrator
Login Security Codes (Out of Band Authentication):
Upon first login or anytime the system requires a user to re-validate their identity, the user will be prompted to enter a security code before being allowed access to the company’s profile. To do so, the user enters their company ID and user ID before recieving a message reading: “An extra layer of security is needed to complete this request”.
Next steps
1. Click the Continue with Security Code button
2. A One Time Security Code will pop up displaying the user’s phone number(s)
3. The user will select a phone number (all but last four digits masked for security)
4. The user will select Call or Text (standard text message rates apply)
a. If the user selected Phone Call a one time security code will display on screen. When call is recieved, type or speak code into phone
b. If the user selected Text Message a text message with the code will be delivered to the mobile number on file. When text is recieved, type this code into the one-time security code field, then click submit. If code matches, user is prompted to enter password to reach the Welcome Screen
Forgot Password:
1. Enter Company ID and User ID
2. On Password page, click Forgot your password?
3. Click continue
4. Continue with security code (see instructions above)
5. Complete the following fields:
a. New Password – Create a password following requirements (see instructions above)
b. Confirm new password – same password typed into new password field
c. Click Submit
d. Click Continue
Login Attempts and Locked Accounts:
Company users are allowed three unsuccessful login attempts before their account is locked and access is prevented.
A locked account can be unlocked by:
1. A company user who has the Administration role. A password change is not required in this case.
2. The company’s financial institution. Company users are provided a temporary password and are required to change it upon signing on.
Note: Passwords can only be reset once per day. This applies to all company users, regardless of assigned role. A company user whose account has been locked by a company administrator cannot reset their password.
B. ADMINISTRATIVE AUTHORIZATIONS - MULTIPLE USERS
Business Online Banking Plus allows customers to assign multiple users to their company profile. Union Savings Bank establishes the Primary User as part of your company enrollment process.
The Primary User:
• Automatically assigned all company and account entitlements upon bank’s completion of the company setup.
• Responsible to establish access for other company users (including other Administrators)
– Each company has only one Primary User
– See Administration for adding additional users, roles, etc.
• Each user is provided with:
– Company ID
– User ID
– Password
Customer is responsible for informing each Administrative User that he or she is prohibited from sharing his or her access credentials (i.e. User ID and Password) with any other person.
If Customer believes or suspects that any Administrative User’s access credentials have become known or accessed by unauthorized persons, Customer agrees to notify the bank immediately. Customer is solely responsible for safeguarding its passwords from risk of misuse or theft.
Customer and it’s users shall comply with the “Security Procedures” listed in Exhibit 1 of the Business OnlineTreasury Management Service Agreement.
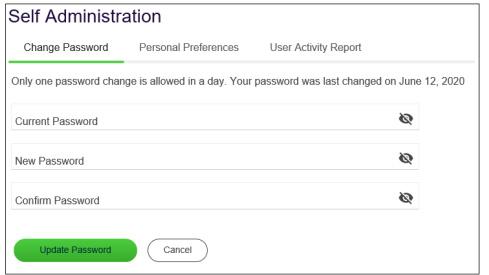
C. SELF-ADMINISTRATION
Change A Password - Company Users
Change the password you use to access business online banking. Company users can change their own password once per day.
b. New Password Create a password following the Company User Password Requirements.
c. Confirm Password The password typed into the New Password field.
d. Click Update Password.
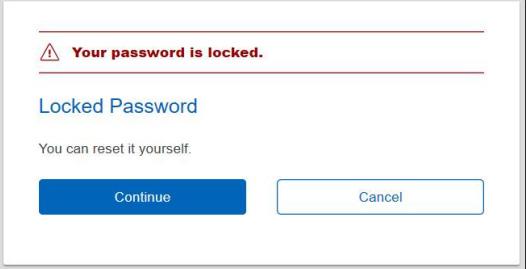
Locked Passwords
• Company users with a locked or inactive status can reset their own password during their sign on to business online banking.
• Company users can change their own password once per day
• A locked user is someone who has entered their password incorrectly three times consecutively.
• An inactive user is someone who has not signed on to Digital One Business for 90 days (or 10 days with a temporary password).
– Note: This function might not be available to some company users. A company user who is locked by a company administrator cannot unlock themselves.
If your Digital One Business is locked or inactive, a Locked Password page is displayed during your sign-on:
• Clicking Continue takes a company user through the authentication step (described in Sign On - Company Users section of this document) and then to a page where their password can be reset.
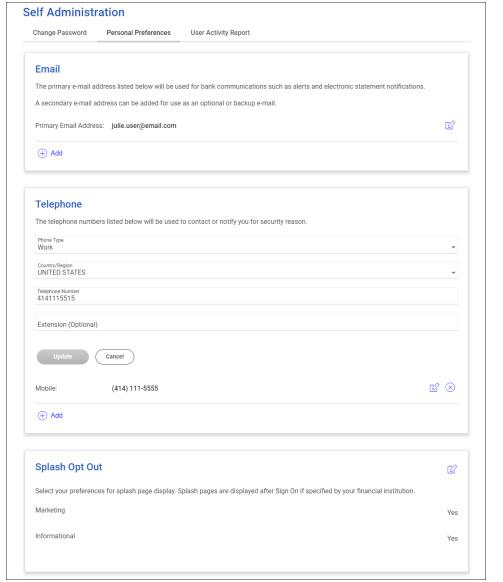
Change E-Mail Address - Company Users
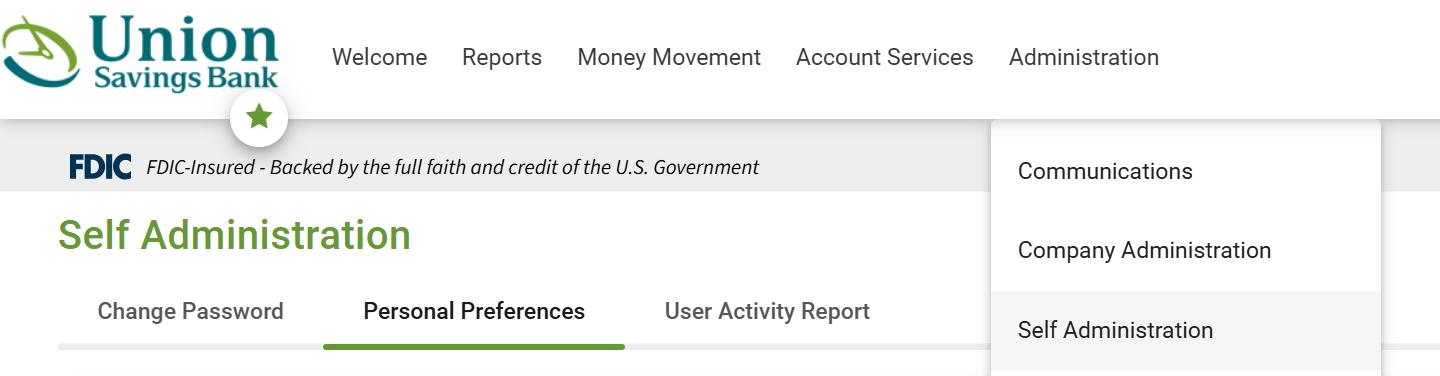
1. Click Administration > Self Administration > Personal Preferences
2. Click the edit icon ( ) beside the email address you want to change.
3. Change the Primary Email Address and/or Secondary Email Address as needed. Up to 100 alphanumeric characters are allowed.
4. Click Update.
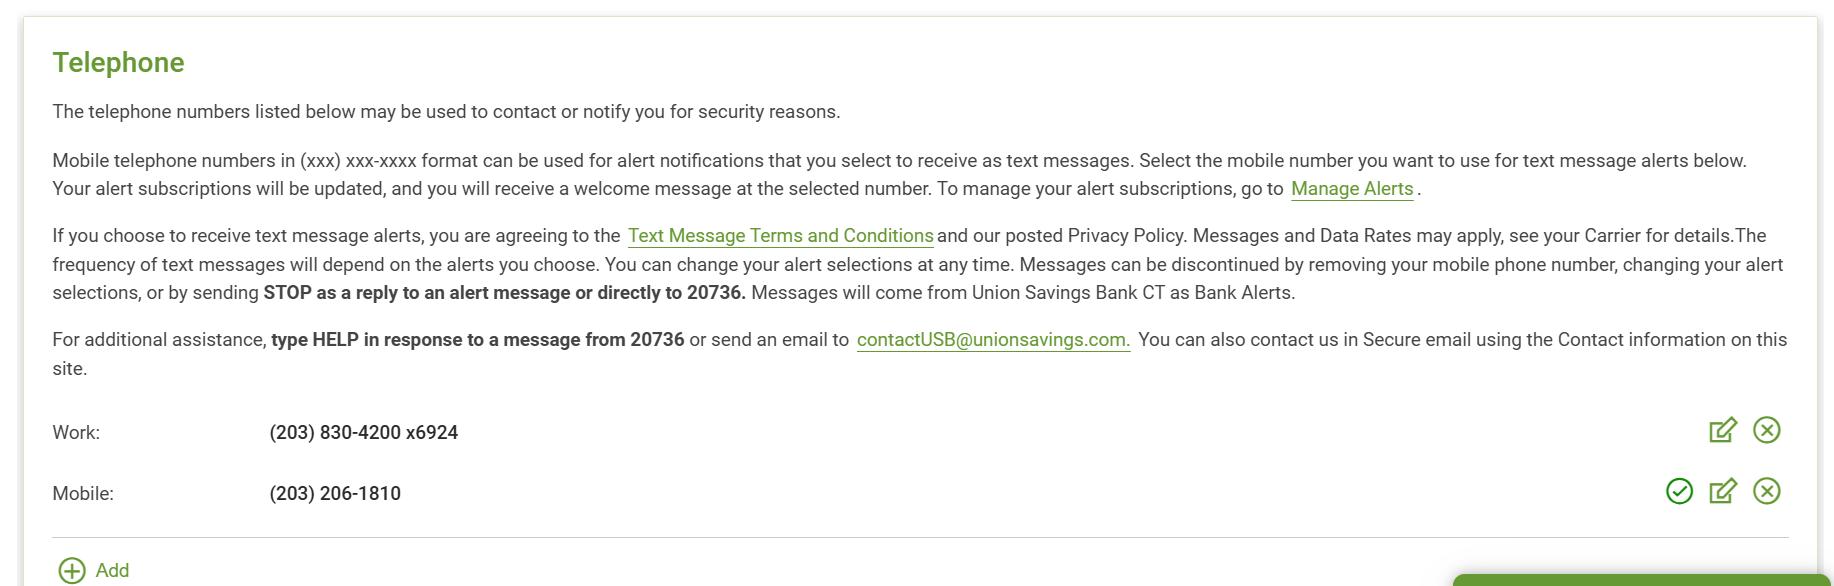
Add Telephone Numbers - Company Users
All users are required to have at least one telephone number. Up to six phone numbers are allowed.
1. Click Administration > Self Administration > Personal Preferences.
2. Click the Add link. This link does not appear if you have six telephone numbers defined.
3. Complete the following fields:
a. Phone Type: Home, Work, Work2, Mobile, Mobile2, and Other. Each type can be used once.
i. If enabled for your company, domestic mobile telephone numbers can be used to receive alert notifications. Message and data rates may apply; see your carrier for details.
b. Country/Region The numeric country code associated with the telephone number. Select from a list of country names. These are mapped to the appropriate one to three-digit country code.
c. Telephone Number The telephone number (up to 30 characters).
d. Extension (optional) For Work and Work 2. Required when an extension is needed to reach the user within an office phone system. Up to 16 numeric characters are allowed.
i. Some phone systems require entry of additional characters, often referred to as control codes, to reach an extension. The following control codes are allowed:
• Pound (#)
• Star (*)
• Comma (short pause - approximately 2 seconds)
• Period (long pause - approximately 5 seconds).
• Multiple comma and period characters can be placed before or after an extension to add pause time during system generated calls that are made to users for the purpose of validating their information.
– For example, ..12345. This example extension has a 10 second pause time before the extension and a 5 second pause time after.
– During a system generated call, the system waits 10 seconds before dialing the extension and waits 5 seconds after it dials before playing an affirmation message such as “Hello.
– This is XYZ Company. Please press 1 to…”.
4. If available, click the Use With Alerts option beside a mobile phone number so it appears as a delivery option for the alerts that are available for SMS/text message delivery. This option can only be assigned to one mobile device at a time.
a. Note: A welcome message is sent to the selected mobile number after you set up your first alert for SMS/text delivery.
5. Click Add
a. If your company requires multiple approvals for Administration, the user profile is submitted for approval by other Administrators in your company
Change Telephone Numbers - Company Users
All users are required to have at least one telephone number. Users can choose to have up to six phone numbers.
2. Click the edit icon ( ) link beside the number you want to change.
3. Change the telephone number as needed and then click Update.
a. If your company requires multiple approvals for Administration, the user profile is submitted for approval by other Administrators in your company.
Delete Telephone Numbers - Company Users
1. Click Administration > Self Administration > Personal Preferences
2. Click the delete icon ( ) beside the number you want to delete. If the number you delete is the only destination set up to receive mandatory alerts, then your primary email address is automatically set up to receive mandatory alerts after the number is deleted.
a. Note: The delete icon does not appear if only one telephone number is set up.
b. If you selected to delete a mobile number that is set up to receive text message alerts click Delete
Stop Text Message Delivery from a Mobile Device
Reply with stop to any text message alert you receive.
Re-Enroll a Mobile Device for Text Message Delivery
If you have stopped SMS/text message delivery to your mobile device you can re-enroll it by completing the steps in this task.
1. Delete the mobile phone number.
2. Re-add the mobile phone number.
a. Note: Ensure you select the Use With Alerts option when re-adding the domestic mobile phone number. This option can only be assigned to one mobile device at a time.
3. Change your alert subscriptions so that one or more alerts are set up to be delivered to the mobile phone number
Supported Telephone Control Codes
Telephone control codes can be used for companies that do not allow direct dialing of an extension.
• For example: If the phone system plays a message and requires pressing the pound key (#) to reach an extension, you can account for the message and pound key by including the appropriate control codes.
The following control codes are allowed:
1. Digits 0-9
2. Pound (#)
3. Star (*)
4. Comma (,) - short pause (about 2 seconds)
5. Period (.) - long pause (about 5 seconds)
a. Control codes are not masked or hidden. Extensions continue to be preceded by the “x” character, with no spaces.
i. example: (414) 286-2489 x, #..00000
02: MAIL, ALERTS, AND APPROVALS
Mail
Mail is used to exchange secure messages between company users and Union Savings Bank in Business Online Banking Plus.
Mail messages are displayed for 90 days, after which they are archived for three years. Mail messages are automatically deleted after 90 days.
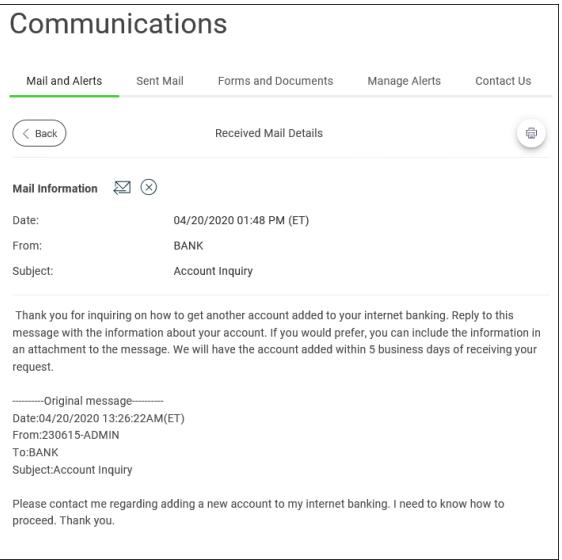
Read Received Mail and Alert Messages
1. Click Administration > Communications > Mail and Alerts.
2. Click the link in the Subject column for message you want to view.
Reply to Received Mail Messages
1. Click Administration > Communications > Mail and Alerts.
2. Click the link in the Subject column for the message to which you want to reply.
3. Click the reply icon ( ) beside the Mail Information heading.
4. Optional: Select a Service to associate with the message.
5. Optional: Select an Account for the selected service.
6. Optional: Click the Add Attachment link to attach a document to the message. The attached document cannot exceed 5 MB.
7. Type a response to the message in the Message field. 10,000 alphanumeric characters are allowed for the message including the original message text.
a. To Predefined contact list(s) for the financial organization.
b. Subject What the message is about (up to 120 alphanumeric characters). Service (optional) If the message pertains to a particular service, select it from a predefined list of entitled services.
c. Account (optional) If the message pertains to a particular account for the selected service, select it from a predefined list of entitled accounts. Account numbers are masked for security.
d. Add Attachment (optional) Click Browse to attach a document to the message. Up to 5 MB is supported for the attachment.
e. Message Type the message content (up to 10,000 alphanumeric characters).
3. Click Send.
Read Sent Mail Message
1. Click Administration > Communications > Sent Mail.
2. Click the link in the Subject column for message you want to view.
Download Forms and Documents
1. Click Administration > Communications > Forms and Documents.
2. Click the check box beside each document you want to download and then click Download.
A. ALERTS
Alerts are messages that inform company users that a specific event has taken place.
About Alerts
• Alert messages are displayed in business online banking for 90 days, after which they are archived for three years. Alerts are not automatically deleted.
• Alerts are delivered business online banking optionally through e-mail and SMS text (if available).
• Alerts are always sent to company users in their business online banking mailbox.
• Company users can also have alerts delivered to their primary and/or secondary e-mail address and/or mobile telephone number (if applicable).
• There are many alerts available to help companies reduce the risk of fraud stay on top of account, transaction, and user activity.
• The combination of user roles, services, and account entitlements determine the alerts available to company users. Messages are delivered throughout the day depending on the topic and when the information is available.
Types of Alerts
• Mandatory Alerts notify company users of important events and cannot be turned off. Mandatory alerts appear with a check mark and cannot be deleted.
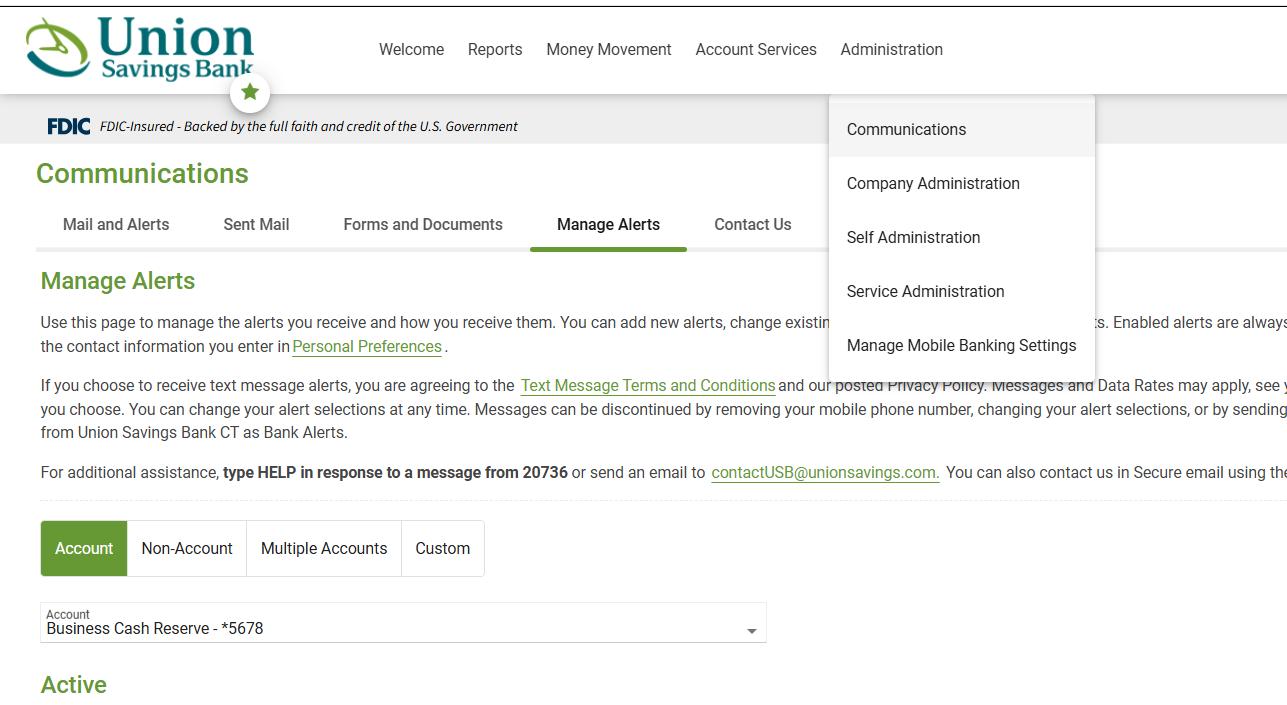
• The Manage Alerts page provides a central area for company users to manage their alert subscriptions. It includes the following categories of alerts:
– Account Alerts
– Non-account Alerts
– Multiple Accounts
– Custom Alerts
• Account Alerts are divided into the following subcategories:
– Balance and Activity
– Transfer and Payment
– Account Reconciliation and Positive Pay
– Stop Payment
– Statement and Document
– Wire Transfer
• Non-account alerts are not sub-categorized.
• Custom alerts are notifications that company users define and are ideal for setting up reminders for something such as payroll.
Read Received Alert Messages
1. Click Administration > Communications > Mail and Alerts.
2. Click the link in the Subject column for alert you want to view.
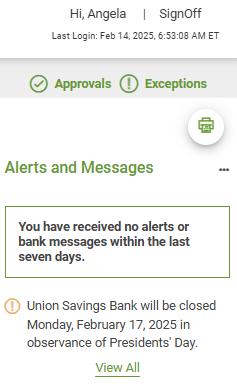
a. Most recent Alerts and Messages also appear on right of the Welcome Screen and Dashboard views.
4. Click the add icon ( ) beside the alert subscription you want to add. The table row expands, showing the alert description and delivery options.
5. If applicable, enter alert criteria.
6. Click the check box beside each Send To option to which you want the alert sent. The Send To option does not appear if an email or mobile telephone (if applicable) is not defined.
3. Click the add icon ( ) beside the alert subscription you want to add. The table row expands, showing the alert description and delivery options.
4. Click the check box beside each Send To option to which you want the alert sent. The Send To option does not appear if an email or mobile telephone (if applicable) is not defined.
3. Select an Alert Type. The table row expands, showing the alert description and delivery options.
4. Click the check box beside each Send To option to which you want the alert sent. The Send To option does not appear if an email or mobile telephone (if applicable) is not defined.
5. Click the View drop-down and select the account type you want to see in the Accounts drop-down.
6. Click the Accounts drop-down and select all accounts or specific accounts and then click Add
4. Type the Subject (up to 120 alphanumeric characters).
5. Type the Alert Message text.
6. Select one or more Send to options.
7. Select a Frequency:
a. One time Sends the alert once on a date in the future.
b. Weekly Sends the alert on the same day each week. The date provided in the Next Send On field determines the day on which the alert is sent.
c. Every other week Sends the alert on the same day every other week. The date provided in the Next Send On field determines the day on which the alert is sent.
d. Twice a month - the 15th and last day of the month Sends the alert on the 15th and last day of the month.
e. Monthly Sends the alert on the same date every month. The date provided in the Next Send On field determines the day on which the alert is sent.
f. Monthly - last day of the month Sends the alert on the last day of each month.
g. Every three months Sends the alert on the same day every three months. The date provided in the Next Send On field determines the day on which the alert is sent.
h. Every three months - last day of the month Sends the alert on the last day of the month, every three months.
i. Every six months Sends the alert on same day every six months. The date provided in the Next Send On field determines the day on which the alert is sent.
j. Every six months - last day of the month Sends the alert on the last day of the month, every six months.
k. Yearly Sends the alert on the same date every year. The date provided in the Next Send On field determines the day on which the alert is sent.
l. Custom Sends the alert on unique Send On dates. At least one date is required but up to 25 custom dates can be scheduled at one time.
8. If applicable, type or select a Next Send On date.
9. If applicable, type or select an End On option.
a. Continue indefinitely.
b. Continue until this date.
c. Continue for this many occurrences. Specify when you want to stop receiving the alert based on the number of times it is delivered.
4. For account and non-account alerts, click the edit icon ( ) beside the alert subscription you want to change. For custom alerts, click the more actions icon ( ) and then click Edit
5. Change the alert as needed and then click Save or Save Changes (depending on the alert type).
4. For account and non-account alerts, click the delete icon ( ) beside the alert subscription you want to delete. For custom alerts, click the more actions icon ( ) and then click Delete
Subscribe to Mobile Alerts
Must be completed on desktop.
1. Add your mobile number to contacts via Administration > Self Administration > Personal Preferences and scroll down to Telephone > Enter mobile information and click Add
2. Setup Text Alerts via: Administration > Communication > Manage Alerts > Select Account from dropdown > Scroll Down to identify active and available alerts.
3. Click Edit ( ) or Add ( ) icon to enable specific alerts
4. Check off Text box and click Add
Note: Alerts can be deleted by using the delete icon ( ) next to an active alert. Mandatory alerts may not be removed from email.
B. ACCOUNT ALERTS
Balance and Activity Alerts
Check Presented Alert (Optional)
Notifies company users when a check with a specific check number is presented, based on the previous day’s transactions.
Requirements:
Credit Posted Alert (Optional)
Notifies company users if a specific credit transaction with a specific amount posts, based on the previous day’s transactions. An alert is sent for every transaction that matches the alert criteria.
Debit Posted Alert Notifies (Optional)
Notifies company users if a specific debit transaction with a specific amount posts, based on the previous day’s transactions. An alert is sent for every transaction that matches the alert criteria.
Requirements:
Reporting and one of the following:
Reporting
Maximum Balance Alert (Optional)
Notifies company users daily when an account’s balance is above the amount specified, based on the previous day’s transactions.
Note: This alert is based on the previous day ledger balance.
Notifies company users daily when an account’s balance is below the amount specified, based on the previous day’s transactions.
Note: This alert is based on the previous day ledger balance.
Requirements:
Negative Balance Alert Notifies (Optional)
Notifies company users daily when an account’s balance becomes negative based on the previous day’s transactions.
Requirements:
and one of the following:
Returned Deposited Items Alert (Optional)
Notifies company users when a deposited item has been returned to one of their accounts. This alert is sent for each returned deposited check even if all the checks are for the same account.
Requirements:
Transfer and Payment Alerts
ACH Approval Pending Alert (Optional)
Notifies company users when an ACH transfer requires approval.
Note: Company users receive this alert even if they have already provided an approval.
Requirements:
Collection
Tax
820 Payment
Collection
Collection
ACH Template Activity (Optional)
Alert Notifies company users when an ACH template is added, edited, or deleted.
Requirements:
of the following
Payment
Collection
Support Payment
Payment
Collection
Payment
Payment
Collection
Collection
ACH Template Approval Pending Alert (Optional)
Notifies company users when a request to add, edit, or delete an ACH template requires approval.
Note: Company users receive this alert even if they have already provided an approval.
ACH Transaction Approval Reminder Alert (Optional)
Notifies company users about ACH transactions that are still pending approval 30 minutes before the processing window closes.
Note: Company users receive one alert per pending ACH transaction.
Requirements:
CCD Payment
CCD Collection
Child Support Payment
CTX Payment
CTX Collection
Federal Tax
IAT Payment
IAT Collection
State Tax
STP 820 Payment
TEL Collection
WEB Collection
Internal Transfer Approval Pending Alert (Optional)
Notifies company users when a transfer between accounts held at their financial institution requires approval.
Note: Company users receive this alert even if they have already provided an approval.
Requirements:
Loan Advance Approval Pending Alert (Optional)
Notifies company users when an advance on a loan requires approval.
Note: Company users receive this alert even if they have already provided an approval.
Requirements:
Loan Payment Approval Pending Alert (Optional)
Notifies company users when a loan payment is pending approval.
Note: Company users receive this alert even if they have already provided an approval.
Requirements:
Multiple Account Transfer Approval Pending (Optional)
Alert Notifies company users when a transfer from/to multiple accounts requires approval.
Note: Company users receive this alert even if they have already provided an approval.
Requirements:
Multiple Account Transfer Template Activity Alert (Optional)
Notifies company users when a Multiple Account Transfer template is added, edited, or deleted.
Requirements:
Outgoing ACH Transaction Status Changed Alert (Optional)
Notifies company users when the status of an outgoing ACH transaction from the selected account changes.
Requirements:
Scheduled ACH Approval Pending Alert (Optional)
Notifies company users when a scheduled ACH request requires approval.
Note: Company users receive this alert even if they have already provided an approval
Requirements:
Any of the following
CCD Payment
CCD Collection
Child Support Payment
CTX Payment
CTX Collection
Federal Tax
IAT Payment
IAT Collection
State Tax
STP 820 Payment
TEL Collection
WEB Collection
Scheduled Internal Transfer Approval Pending Alert (Optional)
Notifies company users when a scheduled transfer between accounts held at their financial organization requires approval.
Note: Company users receive this alert even if they have already provided an approval.
Notifies company users when a scheduled loan payment requires approval.
Note: Company users receive this alert even if they have already provided an approval.
Requirements:
Scheduled Multiple Account Transfer Approval Pending Alert (Optional)
Notifies company users when a scheduled transfer to/from multiple accounts requires approval.
Note: Company users receive this alert even if they have already provided an approval.
Requirements:
Transaction Failed Alert (Mandatory)
Notifies company users when a transfer request from an account fails to process.
Note: For future-dated wire transfers, the alert is generated when the final approval is received in Business Online Banking and the transfer is transmitted to the financial institution.
Wire
Wire
Wire
Wire Transfer Alerts
Incoming Wire Report Available Alert (Optional)
Notifies company users when an incoming wire report is available. Requirements:
Outgoing Wire Status Change Alert (Optional)
Notifies company users when the status of an outgoing wire from a specific account changes.
Requirements:
Any one of the following:
Wire Domestic One Time
Wire Domestic Template Based
Wire File Upload
Wire FX Intl One Time
Wire FX Intl Template Based
Wire USD Intl One Time
Wire USD Intl Template Based
Scheduled Wire Transfer Approval Pending Alert (Optional)
Notifies company users when a scheduled wire transfer requires approval.
Note: Company users receive this alert even if they have already provided an approval.
Notifies company users an hour before the close of their exception decision window that there are exception items without decisions.
Stop Payments
Stop Payment Alert (Optional)
Notifies company users when a stop payment is requested.
Requirements:
Stop Payment Cancellation Alert (Optional)
Notifies company users when a request to stop a payment is cancelled.
Requirements:
Statement and Document Alerts
Statements Available Alert (Mandatory — for Administrators)
Notifies company users when an online statement is available for viewing. The Statements Available alert is mandatory for company users who have the Administration role.
Requirements:
Notice Available Alert (Mandatory — for Administrators)
Notifies company users when a notice is available. The Notice Available alert is mandatory for company users with the Administration role.
Requirements:
Non-Account Alerts
Account Closure Alert (Optional)
Notifies company users when a checking or savings account is unavailable for use.
Requirements:
Account Stale Date Alert (Optional)
Notifies company users when the stale date setting for an account is changed.
Requirements:
ACH File Upload Approval Pending Alert (Optional)
Notifies company users when an uploaded ACH file requires approval. Note: Company users receive this alert even if they have already provided an approval.
Requirements:
ACH File Upload Validation Failure Alert (Optional)
Notifies company users when an uploaded ACH file fails validation.
Requirements:
ACH Notice of Change Received Alert (Mandatory)
Notifies company users when an ACH Notice of Change file is received
Requirements:
ACH Reporting and any one of the following services:
ACH File Upload
CCD Collection
CCD Payment
CTX Collection
CTX Payment
Federal Tax
PPD Collection
PPD Payment
State Tax
STP 820 Payment
TEL Collection
WEB Collection
ACH Returns Report Available Alert (Mandatory)
Notifies company users when an ACH Returns Report is available
Requirements:
ACH Template Activity – Multi Accounts Alert (Optional)
Notifies company users when an ACH Template is added, edited, or deleted on multiple accounts
Requirements:
ACH File Upload
Collection
Collection
Collection
ACH Template Approval Pending – Multi Accounts Alert (Optional)
Notifies company users when a request to add, edit, or delete an ACH template requires approval
Requirements:
ACH File Upload
Collection
Payment
Collection
Payment
Payment
Collection
Collection
ACH Transaction Approval Reminder – Multiple Accounts (Optional)
Notifies company users about multi account ACH transactions that are still pending approval 30 minutes before the processing window closes.
Requirements:
and any one of the following services:
ACH File Upload CCD Collection
Payment
Collection
Payment
Collection
Payment
820 Payment
Collection
Collection
ACH Transaction Failed – Multiple Accounts (Mandatory)
Notifies company users when a multi account ACH request fails to process.
Notifies company users when a user’s password is successfully changed. Requirements:
Scheduled ACH Approval Pending – (Multi-Account Optional)
Notifies company users when a scheduled multi account ACH request requires approval.
ACH Reporting and any one of the following services:
ACH File Upload
CCD Collection
CCD Payment
CTX Collection
CTX Payment
Federal Tax
PPD Collection
PPD Payment
State Tax
STP 820 Payment
TEL Collection
WEB Collection
Telephone Number Changed – (Mandatory)
Notifies company users when they add or change a telephone number
Updated User Entitlements – (Optional)
Notifies company users when their service entitlements have changed.
Requirements:
User Profile Activity – (Optional)
Notifies a company’s administrator when a company user profile is added, changed, or deleted by another company administrator.
Requirements:
User Profile Approval Pending – (Optional)
Notifies a company’s administrator when a request to add, change, or delete a company user profile requires approval.
Requirements:
User Telephone Number Changed – (Mandatory)
Notifies company administrators when another company user changes their telephone number.
Requirements:
Zelle Company Preferences Updated – (Optional)
Notifies company administrators when Zelle company preferences are updated.
Requirements:
Zelle Enrollment Submitted – (Optional)
Notifies company administrators when Zelle enrollment submitted.
Requirements:
Welcome SMS – (Mandatory)
Welcome message for company users who opt in for SMS message alerts.
Requirements:
Help Alert – (Mandatory)
An automatic response sent to company users who request help from their mobile device Requirements:
Stop SMS – (Mandatory)
Confirmation message for users who opt-out of receiving text message alerts Requirements:
03: STANDARD DESKTOP VISIBILITY & REPORTING
A: STANDARD DESKTOP VISIBILITY AND REPORTING
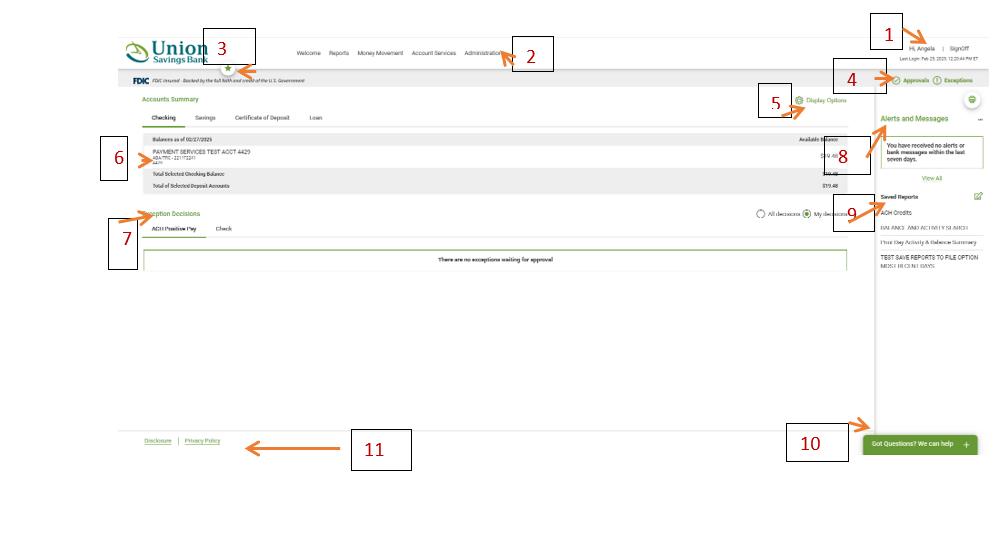
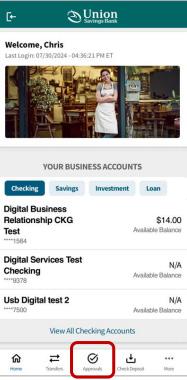
Welcome Page Components
Appears upon company user’s success sign on and provides an at-a-glance view of important.
1
2
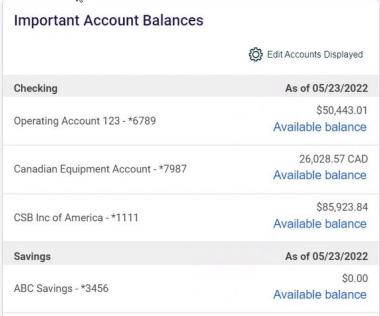
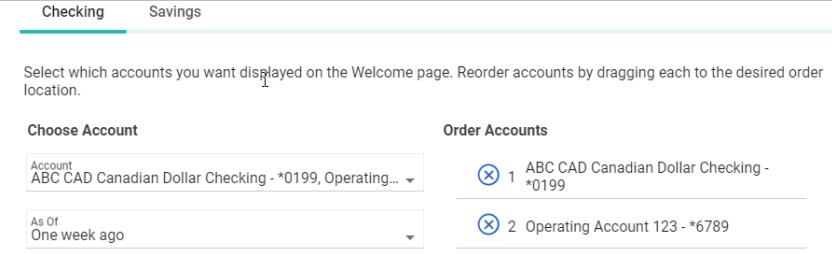
Important Account Balances Displays account and current balance information for entitled accounts. Users choose which accounts are displayed. This panel is optional and can be added multiple times.
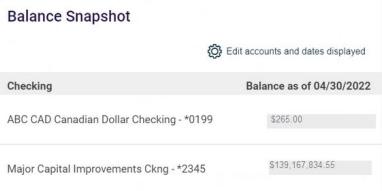
Balance Snapshot Displays account and historical balance information for entitled accounts. Users choose which accounts are displayed. This panel is optional and can be added multiple times.
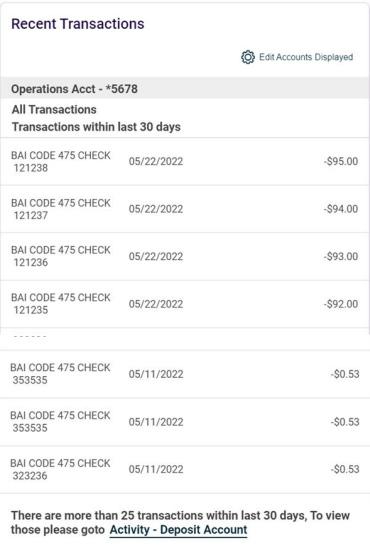
Recent Transactions Displays the most recent 25 transactions for the account selected by the user, within the last 30 days. Users choose which account is displayed. This panel is optional and can be added multiple times.
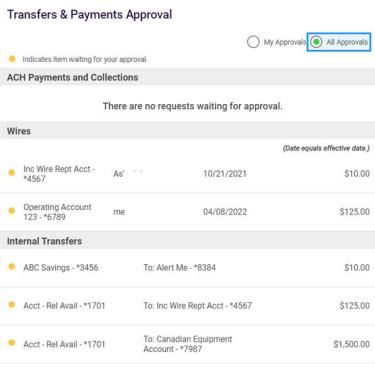
Transfers & Payments Approval Displays all transaction types that the user is entitled to approve. Two views are available: My Approvals, which shows items that the user has not yet approved, and All Approvals, which shows all items that a user is entitled to approve, both those that the user has already approved, and those not yet approved.
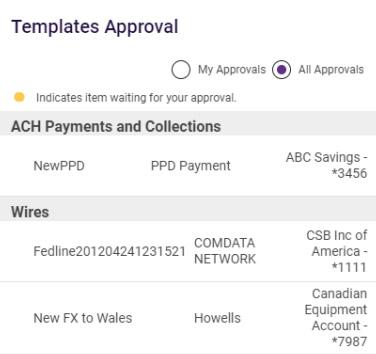
Templates Approval Displays all ACH, Wire, and Multiple Account Transfer templates that the user is entitled to approve. Two views are available: My Approvals, which shows items that the user has not yet approved, and All Approvals, which shows all items that auser is entitled to approve, both those that the user has already approved, and those not yet approved.
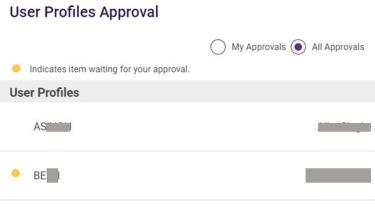
User Profiles Approval Displays all user profiles that have been added, edited, or deleted that the user is entitled to approve. Two views are available: My Approvals, which shows user profiles that the user has not yet approved, and All Approvals, which shows all user profiles that a user is entitled to approve, both those that the user has already approved, and those not yet approved.
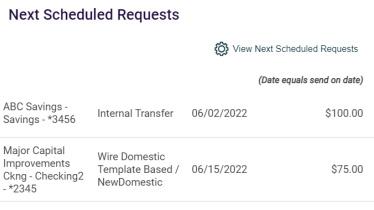
Next Scheduled Requests Displays transactions that the user is entitled that are scheduled to be sent at a future date.
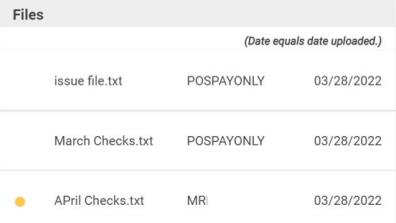
Issues & Issue File Approval Displays check issue and check issue flies, added, edited, or deleted that the user is entitled to approve. Two views are available: My Approvals, which shows issues and issue files that the user has not yet approved, and All Approvals, which shows all issue and issue files that a user is entitled to approve, both those that the user has already approved, and those not yet approved.
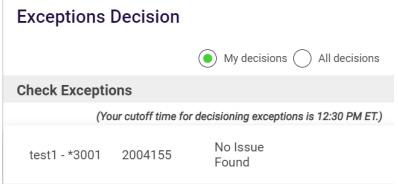
Exception Decisions Displays check exceptions and decisions that the user is entitled to approve. Two views are available: My Approvals, which shows exceptions and decisions that the user has not yet approved, and All Approvals, Which shows all exceptions and decisions that a user is entitled to approve, both those that the user has already approved, and those not yet approved.
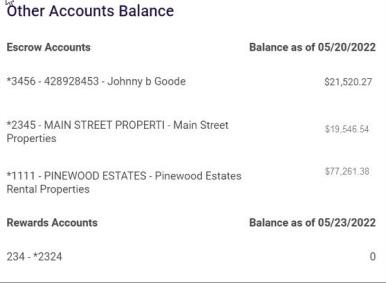
Other Account Balances (Not shown) Displays account and balance information for entitled Escrow Accounts, Credit Card Rewards points, and Brokerage balance information.
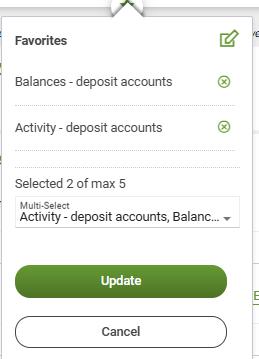
B: ABOUT FAVORITES
Favorites are hyperlinks to frequently used pages (up to five pages). A company user’s entitlements determine the pages available for selection.
C: ADD FAVORITES
1. Click the star icon ( ) displayed by the main navigation menu.
2. Click the Multi-Select drop-down and click the check box beside each page you want to add as a favorite. You can also find a page by typing the name into the Search field.
3. Click someplace outside of the Multi-Select drop-down and then click Update.
Delete Favorites
1. Click the star icon ( ) displayed by the main navigation menu.
2. Click the edit icon ( ) beside the Favorites heading.
3. Click the delete icon ( ) beside the favorite you want to delete.
04: CAPABILITIES – AD HOC TREASURY SERVICES
A. STANDARD OFFERINGS WITH ACCESS
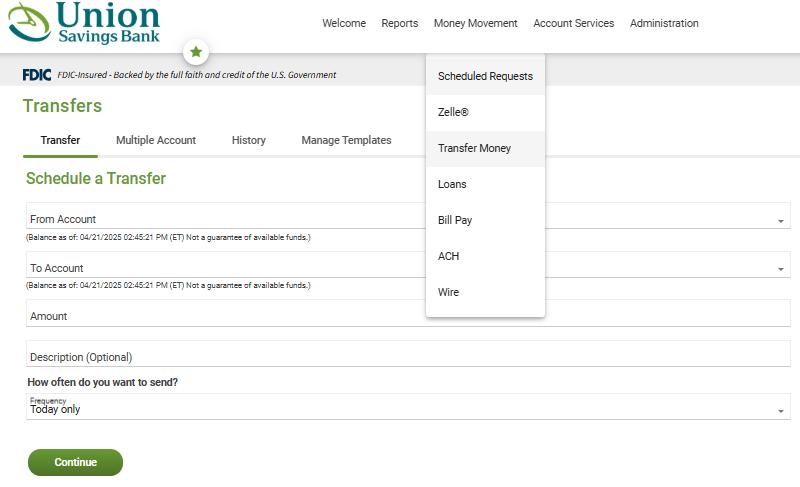
Transfers:
What is an Internal Transfer?
• The Internal Transfer also known as Account to Account Transfer service allows company users to transfer money electronically between accounts in their financial institution. Company users can transfer any available amount up to their approved limit.
• The Manage Alerts page includes many alerts to which company users can subscribe to be notified automatically about various transfer-related events.
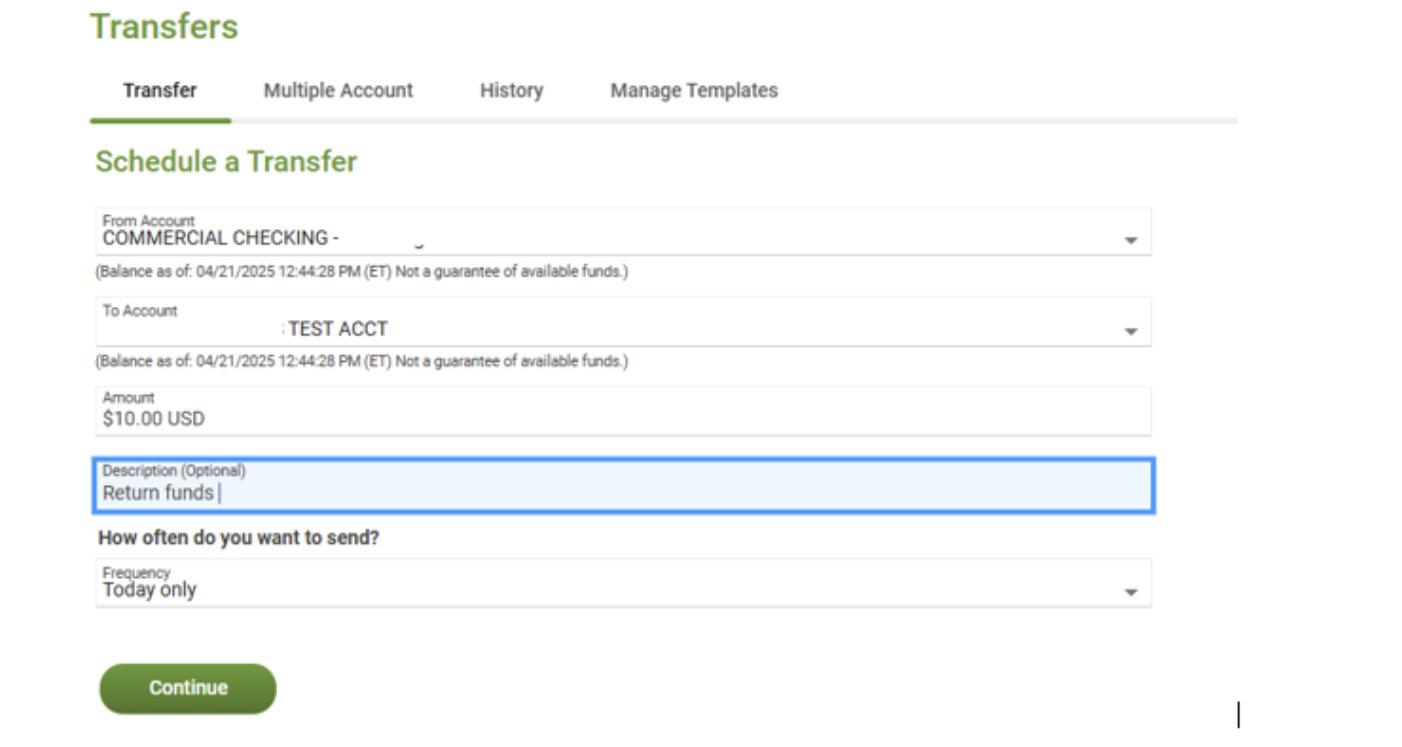
How to initiate a transfer
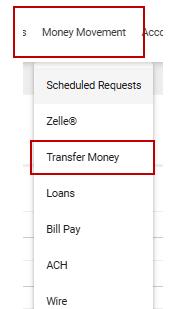
1. From the welcome screen select Money Movement > Transfer Money
2. Complete the following fields
a. From Account: The account that is debited. If enabled for your company, the account balance appears beneath the field for accounts that are owned by your financial institution and entitled to the Information Reporting service.
b. To Account: The account that is credited. If enabled for your company, the account balance appears beneath the field for accounts that are owned by your financial institution and entitled to the Information Reporting service.
c. Amount: The amount of money to transfer (up to the approved limit).
d. Description (Optional): A description of the transfer (up to 35 alphanumeric characters).
e. Frequency Today Only: Sends the transaction once on today’s date.
f. One time: Sends the transaction once on a date in the future.
g. Weekly: Sends the transaction on the same day each week.
h. Every other week: Sends the transaction on the same day every other week.
i. Twice a month - the 15th and last day of the month: Sends the transaction on the 15th and last day of the month unless those dates fall on a day when transactions are not processed, such as a holiday.
j. Monthly: Sends the transaction on the same date every month.
k. Monthly - last day of the month: Sends the transaction on the last day of each month unless those dates fall on a day when transactions are not processed, such as a holiday.
l. Every three months: Sends the transaction on the same day every three months.
m. Every three months - last day of the month: Sends the transaction on the last day of the month, every three months.
n. Every six months: Sends the transaction on same day every six months.
o. Every six months - last day of the month: Sends the transaction on the last day of the month, every six months; unless those dates fall on a day when transactions are not processed, such as a holiday.
p. Yearly: Sends the transaction on the same date every year.
q. Custom: Sends the transaction on dates of your choosing. Up to 25 dates are supported.
i. If applicable, select/type the start date of the recurring transfer in the Next Send On or Send On field.
r. For the Custom frequency, additional dates can be added by clicking the Add Additional Dates link
i. If applicable, select an End On option:
• Continue indefinitely: The transaction is sent forever.
• Continue until this date: The transaction is sent until the date you specify.
s. Continue for this many occurrences: The transaction is sent for a set number of times. For example, if Weekly is the Frequency and the number of occurrences is 4, the transaction is sent on the same day every week for four weeks.
i. If applicable, select one of the Processing Options:
• Use the next processing date if a scheduled request falls on a non-processing date. If the send on date for a transaction falls on a non-processing day like a holiday, then the next processing date following the holiday is used.
• Use the previous processing date if a scheduled request falls on a non-processing date. If the send on date for a transaction falls on a non-processing day like a holiday, then the processing date before the holiday is used.
• Click Continue
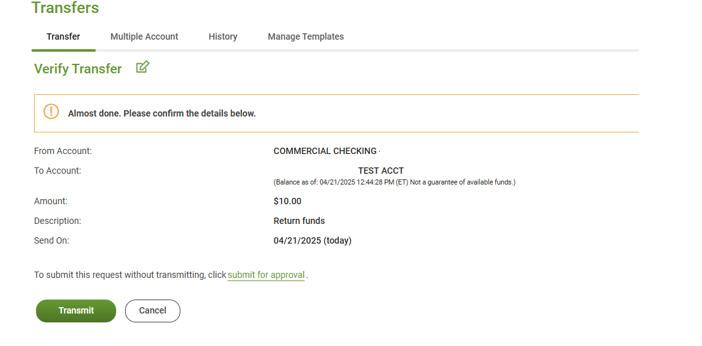
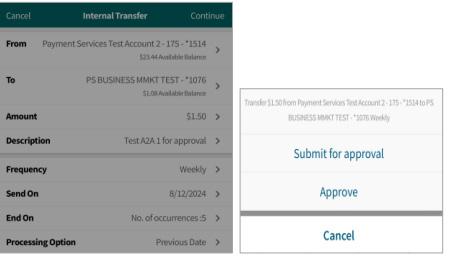
t. Verify the information and then click one of the following options (Note: Your entitlements, number of approvals required, and approval settings for the service determine the options available to you.)
i. Submit for approval: Approve the transaction later or allow other users in the company to approve it.
ii. Approve: Approve the transaction now.
iii. Transmit: Approve and send the transaction.
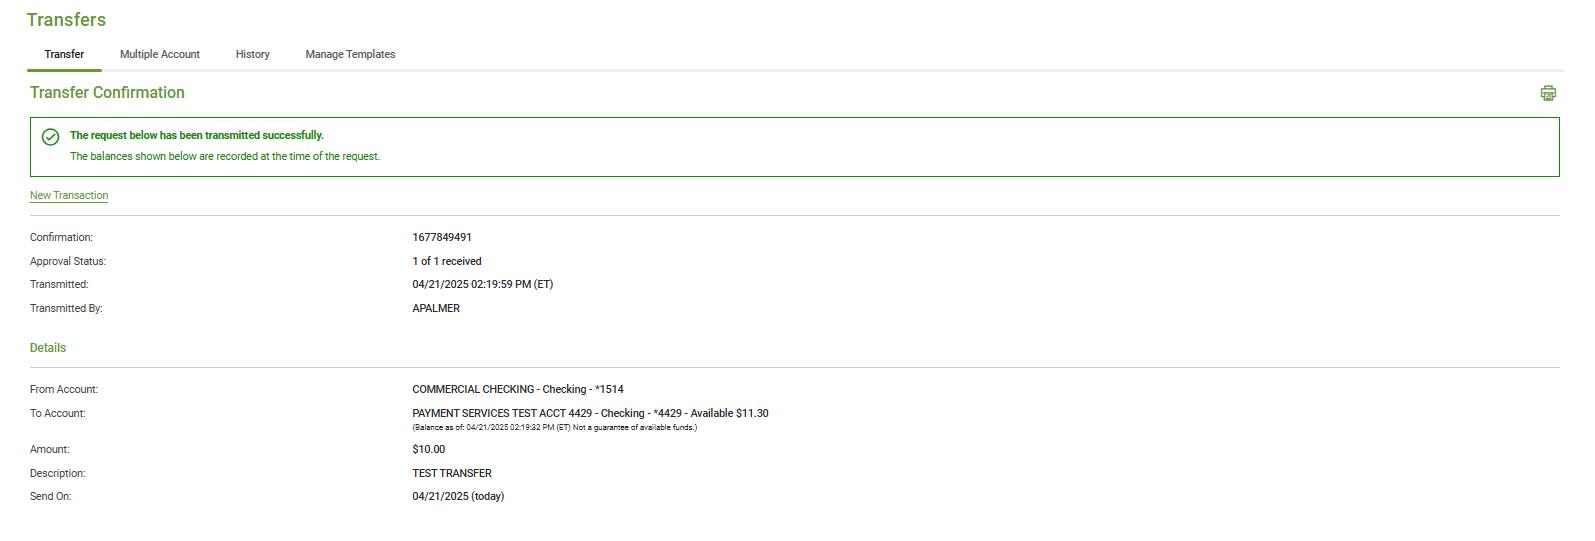
Receive confirmation
Not prompted for Out of Band Authentication for this transaction.
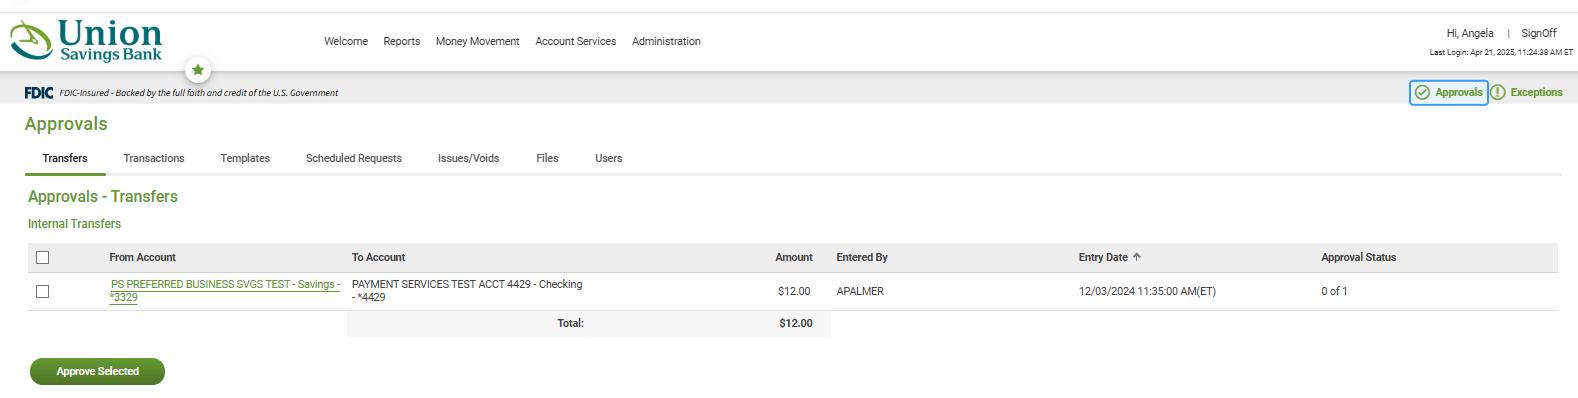
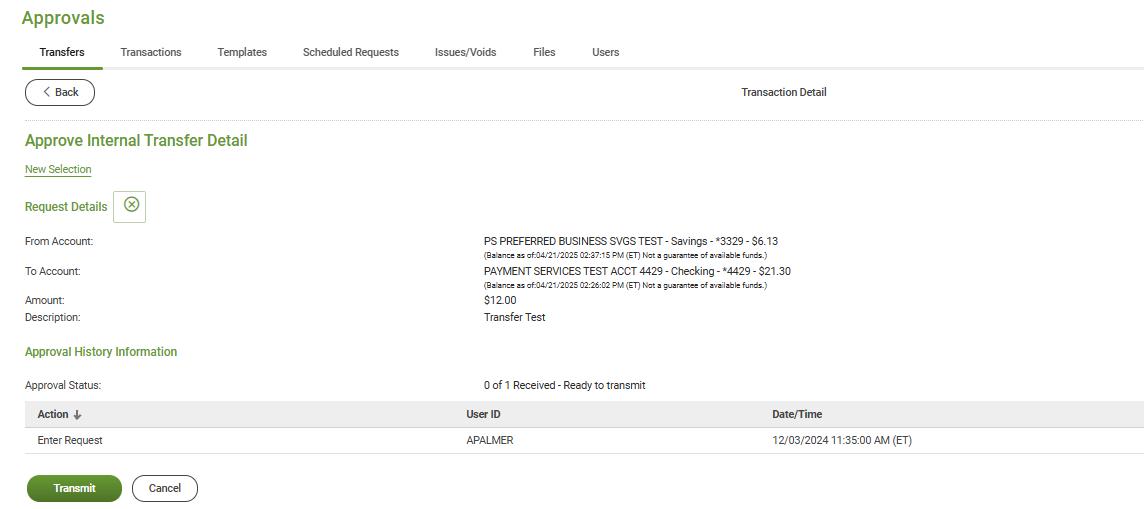
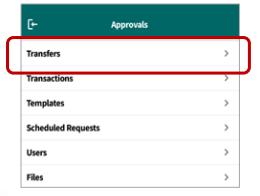
Approve Current-day Transfers – Internal
Approve internal transfers that have Today only set as the Frequency or scheduled transactions that were not approved prior to the transmit date.
1. Click Approvals > Transfers
2. Scroll to the Internal Transfers section.
3. Select the transfers to approve and then click Approve Selected
4. Verify the transfers and then click one of the following options (Note: The number of approvals required and approval settings for the service determine the options available to you.)
a. Submit for approval: Approve the transaction later or allow other users in the company to approve it.
b. Approve: Approve the transaction now.
c. Transmit: Approve and send the transaction.
Internal Transfer Verification Page Sample
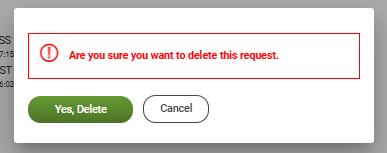
Delete Current-day Transfers - Internal
Delete internal transfers that have Today only as the Frequency and are not approved.
1. Click Approvals > Transfers.
2. Scroll to the Internal Transfers section.
3. Click the link in the From Account column for the transfer you want to delete.
4. Review the transfer and then click the delete icon ( ) beside the Request Details heading.
5. Click Yes, Delete.
Search Completed Transfers - Internal
1. Click Money Movement > Transfer Money > History.
2. If applicable, click Deposit Accounts.
3. Complete the following fields
a. Account > List of entitled accounts.
b. Date > Specific Date or Date Range.
4. Click Continue.
About Multiple Account Transfer
The Multiple Account Transfer service allows company users to transfer money from one account to many accounts (a debit type transfer) or from many accounts to one account (a credit type transfer).
A multiple account transfer is made using templates. A template is a preset format that defines the main account (the “one” account), detail accounts (the “many” accounts), the transfer action/direction (debit or credit), and the amount and is intended for repetitive use.
If your company requires multiple approvals for template setup, template adds, changes, and deletes must receive all approvals before the changes to the template can be used.
The Manage Alerts page includes alerts to which company users can subscribe to be notified automatically about various transfer-related events.
Make a Current-day Transfer — Multiple Account Transfer
1. Click Money Movement > Transfer Money > Multiple Account.
2. Click the Template Name drop-down and select the template you want to use.
3. Optional: Type the maximum amount you want allowed for the transfer into the Total Control Amount field.
4. Optional: Type a short description into the Description field.
5. Do one of the following:
a. Type an amount into the Set All Amounts To field and then click Change to make the amounts for all the detail accounts the same.
b. Type an amount into the Amount field beside the detail account. Clear the check box beside a detail account to exclude it.
The Amount cannot exceed the Maximum Transfer Amount. The Variance Amount is the difference between the Total Control Amount and the sum of the detail account amounts.
6. Click Continue
7. Verify the transfer and then click one of the following options:
a. Submit for Approval: Approve the transaction later or allow other users in the company to approve it.
b. Approve: Approve the transaction now.
c. Transmit: Approve and send the transaction.
Book Transfer vs. Express Transfer
• A Book Transfer is referenced in Account Reporting for multiple account transfers.
• An Express Transfer is referenced in Account Reporting for single account transfers.
– NOTE: See Alerts, Reports & Desktop vs. Mobile Quick Reference Guide
B. REPORTS & REPORTING — DEPOSIT REPORTING
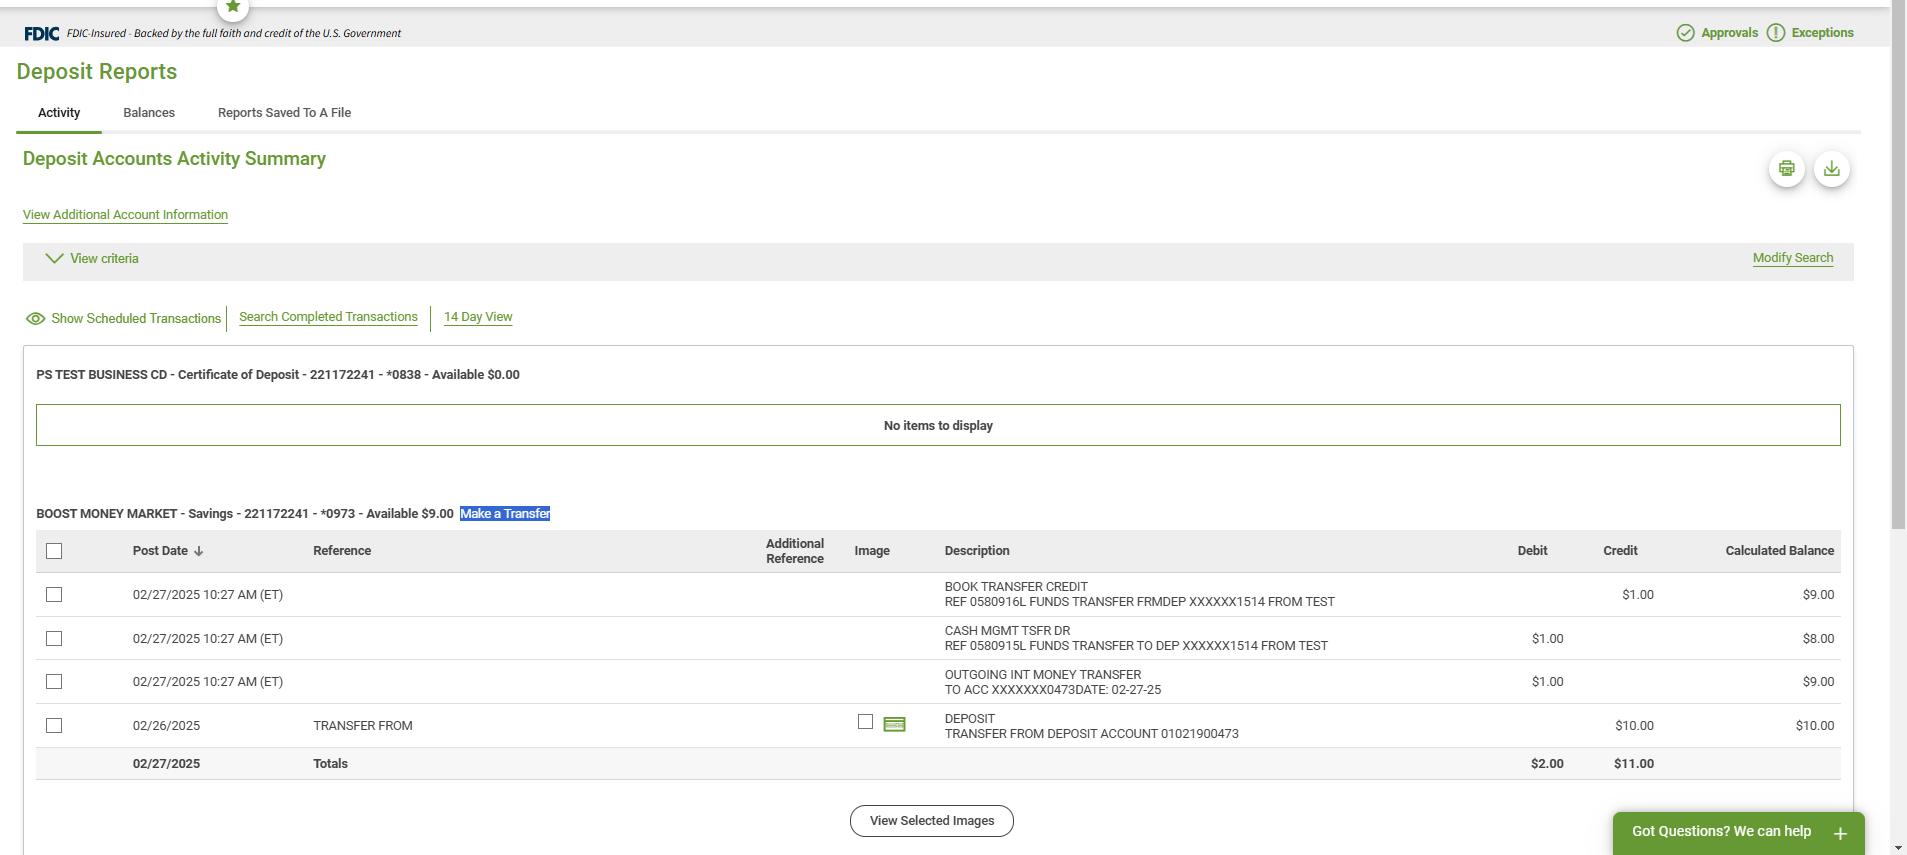
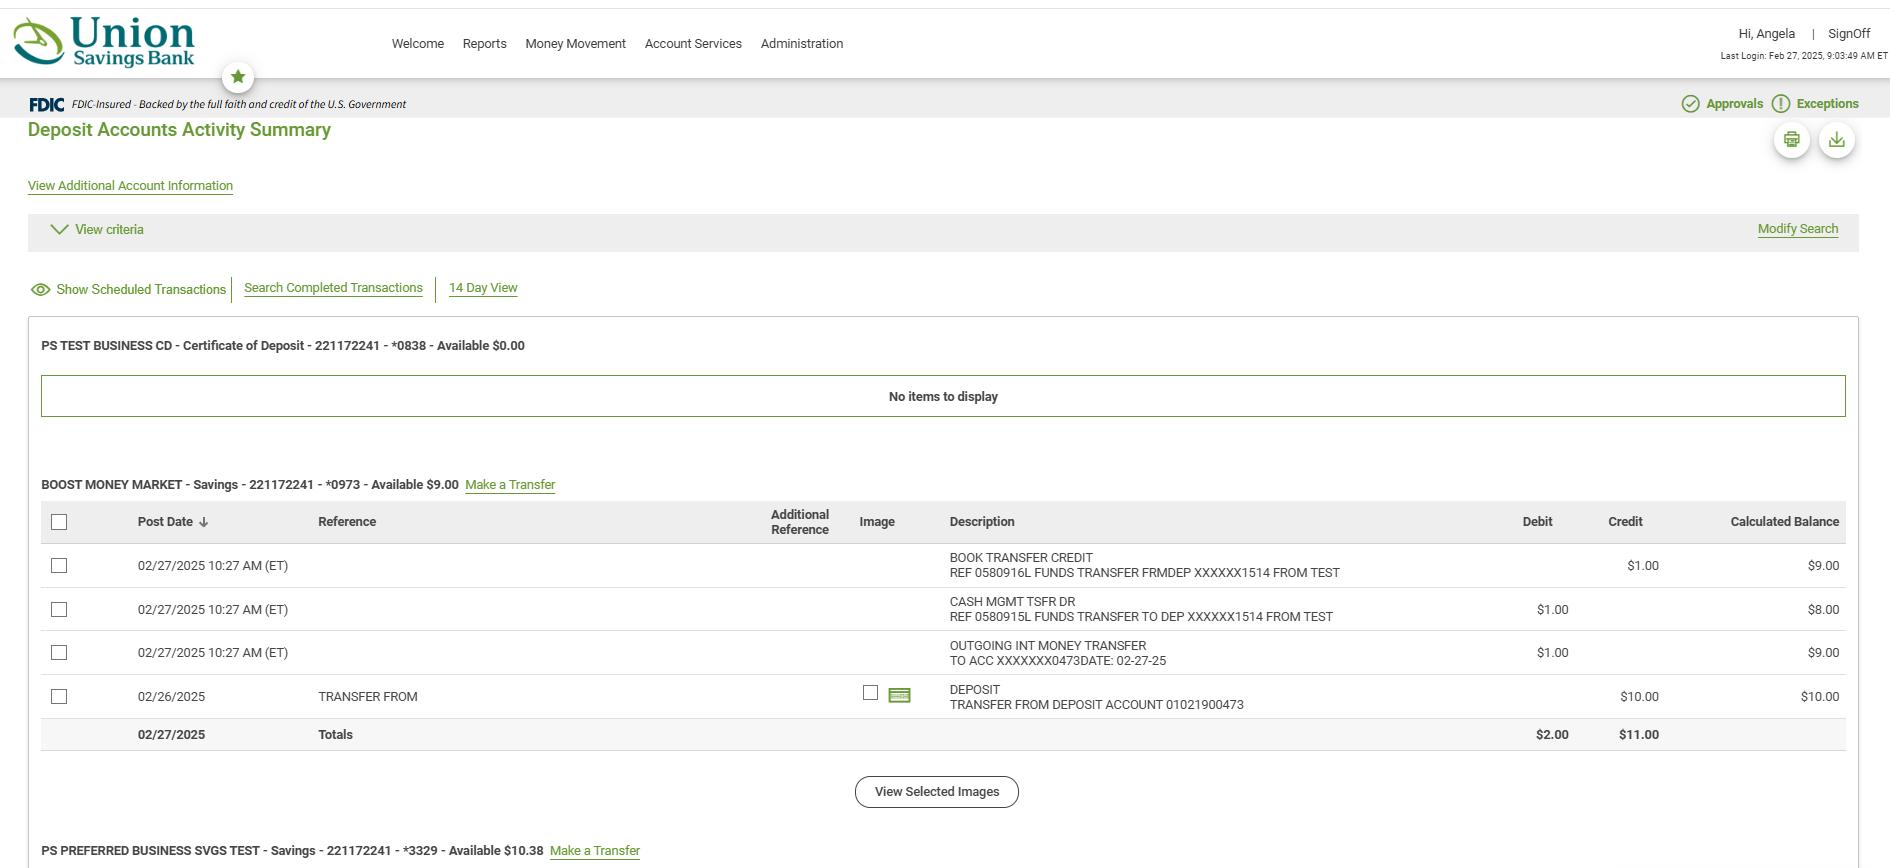
About Accounts and Deposit Reporting
Company users can search for and view activity for deposit accounts. Search results can be downloaded.
Company users can search for transactions by account, date range, transaction type, amount (or amount range), and check serial number (or check range). If available, company users can view images of paid checks.
Search results include a running balance which company users can modify to include the next instance of a recurring transfer, scheduled bill payments, and loan payments (if applicable) Search results include an account’s available balance and calculated balance.
Account activity can also be accessed quickly through the Welcome page. When accessed through the Welcome page a default view of 30 days of activity (including current day) and all transaction details is provided.
Search Deposit Account Activity
1. Click Reports > Deposit Reports > Activity
2. Complete the following fields:
a. Output to
i. Screen, BAI2 file, CSV file, CSV file - all fields, PDF, QIF file QuickBooks®, or a custom file export format. The CSV file - all fields option allows company users to download all information including information in the Additional Reference column. The QuickBooks®, file, option might not be available to all company users. Custom file export formats are fixed or delimited file definitions created by users in the company.
b. Account
i. List of entitled accounts.
c. Date
i. Specific Date, Date Range, or Previous Business Day.
d. Transaction Types
i. All Transactions: Includes all debit and credit transactions.
ii. All Credits: All deposits, ACH credits, wire credits, and/or other credits.
iii. All Debits: All checks, ACH debits, wire debits, and/or other debits.
iv. Selected Groups: Deposits, ACH Credits, Wire Credits, Other Credits, Checks, ACH Debits, Wire Debits, or Other Debits.
v. Transaction Codes: All Codes, Deposits, ACH Credits, Wire Credits, Other Credits, Checks, ACH Debits, Wire Debits, Other Debits. If All Codes is selected, click the Transaction Codes dropdown and select one or more codes.
Optional: Click the Show Advanced Options link to search for specific transactions and customize how the search results are displayed. Advanced options are only available when one account is selected.
3. Complete the Display Options fields:
a. Account Sort. Determines how the search results are sorted; specifically: Account number, Description, ABA number and account number, or ABA number and description. Include. Transaction detail, Subtotals for selected transaction groups, and/or Totals by day for the selected date range.
4. Optional*: Complete the Advanced Search Options fields:
a. Amount, Exact Amount, or Range. Note: If a decimal is not entered, the amount is interpreted as a whole dollar.
b. Check Serial Number, Exact Number or Range
c. Description Search for transactions by their descriptions.
d. Click Generate Report
Current-day Internal Transfers
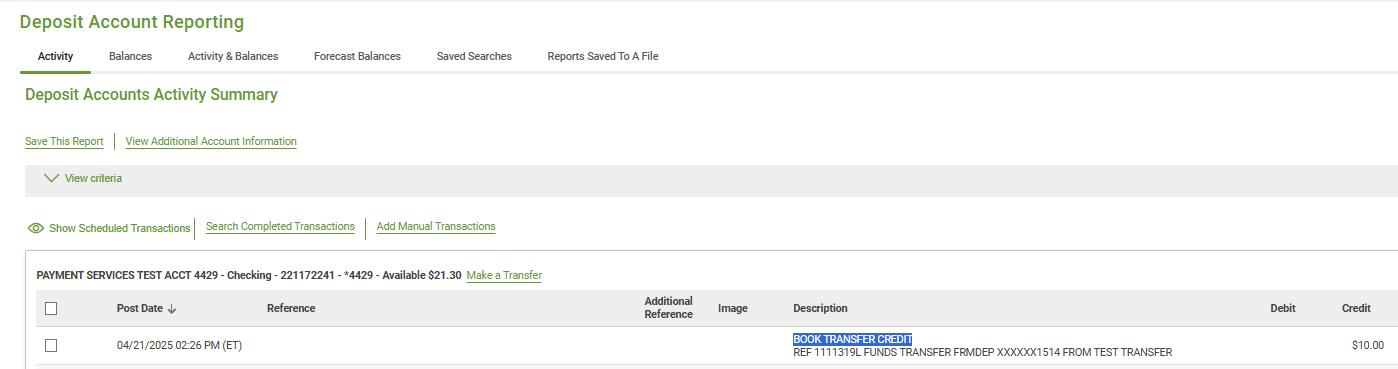
When account activity search results are generated to the screen (HTML) company users are provided with a link they can use to make a current-day internal transfer. This option is available to company users who have accounts entitled to the Internal Transfer service. If multiple approvals are not required for the Internal Transfer service, then the transfer is immediately included in the account activity. If multiple approvals are required for the Internal Transfer service, the transaction is included in the account activity after the final approval is received.
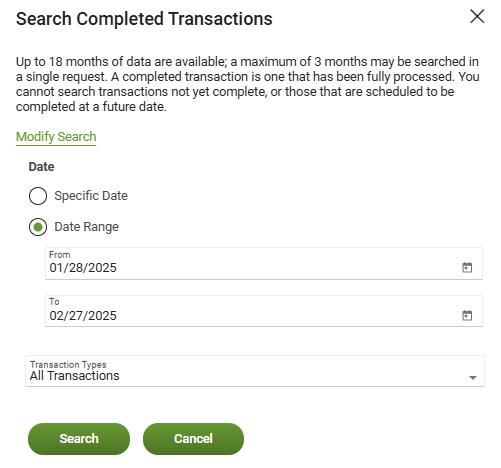
Search Completed Transactions
Complete Search Deposit Account Activity and click Search Completed Transaction Link
Complete following fields:
• Date or Range
• Transaction Types
• Click Search
• Other link options when output to screen include: View Additional Account Information, Show Scheduled Transactions, Show 14-Day View, and Modify Search (Returns user to Activity Report to modify search criteria).
Add Transactions Manually
Manually include transactions that have not posted to an account to better forecast an account’s balance. Transactions can be included singly or collectively by row for a selected account. Manually entered transactions are saved until the expected postdate or until they are manually removed.
Click Manual Transactions Link
Search Deposit Account Balances
1. Click Reports > Deposit Reporting > Balances.
2. Complete the following fields:
a. Account: List of entitled accounts.
b. Date: Specific Date, Date Range, or Previous Business Day.
c. Account Sort: Account, Description, ABA Number and Account Number, ABA Number and Description.
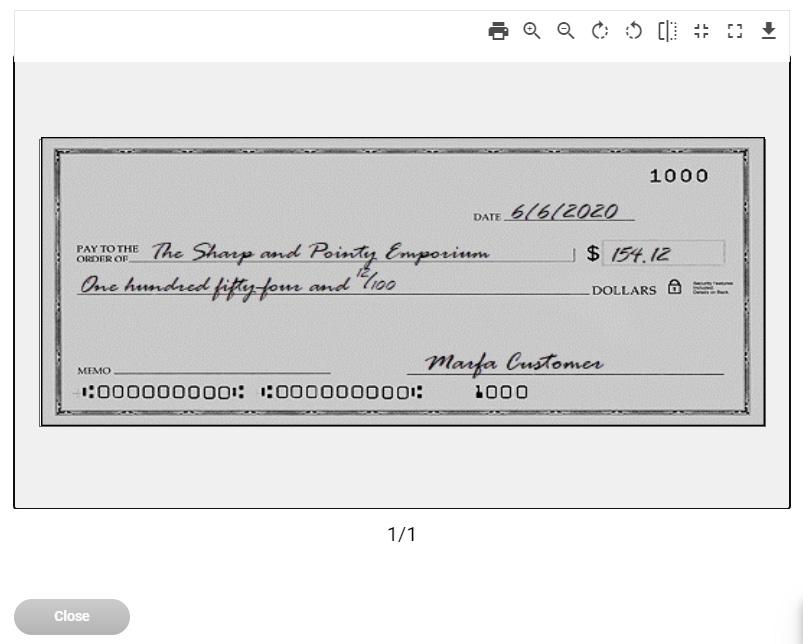
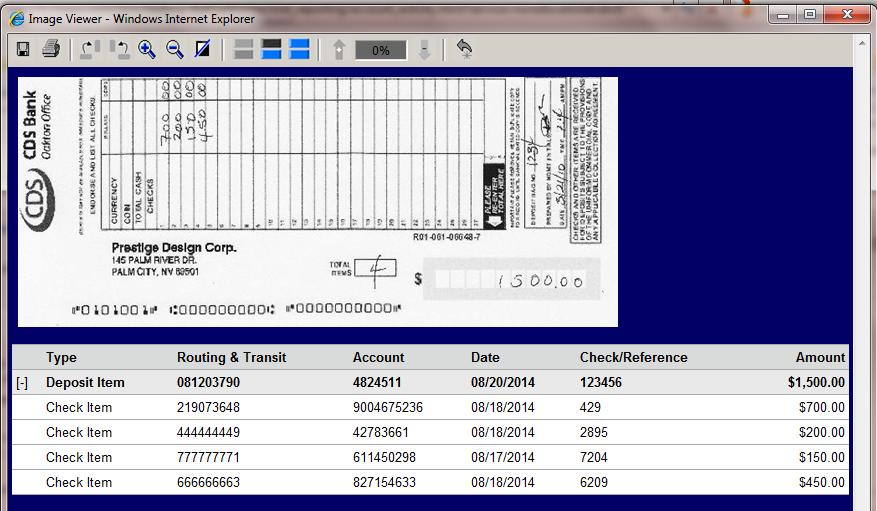
3. Click Search Check Imaging View Check Image
1. Click the check image icon ( ) associated with a transaction.
a. Check Image Viewer Page Sample.
Check Image Controls:
Control Function
Save image
Print image
Rotate image clockwise
Rotate image counter clockwise
Zoom in
Zoom out
View back
View front and back
Increase contrast
Decrease contrast
Return to original view
Deposit Ticket Imaging
Deposit Ticket Imaging helps company users reconcile transactions faster by allowing them to view electronic images of deposit tickets and if available, items contained in the deposit such as checks.
View Deposit Ticket Image
1. Click the check image icon ( ) associated with a transaction.
a. Deposit Ticket Image Viewer Page Sample
Control Function
Save image
Print image
Rotate image clockwise
Rotate image counter clockwise
Zoom in
Zoom out
View back
View front and back
Increase contrast
Decrease contrast
Return to original view
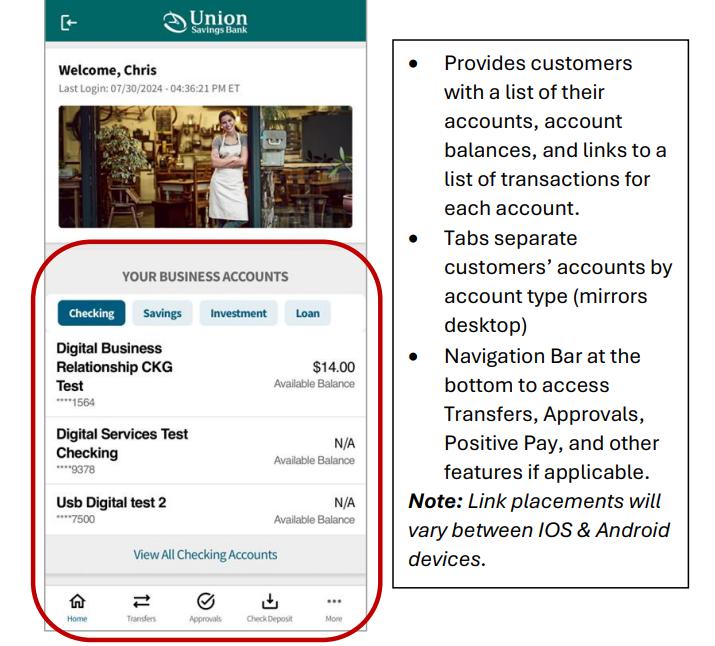
C. MOBILE CAPABILITIES
Enrolling in USB Business Mobile App
Before attempting to use the Mobile App, the user must establish permanent credentials in Business Online Banking Plus.
Note: Users cannot login using a temporary password.
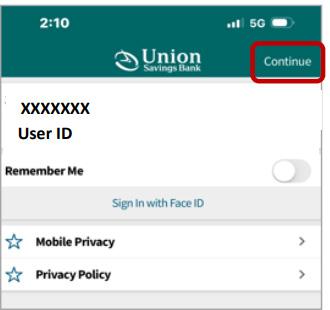
1. Download the USB Business Mobile App from Apple or Google App store.
2. Enter Company ID and User ID. Click Continue.
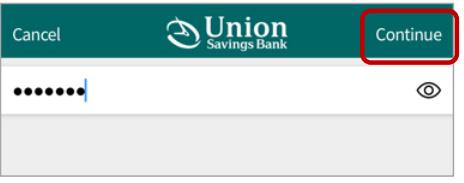
3. Enter Password. Click Continue.
4. Complete Out Of Band Authentication if prompted. (Note: New login credentials will prompt for OOBA step-up on existing device).
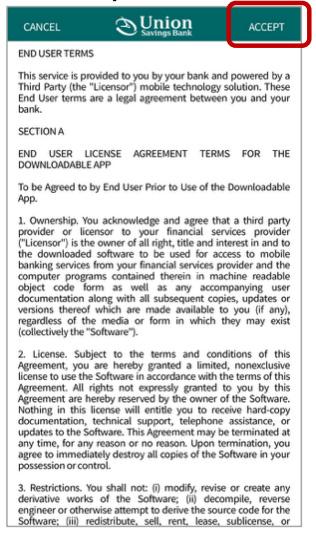
5. Click Accept to the Terms & Conditions.
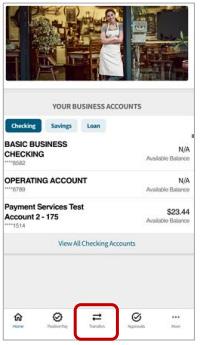
6. User is brought to the new landing page: Your Business Accounts dashboard.
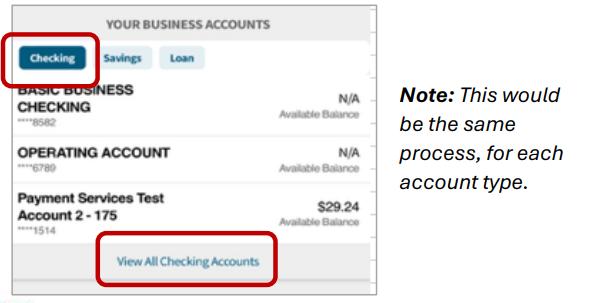
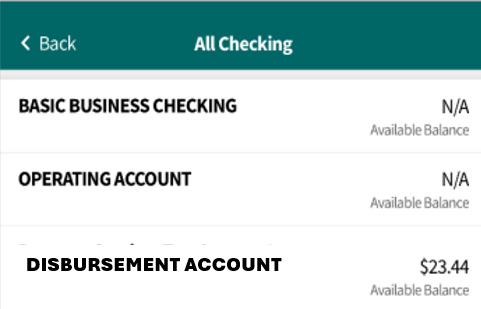
7. To view all checking accounts, user will click View All Checking Accounts.
8. The All Checking page will appear.
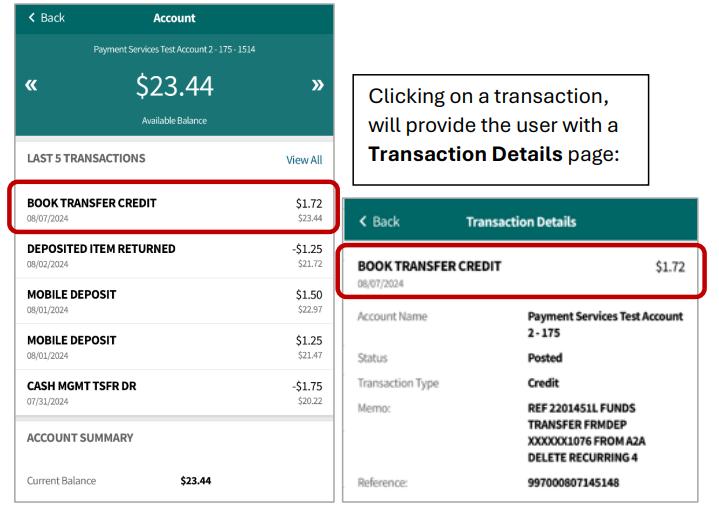
9. Users can click on a particular account to view the last five (5) transactions, transaction history, as well as see a running balance on the account.
10. Clicking View All will present the user with all recent transactions.
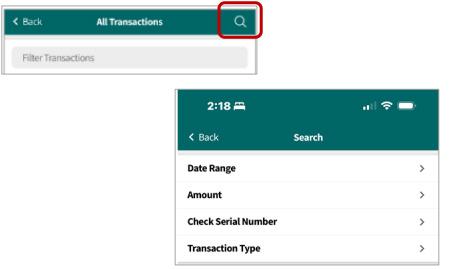
11. Clicking the magnifying glass allows the user to refine the search to include:
a. Date Range
b. Amount
c. Check Serial Number
d. Transactions Type (Debit or Credit)
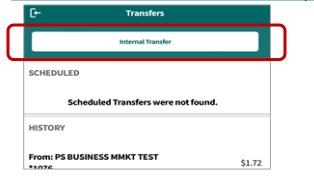
Internal Transfers
Users can setup scheduled, recurring and one-time transfers to move funds between accounts within the same company.
1. Click Transfers from the navigation menu at the bottom of the Accounts Landing page.
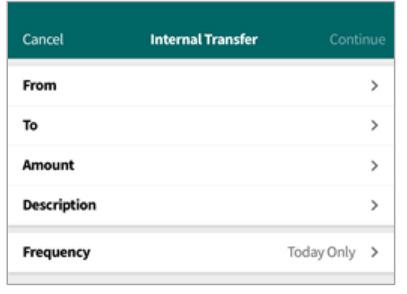
2. Click Internal Transfer on the Transfer page.
3. User will complete the Internal Transfer page:
a. Select the From account.
b. Select the To account.
c. Enter the Amount
d. Enter a Description if applicable.
e. Choose the Frequency (Single or Recurring)
4. After completing the transfer details, the user may:
a. Submit for approval.
b. Approve (If they have authority)
c. Cancel
Approvals — Transfers
1. Click Approvals from the navigation menu at the bottom of the Accounts Landing page.
2. Click Transfers on the Approvals page.
3. Select the Internal Transfer to approve (if multiple).
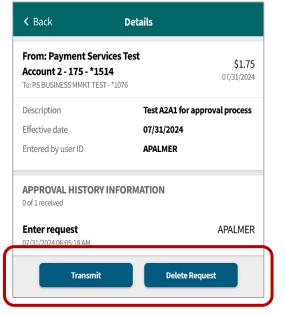
4. The Details page will appear. The Approver can Transmit or Delete Request after reviewing the details.
Approvals — ACH
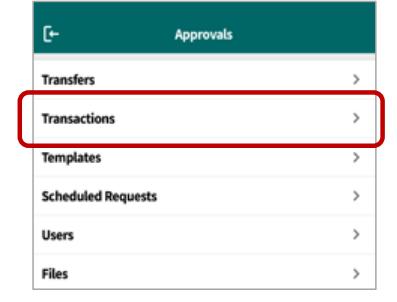
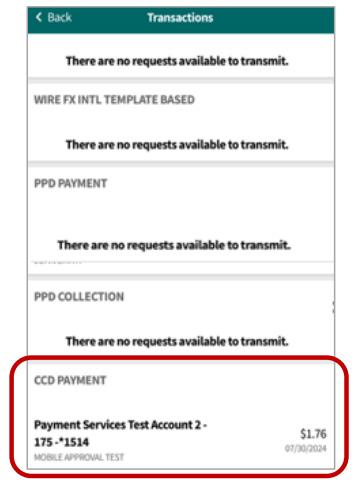
1. Click Approvals from the navigation menu at the bottom of the Accounts Landing page.
2. Click Transactions on the Approvals page.
3. Select the ACH Transaction to approve from the Transactions page.
4. The Details page will appear. The Approver can Transmit or Delete Request after reviewing the details.
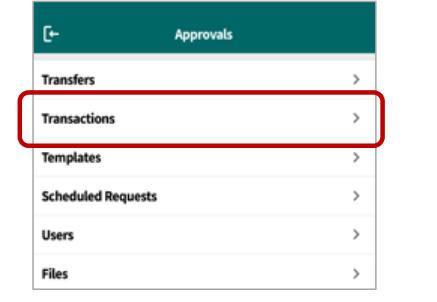
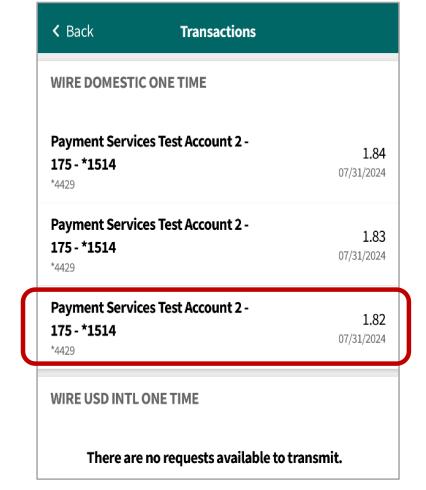
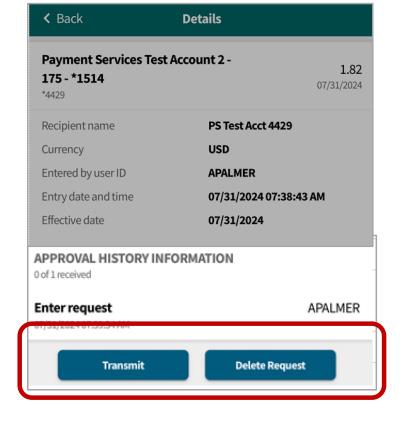
Approvals — Wires
1. Click Approvals from the navigation menu at the bottom of the Accounts Landing page.
2. Click Transactions on the Approvals page.
3. Select the Wire to approve from the Transactions page.
4. The Details page will appear. The Approver can Transmit or Delete Request after reviewing the details.
Approvals — Positive Pay
1. Click Positive Pay from the navigation menu at the bottom of the Accounts Landing page. (Note: Reverse Positive Page Pay Decision currently not available via mobile.)
New Approval Options/Categories:
a. Manual Check Issue or Voids
b. Check Issue Files
c. Check and Payee Name Positive Pay Exceptions
d. ACH Positive Pay Exceptions
2. From the Positive Pay page, select the appropriate category.
3. The Check Issue Approval page will appear. The Approver can Delete or Transmit the item.
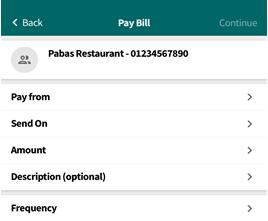
Bill Pay — Payment
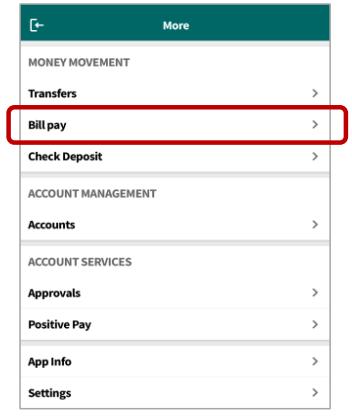
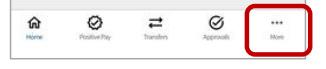
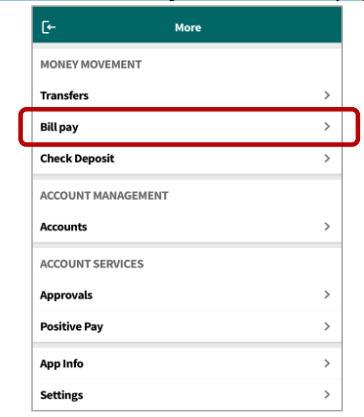
1. Click More from the navigation menu at the bottom of the Accounts Landing page.
2. Select Bill Pay from the More page.
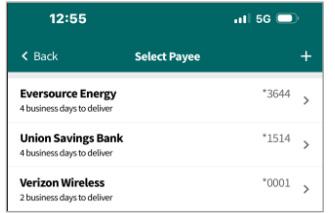
3. The Bill Pay page will appear. Click Pay a Bill.
4. Select the appropriate Payee from the Select Payee page.
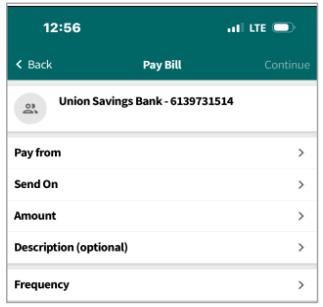
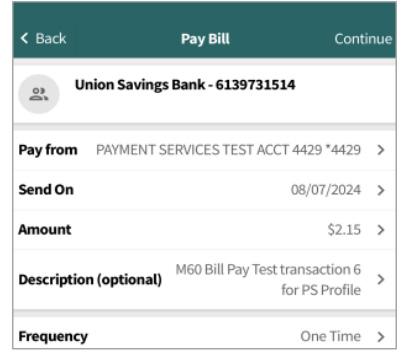
5. User will complete the Pay Bill page:
a. Select the Pay from account.
b. Select the Send On (or “Due Date”)
c. System will default to next available to send or deliver payment.
d. Enter the Amount
e. Enter a Description if applicable.
f. Choose the Frequency (Single or Recurring)
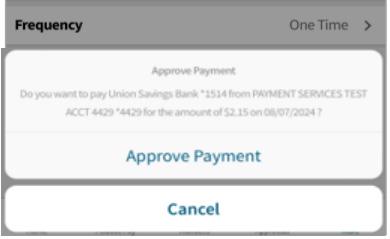
6. Review the Pay Bill page for accuracy once completed. Select Continue.
7. Select Approve Payment or Cancel from the Approve Payment Notification page.
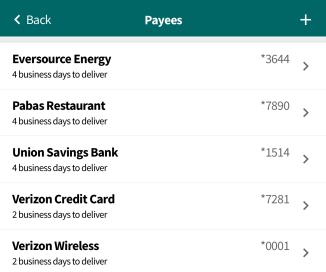
BILL PAY — Add A Managed Payee
1. Click More from the navigation menu at the bottom of the Accounts Landing page.
2. Select Bill Pay from the More page.
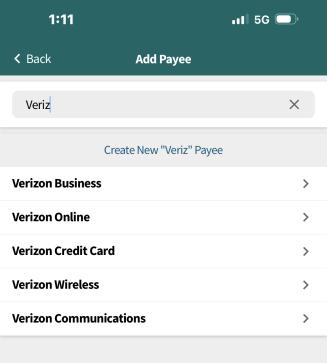
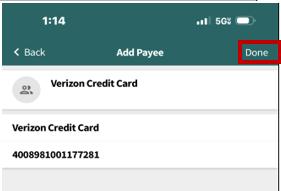
3. The Bill Pay page will appear. Click Add Payee.
4. Search for Payee – list of Payees matching search criteria returned.
5. Select Payee to add and enter minimal details
a. Nickname
b. Account Number
c. Zip Code, etc
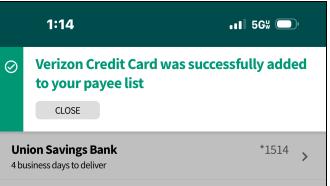
d. Click Done
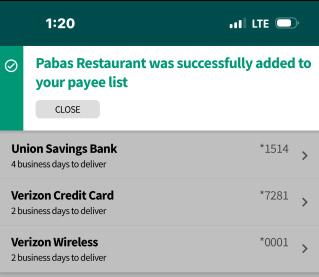
6. Receive confirmation – Payee is now available to use for Bill Payments
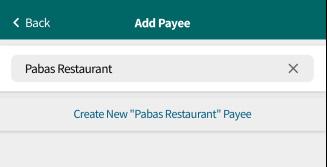
Bill Pay — Add an Unmanaged Payee
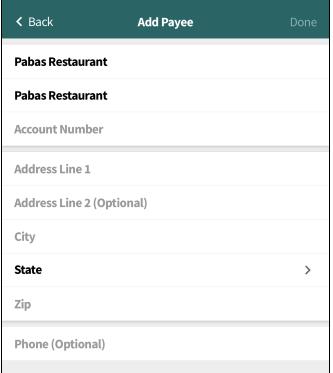
An unmanaged Payee is one that does not display returned search results. Follow steps 1-4 above and click “Create New “Payee Name” Payee
1. Enter all required information for Unmanaged Payee and click Done.
2. Review and close confirmation notice.
3. User is returned to Payee Screen new Payee will be listed
4. Payee listed when following “Pay Bill” instructions above
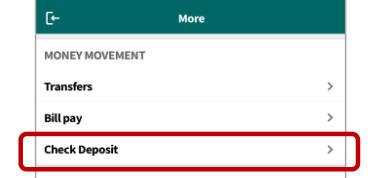
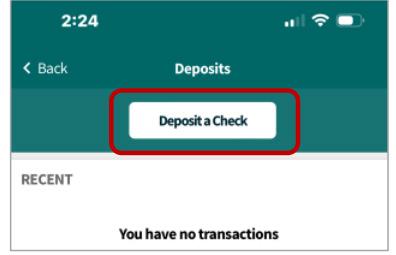
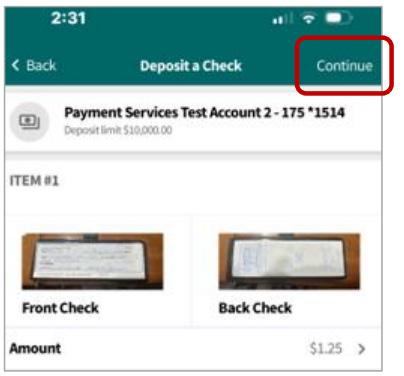
D. MOBILE CHECK DEPOSIT
1. Click More from the navigation menu at the bottom of the Accounts Landing page.
2. Select Check Deposit from the More page.
3. Select Deposit a Check on the Deposits page.
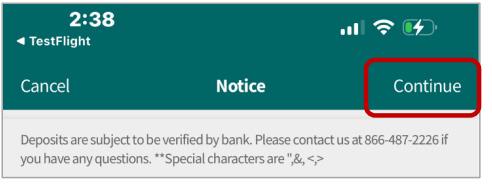
4. Click Continue after reading the Notice for check deposits.
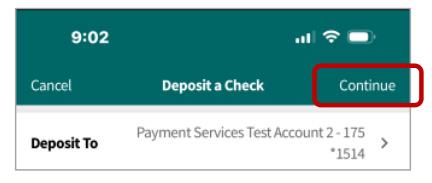
5. On the Deposit a Check page, select the Deposit To account.
6. Click Continue.
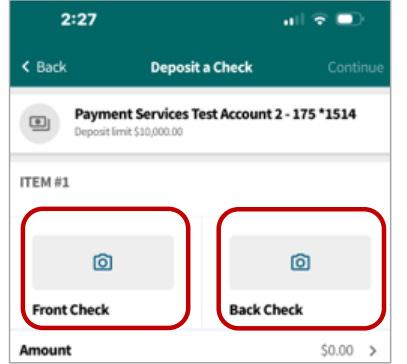
7. On the next page, user will Capture Images of the front and back of the item.
a. Click Front Check and capture a picture.
b. Click Back Check and capture a picture.
c. Enter Amount.
8. Select Continue.
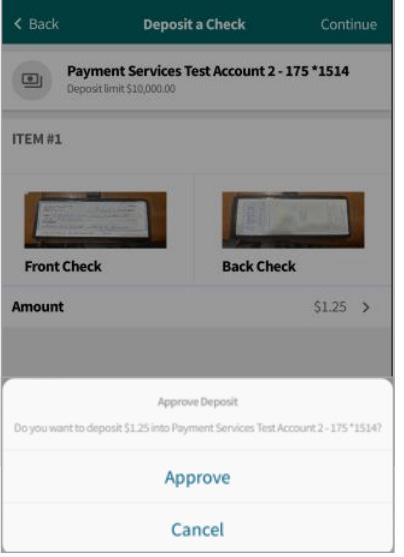
9. Select Approve or Cancel from the Deposit a Check page
05: ENHANCEMENTS
Deposit Account Reporting
Reports > Deposit Account Reporting contains the same information and reporting for activity and balances as the standard Deposit Reports but includes the ability to forecast and managed saved search criteria.
Note: Must be entitled separately by Treasury Services. Deposit Account Reporting is REQUIRED for customers that receive BAI2 files.
i. Screen, BAI2 file, CSV file, CSV file - all fields, PDF, QIF file QuickBooks®, or a custom file export format. The CSV file - all fields option allows company users to download all information including information in the Additional Reference column. The QuickBooks®, file, option might not be available to all company users. Custom file export formats are fixed or delimited file definitions created by users in the company.
b. Account
i. List of entitled accounts.
c. Date
i. Specific Date, Date Range, or Previous Business Day.
d. Transaction Types
i. All Transactions: Includes all debit and credit transactions.
ii. All Credits: All deposits, ACH credits, wire credits, and/or other credits.
iii. All Debits: All checks, ACH debits, wire debits, and/or other debits.
iv. Selected Groups: Deposits, ACH Credits, Wire Credits, Other Credits, Checks, ACH Debits, Wire Debits, or Other Debits.
v. Transaction Codes: All Codes, Deposits, ACH Credits, Wire Credits, Other Credits, Checks, ACH Debits, Wire Debits, Other Debits. If All Codes is selected, click the Transaction Codes drop-down and select one or more codes.
Optional: Click the Show Advanced Options link to search for specific transactions and customize how the search results are displayed. Advanced options are only available when one account is selected.
3. Complete the Display Options fields:
a. Account Sort - Determines how the search results are sorted; specifically: Account number, Description, ABA number and account number, or ABA number and description.
b. Include - Transaction detail, Subtotals for selected transaction groups, and/or Totals by day for the selected date range.
4. (Optional*) Complete the Advanced Search Options fields:
a. Amount - Exact Amount or Range. If a decimal is not entered, the amount is interpreted as a whole dollar.
b. Check Serial Number - Exact Number or Range.
c. Description Search for transactions by their descriptions.
5. Click Generate Report - Follow same process for Balances or Activity & Balances tabs on this screen.
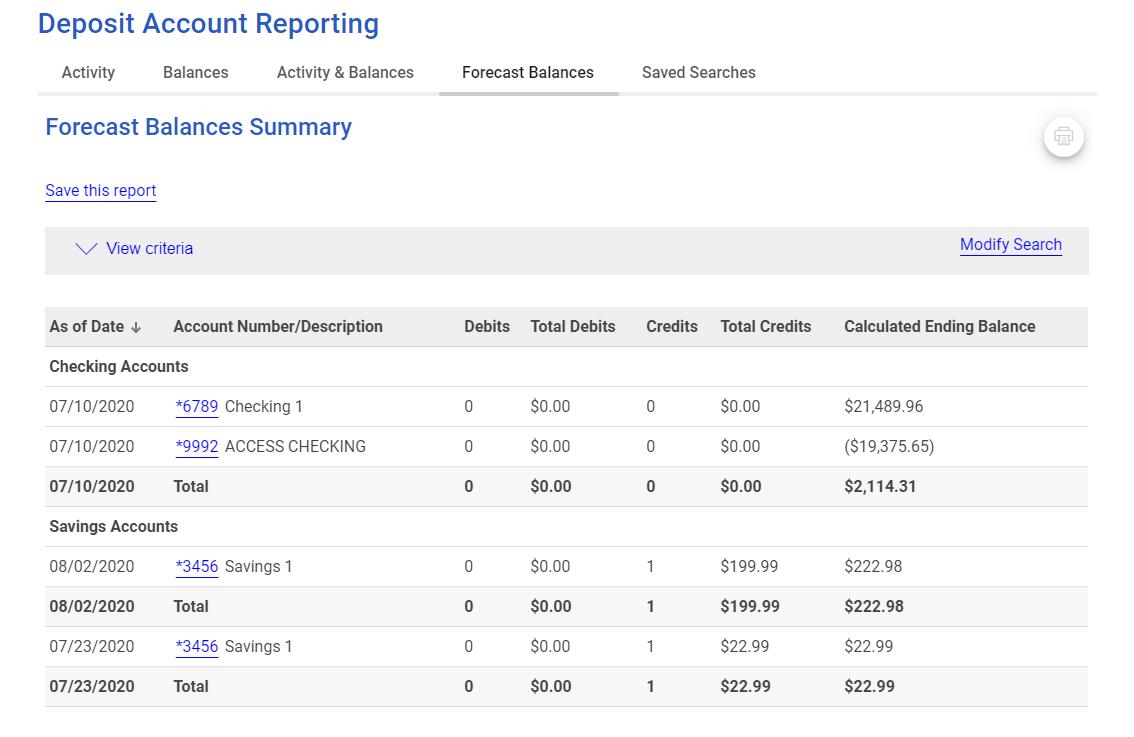
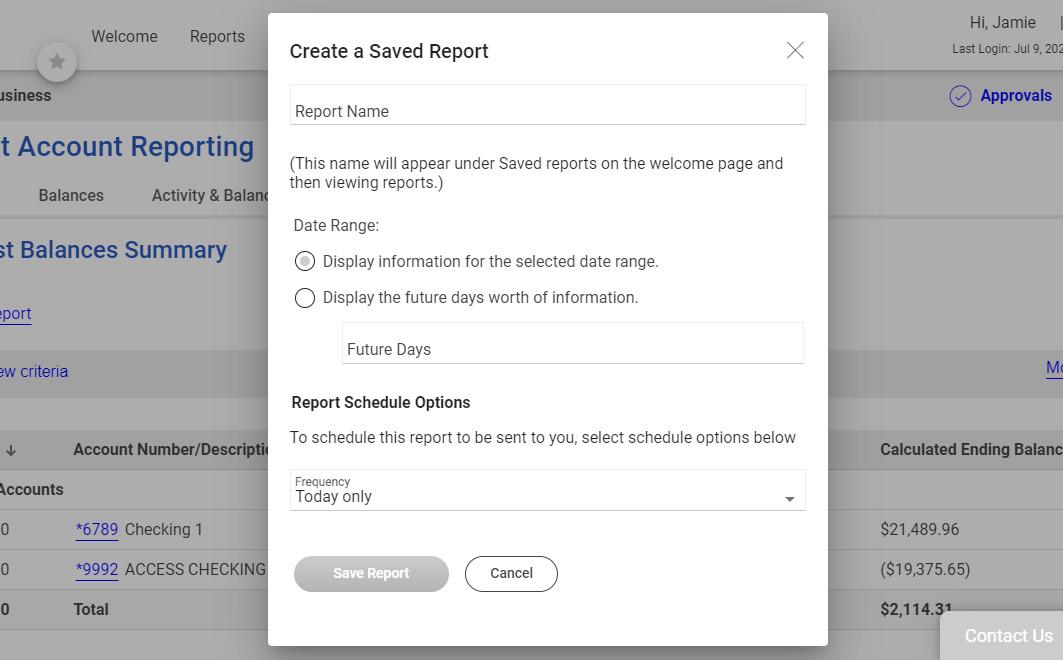
Forecast Deposit Account Balances
View total balances of multiple accounts by date. Manual and scheduled transactions can be included for better forecasting of account balances.
a. Report Name - A name for the search (up to 40 alphanumeric characters).
b. Date Range - Display information for the selected date range or Display the future days worth of information. If applicable, type the number of days into the Future Days field.
c. Frequency - Today only, Daily, Weekly, Twice a month - the 15th and last day of the month, Monthly, or Monthly - last day of the month.
d. Next Send On - The date you want the first search results sent to you.
e. End On - This is last date on which the search results are sent to you: Continue indefinitely, Continue until this date, or Continue for this many occurrences. If applicable, type a number int the Occurrences field.
f. Processing Options - Determines when the search results are sent when a chosen date falls on a non-processing date such as a holiday. Select Use the next processing date if a scheduled request falls on a non-processing date or Use the previous processing date if a scheduled request falls on a non-processing date.
1. Click Welcome and then click the edit icon ( ) beside the Saved Reports heading.
2. Click the delete icon ( ) beside the report.
3. Click Update.
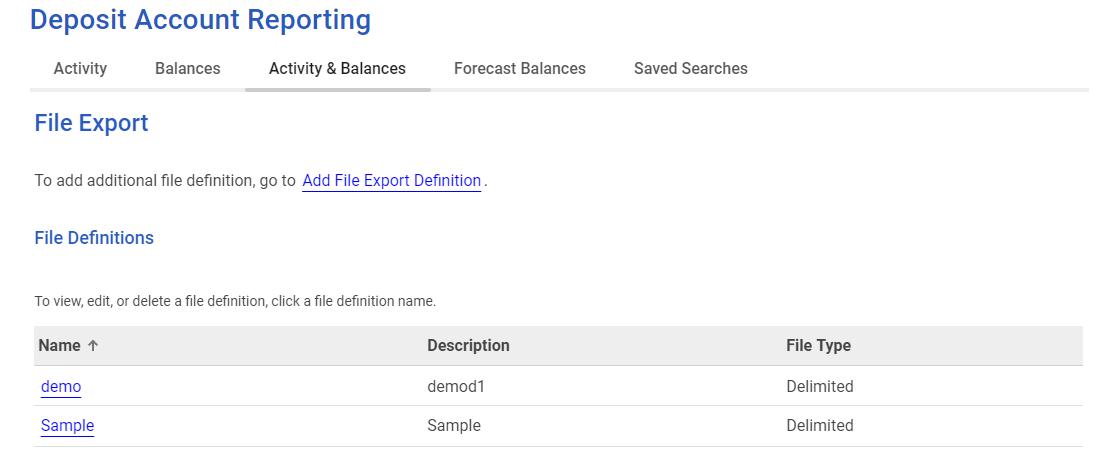
About Custom File Export Formats
Deposit account activity can be exported from Digital One Business using custom delimited or fixed file export definitions which outline the format for the data.
A delimited file is a flat text file consisting of data items separated by a specific character. A fixed file is a text file consisting of data that have specific lengths and positions. File export definitions are not user ID specific. When a user in a company creates a file export definition it is available to all other users in that company.
File Export Page Sample
Create a Custom File Export Definition
Custom file export definitions can be created through various pages.
a. Definition Name - The name of the definition (up to 20 alphanumeric characters). The name cannot be changed once the file export definition is saved.
b. Description - Information about the definition (up to 20 alphanumeric characters).
c. File Type - Fixed, a file where a field’s length is the same in each record.
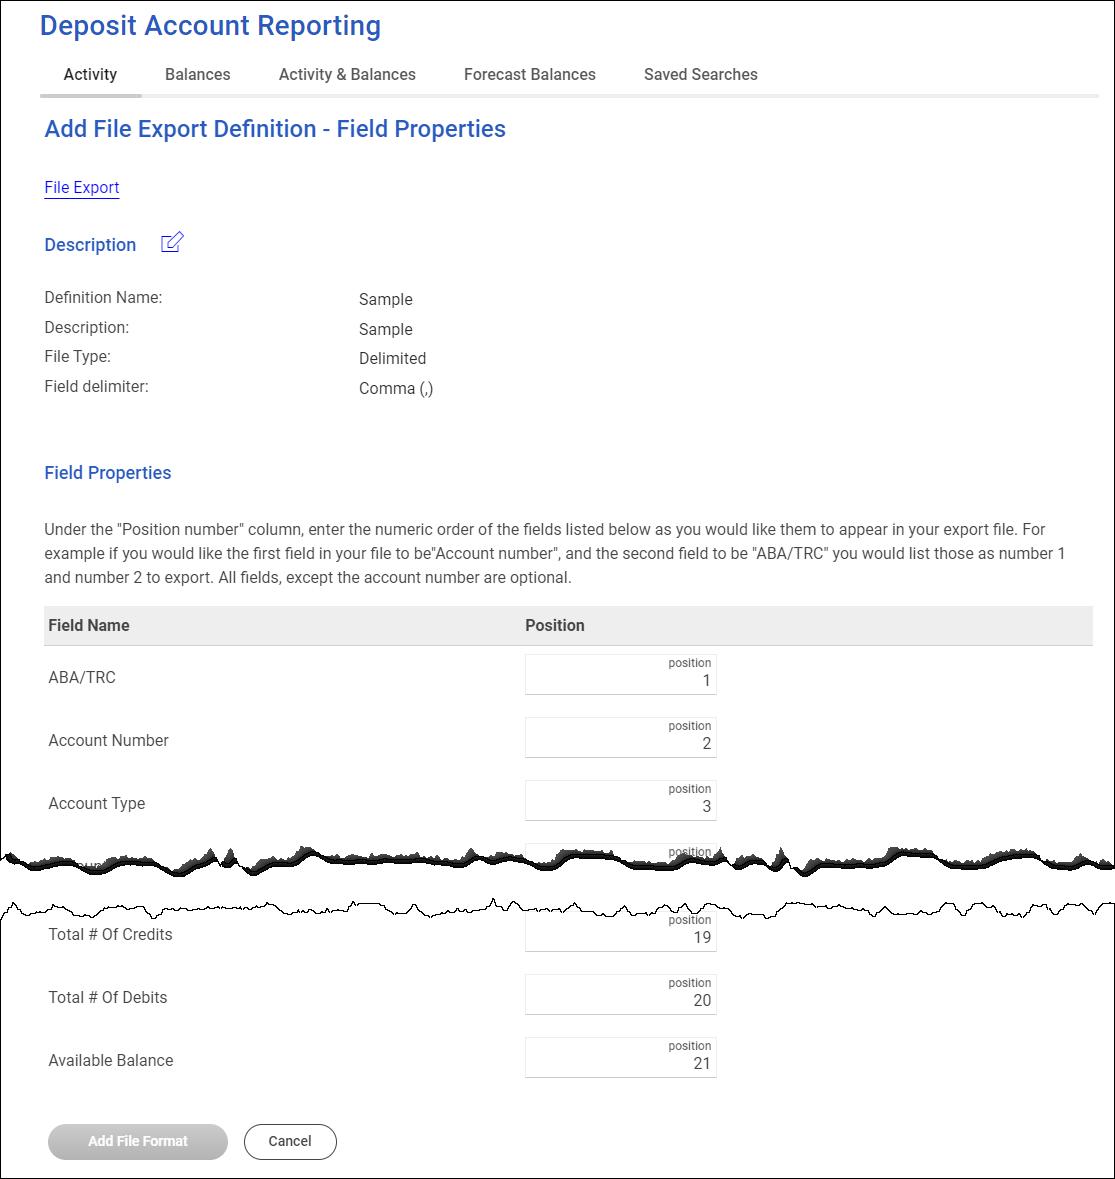
d. Delimited - A flat text file consisting of data items separated by a field delimiter character such as a comma.
e. Field Delimiter - For delimited files. The character used to separate the data: comma (,), dash (-), semi-colon (;), or Tab.
5. Click Continue.
6. Do one of the following:
a. For delimited file definitions, type the numeric order of the fields in the Position fields as you want them to appear in the exported file. For example, if the first field in your file is ABA/TRC and the second field is Account Number, those would be listed as number 1 and number 2 to export.
b. For fixed file definitions, type the appropriate start and end positions into the Position Number fields.
7. Click Add File Format
Add File Export Definition - Field Properties Page Sample
Change a Custom File Export Definition
The description, field delimiter, and field positions in a custom file definition can be changed. The file definition name and type cannot be changed
1. Do one of the following:
a. Click Reports > Deposit Account Reporting > Activity
b. Click Reports > Deposit Account Reporting > Balances
d. Click Reports > Deposit Account Reporting > Forecast Balances
2. Click the File Export link.
3. Click the link in the Name column of the file definition you want to change.
4. Click the delete icon ( ) beside the Description heading.
5. Verify that the file export definition is the one you want to delete and then click Delete This Definition.
ACH Reporting
About ACH Reporting
Note: Must be entitled to ACH Services
ACH Reporting allows company users to view returned ACH transactions and Notice of Change (NOC) information in Digital One Business and update their records so future ACH transactions contain correct information. Notices of Change are linked to the ACH templates they affect (when applicable) so company users can apply the changes quickly.
The Manage Alerts page includes two optional alerts to which company users can subscribe to be notified of Notices of Change and returns automatically.
Notice of Change
About
Notices of Change
A Notice of Change is a notice sent from a Receiving Depository Financial Organization (RDFI) to an Originating Depository Financial Organization (ODFI) that informs the ODFI that there is a detail record in an ACH transaction with inaccurate/out-of-date information.
A Notices of Change could be sent for a number of reasons:
• ABA of the bank needs to be updated.
• The account number of the recipient needs to be updated.
• The name of the recipient needs to be updated.
• The account type indicated in the transaction is of the wrong type (checking/savings).
• The individual identification number for the recipient needs to be updated.
• An addenda record was formatted incorrectly or unclear.
• An incorrect SEC code was used for the Outbound International Payment (specific to International ACH Transactions).
A Notice of Change could originate from a one-time or template-based ACH transaction or from a transaction included in an ACH file that has been uploaded to the system.
Note: Template changes are not subject to a prenote delay (if assigned) only if they are made through the Notice of Change page.
If a template has both a Notice of Change and pending changes submitted by a company user, the Notice of Change cannot be applied until the pending template changes have received all required approvals or the changes are canceled.
Company users might be prevented by their financial organization from using or modifying an ACH template until the associated Notices of Change are applied.
In these instances, templates appear with an alert icon ( ) in place of the radio button so they cannot be selected to initiate a transaction.
Pending ACH Transactions
If a template is used to initiate a transaction and then a Notice of Change is received for it, the alert icon appears next to the pending transaction to indicate that it cannot be approved/transmitted.
The alert icon ( ) remains next to the pending transaction even after the Notice of Change is applied to the template because changes to a template are not applied to pending transactions. In this situation company users can only delete the pending transaction and then recreate it.
Scheduled ACH Transactions
If a template is used to schedule transactions and then a Notice of Change is received for it, fully approved transactions have their last approval removed and are moved to the Approve ACH Transactions page upon their send-on dates. Company users can delete the transactions through the Approve ACH Transactions page.
If a Notice of Change is applied to a template before the schedule is transmitted, the changes are applied to the next scheduled transaction and all previously applied approvals are removed.
Search for Notices of Change
1. Click Reports > ACH > Notices of Change. Notices of change received in the last seven days are provided on the Notices of Change page by default.
2. Click the Modify Search link.
3. Complete the following fields:
a. Output To - Screen (HTML), CSV, PDF, or NACHA.
b. Date - Specific Date or Date Range.
4. Click Generate Report.
a. When Screen (HTML) is selected as the Output To option, the correct values appear in bold green font. Templates that can be updated appear as hyperlinks; the chevron icon ( ) can be used to view additional information. Templates that have pending changes appear as read-only and cannot be updated until the pending changes are either approved or canceled. User entitlements determine the templates displayed.
5. If applicable, apply changes to a template by clicking the link in the Templates Impacted column.
Returned ACH Transactions
About Returned ACH Transactions
A returned ACH transaction (or return for short) is an ACH transaction that is received by an RDFI and sent back to the ODFI. A returned ACH transaction contains the reason why it was returned.
View Returned ACH Transactions for the Current Date
1. Click Reports > ACH > Returned ACH Transactions. By default, the Returned ACH Transactions page appears in the screen (HTML) format and includes returns for the current date for all ACH company IDs.
Note: The company user’s ACH service and account entitlements determine the ACH Company IDs that are shown.
Search for Returned ACH Transactions
1. Click Reports > ACH > Returned ACH Transactions.
2. Click the Modify Search link.
3. Complete the following fields:
a. Output To - Screen (HTML), CSV, PDF, or NACHA.
b. Company name/ID - A company user’s ACH service and account entitlements determine the ACH Company IDs that are available for selection. For example, if a company is only entitled to ACH File Upload, then individual ACH Company IDs are not available for selection.
c. Date - Specific Date or Date Range.
4. Click Generate Report.
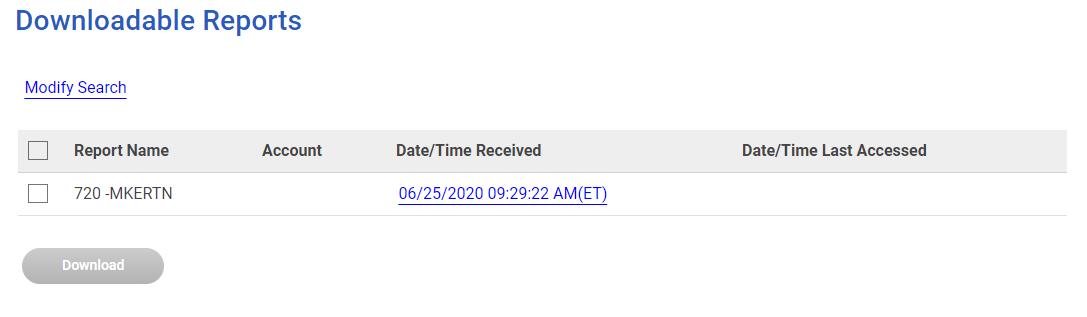
Downloadable Reports
About Downloadable Reports
Downloadable Reports allows company users to view, print, and download files. (EDI Translation – ACH addenda information, most common)
Search for Downloadable Reports
1. Click Reports > Downloadable Reports. All reports that are available for the current date are provided by default.
2. Click the Modify Search link.
3. Complete the following fields:
a. Report Name - List of entitled reports.
b. Date - Previous Business Day, Current Day, or Date Range.
4. Click Submit
5. Do one of the following:
a. Click the check box beside a report and then click Download.
b. Click the link in the Date/Time Received column to view the details.
Investment Reporting
About Investment Reporting
Investment Reporting allows company users to search for and view investment account activity and balances. Search results can be downloaded.
Investment account activity can also be accessed quickly through the Welcome page. When accessed through the Welcome page a default view of the past 30 days of investment activity is provided.
Search Investment Account Activity
1. Click Reports > Investment Accounts
2. Complete the following fields:
a. Report Name - List of entitled reports.
b. Date - Previous Business Day, Current Day, or Date Range.
c. Output To - Screen (HTML), BAI2 file, CSV file, Microsoft Money® file, QIF file, QuickBooks®, or Quicken®.
d. The Microsoft Money® file, QuickBooks®, and Quicken® options may not be available to all company users.
e. Account - List of entitled accounts.
f. Date - Specific Date, Date Range, Previous Business Day , or Since last download (for QuickBooks®).
3. Click Search.
Activity Summary Page Sample
Statements and Documents
About Statements and Documents
Statements and Documents allow company users to view statements and other documents, such as notices, for analysis, checking, credit card, loan, and savings accounts.
When a company is set up with the Statements & Documents service the company’s Administrator is responsible for setting up accounts for online delivery of statements and documents. Company administrators are also responsible for reviewing and accepting service agreements/disclosures relative to statements and documents.
Note: Individually billed credit cards are supported. Statements for corporate credit cards billed to a centralized account are not supported.
The Manage Alerts page includes alerts to which company users can subscribe to be notified automatically when statements and documents are available.
Set up Online Viewing for Statements/Documents
Company administrators are responsible for setting up accounts for online delivery of statements and documents.
1. Click Reports > Statements and Documents.
2. Click the View and maintain document preferences link.
3. Click the Delivery Preference drop-down beside an account and then select one of the following: Online, Online & Paper, Delivery Preference. Online should be used for combined online statements for the primary account.
a. Online & Paper enrolls the account for online statement/document delivery and continues the delivery of the paper statement.
4. Click Continue
5. If applicable, review the service agreement and click I agree to accept it.
6. Click Save Preferences
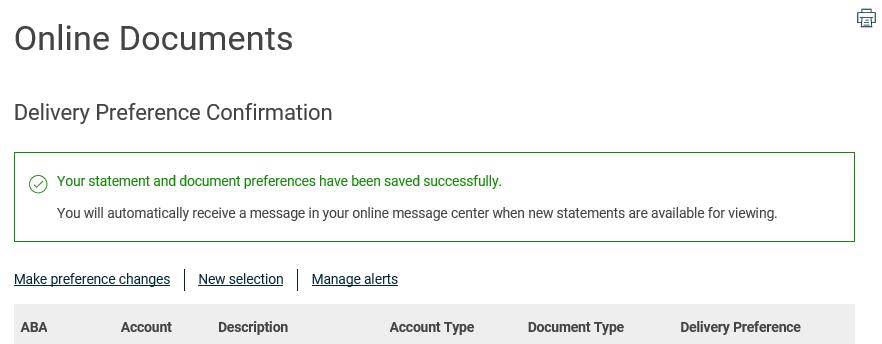
Delivery Preferences Confirmation Page Sample
Remove Online Viewing for Statements/Documents
1. Click Reports > Statements and Documents.
2. Click the View and maintain document preferences link.
3. Click the Delivery Preference drop-down beside the account from which you want to remove online viewing and then select Paper. For combined online statements, select Paper for the primary account.
4. Click Continue.
5. Review the selected accounts as needed and then click Save Preferences.
Search Recent Statements/Documents
Search for the latest statements or documents.
1. Click Reports > Statements and Documents.
2. If more than two accounts are enrolled for online document viewing, select a View option:
a. Most recent documents for an account type: View the latest statements or documents for a specific account type (analysis, checking, credit card, certificate of deposit, loan, or savings). This option does not appear if fewer than two accounts are enrolled.
b. Documents for a specific account: View the statements/documents for a particular account.
3. Do one of the following:
a. If Documents for a specific account was selected:
i. Select a Filter By Account option: All accounts, Checking accounts, Credit card accounts, Savings accounts, or Recently used.
ii. Select an Account
b. If Most recent documents for an account type was selected, select an Account Type: Checking accounts, Credit card accounts, or Savings accounts.
4. If applicable, select a Document Type: Analysis statement, Statement, or Notice.
a. Note: Some of the Document type options may not be available to all company users.
5. Click Continue.
Search Older Statements/Documents
Search for statements/documents received before the last 60 days.
1. Complete the Search Recent Statement/Documents task.
2. Click the Search for older or specific documents link.
3. Fill in or select a Document cycle date and then click Search
Incoming Wire Report
About Incoming Wire Report
The Incoming Wire Report service allows company users to view money that has been wired to their accounts.
The Manage Alerts page includes an optional alert to which company users can subscribe to be notified of incoming wires automatically.
Remittance Information
The inclusion of remittance information with a wire transfer is optional at the discretion of the wire originator. Digital One Business provides access to all remittance information included with incoming wires
• Depending on:
– the wire service vendor and the format in which the remittance information is received, it is displayed on the screen or provided in the CSV file
View Incoming Wires for the Current Date
1. Click Reports > Incoming Wires.
2. Optional - Review the wire details:
a. Select each wire to view.
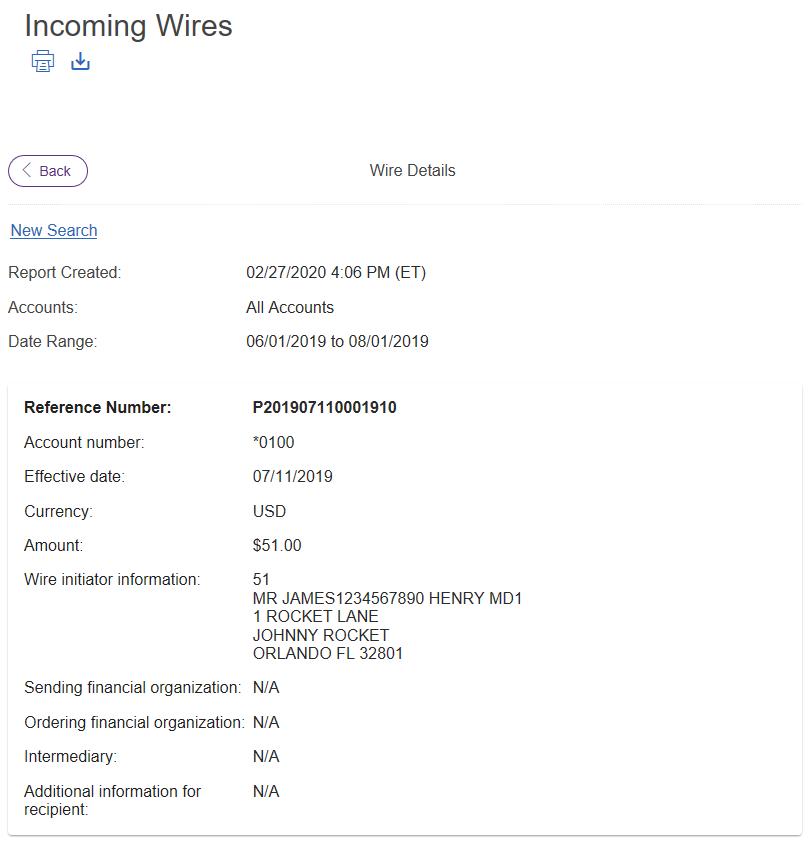
b. Click View Selected. Incoming Wires Detail Page Sample
Search for Incoming Wires
1. Click Reports > Incoming Wires.
2. Click the Modify Search link.
3. Complete the following fields:
a. Output To - Screen (HTML) or CSV file.
b. View - All Accounts, Savings Accounts, or Checking Accounts.
c. Accounts - List of entitled accounts.
d. Date - Specific Date or Date Range.
e. Wire Initiator (Optional) - Search for a specific initiator by typing part of or the entire name. Refine the search by clicking Exact Match .
f. Amount (Optional) - Specific amount or range.
4. Click Search.
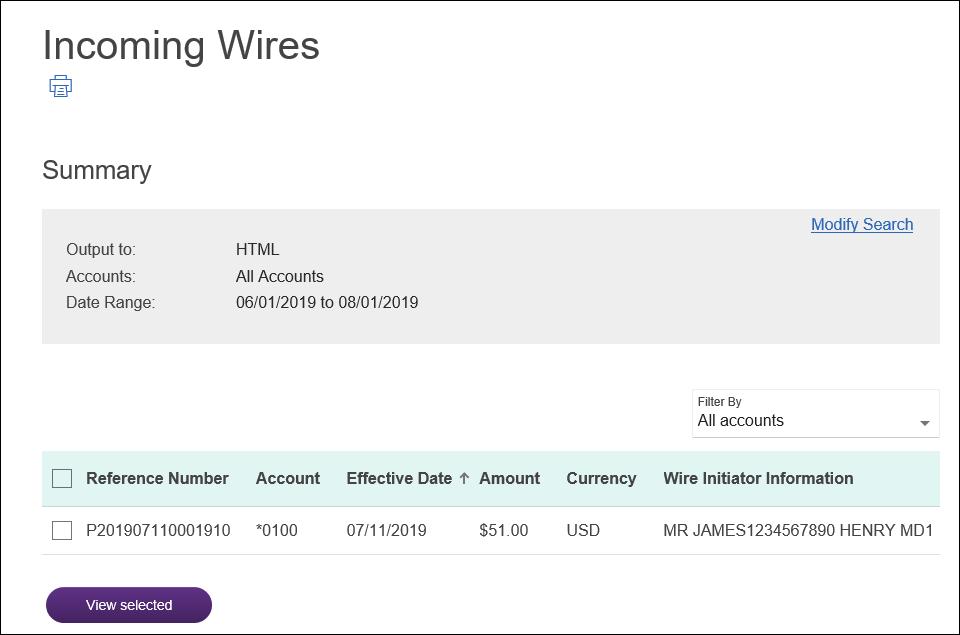
Incoming Wires Page Sample
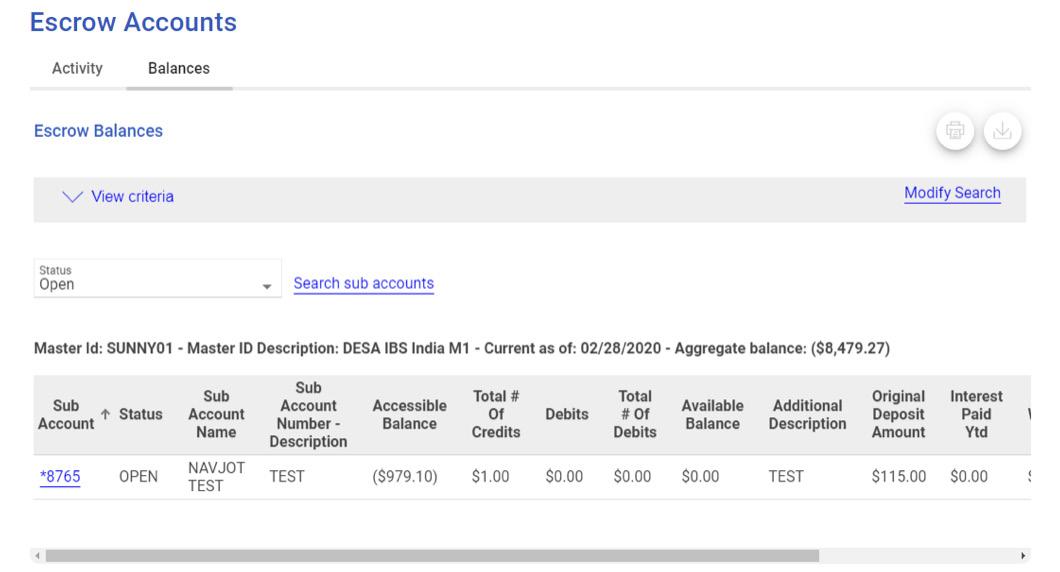
About Escrow Account Reporting
Escrow Account Reporting allows company users to search for and view activity and balances for escrow accounts — subsidiary accounts that have a relationship with one master account.
Escrow account relationships include but are not limited to:
• Landlord and tenants
• Law firms and their clients
• Funeral trusts
• College trusts
Company Administrators can entitle their company users to the main account which automatically entitles the related sub accounts.
Aggregate balance information for entitled escrow accounts is available on the Welcome page.
Search Escrow Account Activity
1. Click Reports > Escrow Accounts > Activity.
2. Complete the following fields:
a. Output To - Screen (HTML), BAI2 file, CSV file, or PDF.
b. Master ID - Entitled master IDs.
c. Sub Account Number - Select (choose from a list of sub accounts).
d. Specific (type the account number in the adjacent text box).
e. Date - Specific Date or Date Range.
f. Transaction Types - All Transactions.
g. Group - All Debits, All Credits, and/or All Checks.
3. Optional - Click the Show advanced options link:
a. Select an Amount: Exact Amount or Range.
b. Select a Check Serial Number: Exact Number or Range.
c. Type a Description.
4. Click Search.
Search for Completed Escrow Transactions
1. Complete the Search Escrow Account Activity task.
2. Click the Search completed transactions link.
3. Complete the following fields:
a. Date - Specific Date or Range.
b. Transaction Types - All Transactions, Transaction Types, or Transaction Codes.
4. Click Search.
Balances
Search Escrow Account Balances
1. Click Reports > Escrow Accounts > Balances.
2. Complete the following fields:
a. Output To - Screen, CSV file, or PDF.
b. Report By - Account or Master ID.
c. Sub Account Number - All Accounts, Select (specific sub account) or Specific (type a specific sub account). Click Exact match on sub account number to refine the search.
d. Status - Open, Closed, or All.
e. Sub Account Name - Search for a specific account by typing part or the whole account name. Click Exact match on sub account name to refine the search.
f. Exact match on sub account description (optional) - Select to refine the search by description.
3. Click Search.
Escrow Balances Page Sample
Note: Some columns displayed on the Escrow Balances page are determined by the financial institution and may differ from those depicted in the page sample.
Loan Reporting
About Loan Reporting
Loan reporting provides company users with loan activity, summary and detailed information about notes and commitments (if applicable).
Loan note and commitment balance information can also be accessed quickly through the Welcome page.
Notes
View a Summary of Loan Notes
1. Click Reports > Loans > Manage Loans
2. Click the chevron icon ( ) to expand the row for one loan account and view its notes or click the Show All Notes link to expand all rows and view all notes at once.
3. Click the link in the Account Number/Note ID column or click the more actions icon ( ) and select Loan Summary - Commitments
Notes Summary Page Sample
Commitments
View a Summary of Loan Commitments
1. Click Reports > Loans > Manage Loans.
2. Click the chevron icon ( ) to expand the row for one loan account and view its notes or click the Show All Notes link to expand all rows and view all notes at once.
3. Click the link in the Commitment ID column or click the more actions icon ( ) and select Loan Summary - Commitments.
Commitments Summary Page Sample
Activity
Search Loan Account Activity
View transactions initiated in Digital One Business and those initiated externally (for example, teller window or mailed-in payment) for a selected note.
1. Click Reports > Loans > Manage Loans
2. Click the chevron icon ( ) to expand the row for one loan account and view its notes or click the Show All Notes link to expand all rows and view all notes at once.
3. Click the more actions icon ( ) and select Loan Activity - Report. Activity for the past 90 days is shown by default.
4. Optional: Change the default date range to view other activity:
a. Click the Edit Date Range link.
b. Select a Date: Specific Date, Date Range, Previous Business Day, or Do not limit by date range.
c. Click Save Loan Activity Page Sample
Search Loan Account Note Balances
1. Click Reports > Loans > Balances.
2. Complete the following fields:
a. Output To - Screen (HTML), CSV file, PDF
b. View - Select Available Notes.
c. Accounts - List of entitled accounts.
d. Date - Specific Date, Date Range, or Previous Business Day.
3. Optional: Click Display totals by day for the selected date range.
4. Click Generate Report.
Note Balances Page Sample
Search Loan Account Commitment Balances
1. Click Reports > Loans > Balances.
2. Complete the following fields:
a. Output To - Screen (HTML), CSV file, PDF
b. View - Select Available Notes.
c. Accounts - List of entitled accounts.
d. Date - Specific Date, Date Range, or Previous Business Day.
3. Optional: Click Display totals by day for the selected date range.
4. Click Generate Report
Commitment Balances Page Sample
Enhanced Treasury Service Considerations - Customized Dashboard - Dash Board (Optional – must be entitled in BST)
The Dashboard page appears upon a company user’s successful sign on and provides company users with information from various pages in small moveable windows called panels. Company users select the panels appearing on the Dashboard. A company user’s role and entitlements determine the panels they can choose from. The user customizes the Dashboard to include panels that provide relevant information on the Welcome page
1
2
Important Account Balances Displays account and current balance information for entitled accounts. Users choose which accounts are displayed. This panel is optional and can be added multiple times.
Balance Snapshot Displays account and historical balance information for entitled accounts. Users choose which accounts are displayed. This panel is optional and can be added multiple times.
Recent Transactions Displays the most recent 25 transactions for the account selected by the user, within the last 30 days. Users choose which account is displayed. This panel is optional and can be added multiple times.
Transfers & Payments Approval Displays all transaction types that the user is entitled to approve. Two views are available: My Approvals, which shows items that the user has not yet approved, and All Approvals, which shows all items that a user is entitled to approve, both those that the user has already approved, and those not yet approved.
Templates Approval Displays all ACH, Wire, and Multiple Account Transfer templates that the user is entitled to approve. Two views are available: My Approvals, which shows items that the user has not yet approved, and All Approvals, which shows all items that auser is entitled to approve, both those that the user has already approved, and those not yet approved.
User Profiles Approval Displays all user profiles that have been added, edited, or deleted that the user is entitled to approve. Two views are available: My Approvals, which shows user profiles that the user has not yet approved, and All Approvals, which shows all user profiles that a user is entitled to approve, both those that the user has already approved, and those not yet approved.
Next Scheduled Requests Displays transactions that the user is entitled that are scheduled to be sent at a future date.
Issues & Issue File Approval Displays check issue and check issue flies, added, edited, or deleted that the user is entitled to approve. Two views are available: My Approvals, which shows issues and issue files that the user has not yet approved, and All Approvals, which shows all issue and issue files that a user is entitled to approve, both those that the user has already approved, and those not yet approved.
Exception Decisions Displays check exceptions and decisions that the user is entitled to approve. Two views are available: My Approvals, which shows exceptions and decisions that the user has not yet approved, and All Approvals, Which shows all exceptions and decisions that a user is entitled to approve, both those that the user has already approved, and those not yet approved.
Other Account Balances (Not shown) Displays account and balance information for entitled Escrow Accounts, Credit Card Rewards points, and Brokerage balance information.
Provides the balance for up to seven accounts per account type.
Balance Snapshot
Recent Transactions
Provides balances for a specific date in the past for entitled checking, saving, certificate of deposit (CD), and investment accounts. Over
Provides the most recent 25 specific transactions for the last 30 calendar days for an entitled checking, savings, or credit card account.
Information Reporting, Loan, Credit Card
Information Reporting, Loan, Credit Card
Information Reporting, Loan, Credit Card
User Profiles Approval
Provides payment and transfer requests with outstanding approvals for the following services:
ACH Payments and Collections
ACH File Upload
Wires
Credit Card Payments
Loan Payments
Loan Advance
External Transfers
Internal Transfers
Multiple Account Transfers
Escrow Transfers
Provides template requests with outstanding approvals for the following services:
ACH Payments and Collections
Wires
Multiple Account Transfer
Provides all added, edited or deleted user profiles with outstanding approvals. Next Scheduled Requests
Provides transactions that the user is entitled that are schedule to be sent at a future date.
Issues and Issue Files Approval
Provides all check issues and issue files a company user is entitled to approve. A company user can choose to view only check issues and issue files they have not approved.
Provides check ACH exceptions that require approval or a decision.
Provices accound balance information for entitled escrow accounts, credit card rewards points, and brokerage accounts.
Any Money movement service, Approval
Any Money movement service, Approval
Positive Pay/Full Account Recon and Approval role.
Dashboard Panel Catalog
About the Important Account Balances Panel (Internal)
Overview
Users can stay on top of their account balances with the Important Account Balances panel.
• If you already use the Business Service Tool’s Welcome Page Configuration page to show a company’s available balance information, that company’s users can select Available Balance to view that information.
Selecting Important Accounts
Users define what accounts are important to them by selecting Edit accounts displayed
• The Edit Accounts Displayed window includes tabs listing all the user’s entitled accounts for each account type.
• The user checks the box for up to seven accounts per account type. The Select All Accounts box will also display at the top of the list if the number of accounts does not exceed seven.
Adding Multiple Panels
• If a user has more than seven accounts for a particular account type:
– They can add one or more Important Account Balances panels to the Dashboard.
• The user can add over 100 copies of this panel to the dashboard so company users can view all entitled accounts if desired.
Accessing More Detail
• The user can select Available Balance for quick access to more detail.
Important Account Balances Panel Sample
Users can also sort the account lists by dragging and dropping the widgets from the Order Accounts list on the right. If multiple account types belong to this account, choose the tabs across the top to include or remove an account from the panel.
Once accounts are added to the Important Account Balances panel, they are grouped by type and initially appear in the following order:
• Checking
• Savings
• CD Accounts
• Investment Accounts
• Loans
• Credit Card Accounts
About the Balance Snapshot Panel Overview
Users can add the Balance Snapshot panel to view balances for a specific date in the past for entitled accounts, including:
• Checking
• Savings
• Certificate of Deposit (CD)
• Investment
• Loan
Setting Up the Panel
1. User selects the account they want to view.
2. Click Edit Accounts and Dates Displayed to open the edit screen.
The Balance Snapshot
Edit window includes tabs listing all the user’s entitled accounts for each account type. The user checks the box for each account to track. If preferred, choose Select All Accounts
Users can also sort the account lists by dragging and dropping the widgets from the Order Accounts list on the right. If multiple account types belong to this account, choose tabs across the top to select or remove an account from the panel.
Display Order & Grouping
Once added, accounts appear grouped by type in the following order:
• Checking
• Savings
• Certificate of Deposit
• Investment
• Loan
– If no data exists for a category, that category’s heading is not shown on the panel.
Displayed Balance Types by Account
• Checking, Savings, CD: Ledger balance
• Investment: Ending balance
• Loan: Sum of balances for the loan’s notes
About the Recent Transactions Panel
• Recent Transactions Panel Overview
The Recent Transactions panel allows company users to view 25 transactions from the last 30 calendar days for an entitled checking, savings, or credit card account.
– Company users choose which account is displayed.
– This panel can be added to the Dashboard multiple times.
• Account Support & Multiple Panels
– The Recent Transactions panel supports one account type at a time.
– Company users can add multiple copies of the panel to:
1. View transactions for different accounts.
2. View different transaction types for the same account
• When More Than 25 Transactions Exist
– If there are more than 25 transactions in the last 30 days for the selected transaction type:
1. A message appears with a hyperlink that allows company users to go to a page to view them
• Additional Account Details
– Drop-down arrows next to the account type heading give users access to pages with more detailed information
About the Transfers & Payments Approval Panel
Company users responsible for reviewing payment and transfer requests can add this panel to view and act on transfers and payments pending approval for the following services:
• ACH Payments and Collections
• ACH File Upload
• Wires
• Credit Card Payments
• Loan Payments
• Loan Advances
• External Transfers
• Internal Transfers
• Multiple Account Transfers
Buttons at the top of the panel allow a company user to view only those transactions requiring their approval or all transactions requiring approvals. Click any of the transactions to take the appropriate action on the request. If there are no transactions pending approval for a particular service, the following message appears:
There are no exceptions waiting for approval.
About the Templates Approval Panel
Company users responsible for reviewing templates can add this panel to view and act on templates pending approval for the following services:
• ACH Payments and Collections
• Wires
• Multiple Account Transfers
Buttons at the top of the panel allow a company user to view only those templates requiring their approval or all templates requiring approvals. Click any of the items to take the appropriate action on the request.
About the User Profiles Approval Panel
Company users tasked with the responsibility of approving new system users and changes to existing user profiles can add this panel to view and act on all user profiles pending approval. The user can select the profile to go to associated pages where they can take the appropriate action. Buttons at the top of the panel allow a company user to view only those profiles requiring their approval or all profiles requiring approvals. If no profiles are pending approval, the following message appears:
“There are no profiles waiting for approval.”
About the Next Scheduled Requests Panel
Company users can add this panel to view their scheduled requests. Only requests that the user is entitled to view or approve are shown. This panel automatically expands to support viewing of unlimited requests without the need of a scroll bar.
1. Select any item to open the appropriate page for action.
About the Issues & Issue File Approval Panel
Company users responsible for reviewing check issues can add the Issues & Issue Files Approval panel to view and act on all entitled check issues and issue files that are pending approval
Buttons at the top of the panel allow a company user to view only those issues and files requiring their approval or all issues and files requiring approvals
Select any item to open the appropriate page for action.
1. If the user has no check issues or issue files to approve, the following message appears: a. “There are no issues or issue files waiting for approval.”
About the Exceptions Decision Panel
Company users responsible for reviewing check and ACH exceptions can add the Exceptions Decision panel to view and act on them. Buttons at the top of the panel allow a company user to view only those decisions requiring their approval or all decisions requiring approvals. Select any item to open the appropriate page for action.
1. If more than 20 check issues require approval or a decision, the following message appears: a. “More than 20 exceptions to display. To view exceptions, go to Exceptions Manager.”
2. If the user has no check exceptions that require a decision or approval, the following message appears:
a. “There are no exceptions waiting for your approval.”
About the Other Account Balances Panel
The Other Account Balances panel allows company users to view and access balances of entitled accounts of various types, such as escrow accounts, credit card rewards accounts, brokerage, or aggregating accounts.
Adding Panels to the Dashboard
1. Select Display Options The Dashboard Preference page provides a sample of each panel available to the user based on their roles and entitlements.
2. Select + to add a panel to the list.
Moving Panels to the Dashboard
1. Select Display Options to open the Dashboard Preference page.
2. Select a panel’s title and drag the panel to the desired location.
The mouse pointer changes to the move icon, indicating the panel can be moved. A dotted outline appears on the page, indicating the location to which the panel can be moved.