Installation Guide
Pre-installation
Check-list
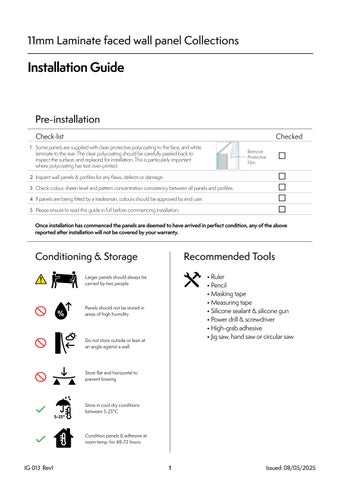
1 Some panels are supplied with clear protective polycoating to the face, and white laminate to the rear. The clear polycoating should be carefully peeled back to inspect the surface, and replaced for installation. This is particularly important where polycoating has text over-printed.
2 Inspect wall panels & profiles for any flaws, defects or damage.

Checked
4 If panels are being fitted by a tradesman, colours should be approved by end user.
5 Please ensure to read this guide in full before commencing installation.
Conditioning & Storage
Larger panels should always be carried by two people
Panels should not be stored in areas of high humidity
Do not store outside or lean at an angle against a wall
Store flat and horizontal to prevent bowing
Store in cool dry conditions between 5-25°C
Condition panels & adhesive at room temp. for 48-72 hours


3 Check colour, sheen level and pattern concentration consistency between all panels and profiles.
Remove Protective Film
Once installation has commenced the panels are deemed to have arrived in perfect condition, any of the above reported after installation will not be covered by your warranty.
Recommended Tools
• Ruler
• Pencil
• Masking tape
• Measuring tape
• Silicone sealant & silicone gun
• Power drill & screwdriver
• High-grab adhesive
• Jig saw, hand saw or circular saw
Wall Preparation, Handling and Cutting
Handling
Wall Preparation
• Protective eye-wear should be worn when cutting panels.
• Gloves should be worn at all times when handling panels.
Panels can be fixed to most surfaces including tiles, concrete, plaster, plasterboard, and chipboard/plywood walls providing they are sound.
Timber grounds should be applied over poor surfaces, set approximately at 60cm vertically and 80cm horizontally as appropriate.
These should be skimmed or packed off the wall as required to ensure they are all true and plumb. If timber grounds are installed they should be checked to ensure that they are true and flat before installing wall panels.
Cutting
Decor down
Jigsaw or Circular saw
When using an upward cutting blade (jigsaw) or a circular saw, panels should be cut face down to avoid chipping.
To ensure your bathroom wall panels are properly bonded, ensure all surfaces to which adhesive will be applied are clean and dry.
Decor up
Handsaw
When using a fine-tooth blade handsaw, panels should be cut decorative face up.
When measuring distance from walls, or passed shower enclosures, allowances should be made for the thickness of aluminium profiles and the space between walls and profiles.
Profiles: reminder
Sealing Panels and Profiles
To protect the validity of our warranty, all panels must be installed and properly sealed using the recommended adhesive and sealant throughout the installation. Panels must also ALWAYS be silicone sealed at the base, whether using the recommended seal kit, with or without extrusions. Inadequate sealing will invalidate your warranty. If the seal starts to deteriorate, it must be re-sealed immediately, and not allow moisture to penetrate joints or junctions. To ensure the best installation, we suggest using the recommended profiles.


The first profile, which normally starts with an Internal Corner or End Cap, should be fixed to the wall or end grounds with countersunk screws, or adhesive and a bead of silicone sealant applied to the channel.

1 2 3 4

Apply silicone to the inside of the first profile.
Alternatively, you can apply adhesive directly to the wall or timber framework.
Fixing Tongue and Groove Panels
Apply high grab adhesive to the reverse of the panel angle into the first profile and push firmly against the wall.
Prior to installation, it is strongly recommended that tongue and groove panels are conditioned in the room (or similar environment) where they will be installed for 48-72 hours. This is particularly important in cold conditions. Tongue and groove panels should be dry jointed prior to final installation to ensure a sufficiently flush and tight joint will be achieved between all panels. Tongue and groove panels MUST be silicone sealed at all vertical joints, as well as at all extrusions, joints and at the bottom of the panel.
Tongue and groove panels can be screw-fixed or bonded to the wall with high-grab adhesive. Screws should be at 400 – 600mm centres with the top and bottom screws a maximum of 35mm from the top or bottom edge of the panel.
When manufacturing tongue and groove joints, 18mm is lost from the original panel width – please allow for this when calculating panel requirements, e.g.
- 2400x598mm = 2400x580mm finished face size.
- 2400x1200mm = 2400x1182mm finished face size.
Fixing Tongue and Groove Panels
Groove
Tongue
Tongue and groove panels are supplied as standard with a tongued long edge and a grooved long edge. When fitting panels into an extrusion, the protruding tongued or grooved edge should be cut off.

Fix through the back flange of the grooved edge with countersunk screws - the screw head should fit into the recess on the back of the tongue. Ensure that screws are turned until they are just under the flush to prevent any obstruction to the tongue of the next panel to be fitted.

1 3 5 2 4 6

Bond the first panel to the wall or frame, with the grooved edge first. If screw fixing panels to the wall/frame, pilot bore the recess in the groove where screws are to be located. (Failure to pilot bore may result in the panel’s joint splitting). Pack between back of panel and wall as necessary to avoid distortion to the tongue and groove joint when screw fixing and to ensure that it is true and plumb.

Apply a narrow bead (2-3mm) of silicone sealant to the front shoulder of the tongue.
Note: Using too much silicone sealant will affect the tightness of the tongue and groove joint. Using too little may affect watertightness.

Starting at approximately 45°, angle the tongue of the next panel into the groove of the fixed panel. Ensure the tongue is fully inserted into the groove before snapping it back to the wall, otherwise it may damage the joint.
Ensure any excess silicone sealant is wiped from the laminate face immediately.
Shower Trays and Baths
Seal Kit
Wet Areas


Window Detail
The Seal Kit is an all-in-one kit for sealing the bottom edge of the panels at a shower tray or bath. See separate installation guide.
Alternatively you can fit the panels with a 3mm gap between the bottom edge of the panel and the shower tray or baths, sealing the gap with silicone sealant.
We offer two profile options for transitioning from wall panel to floor in wet areas. The aluminium Type X Base Profile allows floor covering material to extend approx. 100mm behind panels, screw-fixing it into the wall/frame and applying silicone sealant to the base and back of profile.
The white PVC Type 103 floor to wall profile provides a neat finish for vinyl floor and wall fittings, allowing vinyl floor changes without any panel replacement. The ridge spacer provides a gap for silicone sealant and the vinyl flooring can be fixed securely under the flap at the base of the trim.

Fitting Valves and Controls

At windowsills, or for niche shelving, either the Type C End Cap or Type 102 Angle Profile can be used, and mitred at corners.
When cutting apertures or drilling into the panels, a 2mm clearance gap should be left around all edges, and sealed with silicone sealant.
Adhesives and Sealants
Panel adhesive and sealant are available to order from your distributor or local showroom.
Aftercare
Once installed, your panel requires minimal maintenance. The panels should be cleaned with warm water and a non-abrasive mild detergent. Scouring products or similar products should not be used, doing so may invalidate your warranty.
11mm Wall Panels
Standard Installations
Corner Installation Detail
High Grab Adhesive
Silicone Panel Internal Corner End Cap
Note: Do not overfill the profiles with silicone as this can make it difficult to push the panel into the profile, a suitable bead should be used to create a seal.
Installation Guide
Push panel into internal corner and press against wall firmly, clean any excess silicone from corner.
Recess Installation Detail
Fit Internal Corner in corner (either glued or screw fixed). Fill one side of Type A internal corner with bead of silicone ready for panel.
Spread high grab adhesive on back of panel. Fit end cap on panel with silicone, cleaning excess off decorative face side.
Fit Internal Corner in corner (either glued or screw fixed). Silicone one side of Type A internal corner with bead of silicone ready for panel.
Silicone other side of internal corner with silicone ready panel. Repeat steps 2 & 3.
Panels are now ready for shower cubicle to be fitted if required. Please fix through panel into wall behind for secure fixing.
Silicone other side of internal corner with silicone ready panel. Repeat steps 2 & 3, fitting an end cap if required.
Spread high grab adhesive on back of panel. Fit internal corner on panel with silicone, cleaning excess off decorative face side.
Push panel into internal corner and press against wall firmly, clean any excess silicone from corner.
Again repeat steps 2 & 3, fitting an end cap if required.
Panels now ready for cubicle door to be fitted if required. Please fix through panel into wall behind for secure fixing.
1. Starting at the side of the doorway working clockwise away from the doorway.
2. Silicone to top of doorway only then continue the installation round the room as seen in steps 3 to 8.