INSTRUCTOR MANUAL – USING ALLY IN BLACKBOARD ULTRA
Prepared for: Instructor at University of Arkansas Fort Smith – UAFS
Prepared by: Instructional Support at UAFS
Date: 2/13/2026
Version: 3.0
Platform: Blackboard Ultra
Focus: Ally report for accessibility compliance assistance
INTRODUCTION
To understand how Anthology Ally works, we first need to come to grips with two concepts: Universal Design for Learning (UDL) and Accessibility.
UNIT 1 – UNIVERSAL DESIGN FOR LEARNING (UDL) AND ACCESSIBILITY
OVERVIEW OF UNIVERSAL DESIGN FOR LEARNING (UDL) AND ACCESSIBILITY
These two concepts are related but are not the same. Universal Design for Learning, or UDL is a conceptual framework that emphasizes flexible design to address the variety of needs that learners have. The goal is to make the learning process useable by all people to the greatest extent. In addition to accessibility issues, examples include providing content and interactions in various forms to accommodate the different ways students learn, responding to the needs of gifted learners, improving materials for users who speak English as a second language, and developing learning content that facilitates individualized experiences. UDL Guidelines
In other words, UDL is designed to expand and improve learning experience for all, while also addressing key needs such as accessibility. Accessibility refers to providing content that learners with disabilities can use on their own. This includes, but is not limited to, things like providing closed captions in videos for students with hearing impairments or providing alternative descriptions for images for learners with visual disabilities. Accessibility is mandated under the law, specifically the Americans with Disabilities Act (or ADA)
and Section 508 of the Rehabilitation Act. A lack of compliance can result in legal action to remediate the content in question (as has happened at Harvard, MIT, and the University of California at Berkeley). The University of Arkansas System takes a proactive approach to these issues.
GOALS AND BENEFITS OF UDL AND ACCESSIBILITY
The primary goal of Universal Design for Learning about accessibility is to provide maximum usability and access to all learners so that they may participate, regardless of disability.
However, while addressing this goal, UDL and designing for accessibility also produce a variety of other benefits, including:
• The course content is presented logically and consistently.
• The use of higher ratios of contrast between colors improves readability.
• Closed Captions provides several benefits:
o Improved comprehension for all users who use the captions.
o Students who speak English as a second language can review the text.
o Students can see the spelling of technical terms.
o Captions allow the content to be searchable.
In other words, designing courses in this way has a broad effect on improving the experience and resources for all learners.
WEB CONTENT ACCESSIBILITY GUIDELINES (WCAG)
The Web Accessibility Initiative of the World Wide Web Consortium (W3C) have published accessibility standards for the Web. These standards are used by numerous countries, including the United States, as a measure of online accessibility. These guidelines address four principles:
1. Perceivable – Information and user interface components must be presentable to users in ways they can perceive.
2. Operable – User interface components and navigation must be operable.
3. Understandable – Information and the operation of the user interface must be understandable.
4. Robust – Content must be robust enough that it can be interpreted reliably by a wide variety of user agents, including assistive technologies. These standards are in three tiers or levels of compliance: A, AA, and AAA. The full current standard is WCAG 2.2. However, the federal government currently only requires that institutions meet the WCAG 2.1 AA standards.
UNIT 2 – ANTHOLOGY ALLY
INTRODUCTION TO BLACKBOARD ALLY
Ally is a tool designed to help faculty make their content more universally accessible and to provide a consistent experience across the system. It does this by scanning and analyzing online course content for accessibility. It is integrated with Blackboard Learn to provide maximum access and ease of use. Ally uses machine learning and algorithms to determine how accessible individual content is, based on the WCAG 2.2 AA standards. It then scores the content, assigning each eligible item with a percentage score represented by a color-coded indicator next to the item.
Ally also creates alternative versions of content, designed to improve accessibility and address the needs of individual students. Students have access to this content directly from the location of the original version of the content. Ally also provides guidance and feedback to instructors, showing how to address the accessibility issues in the content. Finally, Ally provides institutional reports to the university administration and course reports to instructors, showing accessibility issues in courses and the progress being made on accessibility.
CONTENT SUPPORTED BY ALLY
Ally supports the analysis and scoring of certain common file types:
PDF
Microsoft Word
Microsoft PowerPoint
• Open Office/Office Libre
• Image files (JPG, JPEG, GIF, PNG, BPM, TIFF)
• Uploaded HTML files
• WYSIWYG/VTBE content - This is content created with the Content Editor.
• YouTube videos embedded in Content Editor content.
Accessibility indicators for each file will appear in both the Course Content areas and the Content Collection. To view the full Accessibility Report, click Books and Tools -View course & institution tools link in the Details & Actions menu. Ally provides alternative versions of files for the following content types:
• PDF (custom encoded fonts are not supported)
• Microsoft Word
• Microsoft PowerPoint
• Open Office/Office Libre
• Uploaded HTML files
Note: Ally can generate alternative formats from these files.
HOW ALLY WORKS
Ally begins to work when an instructor deploys a file or creates content in the Course Content areas. Ally will not analyze a file until you have linked it to the course content or (for image files) uploaded it to the Content Collection. Once you have added the file to the content areas, Ally analyzes the file, using an automated accessibility checklist based on the WCAG 2.2 AA standards. Ally also uses machine-learning algorithms as a part of this process. This process can take several minutes to complete.
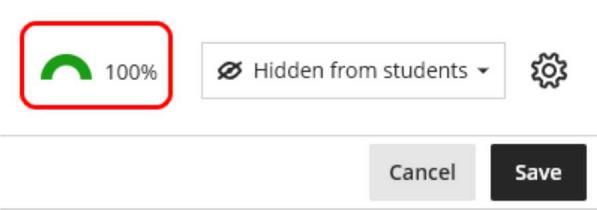
The analysis process generates a percentage score that indicates how accessible the content is. Ally places a gauge score indicator icon next to each file.
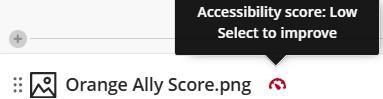
Ally indicators are color-coded:
Red – A score of 0-33% - Content needs immediate attention.
Orange – A score of 34-66% - Content needs further attention.
Green – A score of 67-99% - Content is good, but further improvements are possible.
Dark Green – A score of 100% - Content is fully accessible, and no improvement is required.
Click the indicator to view the following:
• A preview of the file, if available.
• The exact percentage score for the content.
• A button linking to a page listing all accessibility issues for the content.
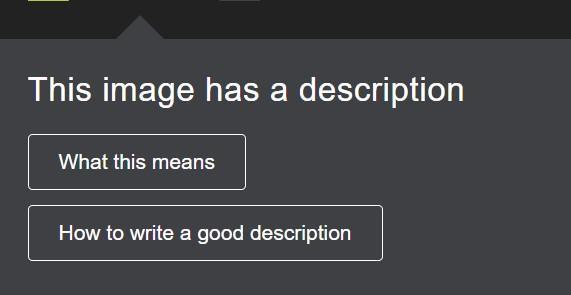
• The primary accessibility issue for the content is important.
• A “What this means” with an explanation of the accessibility issue.
• A button to the suggested solutions to solve the issue.
• An upload box and browse button for uploading updated versions of the file where the accessibility issue is resolved.
• A link to All issues for that specific file.
Indicators (Gauge type) appear next to the title of the content.
A different type of indicator (Half pie chart) appears next to the title of the content when it is in previewing or editing mode.
The indicators are only visible to instructors, course builders, and other roles that can build content. Students and guests cannot see them.
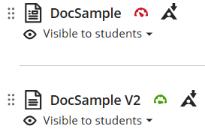
ALTERNATIVE FORMATS
Ally can also create different downloadable alternative versions of the file:
• OCR version - Ally uses Optical Character Recognition to convert a scanned PDF to a text version.
• ePub - An e-book version of the file that can be read on e-readers, tablets, and smartphones.
• Electronic Braille - A file read using an electronic Braille display. (“UA-PTC Blackboard Training Manual”)
• Audio - An MP3 file that users can listen to on electronic devices.
• BeeLine Reader - An enhanced HTML version of the file to improve reading. Users can read the file in different color configurations.
• Immersive reader - Add reading comprehension and grammar skills.
• Mobile-friendly HTML - A Web page that can be readily viewed and read on a mobile device.
• Tagged PDF - A PDF file with accessibility tags added.
• Translated Version - Machine translated version of the document. The files offer students alternatives that may be more accessible than the current file. However, the alternative versions will not be fully accessible until you resolve all the issues with the original file. Both instructors and students can access these alternative files.
To access Ally alternative format features:
1. Click on the Alternative format icon.
2. Select the file version you want and click Download. Not all alternative versions may be available for all types of files.
3. Ally will generate an alternative version. When prompted, choose the location to save the new file format, then click Save.
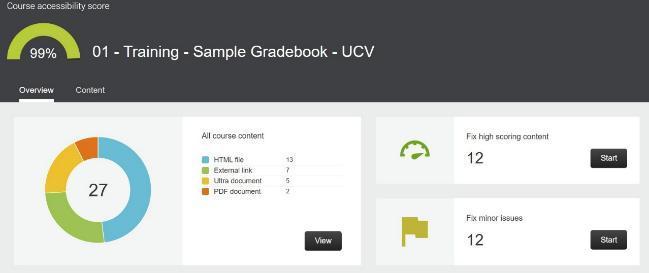
COURSE ACCESSIBILITY REPORT
Instructors can get a view of the overall accessibility of their course, using the Course Accessibility Report. From the Details & Actions menu.
1. Click View course & Institution tools.
2. Click Accessibility Report.
SAMPLE OF AN ALLY REPORT.
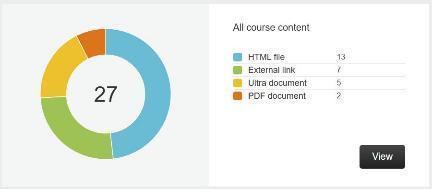
The Ally Accessibility Report has several parts: The overall score – The score for the entire course at the top.
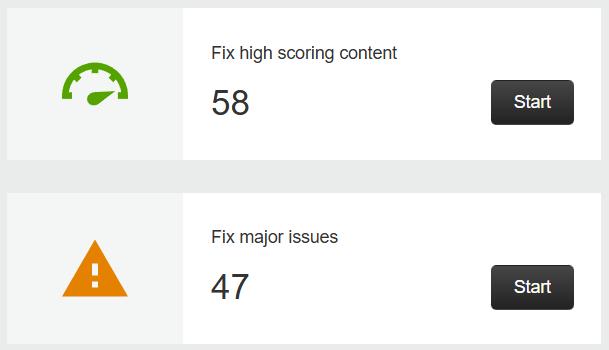
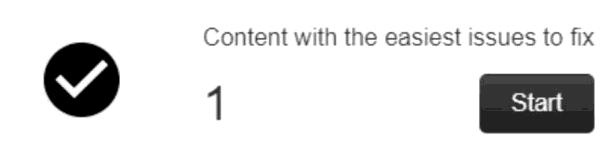
The Overview tab contains the following sections:
• A breakdown of all course content, by type.
• A section that groups the items in distinct categories from minor to major issues.
ISSUE CATEGORIES
(GROUPED BY SEVERITY IN ALLY)
Minor Issues: Accessibility issues with minimal impact on the user experience.
Easy to Fix: Common issues with clear, guided steps provided by Ally.
High Scoring Content with Minor Issues: Files that already have a high accessibility score but are missing a few attributes.
Low Scoring Content - Requires Multiple Fixes: Files with significant accessibility barriers need several types of changes.
Major Issues: Severe accessibility problems significantly impact usability. These often require extensive content revision or replacement (e.g., scanned PDFs without OCR scanning and corrections, videos without captions).
To see the list of issues in that category:
1. Click the Start button for the issue category.
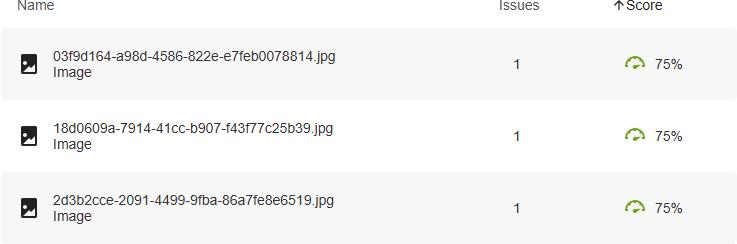
This opens the full list of files for that category, listing the file name, type of file, the number of issues related to that file, and the file Ally score.
2. Click a file from the list to go to that file details page.
FILE DETAILS PAGE
This page displays a screenshot of the file, the Ally score for the file, the All issues link, the current issue, guidance for this specific issue (if available), the drop/upload file section, and a Help link.
The last part of the Overview report is the list of remaining issues. This lists the specific accessibility issues in the course and the number of files with the issue.
This part may serve as a to-do list to assist with locating and solving each accessibility issue.
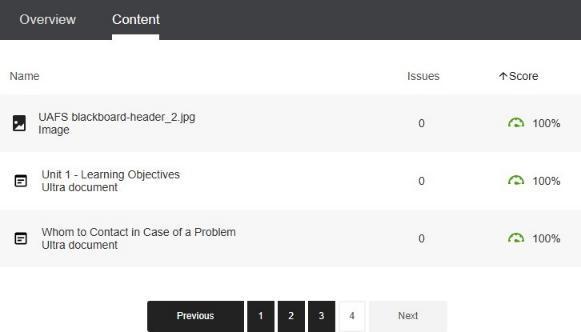
The Content tab contains a multipage list of all scored content in the course shell. You can sort the list by name, number of issues, or score.
1. Click the page numbers, Next, or Previous buttons to navigate to the multipage list.
UNIT 3 – COMMON ACCESSIBILITY ISSUES AND HOW TO FIX
THEM
COMMON ACCESSIBILITY ISSUES
Ally provides feedback on most of the accessibility issues it finds. What follows are a few common accessibility issues we want to address in this manual, to assist you further in making your course content universally accessible. The best way to provide fully accessible content is to design your content with accessibility in mind. As you review the issues below, keep in mind how you can use these solutions to build your content, so it is universal and accessible from the start.
Some of the goals you should set for your content include:
Captions: Always use the auto-captioning tool in your video clip; this feature adds closed captions to your video clips. Panopto supports auto-captioning, but you need to make sure the auto-generated content is accurate.
Document Structure: Always set up documents with proper headings: Use Heading 1, Heading 2, etc. in Word. When you save the file as PDF or HTML, these heading styles remain as tags to your PDF file (Tagged PDF).
Templates: Use templates in PowerPoint. Use a different title for each slide. Make sure to add an identifier, subtitle, or number for the continuous sections, to avoid repeating the slide titles. Repeated titles without describing them as part of a sequence can be confusing to the readers.
Alt Text: Always add Alt Text (Alternative text) for images in your documents. This text describes the image for students who cannot see it.
Table Headers: Always make sure tables have a header row and identify this in the table properties in Word and PowerPoint.
Document Title: Always provide your documents with a title (property). Note that there are different document features that are tagged as titles. This one is a property of the Word document, and the other is the first line of text styled as title in the document textual content.
Tag PDFs: Make sure all PDF files have tags (See “Untagged PDF Files”).
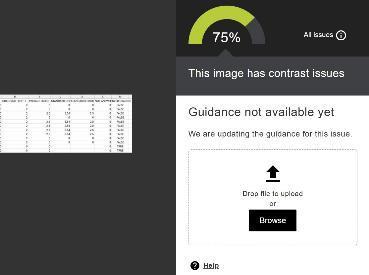
Contrast: Make sure there is a good contrast ratio between the text (foreground) and background colors.
Descriptive List Items: Create lists with descriptive text.
The following sections describe how to correct problems with accessibility and provide an idea on how to achieve most of the goals above. Remember that Ally provides feedback on most of these issues.
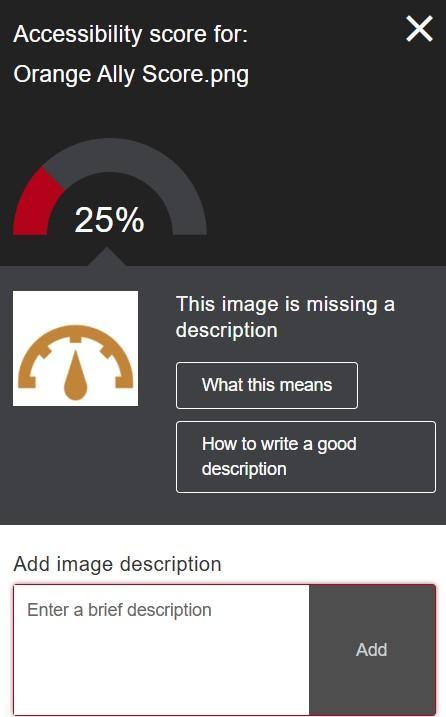
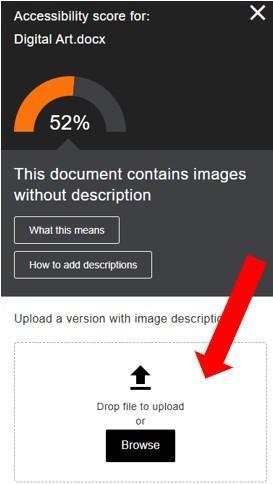
HOW TO CORRECT AN ACCESSIBILITY ISSUE IN ALLY
Once Ally identifies the accessibility issues with a file in Blackboard, instructors will need to correct those issues and update the file in their course.
To correct and update a file with accessibility issues:
1. Click the Ally indicator icon, next to the file.
2. Check the accessibility score details for the file. Note the empty Description field at the bottom.
The lower the score the more numerous or serious the issues. Ally will display the primary accessibility issue. (Other issues can be found by clicking the All issues link.)
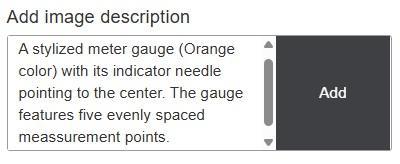
In this sample the issue is related to the lack of alternative text, and for that reason it offers the option How to write a good description.
3. Click the How to Write a good description button.
Ally will walk you through the process of fixing the issue, step by step. Follow the instructions, see the various examples to create a good description.
4. Type the image description and click Add.
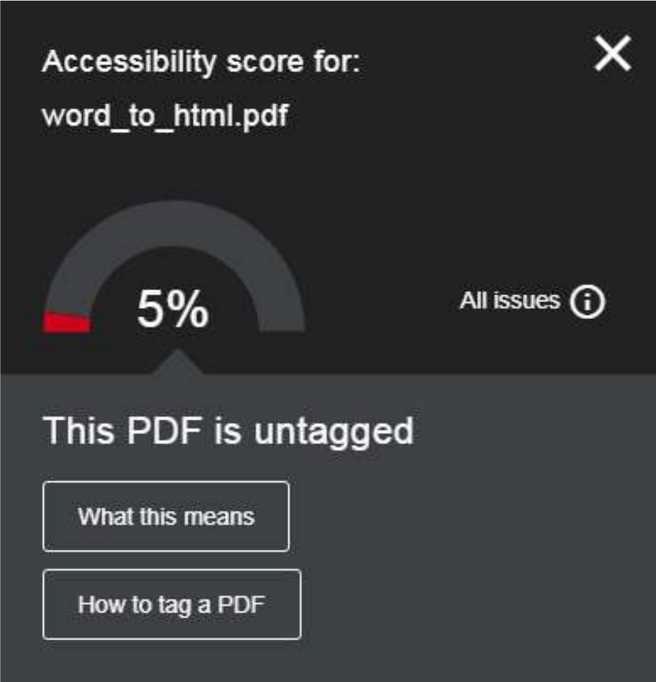
To correct an untagged PDF file:
1. To learn more about the nature of the error click the What this means button. This will help you understand how to correct it.
2. Ally displays a button with the “How to” for the issues it can provide guidance to fix it. Some issues can be corrected while on the page. Some issues such as poor contrast and an untagged PDF cannot be solved in Blackboard. For these issues you will need other applications. For contrast, an image editor or Word for font colors, and for an untagged PDF, the original text and Microsoft Word/PowerPoint to add tags and export it as PDF.
An untagged document is a document without proper and defined structure. There are five major parts in a document that need to be tagged:
• Headings - (tag <H1>, <H2>…, <H6>) - in Word use the styles: Heading 1 for top level sections, Heading 2 for second level sections, etc. Use them in sequential order (H1 > H2 > H3).
• Normal text - text in paragraphs - (tag <p>) - in Word apply Normal style.
• Lists - (tags <L>, <LI>) - in Word format as Bullet or Numbered lists.
• Tables - (tag <Table>, <tr>, <th>, <td>) - In Word add a table and specify that the table has a header row and that row be repeated at the top of every page.
• Images - (tag <img> with alt attribute) – In Word add an image and add alt text.
Once the file is properly tagged it is ready to be exported as a PDF file. Export or save the document as PDF and go back to Blackboard and then replace the untagged file.
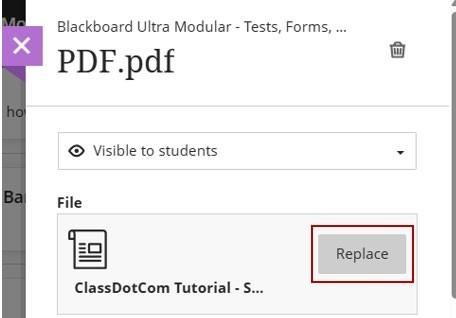
To replace the PDF file:
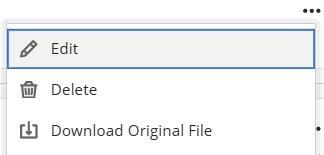
1. Click the ellipsis (…) for the file to be replaced.
2. Click Edit.
3. Click Replace.
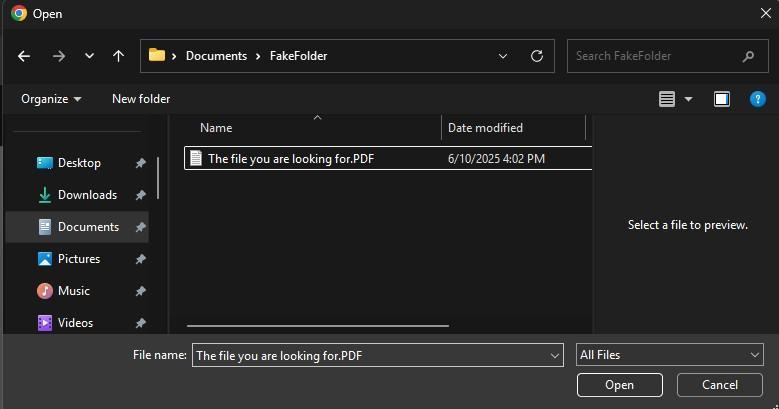
4. Browse for the tagged PDF file in your device or cloud service folder select it then click Open.
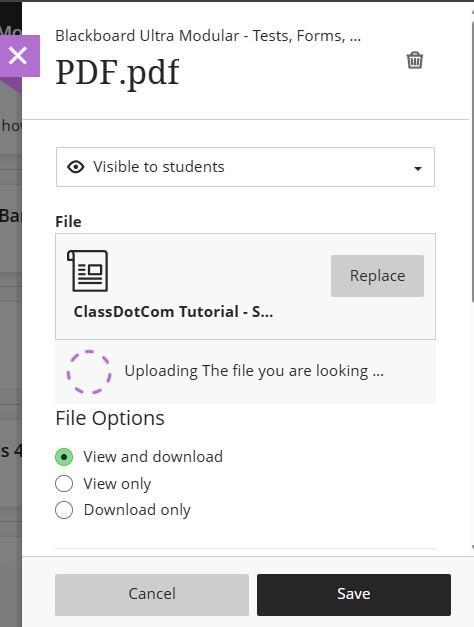
Wait for the file to upload and click Save.
As Blackboard Ultra supports drag-and-drop uploading, you can also update the PDF using the following steps:
1. Click the More options button (…) for the file to be replaced.
2. Click Edit.
3. Drag the file into the File box. Blackboard will start the replace process.
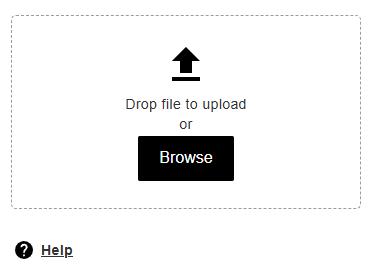
After replacing the old file with a new tagged one check the accessibility score again. The score should be increased to reflect the improvements. However, you can speed this process by using the Ally upload options:
1. Click the Ally Score indicator for the file.
2. Drag the file into the Upload box in the Ally sidebar. This should update the Ally score immediately.
If additional accessibility issues remain, Ally will highlight the next most important one. Repeat these steps to correct each issue individually.
Note: Blackboard’s current documentation does not cover some specific accessibility issues. As Ally continues to improve, guidance for these unresolved issues will be added.
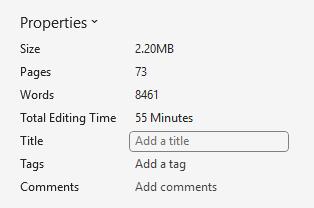
HOW TO FIX DOCUMENT WITHOUT A TITLE
Each document should have a title that appears in the title bar of the window when the document is open. This is in the property of the document and is different from the file name or title (e.g., on the first page of the document).
Titles as attribute in the property of the document help users with screen readers identify documents quickly.
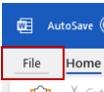
To add a title using Word or PowerPoint
1. Click File > Info.
2. On the right, click Add a title.
3. Type your title.
4. Click Save.
Note: Set the title in Word before exporting to PDF to avoid missing metadata.
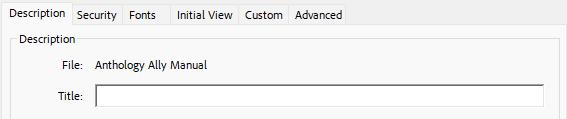
In case the title attribute was note properly set follow these next steps. To add a title using Adobe Acrobat:
1. Click Menu > Document Properties.
2. Type the title under the Description tab then click OK.
DOCUMENT DOES NOT HAVE A LANGUAGE SET
Setting up a language set in a Word or HTML document improves accessibility for screen readers and aligns with the WCAG accessibility guidelines. This language attribute allows screen readers to pronounce English and non-English text correctly.
1. Click File.
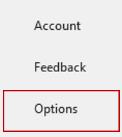
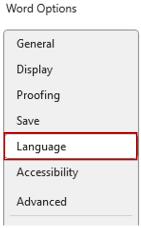
SETTING LANGUAGE TO A DOCUMENT IN MICROSOFT WORD
2. Click Options.
3. Click Language.
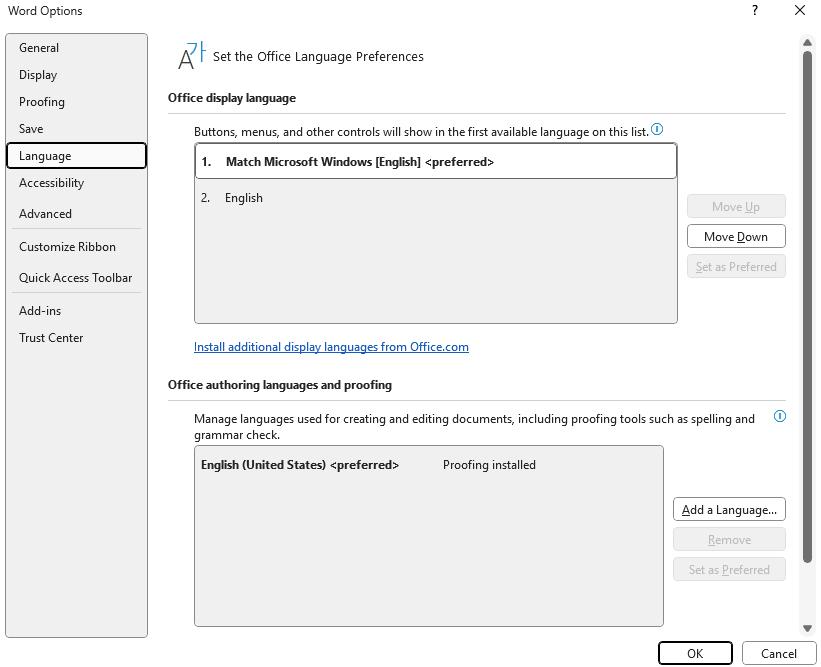
If a list of display languages exists, click the language that represents the major language in the content of the document. It is OK to leave the language that matches the operating system selected if it is the major language of the document. If not, or if another language is needed. Click Install additional display languages from Office.com link.
Note: you may need to install the language for spelling and grammar corrections.
For this use the Authoring Languages and Proofing section below the Display Language section to add a language.
SETTING LANGUAGE IN HTML DOCUMENTS
Open Your HTML document (file with file extensions .htm and .html) with a text editor (Notepad, Notepad ++ etc.).
1. Locate the <html> Tag.
It is usually at the very beginning of the file:
<!DOCTYPE html>
<html>
2. Add or update the lang Attribute to the <html> tag and specify the correct language code for English (U.S.):
<html lang="en">
Full HTML Language Setup Example:
<!DOCTYPE html>
<html lang="en">
<head> <meta charset="UTF-8">
<title>Accessible Web Page</title>
</head>
<body>
<p>Welcome to my accessible website! </p>
</body>
</html>
VALIDATE YOUR HTML
Use a validator to ensure the language attribute is correctly applied:
• W3C Validator
• Wave Accessibility Tool
MULTILINGUAL CONTENT
For multilingual content, use lang on specific elements. In this sample the lang attribute is in the p tag for the paragraph in Spanish:
<p lang="es">Hola, cómo estás? </p>
DOCUMENT IS MISSING HEADINGS
If Ally identifies your document as missing headings or having issues with heading levels, follow the steps below to fix the structure. Headings help users understand the structure and organization of a document. Using built-in heading styles ensures that accessibility software can recognize and navigate the content in a logical order.
The styles should be used as follows:
• Title for the main title of the document
• Heading 1 for the top-level headings
• Heading 2 for subheadings
• Heading 3 for the next lower level of subheadings, and so on, all the way to Heading 6 if necessary, depending on the structure of the document.
• Normal style should be used for the larger blocks of textual content (i.e., detail, descriptions, explanations) inside each level.
Note: Headings are supported up to level 6 (H1–H6). For accessibility, use as many heading levels as needed to reflect the document’s structure.
HTML and most accessibility-supported formats (e.g., Word, PDF, Markdown) recognize heading levels H1 through H6 only.
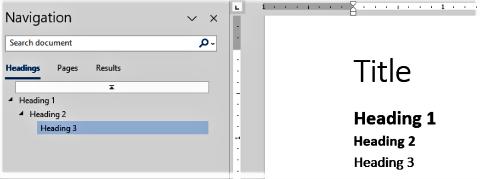
REVIEW YOUR DOCUMENT STRUCTURE
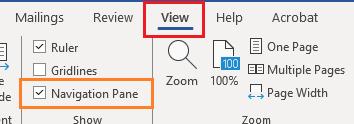
1. Open the document in Microsoft Word.
2. Go to the View tab.
3. Select the Navigation Pane checkbox.
Review the structure of the document on the Navigation panel on the left.
Be sure to structure the headings in the appropriate order. If the structure does not follow a logical heading sequence, the text may present Heading 1 as starting after Heading 2 or Heading 3 starting before Heading 2.
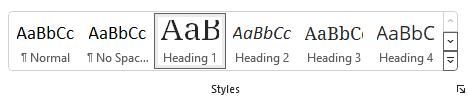
APPLYING HEADING STYLES TO STRUCTURE A DOCUMENT (USING WORD):
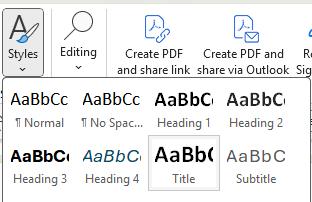
1. Identify the title of the document and highlight the text to be set as title.
2. From the Home tab, select Styles, then select the Title style.
3. Highlight the normal text as text for the textual content for paragraphs or larger blocks of text.
4. Verify if it is set to the Normal style. If not, select the Normal style to tag it as normal text to clear any incorrect formatting.
5. Find and select the first content that best fits the Heading 1 style. This would be a natural heading level that occurs throughout the document.
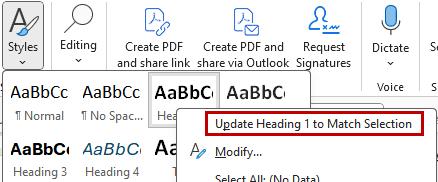
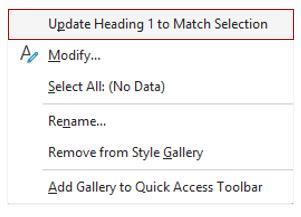
UPDATING STYLE TO MATCH SELECTION
If you prefer to retain the formatting you have selected for that heading: 1. Right click the Heading 1 style and then select “Update Heading 1 to Match Selection.”
Note: This style updating feature is available for all styles, including the Title.
Now Heading 1 has a new format, and it can be used to style Heading 1 to the remaining parts of the text where it is needed.
Remember to save your changes in the document as you go. Once all headings have been properly applied and the entire document is structured. To check the structure correctly set up, you can use the expand/collapse arrow beside each heading to verify that each section toggles its own content correctly. When the main Title collapses, all the content of the document under it is hidden. With Heading 1 collapsed, all the content under it is hidden.
And so on, when Heading 2 collapses, all others under it collapse as well.
With all sections expanded, all parts of the document are visible.
Finally, save the document as a PDF, upload it to Blackboard, and allow Ally to scan it for any remaining accessibility issues.
WORKING WITH IMAGES FOR ACCESSIBILITY
Inserting an image in Microsoft Word is easy but making that image accessible requires extra steps and considerations. The use of accessibility features and practices ensures that all users, including those using screen readers, can understand and benefit from visual content.
Keep in mind that Image can be any still image elements such as:
• Icons
• Shapes
• Charts
• Emoticons
• Screenshots
• Parts of scanned documents (non-OCRed image of text should be avoided), etc.
When adding images to a Word document, consider the following:
Image alignment: Keep the image In Line with Text to maintain a logical reading order.
Alt Text: Provide descriptive alternative text (Alt Text) that conveys the purpose or content of the image. Do not repeat the surrounding text but explain what can be seen in the image.
Contrast and visibility: Ensure that the image has sufficient contrast, especially when it includes visual data or labels.
Purpose and clarity: Only include images that support the content. Avoid decorative images unless marked as such.
Text in images: Avoid placing valuable information as text within an image. Text in scanned images or non-OCRed PDFs cannot be read by screen readers.
Cognitive load: Use simple, relevant visuals that enhance understanding rather than distract or confuse.
By applying these best practices in Word, your documents will be more usable, accessible, and inclusive.
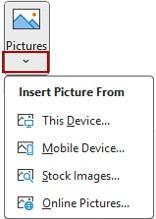
To Insert a new Image:
1. Click the Insert Tab.
2. Click the Picture icon in the Word ribbon under the Insert tab.
a. Click the arrow right under the Pictures icon for more location options.
3. Select the location where image is located.
4. Browse the image, select it then click Insert.
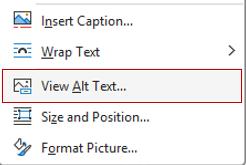
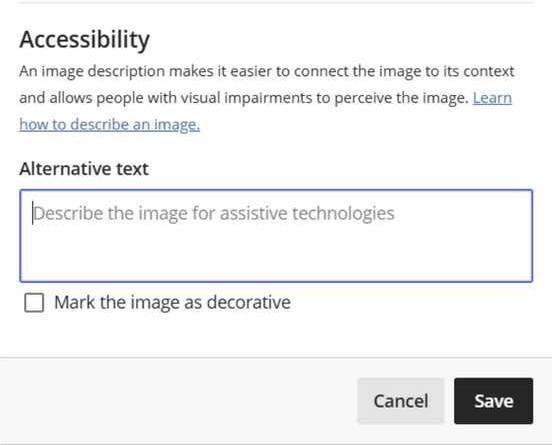
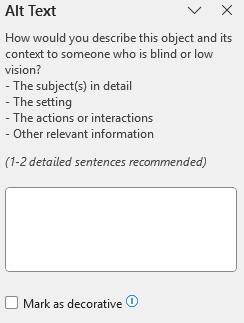
IMAGE ALTERNATIVE TEXT (ALT TEXT)
Ensure all images serve a purpose and include descriptive alternative text.
Add Alternative Text (4 steps):
1. Select the image in your document.
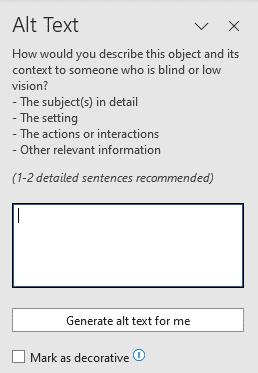
2. Right-click over the image and select View Alt Text from that menu.
3. Type the image description in the Alt Text textbox.
The image description feature has limited capacity, so it is advisable to keep it up to 1 to 2 sentences. For video audio descriptions, captions, and transcripts, the textual content can be much longer.
In case the image does not have relevant information, and it is used solely for decorative purposes, select checkbox the Mark as decorative option.
Keep Images in Line with Text
This feature maintains the image and alternative text in the reading flow with the adjacent textual content, keeping the reading and document navigation sequence.
The feature “keep the image in line with text” is usually the default in most cases.
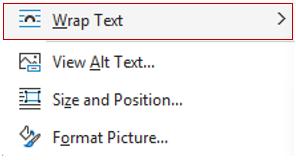
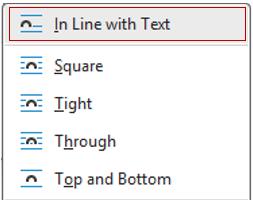
Here is how to ensure the image added is in line with the text:
1. Right click over the image inserted then select Wrap Text.
2. Select In Line with Text option.
Before wrapping up your document for sharing or publishing:
1. Click on the Review tab.
2. Click Check Accessibility to ensure all images have alternative text.
The Accessibility checker will point out any items in the document that are still not accessible and need to be fixed.
IMAGE CONTRAST AND QUALITY CONSIDERATIONS
Simple contrast issues in images can sometimes be adjusted directly in Word using the Picture Format tools (e.g., Corrections or Color adjustments). However, if the image is of inadequate quality—blurry, low resolution, or bad lighting—it may not be fixable within Word. In such cases, you may need to:
• Reshoot the image using better lighting and framing.
• Edit the image using professional tools like Photoshop, GIMP, or Canva.
• Enhance clarity and contrast before inserting it into the document.
Start right: Use well-lit and defined images from the beginning. For screenshots, zoom in or scale up the subject to avoid pixelation and improve visibility.
Decent quality images not only improve accessibility but also reduce time spent on troubleshooting and re-editing later. Keep images at reasonable sizes; large images may make your document slow to load or crash applications and browsers.
It is advisable to keep the best resolution versions of your document backed up, in case you need to scale it down or repurpose it to fit different delivery methods. The need to scale down may be due to storage limitations, number of users using the same system and especially if it is built to be seen or hosted on environments with limited memory, storage and processing power, slow devices (mobile), slow networks (WIFI and cellular). In another lesson we will dive into the ways to compress and optimize your documents and presentations for Blackboard still complying with accessibility standards and not overloading systems.
HOW TO FIX POWERPOINT PRESENTATIONS
When creating or fixing PowerPoint, use built-in layouts and templates whenever possible. These features keep content within defined placeholders, helping ensure the presentation meets accessibility standards.
APPLY LAYOUT TO POWERPOINT SLIDES
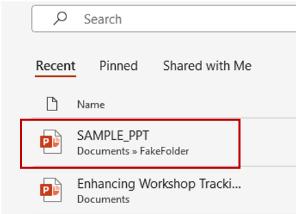
It is difficult to correct PowerPoint files that have not been set up to use headings and templates. However, you can take the following steps.
1. Open the PowerPoint presentation file.
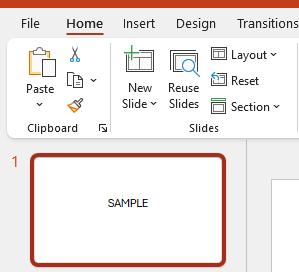
2. Click the first slide with a title.
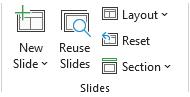
3. Click the Home tab.
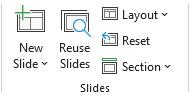
4. In the Slides section, click Layout.
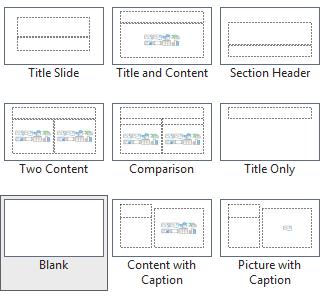
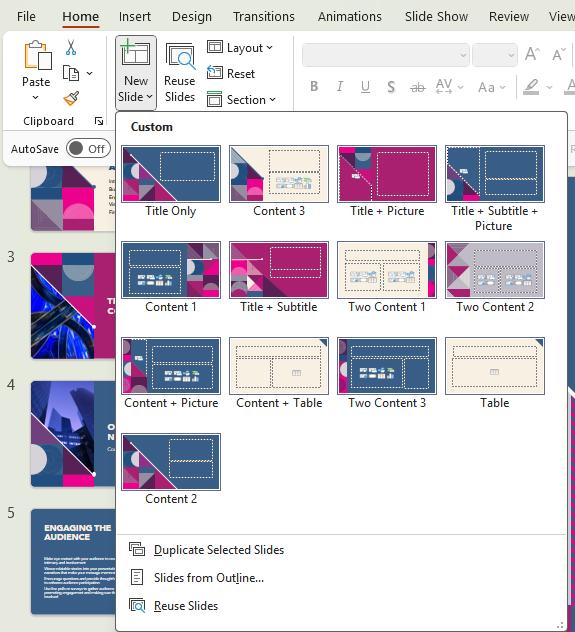
5. Alternatively, right-click over the slide to modify, and then click Layout.
6. Click on the layout that most closely fits the slide.
Note that some Power Point Designs have more layout options. The default layout options are - Title, Title and Content, Section Header, Two Content, Comparison, Title Only, Blank, Content with Caption and Picture with Caption.
(“Which of the following is the default slide layout in a PowerPoint ...”)
If your content fits the boxes that appear, then that means it should be using the layout correctly.
If your content does not fit into the boxes that appear, copy/cut, and paste the content into the boxes, making sure the title text goes into the title box. Click Save to save the changes, repeat the process for each of the remaining slides with a title (or heading) and save the file.
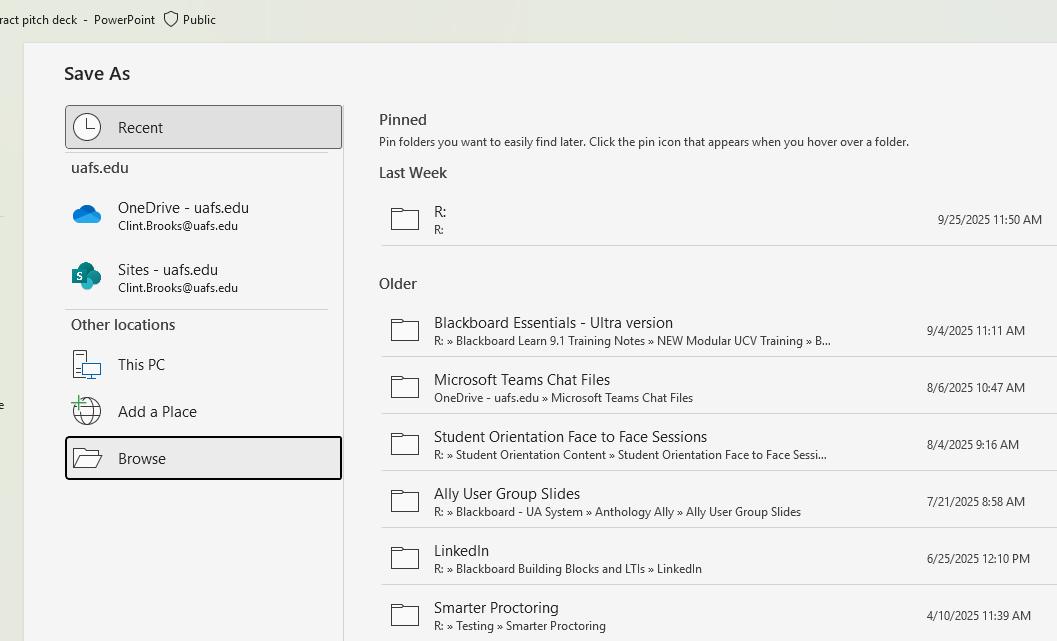
SAVE POWERPOINT PRESENTATION AS PDF
Follow the steps below:
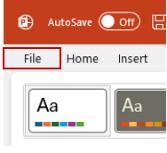
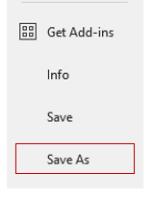
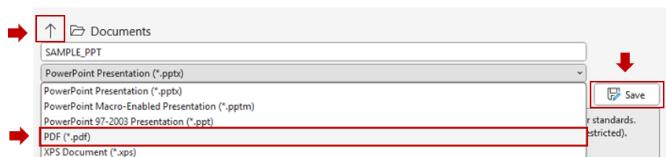
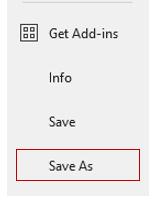
1. Click File.
2. Click Save As.
3. Select the destination folder (1) in which you will save the file. In the Save as Type drop-down menu, select PDF (2) then click Save (3).
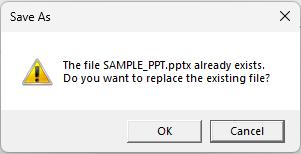
4. If PowerPoint asks if you want to overwrite the file, click OK. This will overwrite whatever older version of that file in that location.
5. Use the upload/replace feature in Ally in Blackboard to update the file and rescore it for accessibility.
KEY ACCESSIBILITY CHECKS FOR POWERPOINT PRESENTATIONS
• Run the Accessibility Checker -PowerPoint has a built-in tool: Review > Check Accessibility.
• Use Built-In Slide Layouts (as instructed) - Keeps content in placeholders readable by screen readers.
• Add Slide Titles - Every slide should have a unique title (use "Arrange" > "Selection Pane" to check visibility).
• Use Sufficient Color Contrast - Text should have a contrast ratio of at least 4.5:1 against the background.
• Use tools like WebAIM Contrast Checker.
• Avoid Color-Only Indicators - Do not rely on color alone to convey meaning. Add text labels or patterns.
• Use Accessible Fonts - Sans-serif fonts (e.g., Arial, Calibri, Aptos) in size 18pt or larger.
• Add Alt Text to Images and Objects - Describe content meaningfully (mark decorative elements like images of lines and borders as such).
• Avoid Animations and Transitions (if unnecessary) - Flashing or fast transitions can cause seizures or confusion.
• Provide Descriptive Hyperlinks - Avoid "click here” use meaningful labels like "Read the Accessibility Guide".
• Reading Order Check - Ensure logical tab order (Home > Arrange > Selection Pane > reorder items. Accessibility Checker can help with this.
• Closed Captions (Video) or Transcript (Audio) - Always include closed captions for videos or links to a transcript file for audio recordings.
POWERPOINT RECOMMENDATIONS:
• Use slide numbers.
• Avoid dense text.
• Test with a screen reader (e.g., NVDA or JAWS)
• Tables without Headings
Users with visual disabilities who rely on screen reader software need tables to be formatted to identify the header row for each table. You will need to take a few steps to help their software recognize the header rows in your tables.
HOW TO FIX TABLES WITHOUT HEADINGS
Users with visual disabilities who rely on screen reader software need tables to be formatted to identify the header row for each table. You will need to take a few steps to help their software recognize the header rows in your tables.
For Word, PDF, and HTML files:
The most effective way to format tables is in Microsoft Word, using the original Word file (for updating Word and PDF files) or the HTML file.
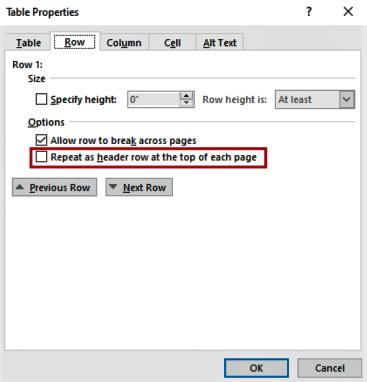
1. Locate the table in your document and highlight the entire header row of the table. This should be the top row.
2. Locate and click Table Design tab at the top of the window.
3. Select Header Row in the Table Style Options section.
4. Right-click the selected header row and select Table Properties.
5. Click the Row tab from the Table Properties dialog box.
6. Select Repeat as header row at the top of each page and then click OK to confirm changes.
This repeats the header at the top of each page with the table.
Note: This will not work if you divide the table between pages. The table rows must be together at one table.
For PowerPoint files, use the same procedure as Word files, skipping the Table Properties steps, since individual tables do not appear on multiple slides in PowerPoint.
HOW TO FIX A PDF FILE THAT IS A SCANNED IMAGE
Scanned PDFs are images of text created when a physical page is scanned. Because they are just photos of the text, they cannot be read, searched, or accessed by screen readers.
To fix these documents, we need to extract the real text from them using a process called OCR (Optical Character Recognition) and convert them to a fully editable document. Afterwards, we need to edit the documents to correct any mistakes the OCR scan makes and to ensure accessibility standards are met. Finally, we will need to run an accessibility check to verify the changes.
CONVERT THE PDF IMAGE INTO A WORD DOCUMENT
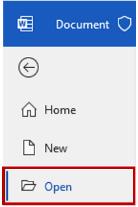
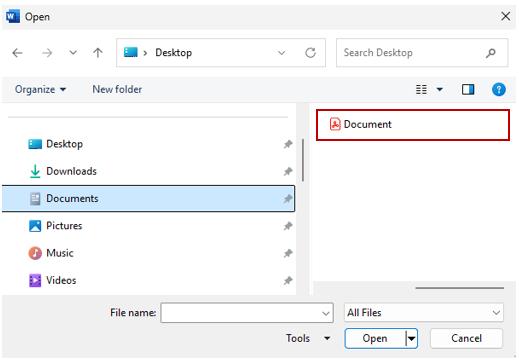
1. Open Word and click File from the main menu.
2. Click Open.
3. Browse and select the PDF file with the scanned text then click Open.
4. Click OK when prompted with “Word will now convert your PDF to an editable Word document...”
As a new unstructured document, it will lack the accessible elements. So, review all its elements for accessibility and other conversion issues:
• Correct spelling and grammar errors.
• Correct font errors to make font usage consistent.
• Correct formatting errors for margins, paragraphs, lists, and indents.
• Add Headings styles appropriately.
• Check and edit Lists, Tables, and Charts to ensure they are accessible.
• Add Alt Text for images.
5. Click Review tab then click Check Accessibility to check for accessibility issues that may still exist. If large chunks of text remain missing or If Word does not extract the text (and continues to show only the image), you can use other applications to convert the PDF to text. You can then copy and paste that text to a Word document and edit it. Please contact Instructional Support to find out about websites and free applications that can convert scanned images of text to editable text.
DIGITAL OCR SCAN
OCR (OPTICAL CHARACTER RECOGNITION) IS ALSO KNOWN AS DIGITIZED TEXT.
To kick start our task to make text accessible to everyone, it is important to understand the difference between a scanned text and a digitized text (OCRed Text). A scanned text such as a photocopy is an image of the page, not actual text. As a result, its content cannot be selected, copied, searched, or edited using a text editor; only image editing tools can modify it. In contrast, digitized text contains machine-readable characters. It is fully editable, searchable, and can be copied and pasted. For accessibility, digitized text can also be interpreted by screen readers, but the text digitalization is not always perfect, and we need to ensure that corrections and formatting are performed to enhance readability for users with disabilities and their assistive technologies.
USING A SCANNER WITH OCR CAPABILITIES
To ensure the best quality of the scanned material, make sure the text is readable in the original and pages can be fully flattened over the scanner glass, straightened with the scanner squared corner, preferable covering the glass of the top left corner of the scanner with the top left corner of the document or paper copy to be OCR scanned. Most scanner manufacturers provide the user with OCR software to use with their scanners.
There are a variety of types of scanners with glass flatbed, single page, and multipage with auto feeders providing fast and accurate OCR results. To simplify our lives there are wireless handheld scanners that facilitates to scan a document on the go, and going further on the scanning possibilities some applications can turn phones and mobile devices into a capable scanner able to read and interpret the text from receipts and paper documents and create a digital editable copy of them and fill up forms with the information acquired. These devices may offer different OCR quality or accurate results. The scanning possibilities are endless, and everybody can create high quality and accessible textual material without much effort and with low cost, allowing anyone to save their scan as PDF or TIFF for best OCR accuracy.
OCR CONSIDERATIONS FOR ACCURACY OF DOCUMENT SCAN
Make sure to have access to images of text that are higher than 300 DPI. Blurred text copies will generate more errors during the digitalization of text. Certify that the contrast of the text has a good ratio. The best ratio is achieved by black text on a white background. This assures the best OCR scan results.
Orientation of text is also relevant, prefer to scan upright and flat with the scan glass table.
If available in the OCR software, set up the main language of the document. This setting allows for better text recognition. Use standard fonts not cursive or stylized ones.
Ally has OCR feature to be integrated into Blackboard; this will assist in the task of digitalizing text.
HOW TO FIX AN UNTAGGED PDF FILE
An untagged PDF lacks structural tags such as headings, paragraphs, or tables. This makes it inaccessible to screen readers that visually disabled students use to navigate and read your content. You may already know how to fix these issues in Microsoft Word. Now let us see how to auto-tag and manually correct tags in PDF files using Adobe Acrobat.
TAGGING A PDF USING ABODE ACROBAT ACCESSIBILITY TOOLS
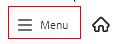
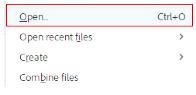
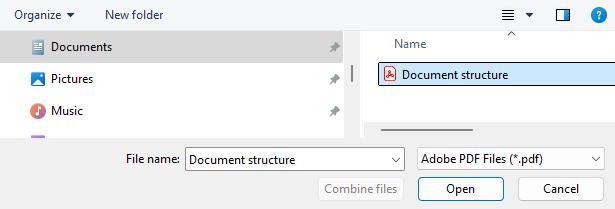
1. Click Menu (located in the top left corner of Adobe Acrobat).
2. Click Open.
3. Browse and select the untagged PDF file, then click Open.
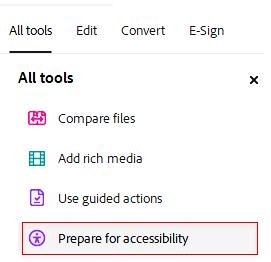
4. Click All tools.
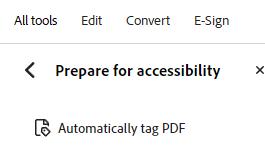
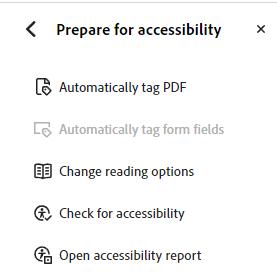
5. Click Prepare for Accessibility.
6. From the Prepare for Accessibility Panel, click Automatically tag PDF.
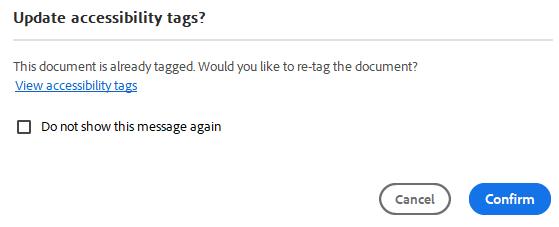
7. When asked to update the accessibility tags click Confirm.
Acrobats will automatically scan and apply structural tags such as Headings, Paragraphs, and Figures.
From the Accessibility tags panel to review if the tags are accurate.
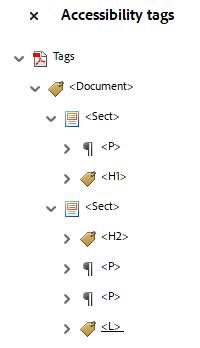
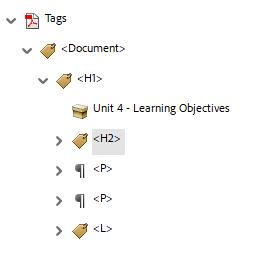
SAMPLE OF THE AUTO GENERATED TAGS.
SAMPLE AFTER MANUALLY EDITING THE AUTO GENERATED TAGS.
Most of the time you will need to reorder, delete tags, or retag using the appropriate ones.
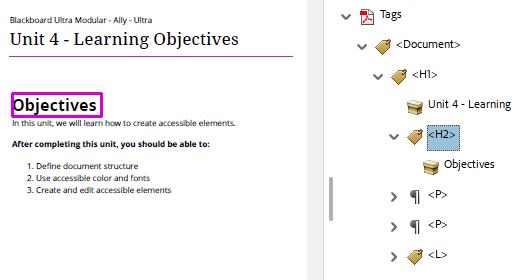
8. Click the tag on the right and text or an image associated with it will be highlighted in the document displayed on the left.
9. If every element is in order. Click Check for accessibility.
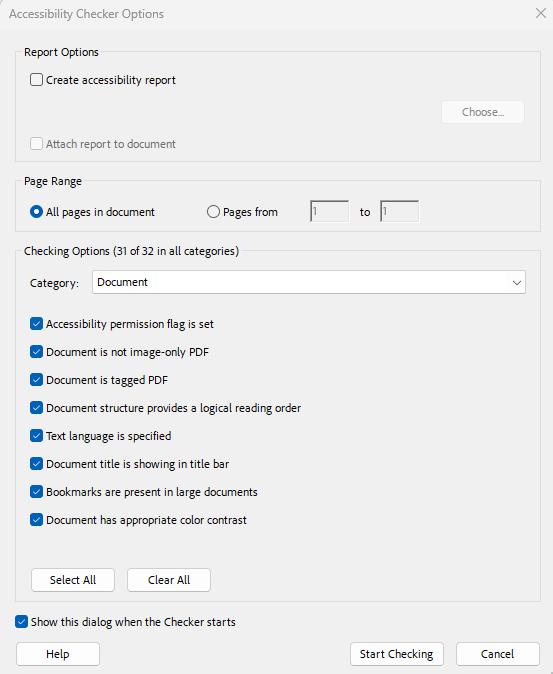
10. Select the Accessibility Options to check then click Start Checking.
The default settings will work for most documents.
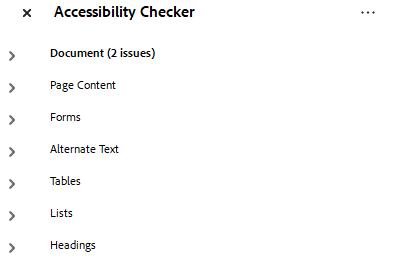
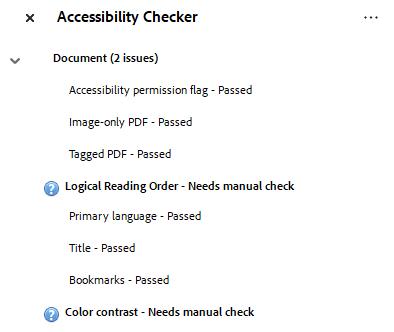
11.Review the issues listed in the Accessibility Checker panel on the right.
In this sample, Acrobat detected two issues, but they need to be checked manually.
12. Click Fix Reading Order from the left panel. This causes the tool to fix the order.
The Fix Reading Order tool numbers the elements in the order they are read.
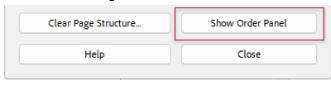
13. From the Reading Order tool, click Show Order Panel.
14. In the Show Order Panel, the elements can be selected and dragged to the right place to fix the order. Repeat this step for all misplaced elements.
HOW TO FIX CONTENT WITH CONTRAST ISSUES
Some contrast issues in images can be adjusted directly in Word using Picture Format tools (e.g., Corrections or Color adjustments). However, if the image is of inadequate quality—blurry, low resolution, or bad lighting—it may not be fixable within Word.
In such cases, you may need to:
• Reshoot the image using better lighting and framing.
• Edit the image using professional tools like Photoshop, GIMP, or Canva.
• Photoshop is available as part of our Adobe Creative Cloud campus license.
• Enhance clarity and contrast before inserting it into the document.
Start right: Use well-lit and defined images from the beginning. For screenshots, zoom in or scale up the subject to avoid pixelation and improve visibility. It is important to note that a good image is not always a larger image. One can have a large, high-resolution image with no value for presentation or instruction.
FIX CONTRAST IN MICROSOFT WORD
1. Select the image for which you want to fix the contrast.
2. Click the Picture Format tab.
Note: This tab is only visible when an image is selected in the document.
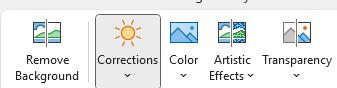
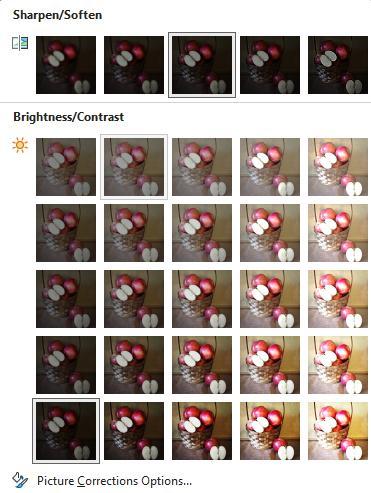
3. Select Corrections from the Picture Format ribbon.
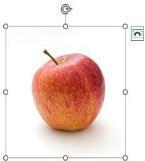
4. Select the thumbnail with the contrast that better corrects the image. To fix the “A Basket of Apples” image, the square under the center will increase the image contrast by +20% and solve the issue.
Note: The preview tooltip should display the contrast value as you hover each square. The values are displayed as brightness and contrast values. You will notice as you move the mouse over the image and get updated with the new contrast value.
Contrast is not limited to images it also affects text readability and overall document accessibility.
Be mindful of the following:
Text and background contrast: Ensure enough contrast between the font color and background. For example, avoid light gray text on a white background or red text on a dark background. Use tools like the WebAIM Contrast Checker to meet WCAG 2.2 AA standards (minimum 4.5:1 for normal text, 3:1 for large text).
Shaded backgrounds and shapes: Avoid using color-only distinctions in charts, callouts, or text boxes. Ensure any background shading does not reduce text contrast.
Color use: Do not rely on color alone to convey meaning (e.g., red for incorrect, green for correct). Pair colors with icons, patterns, or text labels. Use bold (strong) and italics (emphasis)
Fonts: Use readable fonts (e.g., Calibri, Arial, Verdana, Aptos) and avoid decorative or script fonts that reduce legibility. Stick to font sizes of 11 pt or larger for body text.
Themes and templates: When using Word themes or templates, check that the default color combinations meet contrast requirements and adjust as needed. By addressing all aspects of visual contrast images, text, backgrounds, and color use you ensure that your Word documents are accessible, legible, and inclusive for users with visual impairments or cognitive challenges.
CONTRAST EXCEPTIONS
There are rare exceptions where low contrasts might be permittable. These are cases where changing the contrast would fundamentally alter the curriculum. Some examples are below:
Art works (paintings, drawings, etchings, photos, etc.) that were deliberately composed and created to have lower contrast. These would include historical works, or sample works for studying contrast.
Images that are examples of low contrast image files shown for the purposes of improving accessibility.
In these cases, the purpose of the images in question should be conveyed and justified in accordance with university policies.
HOW TO FIX AUTO-GENERATED CAPTIONS OR VIDEOS
WITHOUT CAPTIONS IN PANOPTO
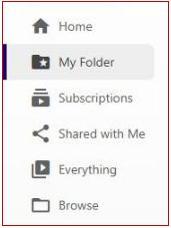
At UAFS, Panopto will auto-generate captions for all videos created using Panopto or uploaded to Panopto (i.e., videos recorded using other tools). In Panopto, you can easily edit auto-generated captions or add caption files from other sources. Before we start, let us look at the parts of the UAFS Panopto home page. From this page you have access to a menu (on the left) with options to browse, subscribe to, and view all videos that are shared with you or connected to your Panopto account. Also, there are three major quick access lists. The quick access lists are:
• Shared with Me - listing the videos other Panopto users shared with you.
• What’s New - the latest videos added.
• Recently Viewed - videos recently viewed by you. The best way to locate and access your videos to edit them is by selecting the My Folder option from the menu.
HOW TO FIND VIDEOS WITHOUT CAPTIONS IN PANOPTO
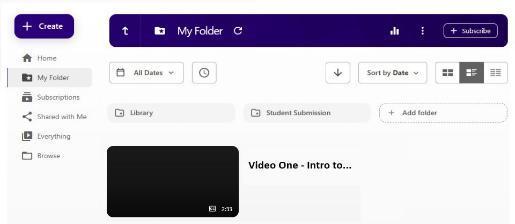
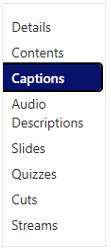
1. Select My Folder from the menu.
In the My Folder page there is a list of videos created or uploaded by you, hover over a video if you want to edit its captions. This folder does not include videos you added directly to your class folders in Panopto. You can access those videos in the class folders.
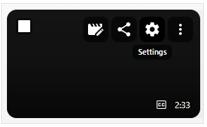
2. Hover over a video thumbnail to display the toolbar.
3. Click the Edit icon from the toolbar.
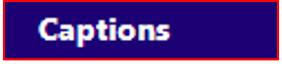
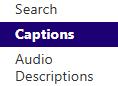
4. Select Captions from the menu on the left side.
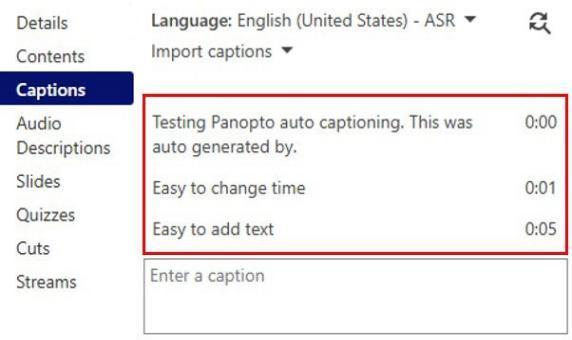
SAMPLE OF EXISTING CAPTIONS
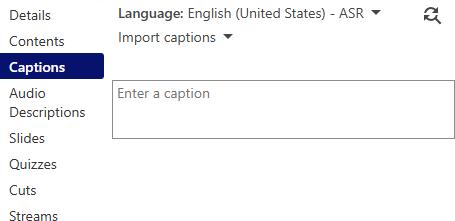
SAMPLE WITHOUT CAPTIONS
EDITING AUTO-GENERATED CAPTIONS
Note that when hovering over a video, a toolbar is activated in the top right corner of the video thumbnail.
1. Click the Edit icon to quickly edit the auto generated caption.
2. Select Captions from the menu on the left.
3. Select and edit the captions, as needed to accurately reflect the audio.
4. Use the textbox with the text “Enter a caption” to add text. Press ENTER to save it.
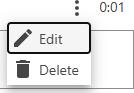
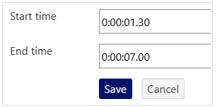
5. Click the More actions button (three dots), and then select Edit to edit the timing for the captions.
6. Enter the new Start time and End time for that part of the captions to appear on the screen.
Note: Ensure that the start time of each caption matches the end time of the previous one, so that captions display sequentially without overlapping.
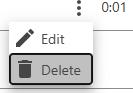
7. Click the More actions button (three dots) for a specific part of the caption, and then select Delete to delete that part of the captions.
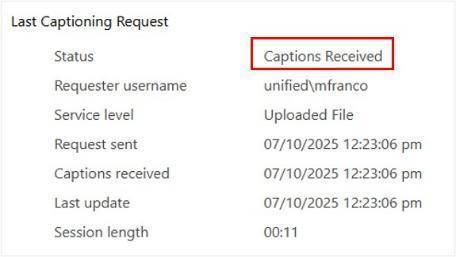
SAMPLE OF THE SETTINGS PAGE
DOWNLOADING AND EDITING A CAPTIONS FILE
1. Click the Gear icon from that toolbar to access the settings.
2. Select the Captions option from the menu on the left side.
Sample of the Captions screen
In the Captions screen, there are three functionally distinct sections:
• Available Captions
• Request Captions
• Upload Captions
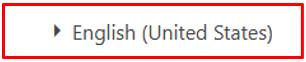
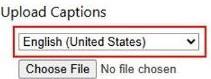
Our focus for the task of editing preexisting captions is the Available Captions section, the first section at the top of the screen. If a caption is available in English a dropdown menu is presented with the label English (United States). If caption is in another language, it will display a dropdown menu labeled with the respective language name.
3. Click the English (United States) drop down menu.
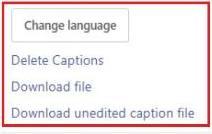
This dropdown menu offers four options:
• Change language – to change the language.
• Delete Captions - if you plan to create or add your own.
• Download file – to access and edit the captions file.
• Download unedited caption file – unedited version of the captions.
4. Click Download file.
5. Open the downloaded file. Usually, the file is in the folder named Downloads on your device. The file is a text file with a long name containing the date, time, language, and region of the language.
6. Review the text of the downloaded file; it is a text file – It will look like the following sample text lines. The actual spoken words were “Testing Panopto Auto Captioning.” This was auto generated by Panopto.”
1
00:00:01,260 > 00:00:04,290
[Auto-generated transcript. Edits may have been applied for clarity.] Testing Panopto captioning.
2
00:00:05,310 > 00:00:11,060
This is the text auto generated by Panopto. As you review the auto generated captions, make sure words are not missing. In this example, in the first line of the captions, the word “auto” is missing before the word “captioning.” Edit your file using a text editor. When finished, save it in a local folder and upload it to Panopto using the Upload Captions tool.
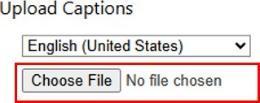
UPLOADING REVIEWED AND EDITED CAPTIONS FILES
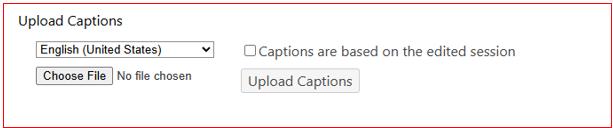
The last section is the Upload Captions. The Upload Captions has four parts:
• A dropdown menu to set the language for the new captions.
• A button to choose the file to upload.
• A checkbox to select if the captions are based on an edited session (based on the remaining parts of the edited video).
• A button to upload the captions file.
UPLOAD CAPTION SECTION
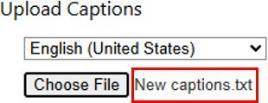
Note: if the existing captions language is the same language as the new captions being uploaded, make sure to delete the existing version.
1. Click the Language dropdown menu and select a new language if needed.
2. Click the Choose File button and select the captions file from your device.
3. Review the name of the file to upload.
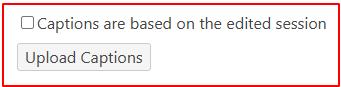
If the video was edited, select the checkbox for Captions are based on the edited session, if video was not edited, leave checkbox as is and click Upload Captions button.
SAMPLE OF CAPTIONS STATUS CHANGE
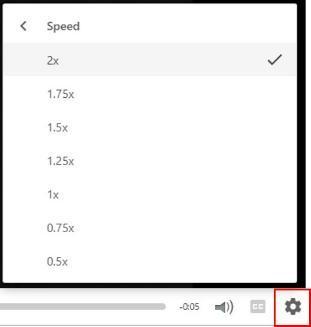
4. Review the newly added captions. While watching the video to review captions, you can use the playback slider/scrubber to move to the exact part of the video where the captions were edited, saving time on the reviewing task.
5. Another useful tool is the Speed setting that can speed playback up to twice as fast. To access it, click the gear icon on the bottom right part of the Panopto video player.
IMPORTANT CONSIDERATIONS RELATED TO CAPTIONS
Auto-generated captions are a starting point and should be reviewed and edited for accuracy, especially if you need to meet accessibility standards like ADA and Section 508.
Human-generated captions offer greater accuracy but may have a longer turnaround time and involve cost.
Ensure your audio quality is good to improve the accuracy of auto-generated captions.
UNIT 4 – CREATING ACCESSIBLE CONTENT AND DOCUMENT
PART I – STARTING A DOCUMENT
SETTING UP DOCUMENT LANGUAGE
Setting up a language set in a Word or HTML document improves accessibility for screen readers and aligns with the WCAG accessibility guidelines. This language attribute allows screen readers to pronounce English and non-English text correctly.
SETTING LANGUAGE TO A DOCUMENT IN MICROSOFT WORD
4. Click File.
5. Click Options.
6. Click Language.
If a list of display languages exists, click the language that represents the major language in the content of the document. It is OK to leave the language that matches the operating system selected if it is the major language of the document.
If not, or if another language is needed. Click Install additional display languages from Office.com link.
Note: you may need to install the language for spelling and grammar corrections. For this use the Authoring Languages and Proofing section below the Display Language section to add a language.
SETTING LANGUAGE IN HTML DOCUMENTS
Open Your HTML document (file with file extensions .htm and .html) with a text editor (Notepad, Notepad ++ etc.).
3. Locate the <html> Tag.
It is usually at the very beginning of the file:
<!DOCTYPE html>
<html>
4. Add or update the lang Attribute to the <html> tag and specify the correct language code -- for English (U.S.):
<html lang="en">
Full HTML Language Setup Example:
<!DOCTYPE html>
<html lang="en">
<head> <meta charset="UTF-8">
<title>Accessible Web Page</title>
</head>
<body>
<p>Welcome to my accessible website! </p>
</body>
</html>
VALIDATE YOUR HTML
Use a validator to ensure the language attribute is correctly applied:
• W3C Validator
• Wave Accessibility Tool
MULTILINGUAL CONTENT
For multilingual content, use lang on specific elements. In this sample the lang attribute is in the p tag for the paragraph in Spanish:
<p lang="es">Hola, cómo estás? </p>
SETTING UP TITLE - PROPERTY ATTRIBUTE
Each document should have a title that appears in the title bar of the window when the document is open. This is in the property of the document and is different from the file name or title (e.g., on the first page of the document). Titles as attribute in the property of the document help users with screen readers identify documents quickly.
To add a title using Word or PowerPoint
5. Click File > Info.
6. On the right, click Add a title.
7. Type your title.
8. Click Save.
Note: Set the title in Word before exporting to PDF to avoid missing metadata.
In case the title attribute was note properly set follow these next steps.
To add a title using Adobe Acrobat:
3. Click Menu > Document Properties.
4. Type the title under the Description tab then click OK.
CREATING DOCUMENT STRUCTURE
HEADING STYLES
Proper heading styles create a logical structure for documents, which is essential for accessibility. Screen readers and navigation tools rely on these styles to interpret and present content effectively. Use the appropriate heading styles as you build your document to avoid accessibility issues.
BEST PRACTICES:
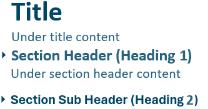
• Title for main titles
• Heading 1 for main sections
• Heading 2 for subsections
• Normal text for paragraphs and detailed content such as larger blocks of text, full descriptions, etc.
CERTIFYING THAT THE DOCUMENT IS STRUCTURED CORRECTLY
1. Click the View tab, then select the Navigation Pane check box from the Show group.
2. On the Navigation Pane on the left the document structure is presented.
Headings should stand out and visually separate the different sections. Bold, larger, and italicized text or combinations thereof, are ways to format headings. When using visual style to distinguish heading and document structure remember to keep them visually consistent throughout the document.
Note that a well-structured document should not have more than six heading levels.
Microsoft Word provides two ways to format heading styles:
• Update the heading style to the current style of the text selected. This works well if you have already formatted your heading text.
• Modify the heading style. This is a good way to fine tune your heading styles.
UPDATING THE HEADING STYLE TO THE CURRENT STYLE OF TEXT SELECTED:
1. Highlight the text with the style you want to apply to a heading.
2. Right-click the Heading to which you want to apply that style.
3. Select Update Heading (number) to Match Selection. This changes the heading to the formatting the selected text is already using.
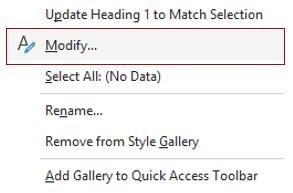
MODIFYING THE HEADING STYLE:
1. Right-click the heading style (i.e., Heading 1).
2. Click Modify to change the formatting.
3. Click the Format drop-down menu at the bottom left to access details, such as bold, italics, font type, font size, etc. To apply the changes to new documents, select the option button for New documents based on this template.
4. Click OK to confirm the changes.
CHOOSING THE RIGHT FILE TYPE
The three most common file types for online documents are HTML, Word (.DOCX), and PDF. Each file type has its strengths and weaknesses. Choose your file type based on the purpose of the file and accessibility needs.
• Word (.docx): Editable, good screen reader support, but formatting may break.
• PDF: Preserves layout, universal compatibility, but harder to edit and must be tagged for accessibility.
• HTML: Most accessible, responsive, editable in Blackboard, and best for screen readers.
However, most PDF files start as Word files, and HTML files can be edited in Word. Therefore, Word is where we will start.
APPLYING HEADING STYLES IN MICROSOFT WORD:
1. Open the file in Word.
Note: Because the default application to open a HTML file is a web browser, you will need to open HTML files in Word by clicking File and then clicking Open.
2. Locate the natural headings in your document. Distinguish between firstlevel headings, second-level headings, etc. Often you may have already formatted these in some fashion.
3. Highlight the text for a heading.
4. Go to the Home tab and select the appropriate heading style from the Styles group.
5. In this example, Heading 1 is selected and that style is applied to the text.
Repeat steps 3 and 4 for all of the headings in your document. Be sure to apply the appropriate heading styles based on the structure of the document, using the heading styles in order.
• Do not skip heading styles, for example using Heading 1 and Heading 3, but not Heading 2.
• Do not use heading styles out of order, for example using Heading 2 for top level content and Heading 1 for subheadings.
Remember to Save your changes as you go.
After you change the text to a heading, you should see a triangle icon beside it. This icon means that you have successfully formatted the text as a heading.
Clicking the icon will hide anything under that heading. Clicking it again will reveal that content.
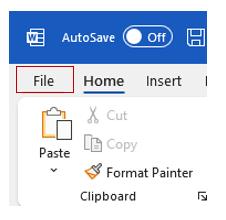
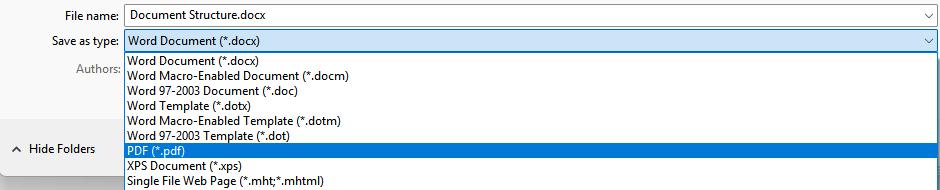
SAVING A WORD DOCUMENT AS A PDF FILE:
1. Click File.
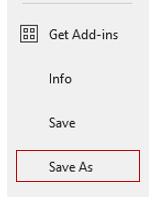
2. Click Save As
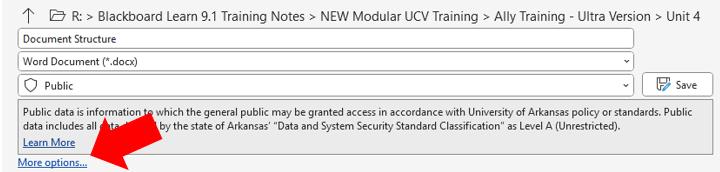
3. Click More options…
4. Select the destination folder in which you will save the file.
5. In the Save as type dropdown menu, click PDF.
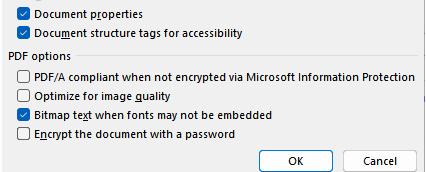
6. Click the option button for Standard (publishing online and printing).
7. Click Options
8. Make sure the check box for “Document structure tags for accessibility” is selected.
9. Click OK.
10. Click Save.
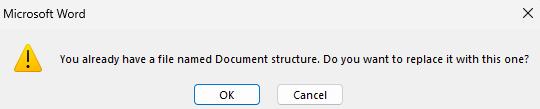
11. If Word asks if you want to replace the file, click OK.
Run the Microsoft Office Accessibility Checker or upload the file to Blackboard and check the Ally report on the updated file. For more on how to update files and check the Ally report update see “Unit 2 – Anthology Ally, How to Correct an Accessibility Issue in Ally” in this course.
FOR POWERPOINT FILES:
When creating new PowerPoint presentations, use built-in layouts and templates to structure the file as you build it.
1. Start a New PowerPoint presentation file.
2. Select a template for your presentation.
3. Click Create.
4. To add slides, click the New Slide menu and then select a layout.
5. To change the layout of an existing slide, click Layout in the Slides section of the Home tab. Alternately, you can right-click a slide and then click Layout.
6. Click the layout that most closely fits your plans for the slide. Note that some Power Point Designs have more layout options than others. The default layout options are - Title, Title and Content, Section Header, Two Content, Comparison, Title Only, Blank, Content With Caption and Picture with Caption.
If you have existing content and it fits the boxes that appear, then that means it should be using the layout correctly.
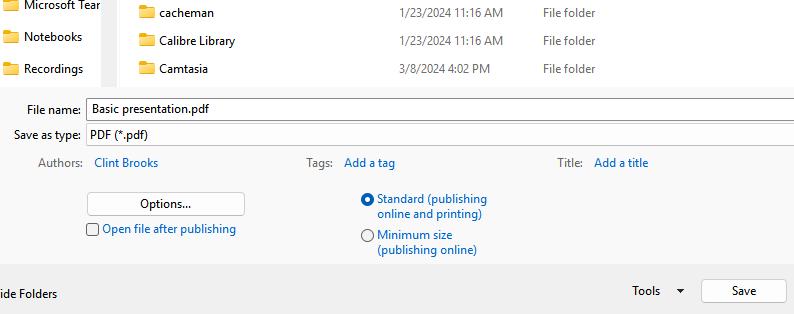
If your content does not fit the boxes that appear, copy/cut, and paste the content into the boxes, making sure the title text goes into the title box. Save the changes and repeat the process for each of the remaining slides with a title (or heading). Be sure to save changes to the file as you go. If you need the presentation to be in PDF format in your course, you can save it as a PDF file:
SAVING A POWERPOINT PRESENTATION AS A PDF FILE
1. Click File.
2. Click Save As.
3. Select the destination folder in which you will save the file by clicking a folder from the list or using the Browse option.
4. In the Save as Type drop-down menu, select PDF.
5. Make sure that the Standard (publishing online and printing) option is selected.
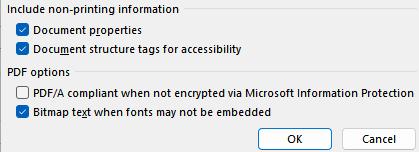
6. Click Options.
7. Make sure the check box for Document structure tags for accessibility is selected.
8. Click OK.
9. Click Save.
10. If Word asks if you want to overwrite the file, click OK.
11. Run the Microsoft Office Accessibility Checker to check the file before uploading it. Use the update feature in Ally to update the file and rescore it for accessibility (see “Unit 2 – Anthology Ally, How to Correct an Accessibility Issue in Ally” in this course).
CREATING ACCESSIBLE ULTRA DOCUMENTS
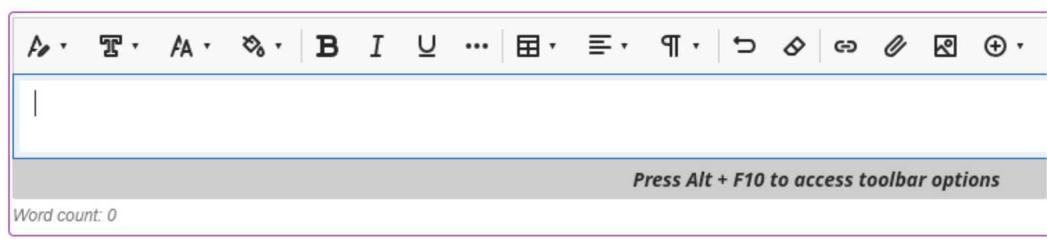
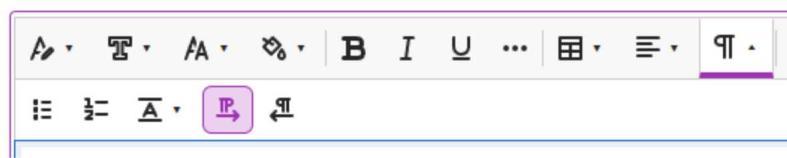
Blackboard Ultra provides a rich text editor, making it easy to create a document online without depending on external Word Processors. Here are some of the features of the Blackboard text editor that can assist you to keep documents structured and accessible.
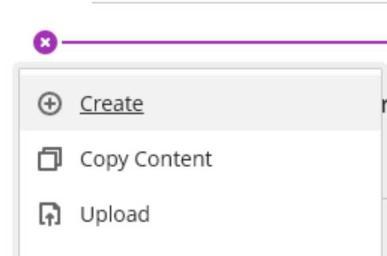
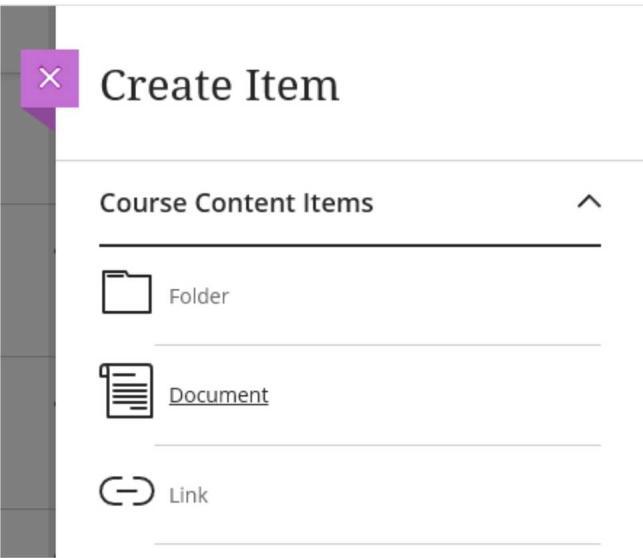
CREATE A CONTENT ITEM
1. the Course Content area, click the Add Content button (+).
2. Click Create.
3. Click Document.
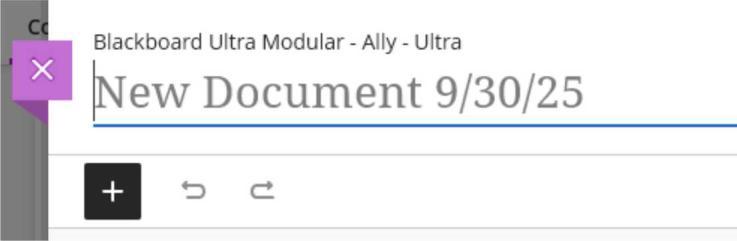
4. Type a name for the document.
5. Select the type of content you want to add to the document. You will use the text editor to create some content.
6. Use the text editor to add content.
7. Check formatting with the Ally Accessibility Checker.
8. Click Save to save the changes.
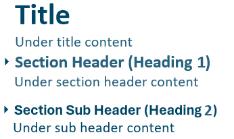
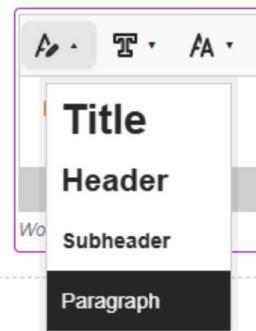
a. Use heading levels (Title, Header, Subheader and Paragraph) for structure.
b. Use bulleted or numbered lists via the editor instead of manually typing bullets.
BLACKBOARD ULTRA DOCUMENT BEST PRACTICES
Use Built-In Formatting Tools
Use headings, lists, and styles through the content editor instead of just bolding or changing font size.
PROVIDE DESCRIPTIVE LINKS
• Avoid vague link text like “Click here” or “More info.” Use meaningful phrases like Download the course syllabus (PDF) and keep the link color and style.
ADD ALTERNATIVE TEXT FOR IMAGES
While inserting an image, as one of the steps, Blackboard will provide a text box to add alternative text. Use the Insert Image tool and fill in the Alternative text field with a brief, contextual description.
Example of alternative text (alt text) for an image of a pie chart: "Pie chart showing 40% of students prefer online classes".
ENSURE COLOR CONTRAST
• Use high contrast colors for text and backgrounds. Keep it simple with black text over white background.
• Avoid using color alone to convey meaning (e.g., red for “important”) as students with color blindness may not be able to distinguish the difference.
USE TABLES FOR DATA ONLY
• Avoid using tables for layout.
• Include column headers and keep table structures simple.
• Blackboard Ultra supports screen reader–friendly tables when built using the content editor.
UPLOAD ACCESSIBLE FILES
• When uploading PDFs, Word docs, or PowerPoint files:
o Ensure they are accessible by checking that:
▪ Headings are used properly.
▪ Alt text for images is included.
▪ Table headers are defined.
▪ You are using descriptive file names (e.g., Module1_Intro to Statistics.pdf instead of file1.pdf).
o Use the Microsoft Office or Adobe Acrobat Accessibility Checkers before uploading the content.
USE BLACKBOARD ALLY CHECKER AND SCORES
• Ally checks content accessibility and provides a score.
• Use Ally indicators (the red, orange, and green gauges) to check accessibility and improve documents before making them available to students.
• Ally also offers alternative formats (e.g. ePub, Electronic Braille, audio) for uploaded documents automatically.
CAPTION VIDEOS AND AUDIO
• Upload videos with closed captions.
• using YouTube or Panopto videos, edit the auto-generated captions for accuracy.
• Provide transcripts or captions for audio recordings.
PART II – CREATING ACCESSIBLE POWERPOINT
Check the link bellow for more on PowerPoint accessibility: Make your PowerPoint presentations accessible to people with disabilities
PART III – CREATING ACCESSIBLE STRUCTURAL AND VISUAL ELEMENTS
ACCESSIBLE COLORS AND FONTS
Most color issues are related to contrast, when the color or shade of one element is too close to the color or shade of another element, making it hard to distinguish one from the other. The most common example of this issue is light colored text on a light-colored background or dark text over a dark background. Also, consider how students with color-blindness might see an image or text on a page. Avoid color combinations that those users would find difficult to distinguish, such as red and green.
Blackboard Ally and Contrast: Contrast issues vary, and Blackboard Ally does not have a tool to resolve this issue. Any document included in the report with a low score due to poor contrast needs to be reedited in a tool outside of Blackboard (i.e., Microsoft Word, Adobe Acrobat)
Here are some best practices you can apply to reduce the chance of this accessibility error:
High Contrast: Always make sure there is enough contrast between the text and the background color of a page. Black text on a white background is the standard for a good reason.
Light and Soft Background Patterns: Avoid background images with strong patterns or bright colors. Text is difficult to read in these backgrounds.
Background Image: If you do feel the need to have a background image, use subtle images, such as subliminal or watermark images, or use backgrounds that leave open spaces for text.
Image Quality: Make sure your photos and other images are clear, well composed, and well-focused.
Clear Fonts: Use sans-serif fonts like Arial, Aptos, Calibri, or Helvetica.
Simple fonts: These are easier to read on screens. Avoid decorative or script fonts, as they can be difficult to read.
Font Size: Use a minimum font size of 12 points for body text. For headings, consider sizes 14 points and above to create a clear hierarchy.
Standard Styles: Stick to common font styles (normal, bold, italic) and avoid excessive variations. Limit the use of underlines, which can be confused with hyperlinks.
Number of Fonts: Use no more than two different font types in your document to maintain a cohesive and professional appearance.
Adequate Spacing: Use line spacing of at least 1.5 to improve readability. Additionally, it includes space between paragraphs and headings.
Line Length: Aim for lines of 50-75 characters per line to make reading easier. Break up long paragraphs into shorter ones.
Font Accessibility: Use accessibility checkers or tools to evaluate the document’s readability and ensure it meets accessibility standards. If possible, ask individuals with different accessibility needs to review your document and provide feedback on its readability.
WRITING GOOD ALT TEXT DESCRIPTIONS
Good alt text (alternative text) helps make images accessible to users who rely on screen readers. But it is not just about describing what is in the image — it is about conveying its purpose in context. This guide will help you write clear, concise, and meaningful alt text.
KEY PRINCIPLES
1. Context is Key
Do not just describe what is visible explain the purpose of the image within the content.
Bad: “A man holding a phone”
Better (for a website instruction): “User holding a smartphone to demonstrate facial recognition feature.”
2. Be Concise
Keep it brief. Most screen readers cut off alt text after 125 characters.
Avoid: “This is an image of a child reading…”
Better: “Child reading a book under a tree”
3. DO NOT State the Obvious
Skip info that is already in a nearby text unless needed for clarity.
Caption: “Martin Luther King Jr. giving his ‘I Have a Dream’ speech”
Alt text: “MLK Jr. at Lincoln Memorial, hand raised.”
4. Skip Decorative Details
If the image adds no informative value (e.g., background patterns, borders), use empty alt text: alt="" or, if available, select the "Mark as Decorative" option.
EXAMPLES BY CONTEXT
News Article
Image: A flooded street with cars half-submerged
Alt text: “Flooded downtown Houston Street after heavy rains on July 10, 2025.”
Why it works: Gives location, cause, and date for relevance.
Educational Site
• Image: Diagram of the water cycle
• Alt text: “Diagram showing evaporation, condensation, and precipitation in the water cycle.”
• Why it works: Summarizes the instructional purpose.
E-commerce
• Image: Red sneakers with white soles
• Alt text: “Red low-top sneakers with white soles, Nike swoosh logo on the side”
• Why it works: Gives key product details a shopper would want.
Social Media Post (Personal)
• Image: Group of friends smiling at a birthday dinner
• Alt text: “Jane and friends celebrating her 30th birthday at a candle-lit dinner.”
• Why it works: Captures the moment’s tone and context.
Common Mistakes to Avoid
• Writing overly long descriptions
• Starting with “Image of…” or “Picture of…”
• Copying visible text into the alt attribute
• Ignoring the image’s purpose in context
• Using generic filenames like IMG_8234.jpg as alt text
Tips by Role
• Designers: Use images that convey clear, describable meaning.
• Writers: Write alt text as part of your content creation process.
• Developers: Use correct HTML syntax: <img src="chart.png" alt="Bar chart showing sales rising from Q1 to Q3, then dipping in Q4">
A well-crafted alt text makes digital content more inclusive and better for everyone.
BULLETED, ORDERED, AND NUMBERED LISTS
Using proper list formats eases reading and navigation.
Guidelines for Formatting Lists
• Use Built-in List Features: Utilize built-in bullet and numbering options. Avoid manually creating lists with spaces or symbols.
• Apply Heading Styles: If your list is part of a larger document, use heading styles to create a clear structure.
• Keep Lists Simple and Clear: Limit complexity and organize nested lists clearly.
• Avoid Blank Lines Between List Items: Keep list items close together to support flow.
• Use Descriptive Labels: Use concise, descriptive text for each item. Avoid jargon unless necessary.
• Consistent Formatting: Ensure consistent font size, style, and color for readability.
• Assess Accessibility: Use the built-in Accessibility Checker (Word, Acrobat) or Ally to identify any issues.
• Provide Alternative Text for Images: Ensure images within lists have descriptive alt text.
Example List
Here is an example of a well-structured list with descriptive labels: Project Phases
1. Planning: Define goals and gather requirements.
2. Execution: Implement the project plan and watch progress.
3. Closure: Review outcomes and document lessons learned.
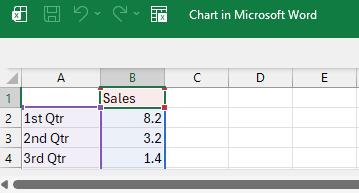
CHARTS AND GRAPHICS
Choose the Right Chart Type
• Consider Your Data: Select a chart type that best represents your data. Common types include bar charts, line graphs, and pie charts.
• Avoid Overly Complex Charts: Simple charts are easier to interpret and to describe with alternative text.
Inserting the Chart (5 steps)
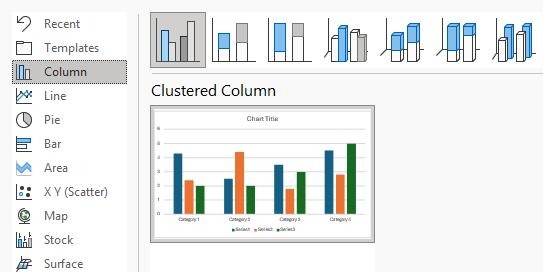
1. Click the Insert tab in Word.
2. In the Illustrations section, click Chart.
3. Select the type of chart you want to create.
4. Input your data on the Excel sheet that pops up within Word.
5. Right-click the chart and select View Alt Text.
6. Type Alternative Text in the text area provided.
Ensure Chart Alt Text is:
• A concise description of the chart.
• What the chart and key data elements represent.
• Meaningful and summarizes the essential information.
Use Descriptive Titles and Labels
• Include a clear title for your chart.
• Label axes and data clearly to aid understanding.
• Use consistent font size and style for readability.
Choose Accessible Colors
• Use high-contrast color combinations to enhance visibility.
• Avoid relying solely on color to convey information (e.g., label sections of pie charts with text).
Ensure Text is Readable
• Use a legible font and appropriate size (12 pt or larger).
• Keep text succinct and to the point.
Organize with Layout and Formatting
• Align your chart properly.
• Scale it to fit width the document space (from left to right margins) without cropping in either side.
• Assure it is in the document navigation order.
Assess Accessibility
• Use Word's Accessibility Checker (found under the Review tab) to identify potential issues.
• Consider checking your document with a screen reader to ensure chart information is correct.
Provide Context in the Document
• Include a brief explanation or summary of the chart in the surrounding text. This provides context for users who may not be able to interpret the chart alone. This information should be different for the one added to the chart alt text area.
Save in an Accessible Format
• When sharing your document, save it as a PDF (using "Save As" and choosing PDF) to maintain formatting while retaining accessibility features.
LINKS
Attributes to consider when creating links:
Descriptive Text: Use clear, descriptive link text that indicates where the link will take the user. Avoid vague phrases like "click here."
Contextual Information: Ensure the link text makes sense out of context. Screen reader users should be able to understand the link's purpose without surrounding text.
Avoid URL Links as Text: If possible, do not use raw URLs as link text. Instead, use meaningful descriptions.
Keyboard Accessibility: Ensure all links can be accessed and activated using a keyboard alone.
Visual Indicators: Use visual cues (like underlines or color changes) to indicate clickable links and ensure sufficient contrast for visibility.
Focus States: Provide a clear focus state for links when navigated via keyboard to help users see which link is currently selected.
Consistent Navigation: Keep link placement and style consistent throughout your site to aid user familiarity.
Avoid Repeated Links: If a link appears multiple times on a page, consider whether it can be combined or if it needs to be repeated for context.
Open in the Same Tab: Unless necessary, links should open in the same tab to maintain the user’s context; if opening a new tab is required, inform the user.
Testing with Assistive Technologies: Test your links with screen readers and other assistive technologies to ensure they are easily understandable and navigable.