CE DECLARATION OF CONFORMITY
We declare under our sole responsibility that these products is in conformity with the standards or standardized documents

EN55014-1:2017 + A11:2020
EN61000-3-2:2014
EN61000-3-3:2013
EN55014-2:1997 + A1:2001 + A2:2008 and EN62841-1:2015
in accordance with Council Directives 2014/30/EC and 2006/42/EC.
Model : Description :
DC-16W Rebar Cutter
DC-20W Rebar Cutter
DC-20HD Rebar Cutter
on December, 2021
Manufacture : IKK CO., LTD
396-59 Ashitaka, Numazu City, Shizuoka Pref. 410-0001 Japan
T. Arai Manager of Technical Dept.
WARNING: TO AVOID SEVERE PERSONAL INJURY OR PROPERTY DAMAGE, READ THESE INSTRUCTIONS CAREFULLY BEFORE ATTEMPTING TO USE CUTTERS.

Ignorance of proper operating procedures can lead to accidents.
If in doubt about any procedure, contact your nearest authorized agent.
THESE TOOLS ARE FOR INDUSTRIAL USE ONLY. OVERHAUL Return
2
CONTENTS Page General Safety Precautions ・・・・・・・・・・・・・・・・・・・・・・・・・・・・・・・・ 3 Parts and specifications ・・・・・・・・・・・・・・・・・・・・・・・・・・・・・・・・ 5 Operating Instructions ・・・・・・・・・・・・・・・・・・・・・・・・・・・・・・・・ 6 Pre-use checks ・・・・・・・・・・・・・・・・・・・・・・・・・・・・・・・・ 6 Warm-up ・・・・・・・・・・・・・・・・・・・・・・・・・・・・・・・・・・・・・・・ 7 Stopper adjustment ・・・・・・・・・・・・・・・・・・・・・・・・・・・・・・・・ 7 Cutting ・・・・・・・・・・・・・・・・・・・・・・・・・・・・・・・・・・・・・・・・ 8 Release valve ・・・・・・・・・・・・・・・・・・・・・・・・・・・・・・・・・・・・・・・ 8 Points of attention ・・・・・・・・・・・・・・・・・・・・・・・・・・・・・・・・ 8 Maintenance ・・・・・・・・・・・・・・・・・・・・・・・・・・・・・・・・・・・・・・・・ 9 Cutter blocks ・・・・・・・・・・・・・・・・・・・・・・・・・・・・・・・・・・・・・・・ 9 Cleaning ・・・・・・・・・・・・・・・・・・・・・・・・・・・・・・・・・・・・・・・ 9 Oil-level check ・・・・・・・・・・・・・・・・・・・・・・・・・・・・・・・・ 10 Oil change ・・・・・・・・・・・・・・・・・・・・・・・・・・・・・・・・・・・・・・・ 11 Bolt tightness ・・・・・・・・・・・・・・・・・・・・・・・・・・・・・・・・・・・・・・・ 11 Carbon brushes ・・・・・・・・・・・・・・・・・・・・・・・・・・・・・・・・ 11
the unit to an authorized agent for overhaul at least once every two years, sooner if subjected to heavy use.
・
GENERAL SAFETY PRECAUTIONS
USAGE
Use DC cutters on concrete reinforcing bars only.
・IMPORTANT (DC-20WH and DC-25X)
Do not attempt to cut rebar by locking the off/on switch to the on position. This locking procedure is to be used only to warm the tool in cold climates. This is a safety issue and may cause damage to your rebar cutter. Always pull the on/off switch by hand for each individual cut.
・RESTRICT USE TO DESIGNATED MATERIALS
There is always a chance that the cut end may shoot out, especially if less than 30cm (1 foot) in length. Exceeding designated material specifications will greatly increase this risk and will also damage the tool. Do not attempt to cut rebars harder, thicker or thinner than specified (see page 5 & 6).
・USE EYE PROTECTION
Wear safety goggles, safety glasses with side shields or a face shield when using cutter.
・PROVIDE SAFETY BARRIERS
Erect safety screens to protect co-workers from flying ends. Place a safety screen under the rebar when working in high places.
・EXERCISE PROPER CONTROL
Hold the cutter firmly and maintain proper footing and balance. Do not over-reach. When working in a high place, secure cutter to scaffolding with a safety rope. Check that the power cord is not fouled and keep the cord away from sharp edges and heat. Check that all adjusting wrenches have been removed before using the cutter.
・GUARD AGAINST ELECTRIC SHOCK
To avoid possible electric shock, do not handle the cutter with wet hands or use the cutter in the rain or damp places. Be aware of all power lines, electric circuits and other hazards that may be contacted, especially those that are below the surface or otherwise hidden from view. (DC-20WH and DC-25X, Failure to ground power supply may result in electric shock to operator.)
3
・UNPLUG TOOL
Disconnect the cutter from the power outlet when not in use and before cleaning, adjusting or servicing. Do not disconnect the plug from the outlet by pulling the cord. Always check that the switch lock is OFF before plugging in.
・BEWARE OF ENVIRONMENT
Do not use the cutter in the presence of flammable materials (e.g. paint, thinner, petroleum products, adhesives). Do not use the cutter in a possibly explosive environment (e.g. an area containing fumes, gas or dust) or poorly ventilated areas.
・KEEP WORK AREA TIDY AND WELL LIT
Make sure that the work area is properly lit and clear of obstructions. Operator should at all times have an unobstructed view of the cutter, rebar and surrounding area.
・WEAR PROPER APPAREL
Do not wear loose clothes, dangling objects or jewelry. Restrain long hair. The use of a safety helmet and rubber-soled boots is recommended. If safety gloves are worn, be especially careful not to get a glove that glove caught in moving parts.
・KEEP VISITORS AWAY
Keep all visitors at a safe distance from the work area for their own protection and to prevent distraction of the operator.
・MAINTAIN CUTTER WITH CARE
Inspect the cutter before each application. Faulty or loose cutter blocks could result in personal injury. Keep the handle dry, clean and free from oil and/or grease. Keep the housing and piston free of dirt and iron filings. Check that no screws or bolts are loose or missing. Follow instruction for maintenance. Inspect the switch, cord, plug and any extension cable at regular intervals. Follow the maintenance schedule (See page 9)
・STORE CAREFULLY
When not in use, store the cutter and accessories in a dry place where they cannot be accessed by unauthorized persons.
4
PARTS AND SPECIFICATIONS
1. Motor 2. Carbon brush caps 3. Switch (Safety switch lock)
4. Name plate 5. Pump case 6. Oil-plug
7. Cylinder
8 Pressure Relief valve (*) 9. Housing 10. Cutter block 11. Cutting guard
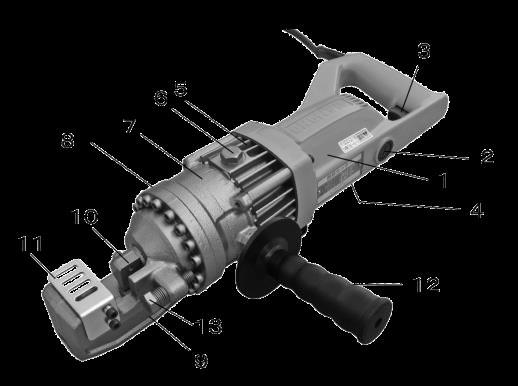
12. Side handle (detachable) 13. Adjustable stopper bolt
* not visible in the Illustration (Illustration shows DC-16W)
5
Model DC-13LV DC-16W DC-20W, 20DW DC-20HD Voltage ±5% 100/115/230V AC only Wattage 1020W 1050W 2500W 1050W Dimensions (L×W×H) 380×220×105mm 460×150×115mm 500×150×135mm 410×110×215mm Weight 6.0 Kg 8.0 Kg 10.5 Kg 11.1 Kg Max. rebar diameter 13mm 16mm 20mm 20mm Min. rebar diameter 4mm 4mm 4mm 4mm Max. rebar hardness Tensile strength 650 N/mm² Cutting speed 1.5~2 sec. 2.5~3 sec. 4 sec. 4 sec.
OPERATING INSTRUCTIONS
WARNING: Indicates the hazard that could result in severe personal injury and / or death.
CAUTION: Indicates the hazard that could result in minor personal injury and / or product damage.
CARE: Indicates the hazard that will result in product damage.
PRE-USE CHECKS
1. Check oil level. (See maintenance p. 10.)
2. Check condition of cutter blocks and tightness of cutter block bolts. (See maintenance p.9.)
CAUTION: Using loose or cracked cutter blocks may result in injury to operator as well as damage to unit.
3. Check that the power source is appropriate to the cutter or charger.
CARE: If voltage is too high, the motor will burn out. If voltage is too low, insufficient power will be generated. Never use DC current.
4. Check that cord is undamaged and that plug is not loose.
CAUTION: Cut or abraded covering could result in a short and electric shock to operator.
6 Model DC-20WH DC-25X DC-25W DC-32WH Voltage ±5% 100/115/230V AC only Wattage 1050W 1330W 2000W 2000W Dimensions (L×W×H) 510x110x210mm 515x150x250mm 525×145×250mm 645×180×260mm Weight 11.5Kg 22.5Kg 23.5 Kg 35.0 Kg Max. rebar diameter 20mm 25mm 25mm 32mm Min. rebar diameter 4mm 4mm 4mm 13mm Max. rebar hardness Tensile strength 650 N/mm² Cutting speed 3~4 sec. 5~6 sec. 4~6 sec. 9~13 sec.
If an extension cable is to be used, make sure that it is undamaged and that it is the proper thickness for the length. See table below.
WARM-UP
In cold weather, warm up the unit for 30~60 seconds so that the hydraulic oil reaches the proper viscosity. Pull trigger-switch to extend piston and release when it has reached its full stroke. Repeat 15~20 times.
STOPPER ADJUSTMENT
The adjustable stopper functions to maintain the rebar in the correct position during cutting and must be properly set for each size of rebar before making a cut.
1. Screw in the stopper to provide sufficient clearance for the rebar.
2. Keeping rebar at right-angles (90º) to front cutter block, screw out the stopper until it is just touching the rebar. Once set, the stopper needs no further adjustment while cutting rebars of the same diameter, but must be re-set for a different size rebar.
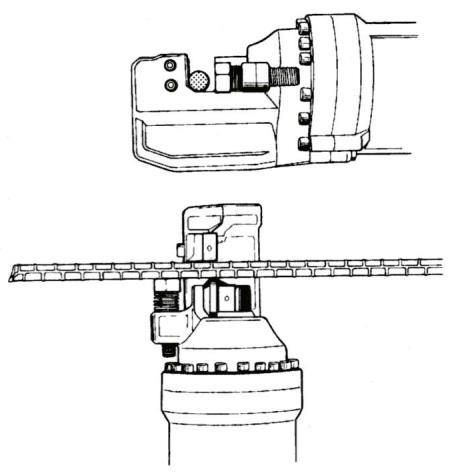
CAUTION:
Failure to correctly set the stopper will result in excessive wear of cutter blocks and may cause cut end to fly out
7
100/115V 230V Cable length Cable size (AWG) Nominal diameter Up to 10m (33 ft) 16 1.0mm² Up to 15m (50 ft) 14 1.25mm² Up to 30m (100 ft) 10 1.5mm²
CUTTING
1. Insert rebar between the stopper and front cutter block, making sure that it is properly seated in the U-shaped support.
2. Press the safety switch lock. (DC-13LV, DC-16W, DC-20W and DC-20DW) Pull the trigger-switch and keep depressed while the piston advances and the rebar is cut. (If the switch is released at an intermediate point, the piston will stop.)
3. When the cut is complete, release the switch. The Piston retracts automatically. (Note that the switch cannot be re-activated until the piston has fully retracted.)
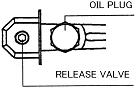
RELEASE VALVE
In the event that the piston should fail to return automatically for any reason (for example, the piston has become jammed in the rebar), use the 4mm hexagon wrench provided to slightly loosen the return valve (approx. 60º turn).
N.B. Make sure to tighten the release valve before making the next cut.
POINTS OF ATTENTION
1. Be especially careful when cutting off short lengths (30cm or less) as the cut end tends to fly out.
WARNING: Flying ends are a hazard to all personnel in the vicinity. Erect safety screens.
2. Do not cover air vents.
CARE: If vents are covered, motor will overheat and may burn out.
3. If the hydraulic oil exceeds 70ºC (158ºF) in temperature, the power will drop. Allow the unit to cool before resuming operation. [Be particularly careful in summer, when the pump case heats up quicker.]
4. If a drop in power is observed and the motor is unusually hot, check the carbon-brushes. (See maintenance p.11.)
8
5. If the piston should ever fail to retract completely, push the rear cutter block backwards to manually retract the piston.
CAUTION: Use a rebar or flat metal bar for this purpose. Never push the cutter block with any part of the hand, even if gloved. Once the piston has been retracted, pull the trigger-switch long enough to partially advance the piston. Unplug the unit. Check the piston and housing for accumulated dirt and iron filings that may be jamming the piston. (See Maintenance p.8.) If, after cleaning, the piston still does not automatically retract when fully extended, the piston itself may be damaged. Return the unit to an authorized agent for repair.
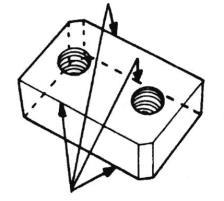
MAINTENANCE CUTTER BLOCKS
Before using, always check that the two bolts on each cutter block are properly tightened. Using a loose block will result in damage to block and housing. Also check the condition of the cutter blocks. If either cutting edge is dull or chipped, remove the retaining bolts and rotate both blocks so that two new edges come into use. Replace and tighten the bolts. Each block has four cutting edges. When all four cutting edges have been used or if either block is cracked or otherwise damaged, replace both blocks.
CAUTION: A loose or cracked block may result in injury to the operator.
CLEANING
Clean the cutter every day, preferably immediately after use.
CAUTION: Wear gloves to protect hands from metal splinters. Do not use an air-gun: blasting with air can cause metal filings and/or dust to get into eyes and the respiratory system.
WARNING: DISCONNECT CUTTER FROM OUTLET BEFORE CLEANING.
1. Disconnect the unit.
2. Wipe or brush away all dirt and metal filings. Pay particular attention to the lower half of the piston, where dirt is more easily accumulated.
9
OIL-LEVEL CHECK
As the cutter is hydraulically operated, the oil-level must be checked at frequent intervals, preferably every day. Failure to maintain the oil at the proper level results in a drop in pressure and loss of cutting power.
CAUTION: Hydraulic oil is highly flammable. Keep away from sparks and naked flame. Do not smoke. Hydraulic oil may cause inflammation of the eyes and skin. If ingested, it will cause diarrhea and vomiting. In case of eye contact, rinse in clean water for at least 15 minutes. Consult a physician. In case of skin contact, wash thoroughly with soap and water. In case of ingestion, consult a physician immediately. Do not deliberately induce vomiting
1. Oil should be warm but not hot. Warm up the unit if it is cold.
2. Adjust the stopper and make three or four cuts, noting exactly at what point the rebar is actually breaking.
3. Pinch a short piece of rebar, stopping just before it breaks off. Unplug the unit from power source.
4. With the partially severed rebar in place, turn the unit over so that the oil-plug is uppermost. (If the unit is hot, allow it to cool down.)
5. Remove oil-plug and seal-washer (packing).
CAUTION: Never remove the oil-plug when the unit is hot or oil will spurt out.
6. Check that the oil is level with the bottom of the plug hole (i.e. that the pump case is full to the brim). If the oil level is too low, top up with 20-weight hydraulic oil with anti-foam and anti-abrasion properties, DC-13LV, DC-16LZ, DC-16W, DC-20W, DC-20DW and DC-2OHL
ISO viscosity grade VG46, e.g. Shell oil Tellus 46, Mobil oil DTE-25 or Esso Uni Power VG46
DC-25W and DC-32WH
ISO viscosity grade VG32, e.g. Shell oil Tellus 32, Mobil oil DTE-24 or Esso Uni Power VG32
7. After topping up, extract air from the system. Gently tilt the cutter lengthwise and return it to a level position. Top up again and tilt in the opposite direction. Repeat this process until all air has been extracted.
CARE: Cutter cannot function properly if oil contains air bubbles.
10
8. Replace the seal washer (packing) and plug. Connect the cutter to the power source and completely sever the rebar.
8. Replace the seal washer (packing) and plug. Connect the cutter to the power source and completely sever the rebar.
OIL-CHANGE
The hydraulic oil should be changed at least once a year, sooner if it appears dirty.
OIL-CHANGE
1. Unplug the unit from the power source. Remove the oil-plug and packing. Turn the cutter over and drain the oil into a suitable receptacle. When oil ceases to drain out, tilt the unit to the rear so that oil trapped in the piston housing can run out. When the housing is empty, tilt the unit in the opposite direction to empty the residue in the pump case.
The hydraulic oil should be changed at least once a year, sooner if it appears dirty.
1. Unplug the unit from the power source. Remove the oil-plug and packing. Turn the cutter over and drain the oil into a suitable receptacle. When oil ceases to drain out, tilt the unit to the rear so that oil trapped in the piston housing can run out. When the housing is empty, tilt the unit in the opposite direction to empty the residue in the pump case.
2. With the drain-hole uppermost, slowly fill the unit with fresh oil. Replace the plug and lightly tighten. Connect the unit to the power source and advance the piston two or three times. Unplug the unit and remove the oil-plug. Top up oil-level and replace the plug.
3. Finally, follow procedure for oil-level check. (Steps 2~8)
2. With the drain-hole uppermost, slowly fill the unit with fresh oil. Replace the plug and lightly tighten. Connect the unit to the power source and advance the piston two or three times. Unplug the unit and remove the oil-plug. Top up oil-level and replace the plug.
Note: Dispose of hydraulic oil in accordance with local regulations. Do not pour into the sea, a river, a lake or a drain.
3. Finally, follow procedure for oil-level check. (Steps 2~8)


