The purpose of this manual is to provide in-depth and step-by-step instructions for the myriad tasks that fall under the purview of the Billing Office Staff. The majority of the protocol is based upon the reimbursement cycle ideology I have utilized, as well as adaptation to the unique needs of this office and a desire to maintain fluidity. Although strict adherence to the instructions herein will result in maintenance of the status quo, procedures(s) should not be followed blindly without an understanding of the rationale substantiating said procedures (s) and an assessment of viability for accomplishing the task(s) at hand.
1) Filing – 4
2) Payments – 7
3) Follow-Up – 14
4) Charges – 17
5) Accounts Payable – 22
6) Month End – 26
7) Insurance Coordination – 33
8) Miscellaneous Tasks – 38
9) Sample Task List – 42
10) Amendment A–46
1) Filing
a. Rationale
b. Overview
i. General
ii. Categorization
iii. Nomenclature
iv. Organization
v. Nextech Notation
vi. Physical Copies
Filing
Rationale
All Billing Office paperwork must be filed in two forms: electronic and physical. These records must be kept clean and timely for review at any point in time. Electronic copies will be kept for efficiency purposes. These files must be organized and easily accessible. Physical copies shall be kept for a minimum of four years as a backup for any electronic records loss that may occur in an emergency situation and archived for seven years thereafter. It is recommended that the past two years worth of records be held on site for physical review in case of emergency.
Overview
General
Daily paperwork, including but not limited to insurance billing, patient statement inquiries, insurance follow-up, patient records release, insurance inquiries, prior notification, and all extraneous paperwork flowing into and out of the Billing Office, will be recorded. Keep in mind that substantiation for any paperwork may need to be provided at any point in time; thus, we must be diligent in filing and keeping records/references in the appropriate locations.
Categorization
Paperwork will fall into three primary categories: Payments, Charges, Nonpay. Payments will include all payment batches regardless of the payer. Charges will include all charge batches. Nonpay will service as a follow-up paperwork and miscellaneous filing category. Each batch will be restricted to a single date or time of service (TOS). Additionally, Accounts Payable (AP) and Prior-Notification categories may be utilized.
Nomenclature
All paperwork batches will be scanned with the prefix FPS. The suffix of each batch name will be either payments, charges, or nonpay, as needed. The name of the batch itself with be based upon a six-digit representation of the relevant date. Thus, all batches will appear FPS xx.xx.xx type. It is important to keep batch names uniform; thus, abbreviations are not acceptable. If more than a single batch is necessary for a given date, each additional batch will be appended with (#), where # represents the batch number beginning at 2.
Organization
In the Common Data folder of the server, there exists a folder entitled FPS. This is the folder that all billing office paperwork should reside in. All charge, payment, and nonpay batches will be organized in the following fashion. Each calendar year will have a subfolder. Within each of these subfolders will exist an additional folder for each calendar month. Within each month subfolder will exist with three additional folders entitled charges, payments, and nonpay. Furthermore, each payment folder should include two additional folders named IPAY and OPAY for further categorization. Thus, for example, any nonpay batch that must be located can be found by entering into the folder for the relevant year, month and then nonpay.
Nextech Notation
Nextech notation is paramount to the functionality of our filing system. Without equally diligent Nextech posting and notation accuracy/precision, the system will prove to be inept. The idea is that because Nextech automatically date-stamps each notation, one can note “on file with nonpay” or “on file with payments” and easily pull the file containing the necessary record. Thus, if an individual notices that the previous record from a referenced note is “on file with payments” and date stamped on a given date, they can utilize the filing organization to immediately and efficiently pull the file and locate the record for reprint, reference, citation, and so on. Furthermore, ALL billing office nextech notation should include ALL pertinent information; nothing should be assumed too obvious for input.
Physical Copies
Physical copies of all payment batches will be retained for financial records. All payment batches will be organized per deposit (see Accounts Payable and Workflow sections) and archived at the end of each month. At year end, the retention of previous annual finances will be reviewed and considered for permanent archives. For charge and nonpay batches, scanning will suffice.
2) Payments
a. Categorization
i. General
ii. Payment Category
b. Posting
i. OPAY
1. Overview
2. Change
ii. IPAY
c. Batching
i. OPAY
ii. IPAY
d. Reconciliation
i. OPAY
1. Overview
2. Process
a. Post
b. Review
c. Record
d. Scan/File
i. Change
ii. Cash Payments
ii. IPAY
1. Overview
2. Process
a. Post
b. Review
c. Record
d. Scan/File
Payments
Categorization
General
Payment will be categorized by office payments (OPAY) and insurance payments (IPAY). OPAY include all mail-in payments, all mail-in requests for credit card processing, all phone orders for credit card processing, and all payments taken in the office. IPAY will include all checks and electronic funds transfers (EFT) from any insurance carrier, be it commercial, liability, or otherwise.
Payment Category
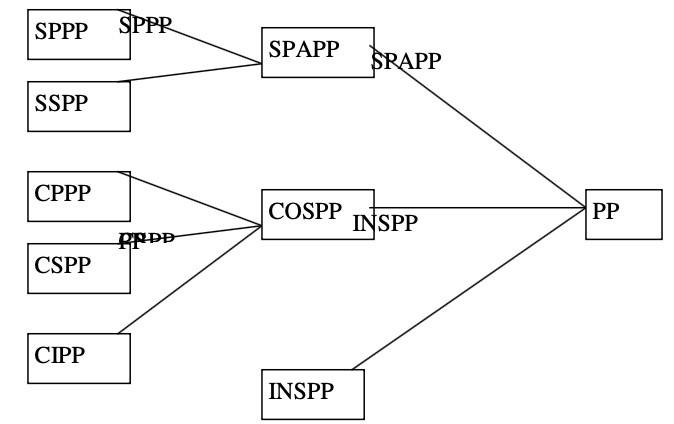
Payment categories have been organized to facilitate simple report processing. It is important that all payments are posted to the relevant category. This means that initial data entry accuracy is imperative. Considering the clinic environment, billing staff will be responsible for monitoring and correcting clerical data entry errors on a regular basis. Please see below an outline of said categories. If a payment spans any given category, please select the next relevant category per the included diagram.
e.g. If a given payment is applied towards a Botox injection (CIPP) and a chemical peel (SSPP), the correct category would be PP. Alternatively, if the payment were applied towards ScarStrips (CPPP) and a prepayment for upcoming cosmetic surgery (CSPP) the correct category would be COSPP.
Posting
OPAY
Overview
OPAY posting will be accomplished through the Billing Tab of the Patient Module in Nextech. OPAY posting must include the following fields: Total Amount, Date, Payment Category, Description (generates automatically), Responsibility, Location (generates automatically), Provider (generates automatically), Method and either Check Number/Card Number/Amount Received.
Total Amount –sum of the amount received
Date – date of payment/batch (TOS)
Payment Category – based upon the rationale for the payment
Description – generates automatically based upon selected Payment Category
Responsibility –paying party
Location – generates automatically as (Provider Name Business Name) – should not be altered
Provider – generates automatically as (Provider Name Business Name) – should not be altered
Method – payment method
Special Note: Change
When collecting cash payment in an instance when change is tendered, the Total amount field should equal the difference of the payment and the change given. The Amount Received field should equal the actual dollar amount received prior to the change being presented. Once the Total Amount and Amount Received fields have been input, the Change Given field auto- calculates to display the correct amount of change to present to the customer.
IPAY
IPAY will be posted through the Batch Payments Tab of the Financial Module. IPAY posting must contain the following fields: Total Amount, Date, Insurance Company, Description (generates automatical ly), Location (generates automatically), Provider, Payment Category (generates automatically), Check Number.
Total Amount – sum of the amount received per check Date – date of IPAY batch Insurance Company – payer
Description – generates automatically based upon Insurance List setup – should not be altered Location – generates automatically as (Provider Name Business Name) – should not be altered Provider –Should ALWAYS select (Provider Name Business Name)
Payment Category –generates automatically based upon Insurance List setup – should not be altered Check Number – Either check or EFT number (EFT trumps check if both are available)
Special Note: Payment Evaluation
Insurance payments should not be accepted in full. All payments that do not coincide with ASPS, CCI, AMA, CPT guidelines, trending, and industry standards should be questioned. No line item should go unpaid without careful analysis and, in most cases, appeal. Please be sure to keep in mind medical policies, coverage determinations, fee schedules, contracted rates, and the like. This level of examination will be further elucidated in the Follow-Up section of the manual.
Batching
OPAY
OPAY batches will be organized by date in terms of time of service. All credit cards processed on said day will be included with all cash and checks received for said time of service (TOS). Mail-in payments can be included with any batch that is being reconciled on the date of receipt, but mail-in credit cards will be processed per the day the card is run. All mail-in payments should be posted by billing office staff to the relevant date. All other OPAY will be posted by reception/spa/clinical staff as is collected. The batch should appear complete, as follows: OPAY reconciliation report, Nextech Payments By Pay Category Report, credit card batch summary reports, and individual payments in order per Nextech report.
IPAY
IPAY batches will be organized in two fashions. Physical checks will be batched based on the lesser of a sum total of $10,000.00 in physical checks or five business days. Physical checks will be posted to the date of batching/posting – this will be the batch date. EFT IPAY will be batched and posted individually on the date of the EFT. EFTs that are allocated on the day of a physical check batch should not be included in the overall batch reconciliation. All IPAY will be posted by billing office staff. IPAY posting is essentially synonymous with reconciliation as both must be completed on the same date. The batch should appear, complete, as follows: IPAY reconciliation report, Nextech Payments By Pay Category Report, all checks, including EOBs in order per IPAY reconciliation report.
Reconciliation
OPAY
Overview
OPAY batches will be reconciled the day following the TOS. The rationale for this is to allow time for the credit card processing terminals to settle the credit batches. A single credit batch is generated automatically, per terminal, at approximately 11:30 PM on a daily basis. If no funds are available to batch, no batch report will be generated. OPAY payments collected by the reception/esthetician/clinical staff are kept in a folder organized by TOS date. The previous day’s folder will be available at the checkout desk. The current day’s folder is available at the Check-In Desk. The previous day’s credit batch summaries are attached to the current day’s payments folder and thus should be detached from the folder to include with reconciliation.
Process
POST - The first step in reconciling an OPAY batch is to post any mail-in payments to be included with said batch. These payments may be deferred from posting/batching for two days (billing office personnel discretion) given the size of the batch to be reconciled.
REVIEW – The second step is to review all payments posted by reception/esthetician/clinical staff. From the Reports Module, Payments Tab, select the Payments By Pay Category report. All Locations, All Providers, and All Patients should all be selected. All Dates should be altered to the Payment Date range for the given TOS, which should be a single day. Print this report. Analyze this report, searching for clear errors in categorization. Each payment should be individually reviewed with given receipt and the Billing Tab of the Patient Module (select View/Edit Payment) until Billing Office Personnel are familiar with rele vant recognition trends. All alterations should be changed in the system. Recording what alterations have been made and who the original error was made by should be indicated on the printout of the report and filed for productivity review. Reprint the Payments By Pay Category report and re-review for accuracy. Make any additional necessary changes and reprint until a clean, accurate report printout is in hand. All physical receipts should be organized as the payments appear on the final report copy.
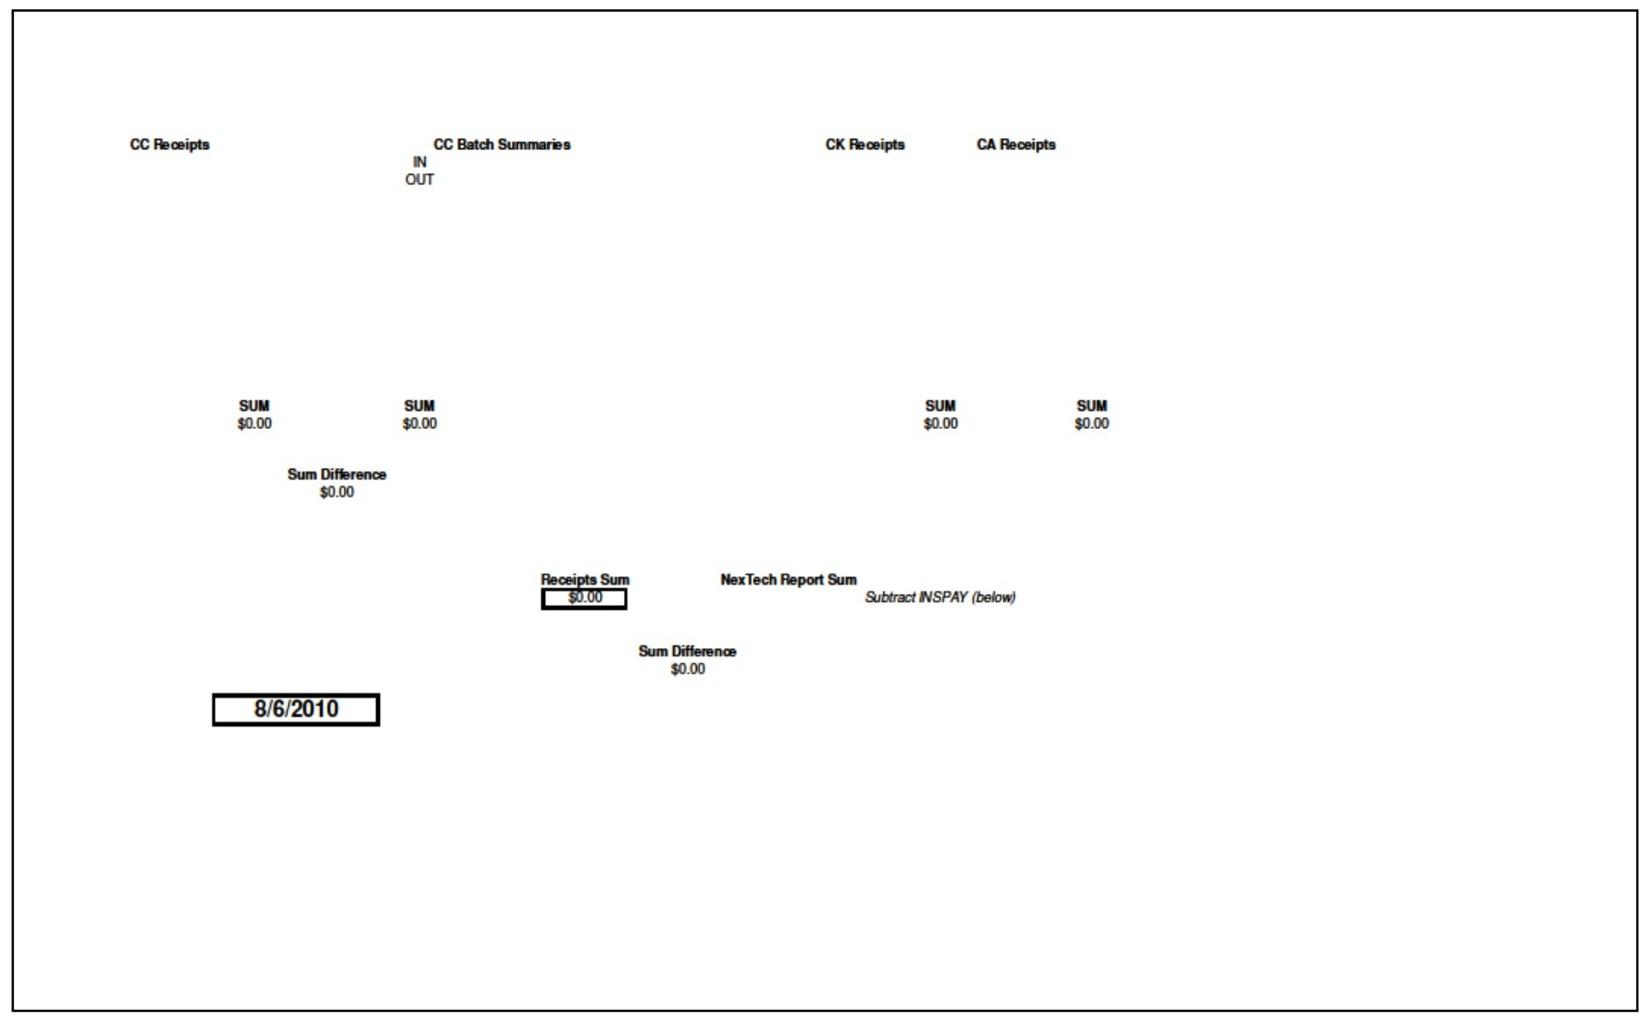
RECORD – The next step is to access the OPAY Reconciliation template located in Common Data/FPS/Financial. Open this file. NO UNAUTHORIZED ALTERATIONS ARE TO BE MADE TO THIS TEMPLATE. The template is set to auto-calculate all relevant data for expedited reconciliation. The cells underneath the bolded headers of CC Receipts, CC Batch Summaries, CK Receipts and CA Receipts are data entry points. These cells are to be filled individually per receipt. The cell directly beneath Nextech Report Sum should be filled with the sum figure at the end of the final report copy. To account for any IPAY that may have been posted to the given TOS date, the IP Pay Category sum should be recorded directly below the Subtract INSPAY (below) box. This will prompt the spreadsheet to recalculate the difference between the report total and the IPAY total for the TOS. No other fields should be altered. If no IPAY are present on the report, this field should be input with a 0.
All credit card batch reports should be fixed to a blank sheet of paper. The sum of each report should be indicated in the appropriate cell. Reception staff should have the reports marked with an I or and O to indicate the terminal of origin per the desk it is located at; I indicates Check-In Desk and O indicates Check-Out Desk. Once credit card batch sums have been recorded, staff may proceed to the bulk of the reconciliation process.
With final report copy in hand, each payment line on the report should be checked off on the outside, right margin as it is verified for accuracy against any cash, check or credit card receipt received. All cash and check payments should be indicated on the report just to the left of the monetary figure with a CA or CK respectively. Line by line, each amount should be individually verified and then input into the reconciliation spreadsheet.
Each SUM field on the spreadsheet auto-sums the Receipts or Summaries totaled in the adjacent column. The Sum Difference field located between CC Receipts and CC Batch Summaries autocalculates any discrepancy between the two SUM fields. Thus if the Sum Difference field is not $0.00, the reconciliation is off by some error in credit card receipts or credit batch summaries. If this field is indeed $0.00, and the Sum Difference field at the bottom of the report is not $0.00, then the error is arising from the CK or CA Receipts. The final field calculates the difference between the report sum minus the IPAY and the Receipts Sum as calculated from the SUM fields for CC, CK and CA. Thus the difference should be $0.00 in most cases.
SCAN/FILE – The final step is to scan a copy of the batch and leave a physical copy for the Accounts Payable personnel.
Special Note – Change
When change is given, the amount of money received will be greater than that of the report. This is acceptable. Please denote with an asterisk in the cells adjacent to the CA Receipts column, next to the relevant payment amount, that change was tendered in any given amount. Thus, the sum of these amounts should equal the sum that the master SUM Difference field is displaying.
Special Note – Cash Payments
All cash payments should be removed from any envelope and individually reviewed for accuracy. The amount of change tendered in the system should be accurate per the charge and the amount of cash on hand with the receipt. Each receipt should be initialed and dated by Billing Office staff as accurate or noted otherwise.
Special Note – Refunds
In the event that a refund is necessary, permission and supervision of a manager is required. Refunds may be placed back onto a given credit card at the discretion of the manager involved. As a rule of thumb, refunds on credit cards should be issued within seven days of the original payment and MUST be placed on the card with which the original purchase was made. All refunds should be written up using the appropriate template, with an explanation, and signed off upon by appropriate personnel. The preferred method of refund is to generate a check utilizing the accounts payable department. When the refund is approved and passed onto Accounts Payable, Nextech should be noted and a copy of the refund request saved on file with nonpay. Once the physical check is cut, the refund should be posted to the appropriate account in Nextech and noted on the Payment Flow.
IPAY
Overview
IPAY batches will be reconciled the day of posting. IPAY reconciliation should be much simpler than OPAY as each batch payment check reconciles automatically upon posting, thus this should only be a process of reconciling Checks/EFTs for a given date. EFTs that are allocated on the day of a physical check batch can be included in the overall batch reconciliation.
Process
POST – Please review the Posting Section of this manual for a detailed description
REVIEW – From the Payments Tab of the Reports Module. Select the Payments SBy Pay Category report. All Locations, All Providers, and All Patients should all be selected. All Dates should be altered to Payment Date range for the given TOS, which should be a single day; note that in most cases, this will be the current date. Prior to printing this report, select only the IP Pay Category. The sum of this report is your key figure.
RECORD – The next step is to access the IPAY Reconciliation template located in Common Data/FPS/Financial. Open this file. NO UNAUTHORIZED ALTERATIONS ARE TO BE MADE TO THIS TEMPLATE. The template is set to auto-calculate all relevant data for expedited reconciliation. This template is much simpler. Each row represents a given check or EFT. Payer fields must be indicated with the insurance company name or simple abbreviation. The Bulk/Individual field should have an I or B indicated whether the check was a bulk payment for more than a single patient or individual. The Amount field should indicate the amount of the actual check or EFT. The Batch Sum field auto-calculates the sum of the Amounts; this figure should match your report figure.
SCAN/FILE – The final step is to scan a copy of the batch and leave a physical copy for the Accounts Payable personnel.
Special Note – Payment Evaluation
As previously noted, each and every line item of payment must be highly scrutinized. Be familiar with trends and guidelines. Have an expectation for each payment as it is posted. If the amount does not coincide with expectations, further research is warranted. When an unusual payment or unpaid line item appears, a copy should be pulled from the payment batch and immediately circulated to follow-up personal or flow for working. This is crucial to the timely follow-up of claims and maintenance of the revenue cycle.
3) Follow Up
a. Overview
i. Ideology
ii. Categorization
b. Processes
i. Agings
ii. Correspondence
iii. Sub-categorization
iv. Adjustments
v. Nonpay
Follow-Up
Overview
Ideology
Follow-up is perhaps the most crucial portion of the reimbursement cycle. Timely, zealous, and diligent follow-up can increase reimbursement significantly if conducted correctly. Please note that some followup will involve simple communication responses, while many instances will require appeals, and some may even warrant notification of governing bodies. It is important to keep in mind that the insurance reimbursement is inaccurate more often than not. In many instances, underpayments will become routine. The key is to argue, fight, pursue, and demand satisfaction. If the answer you are receiving does not appear sufficient, accurate or intelligible than push. Demand supervisors, call executive offices, and utilize provider representatives.
Categorization
The follow-up process can be divided into two main categories: Aging and Correspondence. An aging can be printed from the practice management system; this report will detail all outstanding claims by insurance company and aged period (time from filing date/date of service etc. depending on report variation). Correspondence follow-up is somewhat self-explanatory; it entails responding to all nonpayment claims correspondence in an appropriate fashion. This may include denial explanation of benefits (EOBs), working nonpay forwarded from payment posting, working rejected claims from a given clearinghouse, addressing requests for records, and so on.
Processes
Agings
Agings can be printed from the Reports Module of Nextech. Selecting the Financial Tab will yield several options that each with their own purposes and advantages. The primary aging report that should be utilized is the Aged Receivables By Insurance Co All Locations, All Providers, All Patients should each be selected. The preference arises at the Bill Date/Payment Date versus Assignment Date/Payment Date window. By selecting Bill Date/Payment Date, one can view the aging with the timing based on the actual date of service. This is the best option when charge submission and entry is completed in a timely fashion. The latter option should be utilized when charge entry is less consistent, as it bases the timing off of the date that the charge was actually entered into the system.
Regardless of aging report variety, the report should be printed and initially reviewed. All claims that have not been worked in the previous 30 days MUST be touched. That means submission of records, appeals, calls to insurance, review with the physician, adjusting balances and so on as needed for EVERY SINGLE OUTSTANDING CLAIM once every single month. In terms of addressing claims, although the report will list claims by insurance company, it is important to attack the high dollar amounts first. Thus create brackets for yourself as you review (e.g., 5K +, 1K – 5K, > 1K) as needed. Work through the aging in each given priority bracket and track back for the next once complete. A good goal for an in control aging should be 75% current claims. Current claims can be those categorized as less than 60 days aged.
Correspondence
All daily mail correspondence follow-up should be addressed the day that it is received. All follow-up generated from payment batches must be addressed within two business days of the payment posting. Payment posting personnel are responsible for recognizing, flagging and passing on underpayment and nonpayment claims issues.
Sub-Categorization
As previously noted, follow-up can involve multiple levels of complexity, time and effort. Often times, whether working an aging or daily nonpay (correspondence) it is beneficial to further separate follow-up materials into sets based upon task. For instance, often times separating into simple nonpay (records needed, patient liability (applied to deductible/coinsurance), acceptable write-off adjustments), complex nonpay (obvious appeals, second/tertiary level appeals, provider relations issues) and research needed (call warranted, system research necessary) can streamline the process.
Adjustments
No staff member is allowed to post any write-off or adjustment of any non-contractual obligatory variety (i.e., over the allowed amount per contracted rate) without Billing Manager or appropriate staff clearance. Any and all unauthorized and inaccurate write-offs and adjustments are strictly prohibited. When in doubt, ask. Furthermore, no adjustments should be posted without corresponding paperwork on file. Any denial, appeal, proof of payment etc. MUST be on file. Denied appeals of any level alone are not justification for write-offs without prior approval.
Nonpay
All paperwork encountered during, spurring or consequential to any follow up procedure must be kept on file. Please review the Filing portion of the manual for further clarification. However, please do note that any paperwork referenced within the follow-up process must be on file for future citation. If the referenced paperwork is already on file, there is no need to duplicate the filing, but accurate citation such that any future personnel can easily track down the paperwork must be noted. For example, if a payment is posted for surgery and a single line item is denied, the follow-up personnel need not scan the payment EOB once again. It will suffice to note in Nextech “see xx.xx.xx payment batch for eob” or “eob on file with xx.xx.xx payments.”
4) Charges
a. Overview
i. Overview
ii. Categorization
1. Cosmetic
2. Insurance
b. Ideal
c. Current
i. Overview
ii. Process
1. Generation
2. Input
3. Submission
Charges
Overview
Overview
Charge entry is the first step in the revenue cycle. Charges should be filled out on a superbill by (Provider Name Business Name) and provided to the billing department in a timely fashion. Charges are then reviewed, recoded (if necessary), input and transmitted. It is the responsibility of the billing department to submit all charges released for billing and to oversee the billing process of the physician, thus catching those charges unintentionally omitted. The reality of the current system consists of minimal medical documentation sufficient for billing and minimal charge ticket input from the rendering physician. Thus, we must have a plan for typical and atypical situations for billing.
Categorization
In a practice such as this, charges for cosmetic versus insurance liability must be categorized as such as they will follow different rules for billing. Cosmetic charges include those charges for services rendered with no medical indications. Insurance charges are those charges billed for services rendered with a clear medical indication and a desire for insurance reimbursement. Charges for products and spa services will also be routinely entered by the reception and esthetician teams, respectively. These charges must be reviewed for accuracy on a spot check basis, but will not be individually reviewed by the billing department nor are the responsibility of the billing department for consistent input at this point in time.
Cosmetic
Cosmetic charges should be indicated by the provider. These charges will not be billed with CPT codes regardless of the indication upon the superbill. Cosmetic surgical charges should be entered from quotes and with the alphabetical charge codes. Cosmetic post-operative visits are no charge visits so long as they represent true follow-up visits and not a new consultation. Cosmetic consultations are subject to a $100 fee to the patient. Surgical charges, whether in-patient, out- patient or in-office are subject to the system costs, quotes and (Provider Name Business Name) individual review exceptions; most often, a preapproved price and quote should be generated by the Cosmetic Patient Care Coordinator (CPCC). When in doubt, review with (Provider Name Business Name) and/or the CPCC. Cosmetic services should be paid at or before the time of service and thus charges generated will already have a payment ready to be applied. This process of pre-payment will be reviewed and monitored by the CPCC, Insurance Coordinator and Surgery Scheduler
Insurance
Insurance charges must be indicated by the provider or, on occasion, may be coded from a physician operative report by appropriately trained personnel. Charge tickets should be reviewed at input for accuracy of all data fields including, but not limited to, date of service, CPT, ICD-9, place of service, modifier(s) and so on. Upon completion of charge entry, charges must be logged based on date of receipt and date of service and then transmitted from the practice management system to the clearinghouse for electronic transmission.
Ideal
Ideally, charges should be received from the provider within several days of the date of service for input. These charges can be reviewed at the time of input, logged by date of service (similar to payments and nonpay) and scanned in as such. On a weekly basis, the Reports Module should be used to run the Scheduled and Not Billed Report from the Scheduler Tab for the past week. This safety net report will catch all unbilled charges, which can then be reviewed and input. Charges should be submitted to the clearinghouse for transmission on a daily basis.
Current
Overview
The current state of charge ticket turn in and thus charge entry is minimal. Currently, no charge tickets are received from the rendering physician. Furthermore, office procedures, insurance procedures from the surgical center and office visits all lack sufficient medical documentation for billing without direct physician indication. Thus, the only billing that is submitted to insurance companies arises from charges coded by the billing office from operative reports and dictations. Dictations arrive intermittently from the transcription service in email form. These will include operative reports from in-office procedures, operative reports from surgical procedures conducted in the surgical suite, and consult reports. Additionally, operative reports for surgical cases and hospital visits from the NorthShore University HealthSystems group are faxed over and can be accessed through the online Epic System. These dictations can be coded by appropriately trained billing office staff on behalf of the physician.
The current trend over the past 9-12 month period has included billing primarily hospital surgeries only. More recently, we have begun developing a reporting module with the tech support from the Epic System to capture hospital visits. Furthermore, the occasional (once every 2-3 months) batch of dictations will arrive from our transcription service with office procedures and consultation reports. Insurance applicable surgical cases from the (Provider Name Business Name) have yet to be received to date.
The ideal mindset for the charge entry process should be maximization without sacrifice of any semblance of ethics. No charge has left nor should it leave our office without proper medical documentation and/or a charge ticket from (Provider Name Business Name), made out in his handwriting.
Process
For the purposes of this manual, we will assume no change in rate or trending of charge ticket receipt from (Provider Name Business Name). That said, the current goal is to bill all surgical cases regardless of category. Additionally, all consult reports dictated should be coded into a charge. Furthermore, any and all office procedures with a dictated, formal operative report are to be billed. Again, this means we are currently missing virtually all office visits, all office procedures and all insurance surgical cases from the surgical center. Additionally, we are nearing completion of an additional method to achieve billing for all hospital visits. Upon successful implementation, an addendum will be generated for this manual.
Generation
Charges are to be generated on a weekly basis. Emails and faxes from the NorthShore University Health Systems group and the (Provider Name Business Name) transcriptionist should be compiled from the past charge period (one week). This gives the billing office the first set of “flags” for what is to be billed. Additionally, two reports from the Nextech Reports Module should be utilized. First and foremost, as a benchmark of what needs to go out, the Appointments By Type Report from the Scheduler Tab must be run for the previous week. Charges should be input on Mondays per the current trend; thus the report would be run on a Monday from the previous Monday through Sunday. The report should be limited by the appointment types Surgery – Combo, Surgery – Cosmetic, and Surgery – Insurance. Based on scheduling, this should capture all surgery charges from the hospital system and the surgical suite for the relevant time frame. Additionally, once the charge entry process has been completed, we will run the Scheduled and Not Billed by Appt. and Bill Date) Report from the same tab; this report will catch any unbilled or misbilled dates of service.
In report order, charges should be transcribed to the superbill forms. Cosmetic charges (fully cosmetic and/or cosmetic portions of insurance procedures) can be billed directly from quotes and do not require a superbill. Quotes often contain erroneous charges listed originally for informative purposes such as anesthesia and facility charges or overnight charges for hospital surgeries. These erroneous charges can be omitted. Duplicate charges such as “Breast Reduction – Insurance” which clearly indicates an insurance charge for the service, should be generated, can remain as an indicator for the insurance charge.
Input
Once encounter forms have been generated, charges should be placed in chronological order and input into the system through the Billing Tab of the Patient Module. By selecting New Bill in the upper left, the billing input screen will be prompted to appear. Required fields include Bill Date (which should match the date of service and will automatically generate the date per line item), Diagnosis Codes, Service Codes (append appropriate modifiers), Place of Service, Place of Service Designation Code, Referring Physician, and Patient Hospitalized To and From (when appropriate). Other fields can and should be filled in when necessary. Appropriate diagnosis linking is also expected. The goal is to submit a clean claim at the point of initial submission; this will always lead to a more expedient and efficient reimbursement cycle in comparison to appropriate follow-up work For cosmetic portions of surgeries, only the Bill Date, Place of Service, and Place of Service Designation are required. Prepayments should be immediately applied. Any cosmetic surgery or cosmetic portion that does not match quote to prepayment must be urgently reviewed for what and where the miscommunication/inaccurate payment was generated from.
Because combination cases are likely to have the cosmetic portion billed prior to receipt of the transcript utilized for insurance portion billing charge fabrication, we must account for these missing portions of surgeries. As the Scheduled and Not Billed Report will overlook these charges (as part has been input), we must utilize the Charges Missing Surgery spreadsheet found in FPS/Flows. This flow lists patient name, date of service and procedure. The spreadsheet is also color-coded as follows: green (insurance surgery in surgery center), yellow (insurance surgery at hospital) and orange (review needed). The purpose of this flow is to keep track of charges needed for input that Nextech reporting will not catch. Functionally, it really tracks surgeries with insurance portions that do not have operative reports to bill from. Of course as we collect relevant reporting and bill out the charges, the relevant newly billed charge rows may be deleted from the spreadsheet.
NOTE – facility time
Each week, usually the Wednesday following Tuesday surgery center cases, the Insurance Coordinator will pass off the charts containing surgical records. Utilizing the NorthShore University HealthSystems Anesthesia Record actual surgery time should be calculated by utilizing the Start and End times (ignoring Incision Time). Once the charge has been input, a note should be attached to the DOS with the proper notation prefix of xx/xx/xx DOS. The note should state” x hr and x min Sx, where the “x” denotes the relative number. If the surgery time has gone under the paid time frame by thirty minutes, a refund is due. Should the surgery run over thirty minutes beyond the paid time, an additional amount is due per the fee schedule. The Facility Fee should be adjusted appropriately and the chart notated as to why the changes were made.
NOTE - Insurance Entry
Although it is the responsibility of the Reception Team to enter patient insurance information into each Nextech chart, more often than not, this process is overlooked. Thus each patient’s chart should be reviewed for the most recently scanned or recorded insurance information. This information should be verified as entered and current in the Insurance tab of the patient’s chart in Nextech.
Filing
Upon data entry, the charges are to be scanned in chronological order, and given a batch name as follows:FPS xx/xx/xx for the given date of charge entry. Charges should then be scanned into the computer and filed in FPS/Flows/Charges/Charges backlog. Charges must also be logged on the Charges Billed spreadsheet. Within the Excel document, each month for each year has a worksheet. The date of charge receipt (or generation) should be input as well as review/input date (if received and input on a different date), date of service and number of charges (in the event that more than a single charge for a single date of service is input on the same date). The batch name should also be denoted. In this fashion, if we care to pull a given superbill in the future, we can find the date of input, and utilize the flow to pinpoint which batch it might be in. This is not the ideal filing method (each DOS should constitute a batch ideally), but it is the most efficient given the state of charge ticket turn-in.
Submission
Once the claim batch has been completely entered, scanned and filed, ANSI files must be generated for submission of the claims to the clearinghouse. From the Financial module, EBilling Batch Tab, all newly entered charges can be viewed in brief. If a charge is not present, in all likelihood, the patient’s insurance information was not ever entered. Review the Unselected Batched HCFA Claims at the top of the screen for erroneous charges (product or cosmetic service charges entered at insurance responsibility in error) and correct as needed. Once corrections have been made, batch all charges by moving them to the Selected Batch HCFA Claims section on the lower half of the screen. Next, select Validate Selected HCFA Claims on the right-hand side of the screen. A text file pop-up will be automatically generated with all errors detected by Nextech. This programming is relatively weak and should NOT be relied upon to catch major errors. This corrective measure will typically only catch discrepancies in patient demographics, incorrect provider selections or missing referring provider NPIs. Once all corrections have been made in response to the text file generated, please re-verify charges until Nextech prompts that there are no errors present. Next, select Export Batch from the lower left-hand corner. A pop-up will auto-generate to save the file to Server2/Pracstation/EBilling and automatically name the file as ebilling.txt. Please save the file here and do not alter the title for now. Final upload and submission instructions are included in the Clearinghouse Section of this Manual.
5) Accounts Payable
a. Overview
i. General
ii. Categorization
iii. Quality Control
b. Deposits
i. General
ii. Posting
iii. Nomenclature
c. Invoices
i. General
ii. Filing
iii. Matching
iv. Posting
v. Payment
Accounts Payable
Overview General
The Accounts payable (AP) program utilized is Quickbooks Pro. The program can only be accessed by authorized personnel and is stored on the server for safety and data integrity. Access to the company file will be presented in the form of a green shortcut to the actual program. Additionally, a shortcut to the Quickbooks Folder (hidden on the server) will be available. Within this folder is where backups, accountant’s changes etc. are filed.
All calls with vendors are to be recorded, date stamped and initialed in the Edit Notes section of the Vender Center for the appropriate party. In a similar fashion to the Accounts Receivable (AR) notations, all names and reference numbers should be recorded as well as pertinent information to miscellaneous, extraneous or extraordinary actions/events. The idea remains that anyone should be able to access the note for a clear history of what has happened and have a point of reference as to where all of the information came from. Any and all paperwork that arrives and is not categorically relevant should be scanned into AP and noted in said section. AP is scanned in the exact same location and nomenclature as payments and nonpay. Additionally, an accordion folder for the relative year is available for paper copies to be stored after scanning as a backup.
In general, accounts payable should be addressed once on a weekly basis. Traditionally, this day has been Thursdays, although this can be subject to change based on functionality and efficiency. Invoices are to be posted and paid, deposits recorded, statements reviewed, packing slips matched to invoices and so on.
AP should be handled with great care; entry and payment should be halted if anything remotely questionable is present. We must verify accuracy and ask questions first, record and pay later. Attention to detail is absolutely essential.
Categorization
AP paperwork can be categorized in the following fashion: invoices, payment batches (deposits), packing/ delivery slips, statements and credit card receipts. Paperwork should be filed and handled appropriately per category. Packing and delivery slips are to be attached to the relevant invoice as proof of receipt. Invoices are subsequently entered into Quickbooks and paid with appropriate timing. Statements are to be reviewed on a once weekly basis to determine if any invoices are missing or indicate the possibility of checks not being delivered. Credit card receipts are to be addressed on a once per month basis upon credit card statement processing/reconciliation and payment. Each of these procedures will be explicated further in the relevant section hereafter.
Quality Control
EVERY SINGLE TIME Quickbooks is accessed, the account balances must be verified at initiation, new balance recorded at closing, and a backup saved. The Quickbooks Log is a paper log that has account balances, date of record, and initials of the recording individual. Thus, upon opening Quickbooks, the latest balances in the log should match the program balances. The previous balances in the log should be checked off upon match verification. Once the individual is through utilizing QuickBooks, they should create a new posting in the log with the 6-digit date, account number, account balance (of all accounts
with balances – likely exclusively Cash in Bank (Account 1000) and Petty Cash (Account 1020) and initial. Additionally, a backup should be saved to the following location: Network/server2/Common Data/QuickBooks/Backups. Once a given month is concluded, only the last backup of said month need be saved - the rest can be deleted. The last backup of the month should be moved to the corresponding year folder, titled YYYY.
Deposits
General
Deposits are posted into Quickbooks in such a fashion that they will easily match the Bank of America statement. Thus, although all office payments from a given date of service are recorded on a single deposit reconciliation form, they are to be posted into Quickbooks as they are deposited. Thus, each credit card terminal batch needs its own deposit, the check sum will need a deposit, and the cash sum will need a deposit (on occasion it may be more efficient to do a single check/cash batch rather than split). Furthermore, the credit card batch deposits will match the time of service, whereas the checks/cash batches will match the date of actual deposit at the bank or with the check scanner. Furthermore, insurance direct deposit batches will match the date of payment whereas physical check batches and Admin deposit batches will match the actual date of deposit.
Posting
Deposits can be posted by accessing the Banking tab of the file bar and selecting Make Deposits. Again, take care when entering the deposit date. Other fields that must be filled out are the Memo, From Account, Memo, Pmt Meth and Amount fields. The top Memo field serves as an abbreviation of the lower Memo field. Pmt Meth indicates the method of payment, be it cash, credit, check or direct deposit. The Amount field is self-explanatory. Posted deposits are filed together with the relevant deposit slips and then archived together by month in the storage unit.
Nomenclature
Memo line nomenclature is as follows:
OPAY – Method (2 letter abbreviation such as CC, CK or CA – or CA/CK for joint batches) followed by six-digit date. The lower memo line should read “TOS MM/DD/YY.”
IPAY – Direct Deposits – The top memo line should read “Ins” followed by the insurance company’s abbreviation and then a six-digit date of deposit (i.e., INS MC 11/11/11). The lower memo line should read the full insurance company name, followed by the six digit date again.
IPAY – Check Batch – The top memo line should read “INS CK MM/DD/YY” and the bottom memo line should read “Insurance Checks MM/DD/YY.”
Admin – The top memo line should read Admin MM/DD/YY. The bottom line can mirror the top.
Admin – The top memo line should read Admin MM/DD/YY. The bottom line can mirror the top.
Invoices
General
Invoice addressing involves four processes: matching, recording, paying, and filing. Invoices must first be matched to a packing or delivery slip when applicable; this process verifies that the product was received. Invoices must then be reviewed and posted into Quickbooks and paid AT LEAST two weeks prior to the due date. Paid invoices and check stubs must then be filed together in the appropriate AP folder.
Matching
All packing slips are to be filed alphabetically in the Packing Slips accordion folder. Upon invoice entry, Invoices are to alphabetized and then matched as they are set in the “to be entered” pile. Dated invoices (due to in two weeks or less) with no present packing slip should be reviewed with the pertinent office staff for verbal confirmation of receipt of product(s). In the event that no staff member can reasonably confirm receipt, the invoice must be reviewed with the Office Manager. The invoice will either be approved for payment sans packing slip (please note in an event like this) or will be rejected, in which case AP personnel must review with the relevant vender for confirmation of receipt prior to payment.
Posting
Invoices are entered in the Vender Center of Quickbooks. By selecting Venders from the file bar, Enter Bills one can access the invoice entry screen. Every single invoice entered must include an accurate Vender, Invoice Date, Ref. No (invoice #), Amount Due, Bill Due, Terms (should auto generate unless not yet entered in which case, please do, or variable in which case please leave at most common term set for given vender), and Account. The memo line is appropriate for a variation or specification that may be useful. There is no “standard” for entering information in this field, but please be liberal with descriptions. Once entered, the invoice may be filed in the “Invoice to Be Paid” accordion folder. Credit Memos are also to be entered in this fashion and utilize the same entry procedure. The only difference is that the “credit” option must be selected from the upper right-hand corner rather than “bill.”
Payment
Invoices are to be paid two weeks prior to the due date at the latest. Invoices should be pulled and compiled for payment after review from the “Invoices to Be Paid” accordion folder. Once all relevant invoices have been selected check for credits, which are displayed at the bottom of the screen near the Allocate Credits button. Should a credit be present, simply select the Allocate button and check off which credit(s) you would like to use in the pop-up window.
Once all desired invoices are selected to be paid and credits have been applied, select Pay Bills. Make sure that the check date and invoices listed are accurate; double-check against physical paperwork present in the “to be paid” pile. Once the checks have been printed, organize the invoices behind each physical check and submit to the Physician for review/signing.
After the Doctor has reviewed and signed off on all acceptable checks, detach the bottom third of the stub, staple it to the invoices/paperwork corresponding to the given check. Check any portion of the voucher indicated for return can be enveloped and promptly mailed.
Filing
All invoices are filed in a single filing cabinet per calendar year by vender, alphabetically. Once a given vender has more than three bills paid individually, it is eligible for its own file. Otherwise, each letter of the alphabet should have a “x miscellaneous” file in which all other venders can be filed.
NOTE – Credit/Application – When applying credits, it is crucial to apply them in such a way that the credit does NOT completely wash out any given bill. Any bill “paid” completely by applying a credit or
multiple credits will not print out as displayed on the check stub, thus a given vender may not know that said credit amount and bill have been addressed.
NOTE – Credit Card Statement – When paying this invoice, the card must be carefully reviewed such that each purchase can be verified for accuracy. Although employee access to the card should be limited, unauthorized or unreviewed charges can appear and must be verified. Each charge on the card should have a receipt present. For those that do not, a clear description of what was purchased, by who, and why should be indicated on the reconciliation slip located in Common Data/FPS/Financial
6) Month End
a. Overview
b.Statements
c. Sales Tax
i. Overview
ii. Procedure
d. AR Reporting
i. Overview
ii. Process
e. AP Reporting
f. Reconciliation
i. Overview
ii. Procedure
iii. Filing
a. Statement
i. Payment Flow/Statement Deposits and Credits Section
ii. Payment Flow/Statement Checks Section
iii. Payment Flow/Statement Other Withdrawels and Debits Section
b. Quickbooks
i. Overview
ii. Credits/Deposits Section
iii. Other Withdrawels and Debits Section/Checks Section
Month End Overview
Month end tasks are to be completed at the beginning of each subsequent month, within the following 10 business days. Month end tasks are to be completed by the Billing Office Manager or other appropriately trained personnel.
Statements
Statements must be submitted once each month. Currently, statements are submitted around the 5 th of each month to the clearinghouse for mailing. The date is not as important as consistency; thus if, for whatever reason, it is determined that they are to be submitted late in the month, it should be done is said fashion on a monthly basis. Also, statements should not be submitted for balances below $20.00. Statements are to be spot check reviewed prior to submission to the clearinghouse.
To run statements, select the Reports Module, Financial Tab, Patient Statements 9.0 Report. Select the filter Patient Balance >20, which will limit the statements generated to those with balances greater than $20.00. Additionally, statements must be printed to .pdf for review prior to submission. Select Activities from the file bar, Configure Patient Statements. Make sure that the statement format is CO165 Envelope Format. Once this is complete, select preview report and print the report to .pdf. This file should be saved to the FPS/Flows/Statements folder with the title “MM/YY.” Upon review and approval for submission, utilize the Statement Flow excel workbook to log the date the statements were printed, filter used (if applicable) and number of statements. Then, return to the Configure Patient Statements section of Nextech and select the E-Statement Format, which will allow for document submission through the clearinghouse. You will notice that, upon previewing, a save box will appear. This should default to Pracstation/estatements. Save the document here. Log-in to the clearinghouse and upload the file. Once uploaded, rename the electronic document “DD/MM/YY” and move it to the adjacent Submitted Statements folder.
Within approximately 72 business hours, log back into the clearinghouse and download the confirmation file. This can be accessed through the Bill Patients, Manage Submitted Statements section of the Gateway EDI website. You will be prompted to login again, and select the Confirmation Files section. Click search with no parameters and download the respective file to .pdf. This can be saved to the FPS/Flows/Statements folder with the name “MM/YY conf.”
Sales Tax
Overview
Each month sales tax with the Illinois Department of Revenue website and the Illinois Tax Web File. The module can be accessed at www.revenue.state.il.us. Two reports will need to be run out of Nextech to complete the filing. Once completed, documentation can should be recorded on the server, filed with the Month End Reconciliation and reported to the accountant as needed. This procedure MUST ALWAYS be completed by the 20th of the month following the period in question in order to access discounted rates (this is not an optional perk, it is a requirement).
Procedure
Next login to the IDER website using the Practice IBT# and SSN#, which will be made available to appropriate personnel by the office manager as needed. Once logged in select the appropriate Liability Period. Step 1: Alcoholic Liquor Purchases can be left at zero; select next. Step 2: Taxable Receipts subpoint 1 should be filled with the Report Total from the Pay By Date rounded to the nearest dollar. Press Calculate and then Worksheet. On the ST-1 Worksheet for Line 2 screen, line 1a, insert the Total Tax1 Total amount rounded to the nearest dollar. In the blank space next to 9c enter “SERVICES.” In line 9c take the Pay By Date Report Total and subtract the Tax Totals Charge/Apply Amount column Total; round this amount to the nearest dollar and input; then press Calculate and Next. Press Next again once you are back at the Step 2 screen. At Step 3: Tax on Receipts press Update. In box 4a enter the Tax Totals Pre-tax total column Total amount rounded to the nearest dollar and press Calculate. The amount that appears in box 4b should be equal to the total amount from the Tax Totals Total Tax 1 column. Select Accept to return to the Step 3 screen and then Next. At the Sales from locations outside Illinois screen select Next. On Step 4: Retailer’s Discount and Net Tax on Receipts select “Yes” to the question as to whether we qualify for the discount or not, then select Calculate and the Next. At Step 5: Tax on Purposes select Next. At Step 6: Net Tax Due select Next. At Step 7: Payment Due select Next. At Step 8: Taxpayer and Preparer Information enter the main office number under the Taxpayer section and your information under the Preparer section. At the Direct Debit Payment Option screen select Yes. On the following screen all of the fields should auto-populate with the payment amount, date, checking account information, and contact information. Review the information to ensure it is correct and press continue. Review the document on the Summary screen and select Submit once approved. On the Confirmation page print to pdf and save to the aforementioned location (with the Nextech reports) entitled MM.YY STR. Then select View ST-1 and print to .pdf; save to the same location entitled MM.YY ST1. A paper copy should also be included with the monthly reconciliation.
AR Reporting Overview
The purpose of AR reporting is to provide data in a simple easily accessible fashion to the physician and office manager. Current reporting is designed to elucidate the details of aging development, charge submission and payment receipts. Each of the aforementioned categories contains several reports aimed at displaying different categorical trends. For example, we currently analyze charges from a submitted to payer perspective, volume/amount categorization and date of service by input date fashion. Each report allows for a novel analysis of the same figures. Who are the majority of our charges being submitted to? What charges are billed with the highest dollar value? How dated are the charges input for the current month? Each questions answer and monthly trends provide valuable insight into long-term characteristics, short-term trends and individual anomalies. The value in the process arises from a command of
knowledge of the overall processes and underlying mechanisms and thus an ability to logically explain any/all fluctuations and deviations from the expected or norm. This final point should be presented in a summary to the practice administrator and physician in as simple and concise a fashion as possible so as to augment their understanding, anticipate their questions and provide solid answers.
Process
All reporting should be run on a single date. It is preferable that the actual time of report processing be after business hours or at a point in time when activity in the system (especially from a billing perspective) is minimized. All reports utilized to compile figures must be saved with abbreviated names “DD/MM/YY Report Name” to the FPS/Reports/Month end/YYYY/MM/AR folder. An excel spreadsheet is provided within the FPS/Reports/Month end folder that contains all final formatted data from 2010 to the present. Data from reports is to be transferred from the month end reports to this spreadsheet for presentation and analysis. Saved reports are run with no constraints, such that all data is provided and thus saved data is absolutely transparent upon retrospective review if such a task were ever warranted. That said, often times constraints may be added to simplify reporting data for input into the excel spreadsheet. Additionally, the FPS/Reports/Month end folder contains a word document template, in which the current month’s data can be input. Once dated data is deleted and current data is updated in the excel spreadsheet, the word document can be updated, printed to .pdf and saved in the respective year/month folder.
Below, please find detailed explanation of data compilation/calculation for each report currently utilized. Amendments and omissions may be necessary as month end reporting is customized to the provider’s desired specifications.
-Aged Receivables Split By Responsibility (as of last date of month)
-Aged Receivables By Insurance Co (as of date run)
-Appointments By Type (previous month)
-Charges By Category (“New 2011” report variation; by input date; previous month)
-Charges By Bill Date (by input date; previous month)
-Charges by Insurance Company (by input date; previous month)
-Charges By Service Code By Provider (input date; previous month)
-Financial Summary (by bill and input date; previous month)
-Inventory Values (last date of month)
-Payment By Date (payment date; previous month)
-Payments By Insurance Company (payment date; previous month)
-Payments By Inventory Item (payment date; previous month)
-Payments By Service Category (payment date; “Original Summary no by month” variation; previous month)
-Payments By Service Code (payment date; “by CPT code” variation; previous month)
-Payments By Place of Service (payment date; previous month)
-Scheduled And Not Billed (by Appt. and Bill Date) (previous month)
-Unapplied Credits (previous Month)
AP Reports
Certain reports must be run and recorded for reporting to the CPA at month-end. These reports should be saved to Common Data/FPS/Reports/Month End/YYYY/MM/AP and titled MM.YY Title. Please run and save the following reports:
-Bank Reconciliation Report – Detail and Summary
-Balance Sheet at month end (last day of month)
-Profit and Loss for Month and Year-to-Date with previous year comparison (no % column; last day of month as end date) -Aging Report by Vender (last day of month)
Alternatively, a current Quickbooks backup may be submitted to the CPA at his/her discretion/preference.
Reconciliation Overview
The month-end reconciliation process is one of the few billing office tasks that includes simultaneous work within AR and AP tasks. Due to this fact, this task must be carried out with significant care and attention to detail. This process verifies that the practice management system, accounts payable system, and actual bank account are congruent and without questionable credit/debit items; this is when we make sure the money hit the bank in the expected and correct fashion.
Nextech deposits have been recorded on the Payments Flow throughout the month. This should include the vast majority if not all of the deposits to the bank account for the month, give or take rare extenuating circumstances (for which an explanation should be clear). Thus, by comparing/contrasting the Payments Flow with the bank account Statement Deposits and Credits section we can verify the accuracy of the AR receipts.
Debits/Transfers/Withdrawals must each also be checked for accuracy. QuickBooks will be utilized to “check off” each transaction, but individual review from the bank account must also be used to identify those transactions not already posted to Quickbooks. Often times these transactions will include monthly account analysis fees and/or extraneous circumstances (i.e., new loan payment, new ACH vender transaction etc). These transactions are not a cause for concern unless they are inexplicable or without point of reference. Diligent research must be conducted to identify the source and rationale for each transaction.
Additionally, the Statement will include a list of each and every check that has been cut as well as the image. These should also be visually reviewed and venders/amounts analyzed for anomaly. All out of series checks must be individually reviewed and checked off as well as the preceding and subsequent checks on the Statement
The final step of the Reconciliation process includes utilizing the Quickbooks Reconcile Task. The month-end date and balance are initially set. Each credit and debit in QuickBooks is then “checked off,” which results in a zero balance in an accurately posted month. In this fashion, we again account for all transactions in the month, ensuring that all monies were distributed and collected in the expected fashion.
Procedure Statement
Payment Flow/Statement Deposits and Credits Section
The first deposits posted for a given month displayed upon the bank Statement will likely be composed of early time of service (TOS) credit card settlement batches and deposits “in transit” from the previous month. “In Transit” includes deposits posted to Nextech in one month (thus present on the payment flow),
but not to the bank account in the same month. These deposits must be reviewed with care, as they are the easiest to “misplace” upon reconciliation. Thus we must ensure that the previous month’s “in transit” deposits are accounted for. These deposits should be checked off on the physical bank statement and denoted with the proper TOS and deposit type (i.e., CC, CK/CA etc.).
Following the in transit deposits will be the deposits for the current reconciliation month. These deposits must ALL be accounted for. Once the entire bank statement and Payments Flow have been audited, the only remaining deposits should be those reasonably considered “in transit,” such as those deposited within the last 2-3 days of the given month.
Any and all extraneous deposits must also be accounted for. These miscellaneous deposits will likely come with a prior notification of deposit from the CPA or Bank Contact.
Payment Flow/Statement Checks Section
Each out of sequence check as well as the first check prior and subsequent must be reviewed visually for accuracy of payee. Check images are available at the rear of the statement. Simply visually review check for vender accuracy and check off. Typically checks will appear largely in sequence. Additionally, payroll checks issued physically, rather than via direct deposit, will appear as out of sequence checks at the end of this section.
Payment Flow/Statement Other Withdrawels and Debits
This portion of the statement must be reviewed and scrutinized with additional care. There will not necessarily be a flow or single location for verification of each debit. Rather, there will be several expected debits with individual slips of paperwork for verification. To make matters a bit more complicated, the debit description will often only contain a clue as to the identity rather than a clear title. The reconciliation cannot and will not be completed until each debit has been verified as legitimate. Some common/expected debits will include:
Payroll – split into three debits: Payroll, Taxes, Fees (per payroll run)
401K – American Funds withholdings sum debit (per payroll run)
Sales Tax – IDES debit for the previous month’s sales tax ST1 (once per month based on date of completion)
Transfers – Transfers from corporate to personal account; you should receive emails from the CPA and/or bank contact as well as mailed hard copy verifications of transfers (per transfer completed)
Merchant Services – Credit card processing fees split into two debits by service charges and analysis fees (once per month) Account Analysis – Bank account analysis fee (once per month)
Gateway EDI – Clearinghouse monthly fees (once per month – lump sum)
Loan Debits – Loan debit transfers (once to twice per month – lump sums as indicated on statement(s) – build-out and equipment loans will appear on one statement and laser on the other)
Quickbooks
Overview
Once the bank statement has been verified as accurate through cross-checking/analysis against flows and paperwork on file, we can utilize the statement to verify the accuracy of Quickbooks and reconcile. To access the reconciliation screen select Banking from the file tab and then select Reconcile from the drop down box. A pop up screen should appear. On this screen an “Beginning Balance” should appear; this balance must coincide with the “Opening Balance” displayed on the bank statement. The “Statement Ending Balance” from the bank statement should then be entered into the “Ending Balance” space in
Quickbooks. Ensure that the dates of reconciliation are accurate (i.e., the dates mirror the full calendar length of the month in being reconciled). Once this information has been input select Continue from the lower middle of the pop-up.
The next screen displayed will contain credits on the right and debits on the left. The general idea is to simply check off those items present on the bank statement. Always complete one section before beginning the next. It is recommended that one begins on the credits/deposits side. Please also note that Quickbooks keeps a running tab of the discrepancy between what has been checked off and the closing value on entered from the bank statement. This can be used towards the end of the process to locate any missing amounts.
Also, NEVER close out of the reconciliation screen by any means other than selecting Leave Reconciliation.
Credits/Deposits Section
Columns can be organized by date, amount, memo etc. as desired. The recommended option is to use date or amount. Simply follow the bank statement Credits/Deposits section from front to back, checking off in Quickbooks throughout. Once completed, if the sections are organized by date, everything should be checked off up through the end of the month, where only the in transit deposits and/or deposits from the next month remain. Keep in mind that any miscellaneous deposit not recorded on the flow may not be present here as there has not necessarily been an indication to post said deposit to this point. Simply minimize or leave the reconciliation, post the deposit (again assuming that we have verified the accuracy) and return to the reconciliation.
Other Withdrawels and Debits Section
Again, it is recommended that this side be organized by either date or amount overall. Also, checks will need to be checked off. Thus it is recommended that one begin by verifying checks cashed from the checks section of the bank statement; simply organize by check number for maximum efficiency here. Once all of the checks have been verified it is a simpler task to complete the remaining debits. Flip to the debits section of the bank statement and begin checking off. In general, one should generate a trend in either posting as tasks are completed (transfer requests received, 401K notifications received etc.) or in one session at reconciliation/month end. Many random debits will be present, such as payroll, which is typically imported and thus present, directly after running. Others will certainly not be present until month end and will needed to be posted at the time of reconciliation such as bank maintenance fees and merchant services fees. Leave the reconciliation post the missing verified debits and return to check off. Near the end of this process, organize by amount and review quickly for duplicate postings. This section will not look quite as clean as the deposits side due to discrepancies in dates of posting to the account versus Quickbooks. Once every line item on the bank statement has been accounted for within the reconciliation screen of Quickbooks the closing balance should be met and the Difference field should read “0.” There is something wrong if it does not.
Once completed, the program will prompt the user to print/save the Reconciliation Report – Detail and Summary. Save both reports to the following location: Common Data/FPS/Reports/Month End/(PROVIDER NAME BUSINESS NAME)/MM/AP. Also, print the Summary report and use for the cover sheet.
Filing
Place the Quickbooks Reconciliation Report – Summary as the cover sheet for your packet. Next should come the bank statement, followed by the Payments Flow and then all paperwork in the order it appears
as posted to the bank account. Any extraneous, but pertinent paperwork should be included at the end. This should be scanned and filed with the Reconciliation reports in the FPS folder and named “MM. (PROVIDER NAME BUSINESS NAME) Reconciliation.”
7) Insurance Coordination
a. Prior Authorization
i. Overview
ii. Procedure
iii. Details
b. FMLA/Time-Off Requests
i. Overview
ii. Procedure
c. Medical Record Requests
i. Overview
Insurance Coordination
Prior Authorization Overview
The Prior Authorization process serves to notify insurance companies of upcoming procedures. These procedures include, but are not limited to office procedures (minor surgery), hospital/surgery center procedures (major surgery) and miscellaneous procedures requested by (Provider Name Business Name) but rendered by other physicians (such as, and mostly, mammograms). Although it may typically be considered the responsibility of the patient to notify their insurance company of the aforementioned variations of medical services, it is the stance of our office that excellent customer service must be a primary goal and thus it is the responsibility of the insurance coordinator to address these matters. The Insurance Coordinator should handle all responsibilities therein and keep the patient informed throughout the process. Because of the high level of communication and the emotional impact of results, the Insurance Coordinator must utilize very carefully constructed language and communicate gently so as not to lead a patient to believe in a “guarantee.” As a mindset, the Insurance Coordinator should know and have recorded, insurance prior-notification requirements/results, or a lack thereof if applicable, prior to services being rendered. Furthermore, the Insurance Coordinator should verify eligibility and may also be asked to assist patients with assessing their benefits (i.e., coinsurance, deductible, out-of-pocket maximum).
Additionally, due to the nature of the medical practice (plastics/reconstructive surgery), many procedures are highly scrutinized for medical necessity by insurance companies. As a result, denials do occasionally occur. The insurance coordinator must assess these denials for accuracy and either appeal or pinpoint which requirements were not met. It is the responsibility of the insurance coordinator to familiarize themselves with general guidelines for given procedures; as each insurance plan has its own caveats and stipulations, it is unreasonable to expect to memorize all requirements, but a synopsis is required. Whatever the results, they must be communicated to the patient by the Insurance Coordinator. When denials are received, appeal results have been exhausted or are not applicable, or in instances where the patient does not care to work through insurance for whatever personal reason, the Insurance Coordinator must work in concert with the Patient Care Coordinator to generate cosmetic pricing and quotes for patients. Additionally, to ensure all scheduled procedures are certified appropriately, the Insurance
Coordinator must work closely with the Surgery Scheduler to catch all unconventionally scheduled procedures.
Procedure
Although the general procedure is often “routine,” variations are required depending on the relevant insurance company or companies involved. As a mindset, the Insurance Coordinator should know and have recorded, insurance prior-notification requirements/results, or a lack thereof if applicable. As an overview of procedure:
1) Consultation with medical professional
2) Determination of procedure(s)
3) Clinical information compilation/medical policy review
4) Notification submission
5) Results review
6) If applicable, gather additional clinicals and resubmit or submit to patient care coordinator for cosmetic price quoting
As patients meet with (Provider Name Business Name) for consultations (or on occasion during other office visit variations or even procedures), the Insurance Coordinator should run Nextech reporting Appointments By Type for consultations to flag given patients to be contacted/reviewed. Additionally, the Insurance Coordinator must utilize Nextech report Appointments By Type for surgeries and office procedures to catch scheduled procedures that were not scheduled for consult or otherwise communicated. These reports should be run on a weekly basis at the very least and compared/contrasted with the previous week’s work to identify additions and alterations. Thus, the surgery schedule booking verbiage and office visit records from (Provider Name Business Name)/nurses will serve as a guide for which services are to be certified. Additionally, the Insurance Coordinator will respond to communication from the Surgical Scheduler and the Patient Care Coordinator to ensure all scheduled procedures have been properly addressed.
On occasion, not enough pertinent information will be made available via these avenues to generate coding (be it procedural or diagnosis). Additionally, certain procedures will be abnormal or significantly complicated and thus may require (Provider Name Business Name)’s input. As such, coding sheets should be submitted to (Provider Name Business Name) on a weekly basis for coding clarification. If especially complex circumstances arise, (Provider Name Business Name) may need to provide a consultation dictation elucidating indications for treatment in paragraph format. The idea is to minimize (Provider Name Business Name) activity in this process by coding and compiling data from available records in office and provided by the patient.
Details
There exist several variations of determination responses that must each be addressed individually as follows:
1) Approval: The Insurance Coordinator will inform the patient that this authorization from his/her insurance carrier is not a guarantee of benefit, merely an assurance that the patient does meet the carriers policy for reconstructive procedures and their individual plans do provide benefits for these proposed procedures. The coordinator will instruct the patient to review their insurance plans’ benefits and remind them that balances post-surgery are based on benefits dictated by their insurance carrier, not (Provider Name Business Name) (i.e., coinsurance, deductible, etc.). The coordinator will then direct the patient to surgical coordinator for scheduling of the date of service/pre-operative appointment etc., or the patient care coordinator for review of any cosmetic procedures the patient has included to their date of service.
2) Does not require a pre-authorization of benefits*: The coordinator will inform the patient that their proposed procedures, based on the medical policy of the carrier, are not reviewable prior to service being rendered. This may be due to several factors including, but not limited to...
a) The procedure being outpatient.
b) The procedure is being achieved under local anesthesia or in-office (Place of Service 11).
c) The procedure code being used does not meet criteria for review.
d) The diagnosis code makes the procedure review unnecessary (this happens with diagnosis of cancer or personal history of breast cancer quite a lot).
*This decision, more than any other, has the potential to confuse patients about whether or not their carrier will cover the procedure. The coordinator will review the medical policy with the patient and he/she can make an informed decision about whether they are comfortable moving forward with this type of ambiguous decision. If the patient does not feel comfortable moving forward with insurance, the Insurance Coordinator can direct the patient to the patient care coordinator for a quote of cosmetic costs for an alternative.
3) Denial: The Insurance Coordinator will inform the patient that their insurance considers the proposed procedures to be “cosmetic” in nature and will not give benefits after the procedure. The patient has the option then to appeal this decision (based on carrier policy) and see if they are willing to reconsider this decision. The Insurance Coordinator should guide the patient on the appropriate action and explain the reality of attaining desired results.
a) Appeal
1) The appeal instructions will often appear on the denial from the insurance carrier, along with either a phone number to contact or an address to either fax or mail what is needed.
2) The decision may have the specific reason why the original request was denied in the first place. The coordinator will discuss what is needed with the patient, and the patient will gather this clinical data and fax, mail or email it to the office.
3) The coordinator will write a detailed letter, based on the new information given by the patient, to the insurance carrier as to why the office feels that this patient does indeed meet the medical policy criteria of the carrier, and why this original decision should be overturned, and approved.
4) The coordinator will mail, fax or email all necessary appeal information requested by the carrier to address given within the time frame dictated by the insurance carrier.
5) If the appeal is denied by the carrier for the 2nd time, the coordinator will inform the patient of the decision and outline the recommendations of the insurance carrier. If the 2nd level of appeal outlines a poor likelihood of coverage for the patient, the coordinator will direct the patient to either the surgical coordinator to reschedule the date of service or the patient care coordinator for a cosmetic quote alternative.
6) It is also the responsibility of the Insurance Coordinator to appeal inappropriate denials. If the denial does not make rational or medical sense, then it should be challenged in a similar fashion to post-claim submission denial appeals.
Family Medical Leave Act (FMLA) & Time-Off Requests
Patients who are scheduled for a date of surgical service will often require a lengthy recovery period. In some instances patients will be able to coordinate with their employers to access off after these procedures. The patient will contact the Insurance Coordinator directly or through staff at (Provider Name Business Name) about the need for FMLA/Time-Off paperwork. The Insurance Coordinator will take charge of the executing of this paperwork as well as the storage of the records in the following fashion
Procedure
1) The Insurance Coordinator will determine with the patient what type of procedures the patient is having, what is the date of service, discuss the expected recovery time, and ask the patient his/her expected/ideal date of return to work with appropriate input from (Provider Name Business Name) and the nursing staff.
2) The Insurance Coordinator will determine, with confirmation from nursing staff or (Provider Name Business Name), the specific restrictions needed for the patient post proposed procedure.
3) The Insurance Coordinator will fill out the portion of the FMLA paperwork called “The Attending Physicians Statement” that will often require listing of symptoms, CPT (procedure), ICD-9 (diagnosis) codes, restrictions list, and return to work dates.
4) The Insurance Coordinator will have (Provider Name Business Name) and/or nurses review the FMLA paperwork.
5) The Insurance Coordinator will submit the information to the relevant parties as well as to the patient for his/her records.
6) The Insurance Coordinator will scan the FMLA paperwork into NexTech under the “History and Physical” tab and file away in the determination cabinet under “FMLA” with the relevant date.
Medical Records Requests
Overview
Records from consultations, pre-operative appointments, post-operative appointments, letter's of medical necessity, lab results, pathology, photographs, insurance decisions and operative records are kept digitally in the NexTech computer system or are placed in a patients file. Requests for this information, gathering and mailing of the data as well as collection of payment is done by the Insurance Coordinator. The requests can come from the following are:
1) The patient.
a) If the patient requests his/her own medical records, they are NOT required to fill out a “Medical Records Release Form” form that can be found in the common data folder in the (Provider Name Business Name) server.
b) No charge will be issued to the patient or legal guardian for a copy of his/her own medical records.
2) Physician’s office/hospital
a) The doctor or hospital will need to fax a signed copy of the patients request for medical records and confirmation of patient release authorization
b) After the request has been signed, the coordinator will forward all relevant material to the hospital or doctor’s office by fax or mail.
c) A copy of the records release will be scanned into NexTech.
d) No charge will be issued to the hospital or doctor’s office for the medical records
3) Legal Firm/Consulting Firm/other resource.
a) The firm will need to fax or mail a copy of the reason for need (i.e. being part of a lawsuit or subpoena etc) along with a copy of a medical records release form signed by either the patient or legal guardian and a $20.00 check for records made out to “(Provider Name Business Name)”.
b) The firm will need to fax or mail a copy of the reason for need (i.e. being part of a lawsuit or subpoena etc) along with a copy of a medical records release form signed by either the patient or legal guardian and a $20.00 check for records made out to (Provider Name Business Name).
If the firm does not have a $20.00 check with the original request the coordinator will contact the firm requesting the amount be sent to the office before release of the records can be made. The firm may request a bill for the charge, the coordinator will request a bill from the billing office for medical records or create one and fax/mail/email to the firm.
c) Once the $20.00 check has been received, the coordinator will give it to the billing manager to process in the system and will mail/fax/email the requested material to the appropriate persons.
NOTE: All requests for medical records not part of of FMLA/ Time-off, claims processing, prior notification processing, HSA/FSA medical necessity substantiation MUST be approved by (Provider Name Business Name) personally prior to release.
8) Miscellaneous Tasks
a. Materials Management
i. Overview
ii. Procedure
b. bPre-Operative Financial Counseling
i. Overview
ii. Procedure
c. Gateway EDI (clearinghouse)
i. Overview
ii. Procedure
1. Submitting Claims/Statements
2. Working Rejections
3. Checking for Remittance Advice
Miscellaneous Tasks
Materials Management Overview
The purpose of the Materials Management task and Materials Management Officer is to track all resale items for the medical spa, clinic and injectable portions of the practice. Furthermore, by tracking these items visually and through the practice management system, Nextech, this position/task review the quality of inventory management by attaching a qualitative value in quantity and revenue lost due to error. By analyzing what products disappear in what fashion, we are able to supplement operations management and reduce the cost to the practice.
Procedure
On a biweekly basis, the materials manager takes a visual inventory of all resale items on site for clinic and injectable products (the Spa Manager is currently responsible for maintaining the spa resale item inventory). This count is then compared to the Nextech reporting numbers, which can be collected by running the Inventory Values report. Results are recorded in an excel spreadsheet and analyzed for trending. The materials manager submits a quarterly report to the Business Office Manager detailing any trending, improvements, suggestions or otherwise. The Materials Management office is also responsible for maintaining the inventory item list in Nextech. Thus should items need to be added or removed, it is their responsibility to enter or remove the product as necessary.
Pre-Operative Financial Counseling
Overview
Typically, at least two weeks prior to any surgical procedure, a patient will come to the office for preoperative appointment. At these appointments they will meet with either (Provider Name Business Name) or a nurse to go over medical preparation and learn specifics about their upcoming procedure. After this medical review, the patient will have financial counseling with either the Insurance Coordinator or Patient Care Coordinator. The Insurance Coordinator will serve as a backup to the Patient Care Coordinator and largely counsel patients who are having purely insurance related procedures. It is the responsibility of the Patient Care Coordinator to delegate as needed.
Procedure
For surgical cases, the Insurance Coordinator will prepare all paperwork related to the insurance only financial counseling meeting: Pre-op Financial Counseling Form, Anesthesia Confirmation Form, Facility Confirmation Form and/or Quote as needed.
1. 1) For private insurance patients, the Insurance Coordinator will supply a copy of the insurance decision if a letter is available. The insurance decision will be scanned in the History tab under the Insurance sub-tab. The coordinator will also include a copy of the “Pre-Surgical Financial Counseling Form” for the patient to review.
2. 2) For Medicare Part B patients, the Insurance Coordinator will generate, in addition to the typical forms, the ABN or “Advance Beneficiary Notice”. This form indicates that the patient accepts responsibility for all costs related to (Provider Name Business Name) fees if Medicare denies the medical necessity the proposed procedures.
1. a) The coordinator will list the proposed procedures the patient has requested to be submitted to Medicare Part B in the “items or services” box at the top of the form.
2. b) The coordinator will list possible reasons why these proposed procedures may not be covered by Medicare, i.e. “Does not meet Medicare policy guidelines” etc.
3. c) The coordinator, after confirming the amount with the billing manager, will put the estimated cost of these procedures on the form.
During the counseling meeting with the patient, the coordinator will discuss the insurance decision and all other questions the patient has about the insurance process. After completing the meeting the coordinator will have the patient sign the Financial Counseling Form, Anesthesia Confirmation Form, Facility Confirmation Form, Quote and/or ABN as needed and give a copy to the patient for his/her records. Items of importance that will be discussed include...
1) Explanation of the patient’s Quote, line by line, itemizing all relevant charges. Additionally, it will be indicated that “approval” does not guarantee 100% coverage of all services rendered by (Provider Name Business Name) and that the patient may have some balance applied to their responsibility based on the coverage outlined in his/her plan (i.e., coinsurance, deductible, etc.). Furthermore, it will be indicated that this same rationale applies to anesthesia and facility bills if applicable.
2) Explanation that the patient may receive multiple invoices or statements from sources outside of (Provider Name Business Name) such as the hospital (facility), anesthesia department, pathology department and so on. Furthermore, (Provider Name Business Name) is not responsible for any charges related to these invoices and the patient should contact the provider directly for clarification of the amounts or status of the claims related to these invoices. That said, (Provider Name Business Name) Business office should be utilized as a resource if amicable resolution cannot be successfully achieved with the relevant parties directly.
3) Explanation to the patient should there be any unforeseen issues regarding care, such as extra overnight stays in the hospital, the need for additional medical procedures (labs, additional care etc.) and such services may result in additional unforeseen charges that they are indeed responsible for.
4) Explanation to the patient that additional add-on procedures not discussed prior to this pre-operative appointment have not been pre-approved in the time frame allotted prior to the surgery and therefore may be denied. The Insurance Coordinator will offer his/her opinion on the likelihood of coverage and the risks of denial for noncompliance with prior-notification guidelines. Thereafter, the Insurance Coordinator will present the option of moving forward at a cosmetic rate (generated in conjunction with the Patient Care Coordinator) for these procedures if the patient is uncomfortable with lack of preapproval. The Insurance Coordinator should also explain that denial of services for lack of priornotification may also apply to the facility and anesthesia charges, which will carry a much heftier sum
The coordinator will make a copy of all receipts and signed forms for the patient. The original receipt/check or cash will be put in a folder at the front desk and all other will go to the surgical coordinator for review. The coordinator will make notes in the NexTech system detailing the encounter and file a copy of the counseling form with the billing manager for scanning.
During the counseling meeting with the patient, the coordinator will review the amounts outlined in the surgery proposal with the patient. The patient may add or subtract any procedure at the time of pre op so the coordinator should be prepared to edit the surgery proposal and other subsequent paperwork after discussing financial options. Once all the procedures have been finalized and the amounts agreed to, the coordinator will have the patient sign the surgery proposal, the anesthesia & O.R. form and finally the counseling form. The coordinator will then collect the fees for (Provider Name Business Name) services along with any additional items the patient wishes to purchase at the time of pre op (i.e. vitamins or scar strips).
The coordinator will make a copy of all receipts and signed forms for the patient. The original receipt/check or cash will be put in a folder at the front desk and all other will go to the surgical coordinator for review. The coordinator will make notes in the NexTech system detailing the encounter and file a copy of the counseling form with the billing manager for scanning.
Gateway EDI (clearinghouse)
Overview
The clearinghouse utilized by (Provider Name Business Name) is Gateway EDI. The clearinghouse serves to provide a vehicle for submitting claims, addressing denials, receiving electronic funds transfer explanations and submitting statements. There is additional functionality available such as eligibility verification, reimbursement management and an online patient payment portal through the clearinghouse that our office does not currently utilize, but may certainly consider in the future.
Procedure
Submitting Claims/Statements
From the home page, select Send/Receive Files. On the following screen select either “claims” or “patient statements” by checking the relevant box and press Send/Receive Files. A pop-up box will appear with a Javascript loading image. This upload will automatically pull the file named ebilling.txt from the Pracstation/ebilling folder on the server as indicated the the Charge Submission Section of this Manual. Once the upload is complete, select Confirm File Delivery. The screen should populate the recently uploaded file as well as any other files uploaded in the pre-selected time frame. Claims should be submitted as often as every day depending on the frequency of claim entry. Claims should certainly be uploaded on the day that they are entered into Nextech, as well as statements on the date of processing.
Once the file is confirmed as uploaded, please access the Pracstation/ebilling folder and rename the file to match the charge batch name FPS MM.DD.YY as previously indicated, and move it to the sub-folder therein entitled Submitted Bills.
Confirming File Delivery should also be reviewed to ensure previous batches have been processed with high frequency. Simply select the date range dating back approximately 30 days. Any batch with all claims within confirmed received and processed and/or with the follow-up worked, can be marked as Done. Any batches older than 15 business days still not Done should have all claims not confirmed as received re-billed in a new batch. Additionally, one must follow-up with Gateway EDI to ensure no overarching issues with submissions are present.
Working Rejections
Claim rejections should be reviewed on a daily basis. This can be done by selecting the Primary Claim Rejections or Secondary Claim Rejections, where the titles denote the primacy of the processing insurance party. Any outstanding rejected claims to be worked will be displayed with denial rationale details. These claims should then be worked in Nextech according to the denial rationale and then promptly resubmitted.
Checking for Remittance Advice
This should be done on a daily basis to ensure that all insurance payments are posted promptly. From the home page, select New Remittances. All new remittances should be reviewed, printed, posted, addressed as necessary and marked as complete upon completion.
Sample Task List
b. Patient Payments (CK and CC)
2. Nonpay
3. Miscellaneous
iii. Miscellaneous
b. Log day(s) nonpay
i. Scan
ii. Rename
iii. File
c. Reconcile previous day(s) office payments
i. Post payments from mail
ii. Review Pay By Date report
iii. Correct
1. Log errors
iv. Reconcile per OPAY Excel template
v. Log in Payments Flow
vi. File
1. Scan, rename and log
2. Submit physical copy to AP
d. Check Gateway EDI (clearinghouse)
i. Check messages
ii. Confirm file delivery
iii. Check denials/rejections
iv. Review remittance
1. Print EFTs
a. Submit for posting
2. Print Nonpay batches
a. Submit for follow-up
3. Print “checks”
a. log in Checks Forthcoming Folder
e. Post EFTs
i. Review batch
1. Flag nonpay items
2. Flag issue resolution payments
ii. Compile IPAY Excel template
iii. Post in Nextech
iv. Log in Payments Flow
v. File batch
1. Scan, rename and log
2. Submit physical copy to AP
f. Work excess nonpay chronologically (minimum 2 hours)
g. Work A/R if daily nonpay satisfied
2. WEEKLY
a. Post physical insurance checks
i. Review batch
1. Flag nonpay items
2. Flag issue resolution payments
ii. Compile IPAY Excel template
iii. Post in Nextech
iv. File batch
1. Scan, rename and log
2. Submit physical copy to AP
b. Submit claims
i. Validate claims
1. correct errors
ii. Export electronic batch from Nextech
iii. Upload claims through Gateway EDI
iv. File uploaded batch file
c. Review checks forthcoming
i. Address any checks outstanding
d. Charge entry
i. Review Charges Missing Surgery Report
1. Check EPIC system for applicable outstanding reports
2. Check Flying Fingers transcription service batches
ii. Review Appointments By Date report (surgeries only)
iii. Code encounter forms from available operative reports
iv. Enter charges into Nextech
1. Check Insurance tab for all applicable charges a. Insurance input
i. ID
ii. Group
iii. Primary insured demographics
v. Review Scheduled And Not Billed report
1. Update Charges Missing Surgery spreadsheet
vi. Log charges in Charges Billing spreadsheet
vii. Scan, rename and file batch
e. Accounts Payable
i. Petty Cash Reconciliation
1. Count physical Petty Cash drawer
2. Replace Petty Cash Distribution template
3. Log balance in Petty Cash Flow
4. Review when applicable
a. Discern causes for any/all discrepancies
ii. Verify Quickbooks balance
1. Deposits
a. Enter Deposits for date of expected deposit
i. OPAY Batches
ii. IPAY Batches
iii. Administrative Batches (when applicable – monthly task)
b. Generate Deposit slips
c. File physical batch copies
d. Physically deposit batches
e. File deposit slip receipts with deposit batches
2. Enter invoices (refund requests treated as invoice)
1. Match with corresponding packing slip/order confirmation
vi. Submit reports electronically/physically to Robin McIntyre and (Provider Name Business Name)
c. Submit Statements
i. Run Nextech Patient Statements report
ii. File copy of statements
iii. Generate electronic batch
iv. Upload through Gateway EDI
v. File copy of Statement Batch file
d. Reconcile bank account
i. Review bank statement
1. Review deposits
a. Compare/contrast Payments Flow
b. Compare/contrast Quickbooks deposits
2. Review debits
3. Review physical check images
4. Address inconsistencies
e. Prepare electronic filing and physical filing for next month
i. Generate folders
ii. Generate worksheets in necessary Excel Flow templates
iii. iii. Archive
Deposits
Error logs
Amendment A
(Provider Name Business Name) Payroll & Timekeeping Process/ Protocol
Effective beginning of 3rd Quarter 2011 1st Pay period beginning 6/27/11:
Employee time sheets will be recorded through the PayChex Smart Time module. This program will track hours worked, PTO and vacation time. The employee will be responsible for reporting any missed
punches or errors to the time keeper for correction prior to the end of the pay period on the Time Keeping Correction Sheet.
On a biweekly basis (Wednesday at the latest of the week(s) scheduled to issue payment; usually Monday) designated time keeper/Practice Administrator will approve the past pay period employee time sheets through Smart Time.
Upon approval, Billing Manager or Practice Administrator will import time information into the PayChex Payroll module for processing. The system will be set up to automatically calculate deductions for the respective 401K and health insurance policies. Prior to completion, the system will generate a Payroll Report (summarizes deductions, taxes, payments as a whole and per employee) and a 401K Report (summarizes contributions per employee and as a whole), which will be reviewed prior to finalizing the payment(s).
Once processing is completed by Paychex (typically 24 hours after submission), Billing Manager or Practice Administrator will verify that the payroll charges were applied to the account and post relevant charges to the general ledger. Three debits will appear per pay period: Payroll, Taxes and PayChex processing fees.
401K transfers will be conducted through the American Funds website. These transfer amounts will be input per the Paychex 401K report into the American Funds online module and automatically transferred upon processing. Billing Manager or Practice Administrator will again verify that the transfer has debited the bank account on the proper date and post to Quickbooks thereafter.
1099, 940 and 941 forms are handled automatically by PayChex and issued to the appropriate parties in appropriate time frames.
Billing Manager and Practice Administrator will be cross-trained as back-ups for each other in the event of either’s absence. Additional training and coverage will be set up in advance in the event that both employees are absent at the same time during a payroll run week.
Adding employees, altering status, altering deductions, removing employees will be handled by the Billing Manager, pending appropriate approval by the Practice Administrator, on an as needed basis.
Necessary reports will be provided to Accounting Firm at designated times when these reports and timelines are determined by Accounting Firm.