SHEET
TEXT: QuickBooks 2015: A Complete Course, by Janet Horne
SUPPLIES: 2 USB drives, 3 file folders, printing paper
PROCEDURES: Read each chapter before coming to class. Answer end-of-chapter questions as homework. Always add your name to the company name.
ASSIGNMENTS: Two of the folders required will be used for the chapter and end-ofchapter assignments. Staple the transmittal for each chapter to the printouts that are assembled in the order listed on the transmittal and submit when instructed. (Note: The transmittal sheets for all problems are found at the end of the chapter or the assignment.)
The third folder will be used for the practice sets. Staple the transmittal for the practice set to the printouts that are assembled in the order listed on the transmittal sheet and submit when instructed.
GRADING: Grades will be based on the successful completion of each assignment, end-of-chapter questions, the practice sets, and the examinations. Failure to complete the problems within the chapters or the end-of-chapter assignments will lower your grade by one letter (Example: an A will be lowered to a B if all work is not submitted). Practice sets (including the exam) are worth 100 points each. Written exams are 50 points each, and the final exam is 100 points.
Copyright ©2016 Pearson Education, Inc.
QUICKBOOKS 2015: A Complete Course
Total Projected Points
Section 1 Practice Set (including exam) 100
Written Exam Chapters 1-4 50
Section 2 Practice Set (including exam) 100
Written Exam Chapters 5-7 50
Comprehensive Practice Set (including exam) 100
Written Exam Chapters 8-9 50
Written Comprehensive Final Exam 100
Total Points
Grading Scale
A 90% - 100% 495-550 (and completion of all assignments)
B 80% - 89% 440-494 (and completion of all assignments)
C 70% - 79% 385-439 (and completion of all assignments)
D 60% - 69% 330-384 (and completion of all assignments)
Copyright ©2016 Pearson Education, Inc.
WEEK TOPIC
1 Introduction to class Chapter 1
ASSIGNMENT/NOTES
Introduction to the class
Read Chapter 1 and follow Chapter 1 instructions to download Company Master Files Download Chs 1-4 (Student Data Files)
Complete Chapter 1 for Computer Consulting by Your Name and Your Name Landscape and Pool Service
Answer End-of-Chapter Questions
2 Chapter 2
Read Chapter 2 before class
Complete Chapter 2 for Computer Consulting by Your Name (Continue to use the Computer.qbw file you used in Chapter 1)
Answer End-of-Chapter Questions
Do End-of-Chapter Assignment: Your Name Landscape and Pool Service (Continue to use the Landscape.qbw file you used in Chapter 1)
3 Chapter 3
4 Chapter 4
5 End of Section 1
Read and Complete Chapter 3 for Computer Consulting by Your Name (Continue to use the Computer.qbw file you used in Chapter 2)
Answer End-of-Chapter Questions
Do End-of-Chapter Assignment: Your Name Landscape and Pool Service (Continue to use the Landscape.qbw file you used in Chapter 2)
Read and Complete Chapter 4 for Computer Consulting by Your Name (Continue to use the Computer.qbw file you used in Chapter 3)
Answer End-of-Chapter Questions
Do End-of-Chapter Assignment: Your Name Landscape and Pool Service (Continue to use the Landscape.qbw file you used in Chapter 3)
Turn in folder for Chapters 2, 3, and 4
Complete End-of-Section Practice Set: Your Name At Your Service
Your Name At Your Service Exam
Section 1: Written Exam
WEEK TOPIC
6
Chapter 5
7 Chapter 6
8 Chapter 7
9
End of Section 2
10 Chapter 8
11 Chapter 9
12 End of Section 3
Final Exam
ASSIGNMENT/NOTES
Follow Chapter 1 instructions to download Company Master Files Download Chs 5-8 (Student Data Files)
(Note: the Company Master Files folder also contains three logo files to be used in Chapter 9 and the final practice set.)
Read and Complete Chapter 5 for Your Name Mountain Sports (Use the same Sports.qbw company file for Chapters 5, 6, and 7)
Answer End-of-Chapter Questions
Do End-of-Chapter Assignment: Your Name Resort Clothing (Use the same Clothing.qbw company file for Chapters 5, 6, and 7)
Read and Complete Chapter 6 for Your Name Mountain Sports
Answer End-of-Chapter Questions
Do End-of-Chapter Assignment: Your Name Resort Clothing
Read and Complete Chapter 7 for Your Name Mountain Sports
Answer End-of-Chapter Questions
Do End-of-Chapter Assignment: Your Name Resort Clothing
Turn in Folder for Chapters 5, 6, and 7
Complete End-of-Section Practice Set: Your Name’s Ultimate Golf
Your Name’s Ultimate Golf Exam
Section 2: Written Exam
Read and Complete Chapter 8 for Your Name’s Fitness Solutions
Answer End-of-Chapter Questions
Do End-of-Chapter Assignment Your Name’s Pool & Spa
Read and Complete Chapter 9 for Your Name’s Dogs Dayz
Answer End-of-Chapter Questions
Do End-of-Chapter Assignment: Your Name’s Coffee Corner
Turn in Folder for Chapters 8 and 9
Complete End-of-Section Practice Set: Your Name’s Capitol Books
Your Name’s Capitol Books Exam
Section 3: Written Exam
Comprehensive Final Examination
CHAPTER
Computer Consulting by Your Name
CA 91403
20852 Ventura Blvd. Tarzana, CA 91356
$3,215.00
$3,365.00
$1,425.00
Ahmadrand, Ela
Cooper & Cranston, CPA
Gomez, Luis Esq.
Vines & Rhodes
Williams, Matt CPA
Young, Norton, and Brancato
Computer Consulting by Your Name
2895 West Avenue
Woodland Hills, CA 91367
CUSTOMER
Vines & Rhodes Attorneys at Law 1014 Universal City Plaza North Hollywood, CA 91602
Additional Hours of On-Site Training
Deduct 5 hours of unused training. Reduce the amount due for Invoice 4
It's been a pleasure working with you!
2895 West Avenue Woodland Hills, CA 91367
2895 West Avenue Woodland Hills, CA 91367
Computer Consulting by Your Name
2895 West Avenue
Woodland Hills, CA 91367
Received From:
Research Corp.
Research Corp.
10495 West Avenue
Chatsworth, CA 91311
Date Received 01/15/2015
Payment Method Check
Check/Ref. No. 684
Invoices Paid
Payment Amount $815.00
Computer Consulting by Your Name
2895 West Avenue
Woodland Hills, CA 91367
Received From:
Wagner, Leavitt, and Moraga
Wagner, Leavitt, and Moraga Attorneys at Law
300 Beverly Drive
Beverly Hills, CA 90210
Date Received 01/15/2015
Payment Method Check
Check/Ref. No. 1952
Invoices Paid Date Number
Payment Amount $3,680.00
Computer Consulting by Your Name
2895 West Avenue
Woodland Hills, CA 91367
Received From:
Rosenthal Illustrations
Rosenthal Illustrations
10701 Wilshire Blvd.
Westwood, CA 90025
Date Received 01/15/2015
Payment Method Check Check/Ref. No. 8925
Invoices Paid
Payment Amount $2,000.00
Computer Consulting by Your Name
2895 West Avenue
Woodland Hills, CA 91367
Received From:
Williams, Matt CPA
Matt Williams, CPA
10895 Ventura Blvd.
Encino, CA 91316
Date Received 01/15/2015
Payment Method Check Check/Ref. No. 39251
Invoices Paid
Payment Amount $475.00
Computer Consulting by Your Name
2895 West Avenue
Woodland Hills, CA 91367
Received From:
Andrews Productions
Andrews Productions
2100 San Vicente Blvd.
Santa Monica, CA 90402
Date Received 01/15/2015
Payment Method Check Check/Ref. No. 2051
Invoices Paid
Payment Amount $2,190.00
Computer Consulting by Your Name
2895 West Avenue
Woodland Hills, CA 91367
Received From:
Gomez, Luis Esq.
Luis Gomez, Esq.
5270 Sepulveda Blvd.
Sherman Oaks, CA 91403
Date Received 01/15/2015
Payment Method Check Check/Ref. No. 5632
Invoices Paid
Payment Amount $150.00
Computer Consulting by Your Name
2895 West Avenue
Woodland Hills, CA 91367
Received From:
Shumway, Lewis, and Levy
Shumway, Lewis, and Levy
Attorneys at Law
300 Montana Avenue
Santa Monica, CA 90403
Date Received 01/15/2015 Payment Amount $3,685.00 Payment Method Check
Check/Ref. No. 80195
Invoices Paid
2
CHAPTER
18527 State Street
Santa Barbara, CA 93103
78624 Hope Ranch Street
Santa Barbara, CA 93110
18527 State Street Santa Barbara, CA 93103
Andrews 6019 Sandpiper Avenue Santa Barbara, CA 91306
Thank you for your business.
Your Name Landscape and Pool Service
18527 State Street
Santa Barbara, CA 93103
Received From:
Chang, Hiroshi
Hiroshi Chang
7815 Mission Boulevard
Santa Barbara, CA 91307
Date Received 01/01/2015
Payment Method Check Check/Ref. No. 8642
Invoices Paid
Payment Amount $150.00
Your Name Landscape and Pool Service
18527 State Street
Santa Barbara, CA 93103
Received From:
Ocean View Motel
Ocean View Motel
38951 Marine Avenue
Santa Barbara, CA 91307
Date Received 01/15/2015
Payment Method Check
Check/Ref. No. 6758
Invoices Paid
Payment Amount $450.00
18527 State Street Santa Barbara, CA 93103
$1,850.00
Your Name Landscape and Pool Service
18527 State Street
Santa Barbara, CA 93103
Received From: Creations for You Creations for You
8625 Lake Street
Santa Barbara, CA 91307
Date Received 01/30/2015 Payment Amount $525.00
Payment Method Check Check/Ref. No. 1247
Invoices Paid
Your Name Landscape and Pool Service
18527 State Street
Santa Barbara, CA 93103
Received From:
Collins, Doreen
Doreen Collins
10925 Camino de Oro
Santa Barbara, CA 93109
Date Received 01/30/2015
Payment Method Check Check/Ref. No. 8865
Invoices Paid
Payment Amount $800.00
$1,000.00
Your Name Landscape and Pool Service Sales by Item Summary January 1 - 30, 2015
QUICKBOOKS 2015: A COMPLETE COURSE
CHAPTER 2: END-OF-CHAPTER QUESTIONS
TRUE/FALSE
ANSWER THE FOLLOWING QUESTIONS IN THE SPACE PROVIDED BEFORE THE QUESTION NUMBER.
T 1. A new customer can be added to a company’s records on the fly.
T 2. In QuickBooks error correction for a sale on account can be accomplished by editing the invoice.
F 3. An Item List stores information about products you purchase.
F 4. Once transactions have been entered, modifications to a customer’s account may be made only at the end of the fiscal year.
F 5. In QuickBooks all transactions must be entered using the traditional debit/credit method.
T 6. Checks received for cash sales are held in the Undeposited Funds account until the bank deposit is made.
T 7. When a correction for a transaction is made, QuickBooks not only changes the form used to record the transaction, it also changes all journal and account entries for the transaction to reflect the correction.
T 8. QuickGraphs allow information to be viewed from both a sales standpoint and from an accounts receivable perspective.
F 9. QuickZoom allows you to print a report instantly.
F 10. A customer’s payment on account is immediately recorded in the cash account.
MULTIPLE CHOICE
WRITE THE LETTER OF THE CORRECT ANSWER IN THE SPACE PROVIDED BEFORE THE QUESTION NUMBER.
B 1. To remove an invoice without a trace, it is .
A. voided
B. deleted
C. blocked
D. reversed
C 2. To enter a cash sale, is completed.
A. a debit
B. an invoice
C. a sales receipt
D. receive payments
D 3. Two primary types of lists used in this chapter are .
A. receivables and payables
B. invoices and checks
C. registers and navigator
D. customers and item
D 4. When you enter an invoice, an error may be corrected by .
A. backspacing or deleting
B. tabbing and typing
C. dragging and typing
D. all of the above
B 5. While in the Customer Balance Summary Report, it is possible to get an individual customer’s information by using .
A. QuickReport
B. QuickZoom
C. QuickGraph
D. QuickSummary
A 6. Undeposited Funds represents
A. cash or checks received from customers but not yet deposited in the bank
B. all cash sales
C. the balance of the accounts receivable account
D. none of the above
B 7. QuickBooks uses graphs to illustrate information about
A. the chart of accounts
B. sales
C. the cash account
D. supplies
C 8. Changes to the chart of accounts may be made .
A. at the beginning of a fiscal period
B. before the end of the fiscal year
C. at any time
D. once established, the chart of accounts may not be modified
D 9. To obtain information about sales by item, you can view
A. the income statement
B. the trial balance
C. receivables reports
D. sales reports
A 10. When you add a customer using the Set up method, you add .
A. complete information for a customer
B. only a customer’s name
C. the customer’s name, address, and telephone number
D. the customer’s name and telephone number
FILL-IN
IN THE SPACE PROVIDED, WRITE THE ANSWER THAT MOST APPROPRIATELY COMPLETES THE SENTENCE.
1. The report used to view only the balances on account of each customer is the Customer Balance Summary
2. The form prepared to show a reduction to a sale on account is a(n) credit memo
3. The report that proves that debits equal credits is the trial balance .
4. QuickBooks shows icons on the Home Page and on the Icon Bar that may be clicked to open the business documents used in recording transactions.
5. To verify the company being used in QuickBooks, you check the title bar .
SHORT ESSAY
Explain how the method used to enter an Accounts Receivable transaction in QuickBooks is different from the method used to enter a transaction in an accounting textbook.
Rather than use a traditional sales journal to record debits and credits as you would when using an accounting text, you record the sales transaction for accounts receivable directly on an invoice. Behind the scenes, QuickBooks places all transactions entered via invoices into the Journal.
Copyright
QUICKBOOKS 2015: A COMPLETE COURSE
CHAPTER 2 LECTURE— SALES AND RECEIVABLES: SERVICE BUSINESS
CHAPTER OBJECTIVES
Students will begin hands-on training using QuickBooks and the service business Computer Consulting by Your Name that was used in Chapter 1. The focus of this chapter is sales—both cash and credit—and cash receipts (payments). Students begin preparing invoices to record sales on account, sales receipts to record cash sales, credit memos to record returns by customers, receive payments to record payments received on account, and deposit slips to make bank deposits of checks received from customers. Students begin printing in QuickBooks. They also prepare a variety of reports and graphs focusing on customers and sales.
LECTURE
I. Accounting for Sales and Receivables
A. Discuss the Invoice and its use as a replacement for a Sales Journal
B. Stress the fact that the Customer:Job list is the same as an Accounts Receivable ledger and that the balance of the Customer:Job list will be equal to the balance in the Accounts Receivable account in the Chart of Accounts, which is the same as the General Ledger
C. Discuss the Sales Receipt and its use as a replacement for a Cash Receipts journal
D. Stress the difference between a Sales Receipt (cash sale) and Receive Payments (payment on account for an existing invoice or balance)
IM 2-2
QUICKBOOKS 2015: A Complete Course
E. Remind students to use the dates shown in the text for transaction entry
1. The text uses the year 2015, which is the same year as the version of QuickBooks
2. The text dates will not match the dates of the students’ computers
3. Using the date of the computer, may cause errors in reports and other entries
4. On some reports, QuickBooks automatically inserts the date of the computer and the date cannot be changed; i.e. Bank Deposit Summary
II. Discuss Training Procedures
A. Read the chapter before beginning the assignment
B. When a section is completed, put an X or a check mark on the Do arrow at the beginning of the section
C. If a section is not completed and you stop working, write the date of the work session next to the last step/task completed
D. Review the necessity of closing a company when you finish work
E. Discuss the importance of backing up a company at the end of a work session (Directions provided in Ch. 1)
F. When students are storing data on a USB drive, stress the need to make sure the computer has finished recording data and that they follow the procedures for safely removing the USB (Illustrated in Ch. 1) prior to removing the disk from the computer
LECTURE NOTE
This lecture is designed to be shown in a “live” demonstration where students can see QuickBooks in action. The lecture parallels the text but does not go into the same detail and contains a few illustrative examples. For continuity and by necessity, reports will show totals obtained from the lecture transactions.
COMPUTER DEMONSTRATION AND LECTURE
I. Open Programs
A. Launch Windows—review procedures
B. Open QuickBooks—review procedures
C. Open Computer Consulting by Your Name —review procedures
II. Prepare a sample invoice
A. Create Invoice 1 as a demonstration to students
1. Discuss the relevance of each field as it is completed
2. Show how to Hide History by clicking the Hide History button
Copyright ©2016 Pearson Education, Inc.
3. Demonstrate how to resize the form by
a. pointing to the left or right side until you get a double-arrow
b. drag inward to make the form smaller
4. Show how to move the cursor and use the delete and backspace keys to correct errors
5. Invoice 1 has the following information:
a. Customer:Job—click drop-down arrow, click Gomez, Luis Esq.
b. Custom Template—Intuit Service Invoice (Click the drop-down list arrow and show the students the available invoice templates)
c. Date—01/02/15
1.) Remind students to be very careful with dates
2.) The date of their computers will be the current date
3.) The text uses 2015 for the year to match the version of the program
d. Invoice No.—1
e. Terms—Net 30
f. Item—click drop-down list, click Tech Sup 2
g. Qty—1 (If not entered, QuickBooks calculates on a quantity of 1.)
h. Customer Message—click drop-down list, click Thank you for your business.
6. Click the Formatting tab on the Invoice Icon Bar; and then, click Preview to show how the invoice will look
a. The students will complete the column for Item on the invoice when it is prepared. When printing a service invoice, the column for Item is not printed
b. Click the invoice to Zoom In and point this out
7. Demonstrate printing
a. Discuss QuickBooks printing screens
b. Show how to make changes for printing
c. Provide instructions for the printing procedures in your computer lab
d. NOTE: Remind students—when printing a service invoice, the column for Item is not printed
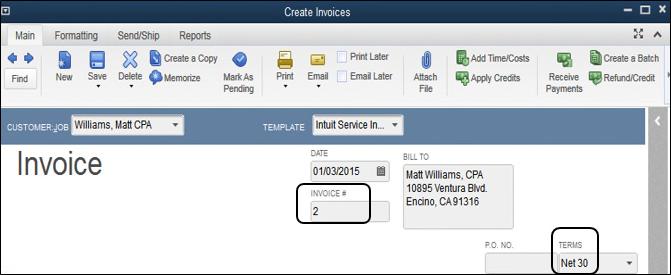
B. Click Save & New and prepare Invoice 2 for Matt
1. Click the drop-down list arrow for Customer:Job
2. Click Williams, Matt
3. The Template should be Intuit Service Invoice
a. If not shown, click the drop-down list arrow
b. Click Intuit Service Invoice
4. Use the date of 01/03/15 (for ease of reading the / is included in the date; however, they do not need to be keyed when you enter the date)
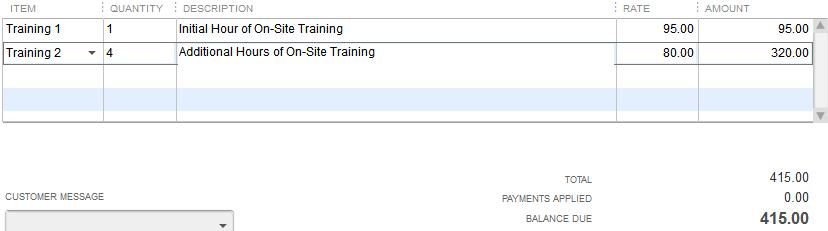
5. Show how to bill for two items
a. Training 1—used only for the first hour of training—bill for qty 1
b. Training 2—used for all additional hours of training—bill for qty 4, press Tab to calculate
6. Point out the amounts in the Amount column
IM 2-4
QUICKBOOKS 2015: A Complete Course
7. Point out the Total at the bottom of the invoice
8. Change the quantity for Training 2 hours to 4, press Tab
9. Use Thank You for Your Business as the message
10. Click Save & Close to close Invoice 2
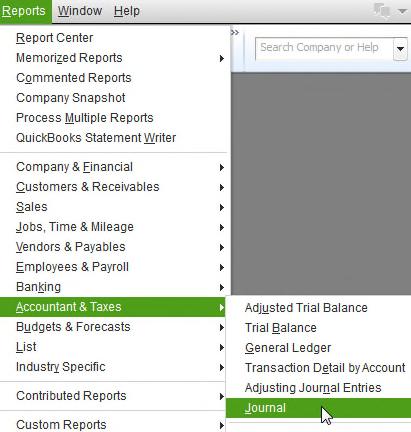
III. Show General Journal to Emphasize Debit/Credit Entries Behind the Scenes
A. Click Reports on the menu bar
B. Point to Accountant & Taxes
C. Click Journal, click OK on the Collapsing and Expanding Transactions dialog box
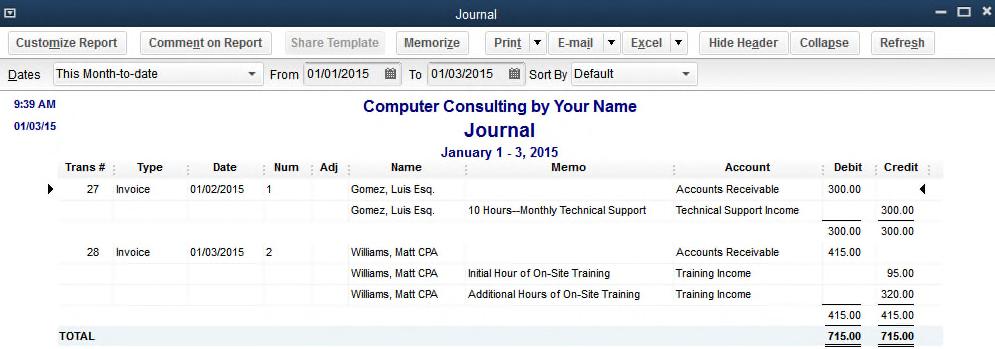
D. Click the Expand button, then enter the dates 01/01/15-01/03/15, press Tab
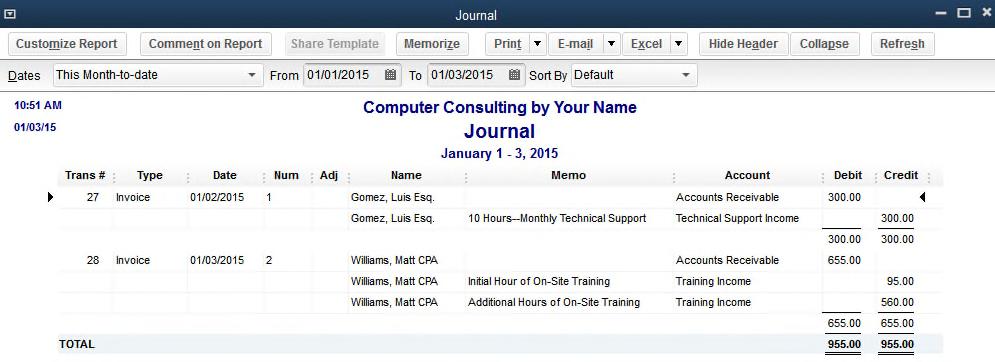
E. View the entries for Invoice 1 and 2
1. Show the students the Debit and Credit entries
2. Emphasize the Accounts used in the transaction
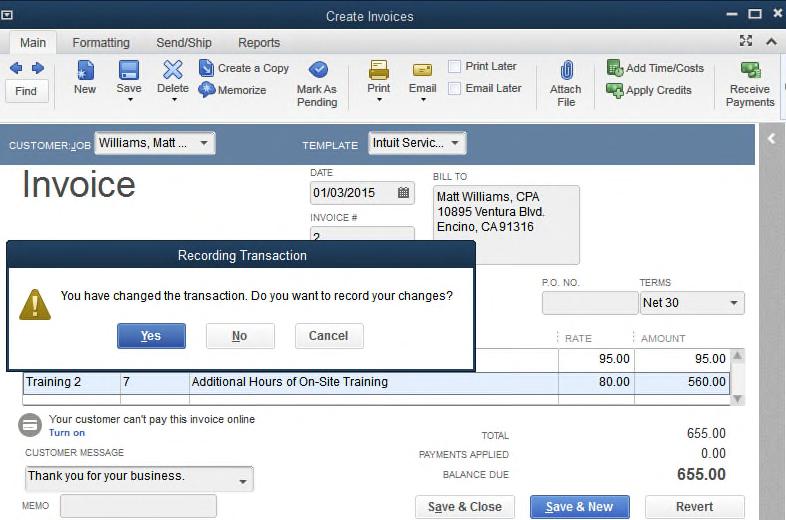
F. Use QuickZoom to show the students the Invoice prepared (double-click the transaction for Matt Williams)
1. Change the Training 2 hours for him to 7 hours, tab so QuickBooks recalculates
2. Click Save & Close
3. If you get a Recording Transaction screen, click Yes
G. Return to the Journal and point out the change in hours and amounts (click the Refresh button if necessary)
H. Close the Journal
IV. Prepare Credit Memo
A. Click the Refunds & Credits icon and prepare a Credit Memo to reduce Training 2 hours by 1 hour for Matt Williams
B. Point out the information in the History section of the Credit Memo
C. Preparation steps similar to Invoice
D. Data needed:
1. Customer:Job—Williams, Matt
2. Template—Custom Credit Memo
3. Date—010315 (hyphens or diagonals are not necessary when typing a date)
4. The Credit Memo Number is 3 (the next number available for invoices)
5. Item—Training 2
6. Qty—1
7. Notice the History for Matt Williams
8. Click the Formatting tab on the Credit Memo Icon Bar, click Preview
a. Item column does not print on a Credit Memo for a Service Invoice
b. Zoom in on total—Point out the $-80.00
c. Close the Preview
CHAPTER 2—Sales and Receivables
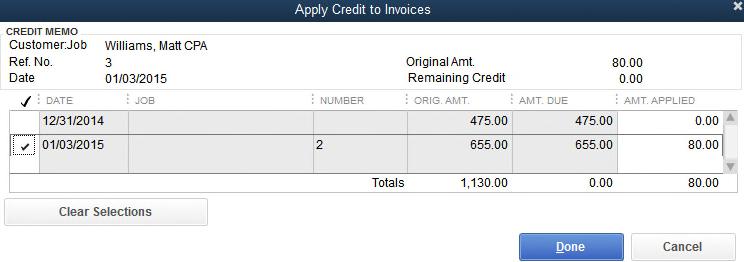
E. Apply the Credit to Invoice
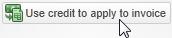
1. Click the Main tab on the Credit Memo Icon Bar, click the Use credit to apply to invoice
2. On the Apply Credit to Invoices, point out the check mark for the 12/31/14 transaction
a. QuickBooks will apply the credit to the oldest transaction
b. The check mark needs to be cleared from the oldest transaction and Invoice 2 needs to be checked
3. Click the Clear Selections button to remove the check mark or click in the check mark column to remove the check mark
4. Click in the column next to the 01/02/15 transaction
5. Click Done
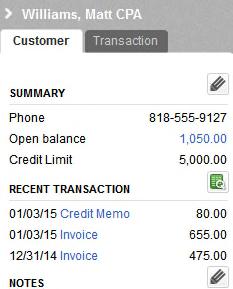
F. Point out the change to the History for Matt Williams
1. Credit Memo has been added to Recent Transactions
2. Open balance changed from $1,130 to $1,050
G. Click the Save & Close button on the Credit Memo
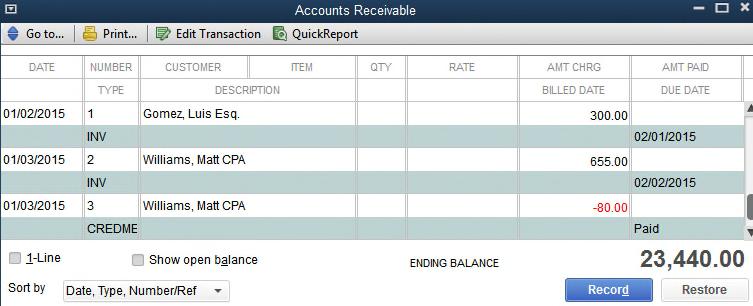
V. Accounts Receivable Register
A. Open Accounts Receivable Register
1. Click Chart of Accounts icon on the Home Page
2. Click Accounts Receivable
3. Click Activities button
4. Click Use Register
5. Scroll through the register—point out Invoice 2 and the Credit Memo to Matt Williams
B. Close the Accounts Receivable Register and the Chart of Accounts
VI. Journal: Re-emphasize the Behind the Scenes Entries in Debit/Credit Format
A. Open the Journal:
1. click Reports on the Menu bar
2. Point to Accountant & Taxes
3. Double-click Journal
4. Enter the dates of 01/01/15-01/03/15
B. Show students the transactions and how they were recorded in Debit/Credit format
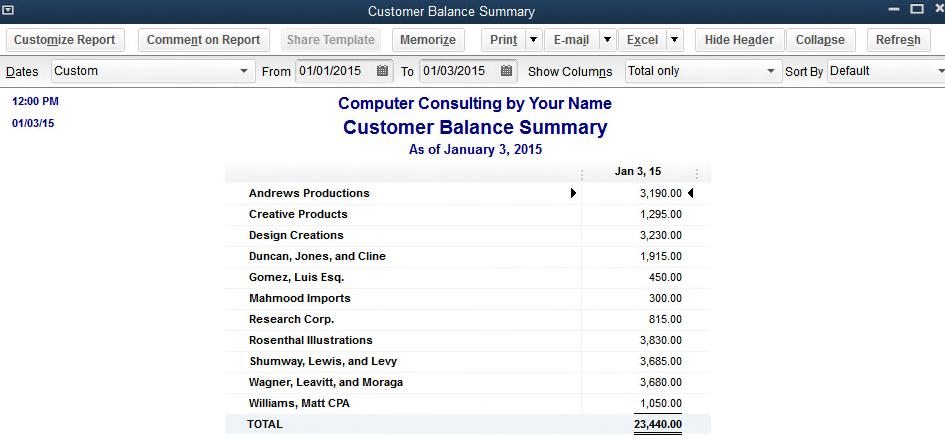
VII. Prepare a Customer Balance Summary Report
A. Demonstrate the ease of report preparation—click Reports on the Menu bar, point to Customers & Receivables, click Customer Balance Summary
B. Prepare report
1. Enter Date—01/01/15 tab 01/03/15
2. Tab to generate the report
IM 2-6
QUICKBOOKS 2015: A Complete Course
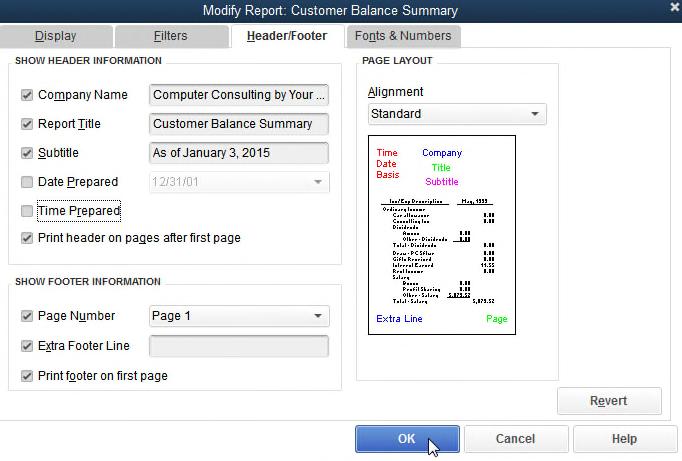
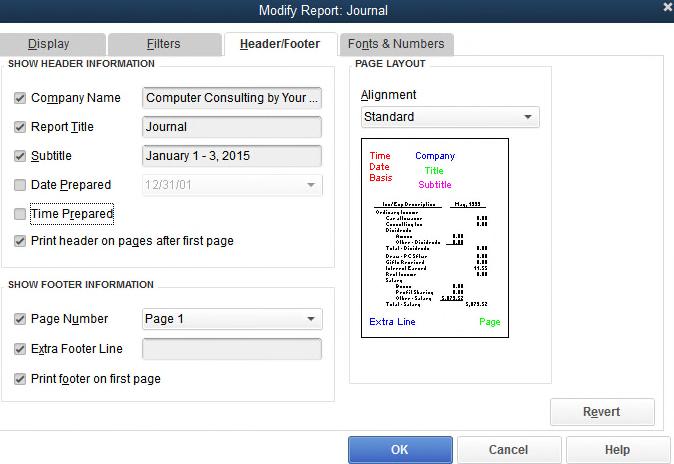
C. Point out the current date and time in the upper-left edge of the report
1. Remove date prepared and time prepared from header
a. Click Customize Report button
b. Click Header/Footer tab
c. Click Date Prepared
d. Click Time Prepared
e. Click OK
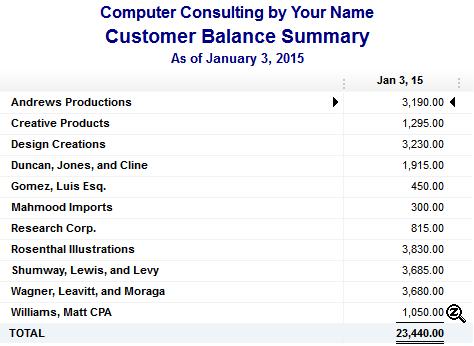
2. Show how this removed the current date and time
D. Discuss customers and balances owed
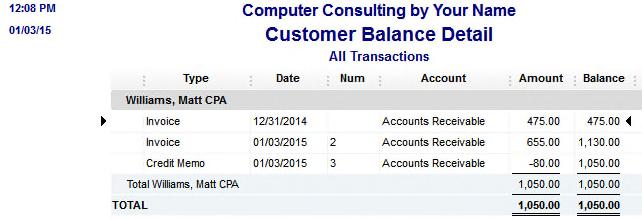
E. Show QuickZoom
1. Point to William, Matt CPA and double-click
2. Point out Invoice 2
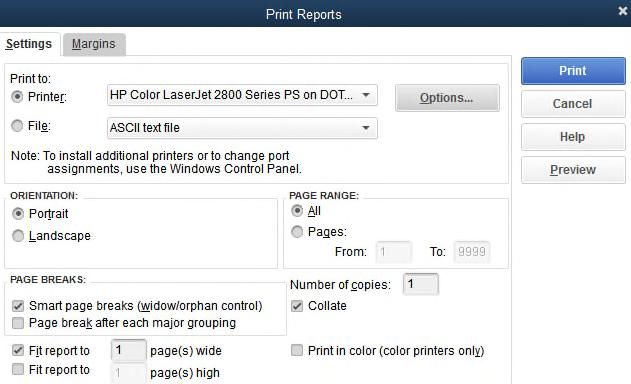
F. Demonstrate printing a report
1. Define the information on the print reports screen
2. Inform students of differences between your lab and the text
3. Discuss portrait versus landscape orientation
a. Click preview with report in portrait (8½ wide by 11 long)
b. Click preview with report in landscape (11 long by 8½ wide)
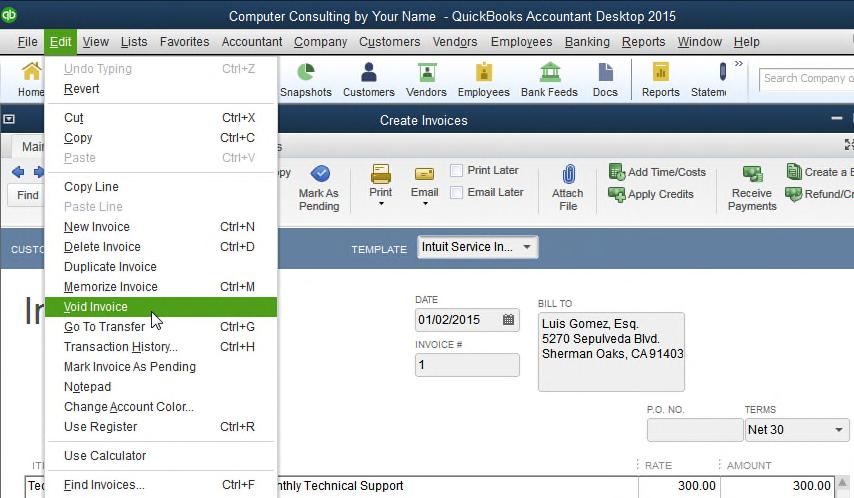
VIII. Void and Delete Invoice
A. Void Invoice 1
1. Open Invoice 1
2. Click Edit on the QuickBooks Menu bar, click Void Invoice
3. Notice total changes to 0.00
4. Memo changes to Void
5. Stays as an invoice in the books
6. Close Invoices
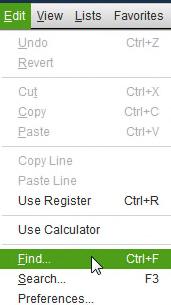
B. Delete Invoice 1
1. Use Find (Explain the purpose of Find. Example, if you had 500 invoices, Find would be faster than clicking through the invoices until you found Invoice 257.)
2. Click Edit, click Find, and click the Simple tab
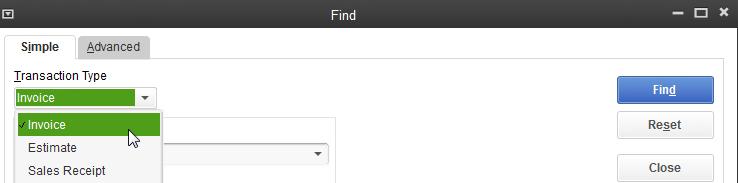
3. Complete Simple Find
a. Click drop-down list arrow for Transaction Type, click Invoice
b. Click the drop-down list arrow for Customer:Job:
c. Click Gomez, Luis, Esq. This will allow QuickBooks to find any invoices recorded for Luis Gomez
4. Click the Find button on the Find dialog box
a. Click Inv. 1
b. Click the Go To button
c. This takes you to Invoice 1
5. Click Edit on the QuickBooks Menu Bar, click Delete Invoice
6. Click OK on the Delete Transaction Dialog box
7. Invoices advance to Invoice 2
8. Click Previous—QuickBooks will not go back to Invoice 1
9. Click Save & Close to exit Invoices
10. Note that Invoice 1 does not show in Find
11. Close Find
C. CAUTION TO STUDENTS:
1. Scroll through the invoices
2. Show students the two invoices prepared for Matt Williams
3. Students do not realize that an invoice was prepared for Matt Williams when the company was established
a. The opening balance is indicated as part of the customer setup
b. The amount of the opening balance is put into the Uncategorized Income account
1.) The opening balance represents revenue earned in a previous period
2.) Since QuickBooks uses the accrual method of accounting, the income earned in the previous period is put into the Uncategorized Income account
4. Whenever a customer account is set up and has an opening balance, QuickBooks prepares an invoice to match the opening balance
5. Students have been known to delete the invoice with the opening balance
6. QuickBooks does not allow a user to prepare an invoice with an opening balance
7. If a student deletes the invoice with the opening balance
a. All transactions for the customer must be deleted
b. The customer must be deleted
c. The customer must be added and the opening balance must be provided at this time
d. All deleted transactions must be re-entered
8. An alternate method is to make a Journal entry
a. Click Company on the menu bar
b. Click Make Journal Entry
c. Date the entry for the previous period (In Computer Consulting by Your Name the entry would be date 12/31/14)
d. Debit Accounts Receivable for the amount of the Opening Balance
e. Click the drop-down list arrow for Customer:Job
f. Click the name of the Customer
g. Credit Uncategorized Income
h. DISADVANTAGE: There will not be an invoice with an Opening Balance
9. The third method is to restore Computer (Backup Ch. 1) and re-enter everything for Chapter 2
IM 2-8
IX. Add New Account and New Item
QUICKBOOKS 2015: A Complete Course
A. Add a new income account—Installation Income
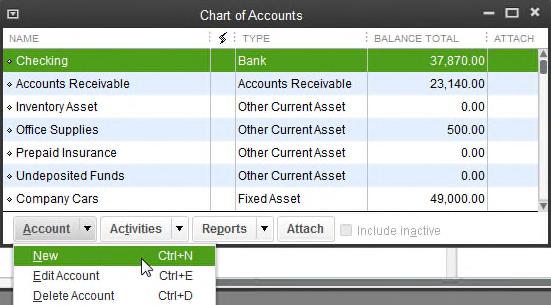
1. Open Chart of Accounts—click Lists, click Chart of Accounts
2. Click Account button
3. Click New (point out keyboard shortcut Ctrl+N)
4. Click Income on the Add New Account: Choose Account Type screen, click the Continue button
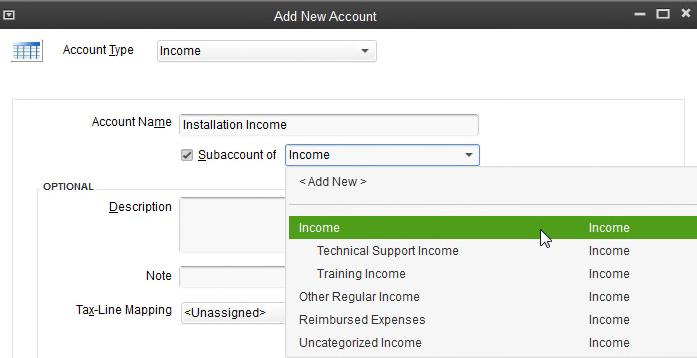
5. Account Name—Installation Income
6. Subaccount of—Income
a. Discuss subaccounts
b. Income is the main account
c. A subaccount categorizes the type of income earned
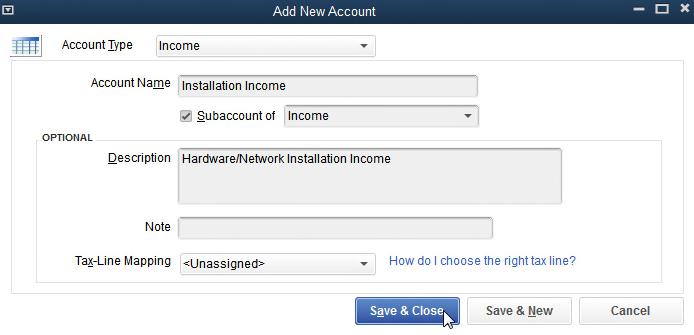
7. Description—Hardware/Network Installation Income
8. Click Save & Close, Scroll through Chart of Accounts until you see Installation Income
9. Point out that Installation Income is a subaccount of Income and is indented
10. Close Chart of Accounts
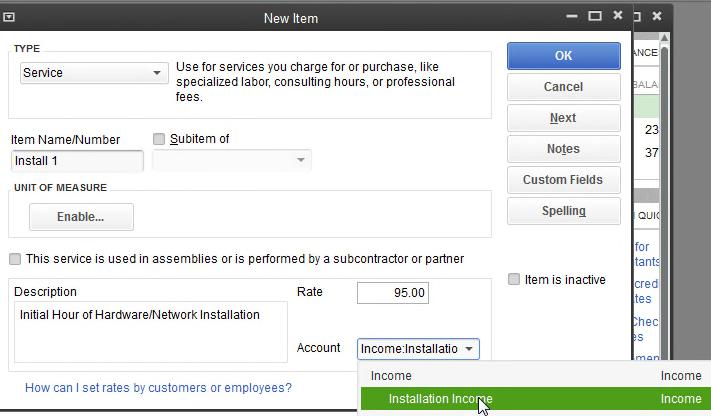
B. Add New Item to List
1. Add the type of sales item that will be used to earn Installation Income
a. For each income or revenue account in the chart of accounts you must have at least one sales item
b. When you prepare an invoice or a sales receipt, you list the Item you used to earn the income (For example, Install 1 is used to record 1 hour of hardware/network installation, which earns Installation Income.)
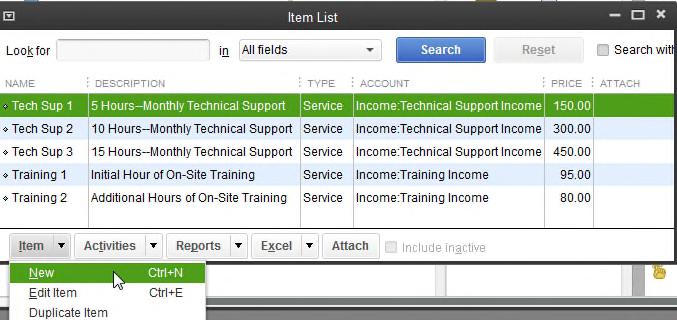
2. Click Items & Services icon on the Home Page
3. Click the Item button at the bottom of the Item List
4. Click New (point out keyboard shortcut, it is Ctrl+N)
5. Item Type—click drop-down list arrow, click Service
6. Tab to Item Name/Number—type Install 1
7. Click in the Description textbox—type Initial Hour of Hardware/Network Installation
a. The description is important because it prints on the invoice and sales receipt
b. It identifies and describes the service performed for the customer
8. Tab to or click Rate, enter 95.00
9. Tab to or click Account, click drop-down list arrow, click Income: Installation Income
a. Point out that Income: Installation Income is now identified as the income account to be used when hardware is installed
b. Stress the difference between a sales item and an income account
10. Click OK
CHAPTER 2—Sales and Receivables
11. Scroll through Item List to view Install 1
a. Point out Description
b. Point out Account
12. Close Item List
X. Show Sales Receipt
A. Click Create Sales Receipts on the Home Page to open a sales receipt
B. Stress the fact that a sales receipt is used for cash sales—not payments from customers on account
C. Discuss similarities to invoice (Item column does not print on a sales receipt for a service business)
D. Point out new information on sales receipt
1. Check No.
2. Payment Method
XI. Add a New Customer and complete a sales receipt
A. A customer can be added to the Customer List using the Customer Center
B. Alternate method is to add while completing a business form
C. Demonstrate adding a new customer while completing a sales receipt
D. Type Collins, Ken in the Customer:Job text box, press Tab
1. You will get a Customer:Job Not Found dialog box
a. Explain Quick Add—add name only
b. Explain Set Up—add name, address, etc.
c. Explain Cancel—cancel adding a new customer
2. Click Set Up
a. Point out the Opening Balance textbox under the Customer Name
b. If there is no beginning balance to be entered, there is no need to enter an opening balance date
1.) Remind students that an Opening Balance may only be entered when creating a customer
2.) Tell students that most opening balances are entered for existing customers when a company is created
a.) Automatically, QuickBooks will use the date of the computer
b.) If using a different date, it should be entered
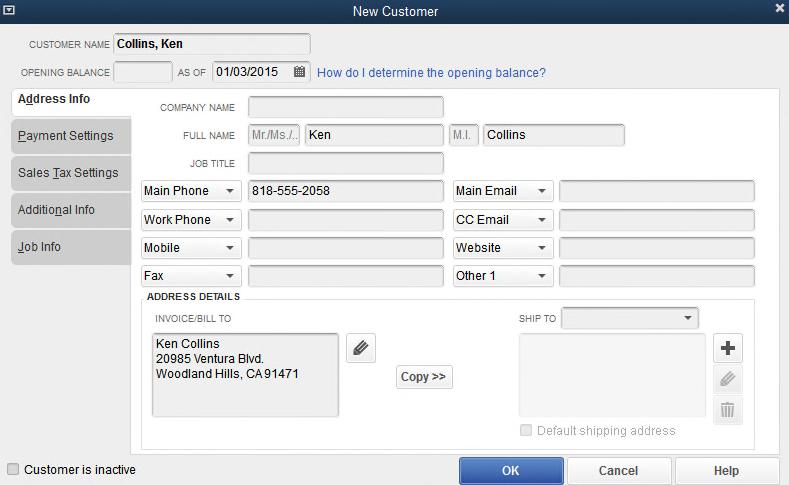
3. Enter information for Ken Collins
a. Customer Name—Collins, Ken (this will alphabetize the customer list by last name)
b. First Name: Ken
c. Last Name: Collins
d. Click Main Phone, enter 818-555-2058
e. Change Invoice/Bill To name to Ken Collins, press Enter
f. Click second line of address, enter 20985 Ventura Blvd., press Enter
g. Click third line of address, enter Woodland Hills, CA 91371
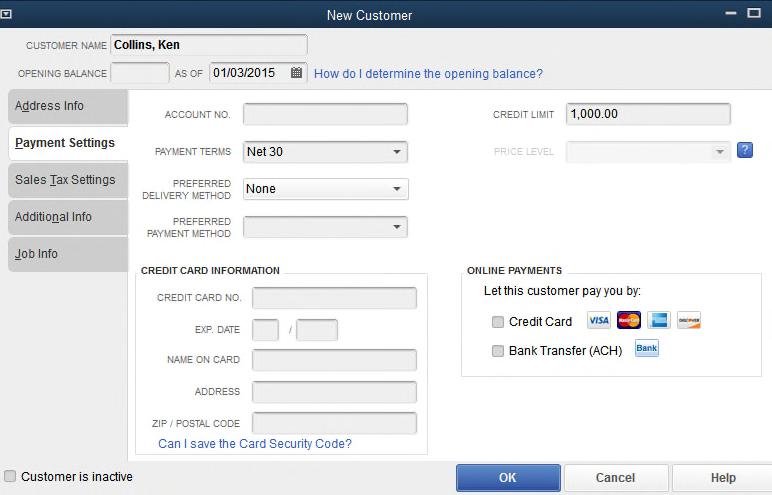
h. Click the Payment Settings tab
QUICKBOOKS 2015: A Complete Course
i. Click drop-down list arrow for Payment Terms, click Net 30
j. Click Credit Limit, enter 1000
k. Click the drop-down list arrow for Preferred Delivery Method, click None
l. Click OK
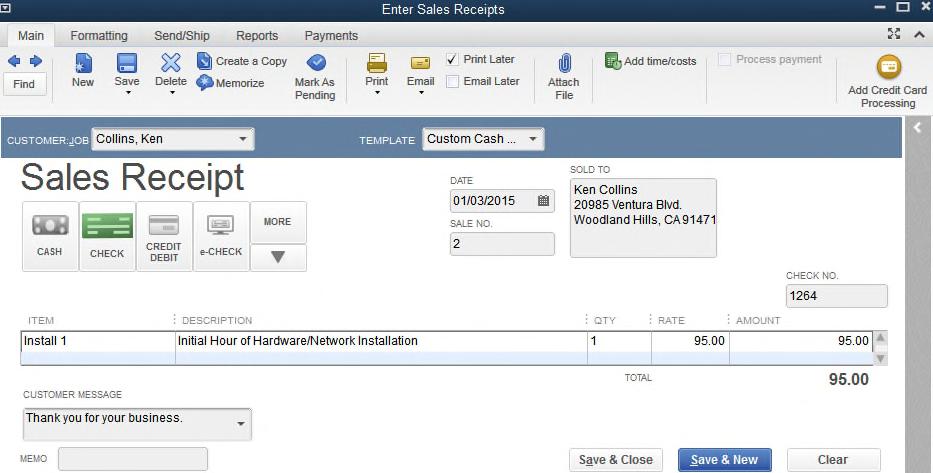
4. Point out name and address on Sales Receipt
E. Complete the sale using
1. Template is Custom Cash Sale
2. Date is 010315
3. Click the Check icon to indicate a Payment Method of Check
4. Check No. 1264
5. 1 hour of Install 1
6. Customer Message Thank you for your business.
F. Click Save & Close
XII. Enter Receipt of Payment on Account
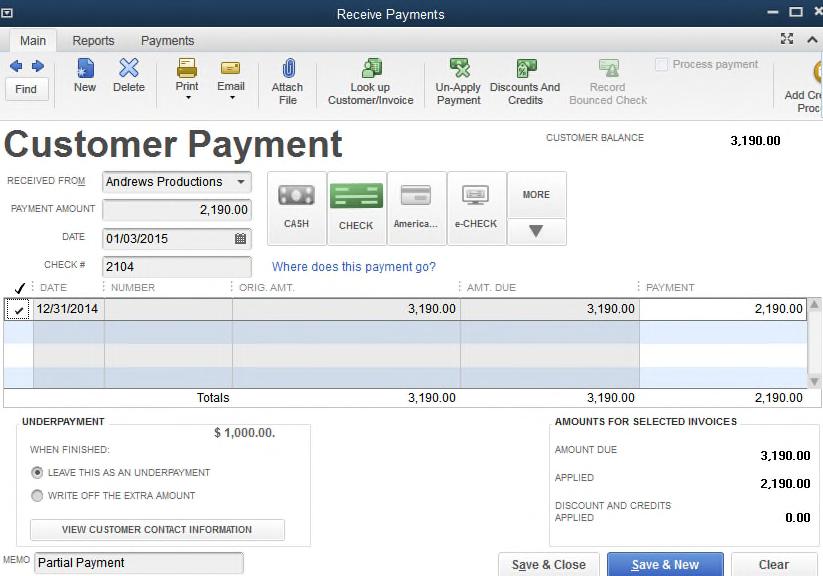
A. Enter the receipt of $2,190 from Andrews Productions
B. Stress the fact that a receipt is a payment on account for an existing invoice. It is not a cash sale. Students often confuse a payment on account (Receive Payments) with a cash sale (Sales Receipt)
C. Click Receive Payments in the Customer section of the Home Page
D. Enter information for the payment
1. Click drop-down list arrow, click Andrews Productions
2. Enter Amount 2190 (no .00 needed, QuickBooks inserts)
3. Enter Date 01/03/15 (no / needed)
4. Click the Check icon to indicate a Payment Method of Check
5. Enter Check 2104
6. Full amount owed is $3,190. Enter a Memo of Partial Payment
7. Make sure the Underpayment $1,000.00 is marked Leave this as an underpayment
E. Point out the following:
1. Outstanding Invoices/Statement Charges
2. The check mark in front of the 12/31/14 Invoice—this indicates that the payment is applied to this invoice, which is the Opening Balance.
a. If the amount being paid matches the amount of an invoice, QuickBooks applies the payment to that invoice
b. If the payment amount doesn’t match, QuickBooks automatically applies the payment to the oldest invoice
c. If more than one invoice is shown, the user may select a different invoice by clicking the appropriate invoice
3. In the center of the screen—students should see that Orig. Amt. and Amt. Due are 3,190.00, and that Payment is 2,190.00
F. Click Save & Close to exit and save the payment
CHAPTER 2—Sales and Receivables
XIII. Prepare a Daily Backup
A. Follow the steps presented in chapter 1 for creating a backup file
B. Name the file Computer (Daily Backup)
C. The file type is QBW Backup (* .QBB)
D. Restore this file if you make an error within Chapter 2.
E. At this point, the file contains your work for Chapter 1 and up through Sales Receipts in Chapter 2
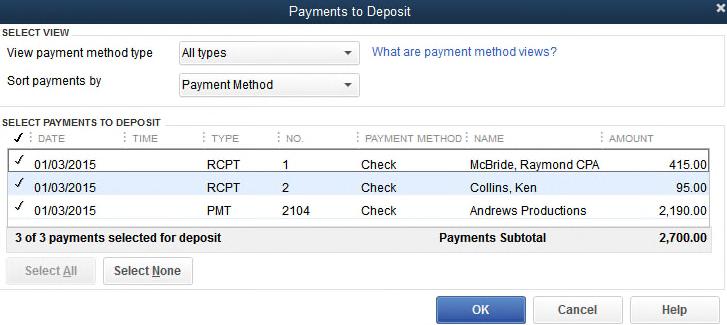
XIV. Deposit Checks Received for Payments
A. When payments have been received and cash sales have been made, the amounts received are put into Undeposited Funds
B. Making a bank deposit will remove the amount from Undeposited Funds and put in the Checking or Cash account
C. This procedure helps to prevent mistakes in writing checks using funds that have not been deposited in the bank.
D. Click Record Deposits in the Banking section of the Home Page
1. Mark Deposits
a. Click next to the Payment to Deposit to mark
b. Click again to unmark
c. Click Select All to select all checks
d. Click OK
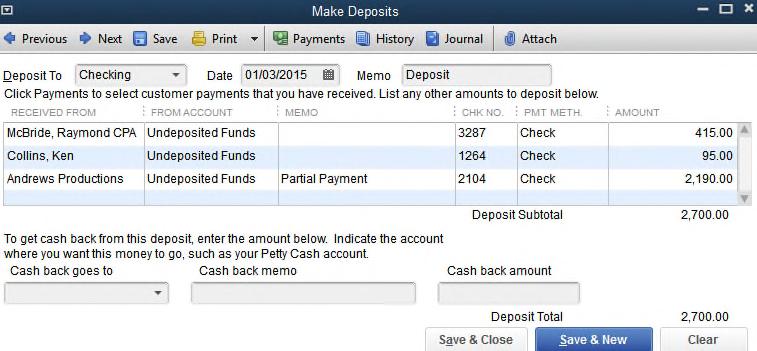
2. Make Deposits Screen
a. Deposit To should show Checking (checks will be deposited into the checking account)
b. Date 01/03/15
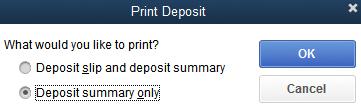
3. Prepare the Deposit Summary
a. Click the Print icon
b. Click Deposit Summary only
c. Click Preview on the Print Lists screen
d. Zoom in on the dates shown at the top of the report
e. Explain that the computer’s date and time is printed at the top
f. This date will usually not be the same as the date shown in the text
g. Click Cancel
4. Click Save & Close to complete the deposit
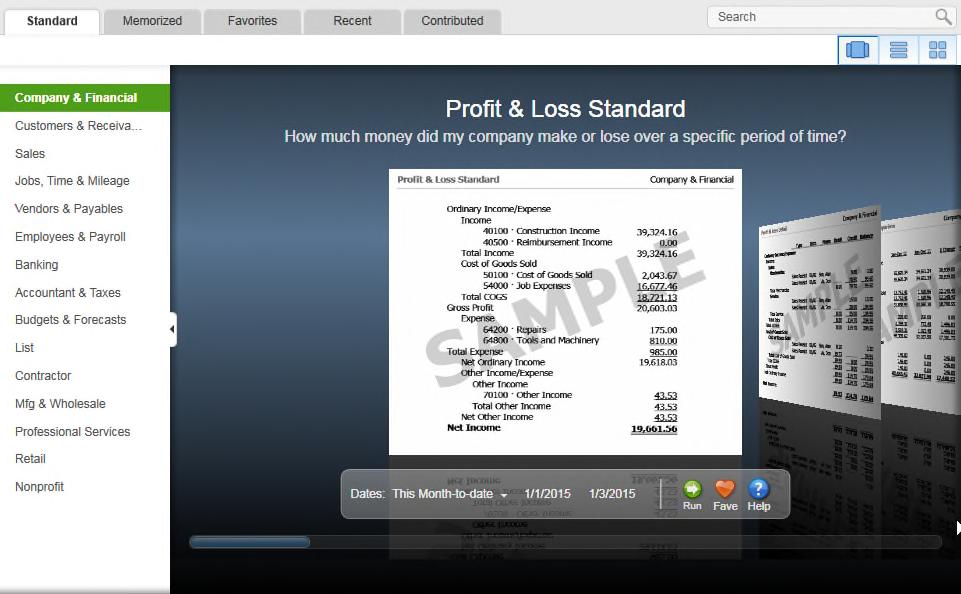
XV. Prepare Journal
A. Open the Report Center by clicking the Reports icon
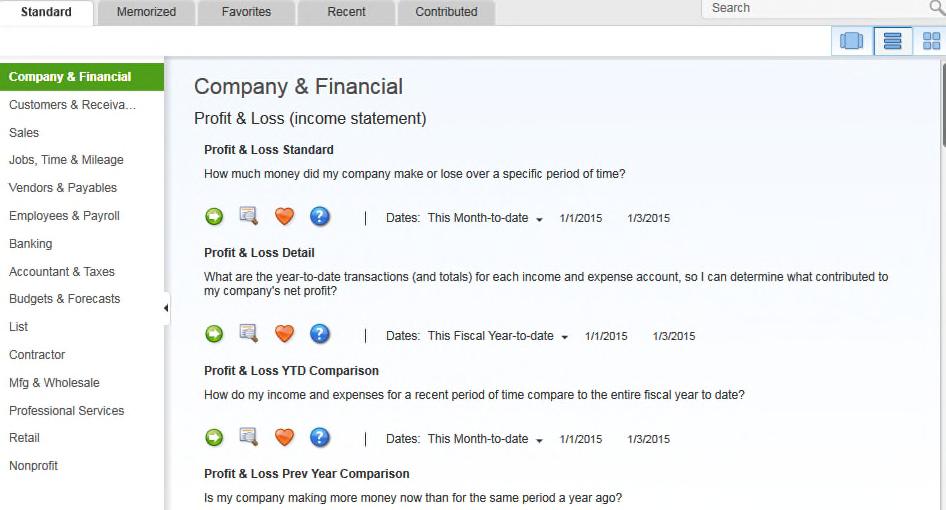
1. Demonstrate the appearance of the Report Center when the reports are displayed in Carousel, List, and Grid views
2. Click List as the view
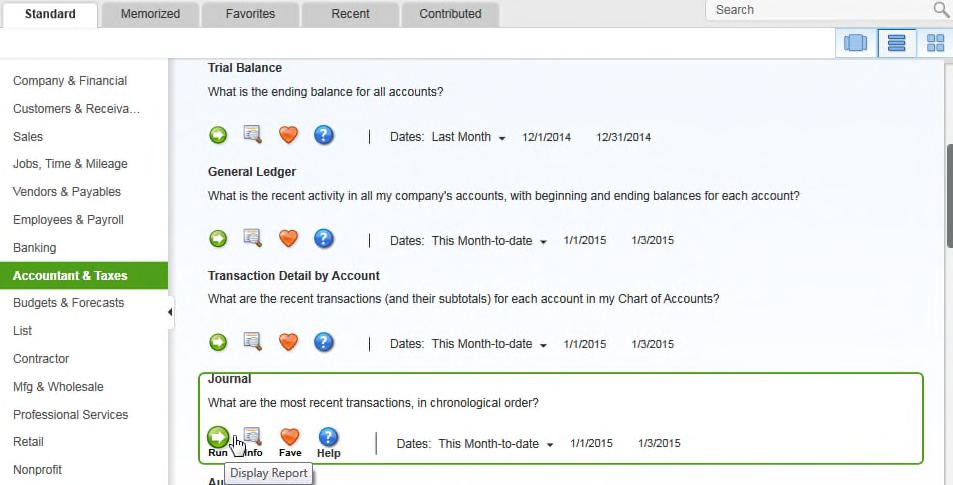
B. Click the Accountant & Taxes section
C. Scroll through the reports, double-click Journal (or click Journal and then click Run) click OK on the Collapsing and Expanding Transactions dialog box
D. The dates should be 01/01/15 to 01/03/15
IM 2-12
E. Click the Expand button
QUICKBOOKS 2015: A Complete Course
F. Scroll through the Journal to view all the transactions
1. Point out that the transaction numbers are automatically entered by QuickBooks. In training these may be different from the number shown in the key. Students should not be concerned about this
2. Students should notice the entries made during lecture—except Invoice 1 because it was deleted
3. Since all entries were made during the lecture, this report does not match the Journal for Chapter 2
G. Remind students that ALL transactions are entered into the Journal in the traditional Debit/Credit format
H. Remove Date Prepared, Time Prepared, and Report Basis
1. Click the Customize Report button
2. Click the Header/Footer tab
3. Click the check boxes for Date Prepared, Time Prepared, and, if shown, Report Basis to remove the check marks, click OK
I. Show how to resize a column
1. Point to the sizing diamond to the right of the column
2. Hold down primary (left) mouse button and drag
a. To the right to make it larger
b. To the left to make it smaller
1.) If a number shows ******, it is too small
2.) Drag to the right to make it larger
J. Close the Journal
XVI. Graphs
A. If time allows, prepare an Accounts Receivable Graph
1. Click Customers & Receivables as the type of report, double-click Accounts Receivable Graph (or click Accounts Receivable Graph and then click Run)
2. Click the Dates button
3. Enter date 01/03/15
B. Point out the Aging
C. Students should examine the pie chart for the Customers—point out that A/R graphs focus on
1. The customers
2. The percentages of total Accounts Receivable each owes
3. The aging of the accounts
D. Demonstrate QuickZoom by double-clicking on one of the customers
CHAPTER 2—Sales and Receivables
E. Enter other dates 02/01/15 and 03/01/15 to show the aging
F. Prepare a Sales Graph
1. Click Sales as the type of report
2. Click Sales Graph
3. Point out that the sales graph shows information about the items sold rather than the customers
4. Click Run
XVII. Students should do the training in the chapter and print as directed
A. During training, students should use the QuickBooks Backup feature to back up their work each day. Suggested backup name: Computer (Daily Backup)
B. Students should also use Windows Explorer to make a duplicate disk to have in case the original work disk or data file is lost or damaged (If time allows, demonstrate the way to make a duplicate company file on a second USB drive.)
C. When the chapter is complete, students should make a second backup. Suggested name: Computer (Backup Ch. 2)
D. At the end of the chapter, students should answer the True/False, Multiple Choice, Fill-in, and Essay questions
E. Students should turn in the printouts made within the chapter
1. Put the transmittal sheet on top
2. The printouts organized in the order listed on the transmittal should follow
In preparation for your Chapter 3 lecture, you may want to Restore the Computer (Backup Ch. 2).qbb file that has been provided in the online instructor’s manual. This contains everything that was done during the training in the text for Chapters 1 and 2.
Sixteenth Edition

Chapter Focus: Sales
• Record credit sales by completing an invoice
– Invoice replacement for Sales Journal
– Use Customer: Job List as Accounts Receivable Subsidiary Ledger
– Balance of Customer: Job List = balance of Accounts Receivable account in Chart of Accounts
– Use Chart of Accounts as General Ledger
• Record a cash sale by completing a sales receipt
– Sales Receipt replacement for Cash Receipts Journal
Lecture Note
• Examples in lecture may or may not match textbook
• Lectures illustrate key points within chapters
• Lectures do not contain every transaction completed in text
• Not everything presented in chapters will be shown in lecture
• Some parts of lecture show results of transactions entered in lecture
Copyright © 2016, 2015, 2014 Pearson Education, Inc. All
Company File
• Lecture uses the company ComputerConsulting by Your Name for demonstration
• To complete training in Chapter 2, open: – QuickBooks – Computer Consulting by Your Name company file
Copyright © 2016, 2015, 2014 Pearson Education, Inc. All
Quick Books Trial Version and Company File
• If you did not complete Chapter 1, refer to Chapter 1 to:
– Download company file from Pearson Web site
– Add your name to company name
– Optional: Install and register trial version of QuickBooks
• For updates, new material, and errata, refer to www.PearsonHigherEd.com/Horne Web site periodically
Date (1 of 6)
• Pay special attention to dates when recording transactions
• Frequent Problems:
– Forget to enter date used in text – Use computer date for a transaction – Incorrect dates may cause problems in
reports other transaction information
Date (2 of 6)
• Text uses 2015
• 2015 may not match date of your computer
• Acceptable to use current year when training
– If you use current year, be consistent
– Remember text and solutions show 2015 and your work will show current year
Copyright © 2016, 2015, 2014 Pearson Education, Inc.
Date (3 of 6)
• In business documents and reports QuickBooks always inserts: – Computer date – Ordate of last transaction • If date used in training is different, you must enter it
Copyright © 2016, 2015, 2014 Pearson Education, Inc.
Date (4 of 6)
• Examples where QuickBooks allows you to change date from computer’s date:
– Some business documents—invoice, sales receipt, etc.
– Some reports—Journal, Trial Balance, etc.
Copyright © 2016, 2015, 2014 Pearson Education, Inc. All
Date (5 of 6)
• Example where QuickBooks will not allow you to change date:
– Bank Deposit Summary, QuickBooks uses computer’s date when printing
• If you cannot change date, accept QuickBooks’ printed date
Copyright © 2016, 2015, 2014 Pearson Education, Inc. All
Date (6 of 6)
• Possible errors caused by using different dates – Use 2015 for some transactions and 2016 or 2017 for others
Reports for 2015 will not show entries for 2016 or 2017
Balances and totals will not match those provided
© 2016, 2015, 2014 Pearson Education, Inc.
Sales on Account
• To record a sale on account, create an invoice
• A sale on account is – Purchase made by a customer – and charged to his/her account with company
• Behind the scenes QuickBooks:
– Records information on invoice into Journal – Posts transaction
Debits: – Accounts Receivable in Chart of Accounts (General Ledger) – Customer’s individual account in Customers & Jobs List (Accounts Receivable Subsidiary Ledger)
Credits proper income account
© 2016, 2015, 2014 Pearson Education, Inc. All
Record Transaction
• 01/02/15, record a sale on account to Luis Gomez, Esq. for 10 hours of technical support:
– Use Invoice 1
– Use “Thank you for your business.” for Customer Message
© 2016, 2015, 2014 Pearson Education, Inc.
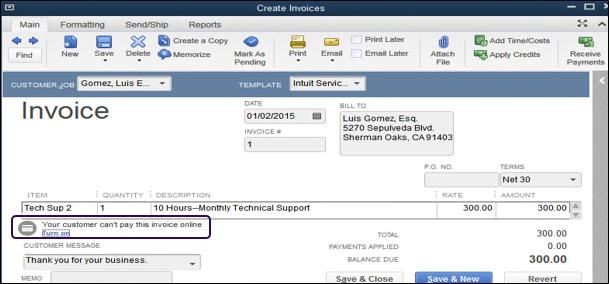
Prepare Invoice (1 of 7)
• Click Create Invoices icon

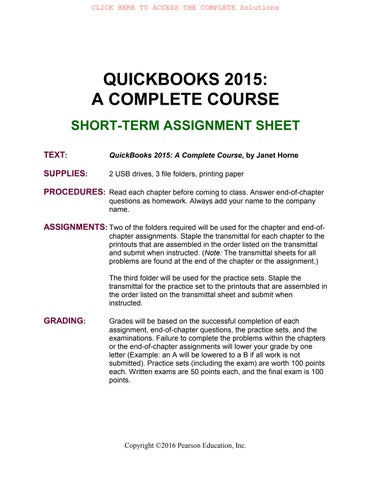
• Click drop-down list arrow for Customer: Job
• Click Gomez, Luis Esq.
Copyright © 2016, 2015, 2014 Pearson Education, Inc. All
(2 of 7)
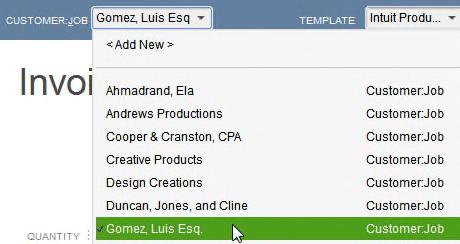
Customer:Jobshows Luis’s name
Information for Bill Tois completed automatically
Notice Historysection
Prepare Invoice (3 of 7)
• History section gives information about Luis Gomez, Esq.
• Click Hide history button to close History section
• To show history, click same button

Invoice (4 of 7) • Template: Intuit Service Invoice – If not, click drop-down list and click Intuit Service Invoice
Always check this because QuickBooks likes to use Product Invoice • Enter date: 01/02/2015 • Invoice Number: • Terms: Net 30
Prepare Invoice (5 of 7)
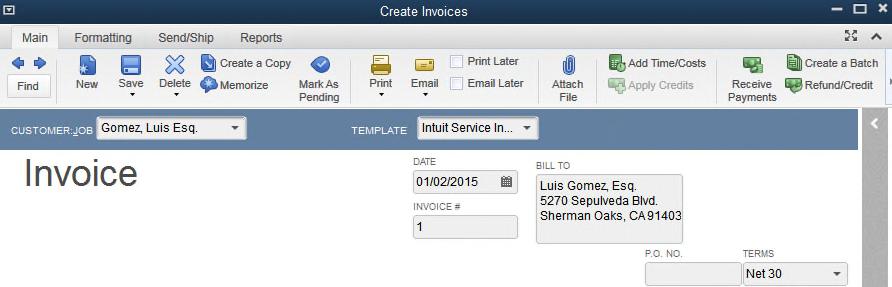
• Click in first line of Item column
• Click drop-down list arrow for Item
• Click Tech Sup 2 to enter Item
Prepare Invoice (6 of 7)
• Tab to Quantity, enter 1
• Description, Rate, and Amount are entered automatically for Tech Sup 2
• Click drop-down list arrow for Customer Message
• Click Thank you for your business
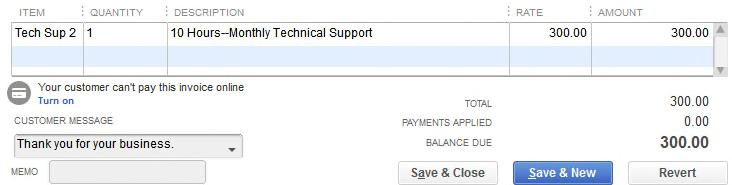
Prepare Invoice (7 of 7)
• Completed invoice is ready for printing
– You may or may not see note “Your customer can’t pay this invoice online”. If you do, disregard it.
© 2016, 2015, 2014 Pearson Education, Inc.
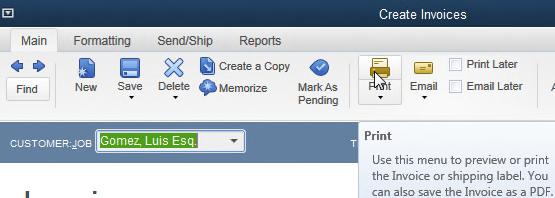
Invoice (1 of 2) • Click Print icon on Invoice Main Icon Bar
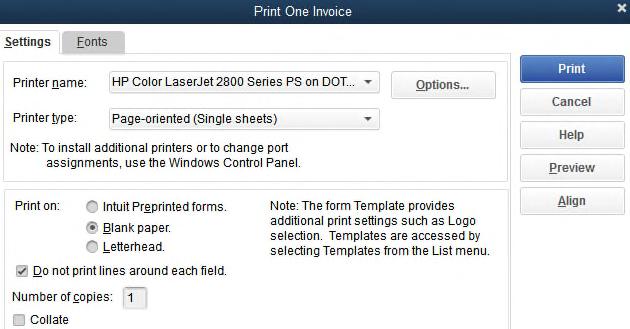
Print Invoice (2 of 2)
• Complete Print One Invoice screen
– Printer name should be for your printer
– Print on: Blank paper
– “Do not print lines around each field” should have a check mark
If it doesn’t, click box to mark
– Number of copies: 1
• Click Print button
© 2016, 2015, 2014 Pearson Education, Inc.
• To save an invoice and prepare a new invoice, click
Save & New
Prepare Invoice with Two Sales Items (1 of 5)
• Complete Invoice 2 to bill Matt Williams on January 3 for five hours of on-site training:
– First hour billed as Training 1
– Remaining four hours billed as Training 2
• Click drop-down list arrow for Customer: Job
• Click Williams, Matt
• Template: Intuit Service Invoice
– Click drop-down list arrow and select if not shown
• Date: 01/03/2015
Items (2 of 5)
• Invoice # 2 and Terms Net 30 should be shown – If not, enter appropriate numbers
(3 of 5)
• Enter first item: Training 1
– Click drop-down list arrow in ITEM column
– Click Training 1
• Tab to Quantity, enter 1
• Enter second sales item
– Click drop-down list arrow in row beneath Training 1
– Click Training 2

(4 of 5)
• Tab to Quantity
• Enter quantity 4 and press tab
• Amount of invoice will be totaled
Items (5 of 5)
Complete invoice:
Click drop-down list arrow for CUSTOMER
Click

Prepare
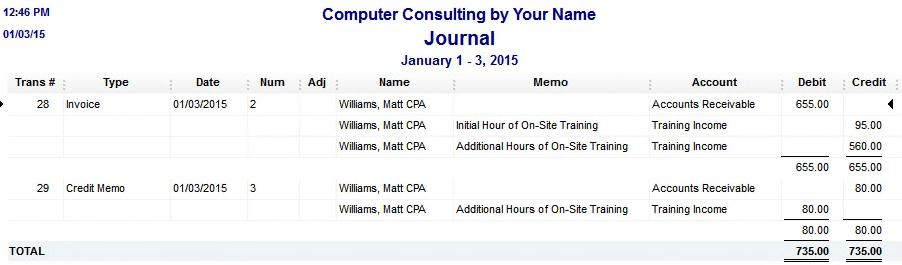
Journal (1 of 7)
• Journal shows every transaction in Debit/Credit format
• All information for Invoices 1 and 2 will appear in Journal
Copyright © 2016, 2015, 2014 Pearson Education, Inc. All Rights
Prepare Journal
(2 of 7)
• Click Reports on Menu bar
• Point to Accountant & Taxes
• Click Journal
Prepare Journal (3 of 7)
• QuickBooks Accountant 2015, can combine multiple items in a transaction into a single line on a report
• Click OK on Collapsing and Expanding Transactions dialog box
Copyright © 2016, 2015, 2014 Pearson Education, Inc.
View
Journal (1 of 2)
• Click Expand button to see transactions in full
• Dates are 01/01/15 to 01/03/15
– Note report date January 1-3, 2015
– Note time and date in upper-left—QuickBooks inserted time and date of computer
– Review debits and credits
© 2016, 2015, 2014 Pearson Education, Inc. All
Quick Zoom from Journal to Invoice 2
• Point to any part of Invoice 2 shown in Journal
• When cursor changes to a magnifying glass doubleclick mouse.

2 • Invoice 2 will be opened – Change Training 2 hours to 7, press Tab – Click Save & Close button – Click Yes on Recording Transaction screen
View Journal after Editing Invoice 2
• View change in report – If necessary, click Refresh button to update report • Close Journal
Prepare Credit Memo (1 of 3)
• 01/03/2015: Prepare a Credit Memo
– Record a one hour decrease in Training 2 hours for Matt William
• Click the Refunds and Credits icon

• Similar to an Invoice but is used to record a refund or a decrease in a sales transaction
• To prepare:
– Select Customer Name
– Enter textbook date: 01/03/15
– Credit Memo number (next available invoice number): 3
– Enter Item Training 2, Quantity 1, and Customer Message Thank you for your business.
Copyright © 2016, 2015, 2014 Pearson Education, Inc. All Rights Reserved
Prepare Credit Memo (2 of 3)
• Notice History for Matt Williams

Prepare Credit Memo (3 of 3)
• Apply decrease in hours to Invoice 2 – Click “Use credit to apply to invoice” on Invoice Main Icon Bar
• QuickBooks will apply credit to oldest invoice
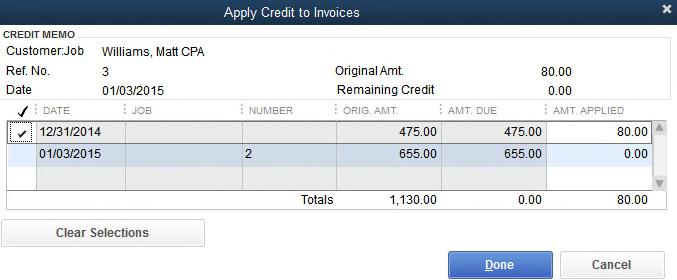
Apply Credit to Invoice (1
of 2)
• Click Clear Selections button or check mark in check mark column for 12/31/2014 to remove

• Click in check mark column next to 01/03/15 to apply credit to Invoice 2
• Click Done
Apply Credit to Invoice (2 of 2)
• Notice change to History for Matt Williams – Credit Memo added to Recent Transactions – Open balance changed from $1,130 to $1,050
• Click Save & Close button
Copyright © 2016, 2015, 2014 Pearson Education, Inc.
• Accounts Receivable account in Chart of Accounts is same as Accounts Receivable Register
• Click Chart of Accounts icon on Home Page.

Copyright © 2016, 2015, 2014 Pearson Education, Inc. All
Open Accounts Receivable Register
• Click Accounts Receivable
• Click Activities button
• Click Use Register

View Accounts Receivable Register
(1 of 3)
Customer Balance Summary report shows customer balances
To prepare
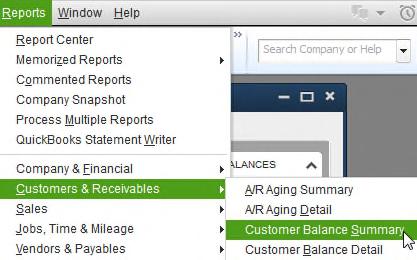
Prepare Customer Balance Summary Report
(2 of 3)
• Report dates should be 01/01/15-01/03/15 or All
• Notice Time and Date in upper-left corner of report
(3 of 3)
Prepare Customer Balance Summary Report
• To remove date and time prepared from report, click: – Customize Report button – Header/Footer tab
– DatePrepared and Time Prepared to remove check marks – OK
Use QuickZoom in Report (1
of 2)
• Point to amount due for Matt Williams – Your cursor will turn into a magnifying glass.

Use QuickZoom in Report (2
of 2)
• Double-click amount to see Customer Balance Detail report for Matt Williams
– Click drop-down list arrow for Dates, click All
– Notice computer time and date show for this report
To remove them, click Customize Report and repeat steps discussed previously
Print Report (1 of 2)
• At top of Customer Balance Detail report
– Click Print Button
– Click Report
• Check following:
– Printer
– Orientation:
Portrait (8 ½ by 11)
or Landscape (11 by 8 ½)
– Smart Page Breaks (should have a check mark)
– Pages should be All
• Click Print
Report (2 of 2) • Printed Customer Balance Detail report shows balances owed by Matt Williams

© 2016, 2015, 2014 Pearson Education, Inc.
Void Invoice (1 of 4)
• Voiding an invoice – Changes amount of invoice to 0.00 – Memo is “VOID:” – Invoice stays as an invoice
• Void Invoice 1:
– Click Create Invoices icon
– Click Previous or Next to find Invoice 1
© 2016, 2015, 2014 Pearson Education, Inc. All
Invoice (3 of 4) • Notice Quantity and Amount are 0.00 • Memo says VOID:
Invoice (4 of 4)
• Journal shows Memo Void: and 0.00 for transaction
Copyright © 2016, 2015, 2014 Pearson Education, Inc. All Rights
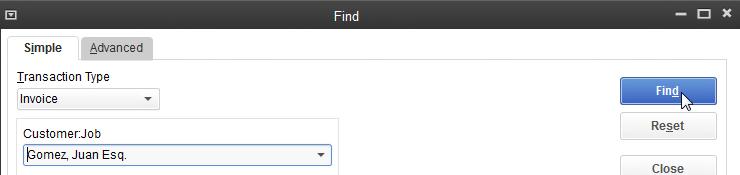
Use Find (1 of 4)
• To find an invoice without clicking through all invoices, use Find
• Click Edit on QuickBooks Menu Bar
• Click Find
Use Find (2 of 4)
• Click Simple tab
• Click drop-down list arrow for Transaction Type
• Click Invoice
Use
Find
(3 of 4)
• Click drop-down list arrow for Customer:Job • Click Gomez, Luis, Esq.
• Click Find button
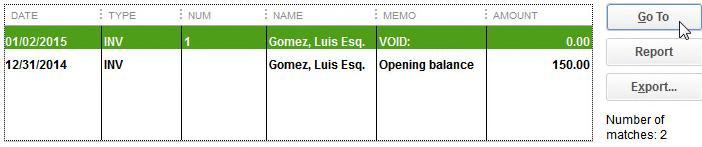
Use Find (4 of 4)
• Click Inv 1
• Click Go To button – This takes to you Invoice 1 Even though Invoice 1 was Voided, it remains as an invoice
A deleted invoice is permanently removed from QuickBooks records
With Invoice 1 on screen:

Invoice (2 of 2)
Click OK on Delete Transaction dialog box • You will now see Invoice 2
When an invoice is deleted, it is removed completely from QuickBooks
Close Invoices
Close Find
• Invoice 1 will no longer show on Find for Luis Gomez, Esq.
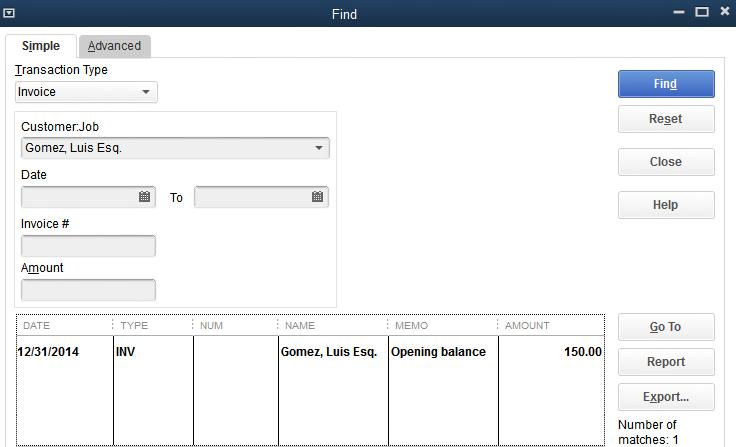
Close Find
of 2)
Invoice 1 no longer shows in Journal
© 2016, 2015, 2014 Pearson Education, Inc.
of 5)
Add Installation Income: – Click Chart of Accounts icon on Home Page – Click Account button – Click New
Add New Account (2
of 5)
• Click Income to select account type
• Click Continue button
Add New Account (3 of 5)
• Enter Account Name: Installation Income
• Click check box in front of Subaccount of
• Click drop-down list arrow for Subaccount of
• Click Income
Add
New Account (4 of 5)
• Click in Description textbox – Type: Hardware/Network Installation Income
• Click Save & Close button to add account
Add New Account
(5 of 5) • Scroll through Chart of Accounts to see new account – Account is indented because it is a subaccount of Income
Add New Item (1 of 5)
• Because an item is used when recording a cash or credit sale, Items are called Sales Items
• Each Income account must be used by or linked to a sales item
• When invoice or sales receipt prepared, select Item used to earn income
• QuickBooks records revenue in associated income account
Copyright © 2016, 2015, 2014 Pearson Education, Inc.
Add New Item (2 of 5)
• Click Items and services icon

• Click Item button at bottom of Item List
• Click New
Add New Item (3 of 5) • Add a New Service Item: – Type: Service – Item Name: Install 1 – Description: Initial Hour of Hardware/Network Installation – Rate: 95.00 – To select Account, click drop-down list arrow Click Installation Income
Add New Item
Add New Item (5 of 5)
• Item List includes Install 1
• Notice Account used for this sales item is Income: Installation Income
• When recording a cash sale, a sales receipt is prepared
• A cash sale is a customer purchase paid for with cash, check, or credit card
• Behind scenes QuickBooks: – Records information from sales receipt into Journal – Posts transaction by
Debiting Checking in General Ledger
Crediting proper income account
2016, 2015, 2014 Pearson Education, Inc.
Prepare Sales Receipt (1 of 3)
• Click Create Sales Receipts icon

• Remove History from screen, click Hide History button
Date: 01/03/15
(2 of 3)
Sales Receipt (3 of 3)

Add New Customer While Completing
Sales Receipt (1 of 5)
• In Customer: Job text box
– Type new customer’s name: Collins, Ken
– Press Tab
• Customer: Job Not Found message appears
– Three choices are available
Quick Add: add customer name only
Set Up: Add complete information for customer
Cancel: Do not add new customer
• Click Set Up
Enter Address Info for new customer
Add New Customer While Completing Sales
Receipt (3 of 5)
• Opening Balance
– When adding a customer who has an existing balance
Enter amount owed as an opening balance
Enter date you are doing this
– An opening balance is normally used when converting to QuickBooks
– Only time an opening balance can be entered is at time a customer is added
– When using QuickBooks most new customers will not have an opening balance

(4 of 5)
• Click Payment Settings tab
• Enter Payment Terms:
– Click drop-down list arrow
– Click Net 30
• Preferred Delivery Method – Click drop-down list arrow – Click None • Enter Credit Limit 1,000 • Click OK
Add New Customer While Completing
Receipt (5 of 5) • Complete sales receipt:
Template: Custom Cash Sale
Date: 01/03/15
Sale No.: 2
Payment Method: Check
Check No.: 1264
Item: Install 1 (Qty 1)
Message: Thank you for your business.
Receive
Payment on Account (1 of 3)
• Receive Payments used to record a payment on an invoice
– Customer must have an account with your company
– Customer must owe a payment on an invoice
– Payment made by customer is for a sale recorded on an invoice
• Remember:
– Receive Payments is notused to record a cash sale
– A Sales Receipt is used to record a cash sale nota payment for an invoice
Receive Payment on Account (2 of 3)
• Record a partial payment of $2,190 from Andrews Productions on 01/03/2015
– Click Receive Payments icon

– Click Received From drop-down list arrow
– Click Andrews Productions Notice that Customer Balance shows 3,190.00
– Tab to Payment Amount and enter 2190
– Tab to Date and enter 01/03/15
– Click Check icon
– Tab to Check # and enter 2104
– Enter Partial Payment as Memo
– On Underpayment screen, mark Leave this as an underpayment
© 2016, 2015, 2014 Pearson
Receive Payment on Account (3 of 3)
• QuickBooks: – Marked transaction for opening balance
– Shows an Underpayment of $1,000 – Shows Amount Due of 3,190 – Shows Applied of 2,190
Backup Files (1 of 2)
• A backup file is prepared
– As a safeguard in case you make an error – Has a file extension of .qbb
Backup Files (2 of 2)
• Prepare a Daily Backup :
– After a number of transactions have been recorded
– At end of every work session
– Restore your daily backup file to restore your work from previous training session and eliminate work completed in current session
–
Example:
Make an error when training, cannot figure out how to correct it, restore backup file so you do not have to redo entire chapter
• Create an end of chapter backup:
– Restore Chapter Backup to erase new chapter and restore previous chapter
–
Example:
Make an error in Chapter 3, restore Chapter 2 backup
Prepare Daily Backup
• Prepare Computer (Daily Backup).qbb file
• Follow steps presented in Chapter 1 for creating a backup file
• Name file Computer (Daily Backup)
• File type is QBW Backup (*.QBB)
• Restore this file if you make an error within Chapter 2.
• At this point, file contains your work for Chapter 1 and up through Sales Receipts in Chapter 2.
Deposit Checks Received for Payments
(1 of 3)
• Amounts received for payments and cash sales are put into Undeposited Funds
• Making a bank deposit will remove amount from Undeposited Funds and put it in Checking (Cash)
• Procedure helps prevent mistakes in writing checks using funds not deposited in bank
3)
• To make a deposit, click Record Deposits icon
• Click Select All button
• Click OK

(3 of 3)
• Make Deposits Screen should show: – Deposit To: Checking – Date: 01/03/15 (insert correct date if necessary) – Memo: Deposit – List of items being deposited
Deposit Total
(1 of 2)
Print deposit summary: – Click Print icon
Select Deposit summary only
Click OK
of 2)
• Complete print information
• Print Deposit Summary
• Note:
– Current date and time in upper-right corner
– This is date and time of your computer. It will not match 01/03/2015 date of deposit
– Date and time shown may notbe changed
Copyright © 2016, 2015, 2014 Pearson Education, Inc. All
• After printing, click Save & Close button on Make Deposits screen
Report Center
• When preparing several reports, use Report Center
• Click Reports icon on Top Icon bar
– List of report categories show on left
– List of available reports for a category show on right

Copyright © 2016, 2015, 2014 Pearson Education, Inc. All
Report Center Views
• There are three ways to view list of reports in Report Center
Grid
Report Center Views: Carousel
• Carousel view – Click carousel view button – Shows reports by rotating report examples

© 2016, 2015, 2014 Pearson Education, Inc. All
Report Center Views: List
• List view – Click list view button

– Shows a list of reports
© 2016, 2015, 2014 Pearson Education, Inc.
Report Center Views: Grid
• Grid view – Click grid view button

– Shows miniature samples of reports

© 2016, 2015, 2014 Pearson Education, Inc.
Prepare Journal
(4 of 7)
• To verify transactions entered, prepare Journal, use List view
– Click Accountant & Taxes in Report Center
– Double-click Journal orclick Journal and click Run button
– Click OK on Collapsing and Expanding Transactions dialog box
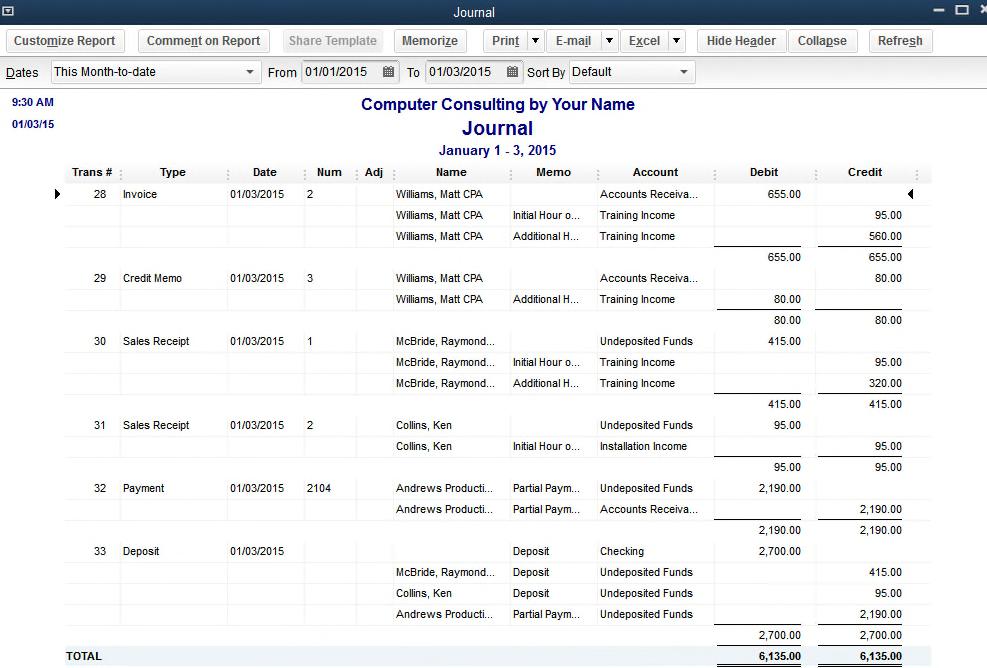
Prepare Journal (5 of 7)
• Enter Dates: From 01/01/15 To 01/03/15
• Press Tab to generate report
• Click Expand button to show all accounts used
• Scroll through report
• Note date and time prepared are shown
• Many columns are not displayed in full
• Journal shows transactions entered for PowerPoint Presentation
– Does not match Journal for Chapter 2 in text
Prepare Journal (6 of 7)
Customize
Report Header (1 of 2)
• Customize header to remove – Date Prepared – Time Prepared
Date and time are for your computer
Will not match textbook date and/or time
Customize Report Header (2
of 2) • Click Customize Report button – Click Header/Footer tab – Click Date Prepared and Time Prepared to remove check marks – Click OK
Display Report Information
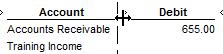
• Resize width of Account column to display account names in full
– Position cursor on sizing diamond between Account and Debit
Cursor turns into a plus with arrows pointing left and right.
– Hold down primary (left) mouse button
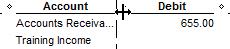
– Drag cursor from diamond between Account and Debit to rightuntil account names display in full
You will see a dotted vertical line while you are dragging mouse and holding down primary mouse button
© 2016, 2015, 2014 Pearson Education, Inc. All
Display Report Columns in Full
• Make columns smaller by pointing to sizing diamond and dragging left
• Point to sizing diamond between Debit and Credit columns
• Drag to leftto make Debit column smaller
– If column is too small, numbers that cannot be displayed will be shown as ******…
Look at Debit column
– If this happens, drag to right to make column larger
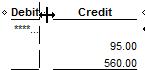
© 2016, 2015, 2014 Pearson Education, Inc.
Prepare Journal
(7 of 7)
• View report and look at debit and credit entries for each transaction

Copyright © 2016, 2015, 2014 Pearson Education, Inc. All
Accounts Receivable and Sales Graphs
• Two QuickBooks graphs are – Accounts Receivable—shows
How much customers owe
Aging of account
Percentage of accounts receivable for each customer
– Sales—shows information about items sold
Copyright © 2016, 2015, 2014 Pearson Education, Inc. All
Prepare Accounts Receivable Graph
(1 of 2)
• Click Customers & Receivables in Report Center
• Double-click Accounts Receivable Graph orclick Accounts Receivable Graph and click Run
• To change dates
– Click Dates button – Enter date for Show Aging as of – Click OK
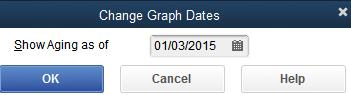
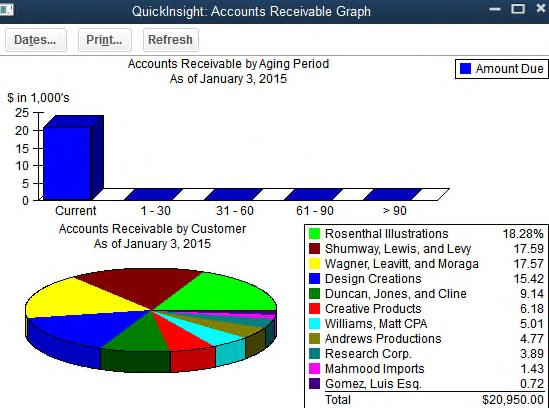
Prepare Accounts Receivable
Graph (2 of 2)
• Graph displays
– Accounts Receivable by Aging Period as a bar chart
– Pie chart and legend showing
Amounts owed by each customer
Percentage of accounts receivable for each customer
• Click Sales in Report Center
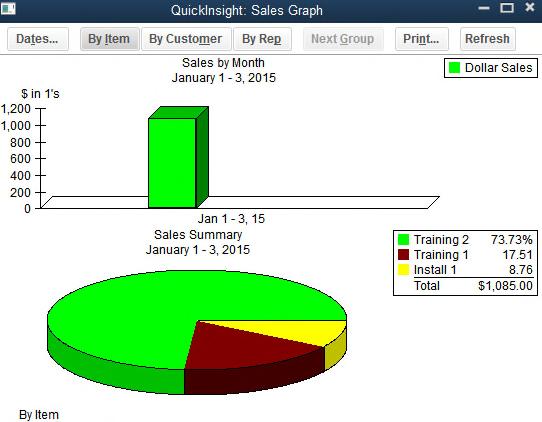
• Double-click Sales Graph orclick Sales Graph and click Run
• Click the Dates button – Enter From 01/01/2015 – Enter To 01/03/2015 – Click OK
Analyze Sales Graph
• Graph shows
– Bar chart to show sales by month
– Pie chart and a legend showing
Amount of sales by sales item
Percentage of sales for each item
End of Chapter Procedures
• Remember to backup your work
– Each day back up your work to Computer Daily Backup.qbb
This contains all of your work completed to date.
If you make a mistake tomorrow, restore this file so you don’t have to start from beginning of chapter
– At end of Chapter 2, back up to Computer (Backup Ch. 2).qbb
This contains all of your work for Chapters 1 and 2
If you make a mistake in Chapter 3 and restoring your Daily Backup doesn’t solve your problem, restore this file so you can so you can begin Chapter 3 at beginning without having to redo Chapters 1 and 2

All rights reserved. No part of this publication may be reproduced, stored in a retrieval system, or transmitted, in any form or by any means, electronic, mechanical, photocopying, recording, or otherwise, without prior written permission of publisher. Printed in United States of America.
Copyright © 2016 Pearson Education, Inc.
Copyright © 2016, 2015, 2014 Pearson Education, Inc. All Rights Reserved