SHARPSHOOTER GRID
ETCHED GLASS RETICLE
ILLUMINATED
Sharpshooter Grid MOA
Sharpshooter Grid MRAD Ranging Sighting in Holdovers Fire correction 3 6 7 10 Ranging Sighting in Holdovers Fire correction 11 14 15 18
TABLE OF CONTENT
SHARPSHOOTER GRID MOA
Sharpshooter MOA is a ranging and holdover reticle using the Minute Of Angle (MOA) system. MOA represents an angle, not a fixed dimension. At 100 yards, 1 MOA measures 1.047 inches, and for simplicity’s sake most shooters round that number down to “shooter’s MOA” of 1 inch at 100 yards. The angle continues to grow by about an inch per 100 yards. At 500 yards, the same 1 MOA angle measures about 5 inches, and at 1000 yards, about 10 inches. Some models feature reticle illumination.
ILLUMINATION OFF ILLUMINATION ON
RANGING: To hit a target at long range you must first have a good idea of how far away it is. At closer ranges the crosshair hash marks measuring 2 MOA apart can be used to estimate range. At long range, the very fine ranging ladders with hash marks 0.5 MOA apart provide extra ranging accuracy.
3
36 32 28 24 20 16 12 32 32 24 24 16 16 8 36 32 28 24 20 16 12 4 36 36 32 32 32 32 28 28 24 24 24 24 20 20 16 16 16 16 12 8 8 12 8 8 4 4
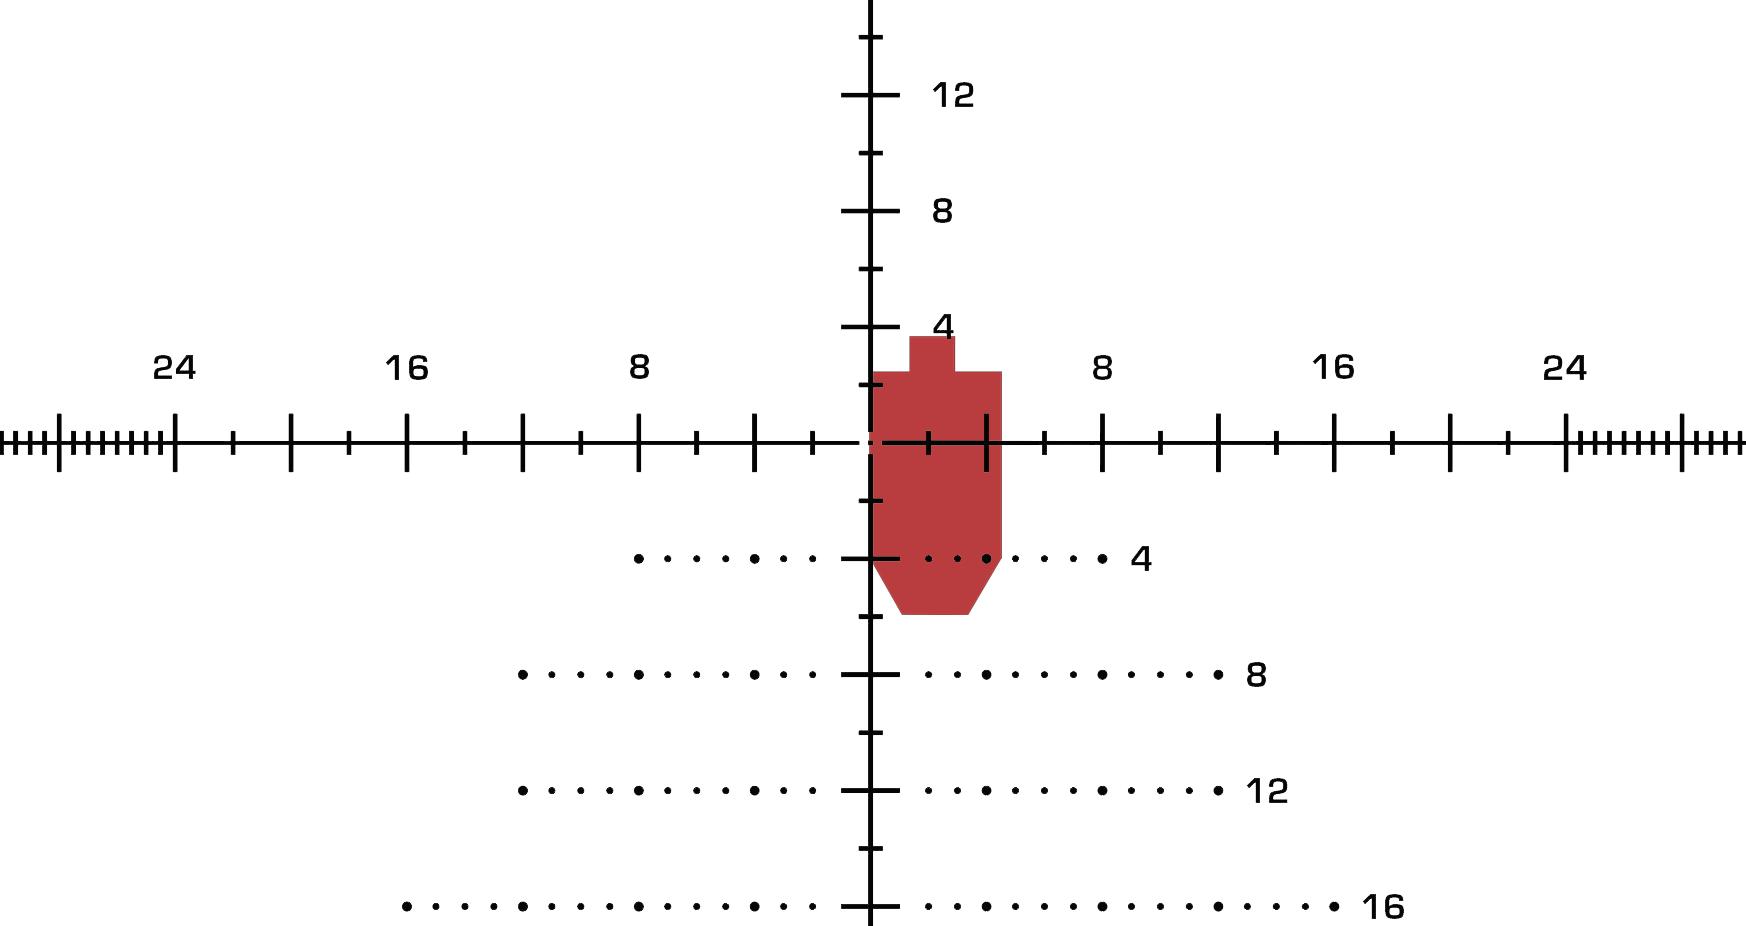
Diagram 1: A standard cardboard target is about 30 inches tall and 18 inches wide.
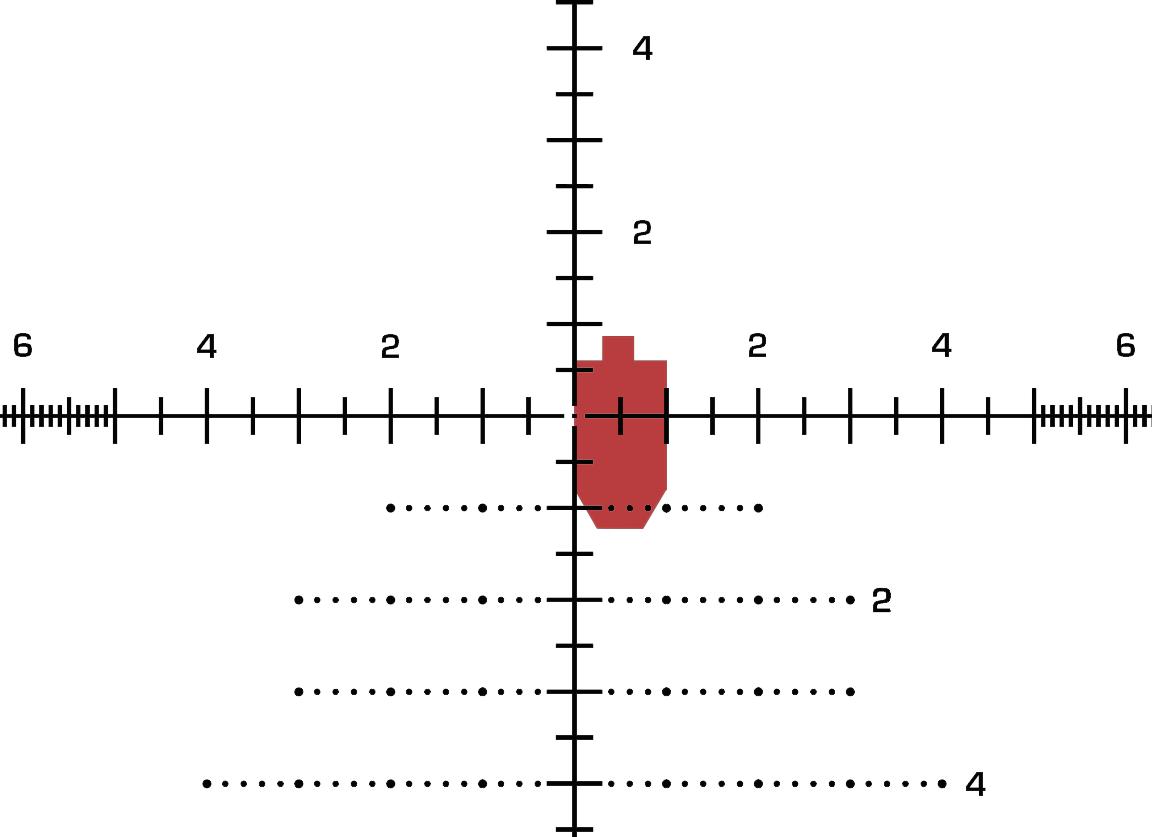
Looking through the scope at the target, it appears to measure 4.5 MOA wide. The measurement will stay consistent regardless of scope magnification setting due to the first focal plane design. Divide the target’s actual width in inches (18) by the observed target width in MOA (4.5), and multiply by 100 to find the range in yards. (18 / 4.5) x 100 = 400 so this target is about 400 yards away.
DIAGRAM 1.
TARGET DISTANCE: 400 YARDS
4
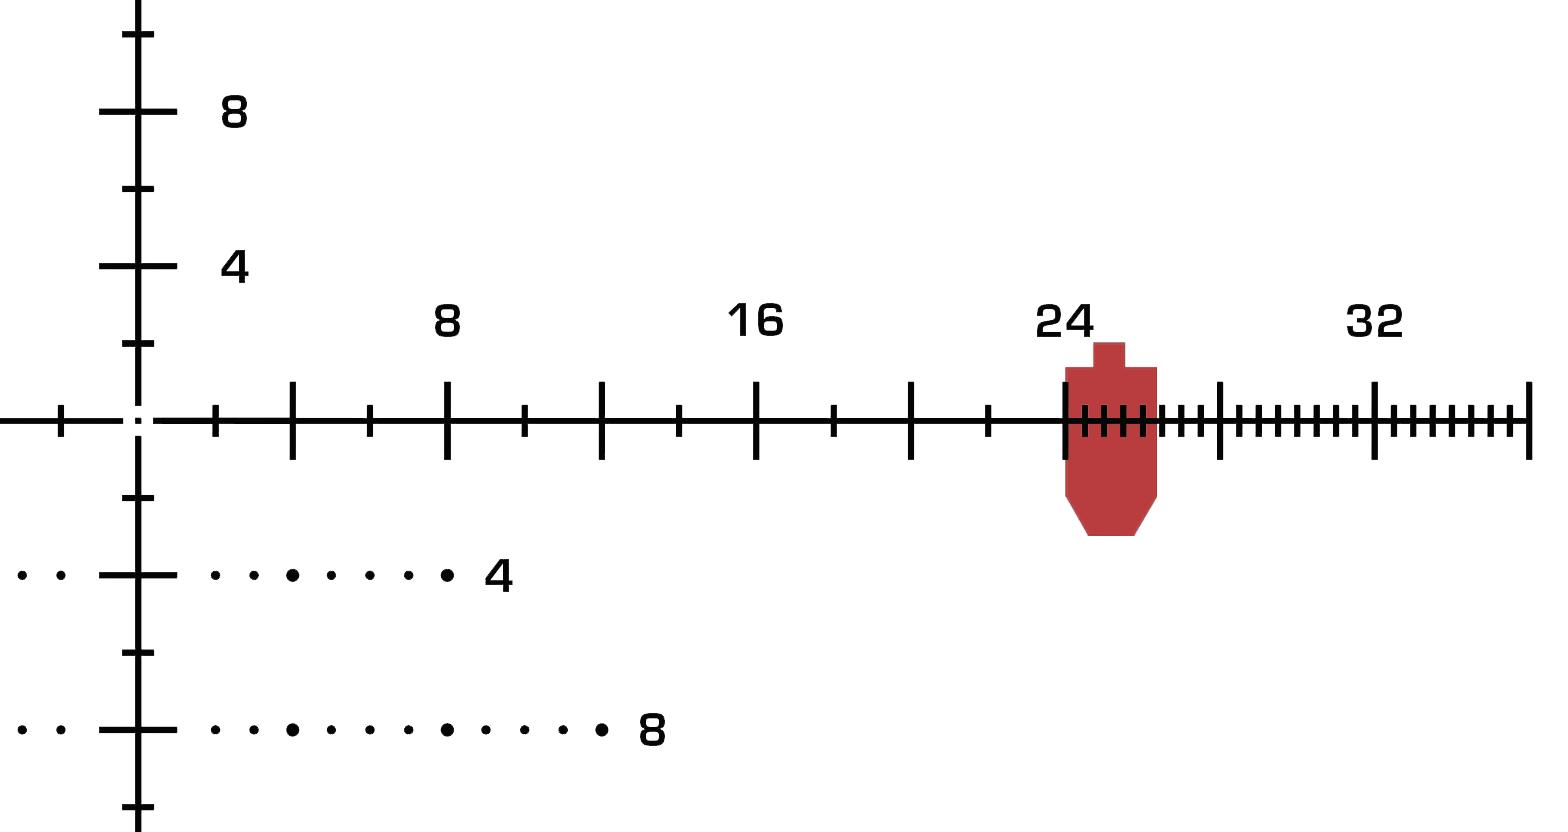
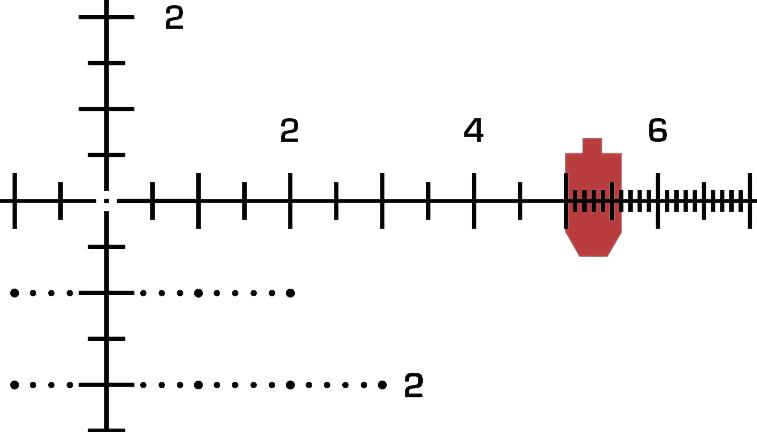
Diagram 2: At longer ranges it becomes difficult to make precise estimations using the hash marks spaced at 2 MOA increments. To range distant targets, use the fine ranging ladders located at the far edges of the reticle. The hash marks are spaced just 0.5 MOA apart. In this example, the same 18-inch-wide target appears to be just 2.4 MOA across, with just a little bit of space remaining between the target’s right shoulder and the hash mark located 2.5 MOA across from the left shoulder. Use the same formula: (18 inches / 2.4 MOA) x 100 = 750, so the target is about 750 yards away.
If you know both the height and width of your target and have time to spare, you can take note of the target’s apparent size in MOA both horizontally and vertically and use the same formula for both measurements. This double checks your calculations and gives you the most precise range estimate possible. In this case, the 30 inch tall target would appear to be 4 MOA tall at 750 yards. (30 inches / 4 MOA) x 100 = 750.
DIAGRAM 2.
TARGET DISTANCE: 750 YARDS
5
SHARPSHOOTER GRID MOA. SIGHTING IN
On the range or out in the field, a lot of ugly math can be avoided if you always think in terms of Minute of Angle, not inches or yards. Use the Sharpshooter reticle subtensions to your advantage. For example, shooters using a traditional duplex reticle usually fire a group of three shots at the center of their target, cease fire and walk to the target, measure the distance from the shot group to their point of aim in inches, then mathematically convert inches to MOA to determine their scope clicks. With the Sharpshooter reticle, if you can observe your group’s point of impact, you can measure the distance between your impact and your point of aim in Minutes of Angle, and make your adjustments in MOA clicks without ever worrying about doing math. Choose whether to measure horizontally or vertically first, adjust that turret, then fire again to confirm the change and adjust the other turret next. This gives more consistent results in sight-in than attempting to adjust both turrets between shot groups.
6
SHARPSHOOTER GRID MOA. HOLDOVERS
Ballistic calculator programs like Strelok Pro or Ballistic AE can accurately predict bullet drop and wind push at any range to target. The standard data for common rifle configurations will get you close, but using real world data such as chronographed velocity numbers from your actual rifle will help you make the most out of your precision scope. For these examples we will use typical data for an AR-15 in 5.56 NATO with a 16” barrel, zeroed at 100 yards. Make sure your ballistic calculator is set to display data in MOA instead of MIL/MRAD.
7
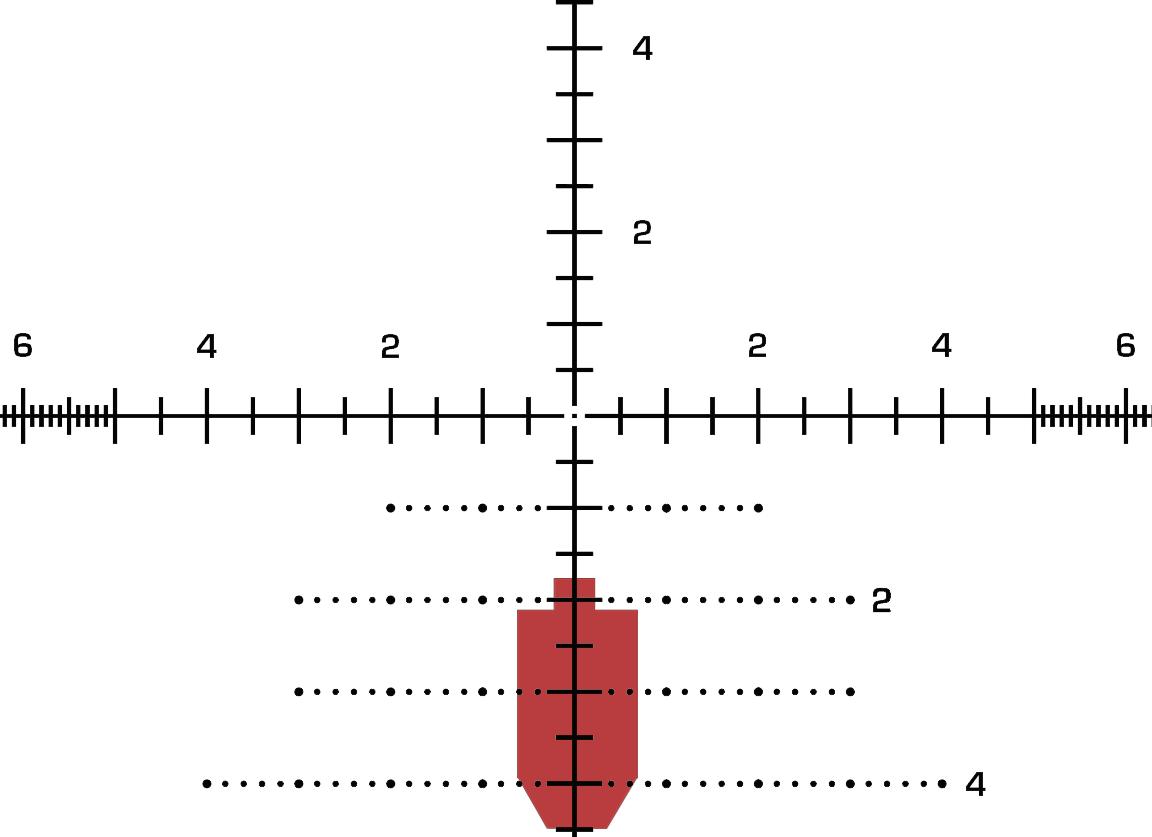
Diagram 3: The ballistic calculator app indicates that the bullet will drop about 6 MOA at 400 yards. If you want to “dial for dope” you can turn the elevation turret up to 6 MOA and fire using the center of the crosshair. However, it is faster to leave the scope zeroed, abandon using the center aiming point, and count 6 MOA down on the crosshair’s hash marks, using the numbers on the right of the dot grid as a quick reference. Looking through the scope, you will appear to be aiming high of the target. Gravity will push down on the bullet as it flies the 400 yards to hit the cardboard target’s center of mass.
DIAGRAM 3.
TARGET DISTANCE: 400 YARDS
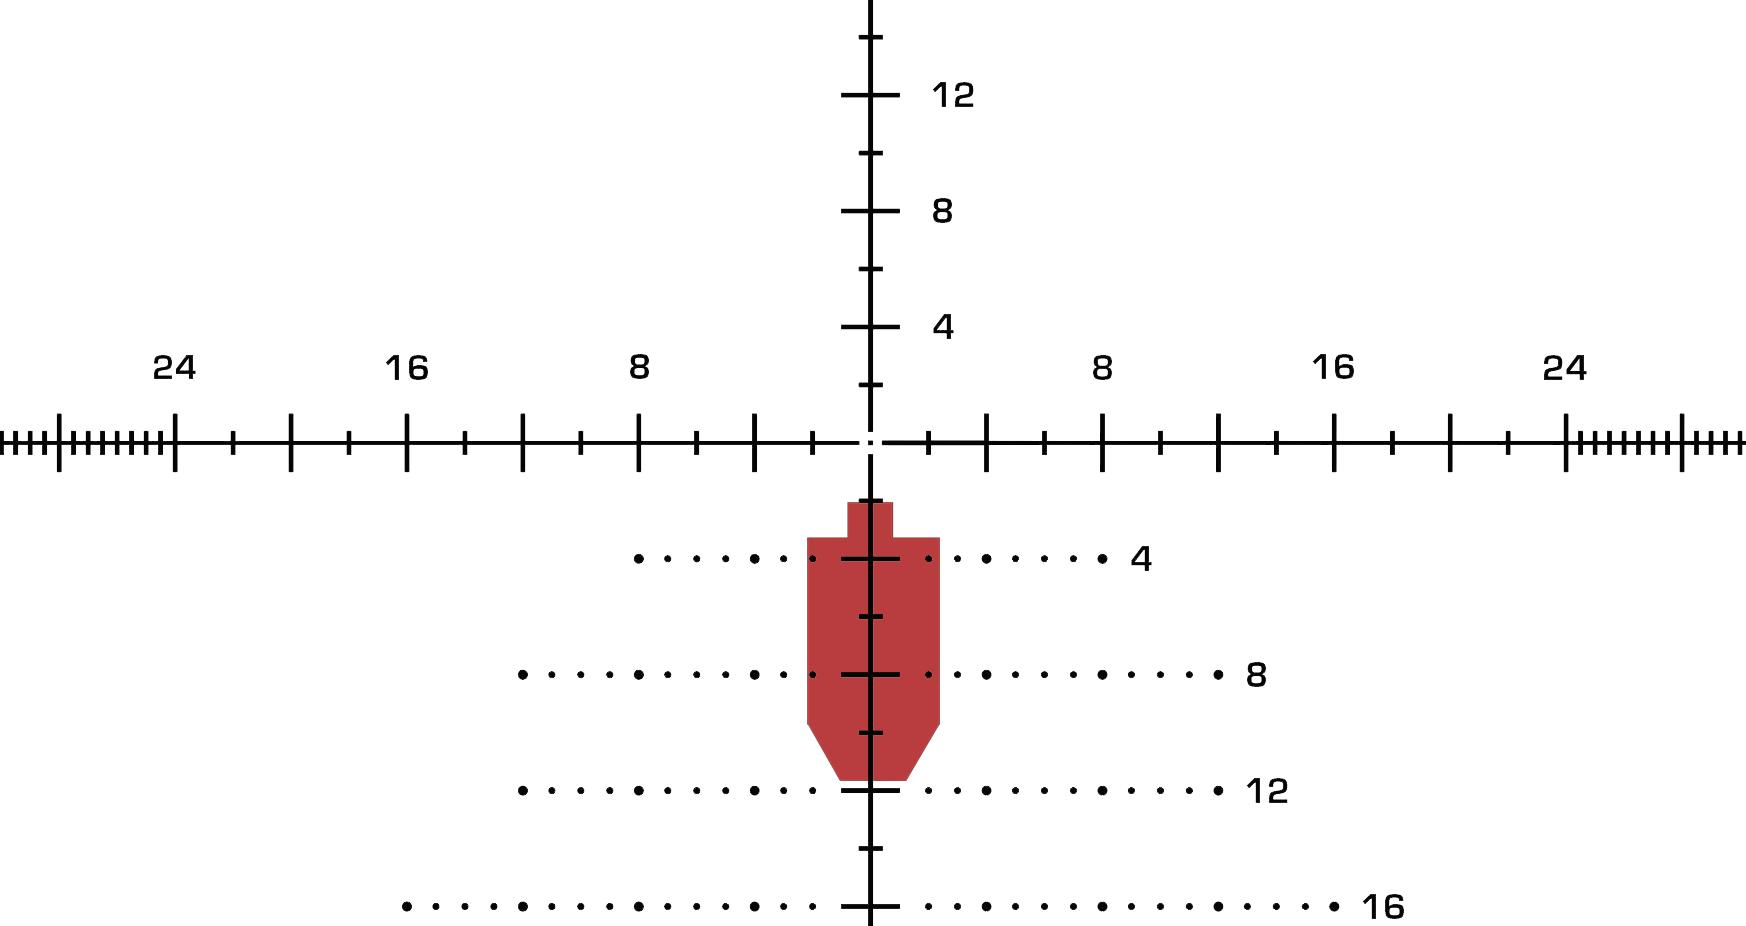
6 MOA down holdover
8
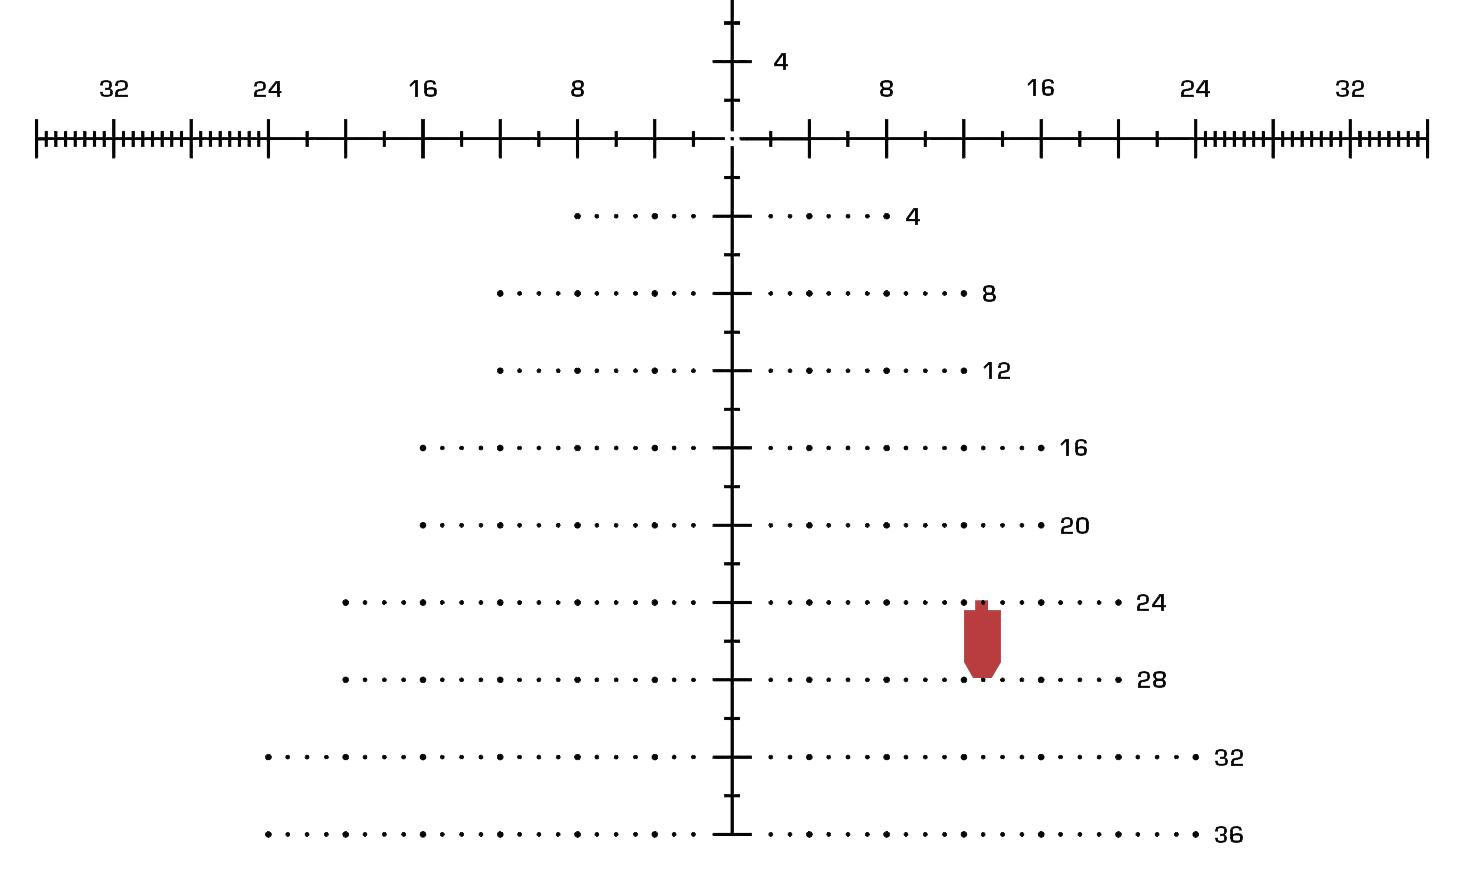
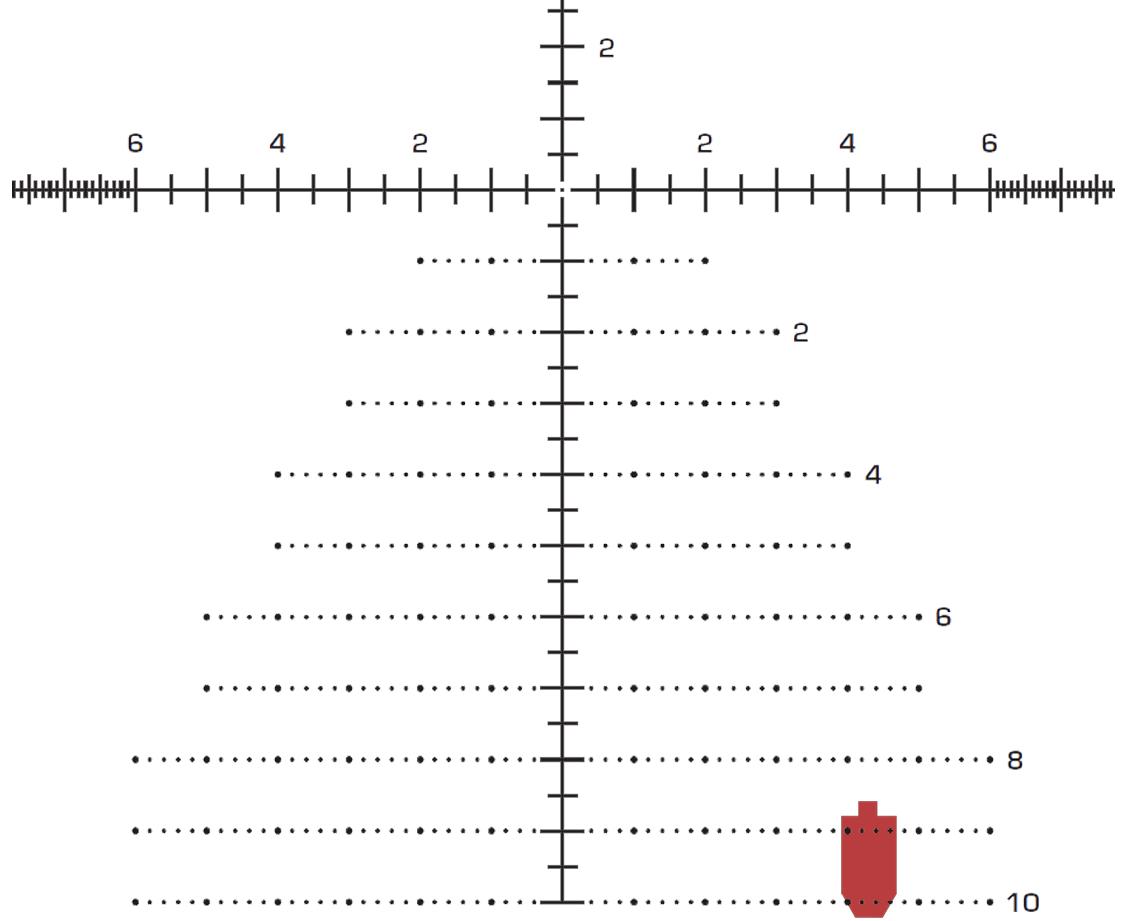
Diagram 4: This is the 750 yard target.
The ballistic calculator indicates that the bullet will drop 26 MOA from the muzzle to 750 yards, but there is another factor added—a 10mph wind blowing from left to right. Instead of chasing wind calls by reaching up and dialing the windage turret, use the horizontal grid dots. The ballistic calculator indicates the wind will push the bullet 13 MOA to the right at 750 yards. Hold 26 MOA down and 13 MOA right to score a hit in the center of the target.
DIAGRAM 4.
TARGET DISTANCE: 750 YARDS
WIND: 10MPH LEFT TO RIGHT
9
26 MOA down, 13 MOA right holdover
SHARPSHOOTER GRID MOA. FIRE CORRECTION
When firing at targets of unknown distance, thinking in MOA instead of in yards or inches is a critical skill. If you or your spotter can spot the “splash” of the round’s impact, you can shift your point of aim and fire again, using the spot on the reticle where the previous round hit as your new aiming mark. Using this method, the range to target does not matter at all, because you are using the angular measurement consistently. If a missed shot hit 2 MOA to the left of your target, dial windage or shift your aim 2 MOA to the right and your next shot will hit, regardless of the distance to target.
10
SHARPSHOOTER GRID MRAD
Sharpshooter MRAD is a ranging and holdover reticle using the Milliradian (MRAD or MIL) system. MRAD represents an angle, not a fixed dimension. At 100 meters, 1 MRAD measures 10 centimeters. Thus, the 1/10 MRAD-per-click adjustment turrets on your Patriot scope will move the point of impact 1 cm per click at 100 meters. The angle continues to grow by about one centimeter per 100 meters. At 500 meters, the same 1 MRAD angle measures about 50 centimeters, and at 1000 yards, about 100 centimeters (1 full meter). Some models feature reticle illumination.
RANGING: To hit a target at long range you must first have a good idea of how far away it is. At closer ranges the crosshair hash marks measuring 0.5 MRAD apart can be used to estimate range. At long range, the very fine ranging ladders with hash marks 0.1 MRAD apart provide extra ranging accuracy.
11
ILLUMINATION OFF ILLUMINATION ON 8 8 8 10 8 6 6 6 6 4 4 4 4 2 2 2 2 8 8 8 10 8 6 6 6 6 4 4 4 4 2 2 2 2
Diagram 5: A standard cardboard target is about 75 cm tall and 45 cm wide. Looking through the scope at the target, it appears to measure 1 MRAD wide. The measurement will stay consistent regardless of scope magnification setting due to the first focal plane design.
Divide the target’s actual width in cm (45) by the observed target width in MRAD (1), and multiply by 10 to find the range in meters. (45 / 1) x 10 = 450 so this target is about 450 meters away.
If you are using Sharpshooter MRAD but want to calculate in imperial units rather than metric, the math is similar.
Divide the target’s size in inches by the observed target size in MRAD as seen through the scope. Then multiply by 27.778. In this example the target is 17.5 inches wide. (17.5 / 1) x 27.778 = 486.1, so the target ranges at approximately 486 yards away.
DIAGRAM 5.
TARGET DISTANCE: 450 YARDS
12
Diagram 6: At longer ranges it becomes difficult to make precise estimations using the hash marks spaced at 0.5 MRAD increments. To range distant targets, use the fine ranging ladders located at the far edges of the reticle. The hash marks are spaced just 0.1 MRAD apart. In this example, the same 45 cm wide target appears to be just 0.6 MRAD across. Use the same formula: (45 cm / 0.6 MRAD) x 10 = 750, so the target is about 750 meters away. In imperial units the math would look like this:
(17.5 / 0.6) x 27.778 = 810, so this target is about 810 yards away.
DIAGRAM 6.
TARGET DISTANCE: 750 METERS
13
SHARPSHOOTER GRID MRAD. SIGHTING IN
On the range or out in the field, a lot of ugly math can be avoided if you always think in terms of Milliradians, not cm or meters (or inches / yards). Use the Sharpshooter reticle subtensions to your advantage. For example, shooters using a traditional duplex reticle usually fire a group of three shots at the center of their target, cease fire and walk to the target, measure the distance from the shot group to their point of aim in inches, then mathematically convert inches to MRAD to determine their scope clicks. With the Sharpshooter reticle, if you can observe your group’s point of impact, you can measure the distance between your impact and your point of aim in MRAD, and make your adjustments in MRAD clicks without ever worrying about doing math. Choose whether to measure horizontally or vertically first, adjust that turret, then fire again to confirm the change and adjust the other turret next. This gives more consistent results in sight-in than attempting to adjust both turrets between shot groups.
14
SHARPSHOOTER GRID MRAD. HOLDOVERS
Ballistic calculator programs like Strelok Pro or Ballistic AE can accurately predict bullet drop and wind push at any range to target. The standard data for common rifle configurations will get you close, but using real world data such as chronographed velocity numbers from your actual rifle will help you make the most out of your precision scope. For these examples we will use typical data for an AR-15 in 5.56 NATO with a 16” barrel, zeroed at 100 meters. Make sure your ballistic calculator is set to display data in MIL / MRAD instead of MOA.
15
Diagram 7: The ballistic calculator app indicates that the bullet will drop about 3 MRAD at 450 meters. If you want to “dial for dope” you can turn the elevation turret up to 3 MRAD and fire using the center of the crosshair. However, it is faster to leave the scope zeroed, abandon using the center aiming point, and count
3 MRAD down on the crosshair’s hash marks, using the numbers on the right of the dot grid as a quick reference. Looking through the scope, you will appear to be aiming high of the target. Gravity will push down on the bullet as it flies the 450 meters to hit the cardboard target’s center of mass.
DIAGRAM 7.
TARGET DISTANCE: 450 METERS
16
3 MRAD down holdover
Diagram 8: This is the 750 meter target. The ballistic calculator indicates that the bullet will drop 9.5 MRAD from the muzzle to 750 meters, but there is another factor added—a 10mph wind blowing from left to right. Instead of chasing wind calls by reaching up and dialing the windage turret, use the horizontal grid dots. The ballistic calculator indicates the wind will push the bullet 4.3 MRAD to the right at 750 meters. Hold 9.5 MRAD down and 4.3 MRAD right to score a hit in the center of the target.
DIAGRAM 8
TARGET DISTANCE: 750 METERS
WIND: 10 MPH LEFT TO RIGHT
17
9.5 MRAD down, 4.3 MRAD right holdover
SHARPSHOOTER GRID MRAD. FIRE CORRECTION
When firing at targets of unknown distance, thinking in MRAD instead of in cm/meters, inches or yards is a critical skill. If you or your spotter can spot the “splash” of the round’s impact and determine the distance away from your point of aim in MRAD, you can shift your point of aim and fire again, using the spot on the reticle where the previous round hit as your new aiming mark. Using this method, the range to target does not matter at all, because you are using the angular measurement consistently. If a missed shot hit 2 MRAD to the left of your target, dial windage or shift your aim 2 MRAD to the right and your next shot will hit, regardless of the distance to target.
18
support@swampfoxoptics.com SWAMPFOX OPTICS INC. swampfoxoptics.com
