2 minute read
INSTALLING CAT ELECTRONIC TECHNICIAN

from Et adaptor
by saher magdy

Purpose
The installation procedure described below is for Cat Electronic Technician. The installation program is designed to run under Microsoft Windows XP/VISTA/Windows 7. The installation requires one (1) Install CD-ROM or access to an Infocast website (see page 45). This process will upgrade the current service tool and preserve files previously created in the service tool, such as defined Status Groups or service tool report documents.
Advertisement
NOTE: While the installation will run from a server or over a network, the service tool will not.
NOTE: To install the service tool in Windows XP, VISTA, or Windows 7, administrative rights on the computer system are required.
Instructions
Perform the following steps to install Cat Electronic Technician from the Install CD-ROM:
Step 1 Close any open applications, including any connections to mainframe computers or networks. Only Windows should be running.
Step 2 Insert the Cat Electronic Technician Install CD-ROM into the computer’s CD-ROM drive.
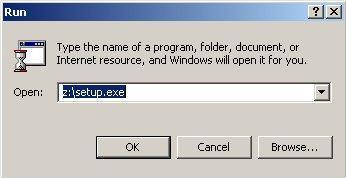
Step 3 Click the Start button on the Task Bar. From the menu, select Run. The Run dialog box is displayed:
Step 4 Type z:\setup.exe in the text box. If the CD is in a CD-ROM drive other than “z,” substitute “z” with the appropriate drive letter.
Step 5 Click OK. The Choose Setup Language dialog box is displayed:
Select the language in which the InstallShield Wizard Setup will be displayed.
Step 6 Click OK. The InstallShield Wizard Setup status box is displayed. This status box displays the progress status of the InstallShield Wizard setup.
Note: For installations 2011B and greater, the InstallShield Wizard will install Microsoft .Net Framework 4.0 if it has not previously been installed on the PC. This process may take several minutes and may require a reboot before the installation of Cat Electronic Technician can continue.
When the setup is complete, the Welcome dialog box is displayed:


Step 7 Read through the Welcome message, and then click the Next> button to continue the setup.
The Software License Agreement dialog box is displayed. Clicking Cancel will abort the setup process.
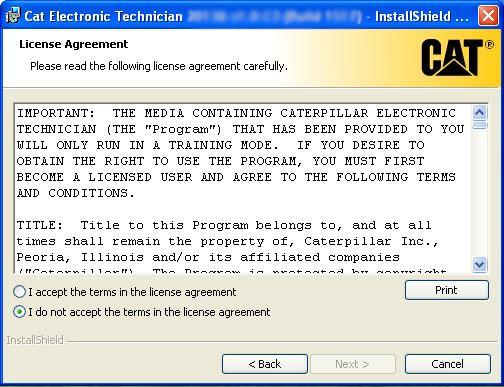
Step 8 Read through the license agreement. Click the “I accept the terms in the license agreement” radio button to accept the terms and conditions. Click Next> to continue the setup.
Step 9 Click Next> to continue the setup. The Ready to Install the Program dialog is displayed.
Click Install to continue. Click <Back to return to the previous screen. Click Cancel to abort the setup process.
Step 10 The setup process begins copying files. Click Cancel to abort the setup/installation process.

Step 11 When the installation has completed, the Installation Complete dialog box is displayed.
Click Finish to close the Installation Complete dialog box. The ReadMe file is displayed. If prompted, the computer must be rebooted in order for the finalization to complete and for the software to work.