Design ET & EAT Class 125-600 UPPER WIPER (KEY 12)
Table 6. Recommended Torque for ENVIRO-SEAL Bellows Seal Packing Flange Nuts VALVE SIZE, INCHES
VALVE STEM DIAMETER THROUGH PACKING
N m
Lbf in
N m
Lbf in
1-2
1/2
2
22
4
33
3-8
1
5
44
8
67
MINIMUM TORQUE
BUSHING (KEY 13)
MAXIMUM TORQUE
PACKING SET: (KEY 6) FEMALE ADAPTOR PACKING RING MALE ADAPTOR
plug in the chuck or vise for easy threading of the adaptor. Thread the adaptor into the valve plug and tighten to the appropriate torque value.
SPRING (KEY 8) THRUST RING 12B4185-A SHT 1 (KEY 39)
12B4182-A SHT 1
7. Select the proper size of drill bit and drill through the adaptor using the hole in the valve plug as a guide. Remove any metal chips or burrs and drive in a new pin to lock the plug/adaptor assembly together.
SPACER (KEY 8)
THRUST RING (KEY 39)
SPACER (KEY 8)
12B4185-A SHT 2
12B4182-A SHT 2
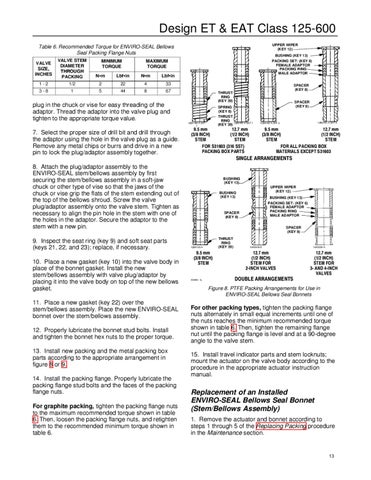
9.5 mm 12.7 mm (3/8 INCH) (1/2 INCH) STEM STEM FOR S31603 (316 SST) PACKING BOX PARTS
9.5 mm 12.7 mm (3/8 INCH) (1/2 INCH) STEM STEM FOR ALL PACKING BOX MATERIALS EXCEPT S31603
SINGLE ARRANGEMENTS
8. Attach the plug/adaptor assembly to the ENVIRO-SEAL stem/bellows assembly by first securing the stem/bellows assembly in a soft-jaw chuck or other type of vise so that the jaws of the chuck or vise grip the flats of the stem extending out of the top of the bellows shroud. Screw the valve plug/adaptor assembly onto the valve stem. Tighten as necessary to align the pin hole in the stem with one of the holes in the adaptor. Secure the adaptor to the stem with a new pin. 9. Inspect the seat ring (key 9) and soft seat parts (keys 21, 22, and 23); replace, if necessary. 10. Place a new gasket (key 10) into the valve body in place of the bonnet gasket. Install the new stem/bellows assembly with valve plug/adaptor by placing it into the valve body on top of the new bellows gasket. 11. Place a new gasket (key 22) over the stem/bellows assembly. Place the new ENVIRO-SEAL bonnet over the stem/bellows assembly. 12. Properly lubricate the bonnet stud bolts. Install and tighten the bonnet hex nuts to the proper torque. 13. Install new packing and the metal packing box parts according to the appropriate arrangement in figure 8 or 9. 14. Install the packing flange. Properly lubricate the packing flange stud bolts and the faces of the packing flange nuts. For graphite packing, tighten the packing flange nuts to the maximum recommended torque shown in table 6. Then, loosen the packing flange nuts, and retighten them to the recommended minimum torque shown in table 6.
BUSHING (KEY 13) UPPER WIPER (KEY 12)
BUSHING (KEY 13)
BUSHING (KEY 13) PACKING SET: (KEY 6) FEMALE ADAPTOR PACKING RING MALE ADAPTOR
SPACER (KEY 8)
SPACER (KEY 8) THRUST RING (KEY 39)
12B4183-A
9.5 mm (3/8 INCH) STEM
A5863 / IL
18A0906-D
12.7 mm (1/2 INCH) STEM FOR 2ĆINCH VALVES
18A5338-A
12.7 mm (1/2 INCH) STEM FOR 3Ć AND 4ĆINCH VALVES
DOUBLE ARRANGEMENTS Figure 8. PTFE Packing Arrangements for Use in ENVIRO-SEAL Bellows Seal Bonnets
For other packing types, tighten the packing flange nuts alternately in small equal increments until one of the nuts reaches the minimum recommended torque shown in table 6. Then, tighten the remaining flange nut until the packing flange is level and at a 90-degree angle to the valve stem. 15. Install travel indicator parts and stem locknuts; mount the actuator on the valve body according to the procedure in the appropriate actuator instruction manual.
Replacement of an Installed ENVIRO-SEAL Bellows Seal Bonnet (Stem/Bellows Assembly) 1. Remove the actuator and bonnet according to steps 1 through 5 of the Replacing Packing procedure in the Maintenance section.
13