Boots / Chemical Spills / Emergency Preparedness / Driving Safety / Stress Management / Fall Protection
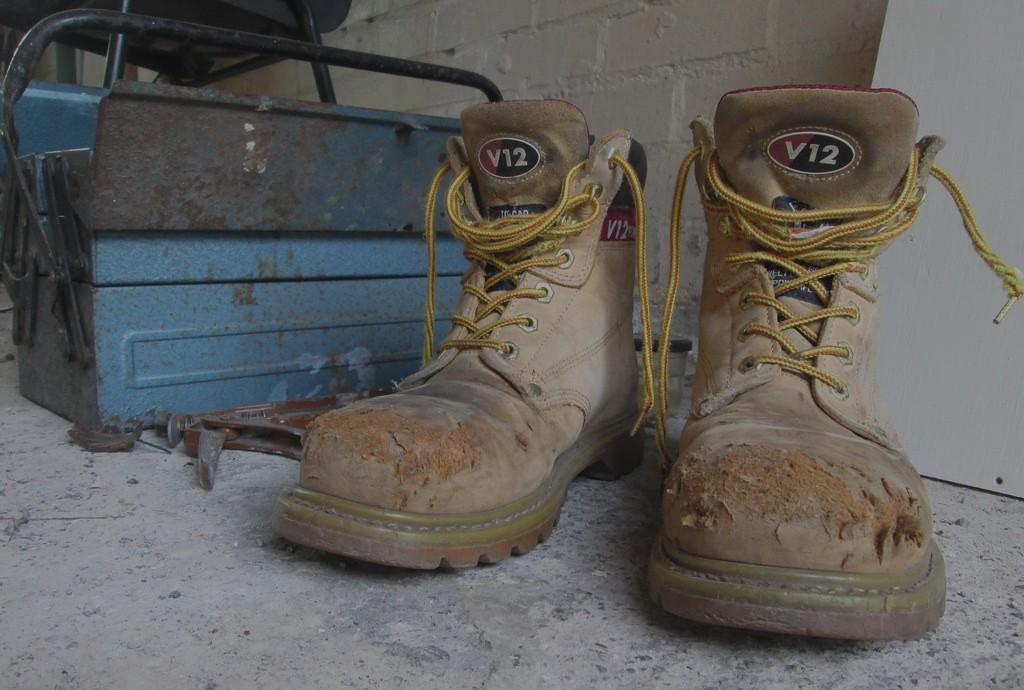
Work boots aren’t just footwear they’re critical personal protective equipment(PPE)thatserveasyour first line of defense in hazardous environments. Whether you're stationed at a warehouse, navigating excavation zones, or working across construction, enforcement, or highway operations in Riverside County, boots protect you from injuries, slips, punctures, electrical hazards, and environmentalexposure.
In fields where safety is non-negotiable, boots are the unsung heroes—working quietly to shield feet from impact and moisture while meeting essential Cal/OSHA PPE requirements. Yet even the most rugged paircan becomea hiddenliability if neglected. That’s why routine maintenance isn’t optional it’s essential for sustained protection, long-term comfort, and policy compliance.
This article explores the importance of proactive boot upkeep and provides a practical, step-by-step guide to ensure your PPE remains safe, durable, and field -
Step 1: Clean Regularly
SurfaceDirtRemoval
• Use a soft-bristle brush to sweep awayloosedirt,dust,anddebris.
• For dry mud or caked-on materials, tap soles together gently before brushing.
SpotCleaning
• Dip a cloth in warm soapy water (mild soap or saddle soap preferred).
• Wipe down leather, rubber, or synthetic panels, taking care aroundseamsandstitching.
• Use a toothbrush for hard-to-reach areas, especially around eyelets andsoles.
DeepCleaning
• For heavy buildup (cement, paint, chemicals), rinse soles with a lowpressure hose and scrub with a boot-specific cleaning solution if available.
• Do NOT use hair dryers, or direct heat: this and shrinkage adhesives.
• Do NOT store wet containers or vehicles moldandbacteria.
Step 3: Condition
Protect LeatherMaintenance
• Once fully dry, conditioner (cream, witha microfiber
Properly a well-ventilated indirectsunlight.
sideways or upside down moisture. with newspaper, boot absorbent every few hours dry.
• Rub in circular motions and allow timeforabsorption.
Waterproofing
• Use a spray-on or wax-based waterproofing product suited to boot material.
• Apply evenly to all external surfaces,includingstitching.
• Re-apply protection monthly or when signs of water penetration appear.
ToeProtection
• Pressthetoeareagently.Anysigns of softness or warping in steel/ composite caps may mean compromisedprotection.
dryers, radiators, this causes cracking in leather or wet boots in sealed vehicles this invites
EnvironmentalNotes
• Bootsexposedtohighheat,dust,or chemical environments may need more frequent conditioning and protection.
• For non-leather boots, use manufacturer-recommended sprays orcoatings.
Step4:InspectforSafety
Sole&Tread
Condition & apply a leather (cream, oil, or lotion) cloth.
• Check for worn tread, cracks, or delamination.
• Use a coin or ruler to measure depth—shallower than 2mm may requirereplacement.
• Visually inspect for dents, corrosion,orexposedmaterials.
Laces&Stitching
• Confirm laces are intact, without fraying.
• Check eyelets and hooks loose or broken hardware can affect fit and safety.
• Inspect stitching for separation or loosethreads,especiallyaroundthe heelandtongue.
• OverallFit&Integrity
• Ask: “Do these boots still feel secure,supportive,andsnug?”
• If ankles roll or feet slip within the boot,itmaybetimetoretirethem.
Chemical Spills
If you work in an office environment and think “a chemical spill won happen here,” think again! Chemical spills can include the delivery or unsafe use of custodial supplies, printing or copying supplies, and traffic accidents involving hazardous materials on streets or freeways adjacent to your building.
The best way to deal with chemical spills is to have a written Emergency Action Plan established and communicated to all personnel. This plan should include procedures for ventilation failure, evacuation, medical care, reporting, and drills.
Safety Data Sheets (SDS):
SDS’s are pivotal to properly reacting to accidental releases of a hazardous chemical. Maintain a Hazard Communication Program and ensure you have the location of your SDS sheets posted on your Safety Bulletin Board.
To avoid a spill in the workplace, read Section 7 Handling and Storage to prevent the material from accidental release. If there is a spill, Section 6 Accidental Release Measures shall be strictly followed.
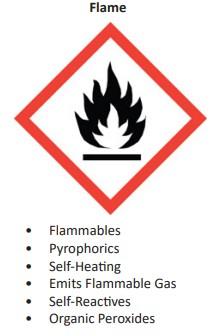
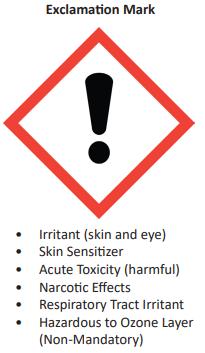
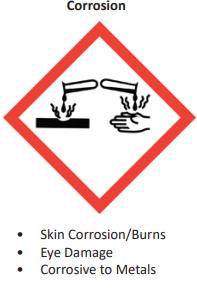
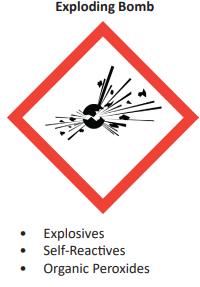
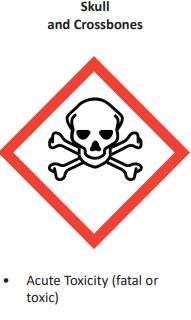
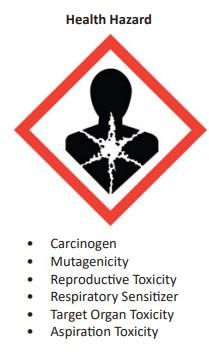
Familiarize yourself with the hazardous pictograms for identification and to adjust Personal Protective Equipment as needed.
Reaction to a Chemical Spill:
Remove all patients/clients, staff, and visitors from the affected area to a safe location. Stop the source of the hazardous material, if possible. Alert Facilities/911, if needed.
Confine the spill by closing all doors to the affected area.
Account for all employees/visitors after removal from the area.
Secure the area to prevent persons from walking through the area. Redirect foot traffic away from the spill.
If the spill happened outdoors, dial 911, notify Facility/building owner, alert your department manager, and protect floor drains or other means for environmental release if possible. Spill socks and absorbents may be placed around drains. Standby and remain alert for changing conditions that may require evacuation. Clean up and decontamination procedures should only be conducted by Facility trained persons. Use all appropriate personal protective equipment like gloves, goggles, full body suits, aprons, face shields, foot protection, etc.
In the event of a large spill, evacuate, call the Fire Department, and notify the County Safety Loss Control Division as soon as possible.
First Aid:
If the spill injures a person, transfer them to a safe area, locate the SDS sheet, read instructions for emergency procedures (Section 4 First Aid Measures), and administer first aid. Send a copy of the SDS sheet to the doctor with the injured employee.
TheImportanceofEmergencyActionPlanning
Emergencies can strike without warning, whether it’s a natural disaster, workplace accident, or unexpected crisis. Having a well-prepared Emergency Action Plan (EAP) is critical to ensuring the safety of employees, protecting assets, and maintaining business continuity. An effective EAP minimizes risks, reduces confusion, and enables swift, coordinated action during high-stress situations.
Why Emergency Action Planning Matters
An EAP is more than a document it’s a proactive strategy to save lives and mitigate damage. Here’s whyit’sessential:
• ProtectsLives: A clear plan ensures employees know how to evacuate, seek shelter, or respond to specific threats, reducing the risk of injury or worse.
• ReducesDowntime: By outlining recovery steps, an EAP helps businesses resume operations quickly,minimizingfinanciallosses.
• Ensures Compliance: Many industries are required by law (e.g., OSHA regulations in the U.S.) to have emergency plans, avoiding penaltiesandensuringaccountability.
• BuildsConfidence: Employees and stakeholders feel safer knowing there’s a structured response topotentialcrises.
The Process for Creating an Emergency Action Plan
Developing an EAP requires careful planning and collaboration. Below are the key steps to create an effectiveplan:
1. Conduct a Risk Assessment Identify potential hazards specific to your workplace, such as fires, chemical spills, earthquakes, or active shooter scenarios. Evaluate the likelihood and impact of eachrisktoprioritizeplanningefforts.
2. DefineRolesandResponsibilities Assign clear roles to employees, such as evacuation coordinators, first aid responders, or communication leads. Ensure everyone understandstheirdutiesandistrainedaccordingly.
3. DevelopResponseProcedures Create step-bystep protocols for different emergencies. For example:
• Evacuation: Map out primary and secondary exit routes, designate assembly points, and account for individuals with disabilities.
• Shelter-in-Place: Identify safe areas for events like tornadoes or chemical releases.
• Communication: Establish a chain of command and methods for notifying employees, emergency services, and stakeholders.
4. Provide Training and Resources Conduct regular training sessions, including drills for evacuation, fire response, or lockdown procedures. Equip the workplace with necessary tools, such as first aid kits, fire extinguishers,andemergencycontactlists.
5. TestandUpdatethePlan Run simulations to test the EAP’s effectiveness. Gather feedback from participants to identify gaps or weaknesses. Review and update the plan annually or after significant workplace changes, such as new equipment or facility expansions.
6. CommunicatethePlan Ensure all employees have access to the EAP, whether through handbooks, posters, or digital platforms. Reinforce awareness through regular safety meetingsandonboardingfornewhires.
Conclusion
Key Tips for Success
• Involve Everyone: Engage employees at all levels to foster ownership and ensure the plan reflectsreal-worldneeds.
• KeepItSimple: Use clear, concise instructions thatareeasytofollowunderpressure.
• StayCurrent: Update the EAP to reflect new regulations, technologies, or lessons learned frompastincidents.
An Emergency Action Plan is a cornerstone of workplace safety. By preparing for the unexpected, organizations protect their people, operations, and reputation. Start today assess risks, build your plan, train your team, and reach out to your Safety Loss Control Coordinator if guidance is needed toensurereadinesswhenitmattersmost.
DRIVING
Forgotten but Critical: 20+ Road Rules & Courtesies Drivers Often Overlook
Legal Must-Knows
CometoaCompleteStopatStopSigns
Rolling through is a ticket waiting to happen.
A full stop means wheels cease motion completely. StopBeforeTurningRightonRed
You must yield first even if it seems clear. Pedestriansandcrosstraffichavepriority.
Don’t Block Intersections
Avoid entering if your exit path isn't clear. Blocking cross-traffic causesgridlock.
Facts and Stats
Only 65% of drivers recognize a school crossingsign.
Thatmeansover83million U.S. drivers might miss thiscriticalsafetycue. Stopsignsweren’t alwaysred.
Theywereoriginallyblack on yellowuntilfaderesistantredpaintwas developedinthe1950s.
YieldtoPedestriansinCrosswalks
Even if there’s no light, if someone's crossing, theyhavetheright-of-way.
SignalLaneChanges
Merging silently is confusing and dangerous. Useyourblinkeratleast100feetbeforehand.
HeadlightsOnWhenWipersAreOn Rain, fog, or snow? California law requires your headlightsforvisibility.
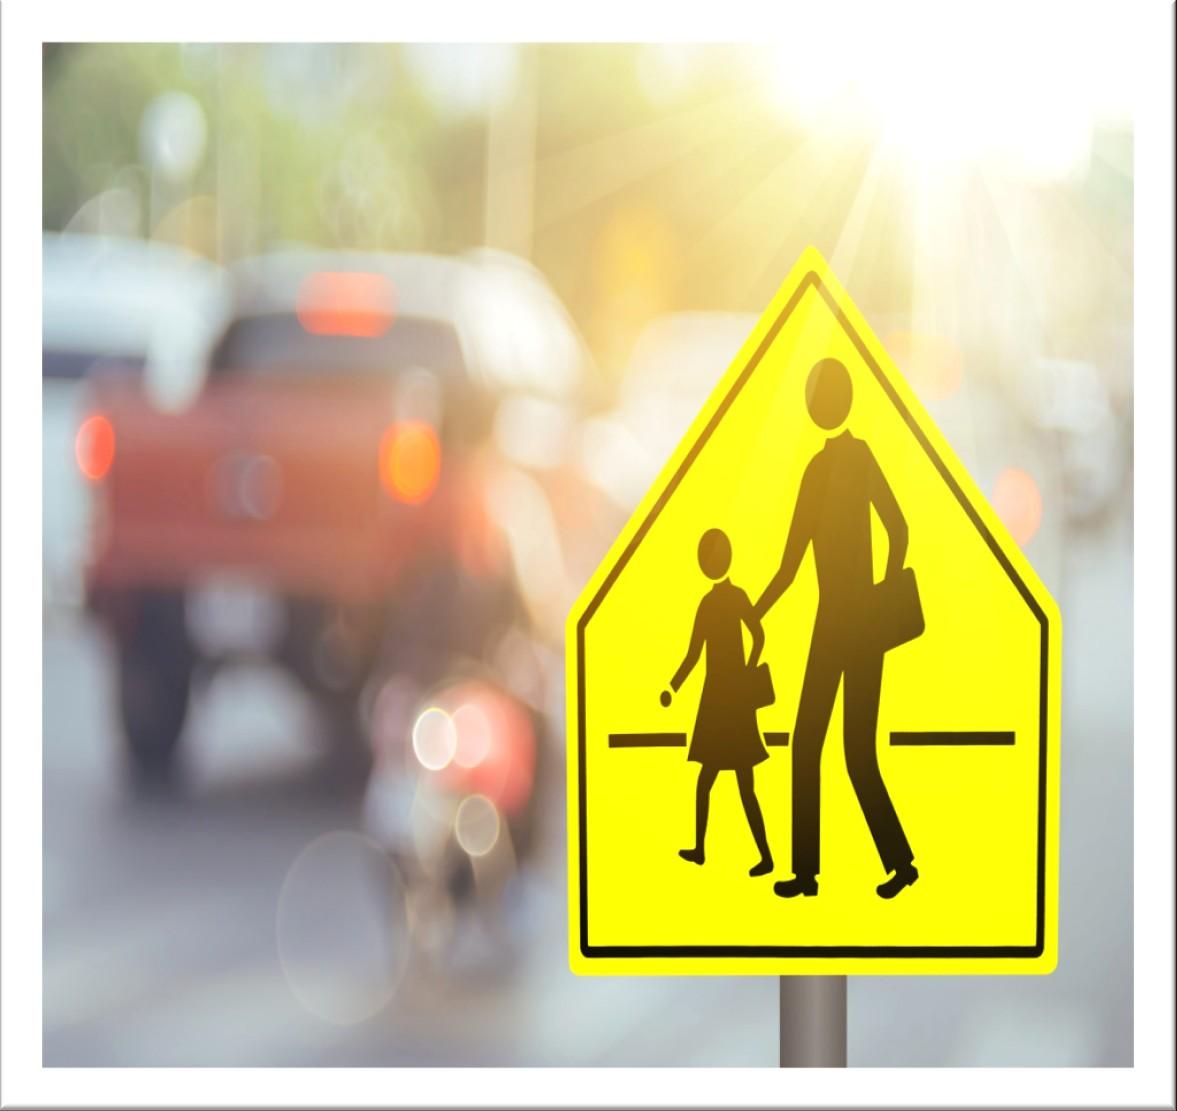
Respect School Zone Speeds Slow down near schools even if kids aren't immediately visible.
No U-Turns in Business Districts (Unless Posted) Avoid flipping around on busy streets unlessexplicitlyallowed.
Don’tUsetheShouldertoPass
Shoulders are for emergencies, not shortcuts. It'sillegalanddangerous.
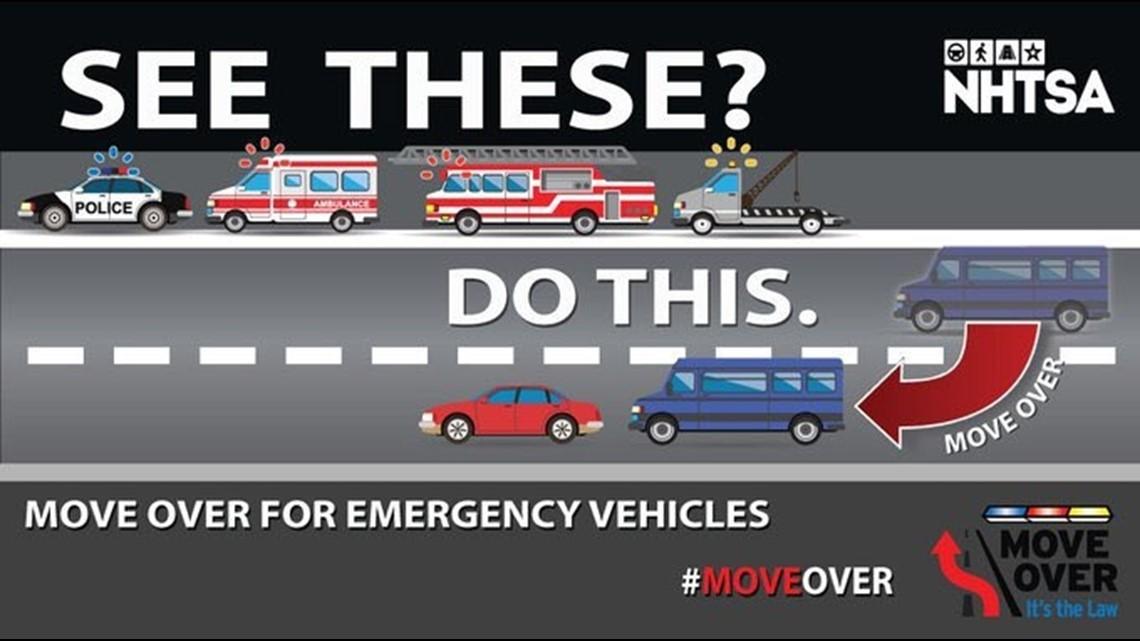
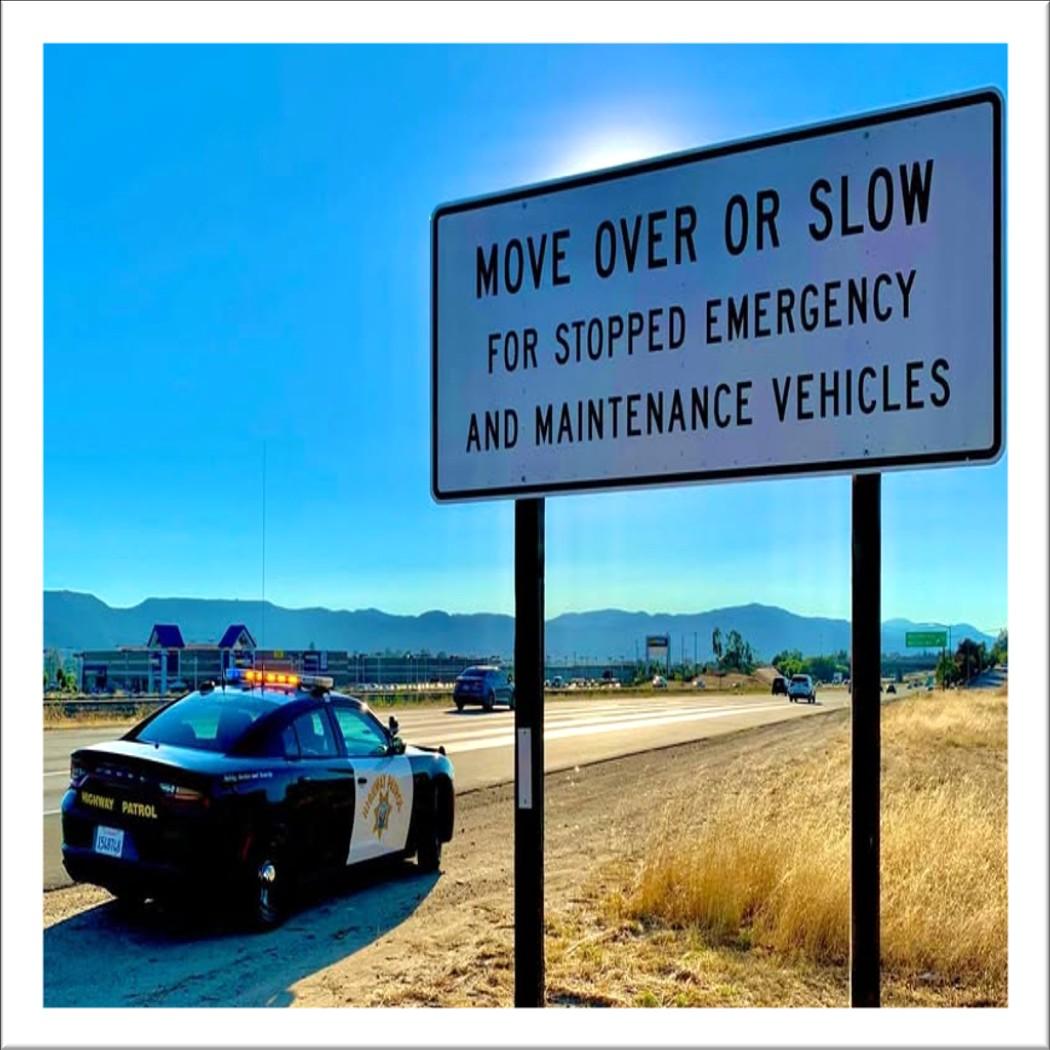
Follow the Move Over Law Whenemergency vehicles are on the shoulder, change lanes or slowsignificantly.
Stay Out of Blind Spots—Especially Around Trucks If you can’t see their mirrors, they can’t seeyou.
SafeFollowingDistance
Apply the 3-second rule, increase it in rain or fog. Tailgatingisaggressiveandrisky.
Use Turnouts on One-Lane Roads If you're holding up 5+ vehicles, pull over where marked toletthempass.
Don’t Pass Vehicles Stopped at Crosswalks They may be yielding to a pedestrian you can't see.
Yield in Roundabouts Incoming drivers must yieldtotrafficalreadycirculating.
YieldtoBusesRejoiningTraffic California law says let the bus merge don’t racethem.
Let Merging Drivers In It’s not a contest. A brief slowdown can ease congestion and tension.
Use the Zipper Merge During Lane Closures
Take turns merging at the closure point it's faster and safer than early merging.
1
and 1
Wave or Nod Thanks When Yielded
To Acknowledging others builds mutual respect. No one likes being ignored.
Dim High Beams Around
Other Vehicles
Blinding other drivers is rude and risky. Flip to low beams when near others.
Don’t Honk Aggressively
Use your horn to alert not express frustration. Prolonged honking is intimidation.
Don’t Double Park or Block Driveways Even briefly this causes chaos and blocks emergency access.
Be Patient in Parking Lots
Rushing through or tailgating in tight quarters leads to fender benders and conflict.
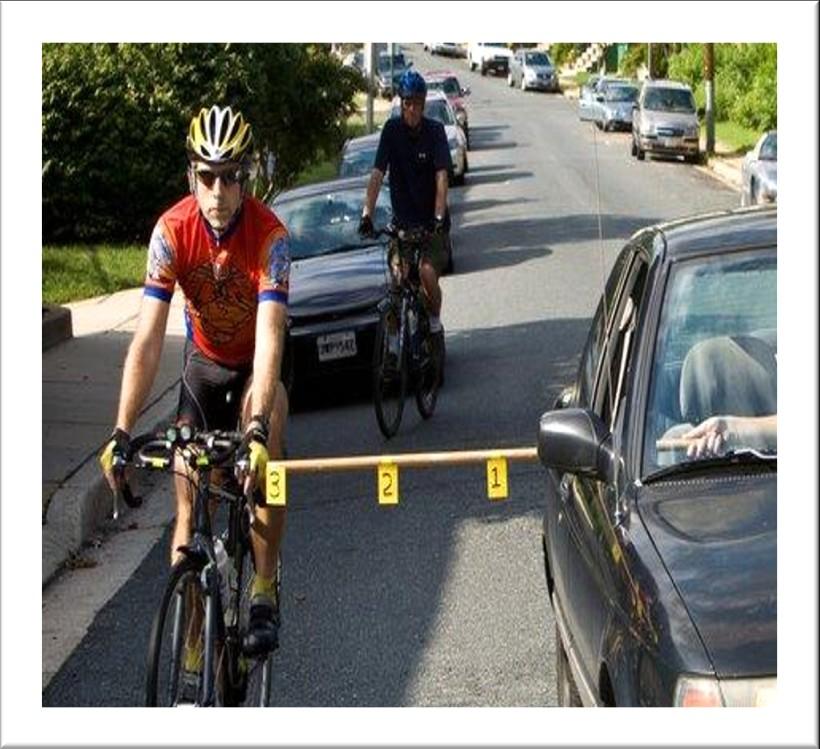
Give Cyclists
Adequate Space
At least 3 feet by law. They’re more vulnerable and deserve room.
Check Before Turning or Changing Lanes
• Always look over your shoulder and check mirrors—cyclists can be in your blind spot.
• Signal early to alert cyclists of your intent.
REMINDER TO COUNTY DRIVERS
When you're behind the wheel of a County vehicle, you're not just driving— You're representing Riverside County.
The public is watching, so:
• Drive respectfully
• Follow all traffic laws
• Stay alert for pedestrians and cyclists
• Keep safety and courtesy front of mind
Your actions on the road reflect on all of us. Drive like you're being watched—because you are.
"Warning, Guide, Regulate:
Every road sign placed throughout Riverside County serves a clear and vital function—protecting lives, directing traffic, and ensuring smooth travel for both residents and visitors. For county employees, especially those working near roadways, knowing what these signs mean isn’t just useful—it’s a matter of workplace safety and public responsibility.
Yellow
Warning / Caution Road Conditions
Yellow signs alert us to changing conditions or hazards ahead, but they don’t call for a full stop. Think of yellow as a preemptive heads-up—a way to prepare before you commit.
Greensigns guidance, drivers what organizedpresence ways.
Look For It: Safety cones, hazard tape, and bump zones often follow the yellow color scheme. It’s used universally for caution. Quick warnings is
The ABCs of Road Signs"
Green Directional or Permission
Green signs are all about movement, guidance, and reassurance. They tell drivers where to go, how far it is, and what’s allowed—offering a calming, organized presence on busy roadways.
Blue Motorist Services Information
Blue signs offer information that supports, but doesn’t control, behavior. Think of these as the helpers of the signage world—providing direction to resources or support services.
Quick Tip: Green is never used for warnings or prohibitions—its function is guidance only.
Note: ADA (Americans with Disabilities Act) signs and accessible route markers often use blue backgrounds with white text for clarity and inclusivity.
The Importance of Road Sign Identification
Road sign identification is critical for maintaining safety, order, and efficiency on the responding appropriately to signs ensures drivers comply with legal requirements, avoid complex traffic environments confidently. From construction zones to school crossings, each essential information that helps prevent accidents and protect pedestrians, workers, and employees operating vehicles or working near roadways, understanding road signs is not just vital skill that promotes workplace safety and public trust.
Red Regulatory Immediate Action
Red means business. It’s used for signs that require an immediate stop or prohibit certain actions. Red signals urgency and demands full attention,andthat’snoaccident.
Fun Fact: Red has the longest wavelength of any visible color, which is why our eyes see it from farther away it’sdesignedtogetnoticed.
Brown
Recreational or Scenic Guidance
Brown signs are used to identify parks, cultural sites, and public facilities important for tourism and resident access. National parks, historical landmarks,orscenicareas.
Did you know; Yellowstone was the first national park in the world, established in 1872 before the concept even existed elsewhere. It’s home to geysers, bison, and the idea thatnaturedeservesprotection.
road. Recognizing and avoid hazards, and navigate each sign communicates and other motorists. For just a legal obligation it’s a
Some signs use multiple colors to layer meaning. For example:
• School Zone Signs use yellow-green for extra visibility.
• Fluorescent Pink Signs (rare) may be used for emergency management situations like chemical spills or incident scenes.
White
Regulatory or Legal Requirements
Whitesignsareusedforrules posted speed limits, lane directions, parking zones, and other enforceable behaviors.
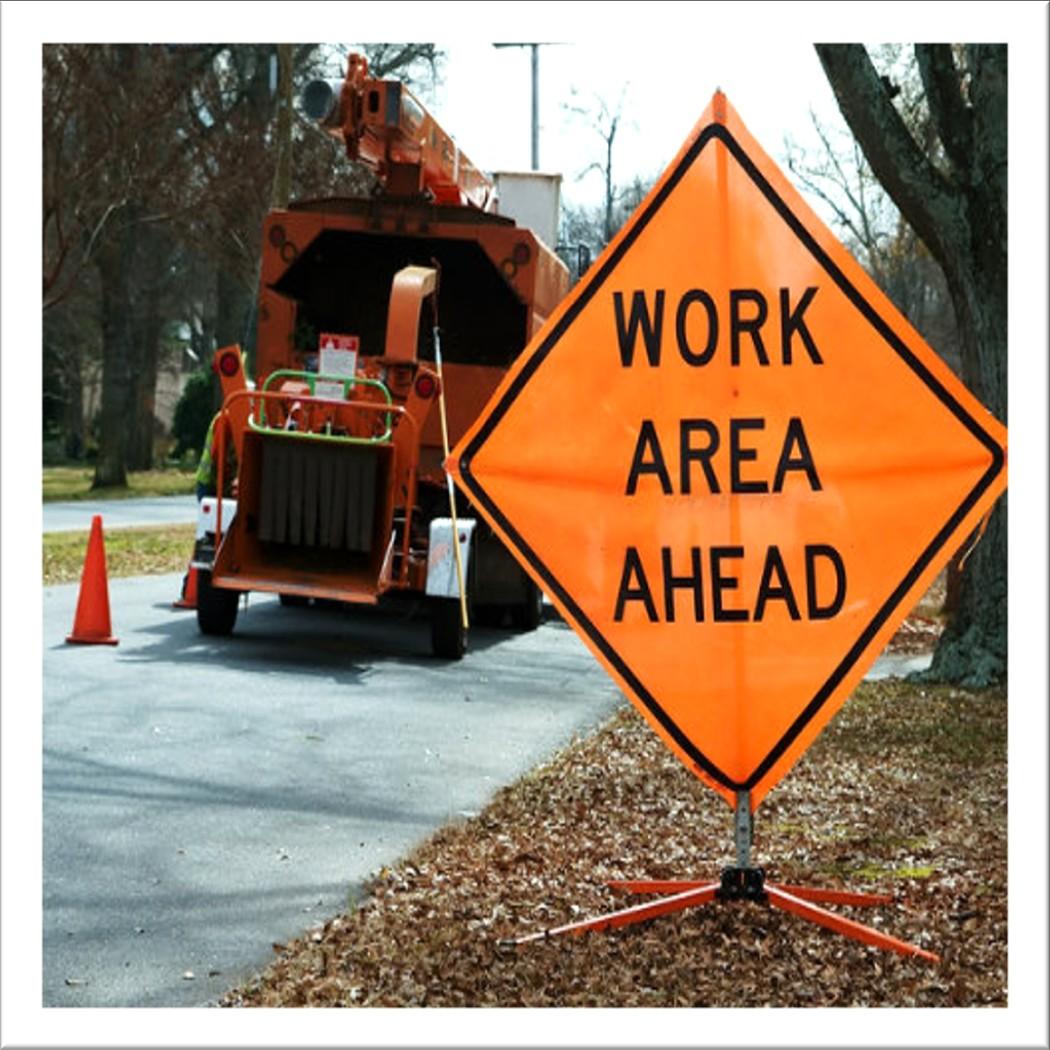
Orange Temporary Warning or Construction
Orange signs mean something is different right now. Whether due to a construction zone, detour, or roadway hazard, orange warns drivers that
Remember: Ignoring a white sign often means a citation, or worse a safetyincident..
Watch Your Speed:Manyjurisdictions double fines in orange-zone areas to reinforce caution during temporary hazards.
“Stress is caused by being ‘here’ but wanting to be ‘there.’ –
Eckhart Tolle
Stress is an unavoidable part of life. If we respond positively to stressful situations, we can learn and grow in ways that wouldn’t be possible otherwise. But too much stress can harm our well-being in many ways – from causing physical illness to overwhelming us mentally. Stress is invisible, but its impact isn't.
Stress can manifest in subtle ways. Employees are encouraged to watch for:
• Frequent headaches or fatigue
• Irritability or mood swings
• Difficulty concentrating
• Changes in sleep or appetite
• Increased absenteeism or presenteeism
While stress may feel overwhelming at times, it’s important to remember that it’s not insurmountable. Recognizing the signs early is the first step toward regaining control. With the right strategies and support systems in place, employees can effectively manage stress, improve their well-being, and maintain a safe and productive work environment. The following tips are designed to help you navigate workplace challenges with resilience and confidence.
1. Microbreaks: Take 2–5 minute breaks every hour to stretch, breathe, look away from your monitor and/or step outside.
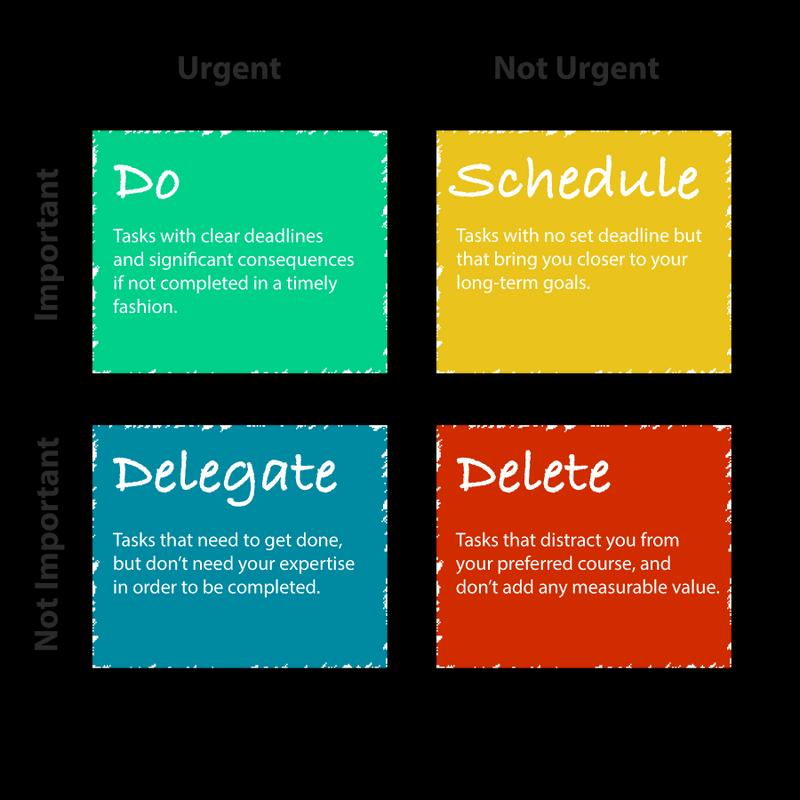
2. Prioritize Tasks: Use the Eisenhower Decision Matrix listed below to differentiate urgent vs. important tasks.
3. Set Boundaries: Avoid checking emails after work hours unless critical.
4. Peer Support: Lean on coworkers and/or the employee assistance program (EAP) for support.
5. Mindfulness Moments: Practice deep breathing or guided meditation during lunch breaks.
CHANGES TO FALLPROTECTION CAL/OSHAREGULATIONSAS OF JULY 1, 2025!
Falls are among the most common reasons for workplace injuries and fatalities in California. Falls generally occur when employees are working at an elevated height and are not adequately protected. Some examples include employees working on elevated work surfaces, ladders, stairs, scaffolds, aerial devices, suspended staging, catwalks and walkways. Starting July 1, 2025, Cal/OSHA is reducing the fall protection trigger height from 15 feet to 6 feet for construction and roofing work. This means that when working on surfaces 6 feet or more above a lower level, employers must implement fall protection measures, such as guardrails, safety nets, scaffolding, or personal fall arrest systems.
Fall Protection systems:
There are 2 basic fall protection systems, Passive systems, such as guardrails, are the preferred system of fall protection. If passive systems cannot be utilized, then personal fall protection is required.
• Passive Systems - Fall Prevention -Guardrails, safety nets, floor covers, catch platforms, etc.
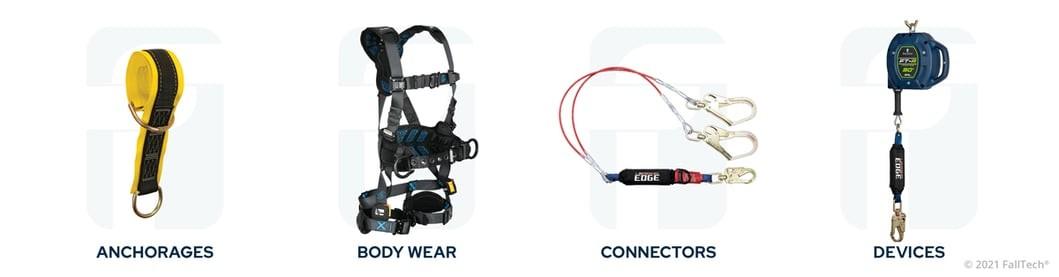
• Active Systems - Personal Fall Protection -Safety belts and body harnesses.
Common Passive System components: Components of an active personal fall protection system:
Guard rails are required at 7.5’ high on open:
• Edges of floors and roofs
• Scaffolds
• Elevated platforms
Major design specifications:
• Constructed of wood or equivalent material.
• Top rail at 42” to 45” and a midrail.
• Wooden posts must be no more than 8’ apart.
• Top rail must withstand 200 lbs load in any direction.
• Anchorage points must support adequate loads.
• Harness (or body belt for fall restraint or positioning) must be worn as per manufacturer instructions.
• Connector (lanyard) must be adjusted so worker will not reach the ground below.