Thank you for your purchase of our machine. We hope that you find it useful and effective in your production.
Specifications: Seller can make changes in the designs, specifications or components of the machine to improve the safety of such machines. Buyers may not make any changes in the specifications for the goods unless seller approves of such changes in writing, in which event seller may impose additional charges to implement such changes.
Limited Warranty: Seller warrants to the original end-user that the machine shall be free of defects in material or workmanship for a period of twelve (12) months (Electric parts and High Frequency motor 3 months , except wear parts such as blades) from the date of purchase. If the spare parts have broken within guarantee time, the seller will provide freely, but the freight cost will be charged by buyer.
We make every effort to ensure that our specifications, images, pricing and product availability are as correct and timely as possible. We apologize for any difference that may occur. We reserve the right to make any and all changes deemed necessary in the course of business including but not limited to pricing, product specifications, quantities, and product availability.
INTRODUCTION
The quality and reliability of the components assembles on our machine guarantee near perfect functioning, free from problems, even under the most demanding working conditions. However if a situation arises, refer to the manual first. If a solution cannot be found, contact the distributor where you purchased the machine. Make sure you have the serial number and production year of the machine (on the nameplate).
TRANSPORTING AND LIFTING
CAUTION: Lifting and carrying operations should be carried out by skilled workers, such as a truck operator, crane operator, etc. If a crane is used to lift the machine, attach the lifting chain carefully, making sure the machine is well balanced. Choose a location that will keep the machine free from vibration and dust from other machinery. Keep in mind that having a large clearance area around the machine is important for safe and efficient working conditions.
Follow these guidelines when lifting:
Always lift and carry the machine with straps on each end for balance.
Use a straps capable of lifting 1.5 to 2 times the weight of the machine.
Take proper precautions for handling and lifting.
Check if the load is properly balanced by lifting it an inch or two.
Lift the machine, avoiding sudden accelerations or quick changes of direction.
Locate the machine where it is to be installed, and lower slowly until it touches the floor.
Use CraneTo Move Wooden Crate
The crane's rope must be in good condition with no visible damage and be able to support the machine's full gross weight to prevent breakage.
Use LiftTruckTo Move Wooden Crate
Place the wooden crate in the middle of the forks and keep at least 50mm distance between the front of the forks and the wooden crate to avoid the case collapsing and secure safe transport.
GENERAL NOTES OF SAFETY
All operators and relevant personnel of this machine must read carefully, understand and comply with this operator’s manual.
WARNING: FAILURE TO FOLLOW THESE RULES MAY RESULT IN SERIOUS PERSONAL INJURY
1. FOR YOUR OWN SAFETY, READ INSTRUCTION MANUAL BEFORE OPERATING THE MACHINE. Learn the machine’s application and limitations as well as the specific hazards. Please keep this manual properly in case you need it.
2. This machine can only used to process wooden boards. Before processing, the material's overall size, thickness deviation and material density should comply with relevant national standards. Only trained and qualified personnel should operate this machine.
3. Regardless of any kind of repair or maintenance, the main power switch must be turned off.
4. Do not attempt to disassemble or modify any parts on the machine without authorization. When you need to repair the machine, please contact our after-sales service department in advance to obtain the necessary technical support.
5. Improper use of the equipment may cause serious harm to the operator's personal safety.
6. Do not wear loose fitting clothing or jewelry as they can be caught in moving machine parts. Protective clothing and steel toe shoes are recommended when using machinery. Wear a restrictive hair covering to contain long hair.
7. When the machine is running, only the operator can approach the machine.
8. It is strictly forbidden to use this machine for processing materials that are not approved by the equipment manufacturer and materials whose size exceeds the parameters specified by the machine.
9. It is prohibited to copy all or part of this manual without prior permission. It is illegal to use this manual for economic or other benefits, and we reserves the right to pursue its responsibilities.
10. Every effort has been made to ensure that the information contained in this manual is accurate. If you find any errors, omissions or ambiguities, please feel free to contact our company.
11. According to the optimization principle, we can modify the contents of this manual without prior notice.
12. After the equipment arrives at the user's site, the user should carefully inspect it. If any damage is found during transportation, contact the company in time and take necessary remedial
measures.
13. Do not touch live electrical components or parts.
14. Never leave machine running unattended. Turn power off and don’t leave machine until it comes to a complete stop.
15. Do not operate machine if under the influence of alcohol or drugs. Read warning labels on prescriptions. If there is any doubt, Do not operate the machine.
16. Observe work area conditions. Do not use machines or power tools in damp or wet locations. Do not expose to rain. Keep work area well lighted. Do not use electrically powered tools in the presence of flammable gases or liquids.
17. If the machine cannot be installed immediately at the site of use, the external packaging must be retained, the equipment should be placed horizontally, and the site must be protected from rain and moisture. The electrical control cabinet must be placed indoors.
18. In the event of incorrect operation or dangerous conditions, the machine can be stopped immediately by pressing the E-Stop Button. Twist the button to unlock and reset the emergency stop button. Resetting the e-stop will not start the machine.
WARNING:“WARNING”in this manual means the contents here is very important. Do not ignore it, otherwise it will cause personal injury. When operating the equipment alone or working with others, pay special attention to the content of the prompt and also observe general safety regulations.
NOTES:“NOTES” in this manual means very important contents will be stated. Please pay special attention, or it may malfunction or even damage the equipment and other important parts.
SPECIFICATIONS
Carved crafts, wooden door line, hangers, Roman columns, photo frames, toilet seats and other wooden products
MODEL ILLUSTRATION
Horizontal
MAINTENANCE
Sanding machine belongs to precision processing equipment, no matter how sturdy and durable this machine is, only through reasonable maintenance can get the best effect and service life.
The long-term use of the machine mainly depends on the reasonable maintenance of the equipment.
Sanding powder and abrasive belt debris inside the machine and electrical control components and air circuit components must be cleaned regularly. Replace consumables before they become damaged.
Please carefully maintain the equipment as planned in order to ensure trouble-free operation and the processing accuracy.
WARNING: Any repair and maintenance work on the equipment must be carried out after the machine is stopped and the main power of the control cabinet is cut off.
LUBRICATION
If the grease cannot fill the internal space and sides of the bearing, this may cause internal wear and temperature rise of the bearing.
Bearings can only be filled with grease in 1/3 of the space. If the temperature of a bearing is high, it is usually due to too much grease in the bearing, not too little. If you use a grease gun to refuel manually, the amount of manual refueling is about 10 grams.
It is recommended that users perform regular lubrication according to the lubrication diagram on the machine.
Only use Mobil grease or She11 Lithium 0 # synthetic grease for lubrication or high-speed grease. The quality of lubricating grease is crucial. It is extremely important to regularly check the filling grease. Never mix synthetic oils with natural oils !
The sanding machine has been properly lubricated at all lubrication points before shipment. No lubrication is required when the machine is first turned on.
LUBRICATING
STEPS
(1) First clean the choke. The oil-let should be regularly checked for blockage to avoid excessive waste oil and heat to the bearing.
(2) During the first lubrication, in order to make the grease evenly distributed in the bearing, slowly rotate the drum and add it several times repeatedly until it meets the requirements.
(3) The bearings at both ends of the worm in the oil tank of the reducer, the bearings of the feed and transport rollers, and the bearings on the screw in the lifting column are all sealed. Generally, lubrication is not required.
LUBRICATION INTERVAL
Lubricate the machine every 160 hours of operation; if the machine works 24 hours each day, then lubricate the machine once a week.
NOTE: Lubricating only when the machine is stopped.
OPERATING INSTRUCTIONS
PRECAUTIONS BEFORE STARTING THE MACHINE
(1) Connect the power and make sure that the moving direction of each moving part is consistent with the sign. If they are not the same, swap any two power cables. The emergency stop switch is in the pop-up state (if not sure, you can turn the emergency stop switch clockwise)
(2) The machine must be grounded to prevent leakage.
(3) Tools and other things must be cleaned before starting the machine
(4) Remind the surrounding workers to pay attention to safety whenever starting the machine.
(5) Adjust the knob of the inverter to ensure that the display number is not 0.00. Turn the switch to ON to start the rollers. Rotate the knob of the frequency converter according to the hardness of the sanding material, and select the appropriate speed.
(6) Check the function of the safety protection device regularly. If any fault is found, it should be repaired immediately.
(7) Never leave machine running unattended. TURN POWER OFF. Don’t leave machine until it comes to a complete stop.
(8) Keep work area clean.
CONTROL BOARD INTRODUCTION
Starting-up Order
1. Turn the emergency stop(②) clockwise to ensure the switch has popped up
2. Turn the knot ① to the ON position to start roller rotation.
Powering-off Order
1. Turn the knot ① to the OFF position to stop roller rotation.
2. Press the Emergency Stop ②
NOTE:
* In case of emergency, you can directly press the emergency stop ② to power off the whole machine.
* Rotate the inverter knob ③ clockwise to increase the speed of the sand rollers, and vice versa.
* Don’t change anything on the control board ④ except ③.
REPLACEMENT OF SANDPAPER
(1) Take off the rubber ring.
(2) Replace the ruined sandpaper with a new one (Pay attention to the direction of the new sandpaper)
(3) Put the rubber ring back after replacement.
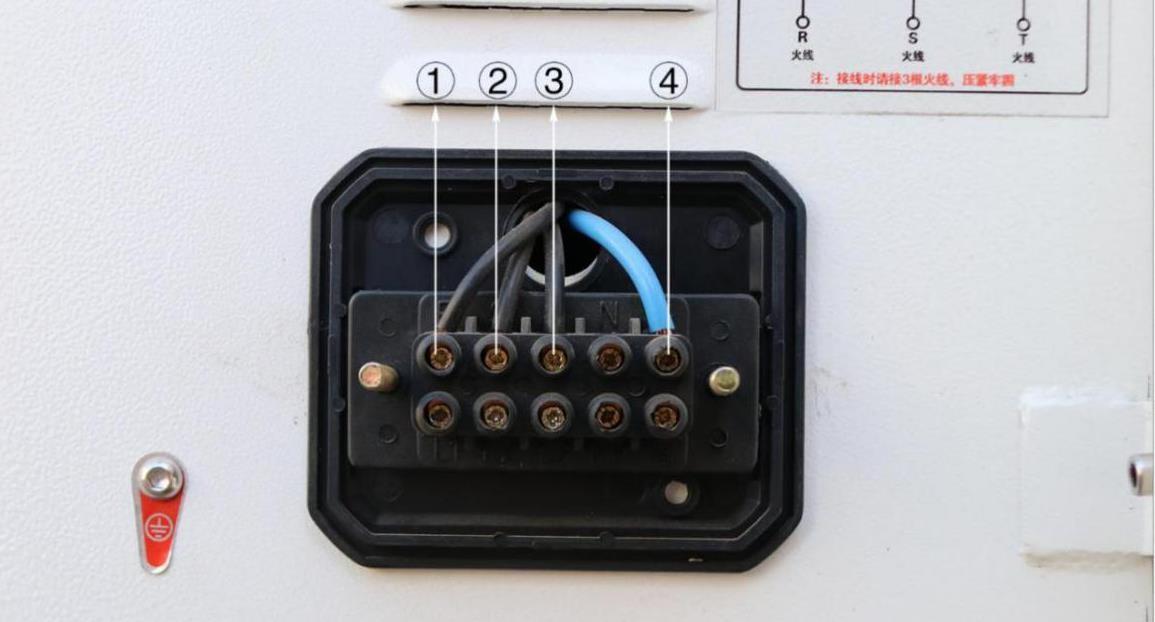
WIRING METHOD
①、②、③are live lines, ④ is grounded line. For effective Grounding, please connect the ground wire to a conductive material more than half a meter underground.
TROUBLESHOOTING
Trouble Cause Solution
Power phase error
Machine can’t be started
1. Wiring or input power
2. The input source voltage is insufficient or unstable
3. Phase sequence protector is damaged or loose by wire
4. Power switch or circuit breaker is damaged
1. Replace any two live wires of the input power and wire them correctly
2. Installed power supply regulator
3. Add commutation speed protector or tighten wiring screws
4. Replace the power switch or circuit breaker
1. Release the emergency stop button
Inverter communi cation failure
1. Emergency stop button is not released
2. The emergency stop button or start button is damaged or the wiring is loose
3. Intermediate circuit breaker or switching power supply is damaged or short circuit
4. Power switch or circuit breaker is damaged
2. Replace the emergency stop button or start button
3. Replace the intermediate relay or switching power supply or tighten the wiring screws and check the relevant wiring
4. Replace the power switch or circuit breaker
5. Correctly connect the neutral line of the power supply
1. The network cable plug is loose and has poor contact
2. Inverter parameter setting is incorrect
1. The inverter has a black screen or internal damage
Inverter error
Lifting motor overload
2. Motor overload or short circuit
3. The mechanical transmission part is frozen
4. Wring loose
1. The mechanical transmission part is stuck or the load is too large
2. The thermal relay current is set too small
3. The thermal relay is damaged or the wiring is loose
4. Thermal relay is not reset after overload action
1. Reseat the network cable or compress the crystal head of the network cable again
2. Reset the inverter parameters
1. Replace the inverter
2. Replace the motor or check the mechanical transmission parts
3. Check whether mechanical transmission parts are stuck or replace related parts
4. Tighten the wiring screws and check the related wiring
1. Check whether the mechanical transmission parts are stuck
2. Set the thermal relay current value correctly
3. Replace the thermal relay or tighten the wiring screws and check the relevant wiring
4. After the thermal relay has cooled down, press the reset button