

Product: BACKHOE LOADER
Model: 428B BACKHOE LOADER 7EJ
Configuration: 428B BACKHOE LOADER 7EJ00001-05999 (MACHINE) POWERED BY 3054 DIESEL ENGINE
Disassembly and Assembly Seal Installation
i04966249
Duo-Cone Seals - Install
SMCS - 7561-012
DUO CONE SEALS


Illustration 1 g03150736
Background
To reduce the risk of leaks or failures, assemble the duo cone seals correctly. This document applies to cast, formed, conventional, and inverted Duo-Cone seals and to installations on factory assembly lines, at dealer shops, and in the field.
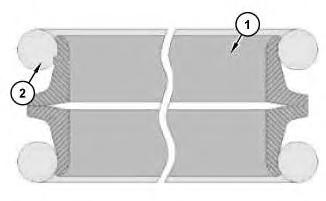
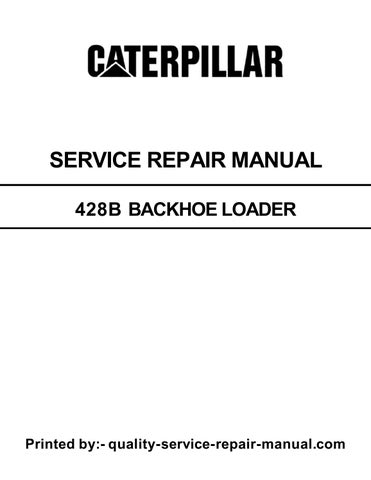
Illustration 2
Duo-Cone seal
(1) Seal ring
(2) Rubber toric
g03150396
The two main components of a Duo-Cone seal are shown in Illustration 2.
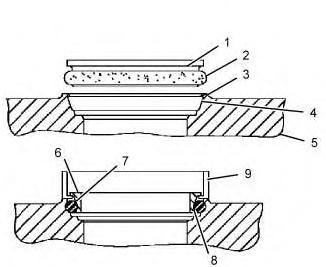
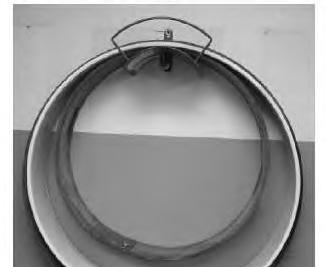
Illustration 3
Duo-Cone seal assembly
g03150397
The standard naming nomenclatures for Duo-Cone seals are listed below.
(1) Seal Ring - The metal component of a seal group.
(2) Rubber Toric (Load Ring) - Elastomeric component of a seal group that applies a face load in the application. This o-ring style seal retains oil and excludes debris.
(3) Housing (Retainer) Lip - The lip inside the housing (retainer) that helps to retain the seal ring/rubber toric during installation.
(4) Housing Ramp - The angled ramp that is located on the housing. Maintaining the proper surface finish is critical.
(5) Housing Retainer - The recess in which a seal ring and a load ring are installed.
(6) Seal Face - The “active surface” of the seal. In a finished seal the face contains the seal band, seal band to taper radius, and taper.
(7) Seal Ramp - The inclined surface on the exterior of the Duo-Cone seal ring that positions the toric between the seal ring and the housing.
(8) Seal Retaining Lip - The function of the retaining lip is to provide a seat for the toric. This radius allows the toric to stay on the ring for ease of assembly.
(9) Installation Tool - Assembly tool used to install the Duo-Cone seal into housing.
(10) Seal Assembled Height (not shown in Illustration 2) - The final installation height of DuoCone seal once installed into the housing (retainer). Assembled height measured in three places approximately 120 degrees apart. Not to exceed 1.0 mm (0.04 inch) variation.
For a full Duo-Cone seal assembly there are three components that comprise a full assembly:
(1) Seal ring
(2) Rubber toric
(5) Housing retainer
These three components help create three separate and distinct sealing areas. If one aspect of the seal assembly goes wrong, then a leak path may occur at one or more of following sealing locations.
• Metal-to-Metal Face
• Metal Seal Ring-to-Toric
• Toric-to-Housing
GENERAL INFORMATION
Recommended Cleaning Wipes
Refer to Table for approved lint free wipes.
Cleaners used should not be oil-based products. Table 1 Lint Free Wipe Crib
Chemtool CT Clean 15861 Wipe With Cleaner 3-0124698 169-5420
Chemtool Lint-Free Wipes 3-0080298 265-2256
Kimtex Lint-Free Polypropylene Towels 3-0039125
New Pig Low-Lint Wipes WIP230 WIP232
Service Kits
Service kits and products are available. A list of approved Duo-Cone seal service items is listed below in Table 2.
2
169-5418 Cat Seal Lubricant 1 Gallon Seal Lubricant Chemtool
169-5420 Cat Duo-Cone Seal Cleaner 1 Gallon Seal Cleaner Chemtool None 169-0503 Duo-Cone Seal Installation Kit Seal Installation Kit
STORAGE
Seal and Seal Ring Storage
Contamination Storage Requirements - Regardless of size or shape, seals and gaskets must be stored in such a manner that prevents contamination and maintains cleanliness. The seals and gaskets should be stored in original packaging until installed.
Best Practice Storage - Best-practice storage requires two methods of limiting contamination direct to the seal or seal ring. If one level of protection is easily frayed or fray-able (rubbed or worn into fibers), (for example: wood/cardboard) the storage container must have an internal layer of protection (for example: polybag). Any storage container (lid or bag) must be resealed after each use.
Minimum Acceptable Storage - Minimum acceptable storage practices would include one method of limiting contamination direct to the seal or seal ring.
Unacceptable Storage - Storing seals or seal rings without any means of limiting contamination or with the storage container (lid/bag) open/unsealed is an unacceptable practice. Seals should not be stored in direct sunlight.
Housing Storage - Store housings in a manner that will prevent contamination, rust, or damage to the component.
CLEANLINESS
Refer to the Contamination Control Guidelines, PEBJ0002, "Caterpillar Dealer Contamination Control Compliance Guide".
Use only an approved lint-free wipe to remove all contamination from the seal ring, rubber toric, and housing.
Seals, Seal Rings, and Housing Cleanliness
Seals and seal rings must be kept free from contamination sources. Examples may include but are not limited to, airborne dust and dirt, metal chips, and liquids such as fuels, oils, greases, and solvents.
To reduce the risk of contamination, assembly aids (including lubricants and retention compounds) should be applied immediately prior to assembly. Containers containing cleaners used to clean the seal face and retainers or lubricants used to prelube the seal faces prior to assembly should be kept covered when not being used.
Housing Retainer Lip Cleanliness
Check the housing retainer lip for burrs, surface blemishes, or damage before installing the seals.
HANDLING
Toric Handling
Toric shall be free from contamination and damage. Contact of the toric with threaded components or other sharp objects shall be prevented as the contact risks cutting, nicking, or damaging the seal.
Do not allow contact with unapproved chemicals as the contact may lead to material degradation.
Seal Ring Handling

Illustration 4
Proper handling of seal ring
g03150399
Do not slide the face of the seal ring across any hard surface. When handling a seal ring, clean, lintfree gloves must be used. Refer to Illustration 4.
Handle the seal ring in a manner to prevent contact or damage to the seal ring face.
Remove the seal ring from the packaging prior to assembly.
Review the seal ring face and toric for defects before installation. Defects could include (but not limited to) scratches on the seal ring face, cut or nicked toric.
Housing Handling
Handle the housing in a manner that will promote safety for the operator and prevent contamination or damage to the housing.
PREASSEMBLY INSPECTION OF CRITICAL COMPONENTS
Complete a 1-second inspection of seal and mating components for damage and contamination. A 1second inspection is a quick visual review of the part and mating component for damage or debris. This inspection is to help identify part issues before assembling the parts to the components.
Seal Inspection - Rubber Toric
Complete a visual inspection to verify that no contamination or damage in the form of, but not limited to: nicks, cuts, or gouges are present.
Toric shall be stored in conformance with the storage and shelf life covered Contamination Control Guidelines, PEBJ0002, "Caterpillar Dealer Contamination Control Compliance Guide".
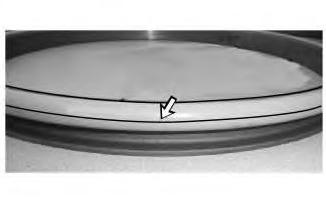
Illustration 5
g03150400
Parting line of toric aligned with outside diameter of seal ring
Toric should have the parting line of the seal aligned with the outside diameter of the seal ring. The parting line should align with the OD of the seal ring. Complete a full 360 degrees inspection of the parting line to ensure the OD of the toric aligns with the OD of the seal ring. Refer to Illustration 5.
If a slight twist is present, the slight twist may lead to misalignment of the OD of the toric and seal ring. Using minimal force, slightly twist or rotate the rubber toric to align properly with the OD of the seal ring.
During reinstallation, rubber toric should not be stretched or twisted beyond what is necessary for installation.
Seal Ring
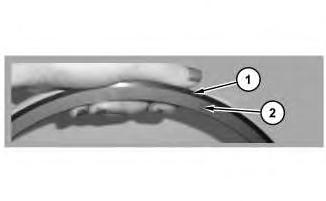
Illustration 6
Critical inspection points for seal ring
g03150401
Seal Ring Face - Flat Band - Complete a visual inspection to verify that no contamination or damage in the form of, but not limited to: scratches or large chips are present. Refer to Illustration 6.
Taper Band/Flat Band - If contamination is present, use an approved lint-free wipe to remove debris. Be careful not to scratch the surface of the seal ring face when removing debris. Refer to Illustration 6.
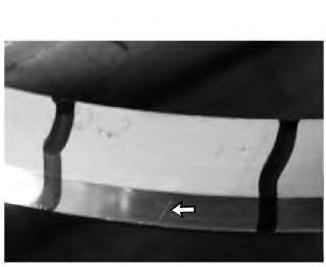
Illustration 7
Scratch on seal ring face
g03150402
Flat Band - Scratches are acceptable only to the degree that the scratches do not impair the function of the seal. Refer to Illustration 7.
Guidelines to be followed
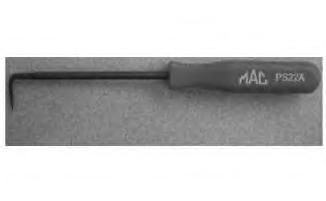
Illustration 8
g03150403
Scratches that cross the transition between the flat band and into the spherical taper are not permitted. Scratches that are in the flat band and spherical taper and cannot be felt with an approved inspection instrument are acceptable. An approved inspection instrument is a MAC tool metal pick, Item No. PS22A. Refer to Illustration 8. Instruments such as dental picks or razor blades are not acceptable.
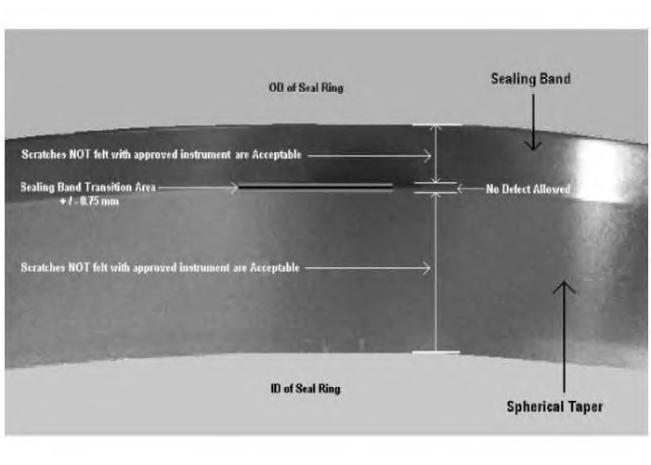
9
g03150404
• Any defect that falls within the sealing band transition area is not acceptable. The sealing band transition area is 0.75 mm (0.030 inch) from the centerline of the radius, where the sealing band and the spherical taper meet. Refer to Illustration 9.
• Defects other than scratches that fall within the sealing band and are more than 0.75 mm (0.030 inch) from the center of the transition radius are acceptable as long as they do not exceed 0.4 mm (0.02 inch) in both directions. Refer to Illustration 9.
• Defects other than scratches that fall within the spherical taper area and are more than 0.75 mm (0.030 inch) from the center of the transition radius are acceptable as long as they do not exceed 0.8 mm (0.03 inch) mm in both directions. Refer to Illustration 9.
Miscellaneous Defects
Any seal that gives an immediate appearance of poor quality or non-uniformity is subject to rejection even if the seal meets the above standards. Set the questionable seal rings aside and metal face seal inspection personnel should be contacted. Examples include:
• Sunburst scratches
• Bright spots or “wash-outs” from the polishing operation
• Seals on which the conditioning rings stopped turning during the lapping operation
• Seals that appear different from a normal run because of scratches, which are too numerous, too deep, or too concentrated in one area
• Seals, which are not clean on the seal face, in particular which show remnants of dried lapping compound
Seal Ring Ramp
If the rubber toric is missing, dislodged, or has been removed, complete a visual inspection to verify that no contamination or damage in the form of, but not limited to: seal ring cracks or other obvious damage are present.
Housing (Seal Retainer)
Complete a visual inspection to verify that no contamination or damage in the form of, but not limited to: sharp edges, missing material, or burrs that may damage the rubber toric are present.
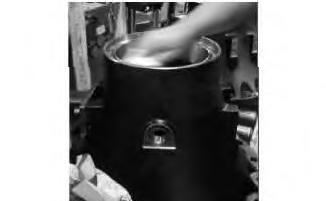
Illustration 10
g03150405
Operator using a lint-free wipe to remove debris from housing
Clean the housing (seal retainer) using one of the approved lint-free wipes prior to installation to remove any contamination that may be present on the housing. Refer to Illustration 10.
Housing Ramp
This is the sample of the manual Click on the download link for complete Manual
The surface finish of the housing ramp should meet appropriate engineering requirements. If the surface finish appears suspect, contact the appropriate product group and complete a surface finish check.
DUO-CONE SEAL ASSEMBLY TOOLING
Refer to the Disassembly and Assembly Manual in the Service Information System (S.I.S.) for the correct Duo-Cone Seal Assembly Tooling.
Duo-Cone Seal Ring Installation Tool
Duo-Cone seal assembly tooling comes in different sizes defined by the outside diameter of the toric and based upon seal ramp angles. Typical seal ramp angles are 8 degrees, 15 degrees, and 20 degrees.
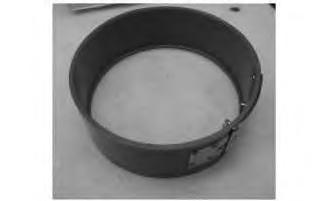
Illustration 11
g03150406

Illustration 12
New tool design: Back side of tool
g03150407
13
g03150408
Old laminated phenolic (rawhide) tool - Front side of tool
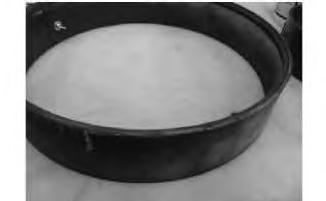
Illustration 14
g03150409
Old laminated phenolic (rawhide) tool - Back side of tool
The seal ring installation tools may be made from a cast polyurethane material or laminated phenolic material. All new tool designs should use cast polyurethane material. Refer to Illustration to 14.
Mallets and Soft Hammers
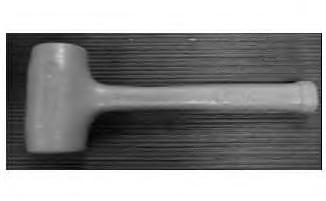
15
Rubber mallets or soft hammers may be used with Duo-Cone seal installation tools. Hammers with metal heads must never be used with Duo-Cone seal installation tooling. The use of rubber mallets or soft hammers helps prevent damage to the installation tool. Refer to Illustration 15.
Tooling Inspection
All tools shall be reviewed for damage and contamination before use.
Tooling Damage
Damage to seal assembly tooling may be in the form of, but not limited to: broken lips or missing material on the inside diameter of the installation tool. (Illustration 16).
Damage should be avoided in any location on the installation tool where the rubber toric would contact the tool.
Tooling - Care, Maintenance, and Damage Reporting
Critical Care Note - Routine Inspection - All seal-specific assembly tooling shall be inspected before use to ensure that the tool is not damaged or contaminated.
Critical Care Note - Routine Maintenance - All seal-specific tooling shall be placed on a routine maintenance schedule similar to the torque-tooling schedule. Regular review and documentation of seal assembly tooling is required.
Critical Care Note - Reporting Damage - A formal reporting process shall be established at every facility to report damaged tooling.
Critical Care Note - Replacement Tooling - To reduce the risk of downtime and use of an unapproved tool due to tooling damage, replacement tooling shall be in inventory and available for immediate use. Damaged tools shall be replaced immediately since using a damaged tool increases the risk of seal damage or leaks.
Tooling Use

Illustration 17
Placement of seal onto the installation tool
g03150412
Duo-Cone Seal Installation Tool - Open or expand the tool so that the flange of the seal fits into the groove of the tool. (Illustration 17).
Bring back the installation tool together and hand tighten the wing nuts on the tool.
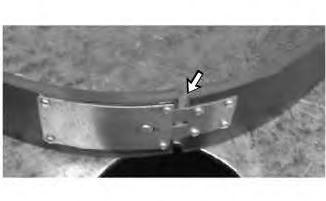
Illustration 18
Impact locations on installation tool
g03150413
When using a rubber mallet with the installation tool, do not strike the joint of the installation tool as the strike will lead to damage. Illustration displays the installation tool joint.
Lubricate the rubber toric with an approved assembly lubricant prior to assembly. Do not use oil or an oil-based lubricant.
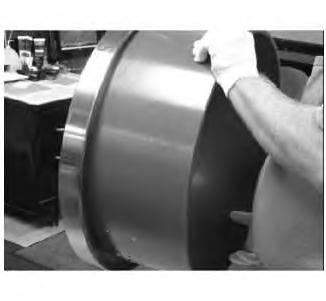
Illustration 19
Vertical installation
g03150414
For vertical installations (radial directions), place the installation tool on top of the housing and quickly press by hand evenly around the tool. The even hand-pressure will seat the rubber toric under the housing retaining lip. Refer to Illustration 19.
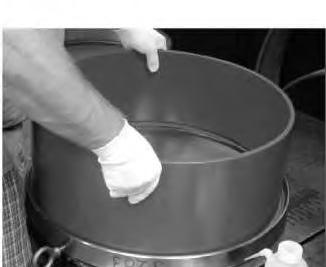
Illustration 20 g03150415
Horizontal installation
Horizontal installations allow for easier access and even hand pressure around the tool, typically without the use or need of a rubber mallet. Refer to Illustration for horizontal installation.
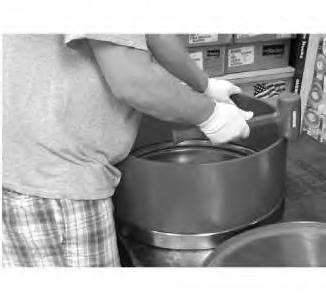
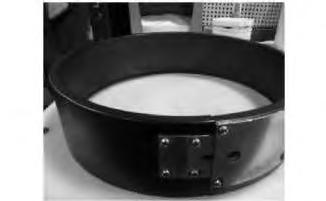
Illustration 21 g03150416
Tool used with large Duo-Cone seals
In cases where the seal cannot be seated or installed with by hand, the use of a rubber mallet is acceptable on the installation tool.
For vertical installations on large seals, that cannot be installed with sudden even pressure, cock the installation tool with the seal, past the retaining lip in the 6:00 position and use a mallet to tap the seal in place. Make sure the toric is fully engaged past the seal retainer lip after the installation tool is removed. Refer to Illustration 21.
Measurement
Use a pair of calipers to measure the stand-up height of the Duo-Cone seal once installed into the housing (retainer).
Obtain the appropriate measurements as defined in "Verifying Duo-Cone Seal Assembly" located later in this document to validate proper assembly.
Tooling Storage Cleanliness
Tooling storage surfaces should be clean and free from contamination such as dirt, filings, or other debris.
Follow the Contamination Control Guidelines, PEBJ0002, "Caterpillar Dealer Contamination Control Compliance Guide" for cleaning schedules.
Duo-Cone Seal Assembly Tooling Storage
Provide proper storage to protect the Duo-Cone seal assembly tooling from damage.
Duo-Cone seal tooling shall be stored in a manner that will prevent damage to the tool edge that interfaces with the Duo-Cone seal and rubber toric. Proper storage prevents tool damage that could lead to seal damage. Acceptable storage methods may include, but not limited to:
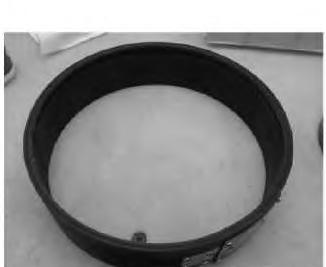
Illustration 22
Groove-End-Up of installation tool
g03150597
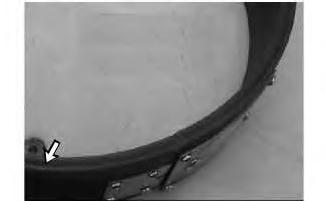
Illustration 23
g03150599
Close up view of Groove-End-Up of installation tool
• The side of the installation tool that contains the installation groove must be placed groove-endup. Groove-end is defined as the end of the assembly tool that interfaces/touches the Duo-Cone seal and rubber toric. Refer to Illustration 22 and Illustration 23.
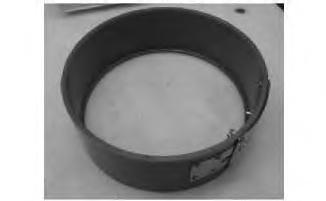
Illustration 24
Storage on soft surface with grove end up
• Storing on soft, forgiving surface such as nylon, high-density polyethylene (HDPE). Refer to Illustration 24. Always store with groove end up.
• Storage by hanging is acceptable as long as the storage rack provides adequate and proper support to the Duo-Cone seal assembly tool.
Note: Duo-Cone assembly tools made from cast polyethylene should not be stored vertically. These tools will distort.
25
• Hang the assembly tool using the inside diameter of the tool only. Storage method must support the tool via the inside diameter to prevent creep or tool damage. Refer to Illustration 25.
• Do not store tools in a basket, floor, or hard metal surfaces as it can lead to damage of the tools critical surfaces. Proper storage must be provided to all to reduce risk of damage to tool.
ASSEMBLY
AIDS
Assembly Lubricants/Cleaners for Use on Rubber Toric
Use an approved assembly lubricant on the rubber toric when installing into the housing (retainer). Use of a non-approved product can lead to seal failure.
Refer to Table for a list of approved Duo-Cone seal assembly lubricants/cleaners.
Assembly Lubricants for Pre lube of Use on Seal Ring Face
The oil used in the application (ex 10wt TDTO) is suitable for “pre lubing” the seal ring faces. Be careful not to allow excessive oil to contact the rubber toric during application.
Assembly Cleaner Application
Approved cleaners shall be applied using an approved lint-free wipe.
Approved dispensers shall be provided to reduce the risk of contamination to the cleaner.
Store all cleaners in properly identified, clean, closable containers. Containers must be kept closed between uses.
Follow the Contamination Control Guidelines, PEBJ0002, "Caterpillar Dealer Contamination Control Compliance Guide".
Assembly Lubricant Application
Duo-Cone seal assembly lubricants can be applied using an approved lint-free wipe, or clean spray bottle containing the approved toric lubricant. Refer to Table 3. Dispose of lubricant/assembly containers that have become internally contaminated.
Store all lubricants in properly identified, clean, closable containers. Containers must be kept closed between uses.
Follow the Contamination Control Guidelines, PEBJ0002, "Caterpillar Dealer Contamination Control Compliance Guide".
Assembly Cleaners for Use on Housing Retainer
Use an approved assembly cleaner and approved lint-free wipe to remove any contamination on the housing retainer.
Table provides a list of approved assembly lubricants/cleaners for use on the toric of the Duo-Cone seal. Use of a non-approved product can lead to seal failure. The lubricants/cleaners below can also be used for the housing.
Table 3
Approved Duo-Cone Seal Assembly Lubricants/Cleaners
Quaker Solvo Clean 68-0
IBM Crib Part Numbers Supplier
3-0048883
Houghton Grind 60 CT 166-6266
Isopropyl Alcohol 3-9874247
Quaker Chemical Conshohocken, PA 19428
Chemtool Incorporated Crystal Lake, IL 60039
Shell Chemical LP Houston, TX 77252
Do not use Stanisol or any petroleum-based chemical, as it may lead to oily residue and material incompatibility.
Do not use any product that will not evaporate quickly.
For approval of alternative assembly lubricants/cleaners, contact the Caterpillar Dealer Service Network (DSN).
ASSEMBLY INSTRUCTIONS AND PROCEDURES
Follow the instructions in the appropriate Service Manualto assemble the duo-cone seals.
PRE-ASSEMBLY
Complete a 1-second inspection for seal and mating components for damage and contamination. A 1 second inspection is a quick visual review of the part and mating component for damage or debris. This inspection is to help identify part issues before assembling the parts to the components. If damage is present, follow appropriate non-conforming material processes for disposition.
General Assembly
The correct installation tools, assembly lubricants, and installation procedures must be used to ensure the proper installation and performance of Duo-Cone seals.
Follow the pre-assembly inspection for each component of the Duo-Cone seal, all ready covered earlier.
Check for contamination and damage on housing retainer lip. If damage is present, follow the appropriate non-conforming material process. If contamination is present, use an approved lint-free wipe and approved cleaner listed in Table 1.
Inspect the rubber toric to ensure that the rubber toric is free from contamination and damage.
General Assembly Requirements
The toric and mating ramps must be dry and free of oil.
The seal ring faces must be clean, free of any foreign material, and coated with oil.
The seal rings and toric should not be damaged during the assembly process.
The assembled Duo-Cone seal should be secure in the housing and not fall out once inverted.
Rubber toric can twist during assembly if not properly lubricated during the installation process.
If correct installation is not obvious after verifying the assembly height, remove the seal from the housing and repeat the steps as outlined below.
Never permit oil to get onto the rubber toric or ramps before both seal rings are assembled in the final assembled position.
Assembly of Small Duo-Cone Seals
Typical range of small Duo-Cone seals is less than 200 mm (7.9 inch).
Install the Duo-Cone seal onto the specified assembly tool.
Inspect for damage and contamination. Using an approved lint-free wipe, remove any contamination or debris from the metal face of the seal ring. If the seal is damaged, do not use.
Lubricate the rubber toric using an approved lint-free wipe or acceptable applicator. Apply a thin even layer of approved assembly lubricant to the outside diameter of the rubber toric prior to assembly into the housing (retainer).
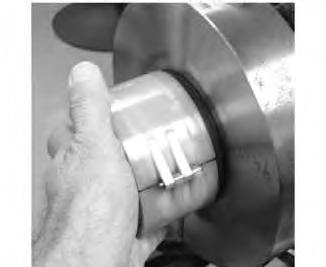
Illustration 26
g03150636
Hand pressure applied to tool for installation of Duo-Cone seal
Using sudden even hand pressure, install the seal into the seal (housing) retainer. Refer to Illustration 26.
If the seal does not install easily with sudden even hand pressure, the use of a rubber mallet on the assembly tool is permissible to install the seal into the housing properly.
Assembly of Medium and Large Duo-Cone Seals
Medium and large Duo-Cone seals may fit into the range of 200 mm (7.9 inch) to 457 mm (18.0 inch) in diameter or larger.
Install the Duo-Cone seal onto the specified assembly tool.
Inspect for damage and contamination. Using an approved lint-free wipe, remove any contamination or debris from the metal face of the seal ring. If the seal is damaged do not use.
Lubricate the rubber toric as defined in the above document.
Place the 6 o'clock position of the Duo-Cone seal into the seal (housing) retainer so the Duo-Cone seal engages the rubber toric under the housing (seal) retaining lip.
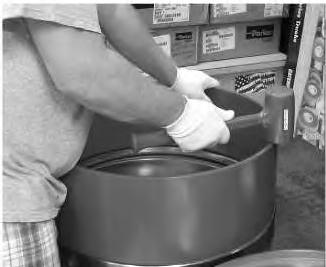
Illustration 27
Rubber mallet used at the 12 O' clock position
g03150637
Using a rubber mallet, at the 12 o'clock position, tap the installation tool to aid in installation. Continue in a clockwise pattern 360 degrees around the installation tool until the seal is properly seated into the housing. Refer to Illustration 27.
Note: Do not strike the installation tool at the installation tool joint.
Removing & Reinstalling a Rubber Toric to a Metal Seal Ring
In some cases the rubber toric may fall off during installation or removal of the seal. In such a case, use an approved lint-free wipe to clean the rubber toric and the seal ring ramp before reinstallation.
To reinstall the rubber toric to the metal seal ring, place the metal seal ring on a clean, contamination free, flat surface, seal face down. This type of surface will help protect the seal ring face.
Note: Contaminated surfaces and sliding during reinstallation may lead to seal ring face damage. Re inspection of the seal ring face is required after toric reinstallation.
Lay the rubber toric over the seal ring ramp.
Starting on the left side of the seal ring, slightly stretch the rubber toric to accommodate for the seal ring ramp size. Apply sight pressure to aid in seating the rubber toric onto the seal ramp into its final assembly position.
Note: Make sure during the reinstallation process the rubber toric does not get twisted. Twists can cause the rubber toric to pop off the seal ring. Twist can also cause uneven face loading, which increases the risk of seal failure and leaks.
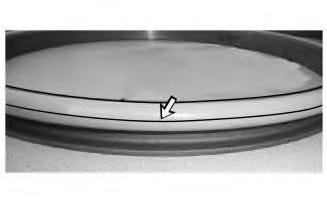
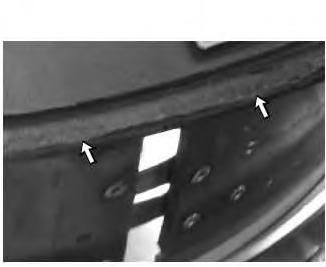
Illustration 28
g03150638
Correct installation of rubber toric. Visible seam-line (Parting line)
Verify that the seam-line (parting-line) of the rubber toric is visible around the seal and that no twisting has occurred. Refer to Illustration 28.
To adjust a twist, grasp the rubber toric and in a simultaneous pull-rotating motion, rotate the rubber toric until the seam-line (parting-line) is present and visibly straight around the outside diameter of the rubber toric.
Do not use any tool to aid in reassembly of toric to the seal ring, use hand pressure only to prevent damage to the toric.
During reinstallation, be sure to avoid damage to the toric, seal ring ramp and seal ring face.
Alternate Method of Assembling of Duo-Cone Seal with Silicone Rubber Toric
For silicone Duo-Cone Seals it maybe necessary to contract the rubber toric and seal ring slightly to ease installation.
Remove from the freezer and install using the assembly method as outlined above for the appropriate seal ring size (small, medium, large.)
Allow installed seal ring to come back to ambient room temperature before proceeding with build. This will insure the toric will roll, rather than slide down the seal ramp when the two seal rings are compressed.
Verifying Duo-Cone Seal Assembly
Once the Duo-Cone seal assembly is installed into the housing, check the stand-up height of the assembly using the validation tool.
Using a calibrated validation tool as described in “Validation Tool Use”, measure the assembled height in three locations, 120 degrees apart.
The stand-up (assembled) height difference between each measurement location cannot exceed 1.0 mm (0.04 inch) variation.
If the measurements exceed 1.0 mm (0.04 inch) variation, use the installation tool to aid in adjusting the assembly. Apply the installation tool to the Duo-Cone seal and adjust the assembly either by a slight pull or a push in the locations that require adjustment.
Do not push or pull on the Duo-Cone seal without the installation tool to avoid personal safety issue.
If the manual adjustments do not resolve the issue, use the assembly tool and pull up on the tool to remove the entire Duo-Cone seal assembly. Reinstall using the appropriate assembly process.
Results of Incorrect Assembly
Illustration 29
Results of incorrect assembly
g03150656
If a Duo-Cone seal is installed incorrectly, there is a risk of misalignments, twists, and bulges to the rubber toric that will cause early hour failures. Refer to Illustration 29.
Final Assembly of Duo-Cone Seal Group
Using a lint-free wipe clean the seal ring faces with approved cleaner.
Using a lint-free wipe, pre-lubricate one seal ring face with the fluid being sealed or approved oil. When pre-lubricating, do not allow the fluid to contact the rubber toric to avoid slippage of the toric.
In the case where the fluid being sealed is not available, refer to 1E4485 for a list of approved DuoCone seal assembly lubricants.
This is the sample of the manual Click on the download link for complete Manual