


Product: COMPACT TRACK LOADER
Model: 279D COMPACT TRACK LOADER GTL
Configuration: 279D Compact Track Loader GTL00001-UP (MACHINE) POWERED BY C3.3B Engine
Disassembly and Assembly
Seal Installation Media
Duo-Cone Seals - Install
SMCS -7561-012
DUO CONE SEALS
i04966249
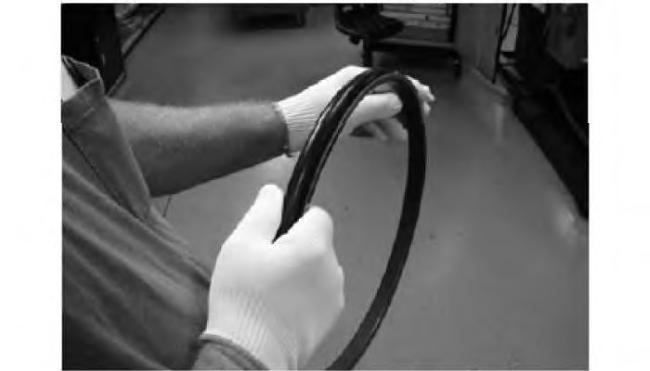
Illustration1 g03150736
Background
To reduce the risk of leaksor failures, assemble the duocone seals correctly. This document applies tocast, formed, conventional, andinvertedDuo-Cone sealsand to installations on factoryassembly lines, at dealer shops, and in the field.
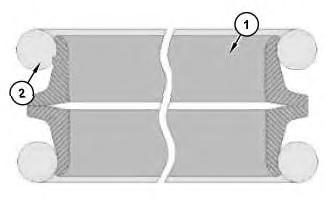
Illustration2
Duo-Coneseal
(1)Seal ring
(2)Rubbertoric
g03150396
The two main componentsof a Duo-Cone seal are shown inIllustration2.
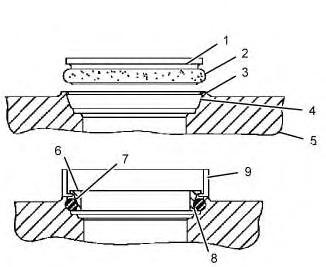
Illustration3
Duo-Coneseal assembly
g03150397
The standard namingnomenclatures for Duo-Cone seals are listed below.
(1) Seal Ring- The metal component of a seal group.
(2) Rubber Toric (Load Ring) - Elastomeric component of a seal group that appliesa face loadin the application. This o-ring style seal retains oil and excludesdebris.
(3) Housing (Retainer) Lip- The lipinside the housing (retainer) that helpsto retainthe seal ring/rubber toric during installation.
(4) Housing Ramp- The angled ramp that is locatedon the housing. Maintaining the proper surface finish is critical.
(5) Housing Retainer - The recessinwhich a seal ringand a load ring are installed.
(6) Seal Face -The “active surface” ofthe seal. In a finished seal the face contains the seal band, seal band to taper radius, and taper.
(7) Seal Ramp -The inclined surface on the exterior of the Duo-Cone seal ring that positionsthe toric betweenthe seal ring and the housing.
(8) Seal Retaining Lip- The function of the retaining lip is toprovide a seat forthe toric. Thisradius allows the toric to stay on the ring forease of assembly.
(9) Installation Tool - Assemblytool used to install the Duo-Cone seal intohousing.
(10) Seal Assembled Height(not shown in Illustration 2) - The final installation height ofDuoCone seal once installed into the housing (retainer). Assembled height measured in three places approximately120 degreesapart.Not to exceed 1.0mm (0.04 inch)variation.
Fora full Duo-Cone seal assembly there are three components that comprise a full assembly:
(1) Seal ring
(2) Rubber toric
(5) Housing retainer
These three componentshelpcreate three separate and distinct sealing areas. Ifone aspect of the seal assembly goes wrong,thena leak path may occurat one or more offollowing sealinglocations.
• Metal-to-Metal Face
• Metal Seal Ring-to-Toric
• Toric-to-Housing
GENERALINFORMATION
Recommended CleaningWipes
Refer to Table for approved lint free wipes.
Cleanersused should not be oil-basedproducts.
Table 1 Lint Free Wipe Crib
Chemtool CT Clean 15861 Wipe With Cleaner 3-0124698 169-5420
Chemtool Lint-Free Wipes 3-0080298 265-2256
KimtexLint-Free Polypropylene Towels 3-0039125
NewPig Low-Lint Wipes WIP230 WIP232
Service Kits
Service kits and products are available.A list of approved Duo-Cone seal service itemsis listed below in Table 2. Table 2
STORAGE
Seal and Seal Ring Storage
Contamination Storage Requirements- Regardless ofsize or shape, seals and gaskets must be stored in such a manner that preventscontamination and maintains cleanliness. The sealsand gaskets shouldbe stored inoriginal packaginguntil installed.
Best Practice Storage - Best-practice storage requirestwo methods of limitingcontamination direct tothe seal or seal ring. If one level of protection is easily frayed or fray-able (rubbed or worn into fibers), (for example: wood/cardboard) the storage container must have an internal layer of protection (for example: polybag).Anystorage container (lid or bag)must be resealed after eachuse.
Minimum Acceptable Storage - Minimum acceptable storage practices would include one method of limiting contamination direct to the seal or seal ring.
Unacceptable Storage -Storingsealsor seal rings without any means of limiting contaminationor with the storage container (lid/bag) open/unsealed is an unacceptable practice. Seals shouldnot be stored in direct sunlight.
Housing Storage -Store housingsin a manner that will prevent contamination, rust, ordamage to the component.
CLEANLINESS
Refer to the ContaminationControl Guidelines, PEBJ0002, "CaterpillarDealer Contamination Control Compliance Guide".
Use only an approved lint-free wipe to remove all contamination from the seal ring, rubber toric,and housing.
Seals,Seal Rings, andHousing Cleanliness
Seals and seal rings must be kept free from contamination sources. Examples may include but are not limited to, airborne dust and dirt, metal chips, and liquidssuchasfuels,oils, greases, and solvents.
To reduce the risk of contamination, assembly aids(including lubricants and retention compounds) shouldbe appliedimmediatelyprior to assembly. Containers containingcleanersused to clean the seal face andretainers or lubricants used to prelube the seal faces prior to assemblyshouldbe kept covered when not being used.
Housing Retainer Lip Cleanliness
Check the housing retainerlipfor burrs, surface blemishes, or damage before installing the seals.
HANDLING
Toric Handling
Toric shall be free from contamination and damage. Contact of the toric with threaded components or other sharpobjectsshall be prevented asthe contact risks cutting, nicking, ordamaging the seal.
Donot allowcontact with unapproved chemicals asthe contact may lead to material degradation.
Seal Ring Handling
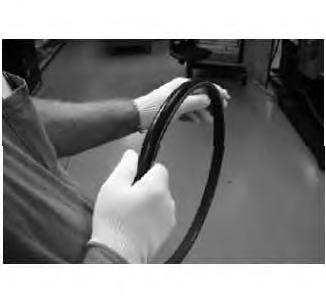
Illustration4
Proper handlingof sealring
g03150399
Donot slide the face of the seal ring across any hard surface. Whenhandling a seal ring, clean, lintfree gloves must be used. Refer to Illustration 4.
Handle the seal ring in a mannertoprevent contact ordamage tothe seal ring face.
Remove the seal ring from the packaging prior to assembly.
Review the seal ring face and toric for defectsbefore installation. Defects could include (but not limited to) scratches on the seal ring face, cut or nicked toric.
Housing Handling
Handle the housing in a manner that will promote safetyfor the operator andprevent contamination or damage to the housing.
PREASSEMBLY INSPECTION OF CRITICALCOMPONENTS
Complete a 1-secondinspection of seal and mating components fordamage and contamination. A1second inspectionisa quick visual reviewof the part and mating component for damage or debris. This inspection istohelpidentifypart issuesbefore assembling the parts to the components.
Seal Inspection -Rubber Toric
Complete a visual inspection to verify that no contamination or damage in the form of, but not limited to: nicks, cuts,or gougesare present.
Toric shall be stored in conformance with the storage and shelf life covered Contamination Control Guidelines, PEBJ0002, "Caterpillar Dealer Contamination Control Compliance Guide".
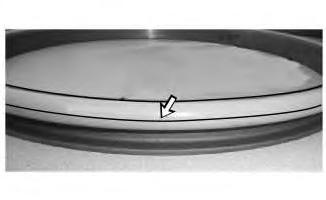
Illustration5
g03150400
Partingline oftoric aligned withoutside diameter of seal ring
Toric shouldhave the partingline of the seal aligned with the outside diameterof the seal ring. The parting line shouldalign withthe ODof the seal ring.Complete a full 360 degrees inspectionof the parting line to ensure the OD of the toric alignswith the OD ofthe seal ring. Refer to Illustration 5.
If a slight twist ispresent,the slight twist may lead to misalignment of the OD ofthe toric andseal ring. Using minimal force, slightly twist or rotate the rubber toric to align properlywith the ODof the seal ring.
During reinstallation, rubber toric should not be stretched ortwisted beyond what isnecessaryfor installation.
Seal Ring
This is the sample of the manual
Click on the download link for complete Manual
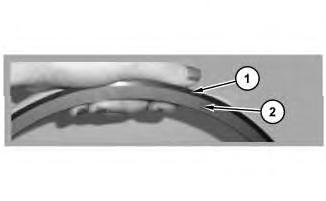
Illustration6
Critical inspectionpoints forseal ring
g03150401
Seal Ring Face - Flat Band- Complete a visual inspection to verify that no contamination or damage inthe form of, but not limited to: scratches orlarge chipsare present. Refer toIllustration 6.
Taper Band/FlatBand - If contamination is present, use an approvedlint-free wipe to remove debris. Be careful not toscratchthe surface ofthe seal ringface when removing debris.Refer to Illustration6.
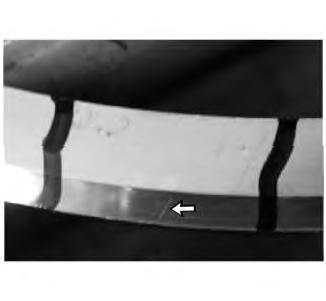
Illustration7
Scratchonseal ring face
g03150402
Flat Band -Scratchesare acceptable only to the degree that the scratches donot impairthe function of the seal. Refer to Illustration 7.
Guidelinesto be followed
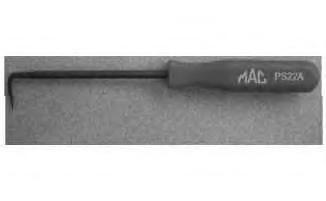
8
g03150403
Scratches that crossthe transition between the flat band andintothe spherical taper are not permitted. Scratches that are inthe flat bandand spherical taper and cannot be felt with an approved inspection instrument are acceptable. An approvedinspection instrument isa MAC tool metal pick, Item No. PS22A. Refer to Illustration 8.Instrumentssuch asdental picksor razorblades are not acceptable.

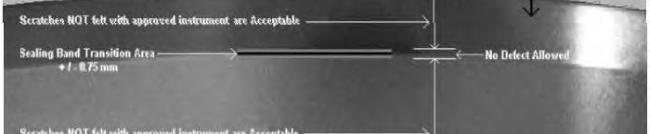
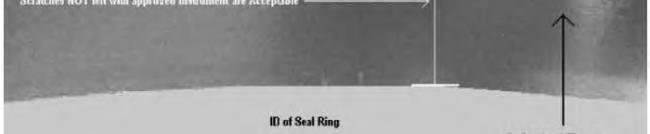
Illustration9
g03150404
• Anydefect that fallswithin the sealing band transition area isnot acceptable. The sealing band transitionarea is0.75 mm (0.030inch)from the centerline ofthe radius, where the sealing band and the spherical taper meet. Refer to Illustration 9.
• Defects other than scratchesthat fall within the sealing band and are more than 0.75 mm (0.030inch) from the center of the transition radiusare acceptable as longasthey do not exceed 0.4 mm (0.02inch) in both directions.Refer to Illustration 9.
• Defects other than scratchesthat fall within the spherical taper area and are more than 0.75 mm (0.030inch) from the center of the transition radiusare acceptable as longasthey do not exceed 0.8 mm (0.03inch) mm in both directions.Refer to Illustration 9.
MiscellaneousDefects
Anyseal that givesan immediate appearance of poor qualityor non-uniformity is subject torejection even if the seal meetsthe above standards. Set the questionable seal rings aside andmetal face seal inspection personnel should be contacted.Examplesinclude:
• Sunburst scratches
• Bright spots or “wash-outs” fromthe polishing operation
• Seals onwhich the conditioning rings stopped turningduring the lapping operation
• Seals that appear different from a normal run because ofscratches, which are too numerous, too deep, or tooconcentrated in one area
• Seals, which are not clean on the seal face,inparticular which show remnantsof dried lapping compound
Seal Ring Ramp
If the rubbertoric ismissing, dislodged,or has beenremoved, complete a visual inspection to verify that no contamination ordamage inthe form of, but not limited to: seal ring cracksor other obvious damage are present.
Housing (Seal Retainer)
Complete a visual inspection to verify that no contamination or damage in the form of, but not limited to: sharp edges, missing material, or burrsthat may damage the rubber toric are present.
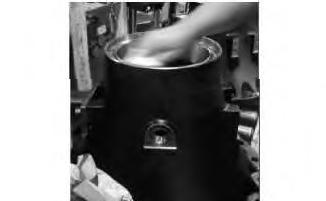
Illustration10
g03150405
Operatorusinga lint-freewipe toremove debris fromhousing
Cleanthe housing(seal retainer)using one of the approvedlint-free wipes prior to installation to remove any contaminationthat may be present on the housing.Refer to Illustration 10.
Housing Ramp
The surface finishof the housing ramp should meet appropriate engineering requirements.If the surface finishappears suspect, contact the appropriate product group and complete a surface finish check.
DUO-CONE SEAL ASSEMBLY TOOLING
Refer to the Disassembly andAssembly Manual in the Service Information System (S.I.S.) forthe correct Duo-Cone Seal AssemblyTooling.
Duo-Cone Seal Ring InstallationTool
Duo-Cone seal assembly tooling comesindifferent sizes defined bythe outside diameter of the toric and basedupon seal rampangles. Typical seal rampangles are 8 degrees, 15 degrees, and 20degrees.
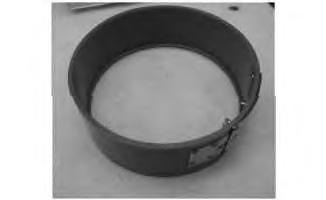
Illustration11
Newtooldesign: Frontside oftool
g03150406
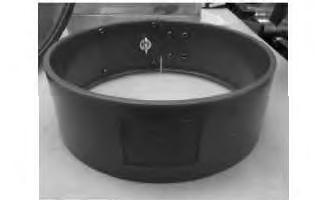
Illustration12
Newtooldesign: Back side of tool
g03150407
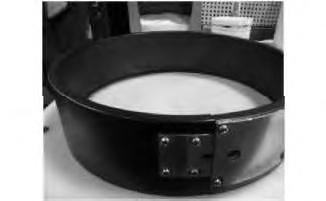
Illustration13
g03150408
Oldlaminatedphenolic (rawhide) tool -Front side oftool
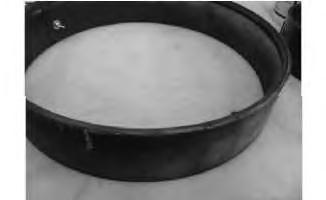
Illustration14
g03150409
Oldlaminatedphenolic (rawhide) tool -Back side oftool
The seal ring installation toolsmay be made from a cast polyurethane material or laminated phenolic material. All newtool designsshould use cast polyurethane material. Refer to Illustration to 14.
Rubber Mallets and Soft Hammers
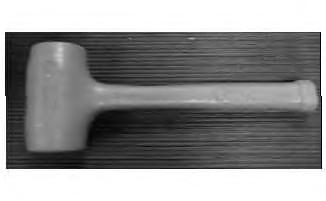
Illustration15
g03150410
Rubbermalletsor soft hammers maybe used with Duo-Cone seal installation tools. Hammers with metal heads must never be used with Duo-Cone seal installation tooling. The use ofrubber malletsor soft hammershelps prevent damage to the installationtool. Refer to Illustration 15.
ToolingInspection
All tools shall be reviewed fordamage andcontamination before use.
ToolingDamage
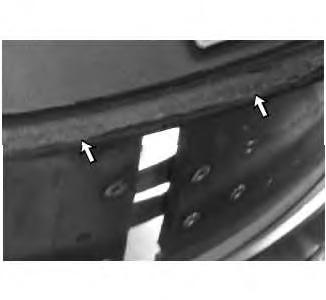
Illustration16
g03150411
ToolDamage: MissingMaterial on Tool Ramp- Broken Lip
Damage to seal assembly tooling may be in the form of, but not limitedto: broken lips or missing material on the inside diameterof the installation tool. (Illustration16).
Damage should be avoided in anylocation on the installation tool where the rubber toric would contact the tool.
Tooling- Care, Maintenance, and Damage Reporting
Critical Care Note - Routine Inspection - All seal-specific assembly toolingshall be inspected before use toensure that the tool is not damagedor contaminated.
Critical Care Note - Routine Maintenance -All seal-specific tooling shall be placedon a routine maintenance schedule similar to the torque-toolingschedule. Regular reviewand documentation of seal assembly toolingisrequired.
Critical Care Note - Reporting Damage - Aformal reportingprocessshall be established at every facility to report damaged tooling.
Critical Care Note - ReplacementTooling- To reduce the riskof downtime and use of an unapproved tool due to tooling damage, replacement toolingshall be in inventory andavailable for
immediate use. Damaged tools shall be replaced immediately since using a damaged tool increases the risk ofseal damage or leaks.
ToolingUse
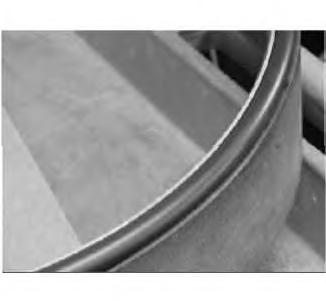
Illustration17
Placement of seal ontotheinstallationtool
g03150412
Duo-Cone Seal Installation Tool -Open or expand the tool so that the flange of the seal fitsinto the groove of the tool. (Illustration 17).
Bring back the installationtool togetherand hand tighten the wing nuts on the tool.
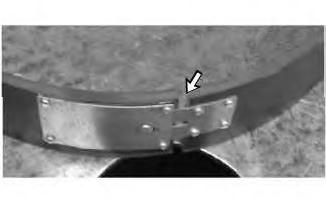
Illustration18
Impact locations oninstallation tool
g03150413
When using a rubber mallet with the installation tool, donot strike the joint of the installation tool as the strike will lead todamage.Illustrationdisplaysthe installationtool joint.
Lubricate the rubber toric with an approved assemblylubricant prior to assembly. Donot use oil oran oil-based lubricant.
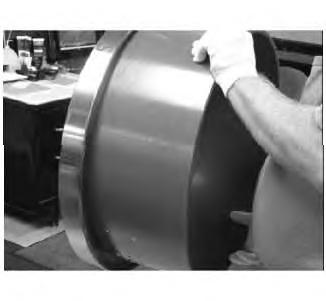
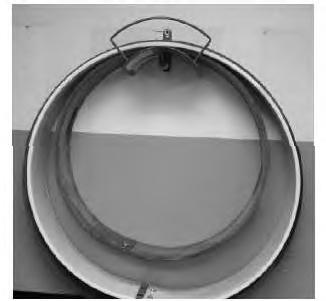
Illustration19
Vertical installation
g03150414
Forvertical installations(radial directions), place the installationtool on top ofthe housing and quickly pressby hand evenly around the tool. The even hand-pressure will seat the rubber toric under the housing retaininglip. RefertoIllustration19.
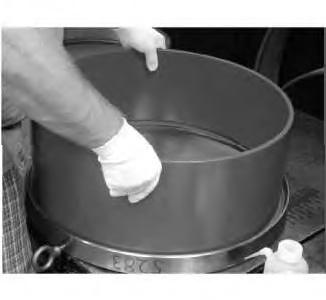
Illustration20
Horizontalinstallation
g03150415
Horizontal installations allowforeasieraccess and even hand pressure around the tool, typically without the use or need ofa rubber mallet. RefertoIllustrationfor horizontal installation.
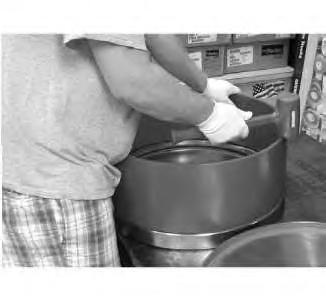
Illustration21
Toolusedwithlarge Duo-Cone seals
g03150416
In cases where the seal cannot be seated or installed with by hand, the use ofa rubber mallet is acceptable on the installation tool.
Forvertical installationson large seals,that cannot be installed with suddenevenpressure, cock the installation tool with the seal, past the retaining lip in the 6:00 position and use a mallet to tap the seal inplace. Make sure the toric isfullyengaged past the seal retainer lipafter the installationtool is removed. Refer to Illustration 21.
Measurement
Use a pairof calipersto measure the stand-up height ofthe Duo-Cone seal once installed into the housing (retainer).
Obtain the appropriate measurementsas defined in "Verifying Duo-Cone Seal Assembly"located later in this document tovalidate properassembly.
ToolingStorage Cleanliness
Tooling storage surfaces should be clean and free from contamination such asdirt,filings, or other debris.
Followthe ContaminationControl Guidelines, PEBJ0002, "CaterpillarDealerContaminationControl Compliance Guide" for cleaningschedules.
Duo-Cone Seal Assembly Tooling Storage
Provide proper storage to protect the Duo-Cone seal assembly tooling from damage.
Duo-Cone seal tooling shall be stored in a manner that will prevent damage to the tool edge that interfaceswith the Duo-Cone seal andrubber toric. Proper storage prevents tool damage that could lead to seal damage. Acceptable storage methods may include, but not limited to:
Illustration22
Groove-End-Upofinstallationtool
g03150597
Illustration23
g03150599
Close upviewof Groove-End-Upof installation tool
• The side of the installationtool that containsthe installation groove must be placed groove-end -up. Groove-endis defined asthe end of the assembly tool that interfaces/touches the DuoCone seal and rubber toric. Refer to Illustration 22and Illustration 23.
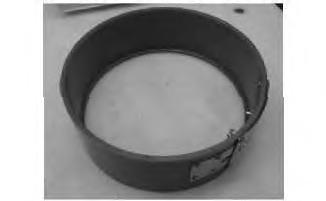
Illustration24
Storage on soft surface with groveend up
g03150616
• Storing on soft,forgiving surface suchasnylon, high-densitypolyethylene (HDPE).Refer to Illustration24. Alwaysstore withgroove endup.
• Storage byhanging isacceptable aslong asthe storage rack provides adequate and proper support to the Duo-Cone seal assembly tool.
Note:Duo-Cone assembly tools made from cast polyethylene should not be stored vertically. These tools will distort.
• Hang the assembly tool using the inside diameterof the tool only. Storage method must support the tool via the inside diameter to prevent creep ortool damage.Refer to Illustration 25.
• Do not store toolsina basket, floor,or hard metal surfacesasit canlead to damage ofthe tools critical surfaces. Proper storage must be provided to all to reduce riskof damage to tool.
ASSEMBLY AIDS
Assembly Lubricants/Cleanersfor Use on Rubber Toric
Use an approvedassembly lubricant onthe rubber toric wheninstallingintothe housing(retainer). Use of a non-approved product can leadtoseal failure.
Refer to Table for a list of approved Duo-Cone seal assembly lubricants/cleaners.
Assembly Lubricantsfor Pre lube of Use on Seal Ring Face
The oil used in the application(ex 10wt TDTO) is suitable for“pre lubing” the seal ring faces. Be careful not toallowexcessive oil to contact the rubber toric during application.
Assembly Cleaner Application
Approved cleaners shall be applied using an approved lint-free wipe.
Approved dispensersshall be provided to reduce the risk of contamination to the cleaner.
Store all cleanersinproperly identified, clean,closable containers. Containersmust be kept closed between uses.
Followthe ContaminationControl Guidelines, PEBJ0002, "CaterpillarDealerContaminationControl Compliance Guide".
Assembly LubricantApplication
Duo-Cone seal assembly lubricants can be applied using an approved lint-free wipe, or clean spray bottle containing the approved toric lubricant. Refer to Table 3. Dispose of lubricant/assembly containersthat have become internally contaminated.
Store all lubricantsin properlyidentified, clean, closable containers. Containersmust be kept closed between uses.
Followthe ContaminationControl Guidelines, PEBJ0002, "CaterpillarDealerContaminationControl Compliance Guide".
Assembly Cleaners for Use onHousing Retainer
Use an approvedassembly cleaner and approved lint-free wipe to remove anycontamination on the housing retainer.
Table provides a list of approved assembly lubricants/cleanersfor use on the toric of the Duo-Cone seal. Use of a non-approvedproduct can leadtoseal failure.The lubricants/cleaners belowcan also be usedfor the housing.
Table 3
Approved Duo-Cone Seal Assembly Lubricants/Cleaners
Quaker Solvo Clean 68-0
IBM Crib Part Numbers
3-0048883
Houghton Grind 60 CT 166-6266
Isopropyl Alcohol
3-9874247
Supplier
Quaker Chemical Conshohocken, PA19428
Chemtool Incorporated Crystal Lake, IL 60039
Shell Chemical LPHouston, TX 77252
Donot use Stanisol or anypetroleum-based chemical, asit may lead to oily residue and material incompatibility.
Donot use anyproduct that will not evaporate quickly.
Forapproval of alternative assembly lubricants/cleaners, contact the Caterpillar Dealer Service Network (DSN).
ASSEMBLY INSTRUCTIONS AND PROCEDURES
Followthe instructions in the appropriate Service Manualto assemble the duo-cone seals.
PRE-ASSEMBLY
Complete a 1-secondinspection for seal andmating components for damage and contamination.A 1 second inspectionisa quick visual reviewof the part and mating component for damage or debris. This inspection istohelpidentifypart issuesbefore assembling the parts to the components.
If damage is present, followappropriate non-conforming material processesfor disposition.
General Assembly
The correct installation tools, assembly lubricants, andinstallation procedures must be usedtoensure the proper installationand performance ofDuo-Cone seals.
Followthe pre-assemblyinspection for each component of the Duo-Cone seal,all ready covered earlier.
Check forcontamination and damage onhousing retainerlip. If damage ispresent,follow the appropriate non-conforming material process.If contamination ispresent, use an approvedlint-free wipe and approved cleaner listedinTable 1.
Inspect the rubber toric toensure that the rubbertoric isfree from contaminationand damage.
General Assembly Requirements
The toric andmating ramps must be dry andfree of oil.
The seal ring faces must be clean, free of any foreignmaterial,and coatedwith oil.
The seal rings and toric shouldnot be damaged duringthe assembly process.
The assembled Duo-Cone seal should be secure in the housingand not fall out once inverted.
Rubbertoric can twist during assembly if not properly lubricatedduring the installationprocess.
If correct installation isnot obviousafter verifying the assembly height, remove the seal from the housing and repeat the stepsasoutlined below.
Never permit oil to get onto the rubber toric or rampsbefore both seal rings are assembledinthe final assembled position.
Assembly of Small Duo-Cone Seals
Typical range of small Duo-Cone sealsis lessthan 200 mm (7.9 inch).
Install the Duo-Cone seal ontothe specifiedassembly tool.
Inspect fordamage and contamination. Using an approvedlint-free wipe, remove any contamination or debrisfrom the metal face of the seal ring. If the seal is damaged, do not use.
Lubricate the rubber toric using anapproved lint-free wipe or acceptable applicator. Apply a thin even layerof approved assemblylubricant to the outside diameter of the rubber toric prior to assembly into the housing(retainer).
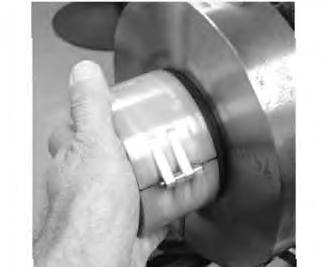
Illustration26
g03150636
Handpressure applied to tool for installationof Duo-Cone seal
Using sudden even handpressure, install the seal intothe seal (housing) retainer.Refer to Illustration 26.
If the seal doesnot install easily with sudden even handpressure, the use of a rubber mallet on the assembly tool ispermissible to install the seal into the housing properly.
Assembly of Medium and Large Duo-Cone Seals
Medium andlarge Duo-Cone sealsmayfit into the range of 200 mm (7.9 inch) to 457 mm (18.0 inch) indiameter or larger.
Install the Duo-Cone seal ontothe specifiedassembly tool.
Inspect fordamage and contamination. Using an approvedlint-free wipe, remove any contamination or debrisfrom the metal face of the seal ring. If the seal is damaged do not use.
Lubricate the rubber toric asdefined in the above document.
Place the 6o'clockposition ofthe Duo-Cone seal into the seal (housing) retainer so the Duo-Cone seal engages the rubber toric under the housing (seal)retaining lip.
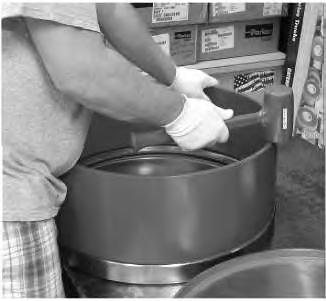
Illustration27
Rubbermallet usedat the 12O' clockposition
g03150637
Using a rubbermallet, at the 12o'clockposition, tap the installationtool toaid in installation. Continue in a clockwise pattern 360 degreesaround the installationtool until the seal isproperly seatedintothe housing. Refer to Illustration 27.
Note:Do not strike the installation tool at the installation tool joint.
Removing &Reinstalling aRubber Toric to a Metal Seal Ring
In some cases the rubber toric mayfall offduring installationor removal ofthe seal. In sucha case, use an approved lint-free wipe to clean the rubber toric and the seal ringramp before reinstallation.
To reinstall the rubber toric to the metal seal ring, place the metal seal ring on a clean, contamination free, flat surface, seal face down. This type of surface will help protect the seal ring face.
Note:Contaminated surfaces andsliding during reinstallation may lead to seal ring face damage. Re inspection of the seal ringface isrequired aftertoric reinstallation.
Laythe rubber toric over the seal ringramp.
Starting on the left side ofthe seal ring, slightly stretch the rubber toric toaccommodate forthe seal ring ramp size. Apply sight pressure to aid in seating the rubber toric onto the seal ramp into itsfinal assembly position.
Note:Make sure duringthe reinstallation processthe rubbertoric does not get twisted. Twistscan cause the rubbertoric to pop off the seal ring. Twist can alsocause uneven face loading, which increases the riskof seal failure and leaks.
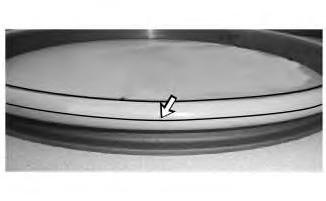
Illustration28
g03150638
Correct installation of rubber toric.Visible seam-line (Parting line)
Verify that the seam-line (parting-line) of the rubber toric isvisible aroundthe seal and that no twisting hasoccurred. RefertoIllustration28.
To adjust a twist,grasp the rubber toric and in a simultaneouspull-rotatingmotion, rotate the rubber toric until the seam-line (parting-line) is present and visiblystraight around the outside diameter of the rubber toric.
Donot use anytool toaidinreassembly oftoric tothe seal ring, use hand pressure onlytoprevent damage tothe toric.
During reinstallation, be sure to avoid damage to the toric, seal ring rampand seal ring face.
Alternate Methodof Assembling of Duo-Cone Seal with Silicone Rubber Toric
Forsilicone Duo-Cone Sealsit maybe necessary to contract the rubber toric and seal ring slightly to ease installation.
Remove from the freezer and install using the assemblymethod as outlined above for the appropriate seal ring size (small, medium, large.)
Allowinstalled seal ringtocome backto ambient room temperature before proceeding withbuild. This will insure the toric will roll, rather than slide downthe seal ramp whenthe two seal ringsare compressed.
VerifyingDuo-Cone Seal Assembly
Once the Duo-Cone seal assembly isinstalled into the housing,checkthe stand-up height of the assembly using the validationtool.
Using a calibrated validationtool as describedin“Validation Tool Use”, measure the assembled height inthree locations, 120 degreesapart.
The stand-up(assembled)height difference between eachmeasurement location cannot exceed 1.0 mm (0.04 inch) variation.
If the measurements exceed 1.0mm (0.04inch) variation,use the installation tool to aid in adjusting the assembly. Apply the installationtool tothe Duo-Cone seal and adjust the assembly either by a slight pull or a push in the locations that require adjustment.
Donot push or pull onthe Duo-Cone seal without the installation tool to avoid personal safety issue.
If the manual adjustments donot resolve the issue, use the assembly tool andpull up onthe tool to remove the entire Duo-Cone seal assembly. Reinstall using the appropriate assembly process.
Resultsof IncorrectAssembly
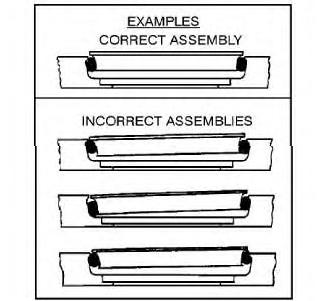
Illustration29
Results of incorrect assembly
g03150656
If a Duo-Cone seal isinstalledincorrectly, there is a risk of misalignments, twists, and bulgesto the rubber toric that will cause early hourfailures. Refer to Illustration 29.
Final Assembly ofDuo-Cone Seal Group
Using a lint-free wipe cleanthe seal ringfaceswith approved cleaner.
Using a lint-free wipe, pre-lubricate one seal ring face with the fluid beingsealedor approved oil When pre-lubricating, do not allowthe fluid to contact the rubber toric to avoid slippage of the toric.
In the case where the fluidbeing sealed is not available,refer to 1E4485for a list of approved DuoCone seal assembly lubricants.
Some instances mayrequire the use of a Molykote GN-paste (CAT P/N: 6V-4876)asthe assembly lubricant in place of an approved oil. Contact the Caterpillar Dealer Solutions Network for any questionsconcerning seal defects.
Refer to Table for the Caterpillar part numbers associatedwith the Molykote Paste.
Table 4
Supplier ProductName CAT Part Number Product Size
DowCorning Molykote 6V-4875 0.5 kg (1 lb) Can
DowCorning Molykote 6V-4876 5 kg(11 lb) Can
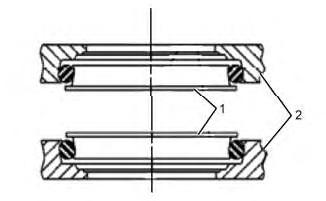
Illustration30
Concentricalignmentoftwohousings
g03150696
Align the twohousings so the housingsare concentric andslowlybring the twoseal ring faces together. Refer to Illustration 30.
Donot let the housingsrock excessivelyas this risks damage to the seal rings. Damages may include seal misalignment or breaking ofthe seal rings.
Donot let the seal ring faces bang together, asthis motion risksbreaking the seal ring.
Resultsof IncorrectAssembly of the Duo-Cone Seal Group
If the rubbertoric slips at one location, but not all the way around the rubbertoric, the toric can twist. This twist can cause the seal ring to cock or misalign.
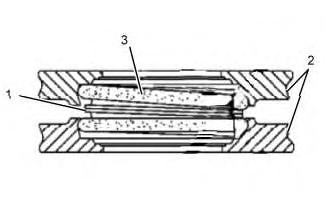
Illustration31
Cocked Duo-Coneseals
g03150697
Severely cocked seals cancause uneven pressure on the seal. This results in an excessive wobbling motion. Refer to Illustration 31.
Wobble may be defined asa seal that has movement exceeding1.0 mm (0.04 inch) in the axial direction.Minorwobble of seals may exist andisnormal in the assembly. For additional information regarding cocked seals/wobble contact the Caterpillar Dealer Solutions Network(DSN).
Wobble can cause dirt to enter by pumping mud andcontamination past the rubber toric. The wobble lead to oil pumping between the rubber toric and housing (retainer), and toric and seal ringinterface which can cause the seal to spin.
Unevenpressure on the seal faces asa result of an excessively cocked seal, can cause galling, scoring,and leakage of the seal assembly.
FAILURE MODES DISCUSSION
While metal face sealsgenerallyperform satisfactorily, premature failure can occur fora number of reasons, but can be avoided or minimized through proper seal designand/or installation.
Failures ofDuo-Cone Seals(oil out or dirt in) can occurin-house or in the field. The different modes of failure that the sealscanexperience are listed below:
• Oil Leakage
• Galling
• Pumpingof Mud Past the Toric and Into the Oil Compartment
• Toric Failure
• Seal Ring Breakage
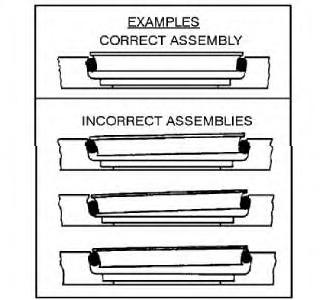
Illustration32
g03150698
The failure modes can be either immediate (in-house) or long term (inthe field) failures. Improper assembly can cause or contribute to all of them (Refer to Illustration 32).
Unevenface loadswhere some areas ofthe seal have a high unit pressure load andother areashave a low orno pressure loadcan cause oil leakage and/or galling. Galling isa form ofsurface damage
arising between sliding solids, distinguished by microscopic,localized, roughening, and creation of protrusions above the original surface.
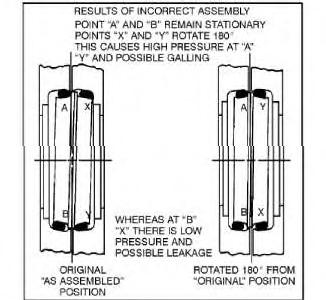
Illustration33
g03150699
The uneven loading can come from twisted toric and cocked sealsand is muchworse when the weather is cold andthe toric are not resilient enough to keep the faces of a crooked seal together during rotation. Also,the area that is in contact has a highunit pressure load that could leadto scoring(Refer to Illustration 33).
Dirt forcingthe toric down the seal ramp andpassing between the toric and seal ring happens most frequently in wet weatherand cold weather. Mud trappedaround the seal and deflections of the housing forcesthe mud into and under the toric. Cocked or excessively loose sealscancompoundthis problem.
Toric failurescanbe due to faulty toric or improperassembly that allowsthe toric to be squeezed between the small end of the ringand the housing. Mud andexternal deflections can also pushthe toric into thisposition. Seal ring breakage can conceivablyoccur from large external deflections against trapped rocksor frozenmud, but thisisnot too common.
Breakage is more likely to occur during assemblyfrom a severe impact, eitherfrom the seal ringsor from the twohousings andrings not being concentric and one seal ring beinghit by the opposing housing.
The overall objective of the assembly process is toslide the toric under the housing retaininglip resulting in a uniform assembled seal ringheight and no twists orbulges of the toric.
From thispoint on,the toric should alwaysroll on the ramps and never slide.If the seal rings are assembled in thismanner, the seal will run true without an objectionable wobble. Even if the seal becomescocked during assemblyof the twohousings, providing the toric have rolled down the ramps, the rings will try to roll back to the original positionwhenthe housings are squared up andthe seal isrotated. The toric will not straighten.
If toric slides downthe ramp, the sliding can be caused by:
• a too-smoothsurfacer
This is the sample of the manual
Click on the download link for complete Manual
• anoilysurface
• assembly lubricant trapped betweenthe toric andhousing ramp
Also, the toric will not straighten up if one of the ringsis assembledcrooked in individual bore of rings,because the toric will always try to roll backtooriginal position.
Selection of improper oil can cause premature failure due to degradation of both the elastomeric load ring and metal sealingring. Some oilsare incompatible withelastomersand cause long-term degradation with exposure, especially when combined with heat. Improper oil usage can cause metal seal failure due toscoringfrom inadequate lubrication flow.