

Product: MULTI TERRAIN LOADER
Model: 277D MULTI TERRAIN LOADER FMT
Configuration: 277D Multi Terrain Loader FMT00001-UP (MACHINE) POWERED BY C3.3B Engine
Operation and Maintenance Manual
Caterpillar Corporate Radio
s02590205
Foreword
SMCS - 7273-572; 7273-573
Literature Information
This manual should be read carefully before using this product for the first time and before performing maintenance. This manual should be stored in the product literature holder or in the product literature storage area. Immediately replace this manual if lost, damaged, or unreadable. This manual may contain safety information, operation instructions, transportation information, lubrication information, and maintenance information. Some photographs or illustrations in this publication show details or attachments that can be different from your product. Guards and covers might have been removed for illustrative purposes. Continuing improvement and advancement of product design might have caused changes to your product, which are not included in this publication. Whenever a question arises regarding your product, or this publication, consult your dealer for the latest available information.
Safety
The safety section, if present, lists basic safety precautions. In addition, this section identifies the text and locations of safety messages used on the product. Read and understand the basic precautions listed in the safety section before operating or performing lubrication, maintenance, and repair on this product.
Operation
The operation section, if present, is a reference for the new operator and a refresher for the experienced operator. This section includes a discussion of gauges, switches, controls, attachment controls, transportation, and towing information (if applicable). Photographs and illustrations guide the operator through correct procedures of checking, starting, operating, and stopping the product.
Operating techniques outlined in this publication are basic. Skill and techniques develop as the operator gains knowledge of the product and its capabilities.
Product Information
The product information section, if present, may provide specification data, product intended use, product identification plate locations, and certification information.
Maintenance
The maintenance section, if present, is a guide to equipment care. Proper maintenance and repair are essential to keep the equipment and systems operating correctly. As the owner, you are responsible for the performance of the required maintenance listed in the Owner Manual, Operation and Maintenance Manual, and Service Manual. The Maintenance Interval Schedule lists the items to be maintained at a specific service interval. Items without specific intervals are listed under the "When Required" service interval. The Maintenance Interval Schedule lists the page number for the step-bystep instructions required to accomplish the scheduled maintenance. Use the Maintenance Interval Schedule as an index or "one safe source" for all maintenance procedures.
Maintenance Intervals
Use the service hour meter to determine servicing intervals. Calendar intervals shown (daily, weekly, monthly, etc.) can be used instead of service hour meter intervals if they provide more convenient servicing schedules and approximate the indicated service hour meter reading. Recommended service should always be performed at the interval that occurs first. Under extremely severe, dusty, or wet operating conditions, more frequent lubrication than is specified in the maintenance intervals chart might be necessary. Perform service on items at multiples of the original requirement. For example, at every 500 service hours or 3 months, also service those items listed under every 250 service hours or monthly and every 10 service hours or daily.
Product Capacity
Additional attachments or modifications may exceed product design capacity, which can adversely affect product performance characteristics, safety, reliability, and applicable certifications. Contact your dealer for further information.
Copyright 1993 - 2021 Caterpillar Inc. All Rights Reserved. Private Network For SIS Licensees. Thu Aug 19 21:52:52 UTC+0530 2021
Product: MULTI TERRAIN LOADER
Model: 277D MULTI TERRAIN LOADER FMT
Configuration: 277D Multi Terrain Loader FMT00001-UP (MACHINE) POWERED BY C3.3B Engine
Operation and Maintenance Manual
Caterpillar Corporate Radio
i07316460
Radio - Entertainment If Equipped
SMCS - 7338
When driving, always keep your eyes on the road and hands on the steering wheel, paying careful attention to normal driving tasks. As always, the driver is responsible for safe vehicle operation. Not keeping your eyes on the road and hands on the wheel while driving could result in injury to you or others.
Introduction
Information included in this owners manual was accurate at the time of publication. Caterpillar, however, reserves the right to and performance without prior notice. Check with your dealer for details regarding changes that may have occurred since time of printing.
The Radio system is controlled by using the buttons, RSA, or steering wheel controls.
Stereo Receivers
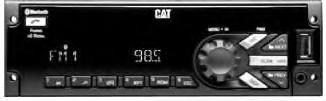
Illustration 1 g03566500
MP3/USB/iPod/Aux/Bluetooth Receiver
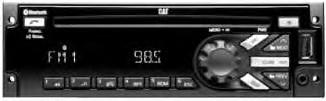
Illustration 2 g03566527
MP3/USB/iPod/Aux/Bluetooth/CD Receiver
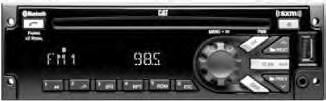
Illustration 3 g03566571
MP3/USB/iPod/Aux/Bluetooth/CD/SAT Receiver
Radio Pin out
Radio pinout is shown below
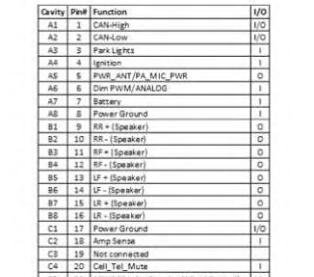
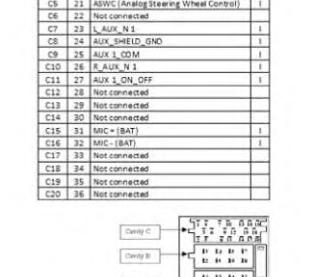

Illustration 4 g03566584
General Radio Receiver Functions
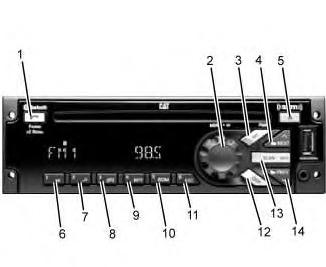
Illustration 5 g03566592
(1) Phone
(2) Knob
(3) SRC/PWR (Source/Power) (4) Next (5) Eject (6) Play/Pause (7) Browse (8) Clock/Alarm (9) RPT (Repeat)
(10) RDM (Random) (11) ESC (Escape) (12) DISP (Display) (13) SCAN/ASCN (Scan/Autoscan) (14) PREV (Previous)
Options
• An AM band with 6 AM presets
• Three FM bands with a total of 18 FM presets
• One weather band with six WX presets
SRC/PWR (Source/Power)
Press to switch to FM -> AM -> WX -> SXM -> CD -> USB/iPod ->AUX -> Bluetooth Audio (if equipped) and to turn Radio ON. Press and hold to turn radio OFF.
One Hour Timer
With the ignition off, pressing the SRC/PWR button will turn on the receiver and activate the receivers one-hour timer. The receiver will turn off after 1 hour or by pressing and hold the SRC/PWR button.
VOLUME KNOB/OK
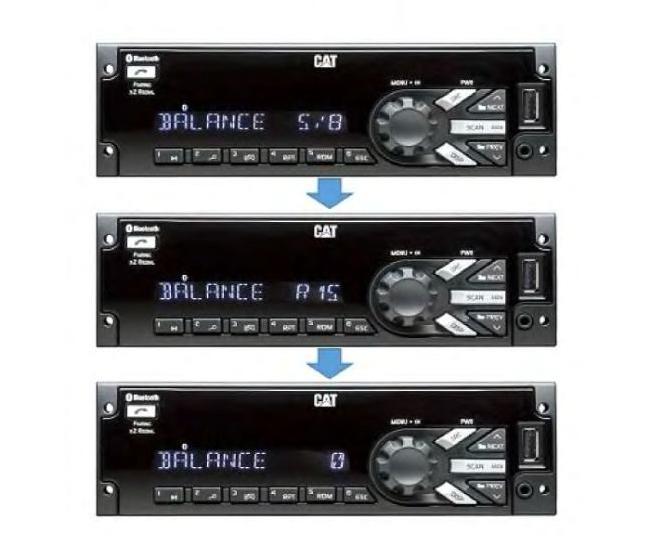
Press for less than 3 seconds to display Audio Control Menu. Press for more than 3 seconds to show the user menu. Rotate to increase/decrease volume or during a menu for navigation. Press while in a menu to confirm the selected action.
PREV (Previous/Reverse)
Press to select previous track or station. Press and hold for FR or Tune Down
NEXT (Next/Forward)
Press to select next track or station. Press and hold for FF or Tune Up
EJECT
Press to eject the CD
Phone (if equipped)
Press the Phone button for more than 3 seconds to show the Bluetooth Menu. When Bluetooth is enabled, press the button to display the Dial Menu or to accept an Incoming Call (if a Phone is paired). During a call press the button for more than 3 seconds to transfer the call from the radio to the Phone.
CLOCK/ALARM
Press during Alarm activation to cancel the Alarm.
SCAN/ASCAN
Scans stations/CD tracks/MP3/WMA files and folder and in tuner, stores stations to presets
PLAY/PAUSE
Press to pause / un pause current Media.
RPT (Repeat)
Press to repeat current track. Press again to stop repeat. Look for the RPT icon in the radio display to turn this feature ON or OFF.
BROWSE
Press to navigate on the device and select a specific song or play context (Applicable to USB sticks, CD MP3 discs and iPod).
RDM (Random)
Press to play the tracks randomly. Press again to stop random mode. Look for the RDM icon to turn on in the radio display.
ESC (ESCAPE)
Press to exit one Menu Level.
If the system is equipped with Bluetooth, press the ESC button during Bluetooth call operation to reject or cancel a call.
DISP (DISPLAY)
If vehicle ignition is ON: Press to change source display
Press for more than 3 seconds to show the Clock for a short time.
Radio (Audio source)
To access AM, FM, WX, SXM (if equipped), iPod, USB, Rear Aux, Front Aux, CD, or BT Audio do one of the following:
1. Press the SRC radio button to scroll through the options and select desired option.
2. Press the SRC radio button and then scroll the source menu by knob rotation or NEXT/PREV short presses and then select by short-pressing the knob.
The CD/MP3, USB/iPod, Front AUX, and BT Audio shall be accessed only if the radio model supports those options and a device is connected/inserted for that specific source.
Note, if a device is connected through different sources at the same time, the functionality cannot be guaranteed (Device Dependent). Example: Device connected through Front Aux and Bluetooth or USB and Bluetooth at the same time.
AM-FM-WX Radio
Tuning: Set the desired "Tuner Configuration" following the steps in the Menu section.
If the radio is set to manual, the radio will allow for execution of the following functions:
• Execute manual tuning when the NEXT or PREV buttons are short pressed.
• Execute Seek when the NEXT or PREV buttons are long pressed.
If the radio is set to Auto, the radio will allow for execution of the following functions:
• Execute Seek when the NEXT or PREV buttons are short pressed.
• Execute manual tuning when the NEXT or PREV buttons are long pressed.
Manual tuning
The current frequency will be increased/ decreased by 1 step of 0.2MHz (USA FM mode), 10 kHz (USA AM mode) and one channel (25 kHz) in WX mode.
Seeking a Station
When the Seek function is activated, the radio increments/decrements the frequency until a tunable station is found.
If a tunable station is not found, the radio will display "NO STATION FOUND".
Presets
Storing Radio Station Presets:
1. Tune the desired frequency, and then long press any of the Preset(1-6) buttons until the radio produces a beep.
Tuning Radio Station Presets
1. Short press any of the Preset(1-6) buttons. The frequency stored at the preset location is tuned when the button is released.
Scan
To initiate the Scan function, short press the SCAN/ASCN button. When SCAN is initiated, the radio seeks up in frequency and stops on the next strong frequency for 8 seconds before continuing to seek for the next strong station.
If no station is found in two passes through the band, the radio will display “NO STATION FOUND” and then tune to the starting frequency.
Autoscan
This function temporally stores the strongest 6 stations of the current band in the presets until the radio is powered off or the source is changed.
AUTOSCAN does not store the frequencies on the presets on numerical order. Frequencies are stored based on the order they were found and on the quality of the frequency.
To initiate the AUTOSCAN function, long press the SCAN/ASCAN button until the radio performs a beep. Then the "AUTO SCAN" icon will blink while the radio is storing the temporary presets.
When the Autoscan process finishes, the radio will tune to the station stored in Preset 1 and the "AUTO SCAN" icon shall be illuminated while the mode is active.
To tune any of the 6 frequencies or to store new presets, follow the steps defined in the Presets section.
To exit this mode and return to the original presets execute any of the following actions:
1. Press and hold the SCAN/ASCAN button
2. Press the SCR/PWR button.
3. Turn off the radio.
4. Perform an ignition cycle
5. Disconnect the battery.
WX
The WX band is for the Governmental weather radio services frequencies. The radio can tune to the seven weather channels following the steps in Tuning, Presets, and SCAN sections.
SXM (If Equipped)
Vehicles with a valid SiriusXM® satellite radio subscription can receive SiriusXM programming. SiriusXM satellite radio has a wide variety of programming and commercial-free music, coast to coast, and in digital-quality sound.
SiriusXM®
SXM Display
When SiriusXM is active, the channel number, channel name, artist name/content info, song title, or category name could be displayed on the screen. SiriusXM may update the information at any time.
To change the current display view, short press the DISP button.
When a new channel is selected, a song change occurs, SXM source is selected (from power-up or source change) or the information is updated, all the elements will be displayed using paging. The paging can be stopped by short pressing the DISP button.
Display labels
To recognize the displayed text, the radio uses the following convention :
• Channel Number: CH
• Channel Name: CH
• Artist Name: ART
• Content Info: INFO
• Song Title: SONG
• Category name: CAT
SXM Categories
SiriusXM stations are organized in categories.
The category list for SXM is in the following webpage: "http://www.siriusxm.com/sxm/pdf/sirius/channelguide.pdf"
To change the current category, long press the NEXT/PREV button and the radio will tune the first channel on next or previous category.
Category mode Enable/Disabled
Category Search Mode Enabled means that only channels in the current Category are searched. When enabled, the CATEGORY icon is turned on.
Category Search Mode Disabled means that all channels are searched. When disabled, the CATEGORY icon is turned off.
To enable/disable the category browse mode, follow the steps in the User Menu section
The default after a power-up is Category Disabled.
SXM Channel Selection
Presets and SCAN functions work the same as defined in the SCAN subsection of AM-FM-WX Radio.
NEXT button
While in SXM the radio will scroll to the next channel available in numerical order.
PREV button
While in SXM the radio will scroll to the previous channel available in numerical order
Note: If the SXM service is not activated, only the free-to-air channels will be present.
SXM Radio ID
If tuned to channel 0, "RADIO ID" label alternates with the SXM radio eight-digit code. This code is needed to activate the service.
DISP button does not work in channel 0. Channel 0 is not available in category mode enabled.
SXM Messages
SXM BUSY - The audio system is acquiring and/or processing audio and/or text data. No action is needed.
ART UNAVAIL - There is not Artist Name related with the current song.
SONG UNAVAIL - There is not Song Title related with the current song.
CHAN UNAVAIL - There is no Channel Name related with the current channel.
CHECK ANTENNA - SXM antenna or antenna cable is not connected to the radio or the antenna is shorted.
NO SIGNAL - SXM tuner module reports the No Signal condition. Under this condition only Channel 0 will work as stated in this manual.
CHAN UNSUB - Active channel has become unsubscribed or the requested channel is not unsubscribed.
SUBSCRIPTION UPDATED - PRESS OK TO CONTINUE - The subscription of the radio was updated. To remove the message and return to the previous state pres "OK" (Knob).
CH UNAVAIL - Requested channel is reported unavailable for a newly selected channel or the currently selected channel. Unavailable channels are in the legal channel range but are not currently available for display or subscription as a broadcast service. After 3 seconds the previous channel (if available) or channel 1 will be tuned.
iPod
This radio supports the following iPod models:
• iPod classic (sixth generation)
• iPod nano (6G)
• iPod touch (4G)
• iPhone (3G, 3GS, 4, and 4S)
Other iPods may be played, but functionality is not guaranteed.
Radio provides up to 1A of charge, so any device connected to the USB that requires less than 1 A will be charged.
There may be problems with the operation and function in the following situations:
This is the sample of the manual Click on the download link for complete Manual
• When, connecting an iPod on which a more recent version of the firmware is installed than is supported by the Radio
• When, connecting an iPod with firmware from other providers is installed
Playing from an iPod
To connect an iPod:
1. Connect one end of the standard iPod USB cable to the iPods dock connector.
2. Connect the other end to the USB port in the front radio display.
1. Radio will start playing the USB and shows the track number, Song, Artist, elapsed time, and Album information when available.
2. iPod music information displays on the radios display and begins playing through the vehicles audio system.
3. If the iPod is an unsupported model, it can be listened to in the vehicle by connecting to the auxiliary input jack using a standard 3.5mm (1/8 in) stereo cable.
Expected behavior when iPod is connected:
• The iPod battery recharges automatically while the vehicle is on.
• The iPod shuts off and stops charging when the vehicle is shut off.
iPod Menu
Use the following steps to navigate the iPod Menu:
1. Press the magnifying glass (preset 1) button while USB source (iPod connected) is active to access the iPod Menu.
2. Use the Volume Knob or Next/Prev button to navigate through the different options.
3. Use the iPod Menu to select.
Playlists
Use the following steps to navigate playlists:
1. Press to view the playlists on the iPod.
2. Select a playlist name to view a list of all songs in the playlist.
3. Select the song from the list to begin playback.
Artists
Use the following steps to navigate artists:
1. Press to view the artists on the iPod.
2. Select an artist name to view a list of all albums with songs by the artist.
3. Select an album.
4. Select the song from the list to begin playback.
Albums
Use the following steps to navigate albums:
1. Press to view the albums on the iPod.
2. Select an album name to view a list of all songs on the album or select All Songs to view all songs on the iPod.
3. Select the song from the list to begin playback.
Genres
Use the following steps to navigate genres:
1. Press to view the genres on the iPod.
2. Select a genre name to view a list of artists of that genre.
3. Select an artist to view albums or All Albums to view all albums of that genre.
4. Select Artist to view albums.
5. Select Album to view songs.
6. Select the song from the list to begin playback.
Podcasts
Use the following steps to navigate podcasts:
1. Press to view the podcasts on the iPod.
2. Select a podcast name to begin playback.
Songs
Use the following steps to navigate songs:
1. Press to view a list of all songs on the iPod.
2. Select the song from the list to begin playback.
Composers
Use the following steps to navigate composers:
1. Press to view the composers on the iPod.
2. Select the composer to view a list of songs by that composer.
3. Select a song from the list to begin playback.
Audio Books
Use the following steps to navigate audio books:
1. Press to view the audio books on the iPod.
2. Select the audio book from the list to begin playback.
When an iPhone or iPod Touch with iOS lower than iOS 5.0 is connected through USB or Bluetooth, the audio may not be heard when the iPod source is selected. To correct this situation, select either the dock connector in the phone or disconnect and reconnect the Apple device.
Note: iOS is the Apple Operative System.
Use the following controls to play the iPod:
PREV (Previous)- Press to seek to the beginning of the current or previous track.
Note: If the track has been playing for less than 10 seconds, it will seek for the previous track. If longer than 10 seconds, the current track starts from the beginning.
NEXT (Next) - Press to seek to the next track.
FF/FR (Fast Forward/Fast Reverse) - To fast forward or reverse through a track, press and hold Next or PREV button.
RDM (Random) - Press to play the tracks randomly. Press again to stop shuffle mode. Look for the RDM icon to turn on in the radio display.
RPT (Repeat) - Press to repeat current track. Press again to stop repeat. Look for the RPT icon to turn on in the radio display.
Error Messages - If an "UNSUPPORTED"message is displayed, it could be for one of the following reasons:
• When, the iPod connected is not supported (look at page X for the list of iPods supported).
• The iPod does not respond to the radio commands, in this case reset the iPod, and try again the connection.
If an "NO MUSIC"message is displayed, it could be for one of the following reasons:
• There are not any playable files in the iPod.
USB
Playing from a USB
A USB mass storage device can be connected to the USB port.
The USB port is in the front of the radio display.
Five volts DC power is limited to1 amp from this port. Devices such as iPad that require greater current will not charge from this port.
USB MP3 Player and USB Drives. The USB MP3 players and USB drive connected must comply with the USB Mass with the USB Mass Storage specification:
• MS-DOS partition only
• Class specification (ESB MSC) and supports formats of FAT32, FAT16, NTFS, and HFS+.
• Hard disk drives may be played, but are not supported.
• The radio will not be able to play write-protected music.
• MTP players are not supported.
The following guidelines must be met when creating MP3 files, otherwise the files might not play:
For MP3 Files:
• Bit rates: 32, 40, 48, 56, 64, 80, 96, 112, 124, 160, 192, 224, 256, 320 kbps for MPEG-1 Audio Layer 3.
• Sampling frequencies: 32, 44.1 and 48 kHz for MPEG-1 Audio Layer 3.
• Maximum number of folders: Eight folders with 255 files per folder.
• Maximum of 1,000 files on a disc.
• M3u and pls playlist versions supported
• Recorded on a CD-R or CD-RW with a maximum capacity of 700 MB.
For Unprotected WMA Files:
• Versions: 1, 2, 7, 8, 9 and 9.1.
• Bit rates: 32 - 320 kbps.
• Sampling frequencies: 32 - 48 kHz.