
Design Portfolio
Priyesh Pandaravalapil (Bsc)
1

Contents Forest Park Primary school Brief & Overview Zone 1 detail Zone 2 detail Zone 3 detail Technical Detail Design process Environmental strategies Oxford College Brief & Overview Masterplan Public wing (Library) Public wing (Auditorium) Technical Detail Student Accommodation Physical model making Professional Experience 10 Penzance Place 5 Gwendolen Avenue St Tropez villa Kathak Studio Brief & Overview Floor plans & Elevations 17 Lansdowne Crescent 4 6 8 10 12 14 15 16 18 21 23 22 24 25 26 27 28 30 32 33 2
3
Forest School
Individual Project | 4th year
Site: Wolvercote, Oxford
Project: Primary Forest School
Project duration: 4 months
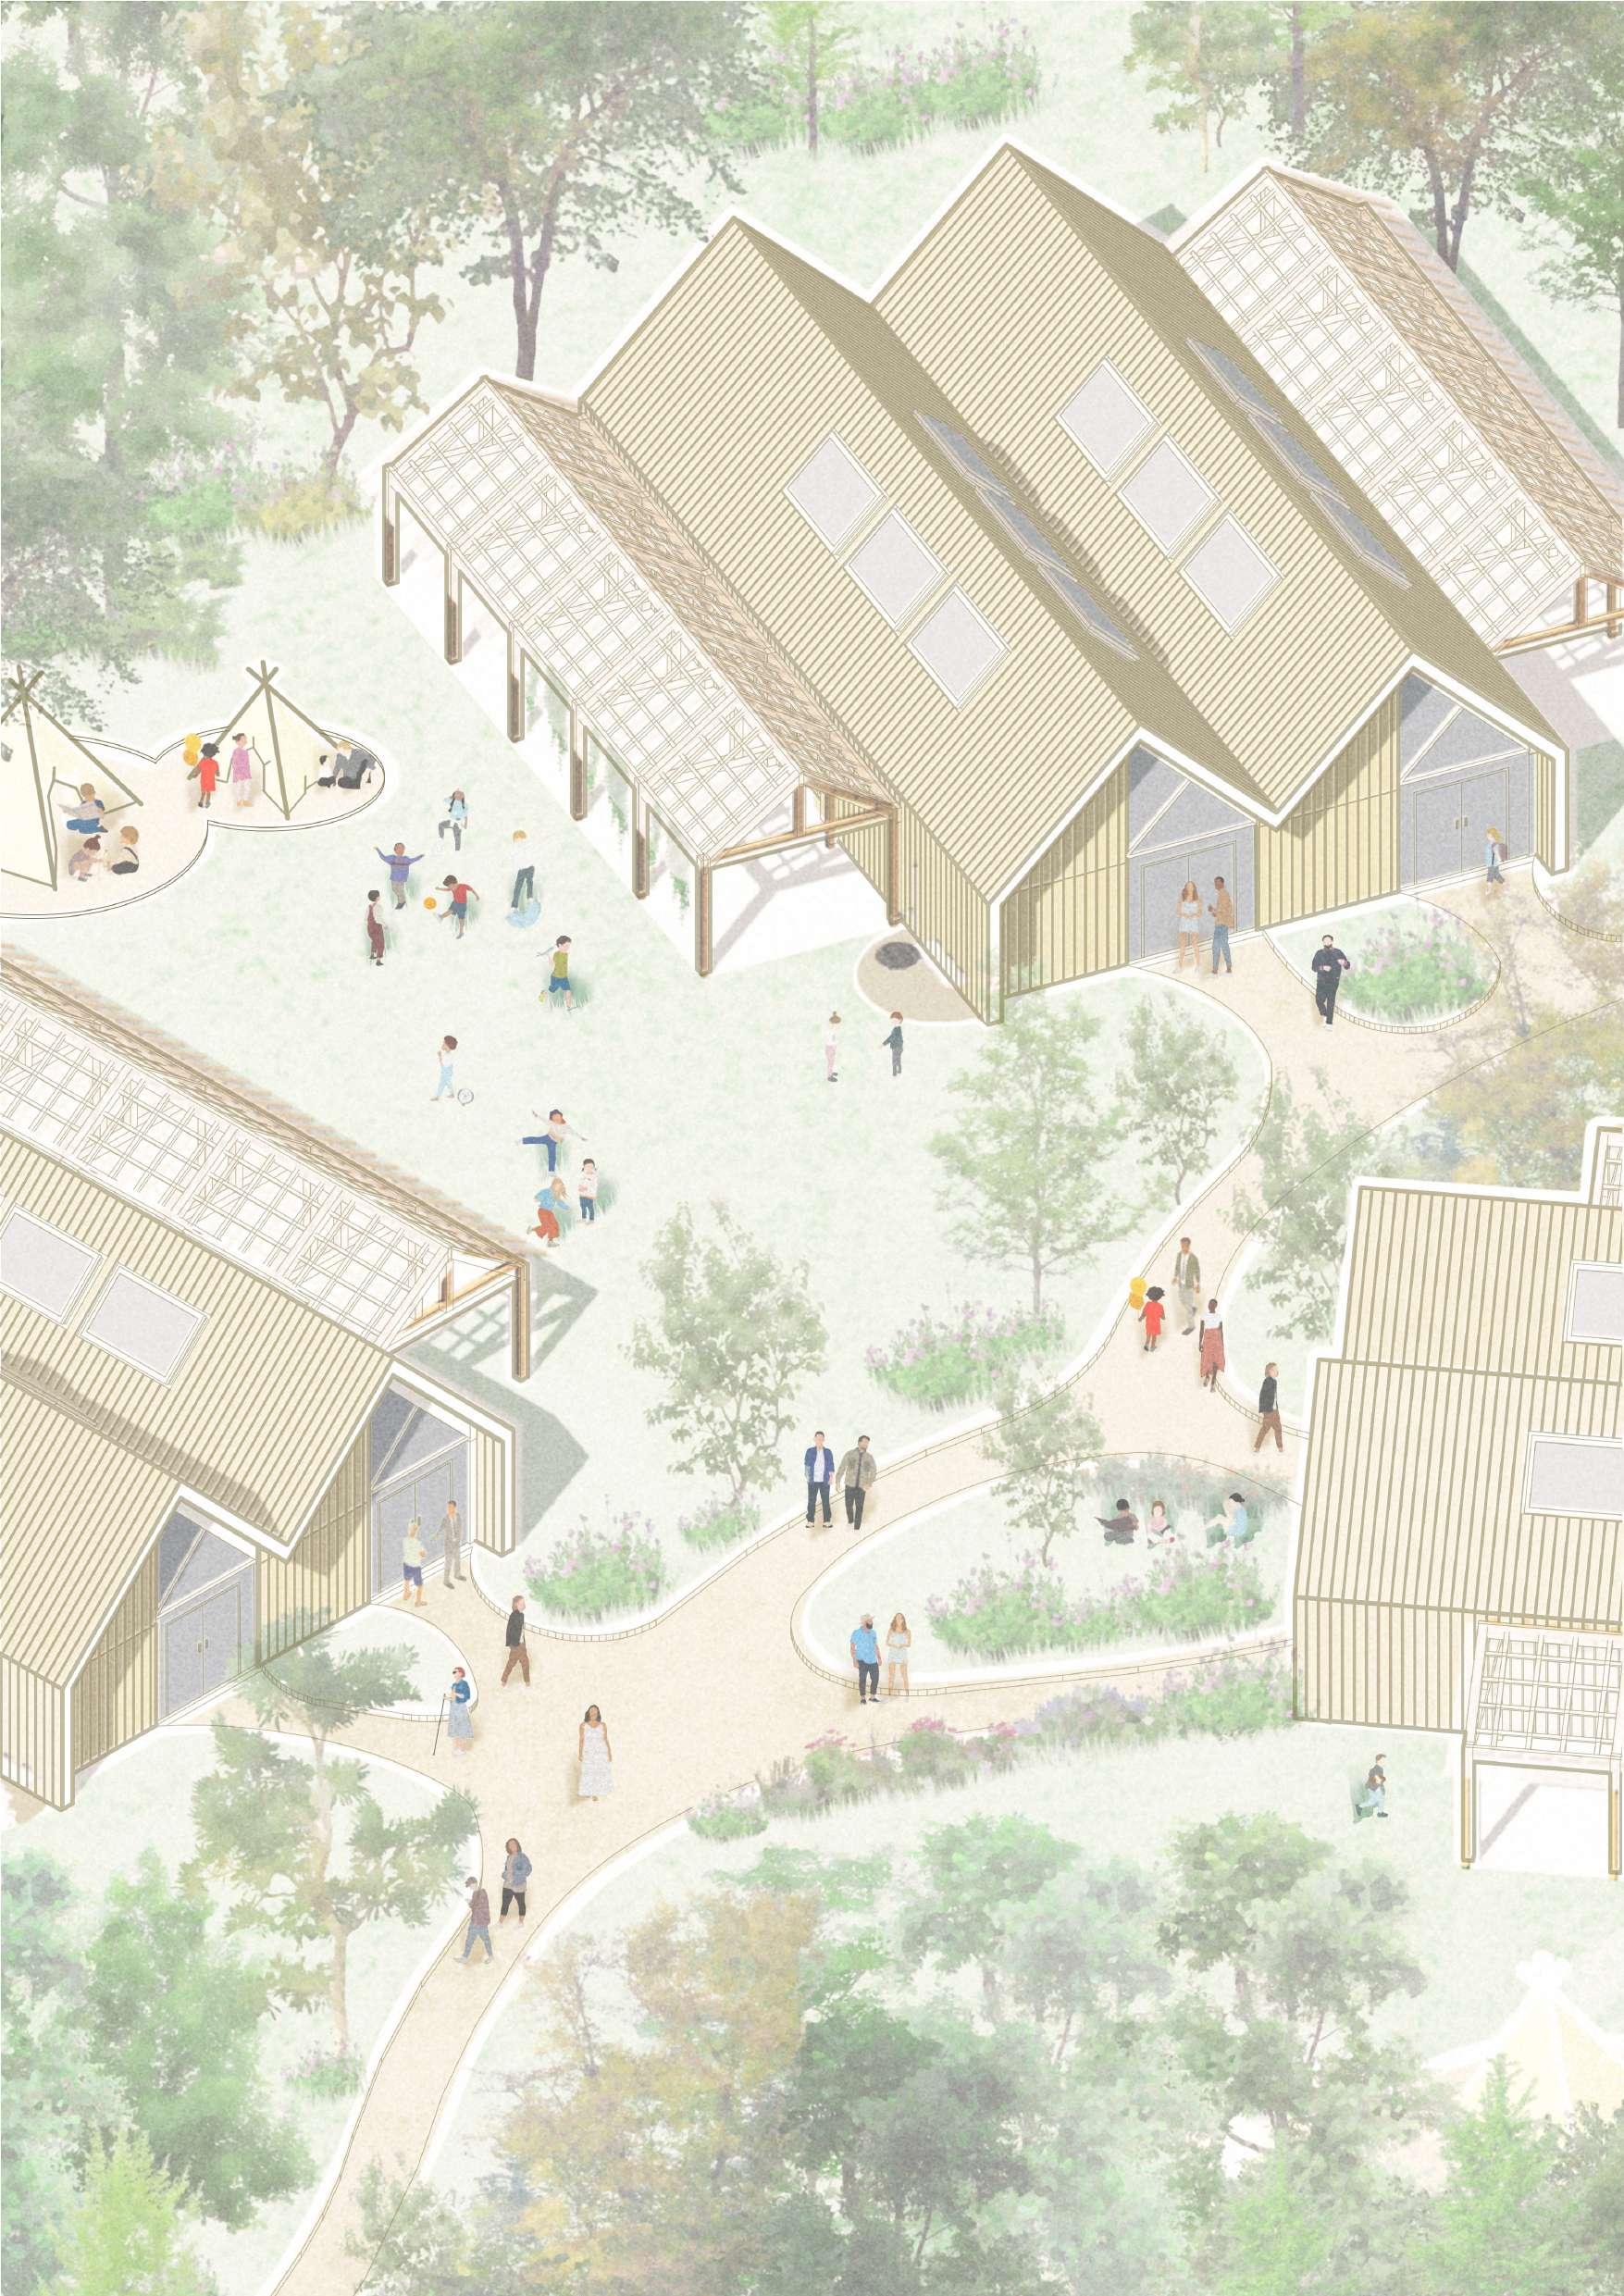
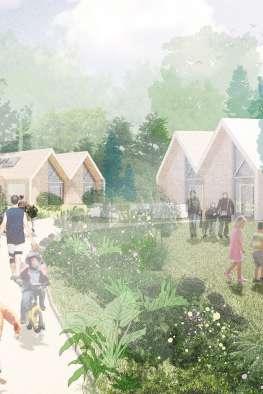
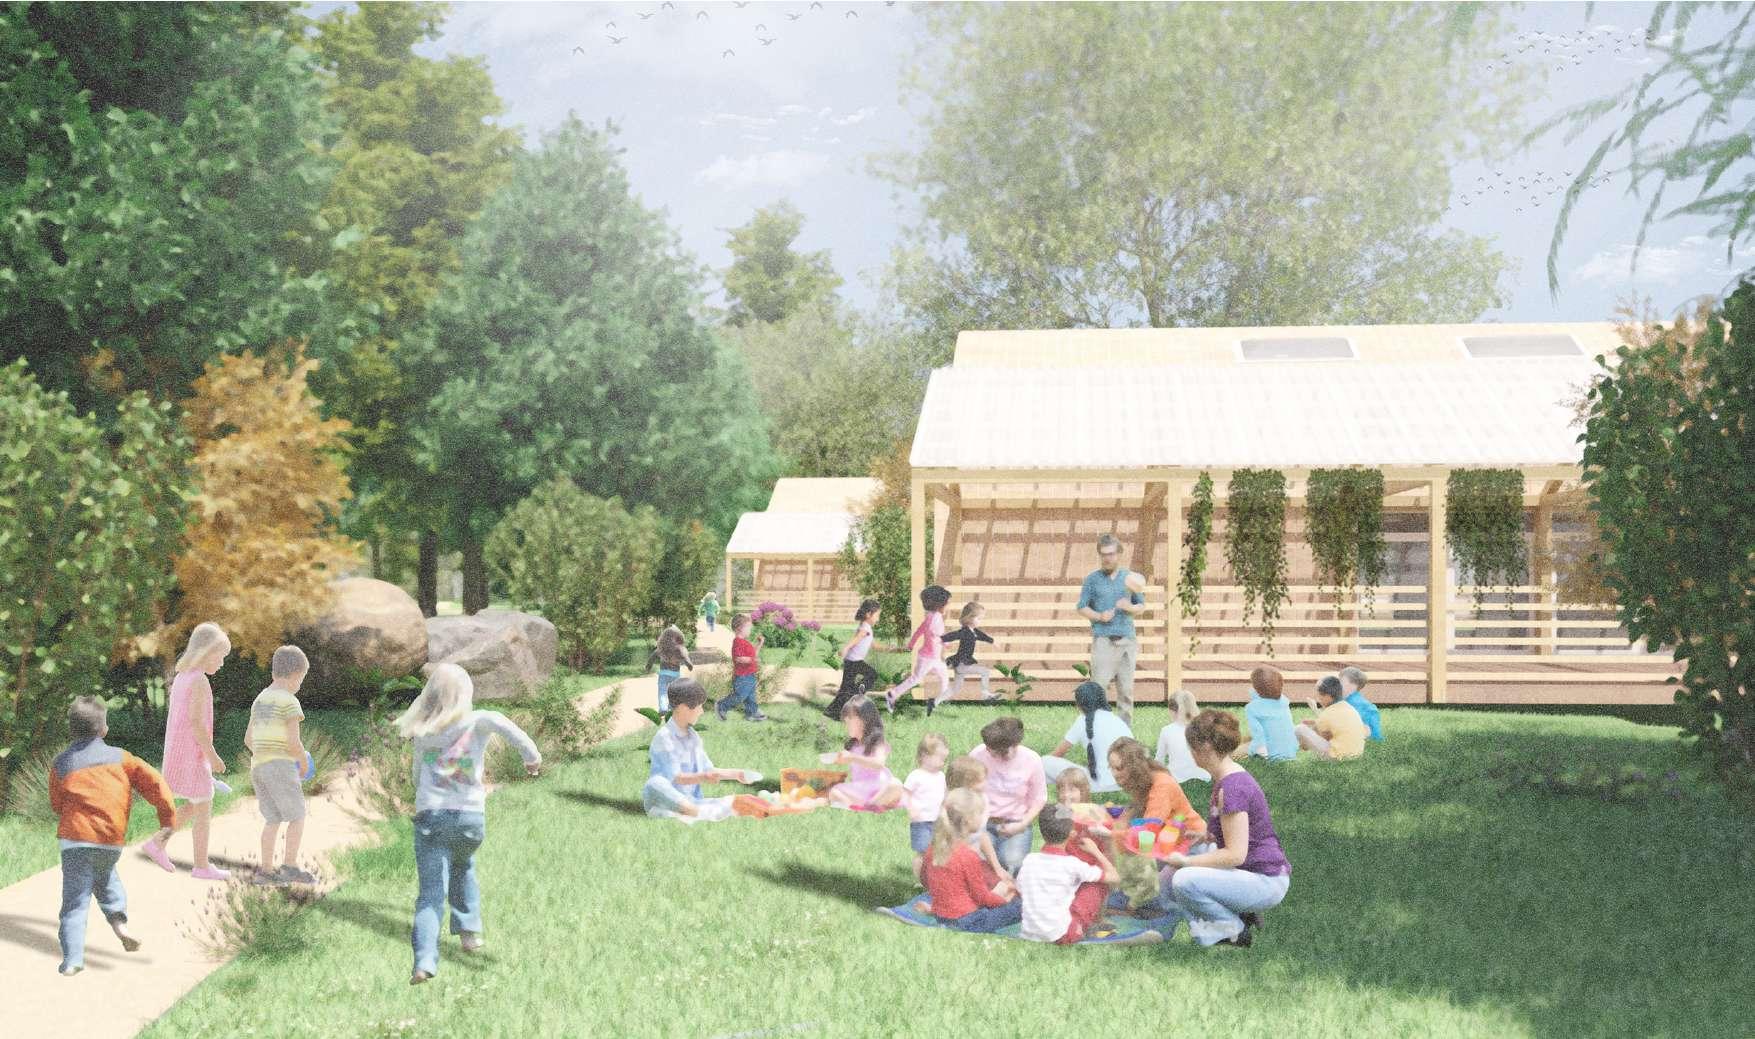
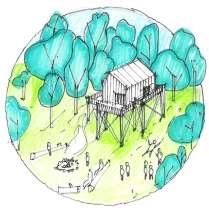
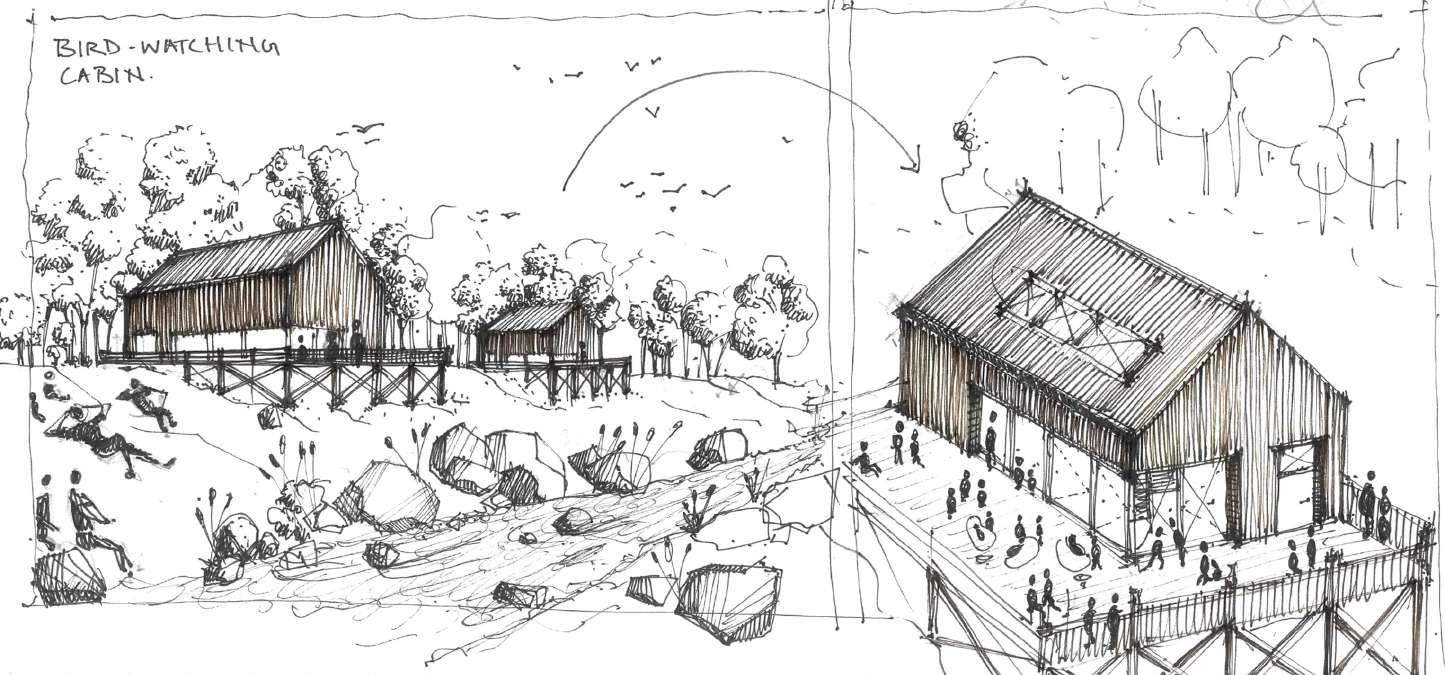
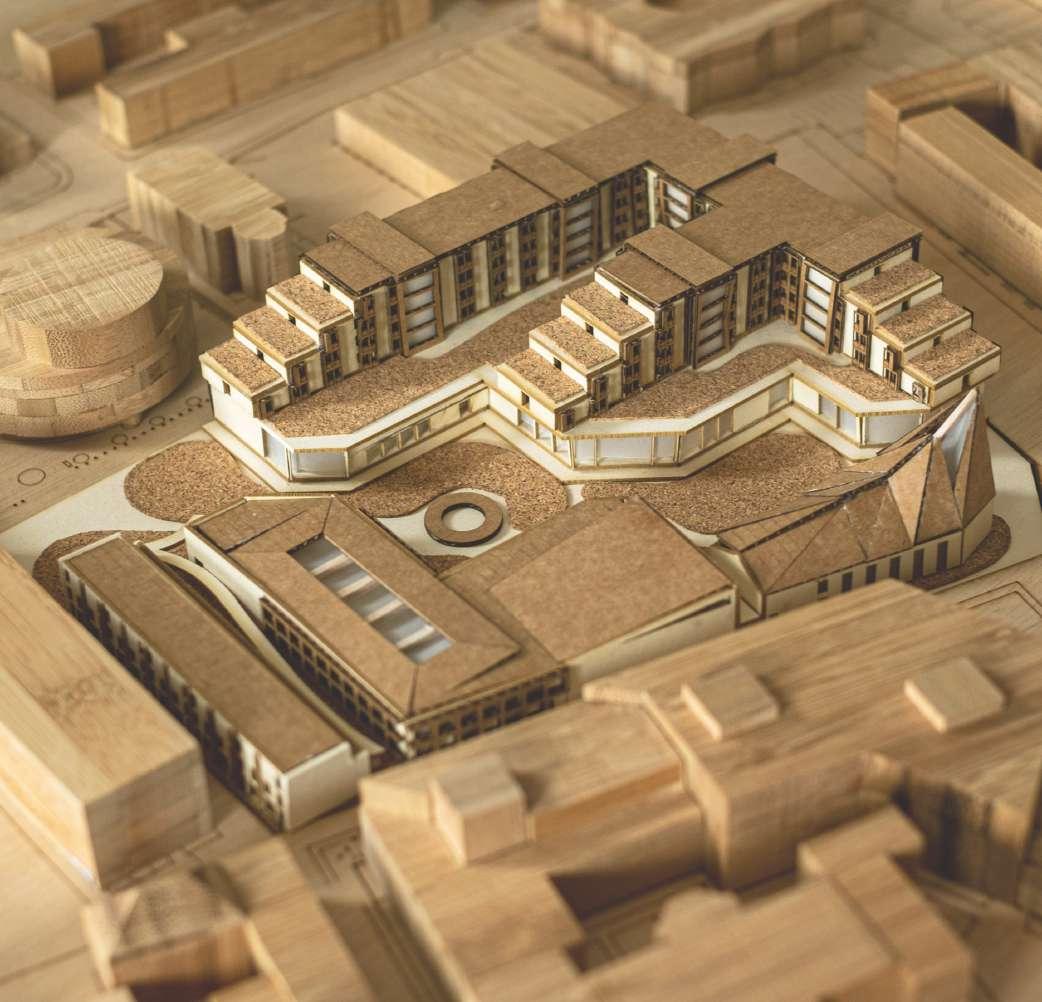
Zone 1 Aerial View 4
For my final year project, I chose to design a forest school set in Wolvercote, Oxford. I chose Wolvercote mainly because this neighbourhood only has two primary schools, both of which are at capacity. Moreover, the new housing development, Cala homes just south of the site has introduced 190 new homes which are likely to attract younger families, thus increasing the demand for primary education. I chose to do a forest school because the sheer abundance of rich green spaces in wolvercote proved to be the perfect landscape to introduce a lush and vibrant school with a direct relationship to its environment.
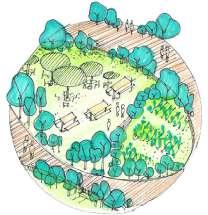
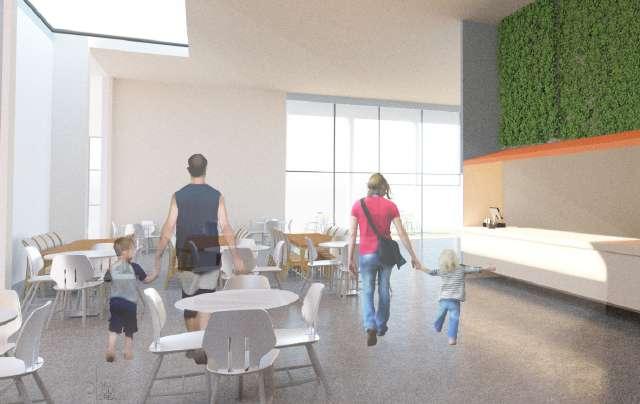
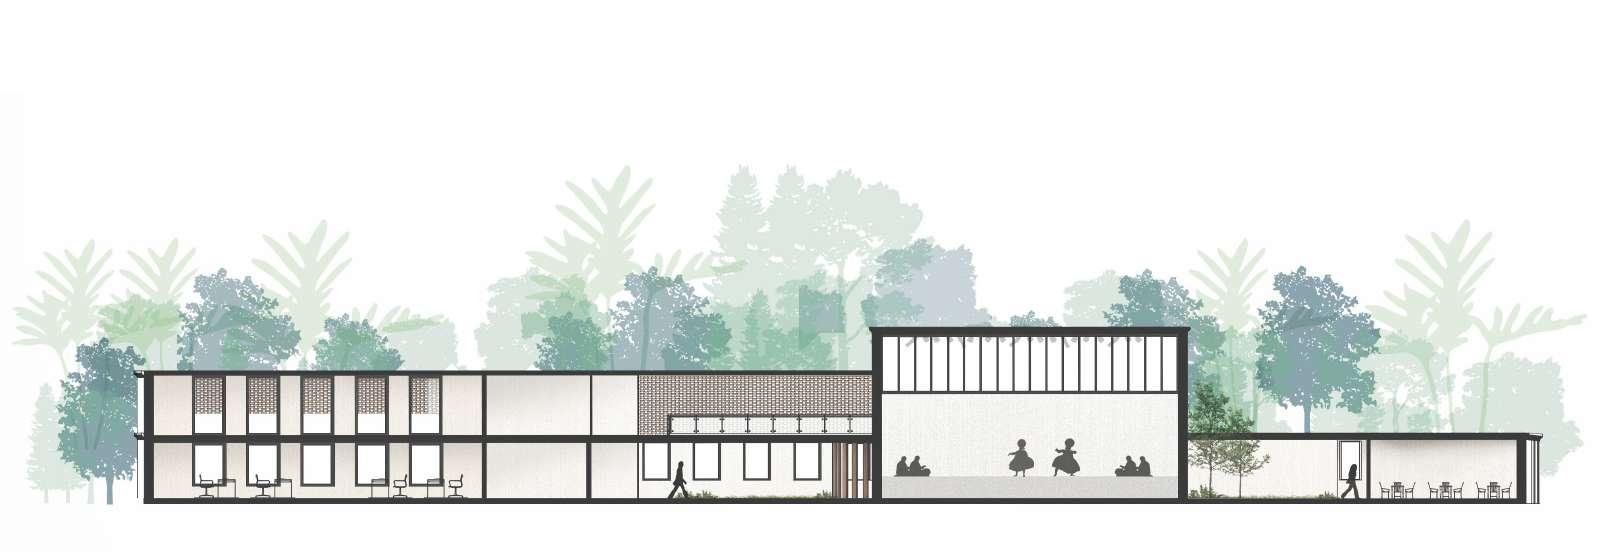
Zone 3 (Hall / Admin block)
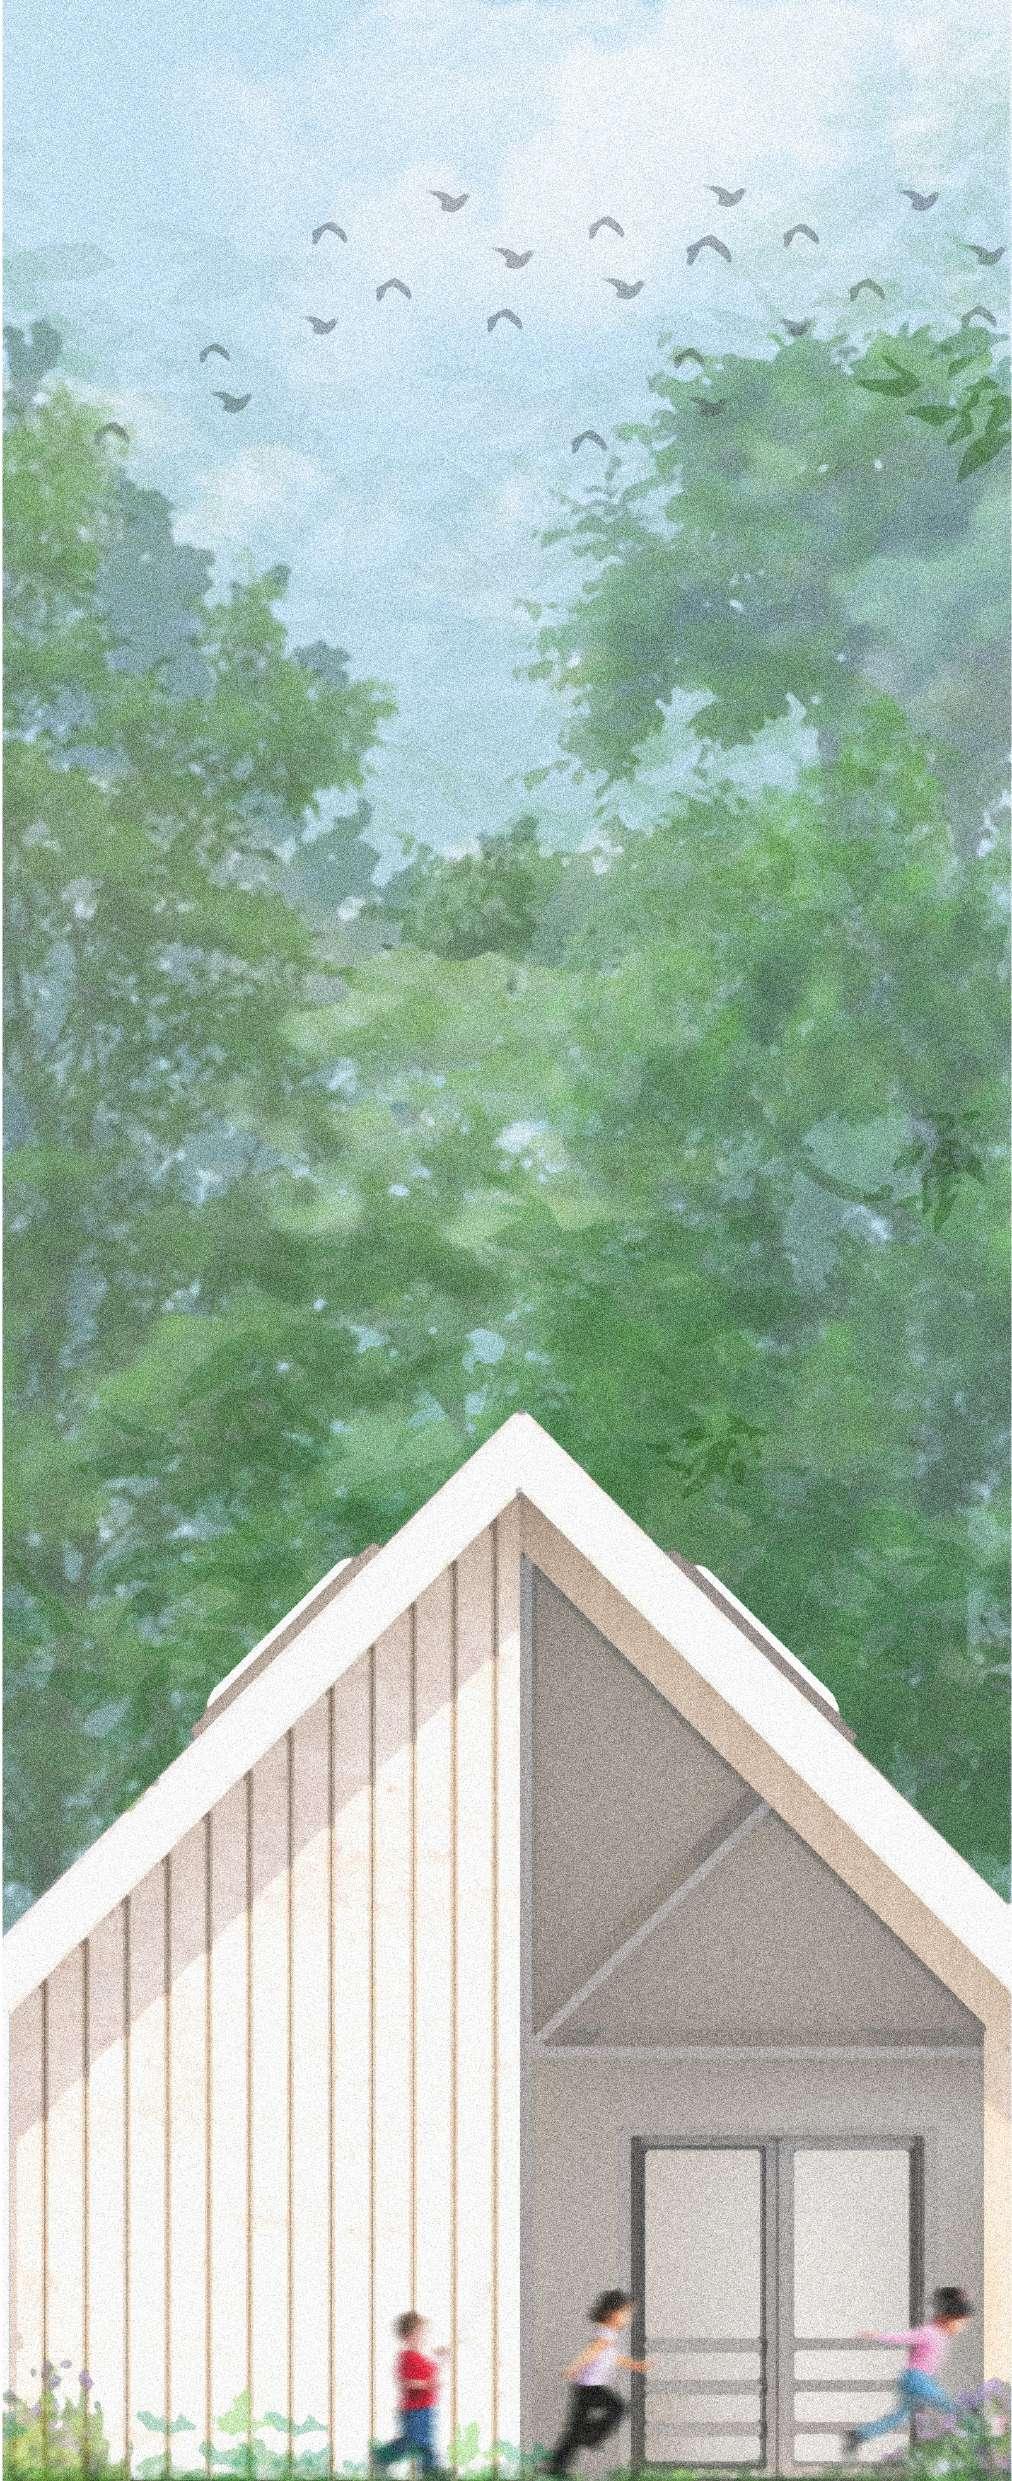
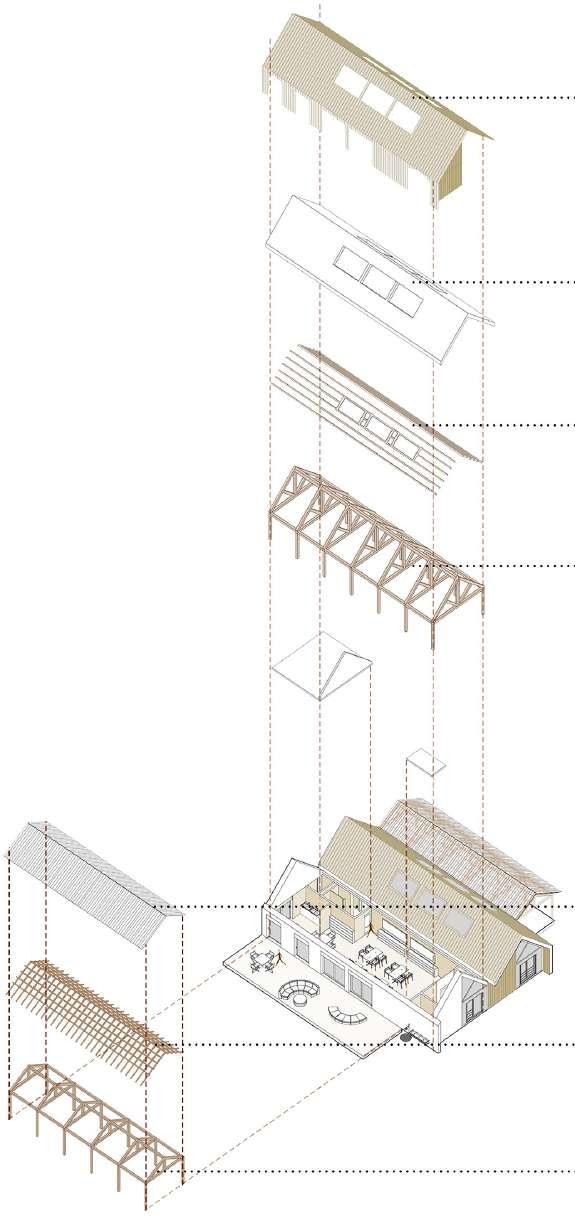
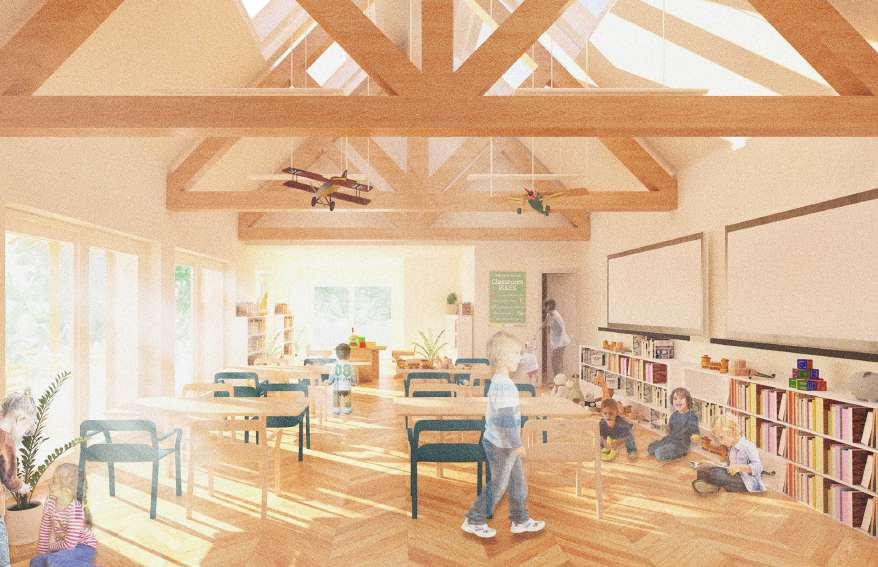
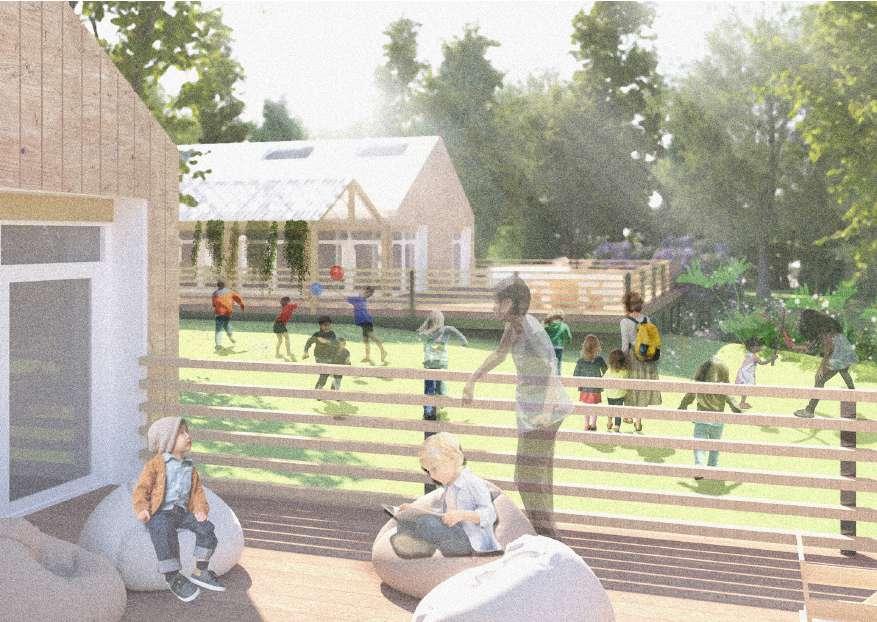
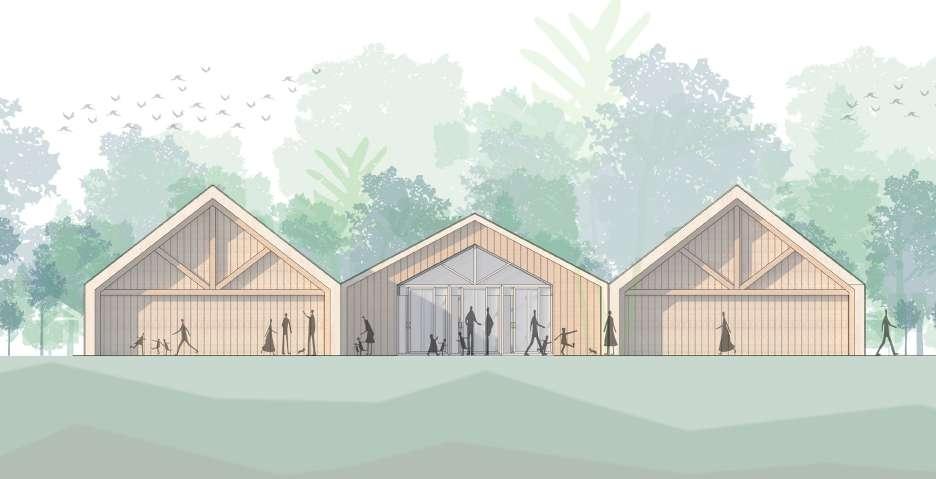
In this project I want my buildings to interact with nature in all its different forms. Whilst some classrooms make use of cleared grassland for assembly/ play, others have a relation to water/ forest which provides opportunities for students to have hands-on learning of their natural environment. I want the buildings themselves to be domestic in scale, and give the effect of several activity-specific cabins that are dispersed in the woods. This school includes a main Entrance/ admin block, main hall & servery, 2 clusters of classrooms for year 1 - 6 with each year group having 2 classrooms, and 4 specialist classrooms to the north of the site.
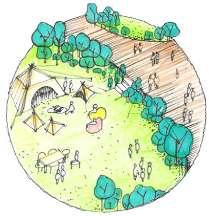
Zone 2 (Specialist Classrooms)
Zone 1 (Year 1-6 Classrooms)
The Brief
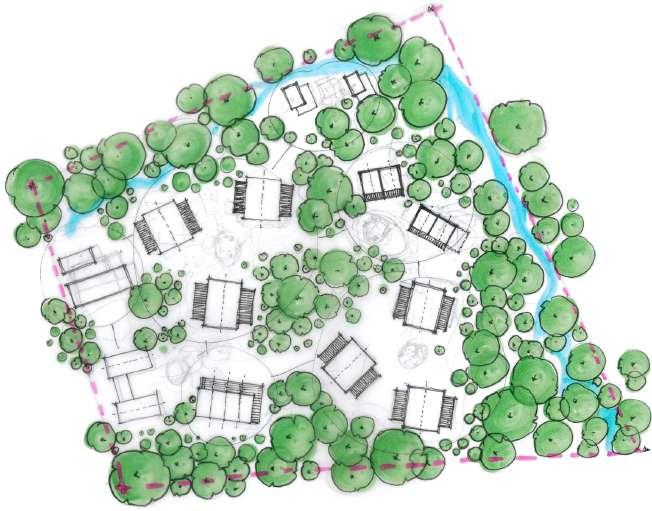
Master-plan Aerial View 5
1:
2:
3:
4:
5:
6:
7: Plant room for Geothermal Heat Pump (GHP)
8:
9:
10:
0m 2.5m 5m 10m 20m N
1 2 3 4 5 6 7 8 8 9 10 11 12 13 South- North Section 0m 2.5m 5m 10m 20m
Zone 1
Year 1 classroom
Year 1 classroom
Cloakroom/ lockers
Disabled toilets/ teachers
toilet
Group
study space
Uni-sex
toilets
Shaded
group learning space
Indoor wash station
Year 2 Classroom
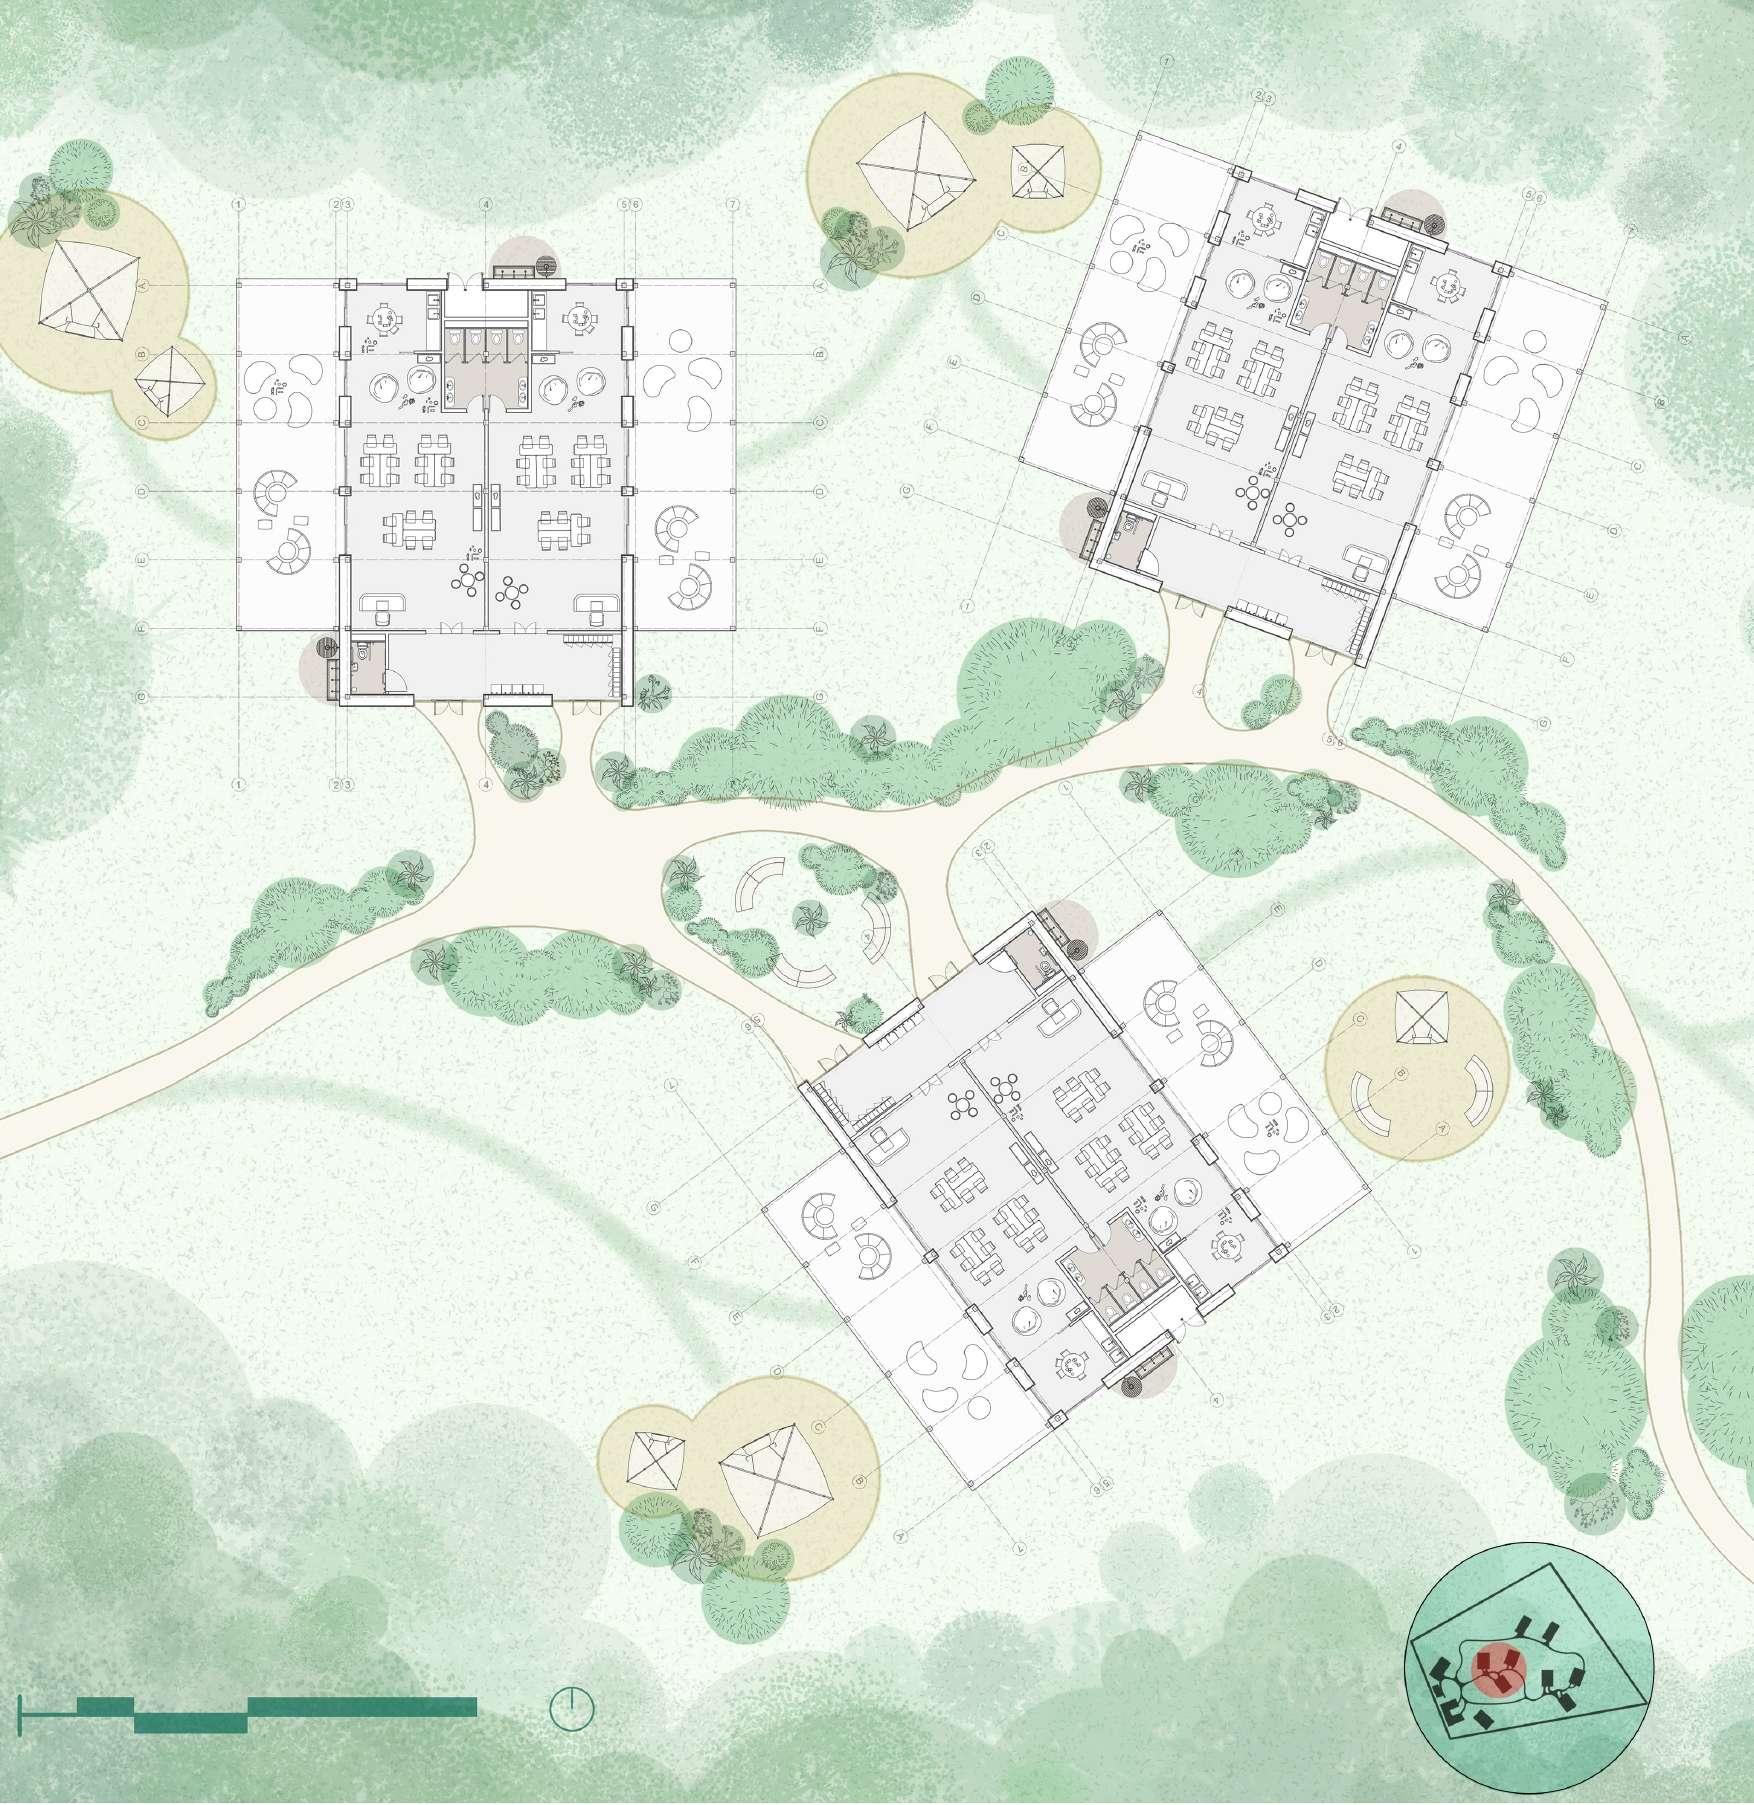
Year 2 Classroom 12: Year 3 Classroom 13: Year 3 Classroom A B (Year 1-3/ 4-6 Classrooms) Floor Plan 6
11:

100x100mm Timber purlins
200x200mm Glu-Lam Structure
100x100mm timber battens
200x200mm Glu-Lam structure
The first three blocks of this zone will house the key stage 1 students (year 1- 3). These classrooms were arranged in order to create their own cluster. I wanted the students of these classrooms to have their learning space be completely their own, surrounded by trees. And the clearings providing opportunities for student built tee-pees where they can continue their independent play/ learning
Vertical red cedar wood cladding
Polycarbonate roof over shaded area
Roof envelope - 150mm mineral wool insulation and 100mm rigid insulation
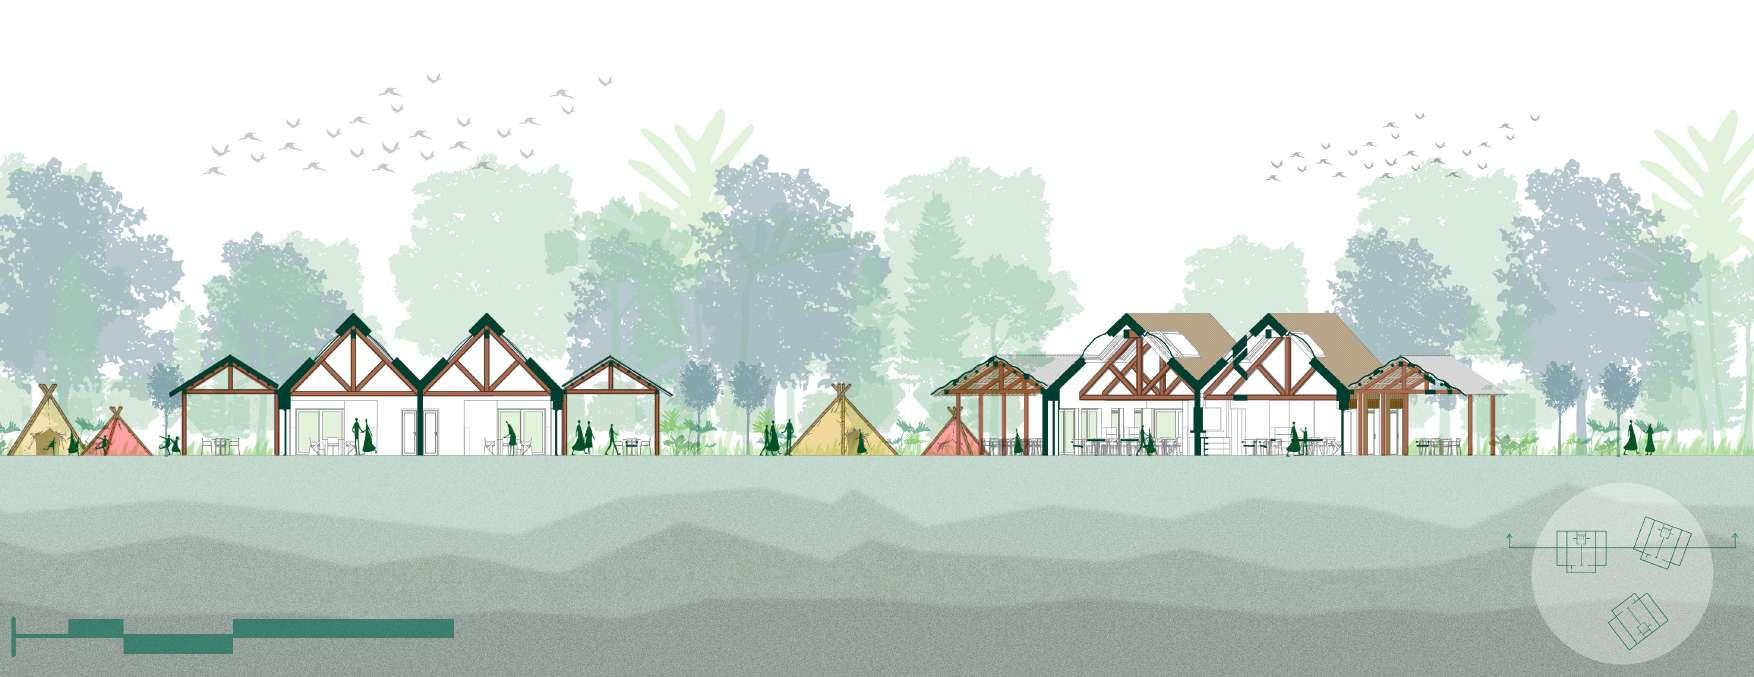
Zone 1 (Year 1-6 Classrooms) External view (A)
Zone 1 (Year 1-6 Classrooms) Internal view (B)
7
Zone 1
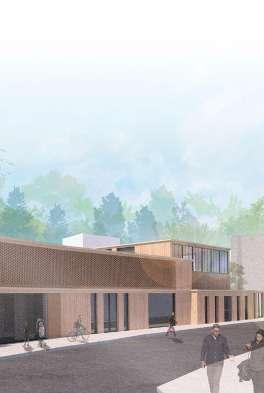
1 2 3 4 5 6 7 8 9 10 11 12 13 0m 2.5m 5m 10m 20m N 0m 2.5m 5m 10m 20m Zone 2 (Specialist Classroom) South - North Section 1: Food Tech Classroom 2: Science Classroom 3: Internal corridor 4: Shaded group learning space 5: Un-shaded group learning space 6: Disabled/ teachers toilet 7: Store room 8: Uni-sex toilets 9: Plant-room for GHP 10: Allotments 11: Greenhouse 12: Library/ reading room 13: Art room A B (Specialist Classroom) Floor Plan Zone 2 8
Vertical red cedar wood cladding
Roof envelope with 150mm mineral wool insulation and 100mm rigid insulation
100x100mm Timber purlins
200x200mm Glu-Lam Structure
Steel Deck
Polycarbonate roof over shaded area
100x100mm timber battens
200x200mm Glu-Lam structure
Since the specialist classes involve a lot of practical learning, I wanted this zone to have access to a lot of different naturalistic elements. The drainage swale creates a mini ecosystem of small animals and insects for students to study, meanwhile the greenhouse and allotments allow students to learn about plant life in a more practical manner.
Zone 2 (Specialist Classrooms) External view (A)
Zone 2 (Specialist Classrooms) External view (B)
9
Zone 2

Zone 3
(Multi Purpose Hall)
Internal View (A)
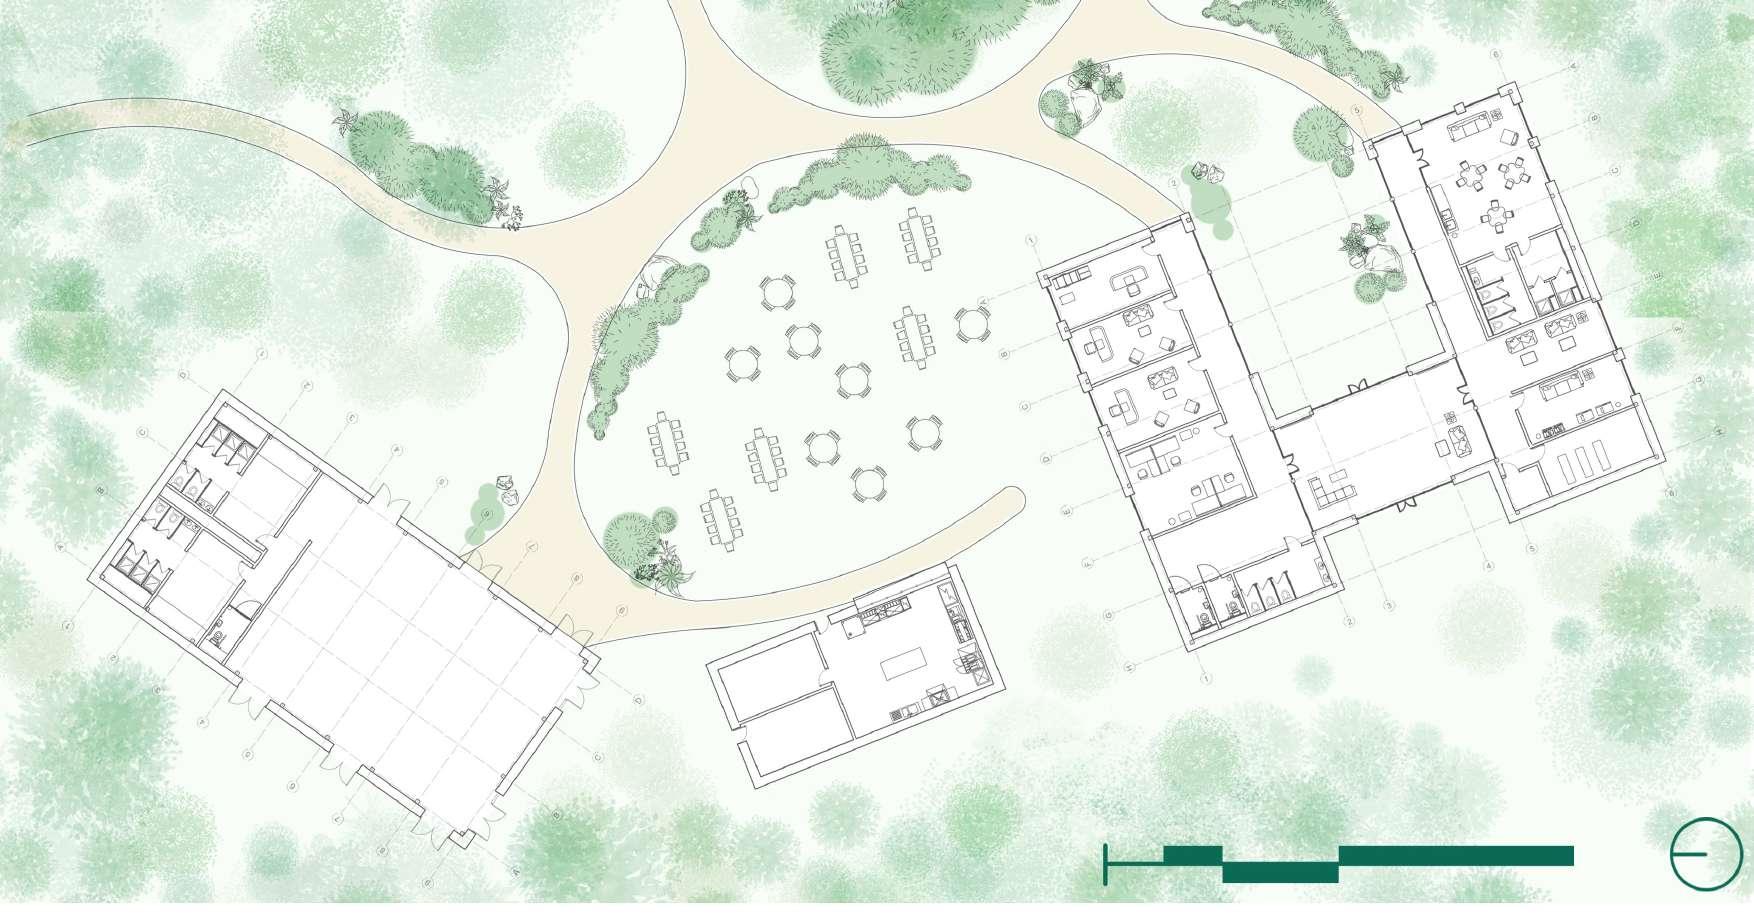
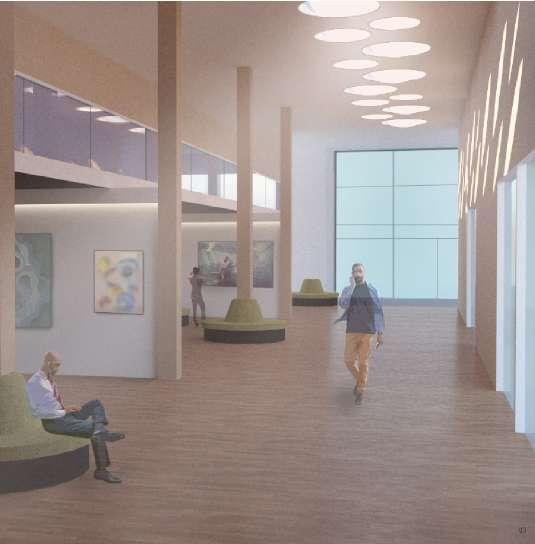
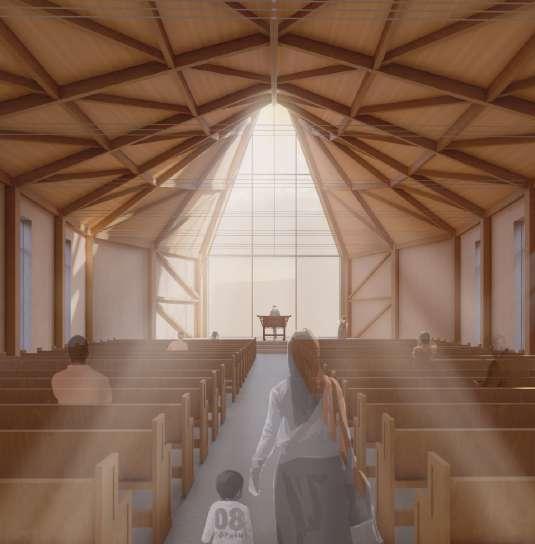
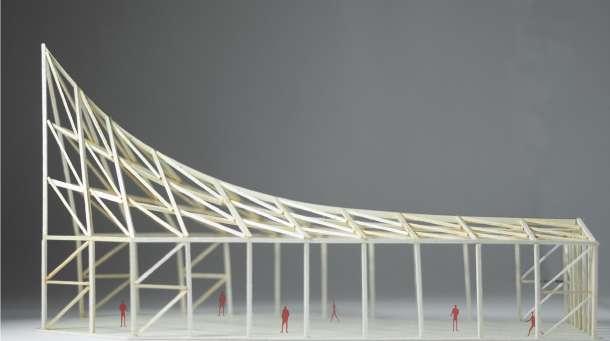
The third zone consists of the dining area, hall and the entrance/ admin block. The admin block is placed such that when students and parents enter, they can see through the glazed foyer, and catch glimpses of the other classrooms through the foliage. Moreover, the staff room is positioned towards the nursery/ reception area, which has the youngest students who would benefit from being closer to staff/ the medical room in case of emergencies. The hall employs a simple structural strategy, using Glu Lam portal frames to form a large open space with plenty of head height for sports activities during the winter.
10
4:
5:
6:
7:
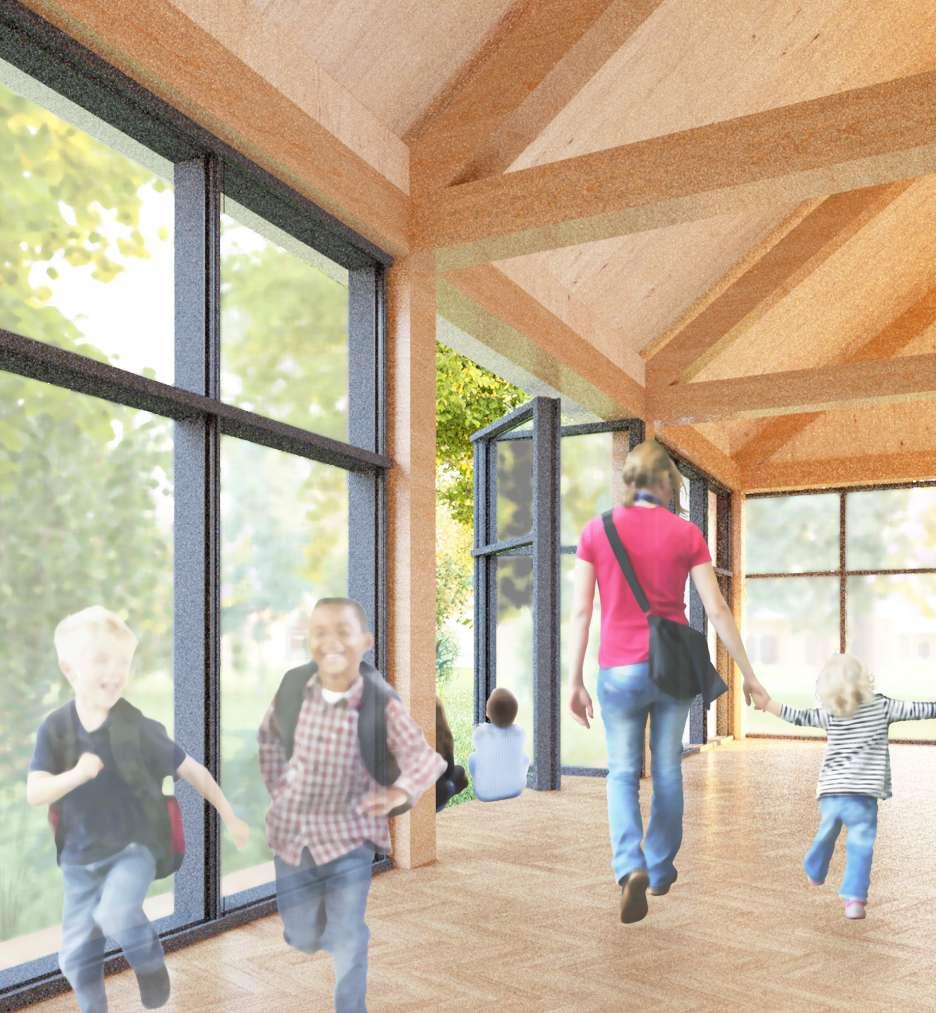
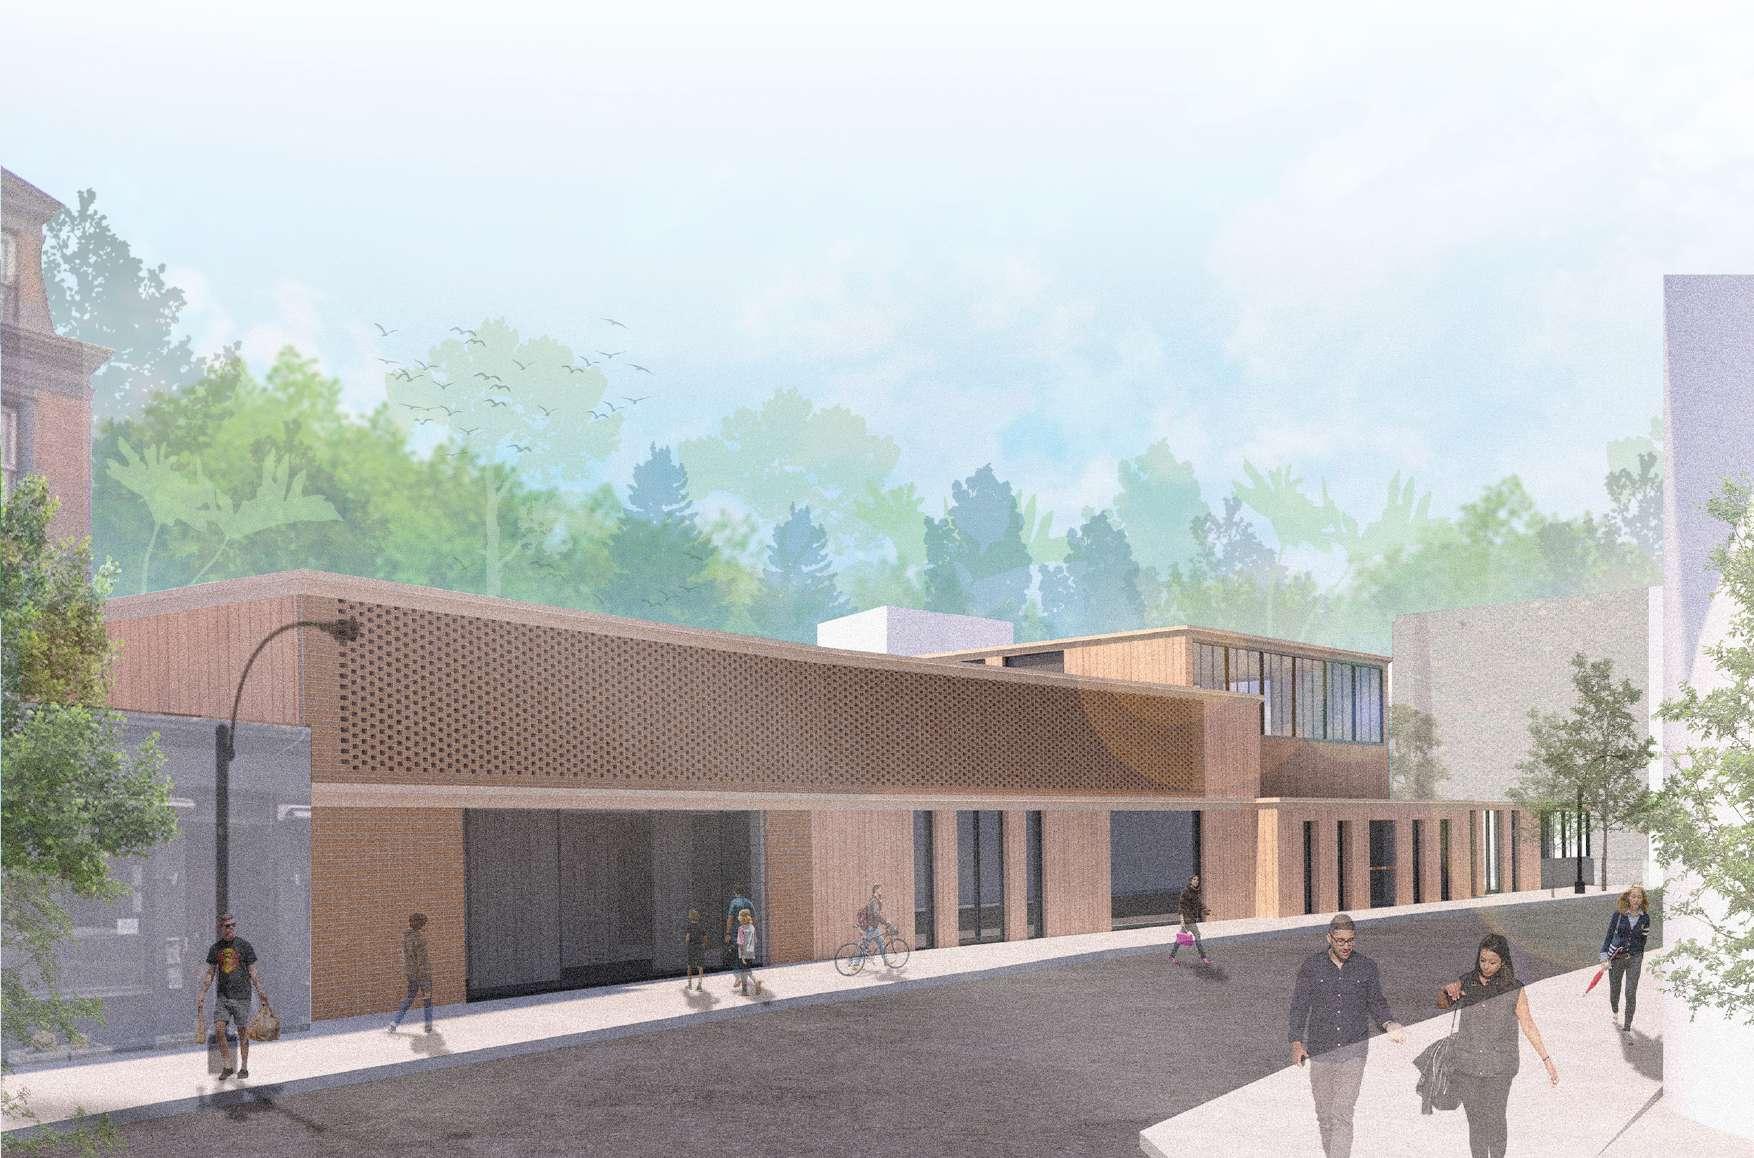
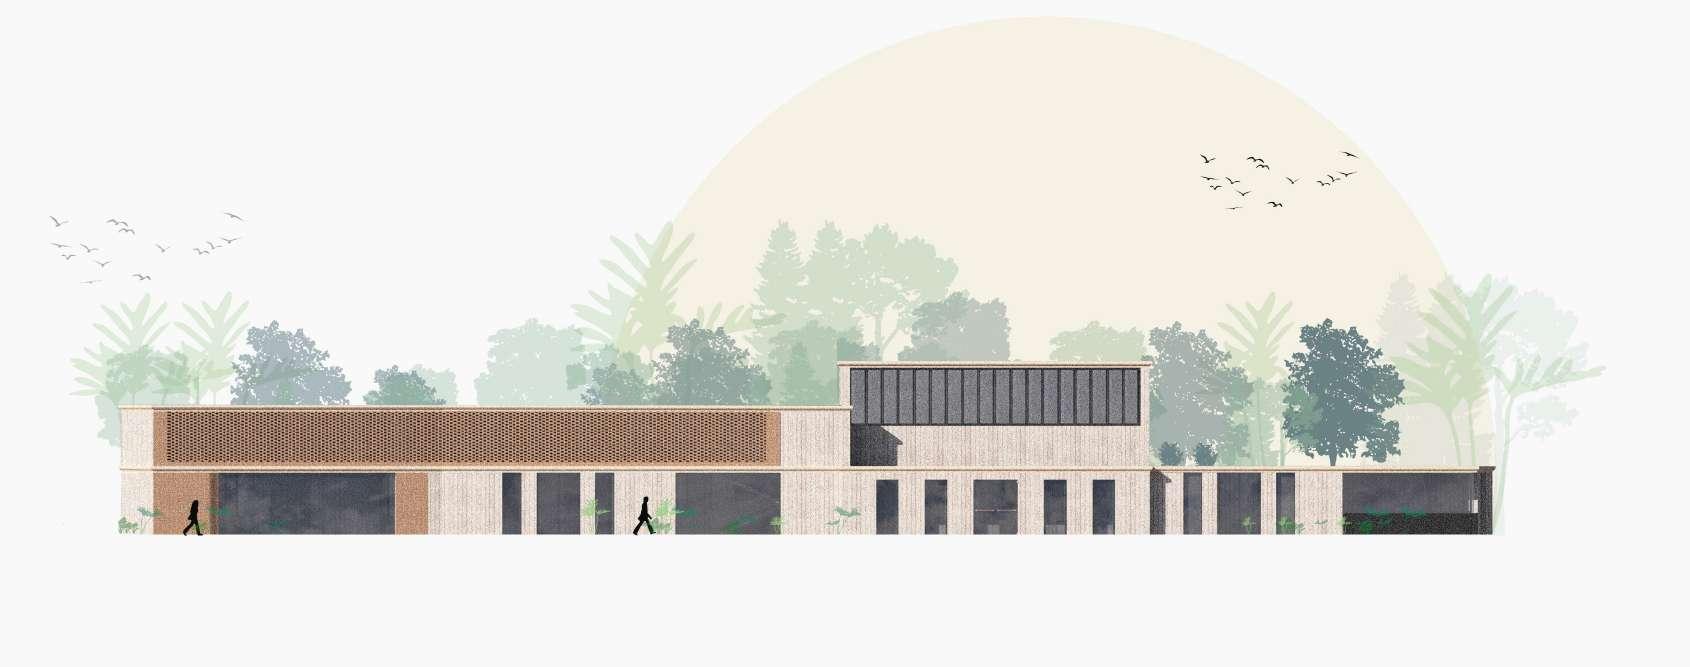
The Entrance block serves as the gateway to the school, establishing its overall tone on the western facade. The twin blocks, separated by the entrance lobby, visually represent the hidden structure. I aimed to expose this structure externally, enabling students to understand the support system of their classrooms. Bar-codes on the trusses allow students to scan and learn about the timber’s sourcing. Emphasizing practical learning, the queen truss is prominently featured on this facade.
Zone 3 (Multi Purpose Hall & Admin block) Plan Admin Block Front Elevation (B) Western facade Admin Block Internal View (C) Zone 3 (Admin Block) A B 0m 2.5m 5m 10m 20m N 1 2 3 4 5 6 7 8 9 10 11 12 13 14 15 16 17 18
General Admin 2: Headmaster’s office
Depute Headmaster’s office
1:
3:
Sick Bay
Uni-sex toilets/ disabled toilets
Entrance foyer
Cleaners store
Server room
Printer room 10: Waiting Area 11: Staff changing room/ showers 12: Staff social space 13: Kitchen/ servery 14: PE store (access from outside) 15: Kitchen cold store 16: Multi-purpose hall 17: Boys changing room 18: Girls changing room 19: Outdoor Dining space
8:
9:
C 11
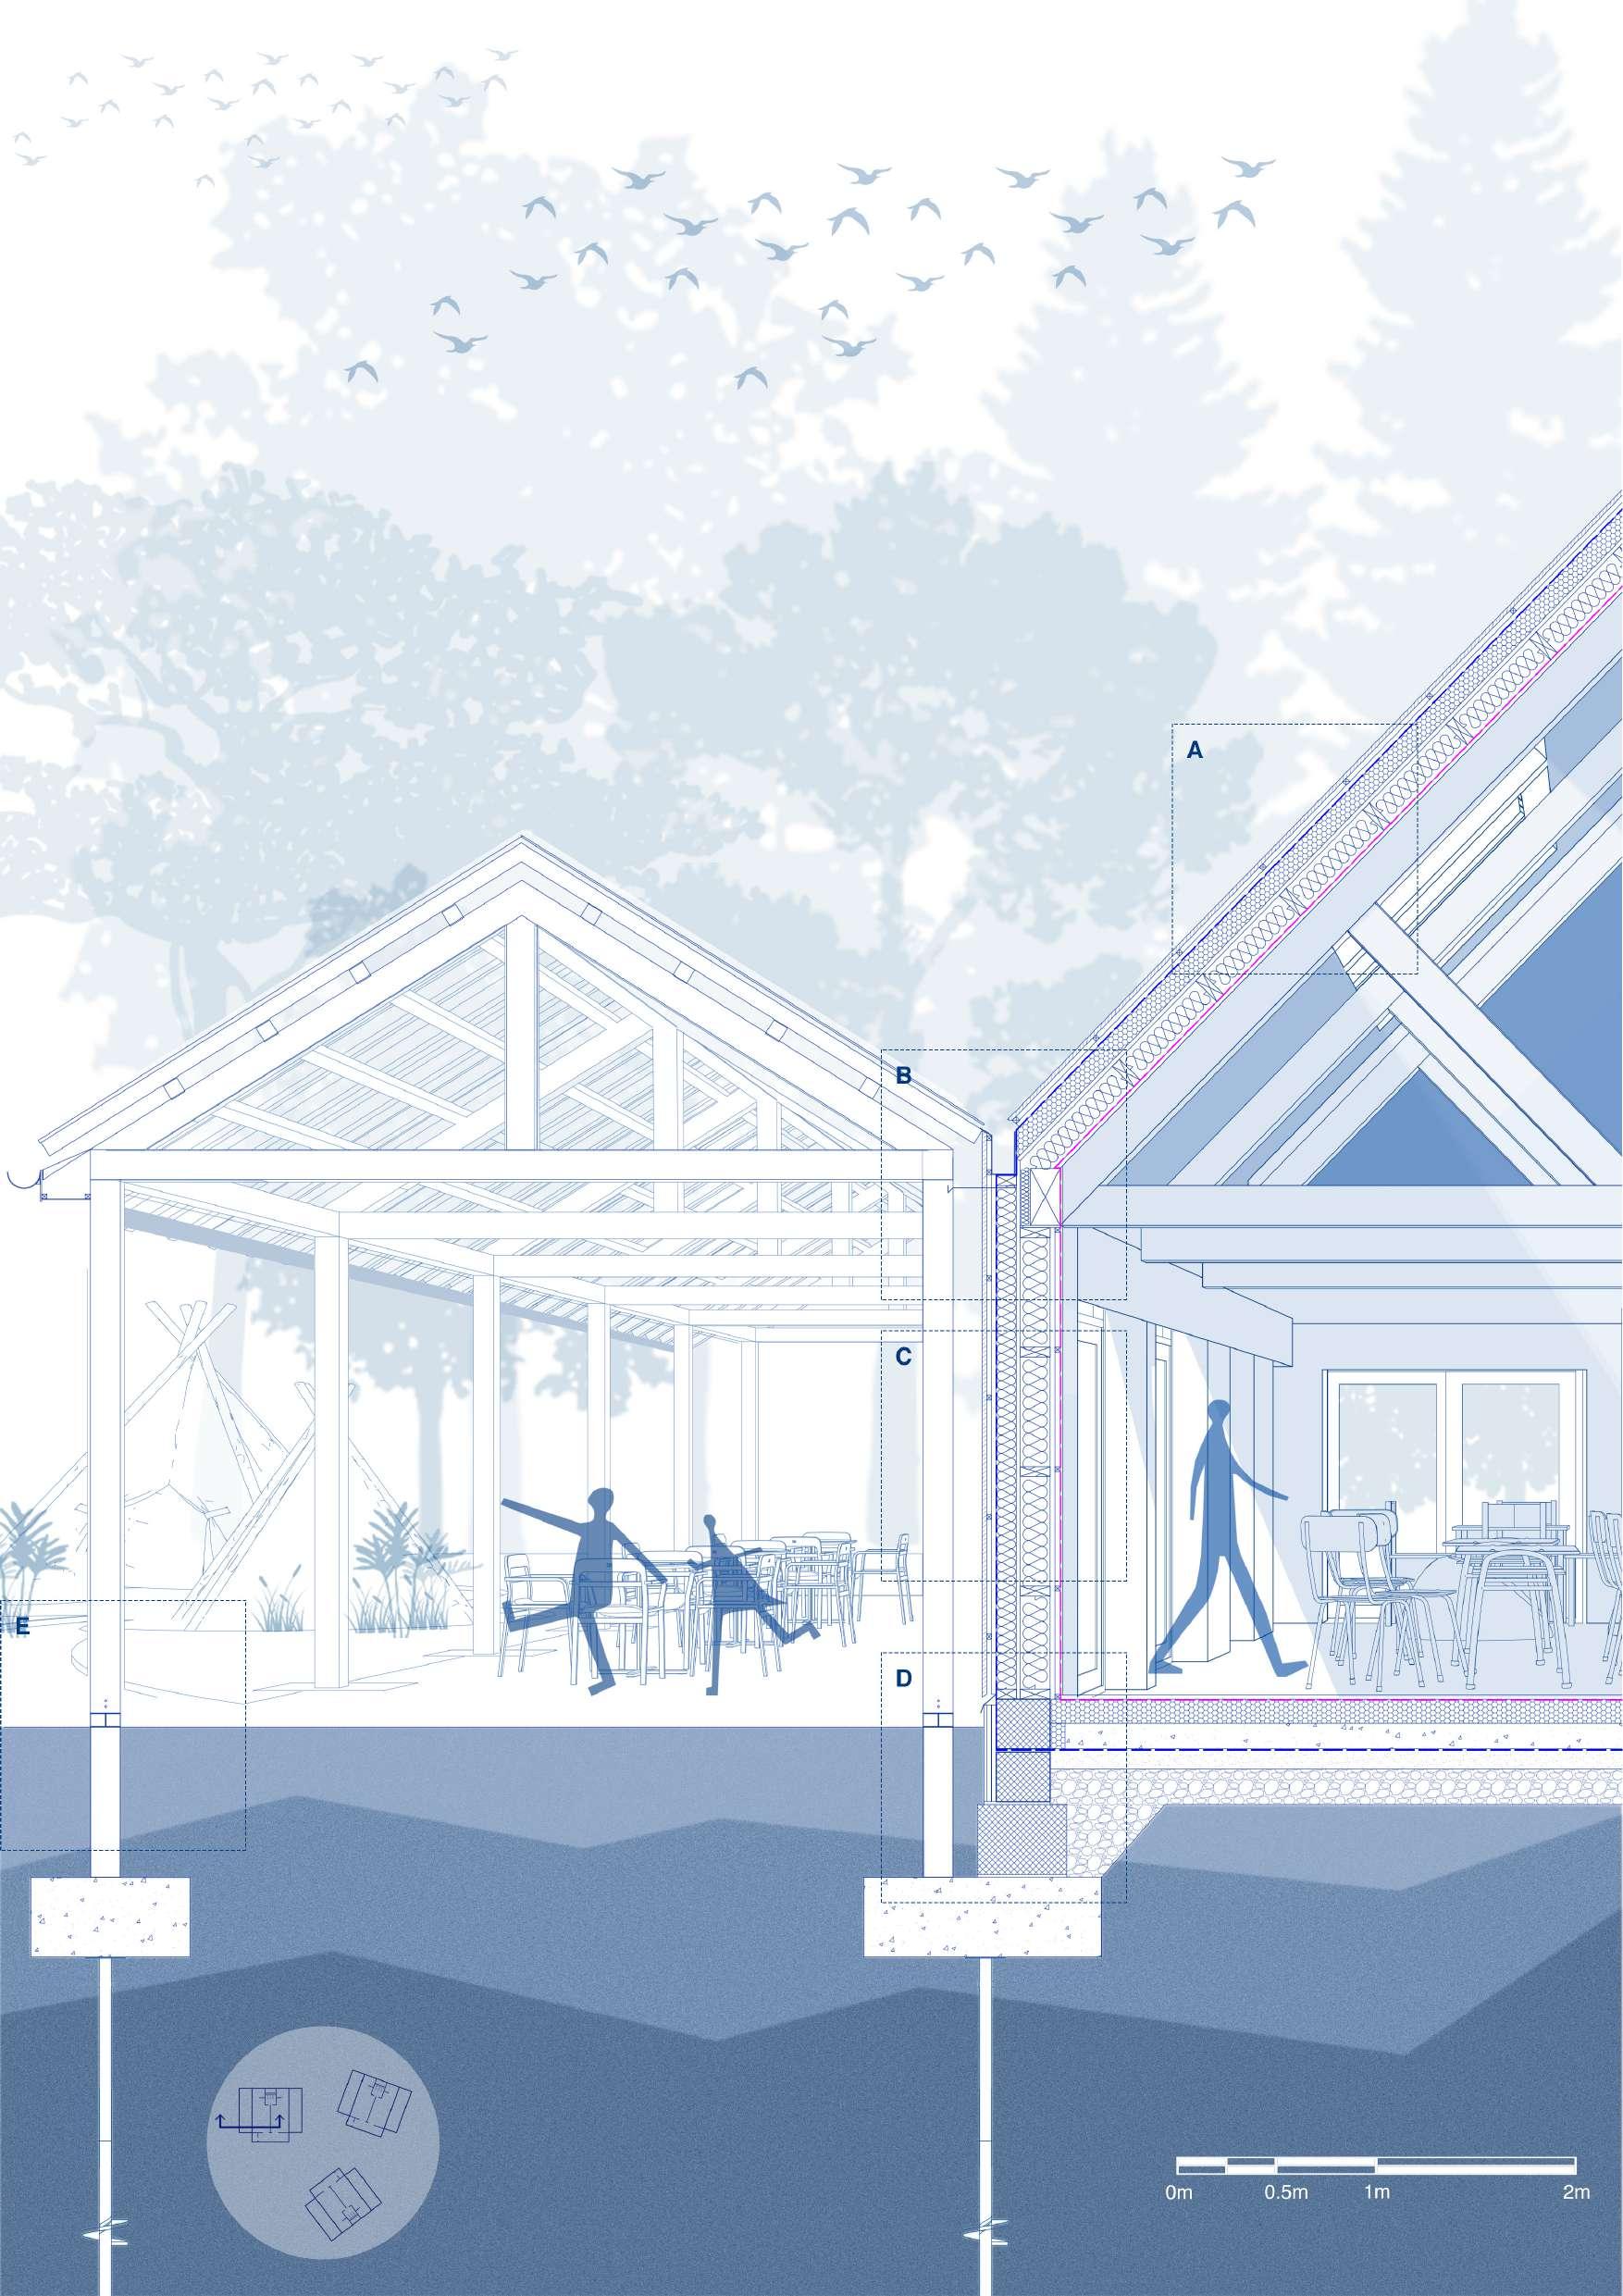
Detailed Section
(Zone 1 - Year 1-3/ 4-6 classroom)
South - North Section

12
Technical Detail
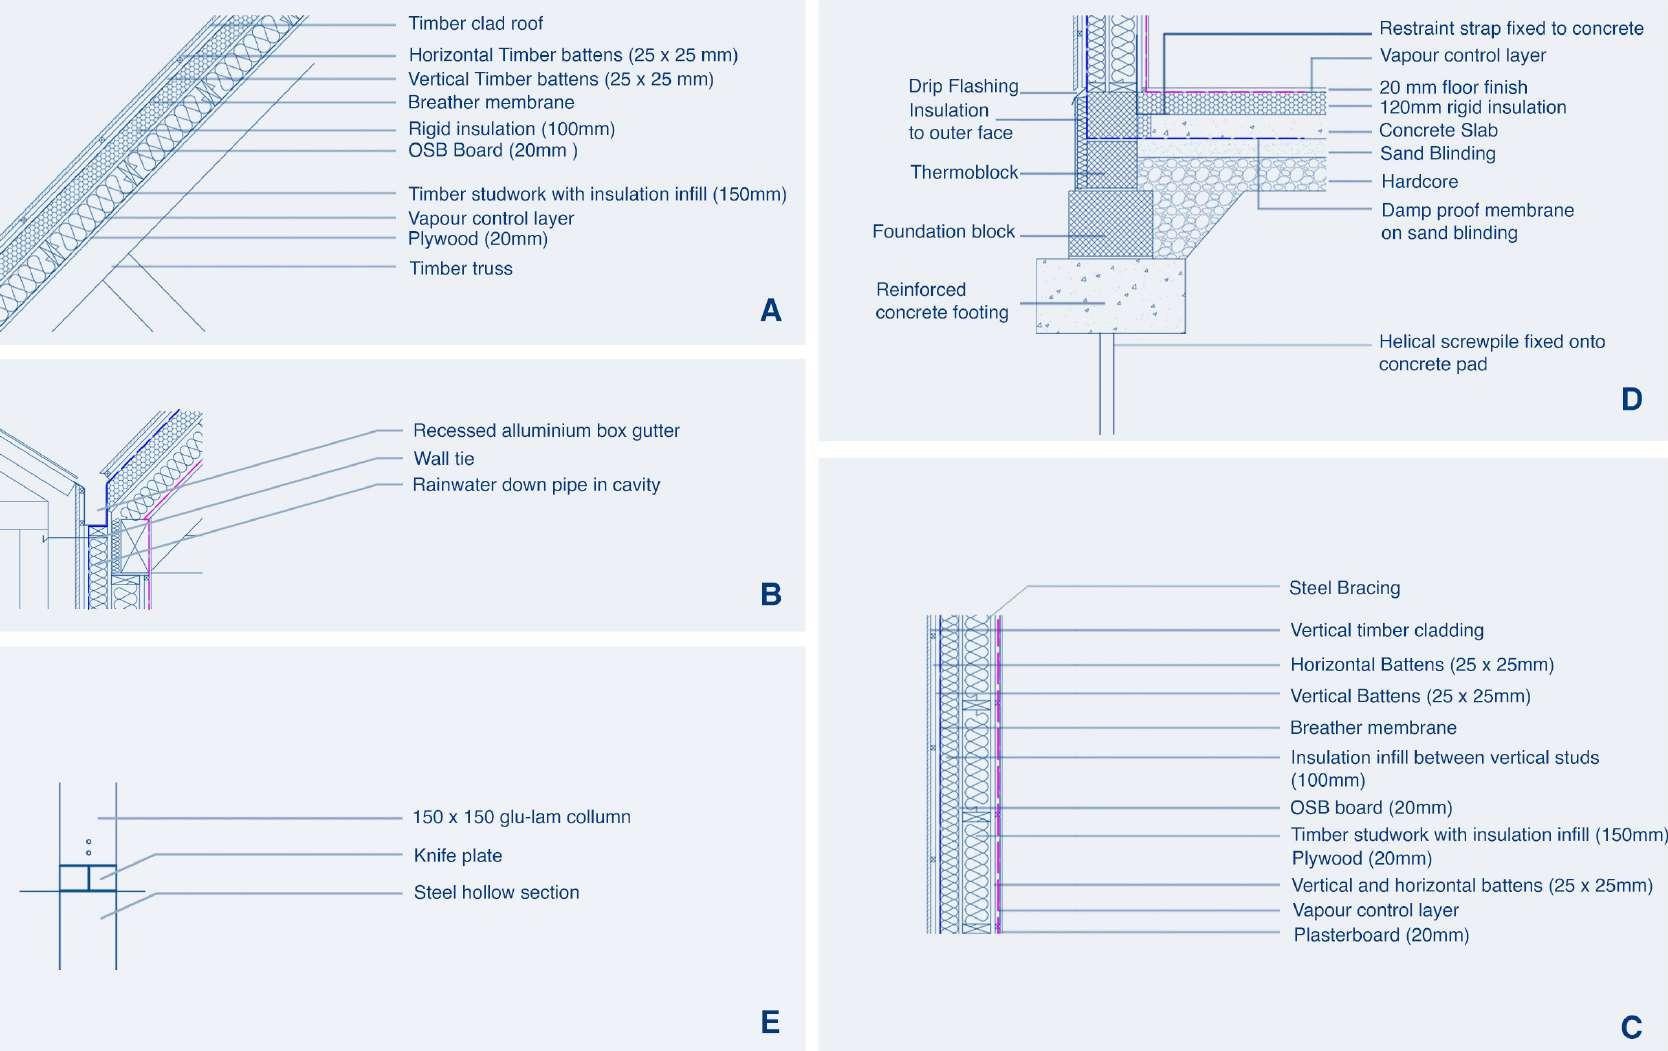
1: Vertical Cedar-wood timber cladding
2: 50mm x 50mm vertical & Horizontal timber battens
3: Breather Membrane
4: Insulation infill between vertical timber studs (100mm)
5: OSB board
6: Timber Stud-work with insulation infill (150mm)
7: 50mm x 50mm vertical and horizontal timber battens
8: OSB board
9: Vapour control layer
10: Plasterboard
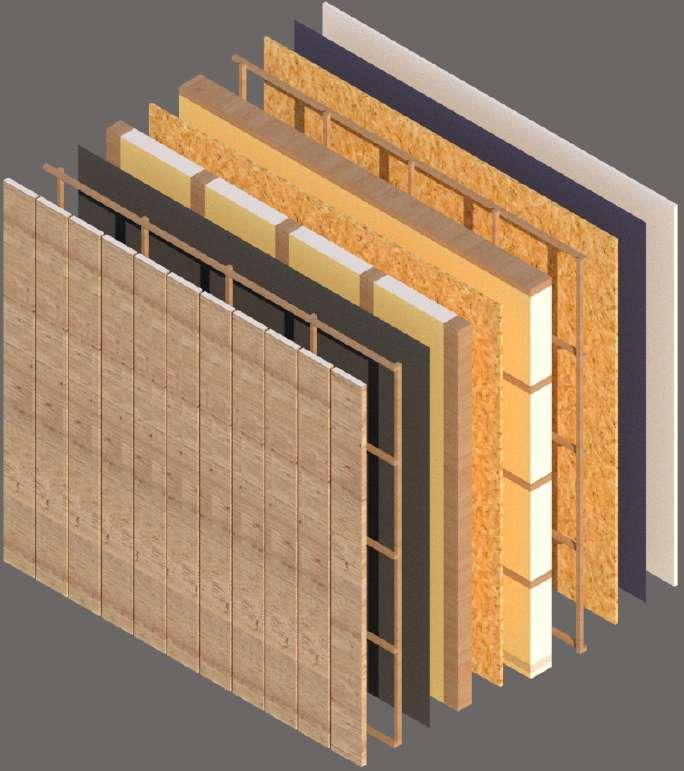
Similar to the specialist classrooms on the swale, in the Year 1-6 blocks, the primary structure doesn’t go into the soil. For the shaded areas, the glu-lam columns are fixed onto a steel hollow section using a knife plate, to stop the wood from getting damp.
1 2 3 4 5 6 7 8 9 10
Wall Build up Y1-6 Classroom block South - North section 13
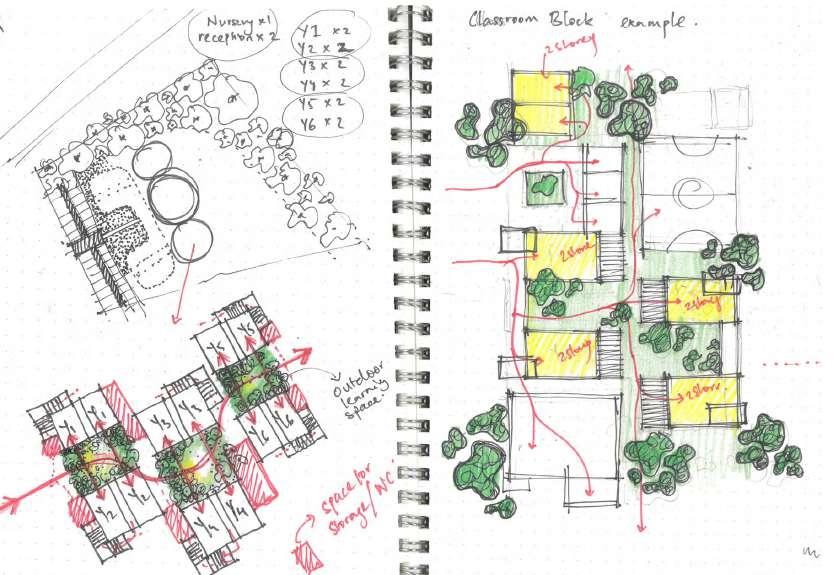
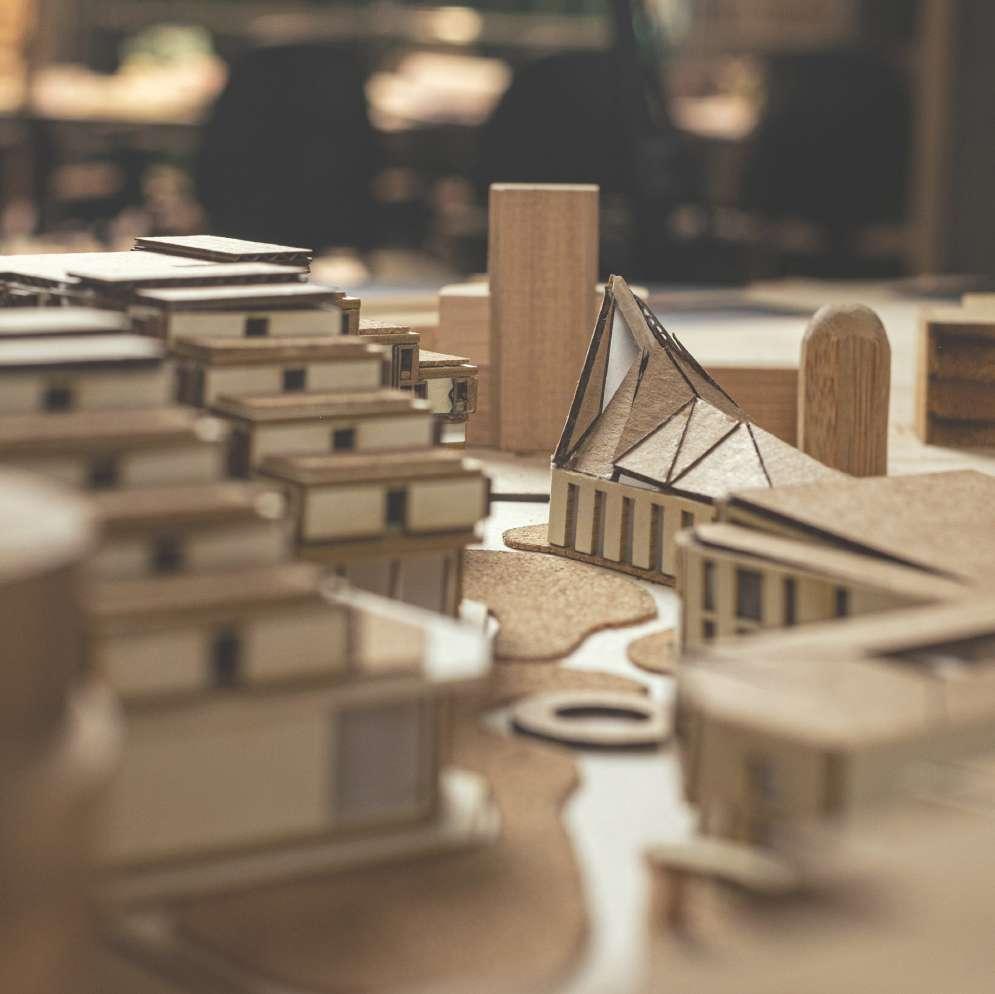
Week one master-planning sketches
Design Process
My initial approach with the scheme was very logical. I arranged my classrooms in a way that seemed rational and straightforward. However, it was pointed out to me that my forest school seemed too rigid, when a school of this nature would be more organic. Whilst I was trying to employ the landscaping of a forest school, the zoning and arrangement of my master-plan seemed more like a conventional school. The sketches below show the early iterations of my proposal
Interim stage sketches
Final week master-planning sketches
 Specialist classroom concept sketches
14
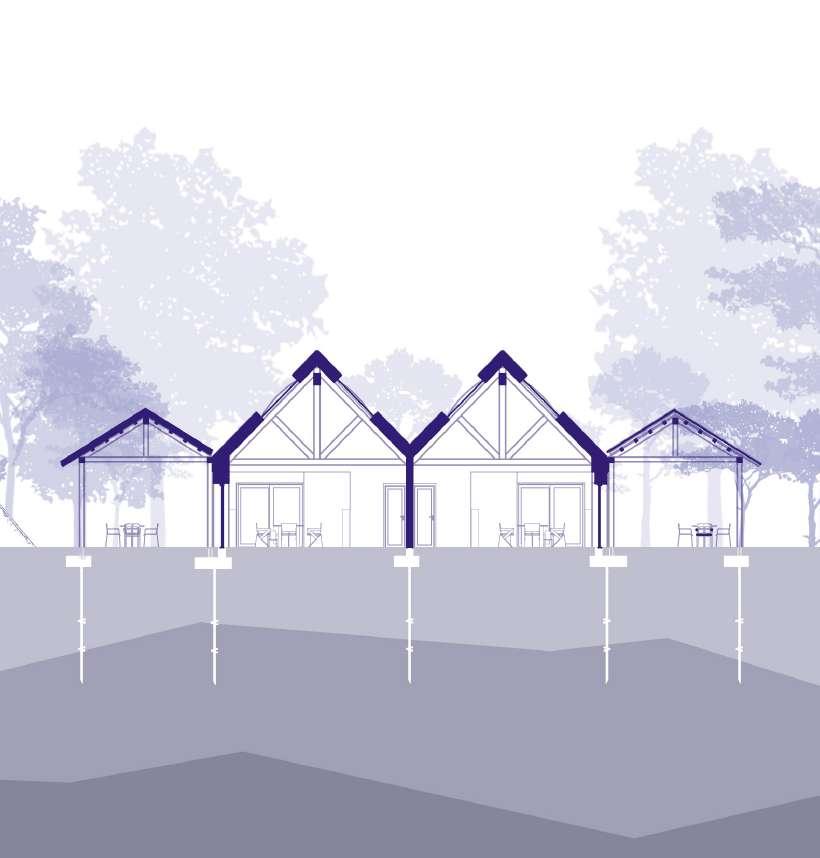
Rainwater Collection
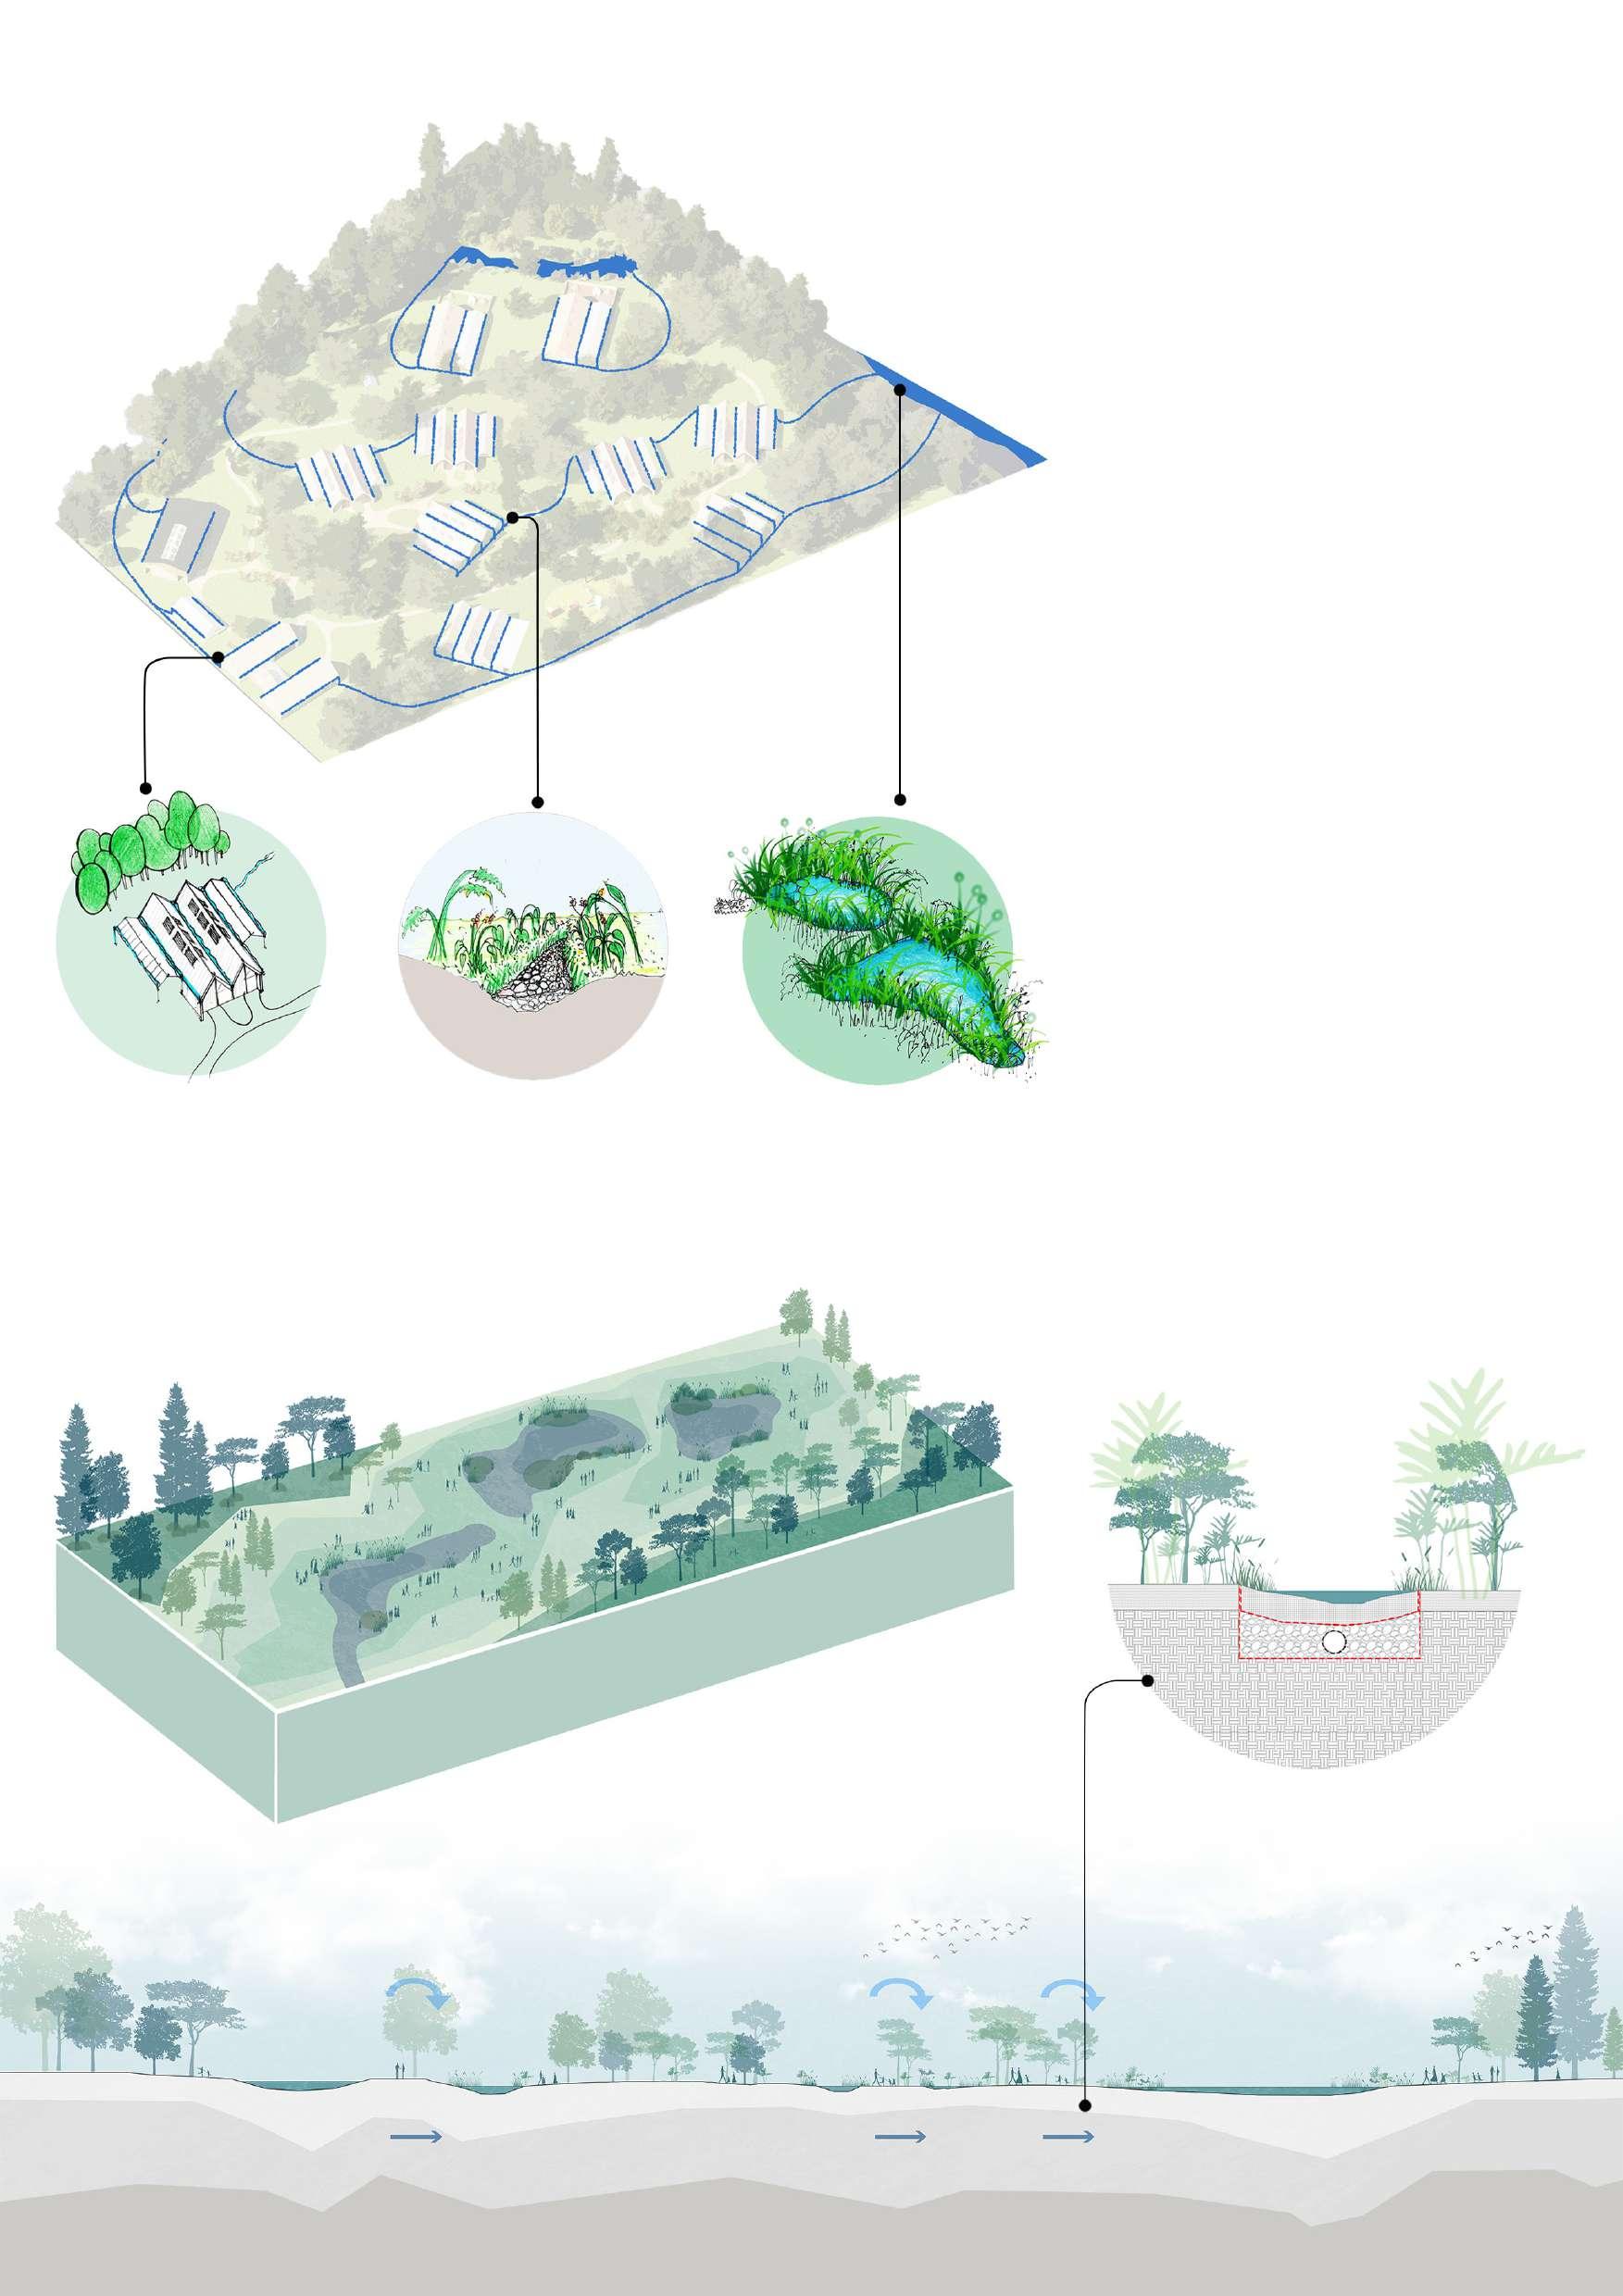
During periods of heavy rainfall, the rainwater fills the pockets of depression in the swale, it overflows and fills the next pocket. this continues until the water is passed onto the wolvercote lakes. This is indicated by the light blue arrows on section A.
During periods of regular rain fall, the water is passed on using the perforated pipes buried within the wetland which slowly attenuates the water, eliminating the risk of flooding. This mechanism can be seen in section B below. The materials required for the creation of this SUDS system is quite low. However, it is worth noting that the land will need to be excavated and moved to create the desired depression and wetland.
Rainwater collected in gutters
Gravel Trenches
Drainage Swale
Swale section B
A A 15
Swale section A

TED Happold Project
Group Project | University College | 4th year
Site: Oxford
Project: Oxford College
Project duration: 6 weeks
The brief for this project required us to design a college for the University of Oxford in the Radcliffe Observatory Quarter. The college comprises of accommodation for students and fellows, common rooms, offices, dining hall, library, auditorium, and Social housing provision. In addition to this, the college is intended to be inclusive to a group that is under-represented.
The client for our project is the University of Oxford, and the under-represented group that we chose for our college are people who are on the autistic spectrum. Upon research, we found that there are not a lot of resources available to students on the spectrum, so this issue resonated with us.
16
Design Development
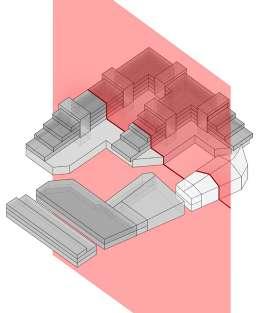
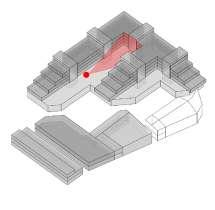
We want the access through the central axis of the site, from the open space in front of the School of Government building to the Observatory.
The plan splits the site into two main spaces. This creates a central parade, wide enough to be an addition to the public realm of the site.
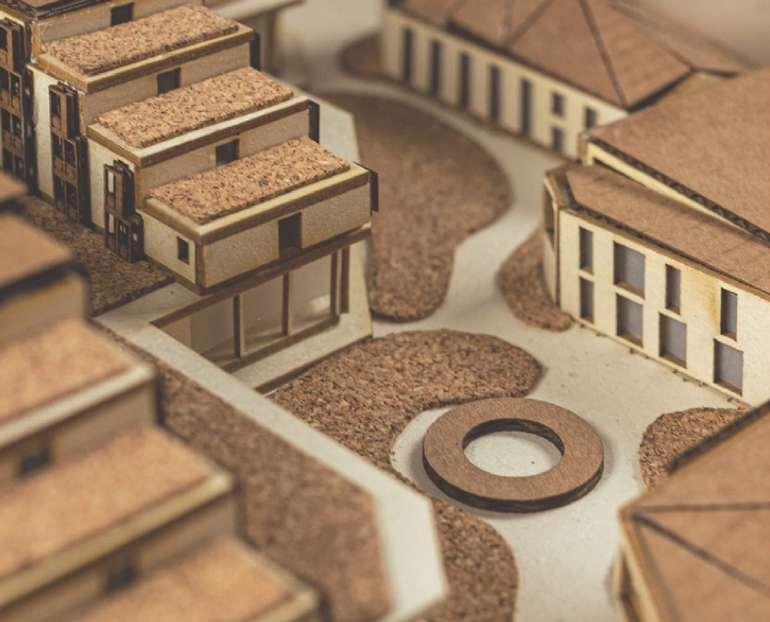
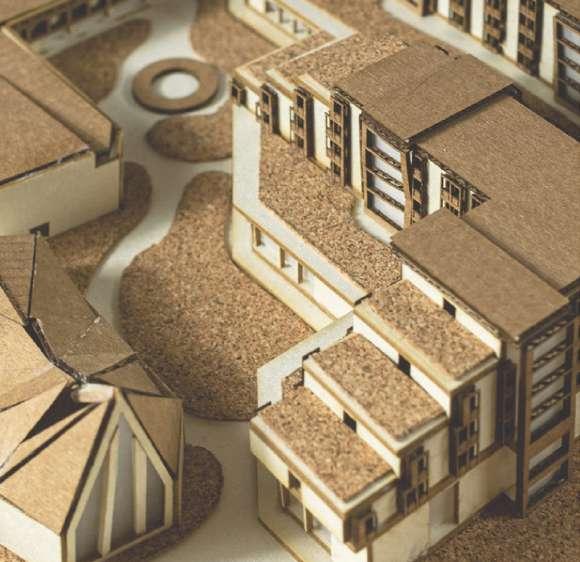
A central courtyard framed by the buildings in the middle of the parade provides a stopping point for pedestrians
4
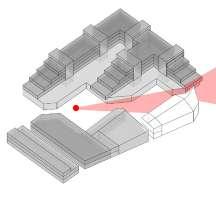
We also identified more opportunities for courtyards, and introduced more stopping points in the main parade. Visitors will be able to meander through the landscapes created by the courtyards. Chapel Auditorium
Student & fellow common areas

Building Program
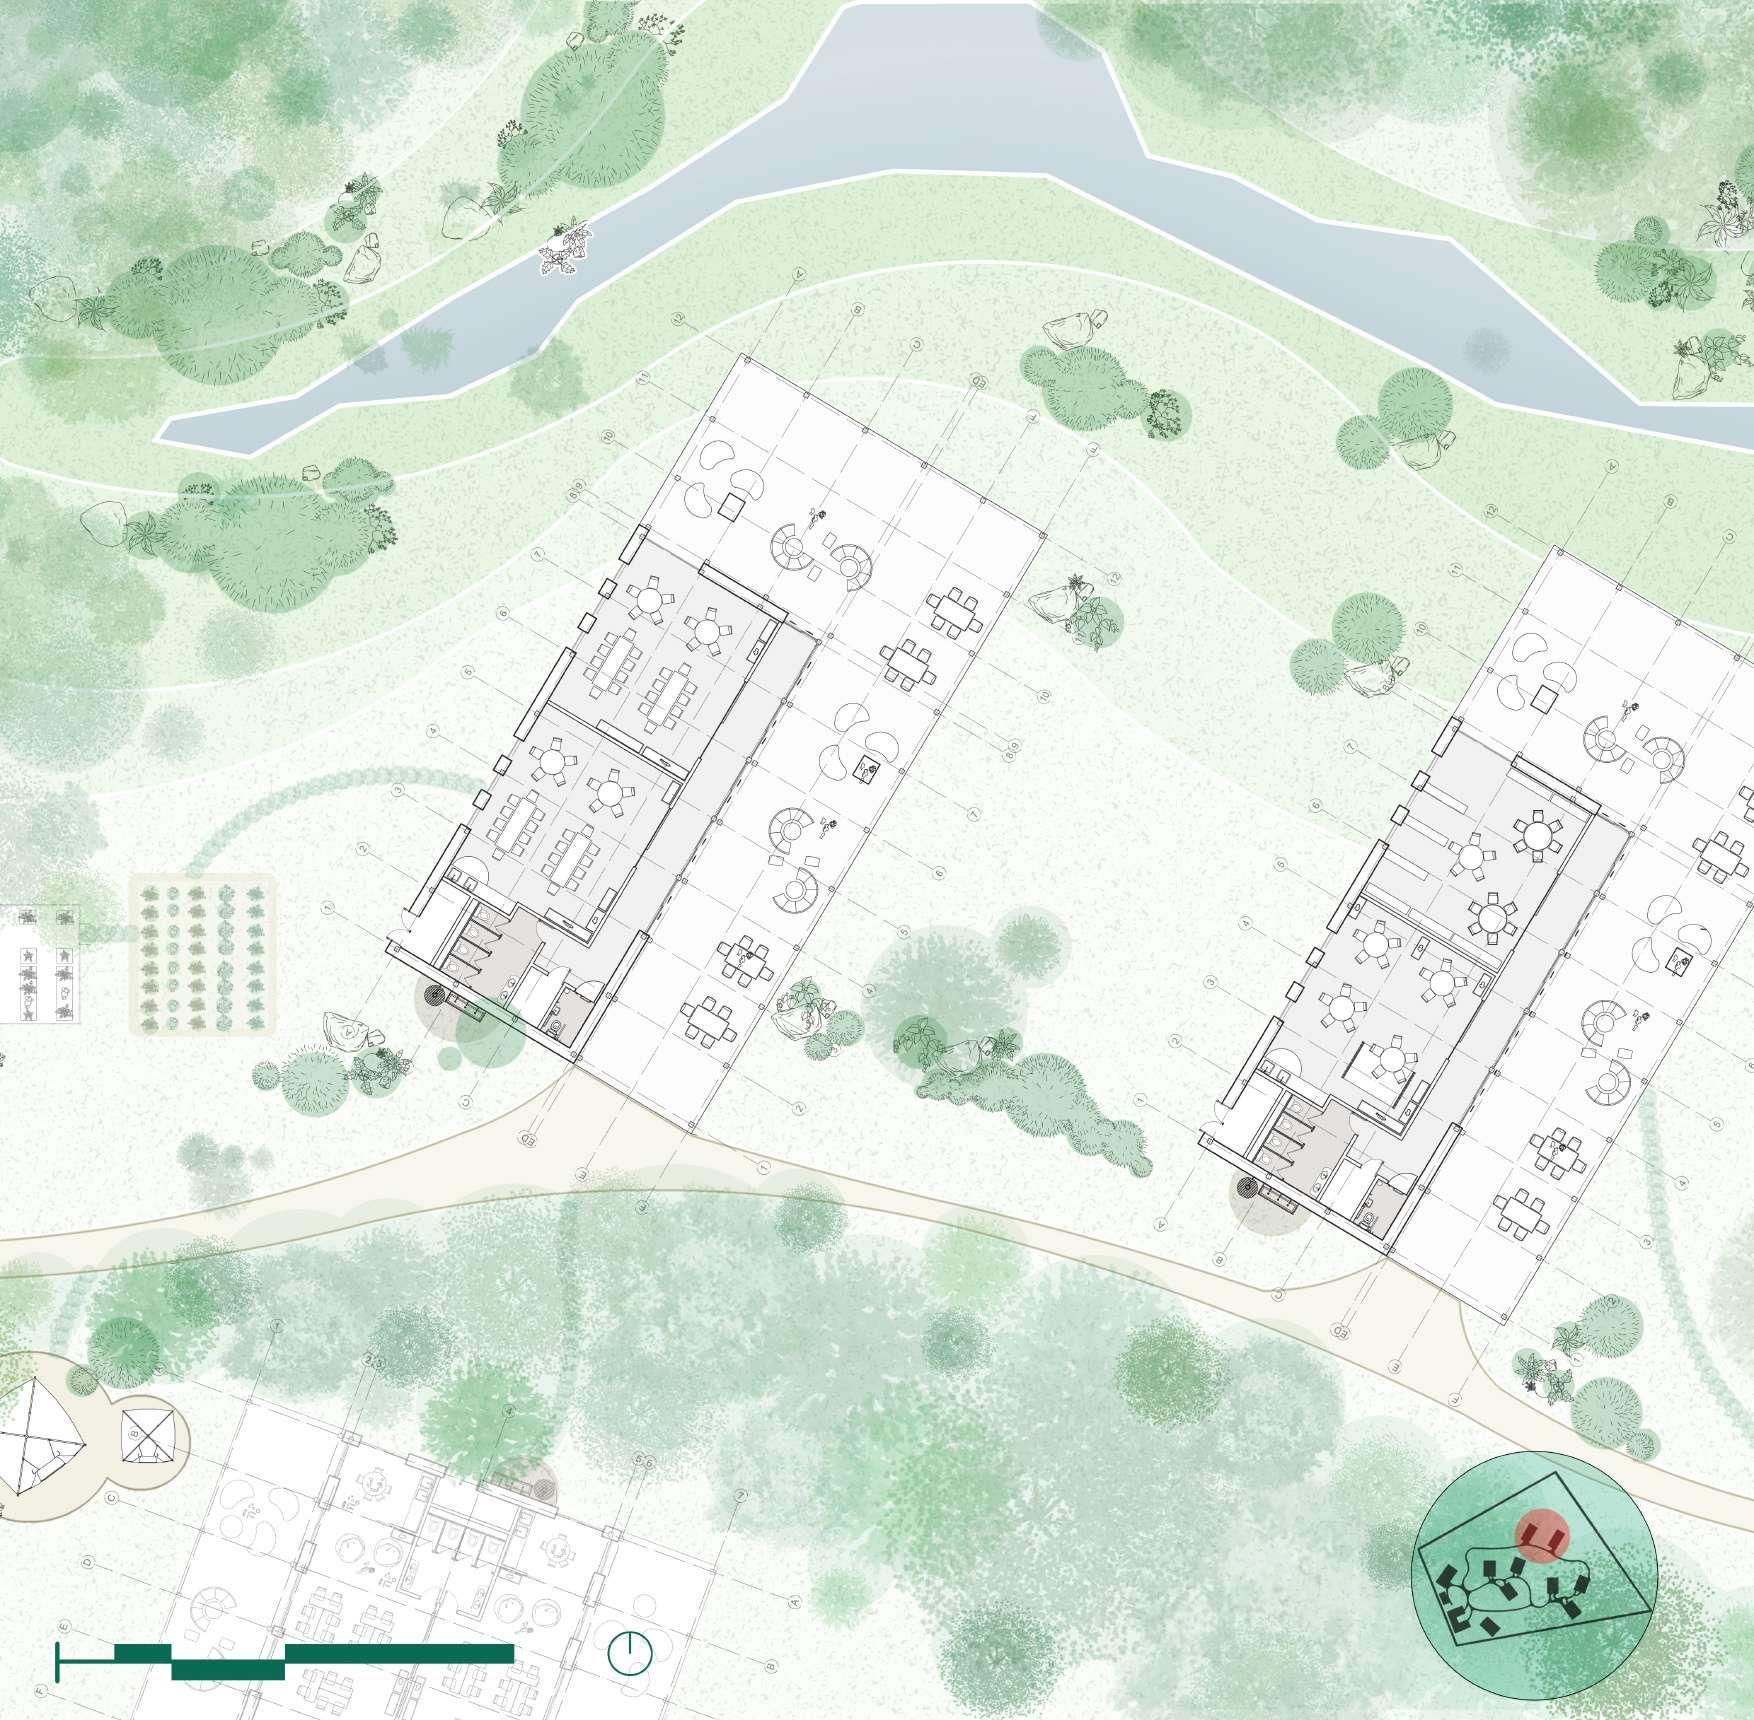
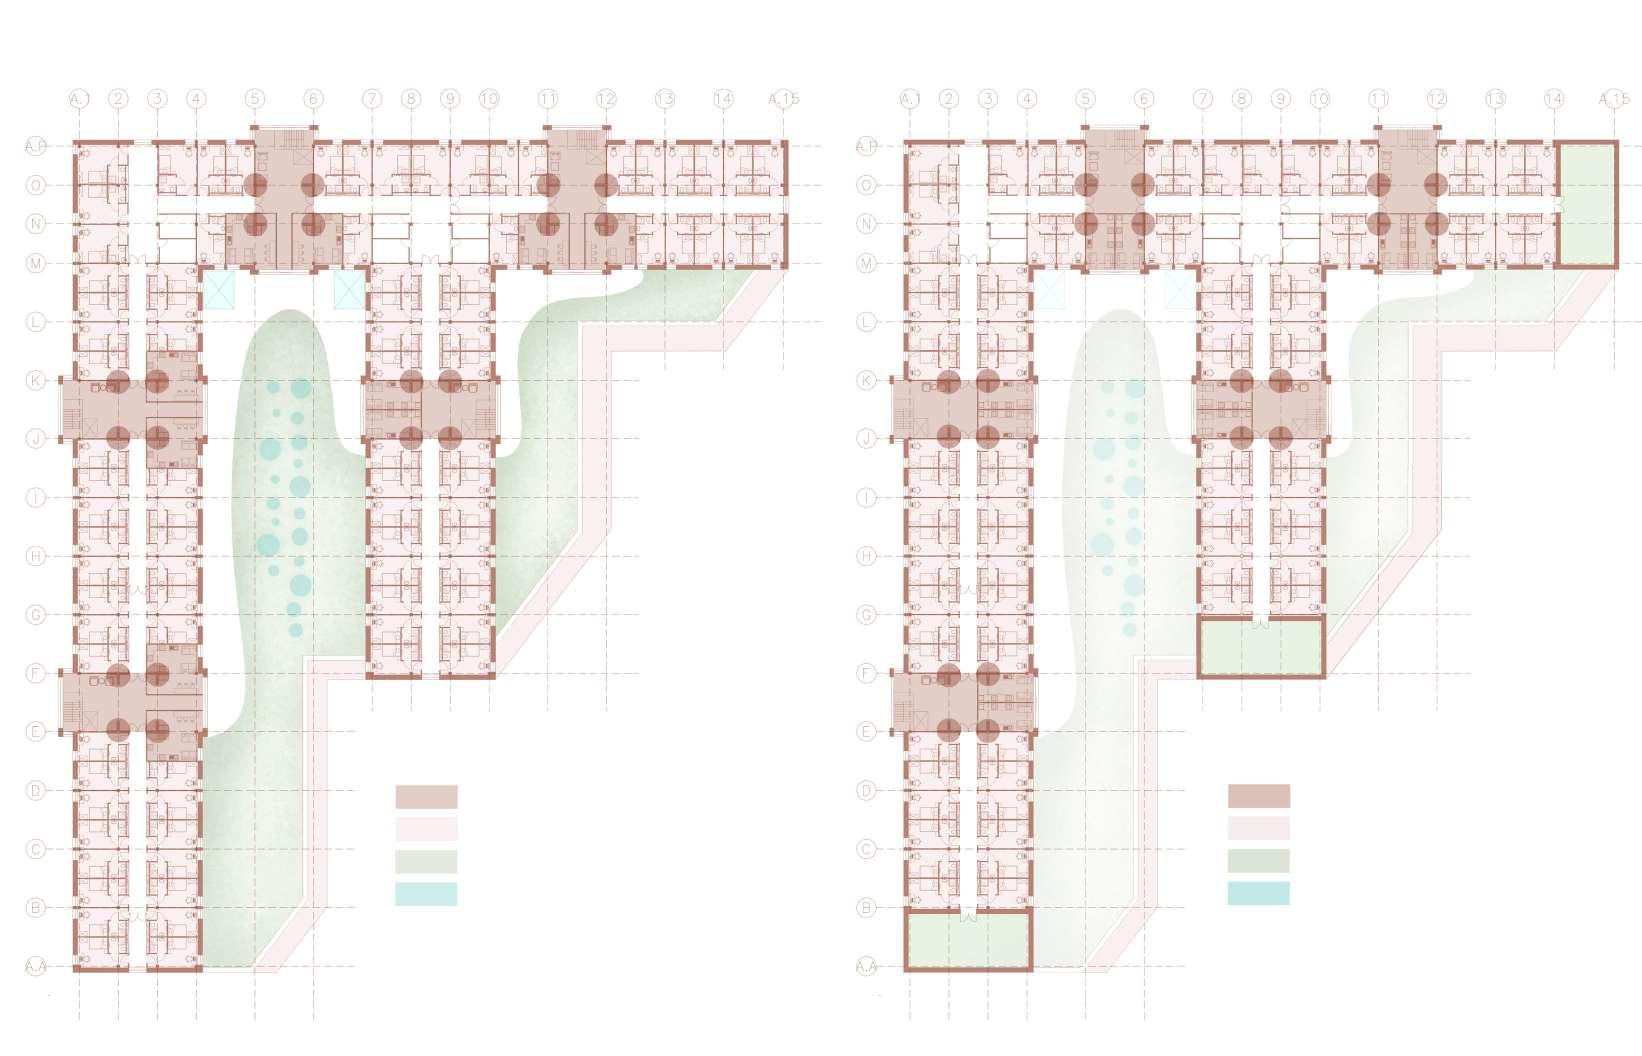
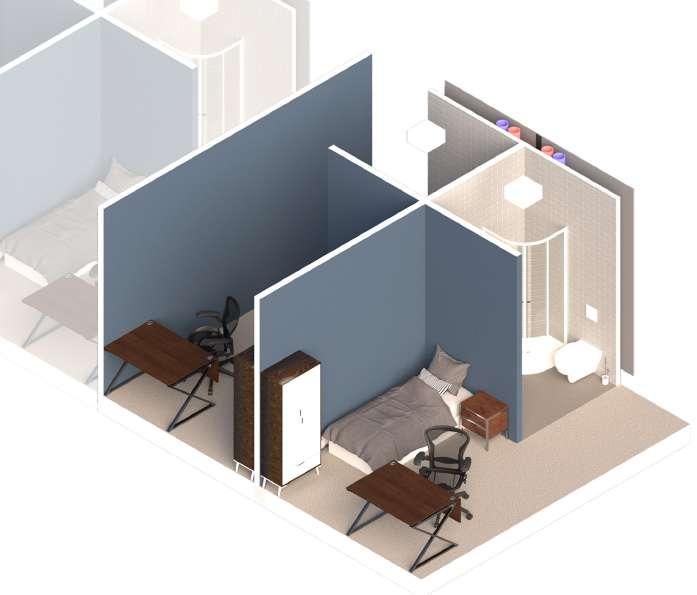
The scheme is divided into two main parts based on the buildings/ spaces’ respective privacy levels. The main private block provides the students and fellows’ common rooms and working spaces, as well as the dining hall on the ground floor. The ground (and mezzanine) floor is aimed to be their main social spaces, and the most public space in this private building as most facilities is this area are expected to be shared spaces. Above their common rooms are the individual accommodations for the students.
The chapel, library, and auditorium are grouped together as the public wing as these buildings are open to the public access.
Privacy Gradient
The aim of the accommodation block’s arrangement is to provide different levels of privacy to cater to the needs of students along the spectrum. Level of privacy increases as the building goes up, whereas shared spaces are all grouped on the ground floor.
The private is completely separated from the chapel and library and auditorium buildings with buffer zones that are landscaped with greenery are provided between the two wings, in the three squares framed by the shapes of the buildings.
1
2
3
Library
Public 17
Student accommodations Vertical circulation Social Housing Private
Three instances along the parade, framed by the forms of the buildings.
The main access into every building is linked through the main parade, which provides easy navigation, important to individuals on the spectrum.
Using water feature and flower beds to suggest visitors to meander through the courtyards, while maintaining the efficiency of the paths to reach the main accesses.
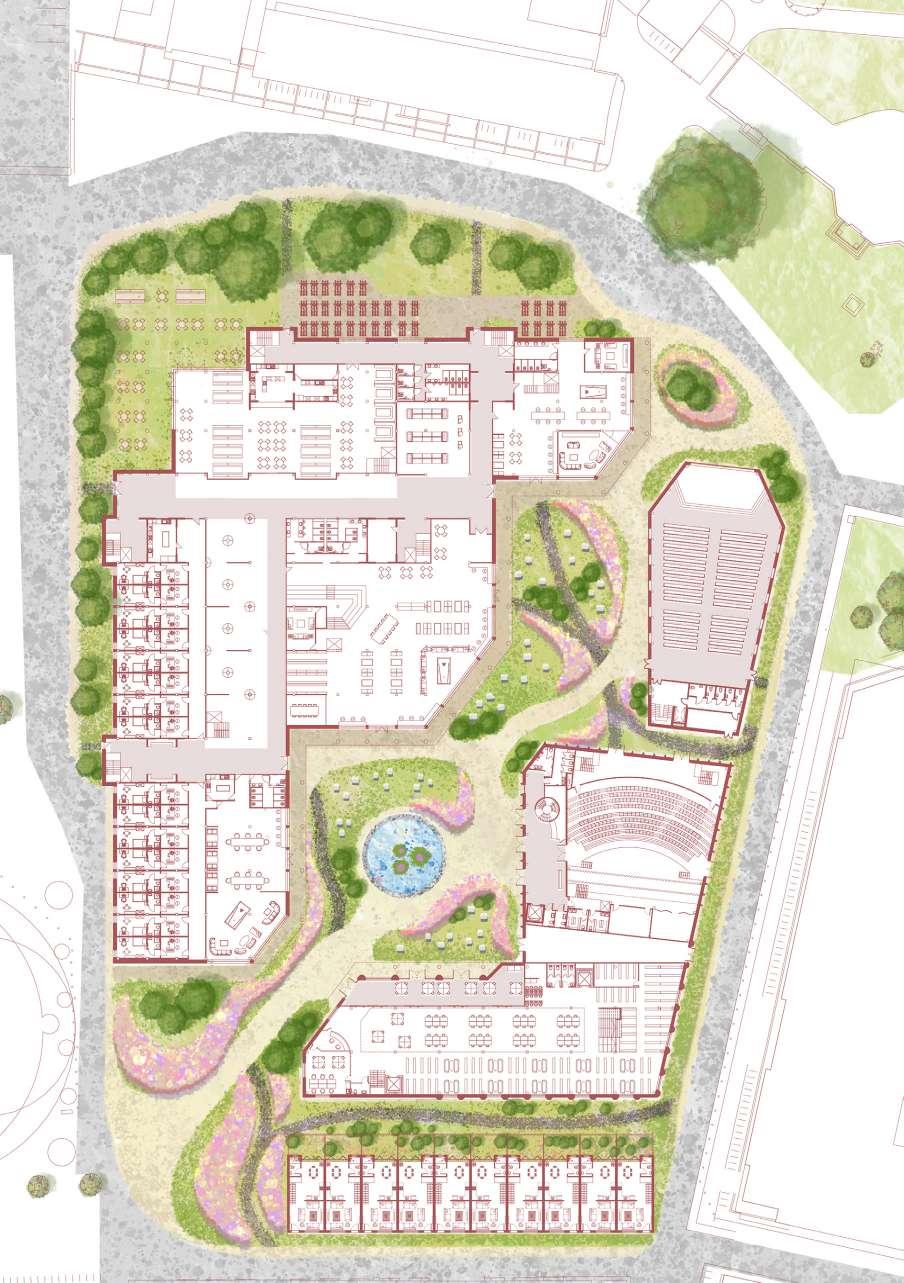
Ground Floor Plan
Ground Floor (Dining Area)
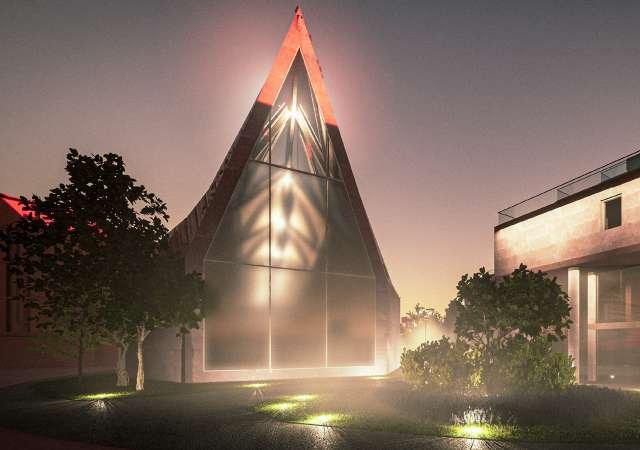
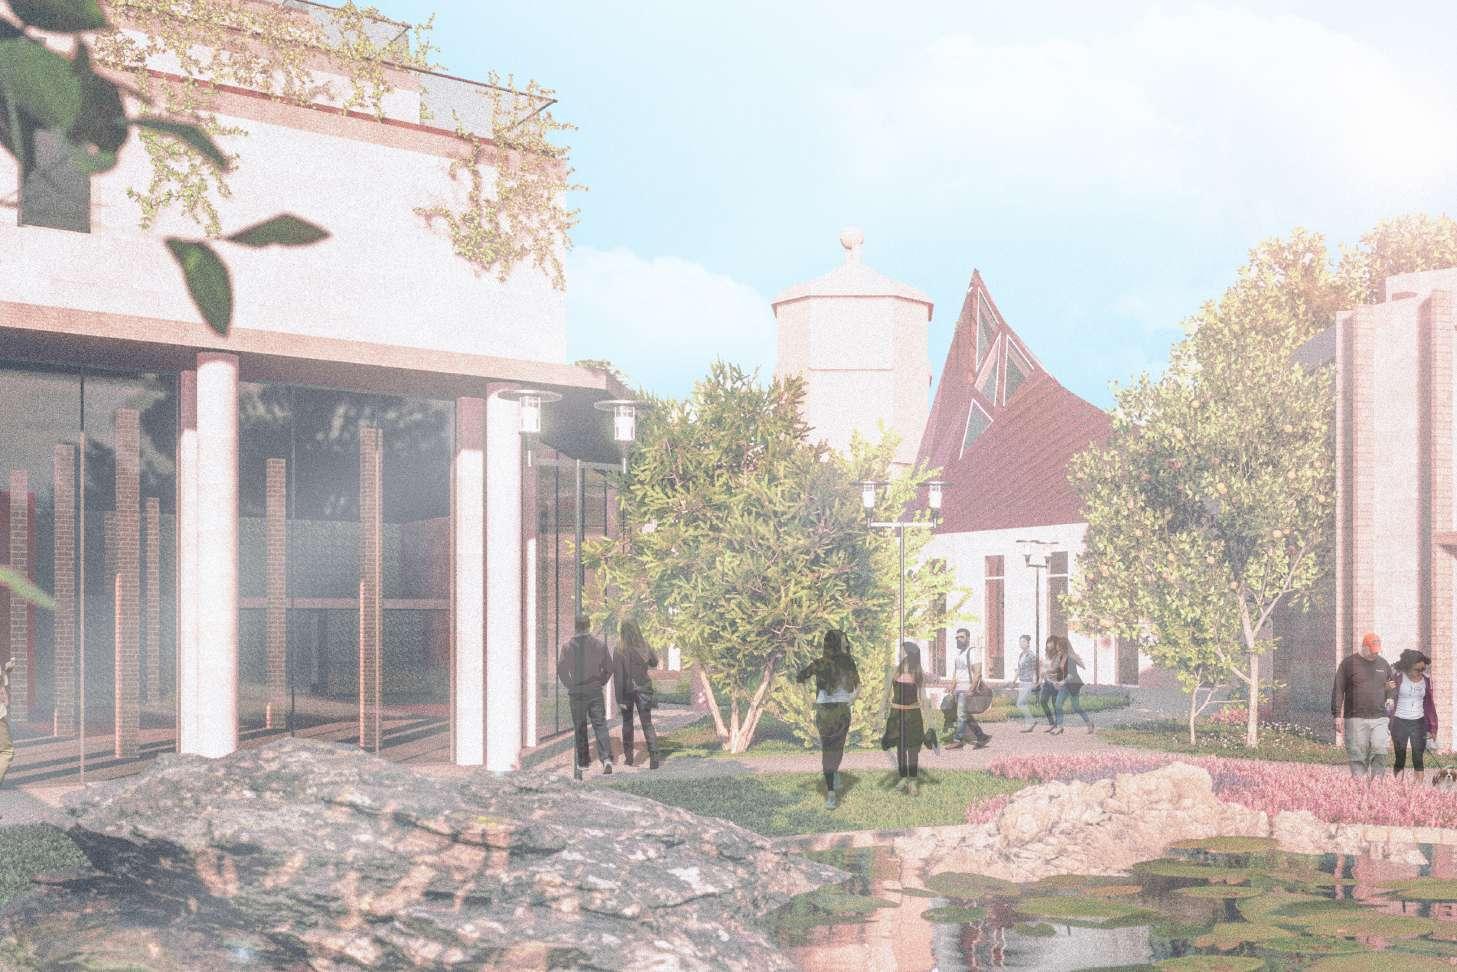
Chapel External View
18
Library Internal View

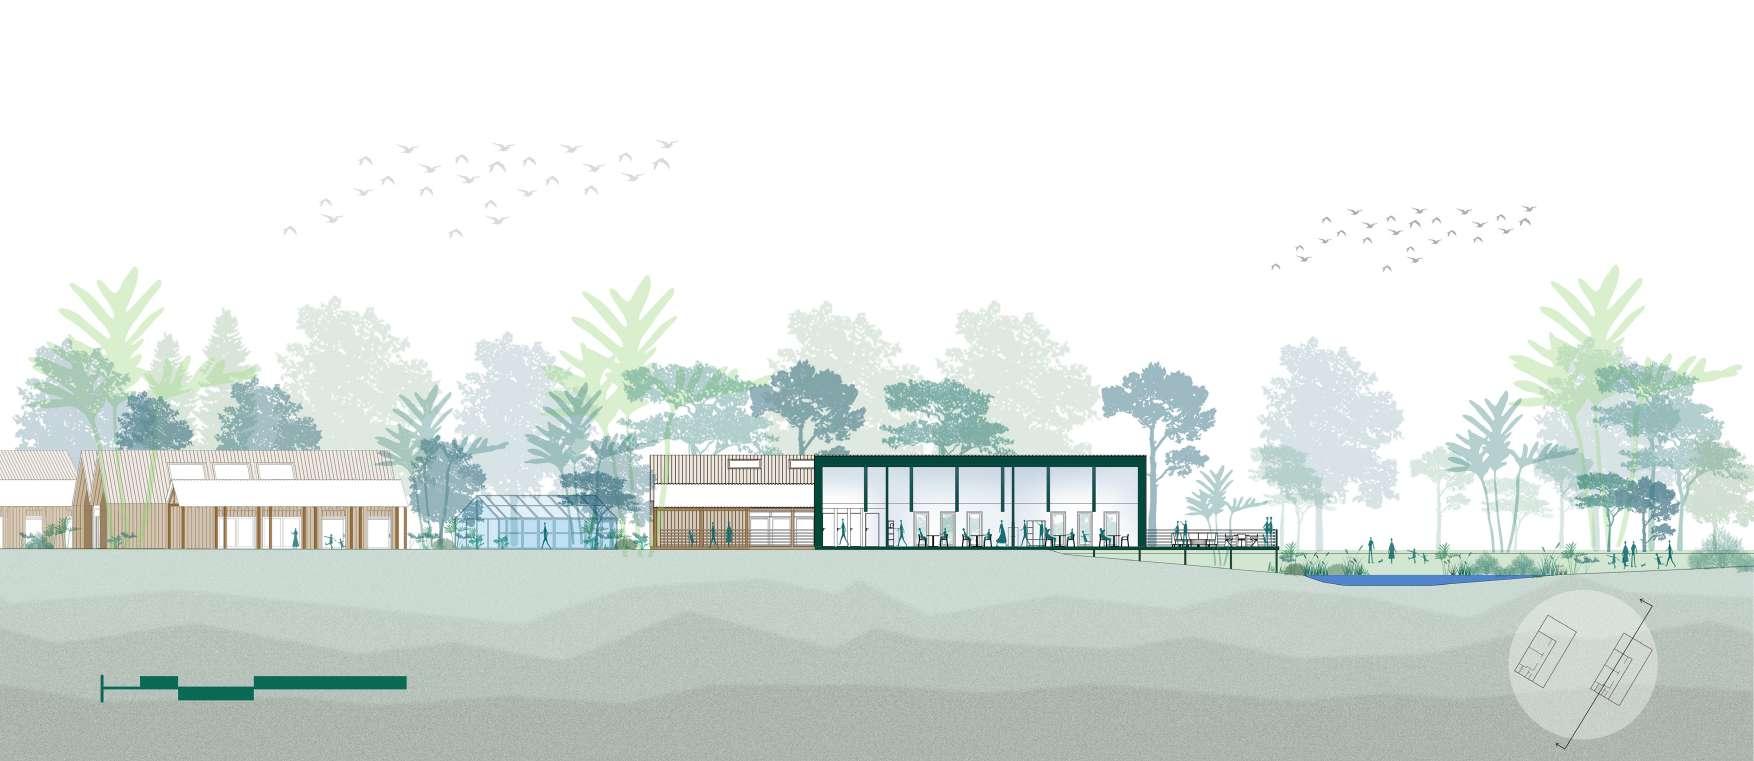
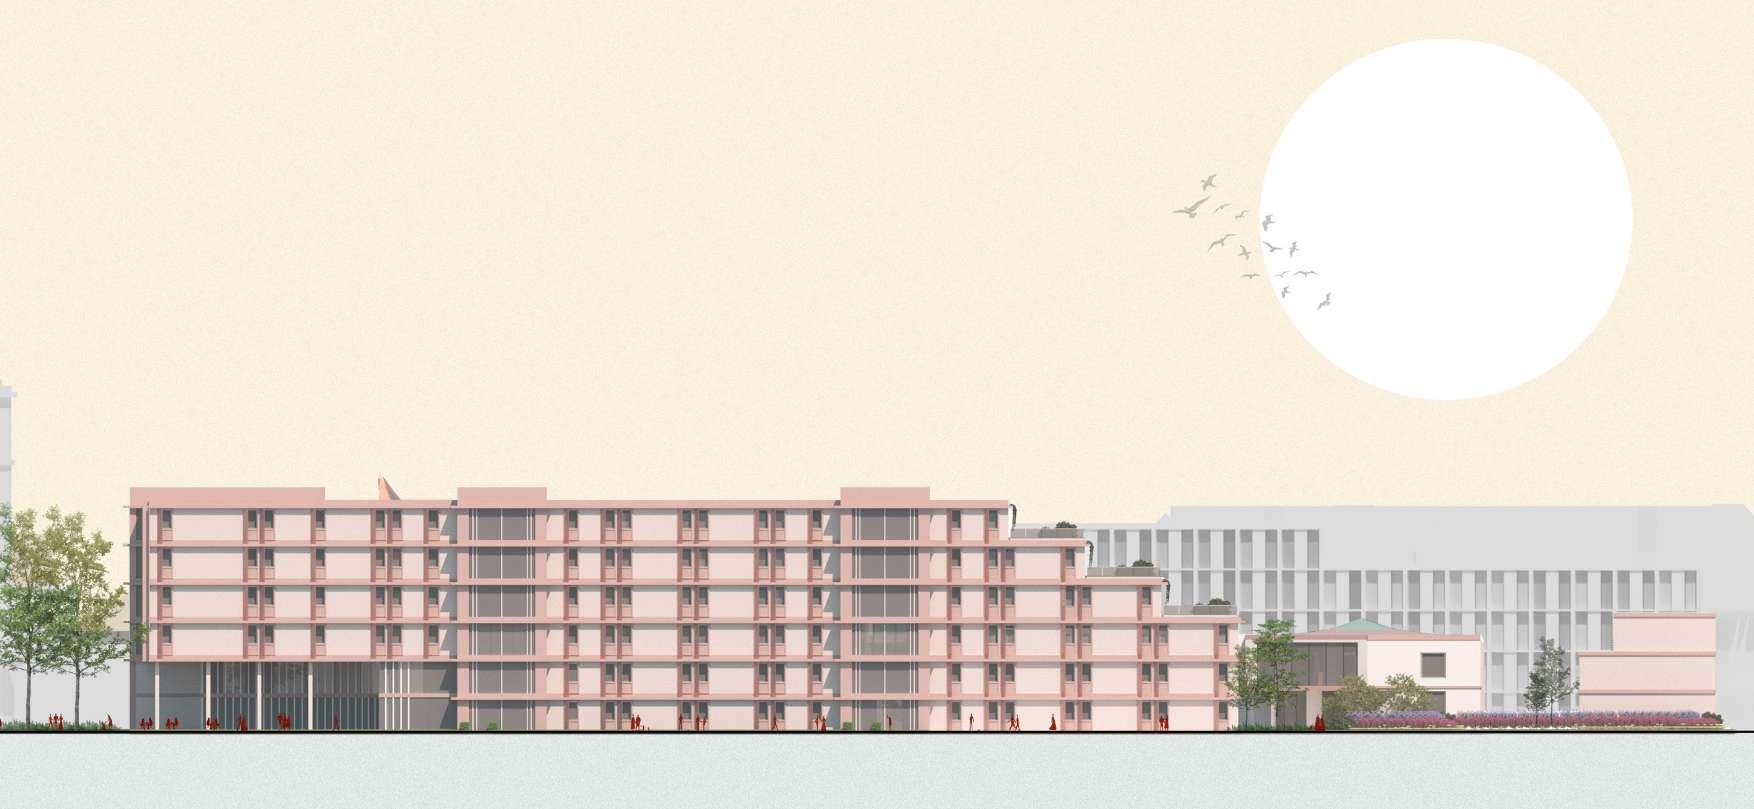 Site Section (South - North)
Private Wing Student/ Fellow accommodation & Common rooms
Northern open Courtyard Chapel Eastern Sidewalk
Ground Floor Art Display Corridor Chapel
Site Section (South - North)
Private Wing Student/ Fellow accommodation & Common rooms
Northern open Courtyard Chapel Eastern Sidewalk
Ground Floor Art Display Corridor Chapel
19
Site Elevation (Western)
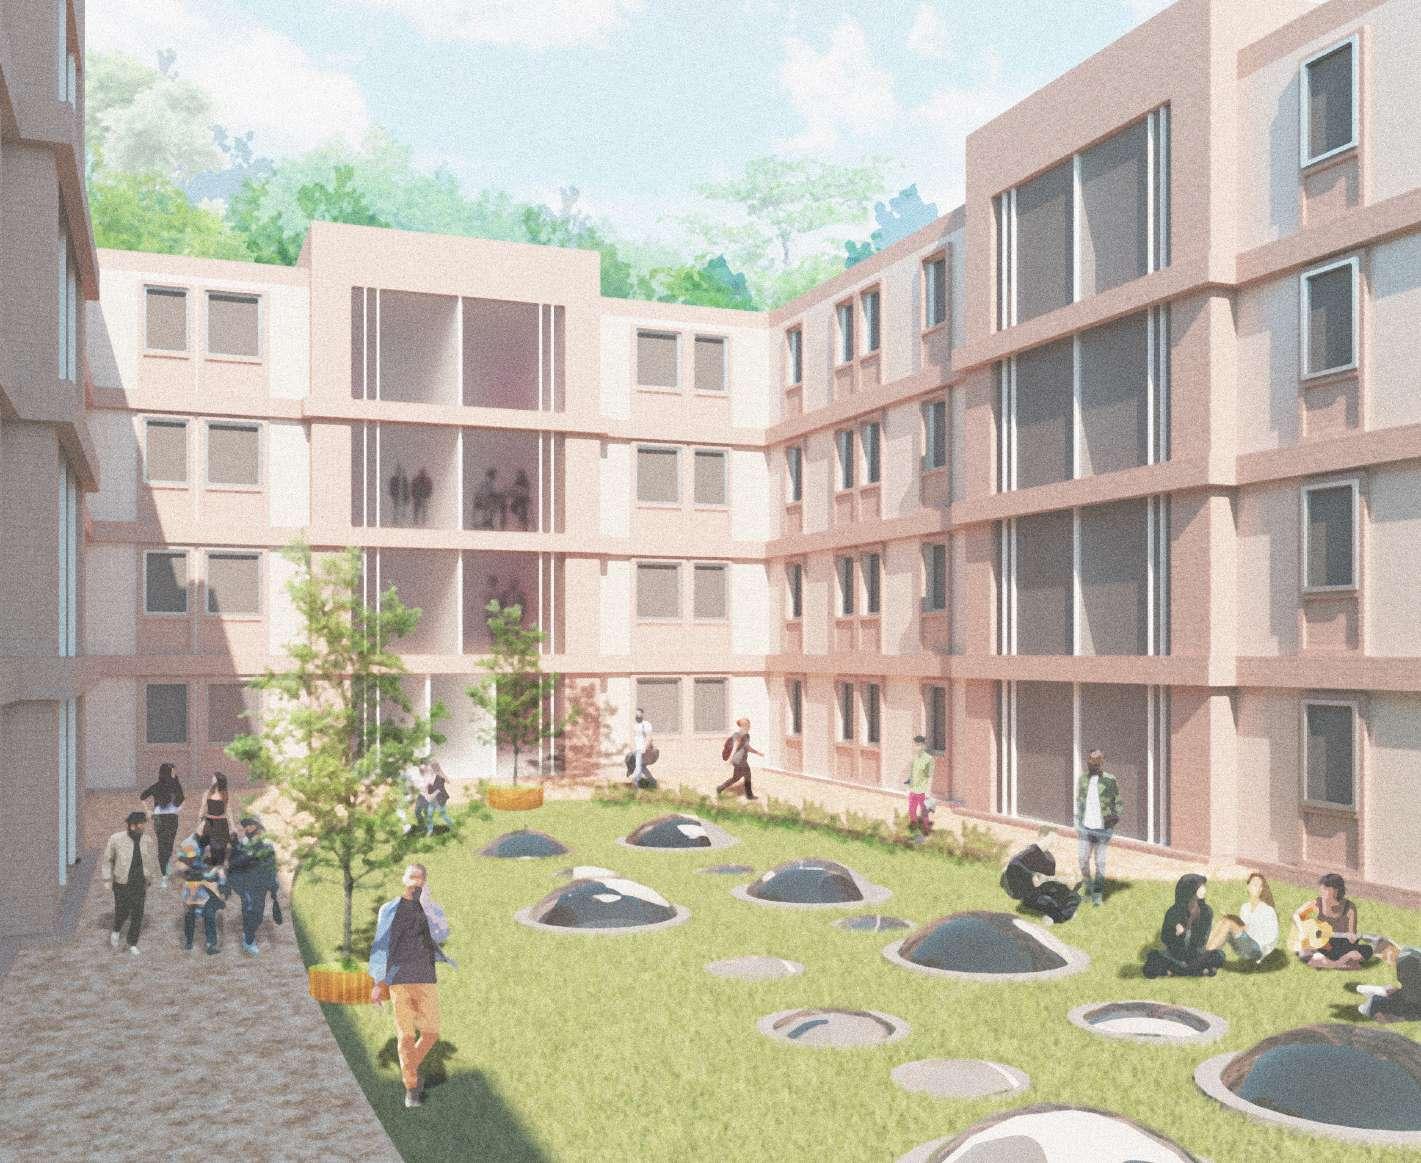
 First Floor courtyard (Student accommodation)
20
Central Courtyard
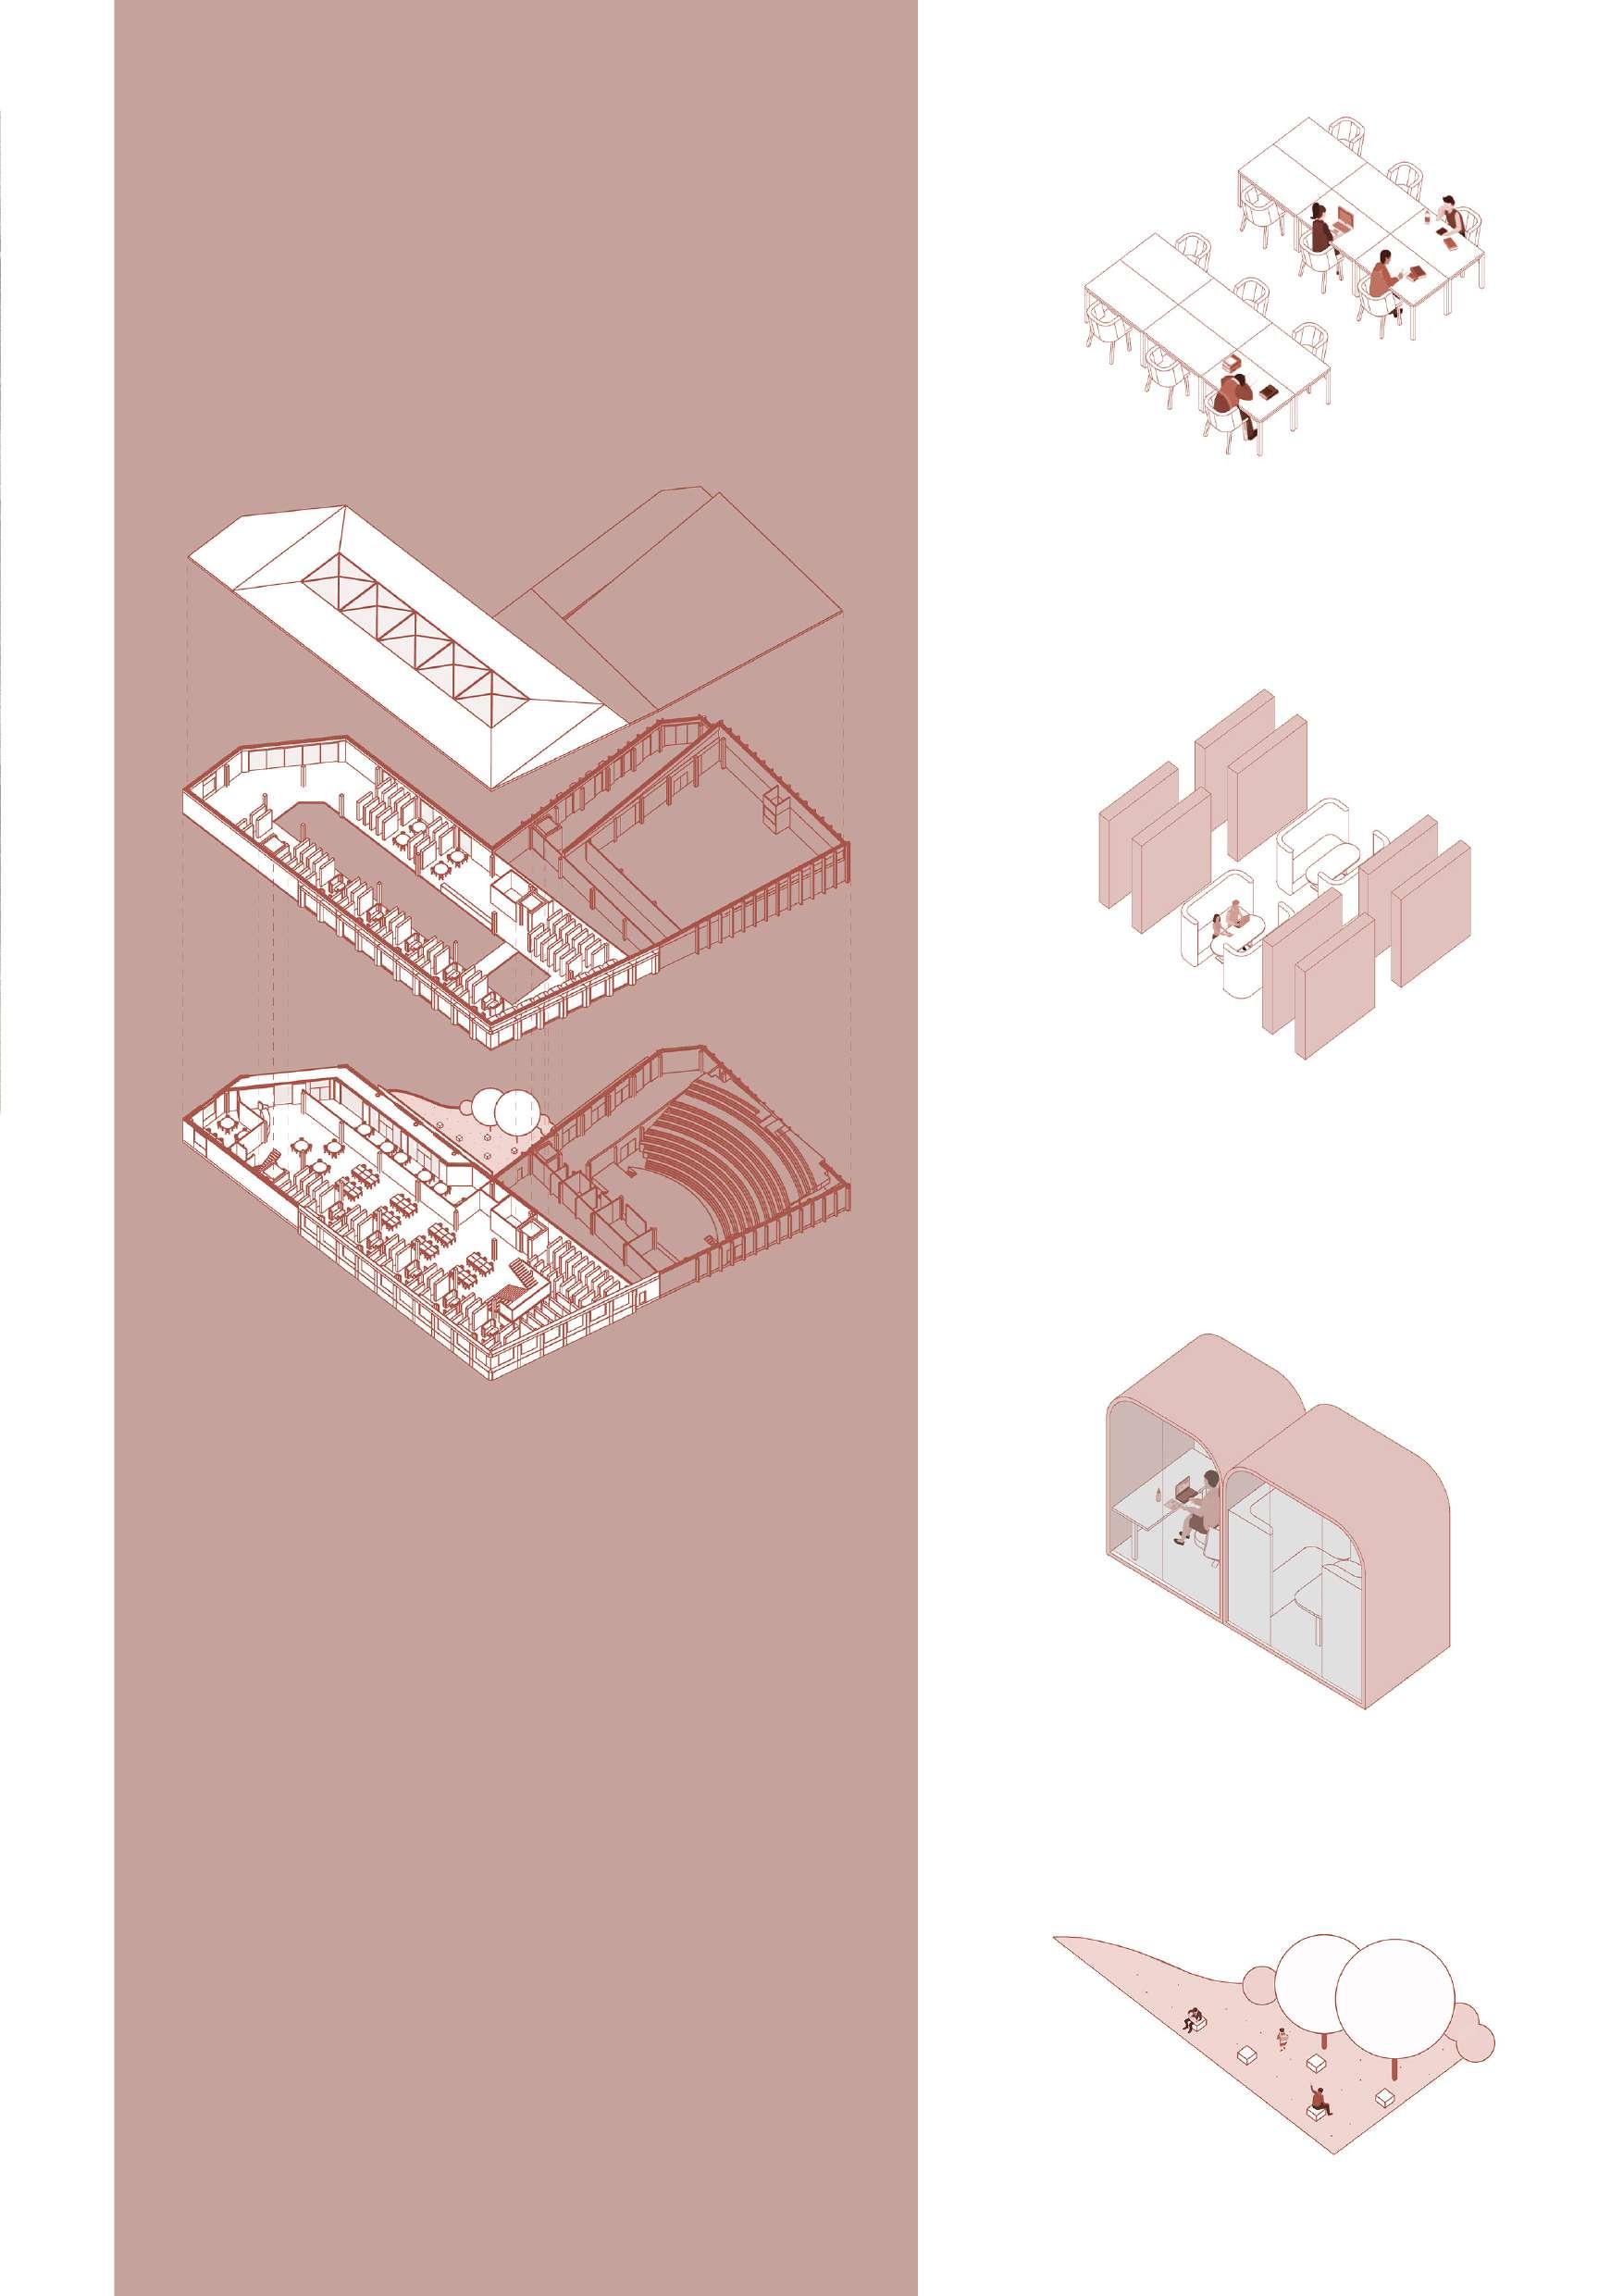
The Library
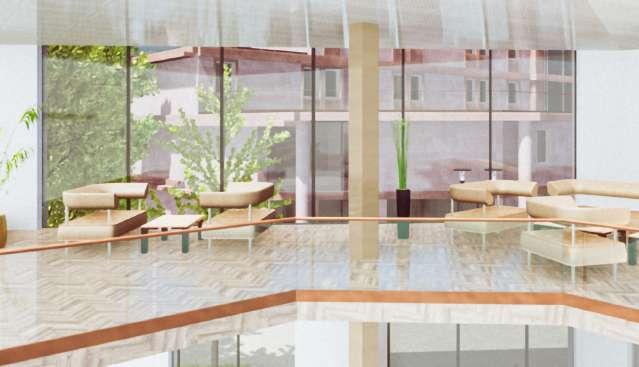
Desks in the ground floor atrium
The library joins with the auditorium in a form that frames the central courtyard. The two buildings share a two-storey plant room in between. The library entrance spills into the courtyard and takes up a portion of it as an outdoor reading area. Shared study spaces are provided in the atrium. Booth seats are tucked away between the shelves, effectively break up the long wall of shelves. Isolated study pods are provided on the first floor.
Secluded study booths between bookshelves
Isolated single & 6 people study pods
Outdoor seats in central courtyard
21
1 Metal parapet coping
2 300mm sheep wool insulation
3 Insulated flashing window head
4 160mm gutter
5 Timber baton
6 250mm deep glulam joist
7 Triple-glazed argon-filled window panel
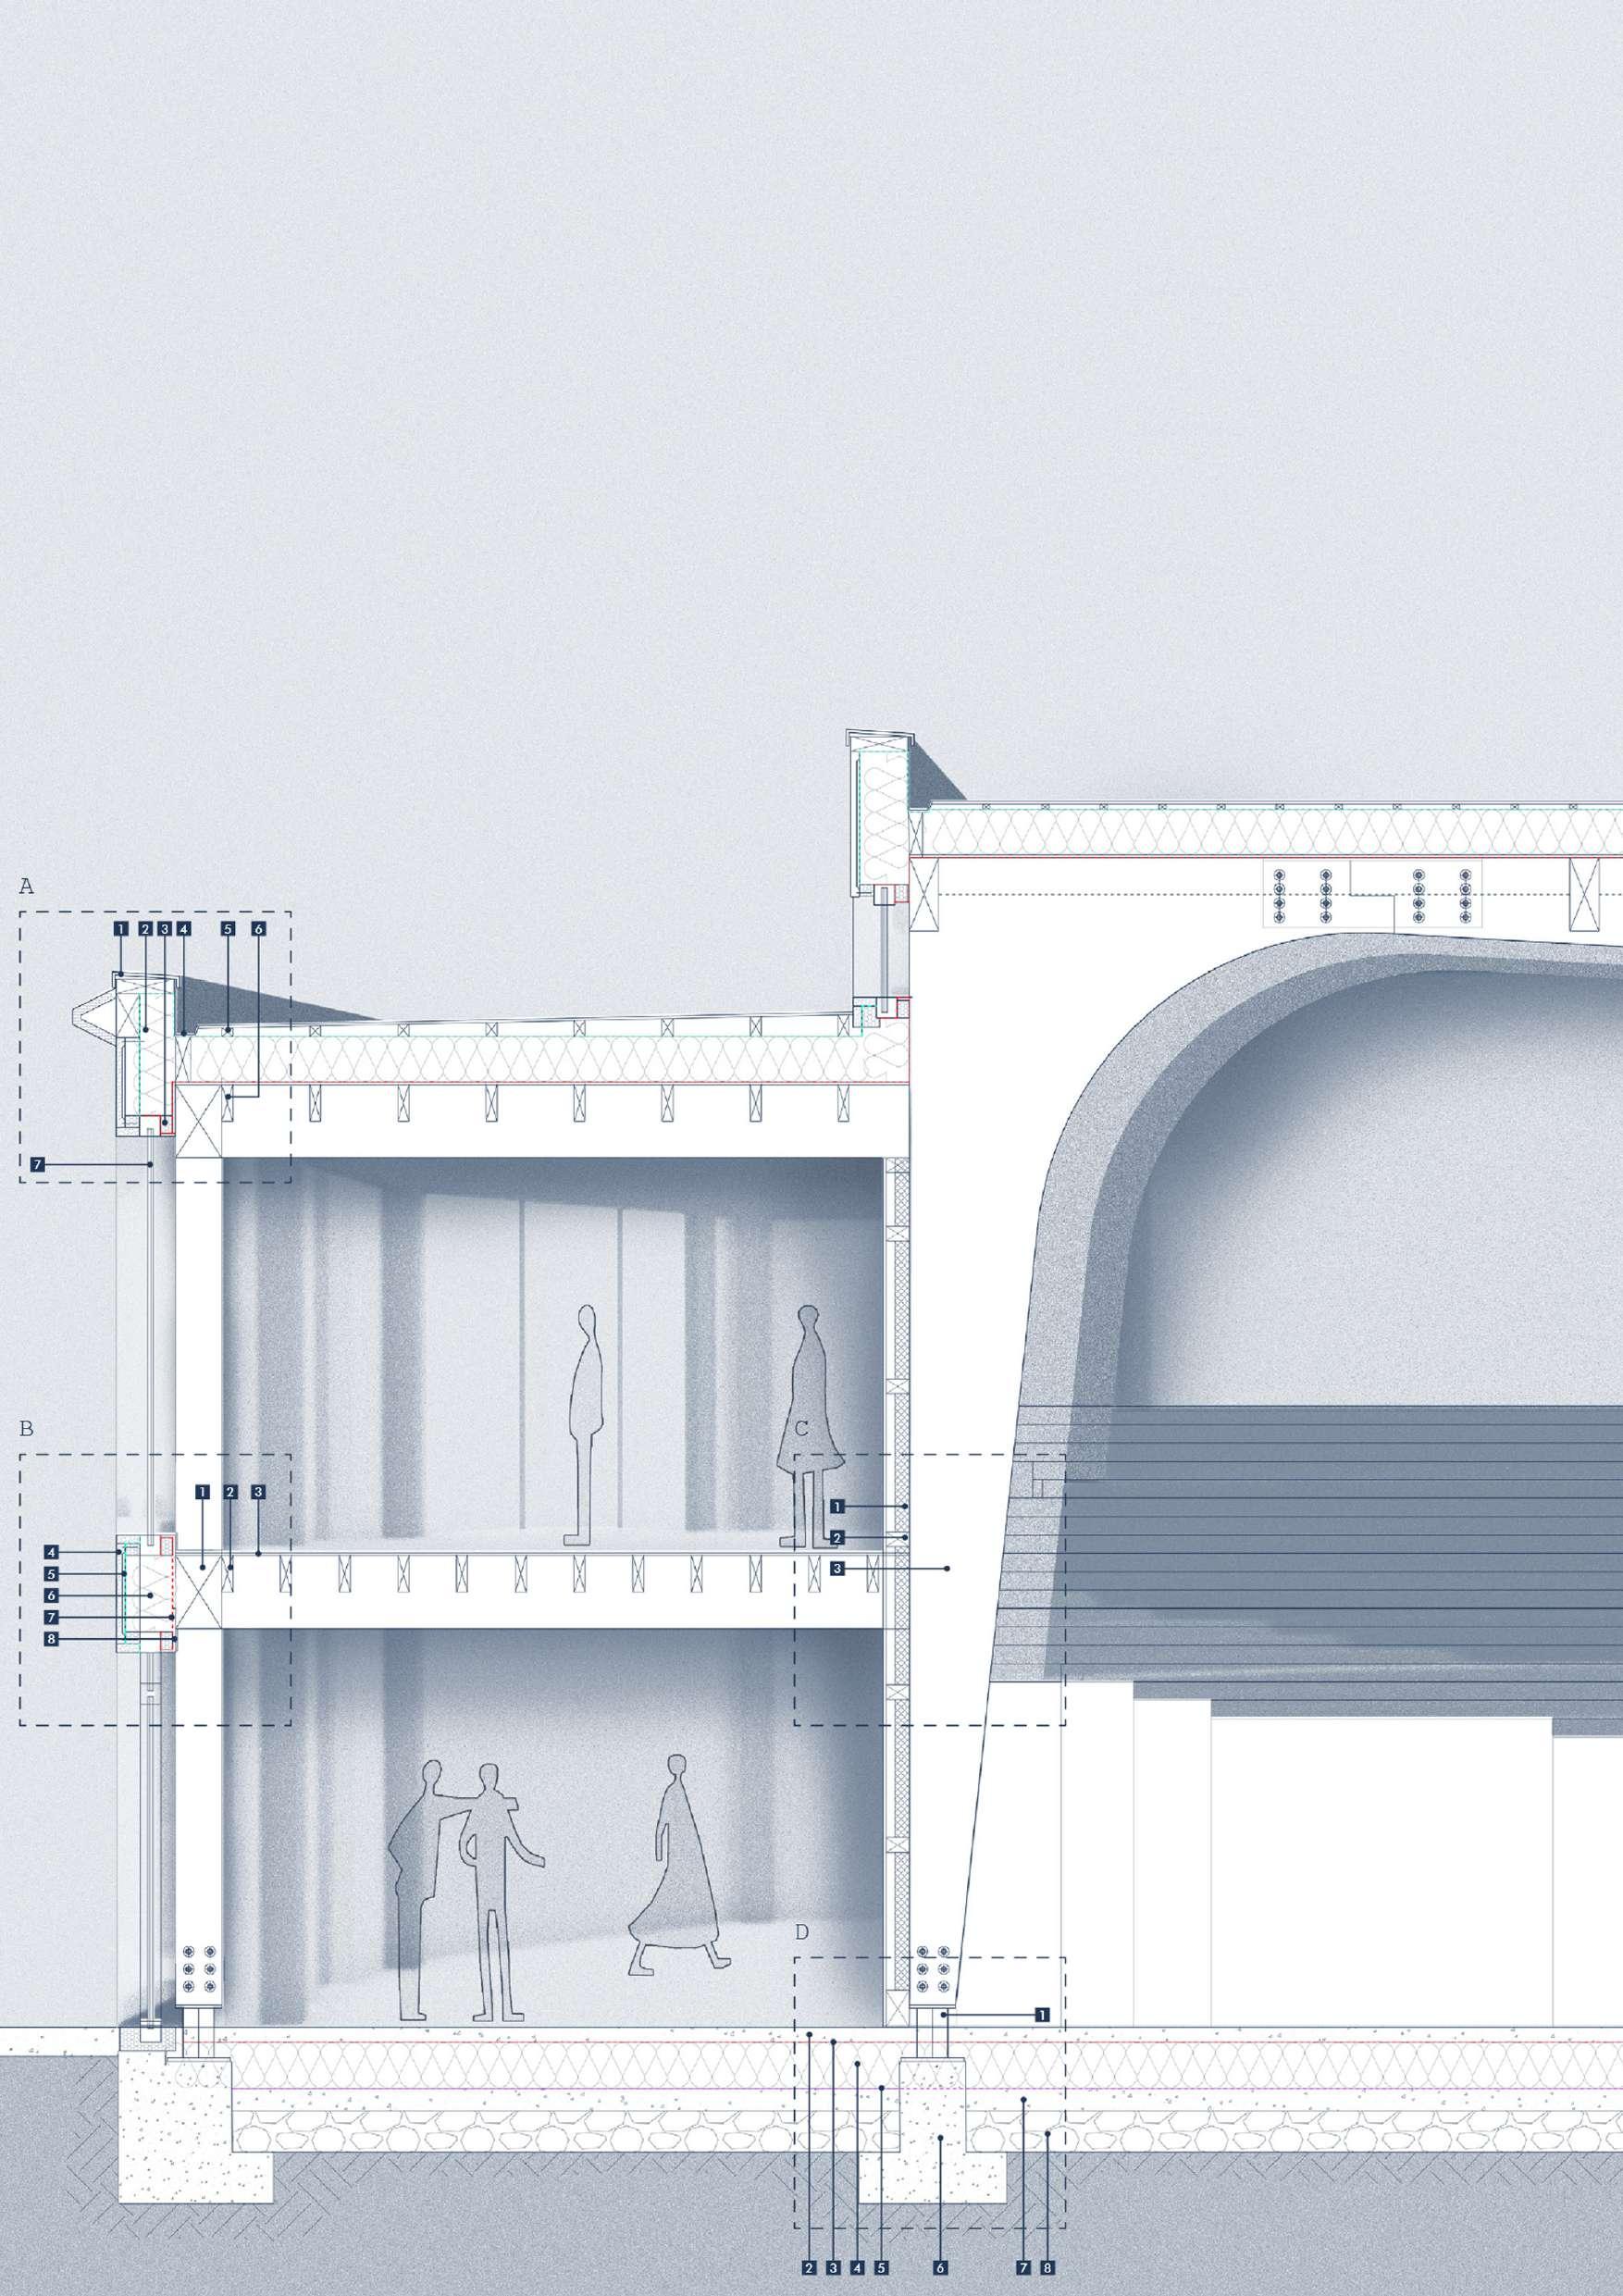
1 500mm x 300mm glulam beam
2 250mm deep glulam joist
3 18mm timber floor finish
4 40mm reconstituted stone cladding
5 Vapour control layer
6 300mm sheep wool insulation
7 Air tight membrane
8 20mm plaster board interior finish
1 Acoustic panel
2 160mm mass timber stud
3 Portal frame
1 Portal frame bolted to steel shoe 150mm F.F.L
2 100mm screed concrete finish
3 Air tight membrane
4 300mm sheep wool insulation
5 Damp proof membrane
6 Concrete pad foundation
7 150mm concrete
8 300mm compacted gravel
A
B
C
22
D
The Auditorium

Similar to the library, the auditorium has an entrance foyer that faces the courtyard. On top of the entrance foyer is the waiting lounge with picture windows framing the courtyard. The public wing’s height increases towards the chapel’s campanile, hence the rise of the seating to 4m from ground to take up the generous head space. The rise also provides sufficient space for the services and displacement ventilation that goes under the seats. A large space without columns to obstruct the stage, the auditorium is one of the most structurally challenging buildings in the scheme.
The structure is formed by a series of Parallel glulam portal frames (red)
Isolated single & 6 people study pods
Foyer facing the central courtyard
23
Social space/ vertical circulation
Student dorms
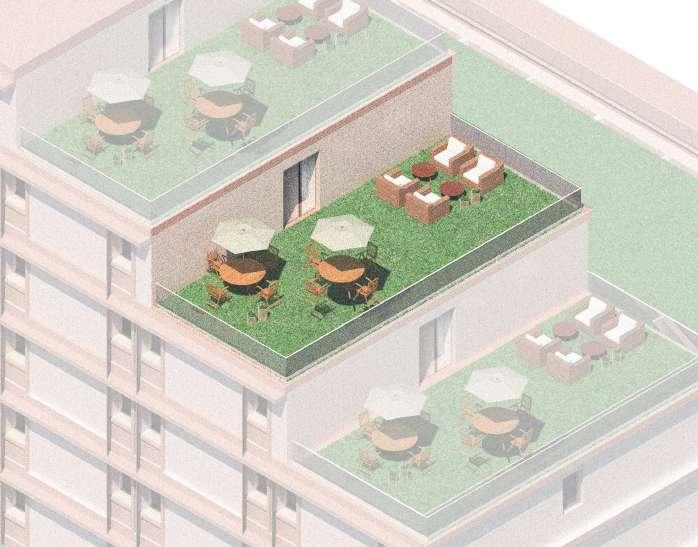
Outdoor green spaces/ balconies
Skylights
Room Ventilation
The rooms will need to me mechanically ventilated during winter and extremely warm days. An MVHR unit is placed in every room in the ceiling void and it is connected to the key card access such that it is only operational when the room is occupied. During other times of the year, the room can be naturally ventilated through the open-able windows.
Green Balconies
We chose to recess the floors on the private wing to create a less intimidating walk-through experience of the main parade. These recessions helped us create green balconies for a few flats, and we wanted to reserve these flats for students who are on the more extreme end of the autistic spectrum. Having a green breakout space which can be accessed directly through your flat block creates a private sanctuary for students. These spaces are ideal for students who would like to get some fresh air without having to be exposed to a lot of stimuli.
First Floor Plan
24
Physical Model Photos
 Western Elevation
25
Chapel Structural model
Kathak Studio
Individual Project |Traditional Dance studio | 3rd year
Site: Camden, London
Project: Dance studio
Project duration: 6 weeks
For my individual project in 3rd year, our assigned site was in the borough of Camden in London. The brief was to design a dance studio. Camden is best known for being artistic, and expressive. It houses people of all backgrounds and is home to a number markets proudly representing various cultures. Being of Indian heritage, and seeing that there is a thriving Indian population in Camden, I chose to design a “Kathak” studio which is a form of South Indian Dance/ Drama.
 Northern Elevation
26
Southern Elevation
Kathakali performances often narrate stories of good versus evil. I wanted to somehow indicate that through the form of my building. This led to the idea of playing with light in my studio. The perforated brick screens are way of indicating this. These screens allow for sufficient daylight, while also giving pedestrians a glimpse of the dance through the screens.
Since Kathakali is such a vibrant and expressive dance, I knew it had a place in Camden. But since it can seem intimidating to people who may not know about it, I wanted to only give away glimpses of it through the screen to encourage people to come in and learn about it.


 First Floor Plan
Second Floor Plan
Kathakali Performer
First Floor Plan
Second Floor Plan
Kathakali Performer
27
North - South Section
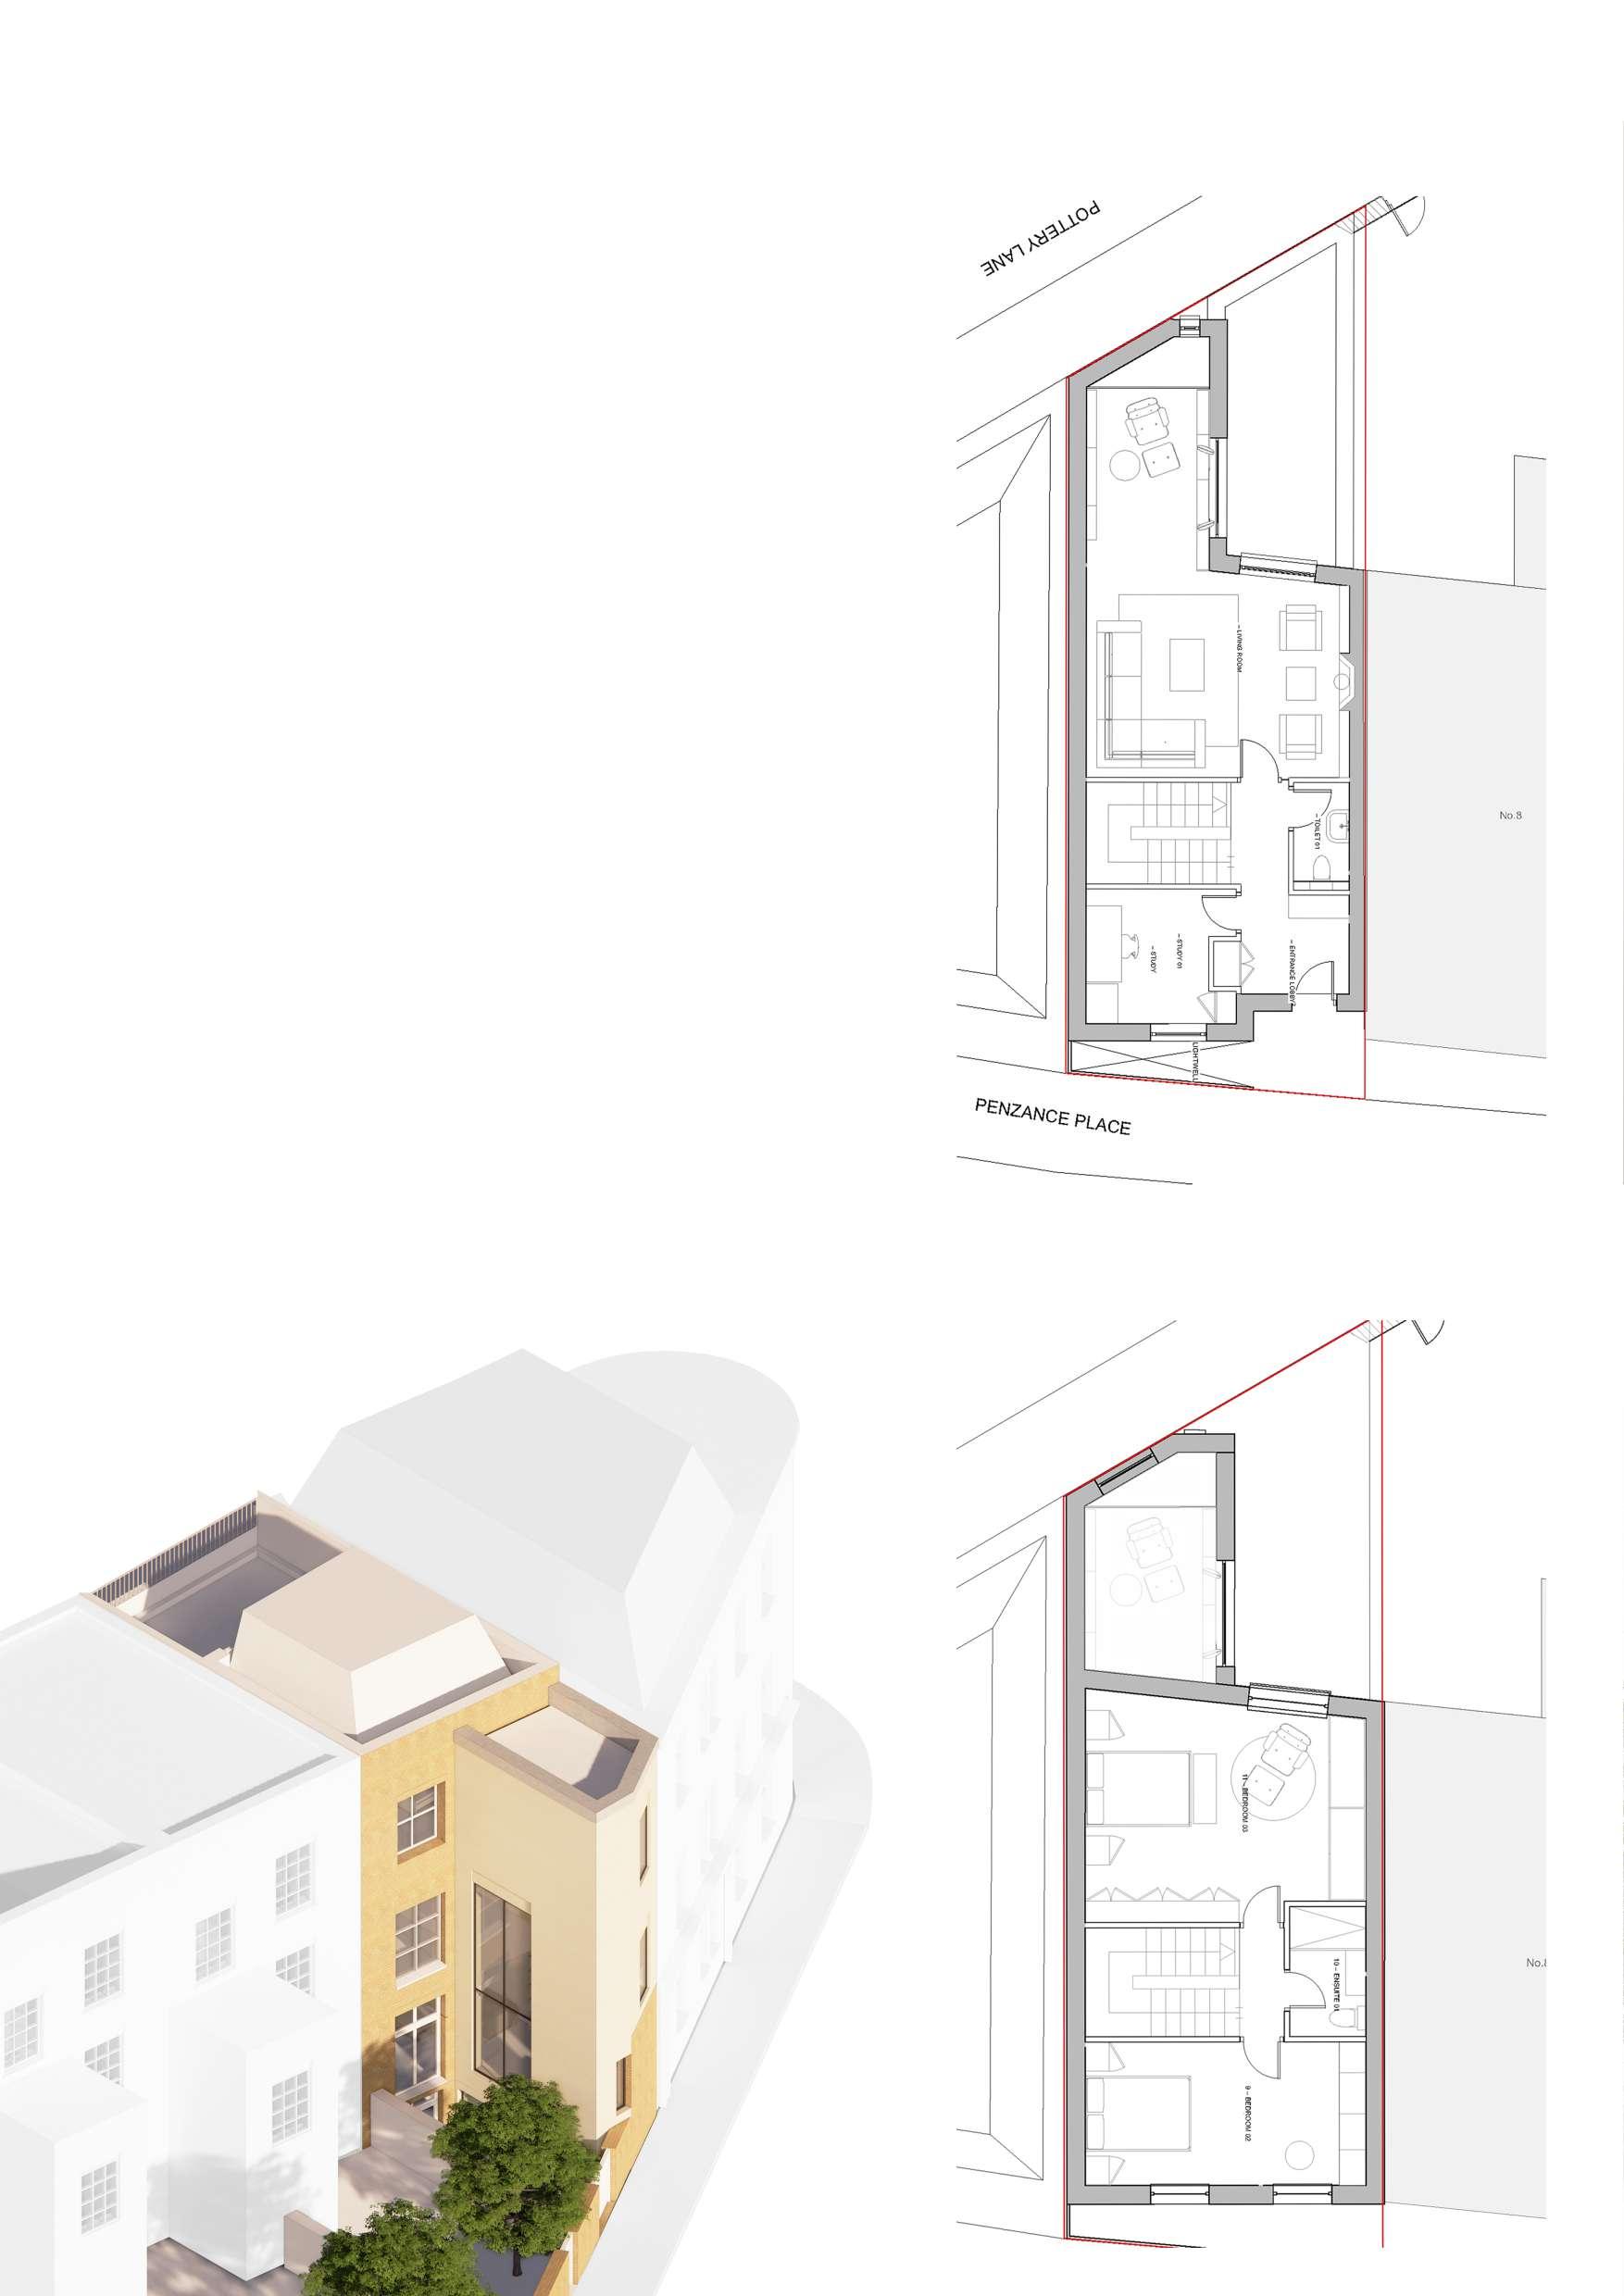
23 + Guy Stansfeld Architecture
Year out placement - post part 1
Site: Notting Hill
Project: Residential (extension + Interiors)
RIBA stage 2
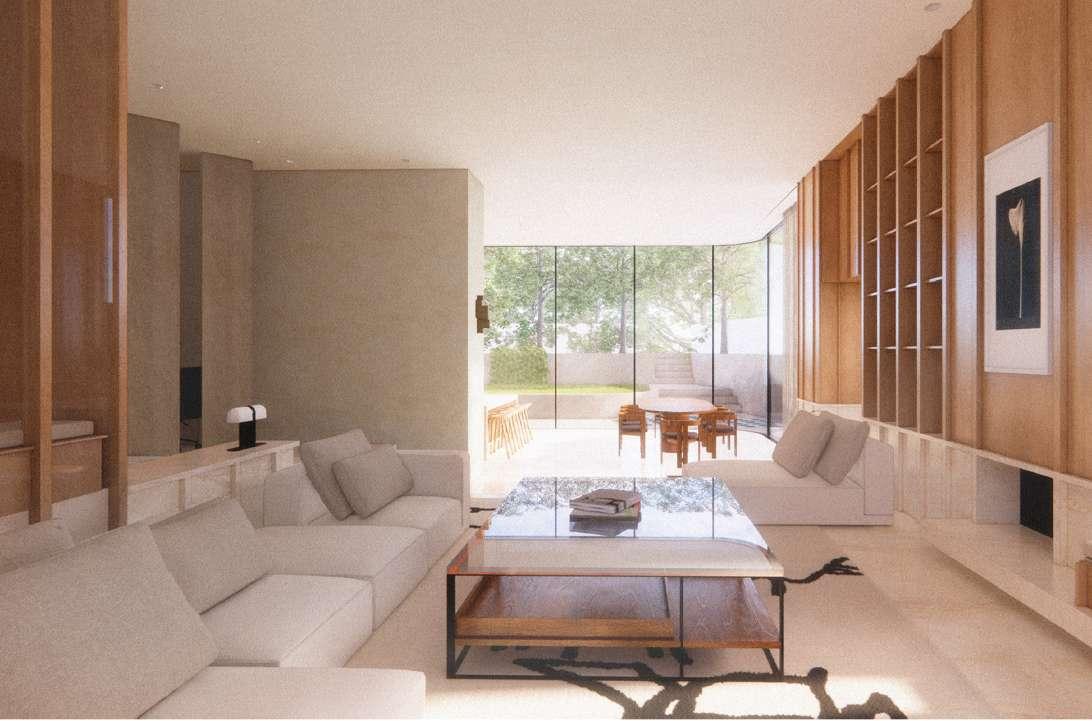
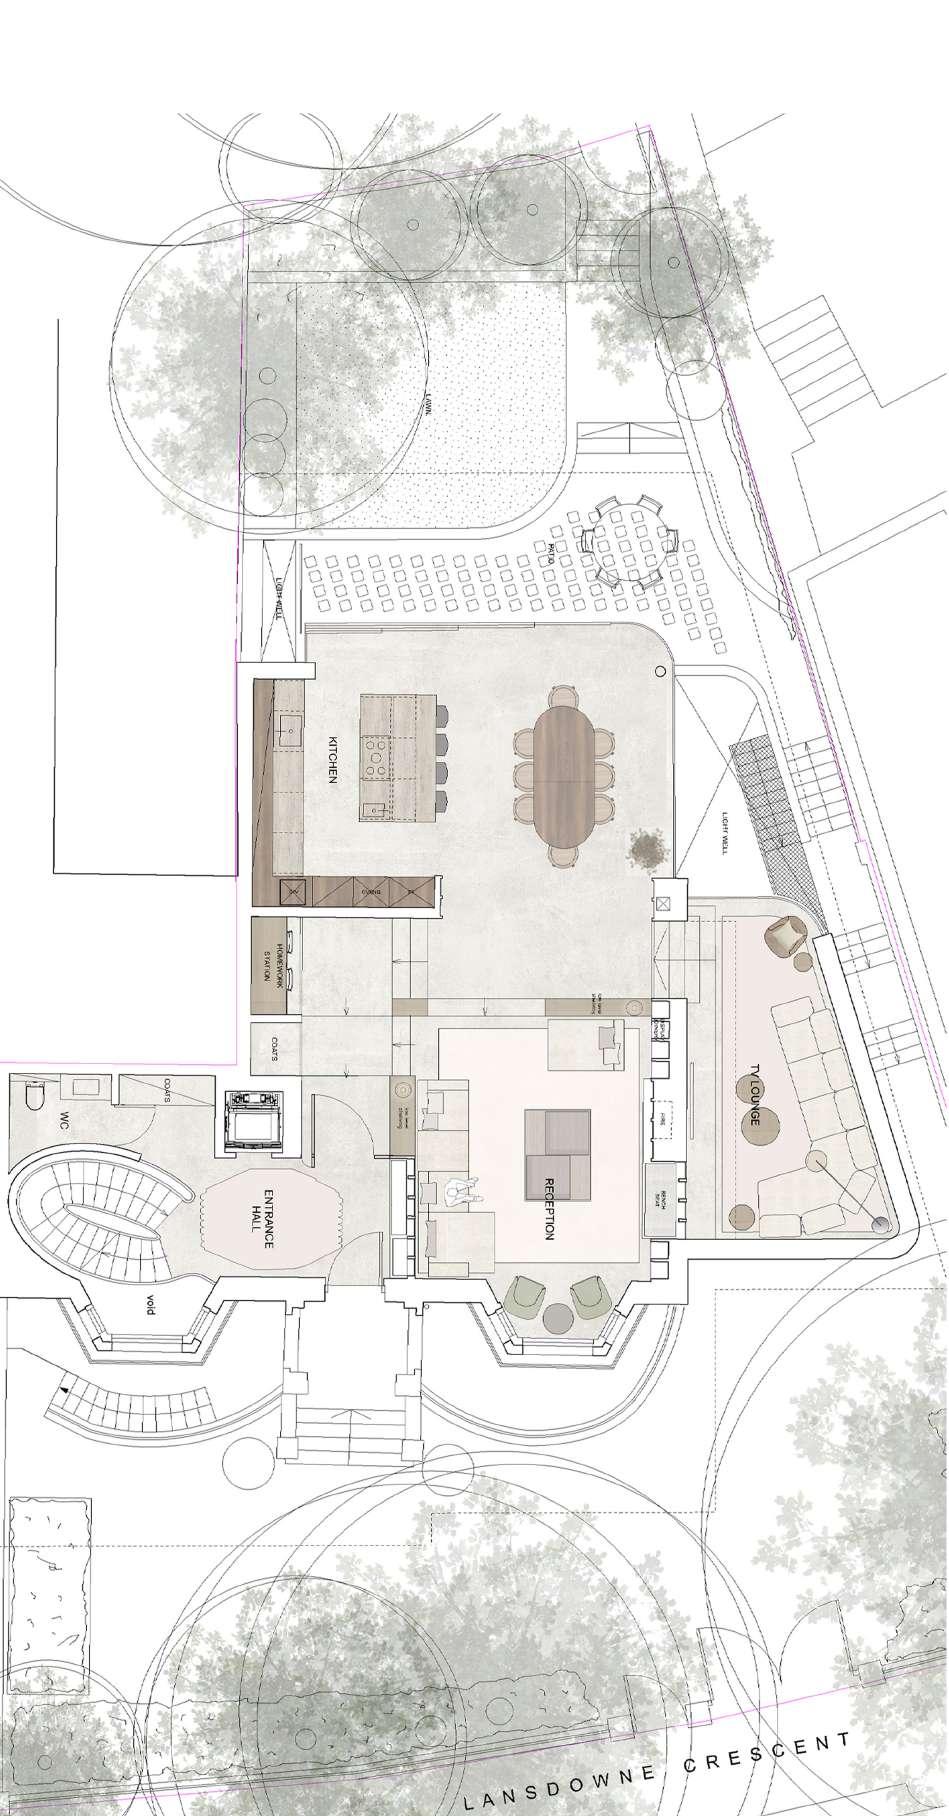


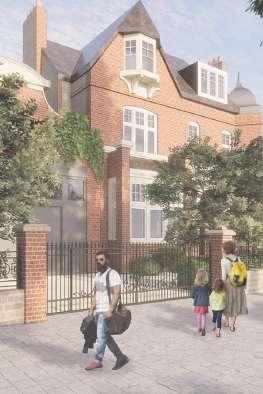
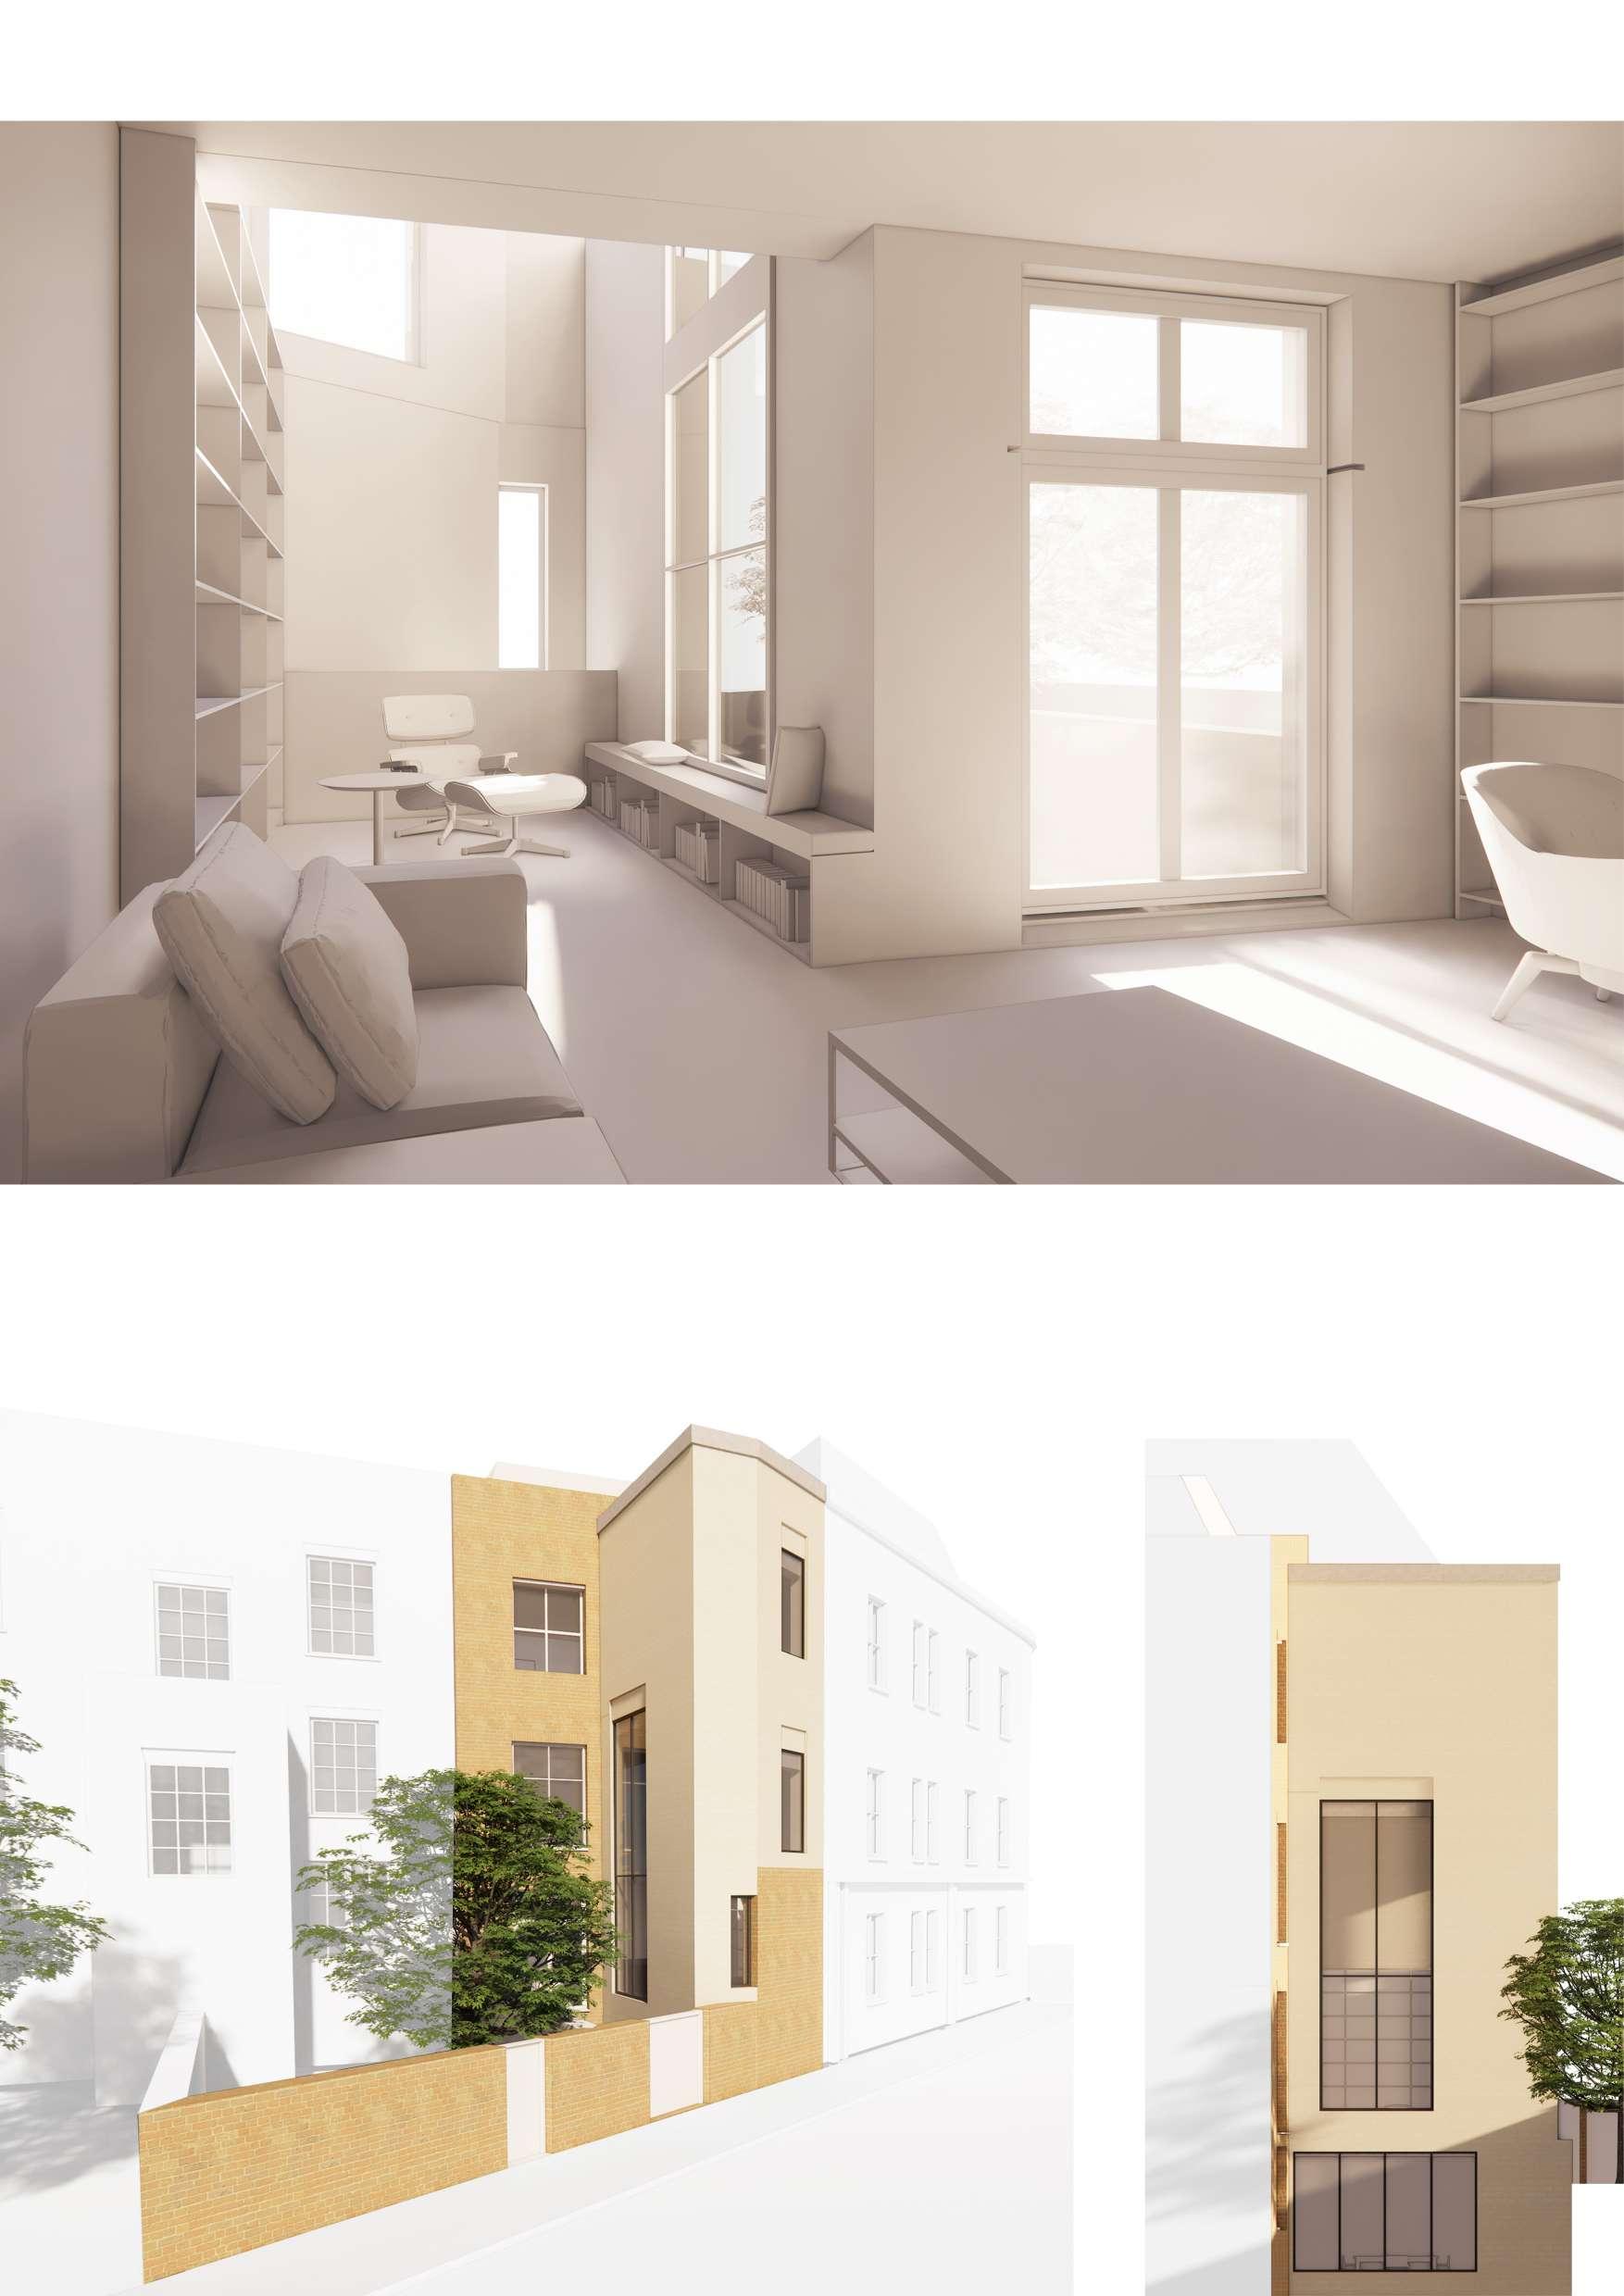
17 Lansdowne Crescent is a town house in Holland park. The brief was to refurbish the entire house and also introduce a new Basement level along with a side extension which can act as a TV room. I worked with a senior architect to model and plan the interior spaces. Moreover, I was given the opportunity to work intimately with the FF & E department to pick and place the furniture pieces. The new side extension gave us an opportunity to play with different levels which make each designated space on the ground floor have its own unique language and function.
Living Room (view A)
Raised Ground Floor
Visuals made by me
28
Sketchup, Enscape, Photoshop
Bar/ lounge (view B)
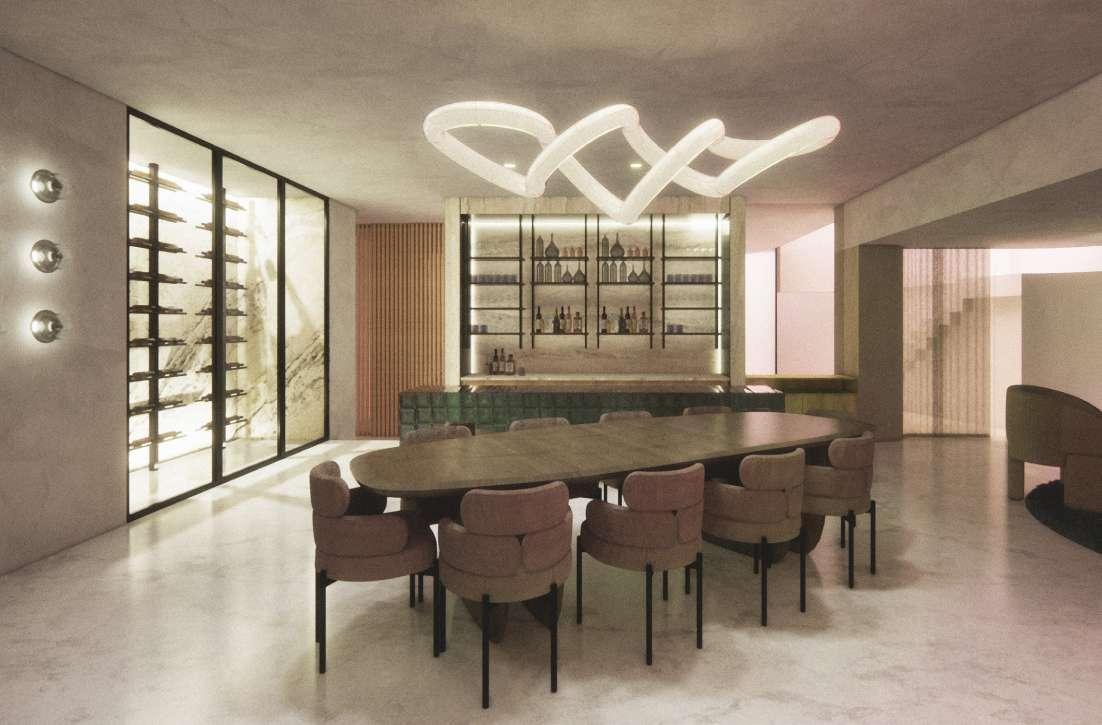
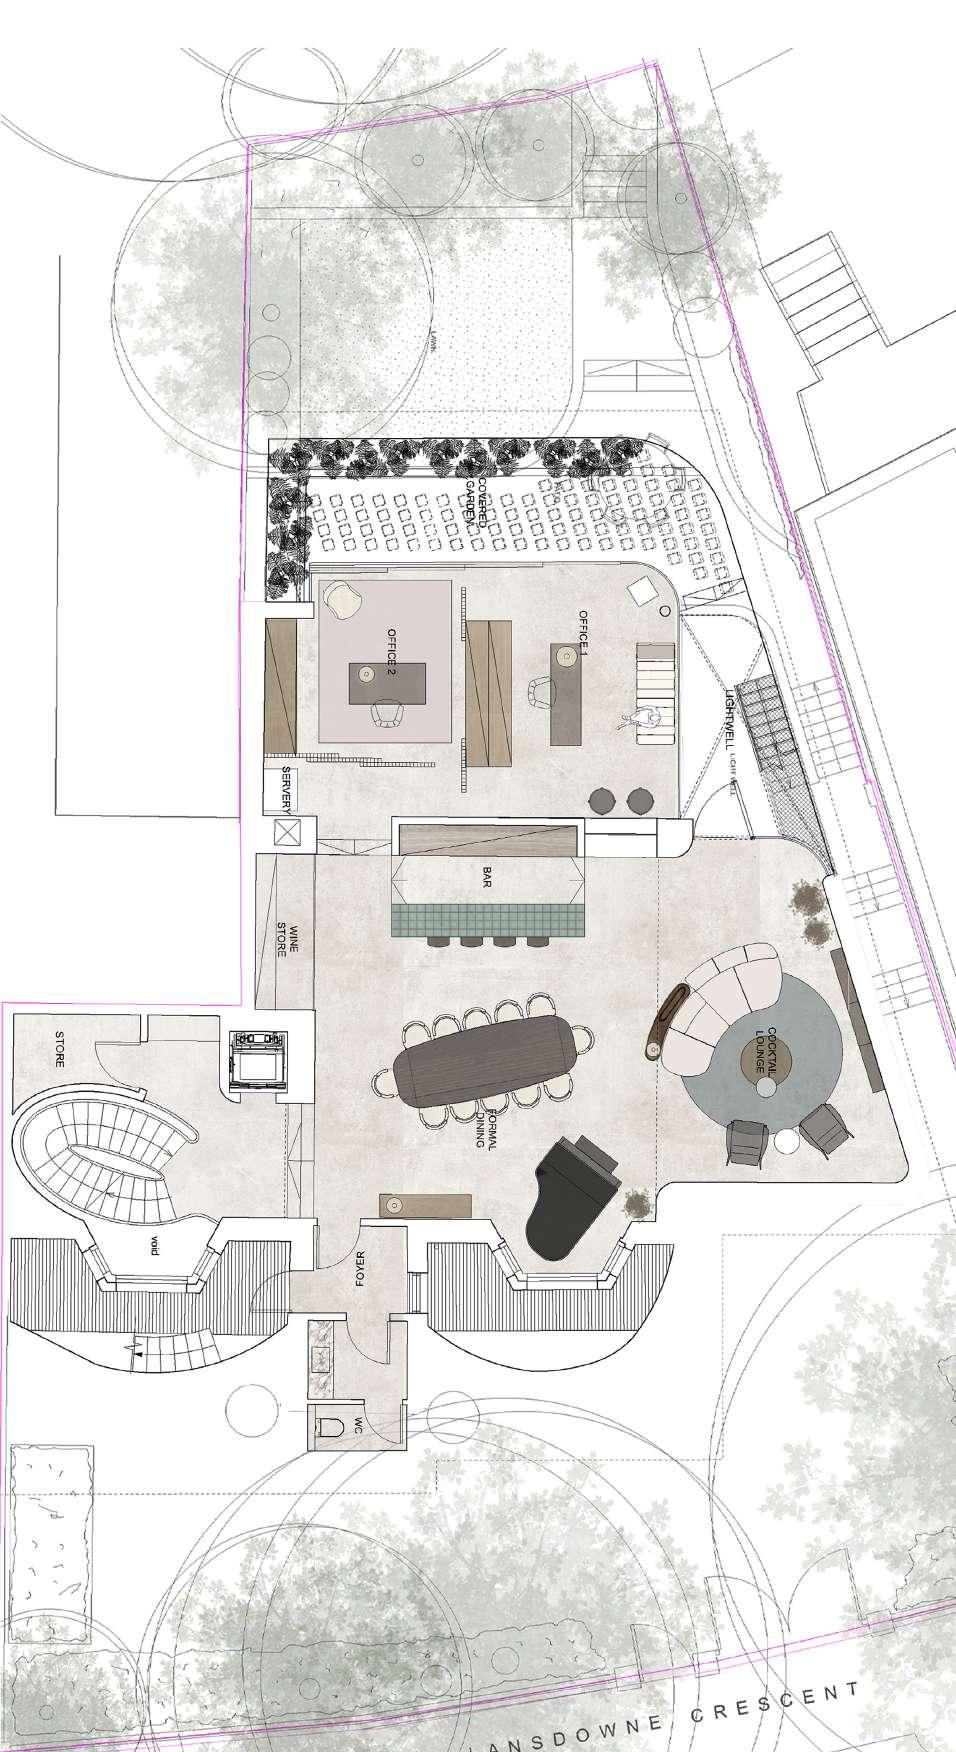


The raised ground floor very much leans into the theme of “light”, using lighter woods and fabrics and making use of a lot of daylight. The lower ground floor however, is quite the opposite. We envisioned this space being a dim cosy lounge. A space to entertain guests in the evening. The lounge is also equipped with a feature glass bar, which contrasts the rest of the darker tones.
During the daytime however, the study spaces in the back receive adequate daylight through the light well, and the glass-bricks placed in the backyard.
Lower Ground Floor
Visuals made by me
29
Sketchup, Enscape, Photoshop
23 + Guy Stansfeld Architecture
Year out placement - post part 1
Site: Notting Hill
Project: Residential (extension + Interiors) RIBA stage 2
This is one of the projects that I have been involved in from the beginning. Moreover, I had the pleasure of actively contributing to the overall design along with another part 1 assistant.
At the moment, we are proposing a complete refurbishment of the entire town house. Moreover, we are proposing the demolition of the conservatory in the rear, and replacing it with a three storey extension which would house a double height reading nook and an en-suite to the master bedroom.
I suggested the introduction of large double height glazing to the extension. This is because the old conservatory was the main source of light in the living area. Introducing a double height space to the living room makes it feel more grand whilst allowing light to flood the living area.
Views A, B and C show the current iteration of the scheme. However, the design is likely to evolve as go back and forth with the client.
A B C
Axonometric
View
Ground Floor Plan
First
Floor Plan
GA drawings made by me using Vectorworks 30
Internal View A
External View B
External View C
31
Visuals
made by me
23 + Guy Stansfeld Architecture
Year out placement - post part 1
Site: Putney, London
Project: Residential (extension + Interiors) RIBA stage 2
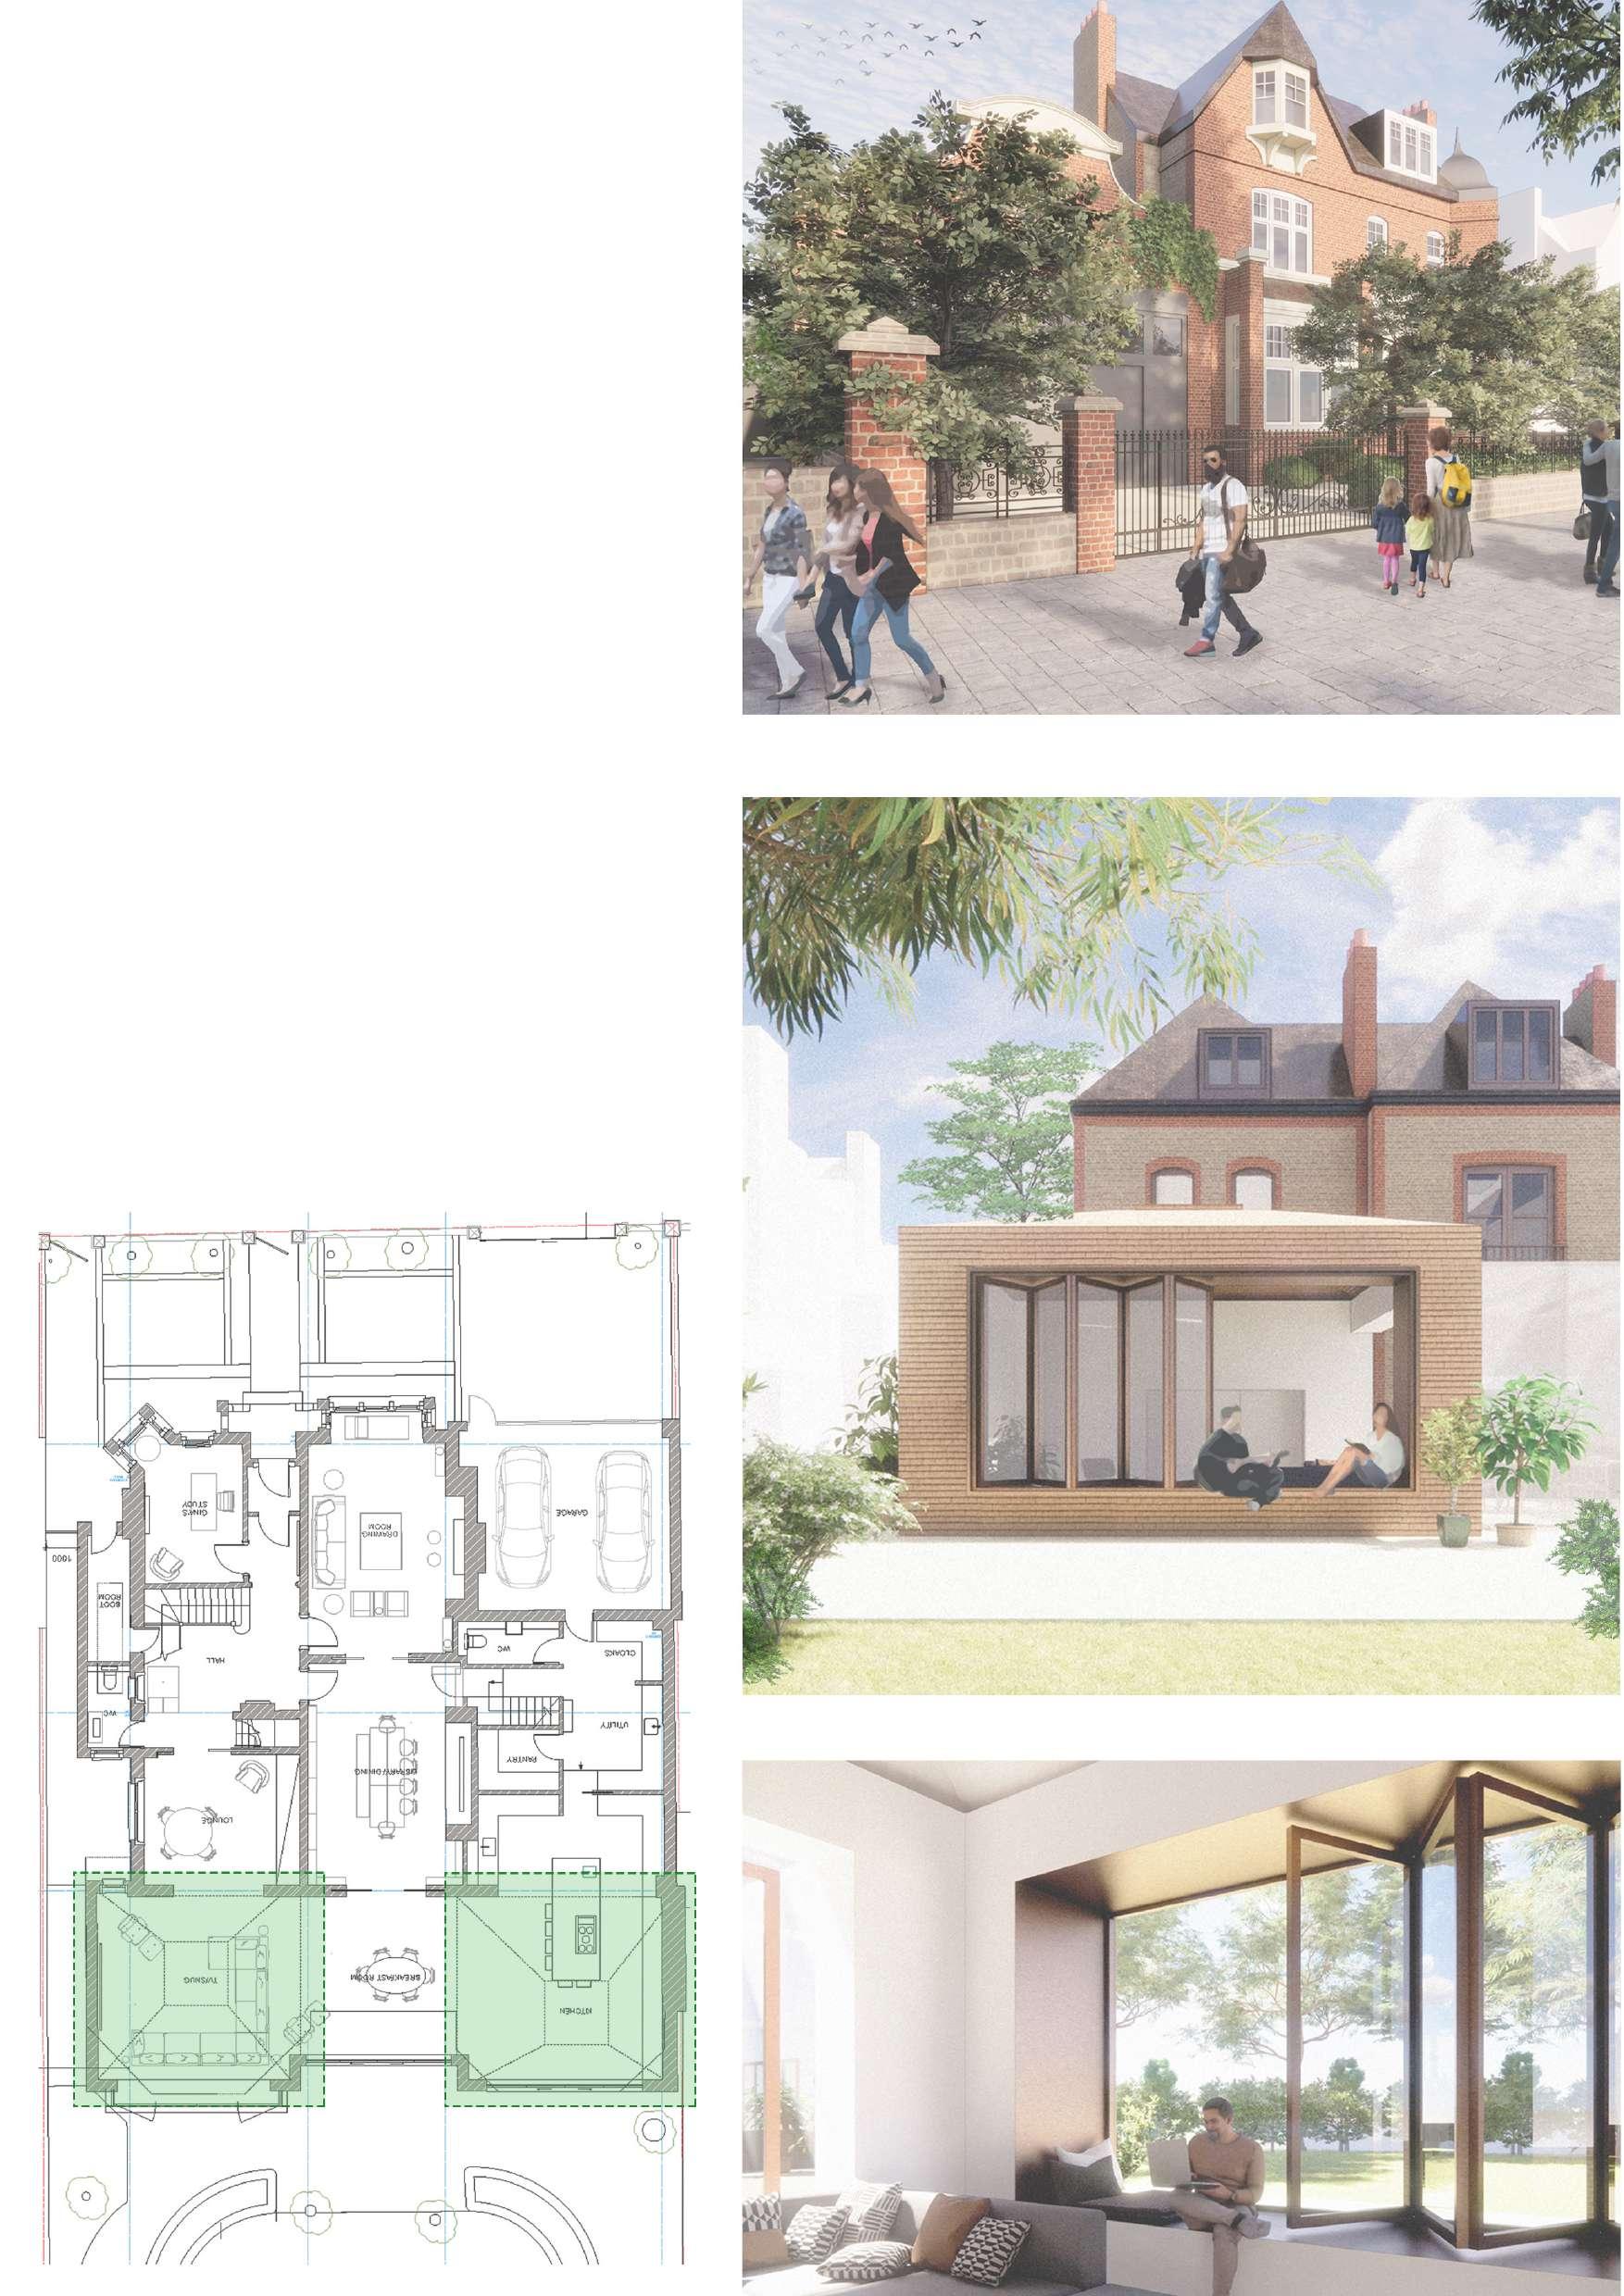
The brief of this was project was to create an extension to add a kitchen/ dining and living area. Located in west London, this building was listed. We therefore couldn’t have any new additions be visible from street level. So, the extension was added towards the back of the house facing the lawn. The volumes were deliberately quite contemporary in their look and feel to contrast the rest of the house. Yet, palette was kept the same. The visuals on the right were created by me to get a sense of the view from the street level, and also from the backyard in order to finalise which kind of glazing system will be used.
Ground Floor Plan A B C
Street Level View A
Extension View C
Extension View B
32
Visuals made by me Sketchup, Enscape, Photoshop
23 + Guy Stansfeld Architecture
Year out placement - post part 1
Site: St Tropez, France
Project: Residential (New Build) RIBA stage 3
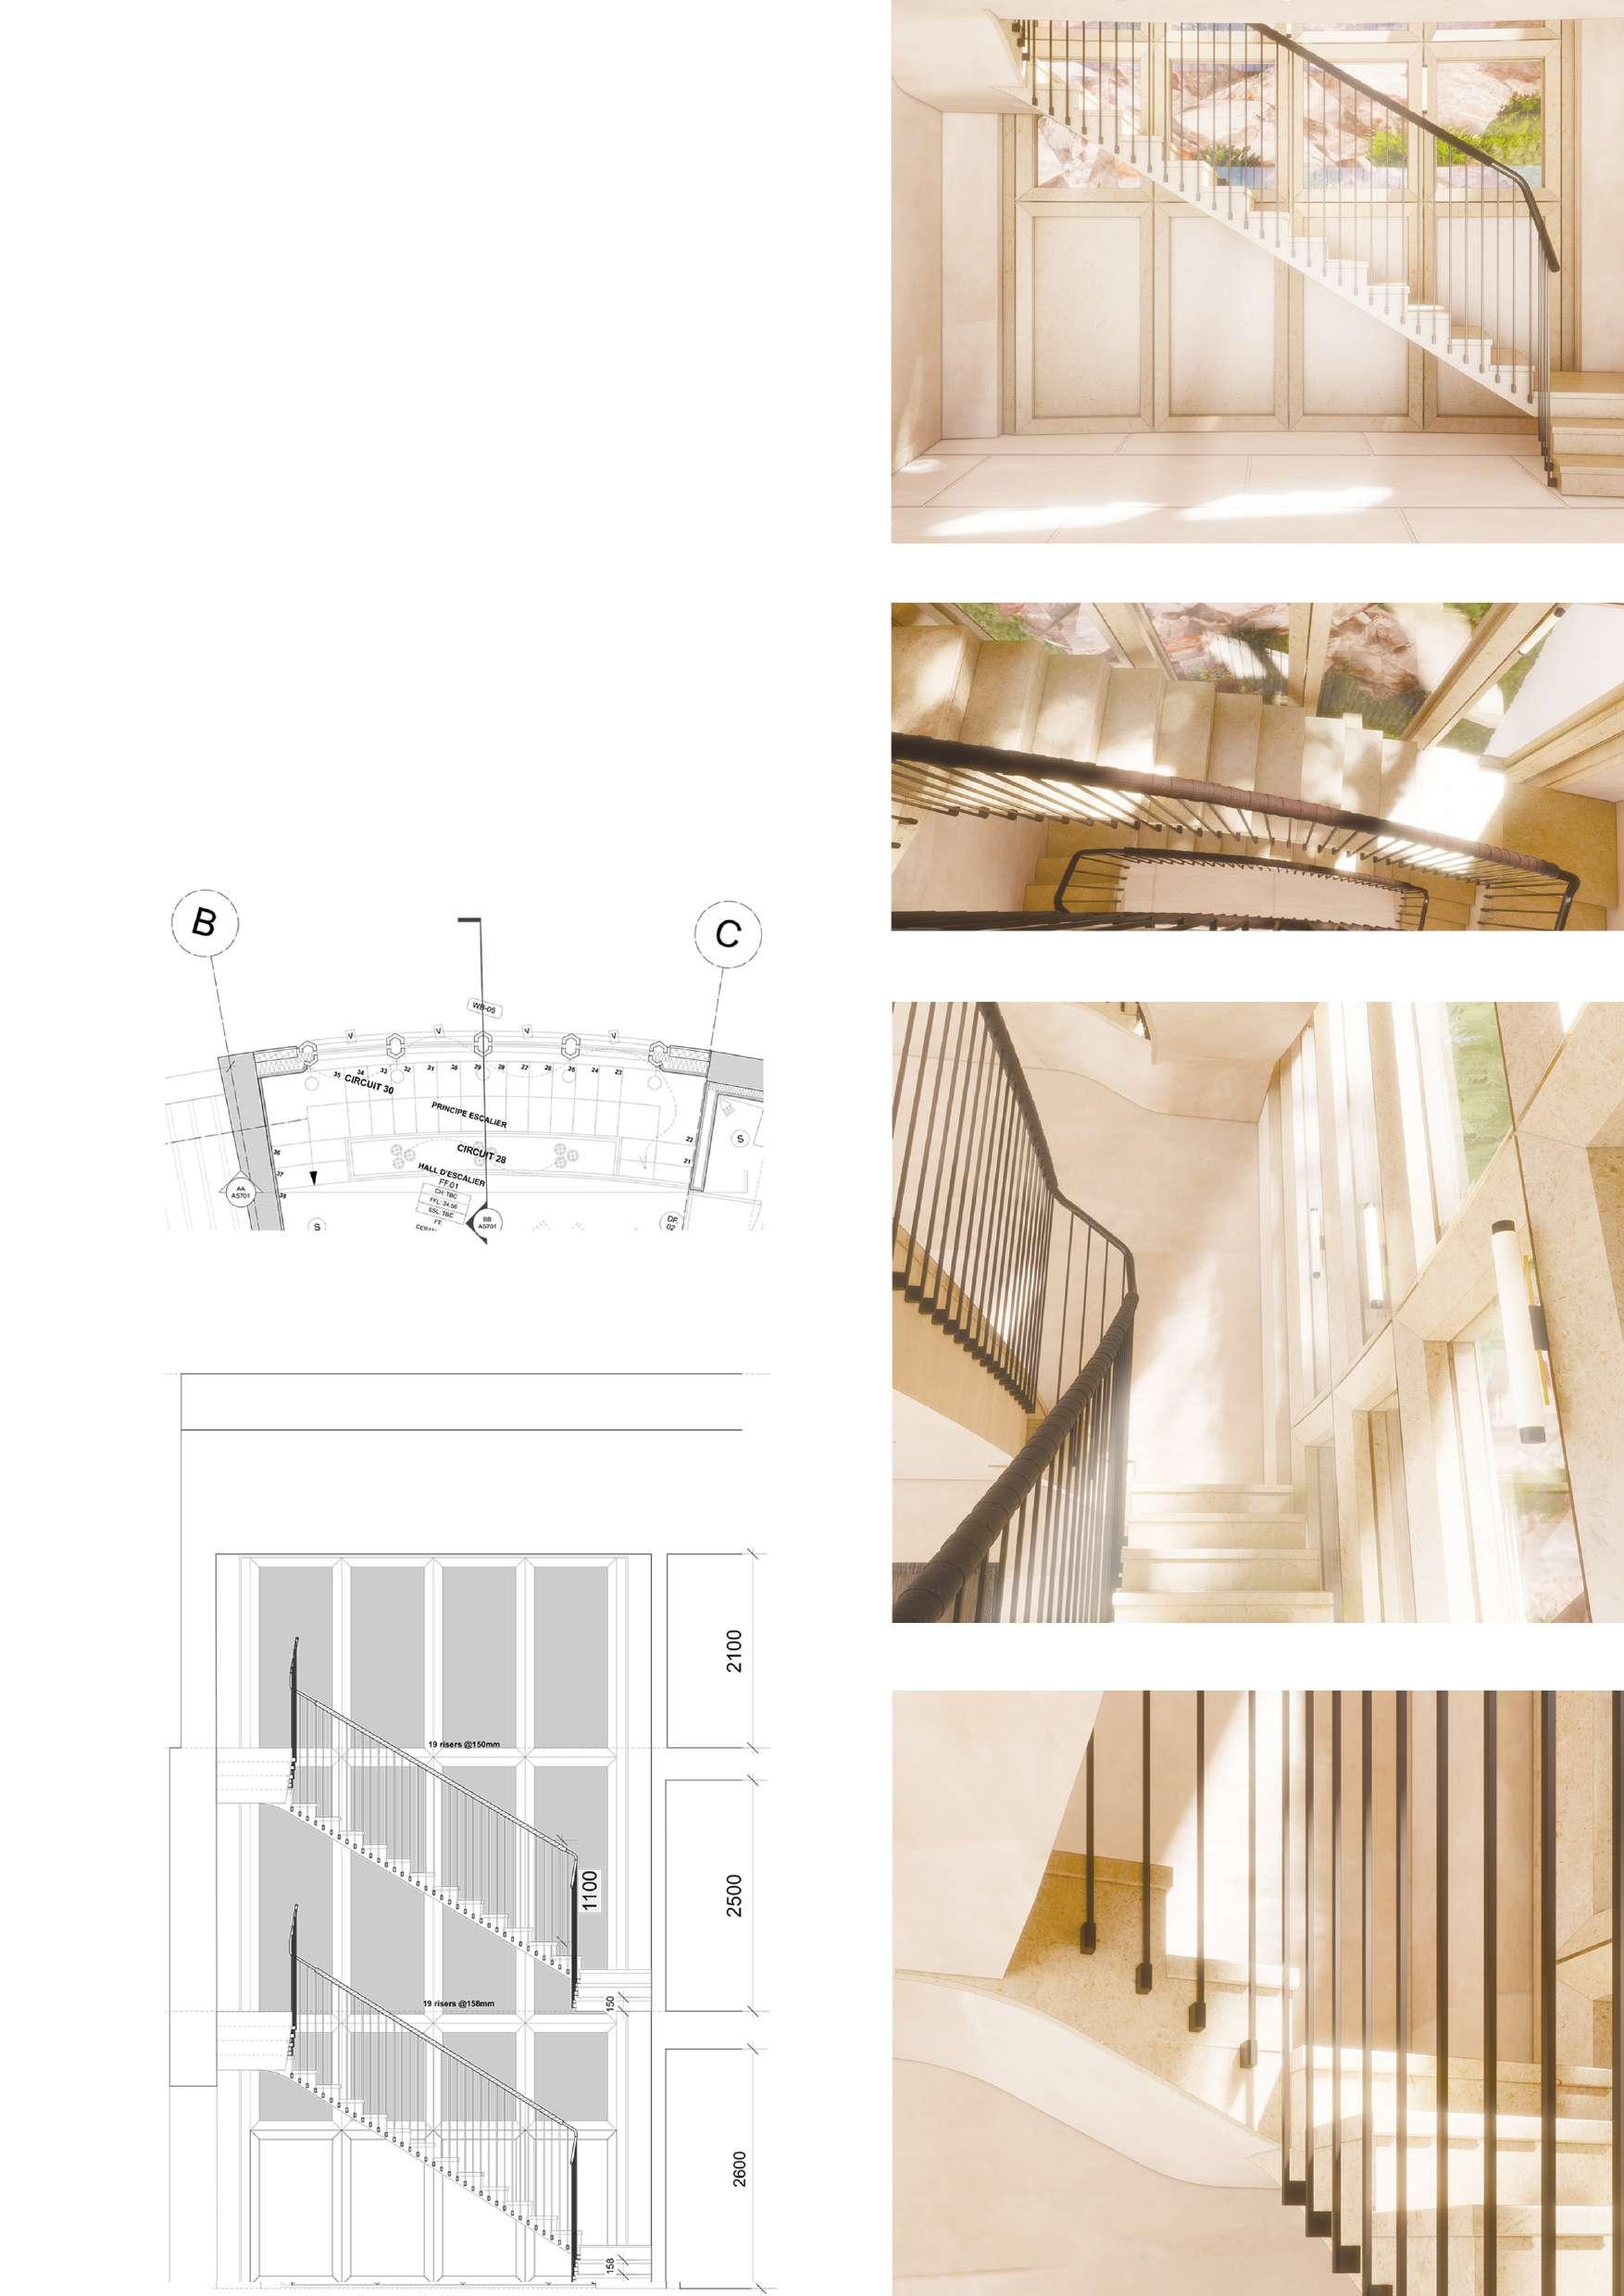
My task for this villa in St Tropez was to come up with a couple of options for the main entrance staircase. After several iterations of the materiality, detailing of the steps and the shape of the balustrades, we settled on the version shown on the right. We decided to keep it simple yet elegant, using warm limestone finish for the stairs with a curved base detailing. Furthermore, wrapped leather was used on the handrails, which further complemented the rest of the color palette. All visuals and drawings shown were created by me for internal and client meetings.
33
Visuals made by me Sketchup, Enscape, Photoshop
34
