#W KCRA F T E RN OO N
Chocolate Box Giant
by Kitiya Palaskas
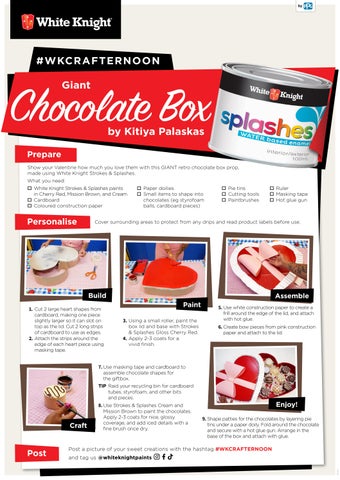
Prepare Show your Valentine how much you love them with this GIANT retro chocolate box prop, made using White Knight Strokes & Splashes. What you need: White Knight Strokes & Splashes paints in Cherry Red, Mission Brown, and Cream Cardboard Coloured construction paper
Personalise
Paper doilies Small items to shape into chocolates (eg styrofoam balls, cardboard pieces)
Pie tins Cutting tools Paintbrushes
Ruler Masking tape Hot glue gun
Cover surrounding areas to protect from any drips and read product labels before use.
Build Paint
1. Cut 2 large heart shapes from cardboard, making one piece slightly larger so it can slot on top as the lid. Cut 2 long strips of cardboard to use as edges. 2. Attach the strips around the edge of each heart piece using masking tape.
3. Using a small roller, paint the box lid and base with Strokes & Splashes Gloss Cherry Red. 4. Apply 2-3 coats for a vivid finish.
Assemble 5. Use white construction paper to create a frill around the edge of the lid, and attach with hot glue.
6. Create bow pieces from pink construction paper and attach to the lid.
7. Use masking tape and cardboard to assemble chocolate shapes for the giftbox. TIP Raid your recycling bin for cardboard tubes, styrofoam, and other bits and pieces.
Enjoy!
8. Use Strokes & Splashes Cream and
Craft
9. Shape patties for the chocolates by layering pie tins under a paper doily. Fold around the chocolate and secure with a hot glue gun. Arrange in the base of the box and attach with glue.
Post a picture of your sweet creations with the hashtag #WKCRAFTERNOON and tag us @whiteknightpaints RET3071
Post
Mission Brown to paint the chocolates. Apply 2-3 coats for nice, glossy coverage, and add iced details with a fine brush once dry.