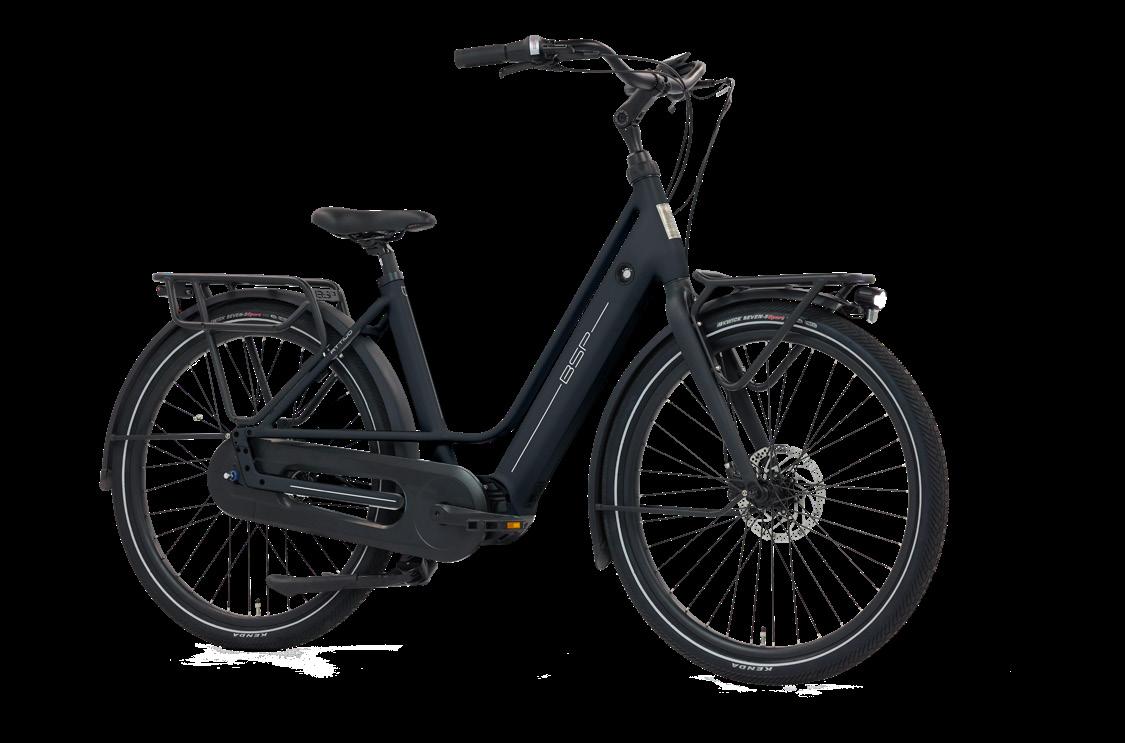
BSP Attivo
User Manual
The VIN number (also called framenumber) can be found on the bottom of the frame. The Attivo is supplied with an ABUS ART II certified lock, we advise registering the key number here in the manual.
VIN number
Key number
Date of purchase
1.1 Pedal assistance
1.2 Assistance profiles and power levels
1.3 General warning
2.1 Register your e-bike
2.2 Guidelines for using your Attivo
2.3 Setting the height of the saddle
2.4 Installing the Seatpost And Saddle
2.5 Installing the Handlebar And Stem
2.6 Hand brakes
2.7 Charging the battery
2.8 Lock your bike
2.9 Gear system
2.10 Tips for using your bike
3.1 Button definition
3.2 Specifications
3.3 Installation instruction
3.4 Software alterations
3.5 Notes for users
4. Normal
4.1 Power on/off
4.2 Power-assisted mode
4.3 View the data
4.4 Adjust the Headlight/backlight
4.5 Walk assistance
4.6 Type-C charge
5.1 Imperial/metric
5.2 Set the automatic shutdown time
5.3 Set the backlight
5.4 Set the light sensitivity
5.5 Reset the trip
5.6 Maintenance prompt
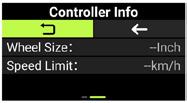
5.7 View the wheel size & speed limit
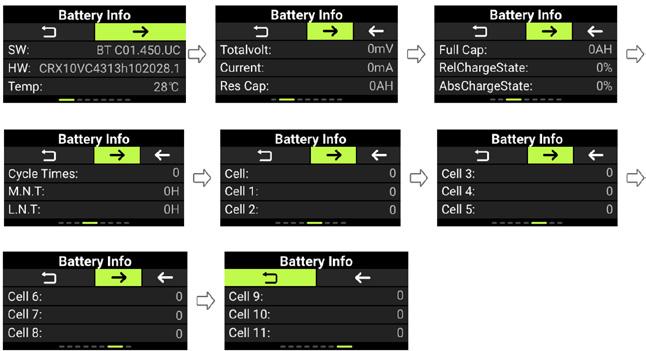
5.8 View the battery info
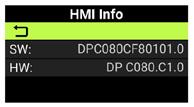
5.9 View the HMI Info
5.10 View the controller info
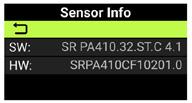
5.11 View the sensor info
5.12 Set the UI theme
5.13 View historical error codes
6.1.1 Use and storage
6.1.2 Points of attention 6.2 Range 6.3 Battery lifespan 6.4 Golden rules of battery use
8.1 Servicing
8.2 General maintenance
8.3 Major overhaul
8.4 Important maintenance safety warnings and tips
4.5 Walk assistance
4.6 Type-C charge
9. Helpdesk
9.1 Error notifications
9.2 Warranty
9.3 Conditions
9.4 General safety risks and tips
Everything you need to know about your e-bike.
Your e-bike has electrically powered pedal assistance. Thanks to the motor, it takes less effort to pedal. The motor provides appropriate assistance, depending on your speed and strength. So it's easy to start up and you also get a little extra nudge during the ride too.
The power assistance gives you more speed, so practise first outside of traffic.
The assistance of the motor kicks in as soon as you set off. It's best to engage the lowest level of assistance when setting off.
You can also use the bike without the pedal assistance. Bear in mind that the bike's lights don't work if the e-bike's power isn't switched on. When it starts getting dark we always advise to drive with the e-bike system turned on, visibility is extremely important and the lights of your e-bike will work even when the battery is low.
When extremely low turn off the pedal assistance and use the system purely for the lamps
Switch off the pedal assistance when you get off.
It's easy to adjust the pedal assistance to your preference and your route. For an expansive explanation how to use the pedal assistance see chapter 4 of the manual.
The degree of pedal assistance depends on your speed, the assistance profile you selected, the power you provide and how full the battery is.
The assistance of an e-bike motor is legally limited to a speed of 25 km/h (15,5 mph). As you approach the maximum speed, the assistance from the motor will gradually decrease.
Important: the more powerful the assistance profile you select, the shorter the range of the battery.
Using a bicycle means you run the risk of injury or damage. It is therefore very important to keep in mind and adhere to all warnings mentioned in this manual. Several warnings are placed throughout the manual, recognizable by the (!!) symbols. See also chapter 8 for an extensive overview of general warnings important for safe cycling practices.
Prepare for your trip.
You can use the VIN number (Vehicle Identification Number) of the e-bike to register and identify the e-bike and to activate the warranty. The VIN number (also called framenumber) can be found on the bottom of the frame (easily visible after turning the bike upside down). The frame number starts with BE33 - if stolen the police will need this number for a police report.
Important: We recommend you make a note of both the VIN number, the number of the key and the date of purchase and keep it in a safe place. In the event of theft or loss, this will help us help you faster and better.
The Attivo provides enjoyable and safe rides for you and your loved ones. Below are some important guidelines:
2.2.1 We designed your bike for:
Family outings, school rides, errands and visits to friends. Not intended for professional use, such as transporting goods.
Overloading can:
Decrease stability.
Cause structural damage to the frame.
Void the warranty.
2.2.2 Safe riding
Avoid riding off curbs while on the bike. Step off and keep the handlebars under control. Ride only on paved roads; unpaved surfaces can affect tire grip and the safety of the driver.
2.2.3 Clothing advice
Helmet: Always wear a properly fitting helmet.
Clothing: Choose breathable, moisture-wicking clothing for comfort. In cold weather, wear windproof and insulated layers. Wear bright or reflective clothing to be more visible.
Avoid loose fitting clothing and loose laces, loose fitting clothing or laces can be entangled within moving parts causing dangerous situations
Shoes: Choose sturdy, comfortable shoes that won't slip off the pedals.
2.2.4 Follow the traffic rules for cyclists in your country.
Local authorities can provide advice on safe cycling, including the proper use of bike lanes. By following these guidelines, you will get the most out of your Attivo and enjoy safe adventures.
2.2.5 Steering lock
The Attivo bike has a very strong steering lock, see chapter 7.4 for tips how to use it.
2.2.6 Centre stand
To effectively use a center stand, align the handlebars straight, place your right foot firmly on the stand's lever, grasp the rear of the bike with your right hand and the left handlebar with your left hand, then use your body weight to push down on the stand while simultaneously pulling up on the rear of the bike to lift it onto both stand feet.
Weather influences your riding experience and safety
Weather conditions have a significant impact on the performance, stability and safety of a bike.
Rain:
Reduces your grip: Wet surfaces increase the risk of skidding, especially when cornering with heavy load. Longer braking distance: The extra weight of the load increases braking distance, and wet brakes reduce braking performance.
Limited visibility: Rain can reduce your visibility and that of others.
How to deal with rain:
→ Reduce speed and avoid sharp turns.
→ Be mindfull that the road can be more slippery than you expect, and adjust your speed accordingly.
→ Use waterproof lights and wear reflective clothing.
Wind:
Cycling against the wind requires more effort, especially with a heavy load.
How to deal with wind:
→ Choose routes that avoid open areas in strong winds.
→ Distribute the load evenly for better stability.
→ Lean against the wind in crosswinds.
Slippery roads: On slippery roads being pushed forward by a middle motor can cause unexpected skidding movements.
Difficult steering: Steering becomes more difficult due to less grip and extra resistance from snow.
How to deal with cold conditions:
→ Use winter tires or tires with spikes for better grip.
→ Reduce your speed significantly and avoid sudden movements.
→ Keep the weight of the load low and evenly distributed for stability.
Tires: High temperatures can increase tire pressure, which can lead to blowouts.
Overheating of components: Prolonged heat can affect braking performance and make parts wear out faster.
How to deal with heat and sun:
→ Check tire pressure regularly, especially before and after long rides.
→ Put the bike in the shade when not in use.
→ Carry plenty of water to stay hydrated.
By respecting these hazards and taking precautions, you can safely ride your bike in a variety of weather conditions. Adjust your riding style and plan ahead for safe rides.
2.2.6 System weight and loading guidelines for your Attivo
Your bicycle has a maximum system weight of 170 kilograms. This includes the combined weight of the bicycle, driver, and any luggage. Exceeding this weight may compromise the safety and structural integrity of the bicycle. The weight of the bike is 27 kilograms including the battery, the carrying capacity of the front carrier is 10 kilograms, the rear carrier capacity is 27 kilograms. This means the total weight the bike can carry is 170 kilograms, after reducing the weight of the bike 143 kilograms remains of carrying capacity. Of this 143 kilograms 10 kilograms are related to the front carrier and 27 to the rear carrier leaving 106 kilograms for the saddle for a bike loaded to the maximum within safe parameters.
Be mindfull that if you use a childrens seat that this weight will usually be hung from the seatpost. The weight of the seat and child must be deducted from the 106 kilograms available for the bike.
Distribute the weight carefully and consider luggage to stay within the system weight, this includes the weight of the bike.
Examples of different configurations:
Example 1 (Safe):
Bike: 27 kg
Rider: 100 kg
Total: 127 kg (Safe)
Example 2 (Safe):
Bike: 27 kg
Driver: 95 kg
Front carrier: 10 kg
Total: 132kg (Safe)
Example 3 (Not Safe):
Bike: 27 kg
Driver: 110 kg
Front carrier: 10 kg
Rear carrier: 10 kg
Total: 157 kg (Exceeds system weight of driver (max 106))
Example 4 (Not Safe):
Bike: 27 kg
Driver: 80 kg
Rear carrier: 40 kg
Total: 147 kg (Exceeds rear carrier weight)
Example 5 (Safe):
Bike: 27kg
Driver: 106 kg
Rear carrier: 27 kg
Front carrier: 10 kg
Total: 170 kg (loaded to maximum capacity)
Tips for safe loading:
→ Make sure the total weight is within 170 kg.
→ Distribute the weight evenly to maintain stability.
In order to determine the correct height for the saddle, sit on the bike and put your feet on the pedals in the lowest setting. If your knee is slightly bent, the saddle is correctly adjusted. If your leg is straight or you can barely reach the pedals, the saddle is too high. If you are able to put your foot flat on the ground, the saddle is too low.
Use an Allen key number 6 to adjust the height of the saddle.
Don't forget to tighten all bolts properly after you've adjusted the saddle.
To ensure that the vehicle is ready for use, it is important to tighten the bolts and screws to the specified torque. Overtightening can lead to cracks and fractures. The table opposite lists all the prescribed tightening torques.
Recommended tightening torques
Handlebar plug bolt
Handlebar stem bolt max
Nut for seat post bolt
Cranks with square section
Head tube nut
Front wheel hub axle nuts
Rear wheel hub axle nuts
Seat post
Brake lever bolts
21–23 Nm
15 Nm
12 – 15 Nm
38-42 Nm Nm
18 – 23 Nm
20 – 27 Nm
20 – 27 Nm
5 Nm
4 - 6 Nm
To be sure the nut or bolt is tightened correctly a torque wrench is needed. We therefore advise to ask your reseller to make sure the bike is tightened to the correct torque.
If the seatpost/saddle assembly has been removed for shipping, install it in the seat tube. You may need to slightly loosen the clamp bolt. The type of clamp used on the Attivo bike requires an allen key number 6 to tighten or loosen a bolt that clamps the seat post in the seat tube.
Aluminum frames: Grease inside the seat tube and on the seat post. Grease prevents corrosion which can cause a seatpost to seize in a frame.
Disc brakes can reach high temperatures, be mindfull after a rough brake not to touch the brakes directly but give them time to cool.
All seat posts have a minimum insertion line. The seat post must be inserted far enough into the bike seat tube to cover this line. Do not ride without properly adjusting the seat post height and securely tightening the seat post clamp or quick-release clamping mechanism. Failure to observe the minimum insertion line or properly tightening the clamping mechanism could result in seat post system failure, which could lead to an accident, with risk of serious injury, paralysis or death.
Your bike will normally be shipped to you with the handlebar assembly (handlebars, brake and shift levers with all cables attached) inside the bike, but turned 90 degrees. Place the stem + handlebar in the correct angle and fix them. Find the stem clamping bolts on the back of the stem. These are the bolts that hold the stem/ handlebar assembly in place on the steering tube of the fork. Tighten these bolts using a torque wrench to the torque value marked on the stem. If no torque marking is present, tighten to 10-12 Nm.
If you are unfamiliar with using a torque wrench contact your reseller to have this done.
Before riding, make sure you know which brake lever controls which brake (front or rear) as these may be set up specific to market regulations. If you have two hand brakes, apply both brakes at the same time. The front brake provides more stopping power than the rear, so do not use it too forcefully or too abruptly. Gradually add pressure to both brakes until you slow to the desired speed or stop. If you must stop quickly, shift your weight back as you apply the brakes to keep the rear wheel on the ground.
Disc brakes can reach high temperatures, be mindfull after a rough brake not to touch the brakes directly but give them time to cool.
You can charge the battery both in the e-bike and separate from it.
Charging the battery in the e-bike.
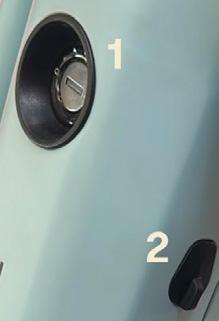
First connect the charger to the e-bike (see point 2 on the picture below, the charging point is beneath the rubber plug shown). Then connect the charger to the mains. When taking off after charging take care to remove the charger from the e-bike before stepping on the bike. You can find more information about the battery and charger in chapter 6.
Charging the battery separate from the e-bike
Release the battery by putting the key in the framelock (see point 1 on the picture below), and turning the key. After turning the key turn the side handle on the opposite side of the frame and the battery can be taken from the frame. After placing the battery back in the frame post charging be mindful to lock it in place and removing the key.
The charger is not waterproof and may only be used indoors.
The Attivo comes with an ART II approved lock. BSP strongly recommends always using an ART approved lock when the bike is not in use. Popal also recommends buying an additional ART approved chainlock in combination with the provided lock so the bike can be attached to a fixed non-removable object.
Shimano Nexus: your bike has 5 Shimano Nexus gears. By turning the rotating mechanism away from yourself, you move the gear to a lower (lighter) position. The rotating mechanism (shifter) can be found on your handlebar on the right side. The heaviest (highest) gear is 5, the lightest (lowest) gear is 1. By turning the turning mechanism towards yourself the gear moves to a higher (heavier) position. After frequent use, the gears may have to be readjusted. Make an appointment for this at a service point, this is considered regular maintenance. You will notice this is necessary when your lightest gear pedals heavier and/or your heaviest gear pedals lighter. For more information about when to maintain your bike parts see chapter 8.2
Never ridden an electric bike before? Don't worry, it's just a bike with a few things that are a little different. To get you on the road safely, we have some tips:
With an electric bike it is easy to forget you are moving faster than you usually ride with a bike, other participants in traffic can make mistakes in estimating how fast you will approach which can lead to dangerous situations. At higher speeds be extra careful of your surroundings and adjust your speed accordingly to keep situations safe at all times. Take corners gently and do not lean your body to far into corners.
An electric bike, with or without cargo, is heavier than a regular bike. This has consequences for your braking distance. Use your brakes properly and make sure you come to a safe stop. Your Attivo bike is equipped with hydraulic disc brakes. This makes braking a lot easier because they are more powerfull than traditional V-brakes.
For a safe and comfortable ride, your brake levers should be in line with your riding position. Follow these steps to adjust them correctly:
1. Adjust your saddle height
a. Adjust the saddle to a height that is comfortable so you can pedal with your knees slightly bent.
b. Sit on the bike and place your hands on the handlebars.
c. Rest your fingers naturally on the brake levers.
2. The brake levers should be in line with your arms for ergonomic and safe use.
a. Mark the position
b. Determine and mark the position where the brake levers connect to your fingers.
c. Adjust the levers with an allen wrench
d. Use an Allen wrench to loosen the bolts that secure the brake levers
e. Adjust the levers to the marked position.
f. Tighten the bolts securely to hold the levers in place to 6-8 nM.
3. Test the adjustment
a. Grasp the handlebars and check that the brake levers feel comfortable and properly aligned
4. Make further adjustments if necessary. Correctly aligned brake levers provide better control and reduce strain while cycling, increasing safety and comfort.
→ Brakes: Test the front and rear brakes to make sure they respond properly. Replace worn brake pads.
→ Chain: Clean the chain with water and check for rips and tears. Make sure the chain is tight.
→ Headlight: Aim the headlight so that the beam reaches the road up to about 3 meters feet in front of the wheel.
→ Reflectors: Check that reflectors and lights are clean and in place. Make sure they are not covered by luggage while riding.
→ Bolts and screws: Tighten all bolts and screws on the frame, handlebars, saddle and other parts properly to avoid problems while riding.
→ Accessories: Attach any accessories such as child seats securely. All child seats come with an extensive explanation for safely securing the seat, read this carefully and contact the reseller of the child seat when you have questions.
→ Tires: check the pressure of the tires.
All about your display.
3.1 Button definition
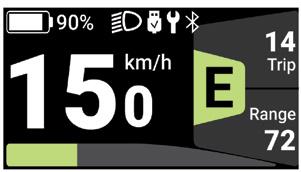
1 Battery capacity 2 Headlight
3 Charge
4 Maintenance
5 Bluetooth
6 Power-assisted mode
7 Multifunction indication
8 Watt
9 Real-time speed
1 Headlight key
2 Power key
3 Walk assistance key
3.2.1 Specification
• LCD screen
• Power supply: 36/48/52Vdc
• Operating temperature: -20°C~45°C
• Storage temperature: -20°C~60°C
• Waterproof: IPX7
• Storage Humidity: 30%-70% RH
3.2.2 Functional Overview
• CAN communication protocol; Easy and user-friendly operation with three keys.
• Speed indication: including real-time speed, maximum speed "MAX" and average speed "AVG".
• Km/mile shift
• Smart power indication: Provides stable battery percentage alerts through optimized algorithms.
• Automatic control of light-sensing headlight
• Backlight brightness 4-level adjustment
• Gear control: 6 modes in total
• Range indication: The maximum mileage can be displayed up to 99999. Single mileage can be shown as TRIP; accumulated mileage can be shown as ODO.
• Smart indication: remaining range can be shown as RANGE, energy consumed can be shown as Cal (calories).
• Error code indication.
• Walk assistance.
• Type-C charging
• Maintenance prompt.
• Bluetooth.
The display is installed by your reseller, for alterations or replacement of the display contact your reseller.
What are software modifications?
Software modifications refer to modifications to the motor control unit (or firmware) that have not been performed by authorized service providers or the manufacturer. This may include the change speed limits, power settings, or other control parameters.
3.4.1 Why are software changes problematic?
Unauthorized software changes may void the warranty. This includes manipulating engine power output, removing speed limitations or modifying performance characteristics. Modifying the software may result in unsafe engine behavior, overheating or damage to the motor or battery, resulting in premature wear or failure.
How to deal with software changes:
Avoid unauthorized modifications: Do not attempt to modify the engine's software yourself or through non-certified third parties. Restore to factory settings: If changes have been made, it is best to contact contact the dealer or a professional service provider to restore the engine's software reset to factory settings.
Warranty and support: If you have problems with software or software changes, check with your authorized dealer if the engine can be reset to its original settings for warranty support.

Don’t attempt to release the connectors/plugs when battery is on power.

Try to avoid hitting.

Don’t split the waterproof sticker on the display or battery to avoid affecting the waterproof performance

Don’t modify system parameters to avoid parameters disorder.
All about your display.
Power ON: Press and hold" "Power key (≥ 2s) when the HMI is OFF. (HMI is a term generally used for a display showing information to you, the user)
Power OFF: Press and hold" "Power key (≥ 2s) when the HMI is ON to power OFF the HMI.

4.2 Select the power-assisted mode
Press" "/Headlight key or" to switch the power-assisted mode and change the power of the motor.
The lowest assistance level is E, and the highest assistance level is B (user selectable). The default mode is E; 0 means the e-bike is in neutral position.
E (Eco): Green ECO mode
T (Tour): Blue TOUR mode
S (Sport): Indigo SPORT mode
S+ (Sport+): Orange SPORT+ mode
B (Boost): Purple BOOST mode
In the main interface, press the" "Power key to enter the data-interface. Press the" "Power key to switch data displays.

Press and hold (≥2s)" "/Headlight key to turn on the headlight, the backlight luminance of the HMI will decrease, and the light icon appears. Press and hold the" "/Headlight key again to turn off the headlight, the HMI backlight luminance will increase, and the light icon will disappear.
When the system not in operation, press the" to shift to 0, and then press the" again, and the symbol will appear and be normally on. Press and hold the" , the symbol will flash (frequency 500ms), and the e-bike will go into walk assistance mode (If no speed signal is detected, the HMI will display a speed of 2.5 km/h).

Release the" to exit from the walk assistance mode, and the symbol will stop flashing and be will normally on. If no operation within 5s, the mode will be automatically switched to 0.
To charge the HMI, connect the Type-C cable with the HMI. If the HMI is OFF, connect the Type-C cable with the HMI and power ON the HMI. Maximum charging voltage is 5V; maximum charging current is 500 mA.
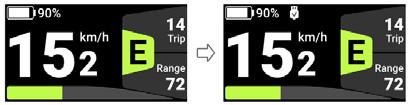

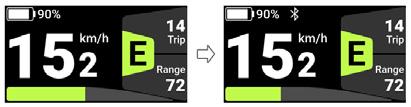
The HMI can be connected to Bafang Go App through Bluetooth.

All about your display.
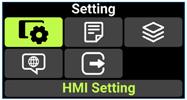
Press and hold the" "/Headlight key and" simultaneously to enter "Setting". Press" "/Headlight key or" to select "HMI Setting", "Information", "Themes", "Language" or "EXIT," and press" "Power key to enter.
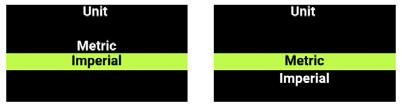
Enter the "Setting", press" "/Headlight key or" to select "Unit". Press" "Power key to enter the setting, press" "/Headlight key or" to select "Metric"/"Imperial", and press" "Power key to save and return to "Unit." To save and return to the main interface, press and hold" "/Headlight key and" simultaneously, or press "BACK" → "EXIT".
Enter the "Setting", press" "/Headlight key or" to select "Auto Off". Press" "Power key to enter the setting, press" "/Headlight key or" to select "OFF" / “1 Min” / “2 Min” / “3 Min” / “4 Min” / “5 Min” / “6 Min” / “7 Min” / “8 Min” /“9 Min” / "10 Min", and press the" "Power key to save and return to "Auto Off". To save and return to the main interface, press and hold" "/Headlight key and" simultaneously, or press "BACK" → "EXIT". "OFF" means to cancel the automatic shutdown function.

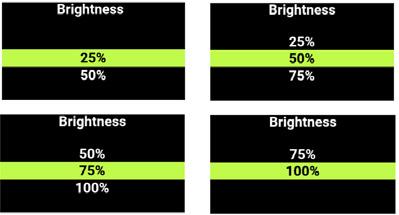
5.3
Enter the "Setting", press" "/Headlight key or" to select "Brightness". Press" "Power key to enter the setting," "/Headlight key or" to select “100%”/“75%”/“50%”/“25%”, and press" "Power key to save and return to "Brightness". To save and return to the main interface, press and hold " " and " " simultaneously, or press "BACK" →"EXIT".
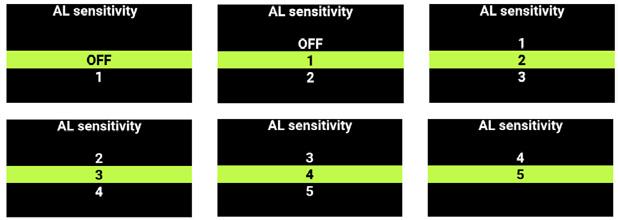
Enter the "Setting", press" "/Headlight key or" to select "AL sensitivity". Press" "Power key to enter the setting, press" "/Headlight key or" to adjust the light sensitivity, "OFF"/“1”/“2”/“3”/“4”/“5”. "OFF" means to turn off the function. The numbers 1 through 5 correspond to different levels of light sensitivity, from weak to strong. Press" "Power key to save and return to "AL sensitivity". To save and return to the main interface, press and hold" "/Headlight key and" simultaneously, or press "BACK" → "EXIT".
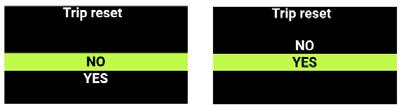
Enter the "Setting", press" "/Headlight key or" to select "Trip reset".
5.8 View the battery info
Enter the "Information", press" "/Headlight key or" to select "Battery Info". Press" "Power key to enter. Press" "Power key to view the battery information. Select , and press" "Power key to return to "Battery Info". To save and return to the main interface, press and hold" "/Headlight key and" simultaneously, or press "BACK" → "EXIT".
Press "Power button" to enter the setting, press" "/Headlight key to select "NO"/"YES" ("YES" means to clear, "NO" means not to clear), and press the power button to save and return to "Trip reset". To save and return to the main interface, press and hold" "/Headlight key and" simultaneously, or press "BACK" → "EXIT".
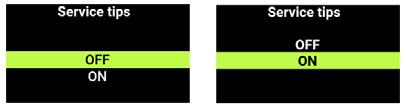
Enter the "Setting", press" "/Headlight key or" to select "Service". to enter the setting, press" "/Headlight key or" to select "OFF"/"ON" ("OFF" means to turn off the function; "ON" means to turn on the function).
Press" "Power key to save and return to "Service". To save and return to the main interface, press and hold" "/Headlight key and" simultaneously, or press "BACK" → "EXIT".
The maintenance prompt function is turned off by default. When it is turned on and the ODO of the e-bike exceeds 5,000 km, will appear on the HMI.
5.7
Enter the "Information", select "Controller Info", and press the" "Power key to enter. Select the "→" icon, and press the" "Power key to enter to view the "Wheel Size" and "Speed Limit" information. To save and return to the main interface, press and hold" "/Headlight key and" simultaneously, or press "BACK" → "EXIT".


5.9 View the HMI Info
Enter the "Information", press" "/Headlight key or" to select "HMI Info". Press" "Power key to enter. The sequence is "SW: → HW:". Press" "Power key to return to "HMI Info". To return to the main interface, press and hold" "/Headlight key and" simultaneously, or press "BACK" → "EXIT".
5.10 View the controller info
5.13 View historical error codes
Enter the "Information", press" "/Headlight key or" to select "Controller Info". Press" "Power key to enter and press" "/Headlight key . The sequence is "SW: → HW:". Press" "Power key to return to "Controller Info". To return to the main interface, press and hold" "/Headlight key and" simultaneously, or press "BACK" → "EXIT".

5.11 View the sensor info
Enter the "Information", press" "/Headlight key or" to select "Error Code". Press" "Power key to enter and press" "/Headlight key to view the last 10 error messages, "E-Code1" to "E-Code10". Press" "Power key to return to "Information", or press and hold" "/Headlight key and " simultaneously to return to the main interface.
Enter the "Information", press" "/Headlight key or" to select "Sensor Info". Press" "Power key to enter. The sequence is "SW: → HW:". Press" "Power key to return to "Sensor Info". To return to the main interface, press and hold" "/Headlight key and" simultaneously, or press "BACK" → "EXIT".
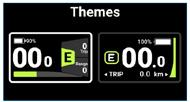
5.12 Set the UI theme
Enter the "Setting", press" "/Headlight key or" to select "Themes". Press" "Power key to enter it. Press" "/Headlight key or" to select the UI theme you want. Press" "Power key to save and the HMI will be reset and restarted. If you do not want to change the theme, press and hold" "/Headlight key and" simultaneously to exit to the main

All about charging, range and maintenance of your battery.
In order to keep enjoying your e-bike for a long time, it's important that you use the battery correctly. The following tips will help you to get the most out of your battery:
→ Charge the battery as soon as it's empty. An empty battery can be irreparably damaged after just a few days, this type of damage due to 'deep discharging' is also not covered by warranty.
→ Charge the battery regularly, in winter too or when you're not using it for a long period. A battery must be charged at least every three months, but every month is even better.
→ Make sure you never let your battery run out completely before you recharge. This means you NEVER cycle until the battery is completely empty due to the risk of deep discharging. If it does run out completely, attach it to the charger as soon as possible.
To extend the lifespan of the battery, it's important to regularly ride the bike until the battery is almost empty and then charge the battery fully. That's better than always topping it up after every trip.
→ If you won't be using the battery for some time, try to store it charged to roughly 70% (3-4 bars); and at a temperature of 10-15° C.
If you fail to follow the most important points of attention, the battery may become damaged in the short term. BSP will examine a battery that is still under warranty and if there are signs of serious abuse, the warranty may expire. If you have any questions, please get in touch with your reseller.
Even when the battery is switched off, the bike's electrical system will use a tiny bit of power from the battery. If you're not going to be using the bike for a long time, it's best to store the battery separate from the bike.
The battery is splash-proof and therefore resistant to rain. However, it's better not to expose the battery to large amounts of water/rainfall.
Dropping the battery can lead to internal and/or external damage, which might not be visible right away. After dropping, falling with the bicycle or after a collision check the battery for signs of damage and when in doubt contact your reseller to discuss what best to do.
The range of the e-bike is the total distance you can travel on a fully charged battery. This range depends on the capacity of the battery and the energy consumption of the motor. It is difficult to calculate the exact range of your bike because there are so many factors that play a role. The range on average will be between 30 and 100 kilometers on a fully charged battery. With lower assistance levels and a lighter load you will experience a significantly higher range compared to TURBO/BOOST support levels and heavy loads.
The figures above are based on tests on flat ground, in temperatures of roughly 20°C, at an average speed of 20 km/h and a total weight on the bike of approximately 75 kg.
If you should experience less range, bear the following in mind:
The higher the assistance level set, the harder the motor has to work and the more power it uses. In addition, your own pedalling power has a lot of influence. The harder you pedal, the more battery you save. Generally speaking; the lighter cycling feels, the more energy is being used by the battery.
Stopping (often) for red traffic lights has a negative effect on the range. Setting off from a stationary position uses a relatively large amount of power and makes the battery run out more quickly.
In general, one long trip uses less battery power than multiple short ones.
The total weight on the bike reduces the range exponentially. For example, if you are carrying 10 kg of luggage, the range may be reduced by 10%.
Your pedalling frequency (RPM) also influences the range of the e-bike. In general, a higher RPM results in a greater range.
Tyre pressure also plays an important part in the range.
On an e-bike, you scarcely notice if your tyres are slowly losing pressure. Soft tyres will significantly reduce the range. You will find the minimum and maximum tyre pressures indicated on the side of the tyre. Pump the tyres up to the desired pressure and check them every two weeks.
Bear in mind that low temperatures will reduce your bike's range. The battery's capacity is measured at 25°C and will decrease (temporarily) when it gets colder.
At a temperature of 0°C, a fully charged battery has roughly 70% of its maximum capacity and at -10°C, this can decrease even more to 50%. Take into account the fact that in the winter, your e-bike battery may well run out more quickly than you are accustomed.
Not only the temperature, but such factors as wind, rain and the type of road surface will all influence the remaining range of the battery.
The display on your e-bike shows consumption. It will tell you how much energy the motor is using at that moment. This allows you to closely monitor what effect things like changing to a lower gear, headwind or a climb have on the consumption. The lower the meter indicates, the further you can ride on your battery.
Here at BSP, we do our very best to communicate the range as honestly and clearly as possible. So we choose to give you a detailed description of our testing circumstances so that you can make a good comparison with your own situation. Naturally, there's always the possibility of the range being greater or shorter due to the number of factors that can affect the operating radius. So we recommend you ride your bike's battery till almost empty a few times, certainly in the beginning. That will help you get to know your bike and find out what your personal range is.
The lifespan of the battery depends on how and how frequently it's used. With the tips in this manual, you can easily make your battery last for years. However, bear in mind that usage will always decrease a battery's lifespan.
A reduction in capacity of between 5 and 15% a year is perfectly normal.
In ideal circumstances, the battery can be charged and emptied between 1,000 to 1,500 times with the capacity gradually diminishing. If the end of the battery's lifespan is reached, it must be replaced.
Eventually, every battery will fail. This is simply the result of the natural aging process. To ensure that your e-bike battery lasts as long as possible, there are five golden rules to follow.
An electric bike battery can take a lot these days, but temperatures below zero should be avoided because of the risk of condensation forming inside the battery. In severe frost (or temperatures below -10°C), chemical processes in the battery will cause it to become unusable.
Extreme heat is also harmful to the battery. Heat activates other chemical processes that damage the battery. Therefore, make sure the temperature of the battery does not exceed 40°C. Do not leave the battery in the burning sun for too long in summer. Preferably store and charge the bicycle (battery) at room temperature, i.e. between 10 and 20 degrees Celsius.
The battery is an electrical component and therefore does not mix well with water.
Do not store the battery in a damp shed (or worse: outside), but preferably indoors.
To prevent deep discharge, charge the battery regularly. Natural self-discharge causes the battery to self-discharge over time, which can eventually damage the battery cells beyond repair. Try charging the battery at least once a month (to about 90%). It is best to store the battery with a charge of between 30 and 80 percent.
Never use just any charger to charge your bike battery, but always use the charger that goes with your bike and battery. There are many different types of batteries (Li-ion, NiMh, NiCd) and they also differ in power and current. Using the wrong charger can damage the battery. Be mindfull the charger is indoor use only.
In the past, when NiMh batteries were just coming on the market, it was recommended that you always drain the battery completely before recharging it. This is no longer the case!
Nowadays, just the opposite is true: you should absolutely avoid draining the battery completely, as it will cause it to deteriorate faster.
In case the battery fails and forms leakage make sure to follow the following instructions.
In case of;
Eye contact;
Flush eyes with plenty of water of least 15 minutes, occasionally lifting the upper and lower eyelids. Get medical aid.
Skin contact;
Remove contaminated clothes and rinse skin with plenty of water or shower for 15 minutes. Get medical aid.
Inhalation;
Remove from exposure and move to fresh air immediately. Use oxygen if available.
Ingestion;
Give at least 2 glasses of milk or water. Induce vomiting unless patient is unconscious. Call a physician.
Do not dispose of batteries, chargers or accessories with household waste.
All these components can be recycled in an environmentally friendly way. Take them to one of the special collection points.
You can also take the battery to the dealer in your neighbourhood.
Your whole bike taken care of completely.
Disc brakes ensure a powerful braking sensations and give a strong sense of control. For adjustments to your brakes contact your reseller or a local bike specialist.
Press and hold (≥2s)" "/Headlight key to turn on the headlight, the backlight luminance of the HMI will decrease, and the light icon appears. Press and hold the" "/Headlight key again to turn off the headlight, the HMI backlight luminance will increase, and the light icon will disappear.
In order to avoid any unpleasant surprises while cycling, it's important to check beforehand which brake handle operates the front brake and which the rear brake. The left brake handle operates the front brake and the right one the rear brake.
Never use lubricant or regular cleaning agents on your brake blocks or rotors, since that can cause noise when braking and reduce the reliability of the brakes.
Be mindfull that in heavy rain your braking distance can increase, make sure to drive more carefully and brake earlier in heavy rain conditions.
Disc brakes need a 'breaking in' procedure. If you don't break them in, you won't reach the maximum braking capacity, with the risk that the brake blocks will squeak. If they do start to squeak, replace the brake blocks, clean the discs with brake cleaner and repeat the breaking in procedure. Check with your reseller if the bike has had the breaking in procedure done or not.
You need a clean, dry environment for breaking in. Accelerate to 20 km/h, and brake moderately on one brake until the bike stops. Do this 20 times for each brake.
Some dealers have what is known as a breaking in machine at their disposal and can carry out the breaking in procedure for you before delivery.
Get to know the stopping capacity of your brakes well, so that you will be able to rely on your bike in the event of an emergency stop. An emergency stop using only one brake can lead to you briefly lose control of your bike. So always use two brakes at the same time. Keep your arms stretched and your weight to the back. That way, you'll stop fastest and most steady.
Not all bicycles and, in turn, all tyres are suitable for any terrain. The BSP Attivo should only be used on paved/asphalt roads.
Tyre pressure greatly affects the range, safety and comfort of your bike. So we recommend you always pump your tyres up properly. Optimal tyre pressure is between 3.5 and 6 bar. The sidewalls of all tyres display the correct inflation pressure recommended by the manufacturer. A handy aid: if you push your thumb against the top of the tread and it's possible to depress the tyre slightly, you have the correct pressure. Optimal pressure for the Attivo is 3-4 bar.
Check your tyre pressure every 2 to 4 weeks.
The Attivo bike has a very strong steering lock, this can be used to lock the handlebar in place when parking and loading the bike with cargo or children. Twist the lock beneath the handlebar to the right to lock it in place and to the left to release it (the line will become green).
Do not drive off while the steering lock is on because it is almost impossible to turn the handlebar and serious accidents can occur.
What are motor modifications?
Motor modifications include physical changes to the motor system, such as modifying the internal components of the motor, changing the wiring, or changing the motor's power or performance settings.
Why are motor modifications problematic?
Unauthorized motor modifications can void the warranty and lead to potential safety problems, such as overheating, motor failure, or damage to the battery or other components.These modifications may also affect the performance and life of the motor, as the motor is designed to operate within specific operational parameters.
Avoid unauthorized modifications:
Only authorized service centers or the manufacturer may make motor modifications or repairs. If you have made modifications, review the warranty conditions to check if it still applies. If modifications have been made, it may be necessary to return the motor to its original condition.
Contact authorized BSP dealers:
If you have made changes, contact an authorized Bafang service provider to evaluate the motor and ensure that it is in a safe working condition. Some service centers may be able to help return the motor to its original configuration.
to original condition
If possible, restore the motor to its original configuration by undoing the changes so that the warranty can be honored.
Recommendations to maintain your warranty Regular maintenance:
Have the motor system serviced regularly according to the maintenance schedule recommended by the manufacturer.
Authorized dealers: Always work with an authorized Bafang dealer or service center for repairs, upgrades or service to ensure that the warranty remains intact remains intact.
Retain documentation: Keep all purchase and service records in case you need to make a warranty claim needs to be filed.
By following these guidelines and avoiding unauthorized changes to the motor or software avoided, you can ensure that your Bafang motor system remains under warranty and continues to operate safely for years to come. Always consult your local dealer for warranty and services.
Loving attention for your new e-bike.
It's time to have your bike serviced for the first time after either 250 km or 3 months. After that, maintenance is mainly dependent on how intensive your use of the bike is. So discuss with your dealer what would be an appropriate maintenance plan for your situation. BSP advises having the bike checked at least every 6 months after the first service appointment
Always be sure to use original parts or parts recommended by your BSP dealer. Using original components ensures compatibility, retention of warranty and optimum performance and safety. Avoid using nonrecommended parts, as they may not fit properly or meet required specifications, which could lead to malfunctions or damage to your bike. Consult your BSP dealer for advice on approved replacements or upgrades.
An electric bike should always be properly maintained by an authorized dealer. Periodic checks are essential for the life of your bike. Make sure you don't bump into anything while riding, don't hit curbs and take corners wide and safely. Use the bike as intended. With proper use and normal maintenance you can enjoy your bike for a long time.
Naturally, there's a lot you can do yourself to keep your bike in peak condition. Our tips:
Always go to the first service appointment. Parts such as spokes and cables can stretch after the first use of the bike. If they're not adjusted, there is a greater risk of spokes snapping or gears not engaging.
You can clean your e-bike by removing dirt with a soft brush and hot water. That'll get it gleaming like a showroom model again. Not only that, but regular cleaning makes sure your bike will be with you for longer. Do be careful not to use too much water around electronics and the battery. It's best to remove the battery before washing.
Don't use a high-pressure cleaner to spray the e-bike clean. The jet can damage the bike's electronics.
It makes sense to take care of certain parts of the bike immediately after cleaning it. Chrome components, unlacquered aluminium and stainless steel parts can be greased with acid-free Vaseline or Vaseline spray to prevent rust. Moving parts need grease/oil. We recommend you regularly lubricate the chain, cogs and axles. Naturally, your BSP dealer can do this for you too.
*We recommend you maintain your bike regularly in addition to the periodic servicing by the dealer.
How do you keep your e-bike safe and looking good for longer?
→ Check the tyre pressure and tread regularly.
→ Check that the brakes are working properly and if the brake blocks are worn. Replace or repair them where necessary.
→ Check that there is enough tension in the spokes, that none of them are broken or that there is no twist in the wheel. If there is, visit your dealer.
→ Treat all moving parts and electrical contact points regularly with acid-free Vaseline spray.
To insure a smooth ride make sure the chain of your bike is on the correct tension.
→ Provide a stable setup
Put the bike on a level surface so you can work safely.
→ Check the chain and gears
Make sure the chain and gears are clean and free of dirt or grease.
→ Loosen the rear axle
Loosen the rear axle bolts to move the axle.
→ Adjust the tension
Move the rear axle forward to relax the chain, or backward to tension it.
→ Check the tension
Press into the center of the chain, between the two sprockets.
→ A properly tensioned chain moves up and down about 1 centimeter.
→ Tighten the rear axle
When the tension is correct, tighten the rear axle bolts firmly.
For urgent repairs or a major overhaul, you can always go to your BSP dealer. But you can also regularly run a check on your bike yourself. This checklist will help you keep your bike in peak condition:
→ Is the pedal assistance working as it should?
→ Are all the gears working and does the e-bike change gear smoothly?
→ Is there enough tension on the chain?
→ Are both brakes working properly?
→ Is the saddle at the correct height? Is it still comfortable?
→ Are the handlebars adjusted correctly and are they at right angles to the front wheel?
→ Are all the spokes still whole?
→ Are the tyres pumped up to the right pressure? Is there still enough tread on the tyres?
→ Are all the lights working? Is the headlight properly adjusted?
→ Are all reflectors still clearly visible?
→ Is your e-bike in need of cleaning?
→ Is there any damage visible?
→ Is the stand attached firmly and is it greased well?
→ Is the bike making noises that it did not make in the past? Contact your reseller to have it checked.
→ Are the brake blocks and discs in good condition?
→ Do you hear any strange sounds while you're cycling?
→ Are the seat post and handlebar stem positioned correctly and are theytightened properly?
→ Have the seat post and handlebar stem been greased?
→ Is there slack in the front fork, around the steering head bearings?
→ Are all nuts and bolts properly greased?
→ Is the lock still working smoothly and has it been greased?
→ Does the bell still work and is it in the right position?
→ Are the pedals attached properly and have they been greased at the screw thread?
BSP recommends you schedule a service check-up every 3 months and a major overhaul once a year, we advise you do this at your reseller or a local bike specialist recommended by PMG. During a service check-up, your dealer will carry out the following:
→ Check wheels and tyres (twists in the wheels, tension of spokes, tyre pressure and tread)
→ Check all mounting components/nuts and bolts, and tighten where necessary
→ Check brake blocks for wear, adjust cable tension, check efficiency of brakes
→ Check steering head for slack, check attachment of handlebar stem and adjust if necessary
→ Electrical system: Fully charge the battery, clean pedal sensor with lukewarm water and sponge, treat contacts with contact spray
→ Check drive system of the e-bike and where necessary, replace defective parts
We advise to have your bike checked at least once a year by your reseller or a local bike specialist. Needed to do annualy is:
→ Take apart, degrease, grease and put together the following parts:
- hub
- gear and brake cables
- steering head
- handlebar stem
- seat post
→ Check and grease the following parts:
- gears and shifters
- lock
- stand
→ Check spoke tension (tighten if necessary)
→ Check tyre pressure (replace tyres if necessary)
→ Check crankset and pedals and adjust
→ Check that lights are working properly and adjust
→ Check saddle for damage and suspension
→ Apply a protective layer of wax to the bike
→ Take the bike for a test drive to check that all parts are working as they should
- When replacing parts, always make sure that the original parts are put back in place
Regular inspection of the bike helps to avoid dangerous situations. Check and replace bearings and cables in a timely manner to avoid wear and failure.
Insufficient maintenance can not only void the warranty, but also compromise the safety of the rider and passengers. Therefore, ensure timely and careful maintenance!
Like all mechanical parts, EPAC is subjected to wear and high loads. Different materials and components can react to wear or metal fatigue in different ways.
When the designed life of a component is exceeded, it may fail unexpectedly, potentially causing injury to the rider or passengers. Any cracking, scratching or discoloration in highly stressed areas indicates that the component has reached its service life and needs to be replaced.
With composite components, impact damage may be invisible to the user. The manufacturer should explain the consequences of impact damage and point out that composite components must be returned to the manufacturer for inspection or destroyed and replaced after an impact. These components may be affected by prolonged exposure to sunlight or other forms of heat. When there is any deformation you should inform the dealer and assess the risk.
Is something not working properly? Follow this handy step-by-step guide.
If something is amiss with the e-bike system your Bafang bike will give an error code, the complete list of error codes and possible measures to take can be found in appendix 1 at the end of this manual.
When in doubt always contact your reseller if an error message appears and do not try to fix complicated issues yourself. An experienced technician can judge an error correctly and resolve the problem safely.
The frame has a 5 year warranty, warranty on batteries is 2 years. Other electrical components are guaranteed for 2 years.
For more information about your e-bike and about your warranty, please go to: www.bsp-fietsen.nl/service
Using your bike unchecked can put yourself and others in danger. Moreover, the warranty expires in the case of unchecked use.
There is no warranty: if changes have been made to the product, including repairs which have not been authorised by PMG or the purchaser.
Use only the battery supplied by BSP on your bike.
You can always visit your BSP dealer for maintenance on your e-bike.
For more information, please refer to BSP general terms and conditions
BSP reserves the right to make changes to the models of e-bikes. Prices may also be subject to change.
BSP cannot be held liable for any inaccuracies in this manual. The copyright on this manual rests with PMG.
9.4.1
Electric bikes may be subject to different rules per country and region. Make sure you know and understand the rules in your country.
For the Netherlands you can read the rules on the website of the Rijksoverheid, the article is called: “Welke regels gelden voor mijn elektrische fiets (e-bike, elektrische bakfiets en fatbike)?”
Test your bike: first try your new electric bike without luggage or luggage. Make different turns, shift gears and brake. Cycle on different roads and try out the pedal assistance settings.
Plan your route: Determine your route in advance, for example with a navigation system and preferably choose the safest most accessible roads.
Be visible: Use good lighting, wear bright clothing and use reflective strips.
Keep an overview: Look around you regularly while cycling.
Keep a safe speed: The faster you drive, the longer it takes to come to a stop. Adjust your speed to the situation. Watch for bollards and curbs: Warn fellow cyclists about posts in the bike lane and take curbs calmly and straight.
If you are using the Attivo bike with child seats always adhere to the safety precautions in the manual of the child seat manufacturer. When loading and unloading children on to the bike always be aware of your surroundings, make sure the bicycle is safely parked, on its centre stand and the steering lock on the locked position.
Cycling involves risks of injury or death. Riders accept this responsibility and must adhere to safe riding and maintenance practices. Find below a list of general warnings to take into account.
Note: Before servicing your bike, the battery must be removed to avoid injury and/or damage.
Safety: Ensure that the connector is not disconnected when the battery is energized.
Protection: Avoid bumping and damaging the waterproof sticker to maintain water resistance.
Parameters: Do not adjust system parameters to avoid malfunctions.
Repair: Consult a professional if error lights appear.
Risk of trapping: Hands, fingers, or clothing can become trapped between moving parts such as the chain or chain, gears, or wheel spokes. Extra caution is needed when adjusting the drivetrain or when children are near the bicycle.
Risk of overloading: Carrying loads beyond the recommended weight capacity can lead to structural failure or loss of control. Overloading can put excess strain on the frame, wheels, and braking system.
Risk of tipping over: An unbalanced load, especially in cargo or child-carrying bicycles, increases the chance of tipping. Sharp turns at high speeds or uneven terrain can also lead to loss of balance.
Risk of mechanical failure: Poor maintenance (e.g., loose bolts, worn brakes, or underinflated tires) can cause accidents.Regular inspection and servicing are essential for safe operation.
Risk of collision or falling: Riding in traffic or on slippery surfaces poses a risk of collision or falling. Wearing a helmet and using lights and reflectors reduces the severity and likelihood of injury.
Helmet Use: Always wear a properly fitted, approved helmet. Never wear helmets during play (e.g., on playgrounds) as it can lead to strangulation or injury.
Bike Fit Risks: Improper bike size or saddle height can lead to loss of control and falls.
Warning code
E-05
Throttle not in position
E-06
Battery voltage lower than the system's operating voltage
E-07
Battery voltage higher than the system's operating voltage
E-08
Motor position signal abnormal
1. Make sure that the throttle returns to position, and restart the system.
2. If the problem persists, disconnect the throttle from the system, and restart the system.
3. If the problem persists, stop use, and contact your place of purchase for assistance.
1. Connect the charger, and charge battery to full capacity.
2. If the problem persists, stop use, and contact your place of purchase for assistance.
1. Make sure that the original battery is used.
2. If the problem persists, stop use, and contact your place of purchase for assistance.
E-09
Motor phase cable abnormal
1. If the problem persists, stop use, and contact your place of purchase for assistance.
1. If the problem persists, stop use, and contact your place of purchase for assistance.
E-18
Motor overload
E-21
Speed signal abnormal
E-30
Communication abnormal
1. Restart the system.
2. If the problem persists, stop use, and contact your place of purchase for assistance.
1. Check whether the magnet unit has been installed and faced oppo site the speed sensor signal area.
2. Check the speed sensor for damage (e.g. cables, connectors, pins), and check the sensor and controller for correct assembly.
3. If the problem persists, stop use, and contact your place of purchase for assistance.
1. Check the HMI for damage (e.g. cables, connectors, pins), and check the HMI and controller for correct assembly.
2. If the problem persists, stop use, and contact your place of purchase for assistance.
E-42
Battery voltage lower than the system's operating voltage
E-45
Battery temperature too high
E-46
Battery temperature too low
E-48
Remaining battery too low
E-50
Temperature difference between individual cells too large
E-59
The charger not compatible with the battery.
E-71
E-lock abnormal
E-89
Communication between IoT and controller abnormal
1. Connect the charger and check whether the charger works properly.
2. Charge the battery to 30% or for 2 hours.
3. If the problem persists, stop use, and contact your place of purchase for assistance.
1. Stop use until the battery cools down.
2. If the problem persists, stop use, and contact your place of purchase for assistance.
1. Stop use until the temperature returns normal.
2. If the problem persists, stop use, and contact your place of purchase for assistance.
1. Connect the charger and check whether the charger works properly.
2. Charge the battery to 30% or for 2 hours.
3. If the problem persists, stop use, and contact your place of purchase for assistance.
1. Stop use, park your ebike properly, and let it rest for at least 30 minutes.
2. If the problem persists, stop use, and contact your place of purchase for assistance.
1. Make sure that the compatible charger is used.
2. If the problem persists, stop use, and contact your place of purchase for assistance.
1. Restart the system.
2. If the problem persists, stop use, and contact your place of purchase for assistance.
1. Check the IoT for damage and cor rect assembly (e.g. cables, connec tors), and restart the system.
2. If the problem persists, stop use, and contact your place of purchase for assistance.
Warning code Measures mid motor system
E-90
ABS communication signal abnormal
E-91
ABS abnormal
E-92
ABS abnormal
E-93
ABS abnormal
E-94
ABS abnormal
E-95
IoT connection abnormal
E-96
IoT CAN Communication abnormal
1. Check the ABS for damage (e.g. cables, connectors, pins), and check the ABS and controller for correct assembly.
2. If the problem persists, stop use, and contact your place of purchase for assistance.
1. Restart the system.
2. If the problem persists, stop use, and contact your place of purchase for assistance.
1. Restart the system.
2. If the problem persists, stop use, and contact your place of purchase for assistance.
1. Restart the system.
2. If the problem persists, stop use, and contact your place of purchase for assistance.
1. Restart the system.
2. If the problem persists, stop use, and contact your place of purchase for assistance.
1. Check the battery for the connection to the system.
2. Charge the battery.
3. Check the IoT for damage and correct assembly (e.g. cables, connectors), and restart the system.
4. If the problem persists, stop use, and contact your place of purchase for assistance.
1. Check the IoT for damage and correct assembly (e.g. cables, connectors), and restart the system.
2. If the problem persists, stop use, and contact your place of purchase for assistance.
E-97
Ebike falling down alarm
1. Right your ebike, and the problem will disappear.
E-98
Disturbance alarm
E-99
IoT low battery alarm
W-22
Battery SOC calculation abnormal
1. Stop your ebike, and the problem will disappear.
W-25
Torque sensor signal abnormal
1. Charge the battery, and the problem will disappear.
W-26
Torque sensor signal abnormal
1. Check the battery for damage (e.g. cables, connectors, pins), and check the battery and controller for correct assembly.
2. If the problem persists, stop use, and contact your place of purchase for assistance.
1. If the problem persists, stop use, and contact your place of purchase for assistance.
1. If the problem persists, stop use, and contact your place of purchase for assistance.
W-33
Brake abnormal
W-36
ON/OFF button ab normal
1. Restart the system.
2. If the problem persists, check the brake for damage and correct as sembly.
3. If the problem persists, stop use, and contact your place of purchase for assistance.
1. Pressing ON/OFF button too long at startup will trigger the problem. It will disappear, if you release the button.
2. If the problem persists, stop use, and contact your place of purchase for assistance.