


A complete guide to using our POD service Print-on-demand (POD) eCommerce Platform FRONT BACK

1. Started
• How it works - Selling customised
• Account Activation - How to activate your POD Platform account
2.
• Dashboard Interface - Inside the POD Platform
• Product Creator - How to use the Product Creator
• Text Features - Understanding the text tool publishing options
• Artwork Guidelines - Print settings
3.
• Apparel Design - How to design a t-shirt using the Product Creator
• Drinkware Design - How to design a bottle using the Product Creator
• Shopify - How to
• WooCommerce - How to your store
• Publishing - How to to your
• Shopify How to
• Community - POD
Our platform is a free of charge, easy to use online platform. Simply create your artwork, select from our wide range of products and publish directly to your eCommerce site.
Our POD eCommerce Platform includes unlimited access to design resources and an extensive product range.
The POD Platform connects directly to your eCommerce store enabling you to seamlessly publish products ready to sell.


We take on the responsibility of production, quality control and shipping of orders to your customers.


To activate your account and start selling products using our integrated apps, you must complete the following steps. Once completed, you are live and ready to start publishing products to your store.
1. Email us at - hello@tshirtandsons.com

2. Our Business Development team will contact you to proceed with the activation process
3. Activation of live account - 48 hours (2 working days)


Dashboard Interface overview dashboard gives you access to the main menu, where you can access your products, artwork, orders, and store connections. Our POD Platform has informative help available on the dashboard to get you started with creating and publishing products to your store. homepage, including our user guide and training tools.

Create and organise categories for your products. This central location allows you to access your creations within the Product Creator window.
• Go to: Dashboard > My Products

• Select: Create New
• Pop-up box: Enter your category name
• Click: OK
• Your category has now been created
• Create a delete folder for any unused products you wish to remove
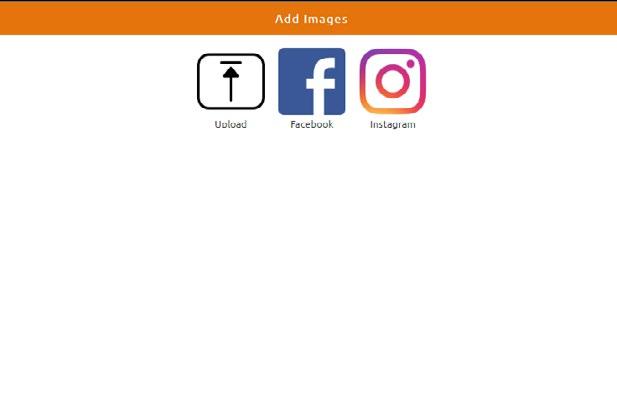
You can create and manage your collections here. Simply upload your artwork ready to apply to your products in the Product Creator.

• Go to: Dashboard > Artwork
• Click on your chosen collections folder
• Select: Add Artwork > Upload
• Select your chosen artwork
• You can rename your artwork file
• Click: Save
• Add artwork to favourites folder by clicking the heart symbol (turns green)
• Recommended file PNG/JPG 300 DPI
For more information on preparing your artwork, see our guide: Artwork Guidelines - Print settings
An your
•
•
•
•
• your
•
•
• Stores


The Product Creator is where you select your product and add your designs. Use the toolbar to adjust your creation on the product and then publish directly to your integrated eCommerce store. Creator

• our blank
•
•
•
•
•
• eCommerce see
** be published to your store.

• Edit the name of your design
• Manage artwork layers

• Adjust the measurements
• Use units in mm or inches
• Text box: Enter text to add to product

• Font: Choose your font

• Bold: Make text bold
• Italic: Make text italic
• Size: Adjust font size
• Align: Set text
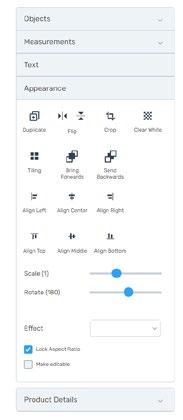
• Duplicate: Duplicate design
• Flip: Flip artwork - horizontal/vertical
• Crop: Crop artwork
• Clear White: Remove artwork background
• Tiling: Create tiling of artwork
• Bring Forwards: Send artwork to front
• Bring Backwards: Send artwork to back
• Align Left: Align artwork left
• Align Center: Align artwork center
• Align Right: Align artwork right
• Align Top: Align artwork top
• Align Middle: Align artwork middle
• Align Bottom: Align artwork bottom

• Scale (1): Scale artwork on product
• Rotate (180): Rotate artwork 180
• Effects: Add effects to your artwork
• Lock Aspect Ratio: artwork dimensions stay the same when resizing
• Make editable: Allows personalisation of products in you Shopify store
For more information on how to sell customisable products on your Shopify store, see guide: Shopify – How to publish customisable products
There are 2 publishing options available in Product Creator. You can add text to your product, and if publishing to a Shopify store, this text can be personalised. Publish as Print-on-demand

You can add custom text to your product and also combine it with your uploaded artwork. Use the text tool bar to make any visual adjustments.
• Go to: Text > Standard > Select font
• Text: Type your custom text in the box
• Save your product
• Go to: Publish > Shopify > Publish as Print on demand
• Choose: Connected Store > Select store
• Select: Export Products
To


•
•
•
•
•
•
When preparing your artwork to upload to the POD Platform, we recommend using the following settings to help you produce the highest quality prints with DTG (direct to garment) printing.

• 8-bit image depth


• 300 PPI (Minimum 200 PPI)
• RGB Colourspace
• Scaled to print size
We recommend using a good quality PNG file for most artwork. This will allow for a transparent background to your design. Our designer will accept other files such as JPEG which are commonly used for photographs.
Our printing systems require all artwork to use 8bit image depth. When you’re shooting with a standard camera it usually shoots with an 8-bit image depth, this allows for 256 different colors and tones within your image most of the time this is enough depth to get a good quality print.
We recommend using a minimum of 200 PPI but ideally using 300 PPI. Pixel per inch, commonly referred to as DPI (dots per inch) this term describes the level of little dots or pixels used to make up your image. When editing, the level of pixels per inch in your image will directly affect the quality of the print. If you are uploading your image without putting it into editing software, please ensure your artwork is of a good size and isnt visually blurry.
Half-tones & gradients in t-shirt printing are made by the printers spraying down layers of ink onto the shirt. When printing on a dark tshirt, before printing your design the printer will add a white base layer to ensure your design stands out. Usually, you cannot see the white base layer, but when using gradients and half-tones in your design, it's worth keeping the following in mind:
Black fading to nothing
White fading to nothing
Colour fading another
Colour fading


• Go to: Dashboard > Artwork
• Select: Create New folder

• Enter Collection name into the pod-connector pop-up
• Click: Save
• Select your chosen Collections
• Click: Add Artwork
• Select your chosen
• Click: Save
• Artwork is ready to to your


•
•
•
•
•
•
•
•
•
•
•
•
• Available Colours: Variants available
• Deselect all: Remove all variants
• Select all: Publish all variants

• Click: Next

• Trade Base Price: Standard cost of product
• Recommended Retail Price: Suggested pricing of product
• Previous: Go back to previous tab
• Save & Publish: Save & publish product
• Save: Save product
* This is the public standard price which always includes garment + 1 print. Additional print cost will be Communicated via the price list. For more information, contact our Business Development team.

• Go to: Dashboard > Artwork
• Select: Create New folder
• Enter Collection name into the pod-connector pop-up
• Click: Save
• Select your chosen Collections folder
• Click: Add Artwork >
• Select your chosen artwork
• Click: Save
• Artwork is ready to apply to your product


•
•
•
• Go
•
•
• Yellow
• 3D
*Artwork Anything outside of this guide will not be printed. to this around the entire
•
•
•


•
•
• your
•
•

When connecting your store to POD Platform, Shopify applies an order ID prefix ‘#’. To allow our system to process your orders via Shopify, you will need to remove the Order ID Format applied.
• Log into your Shopify account
• Go to: Settings > Store details
• Scroll down: Standards and formats
• Select: Prefix field > delete the #
• Create your ID using character A-Z, 0-9 #

When we set up your shipping methods to integrate within our system, we need the exact shipping names you have created in your Shopify store.

• Log into your Shopify account
• Go to: Settings > Shipping and delivery
• Select: Manage
• Scroll down: Shipping to section
• Screenshot: Rate name
• We need the exact Rate name & shipping methods for our system integration

• Standard: £2.95 (T-shirts)
• Standard: £3.95 (Hoodies & Sweatshirts)
• Standard Tracked: £4.95
• Express: £6.95
• Per additional item: £1.30
• Standard: €3.75 (T-shirts)
• Standard: €5.20 (Hoodies & Sweatshirts)
• Standard Tracked: €5.49
• Express: €11.00
• Per additional item: €1.49
To ensure your orders are automated from your Shopify store, the following steps must be setup.

• Go to: Settings > Shipping and delivery
• Scroll down: Order processing*
• Select: Don’t fulfil any of the order lines automatically
• Click: Save
* Please note, manual order status changes will prevent orders from going through.


To connect your store to our WooCommerce integrated app, you need to install the Bridge Connector
•
•
•
•
•
• Follow Step 2 to
• your the
Log into your WordPress account and follow the below steps to install the bridge connector plugin.
• Log into your WordPress account

• Go to: Plugins > Add New

• Click: File > Bridge Connector plugin

• Select: Install Now
• Click: Activate Plugin
• Bridge Connector plugin now activated
• Go to: Plugins > Bridge Connector
• Select: Connect
• Store key has been
• Ready to


• Go
• Select:
• Choose
• Click:
•
•
•
•
•
•

These guidelines are set out to help our customers understand the policies by which we define acceptable artwork. Orders with artwork that do not follow these guidelines will not be printed.
Whilst T Shirt & Sons actively reviews all artwork, it is the responsibility of the customer to ensure artwork follows these guidelines.
Customers must ensure that they have the right to print the design before submitting their artwork. Artwork that appears to infringe on copyright will not be printed until the customer has provided the appropriate proof of right to print. Artwork that cannot prove copyright licence will be removed.
All artwork for children’s apparel must be deemed appropriate for all ages and cannot feature any mature content, adult language, or any of the guidelines below. Slogans and images must be carefully considered to ensure there are no negative connotations with the garment.
Artwork featuring children, or any persons under the age of 18 must be appropriately clothed. This being defined as all genitalia, bottoms and bare chests covered and not visible. As well as featuring no mature content, language and meet all guidelines set out on this page.
Artwork using mature content such as adult language, drugs, alcohol, violence, adult humour, and other similar themes will be judged on a case by case basis following the guidelines below.
Artwork that features anything with the intention of portraying hate speech towards another person or group of people is not permitted to be printed. This included but is not limited to using words, symbolism or signage with negative connotations that have been associated with issues regarding race, religion, prejudice, or harmful meaning.
Artwork created with the purpose to harass, stalk, intimidate or unnecessarily humiliate another person or persons that go beyond appropriate boundaries or humorous jokes. Particularly featuring, hate speech, racism, homophobia, or sexism will not be printed.
Artwork that intentionally spreads misinformation about topics relating to public safety or inciting prejudice, including artwork that mentions or depicts conspiracy theories relating to sensitive or offensive topics will not be printed.
Images depicting, explicitly showing, or created with the purpose of suggesting sexual connotations of real people, or realistic representations of genitalia, graphically nude people, or sexual acts are strictly forbidden regardless of purpose or reason.
Cartoon artwork depicting sexually graphic or offensive content. Made with the intention of spreading misinformation of a real person or situation, or featuring images involving hate speech will not be permitted.