
Savvy Spring Celebrations Recipe Book

10 servings
5-min prep time | 25-min total time
Ingredients
8 oz. (250 g) cream cheese, softened
1⁄3 cup (75 mL) heavy cream
3–4 oz. (90–125 g) smoked salmon
1 tbsp (15 mL) fresh dill or 1 tsp (5 mL)
All-Purpose Dill Mix
2 English cucumbers
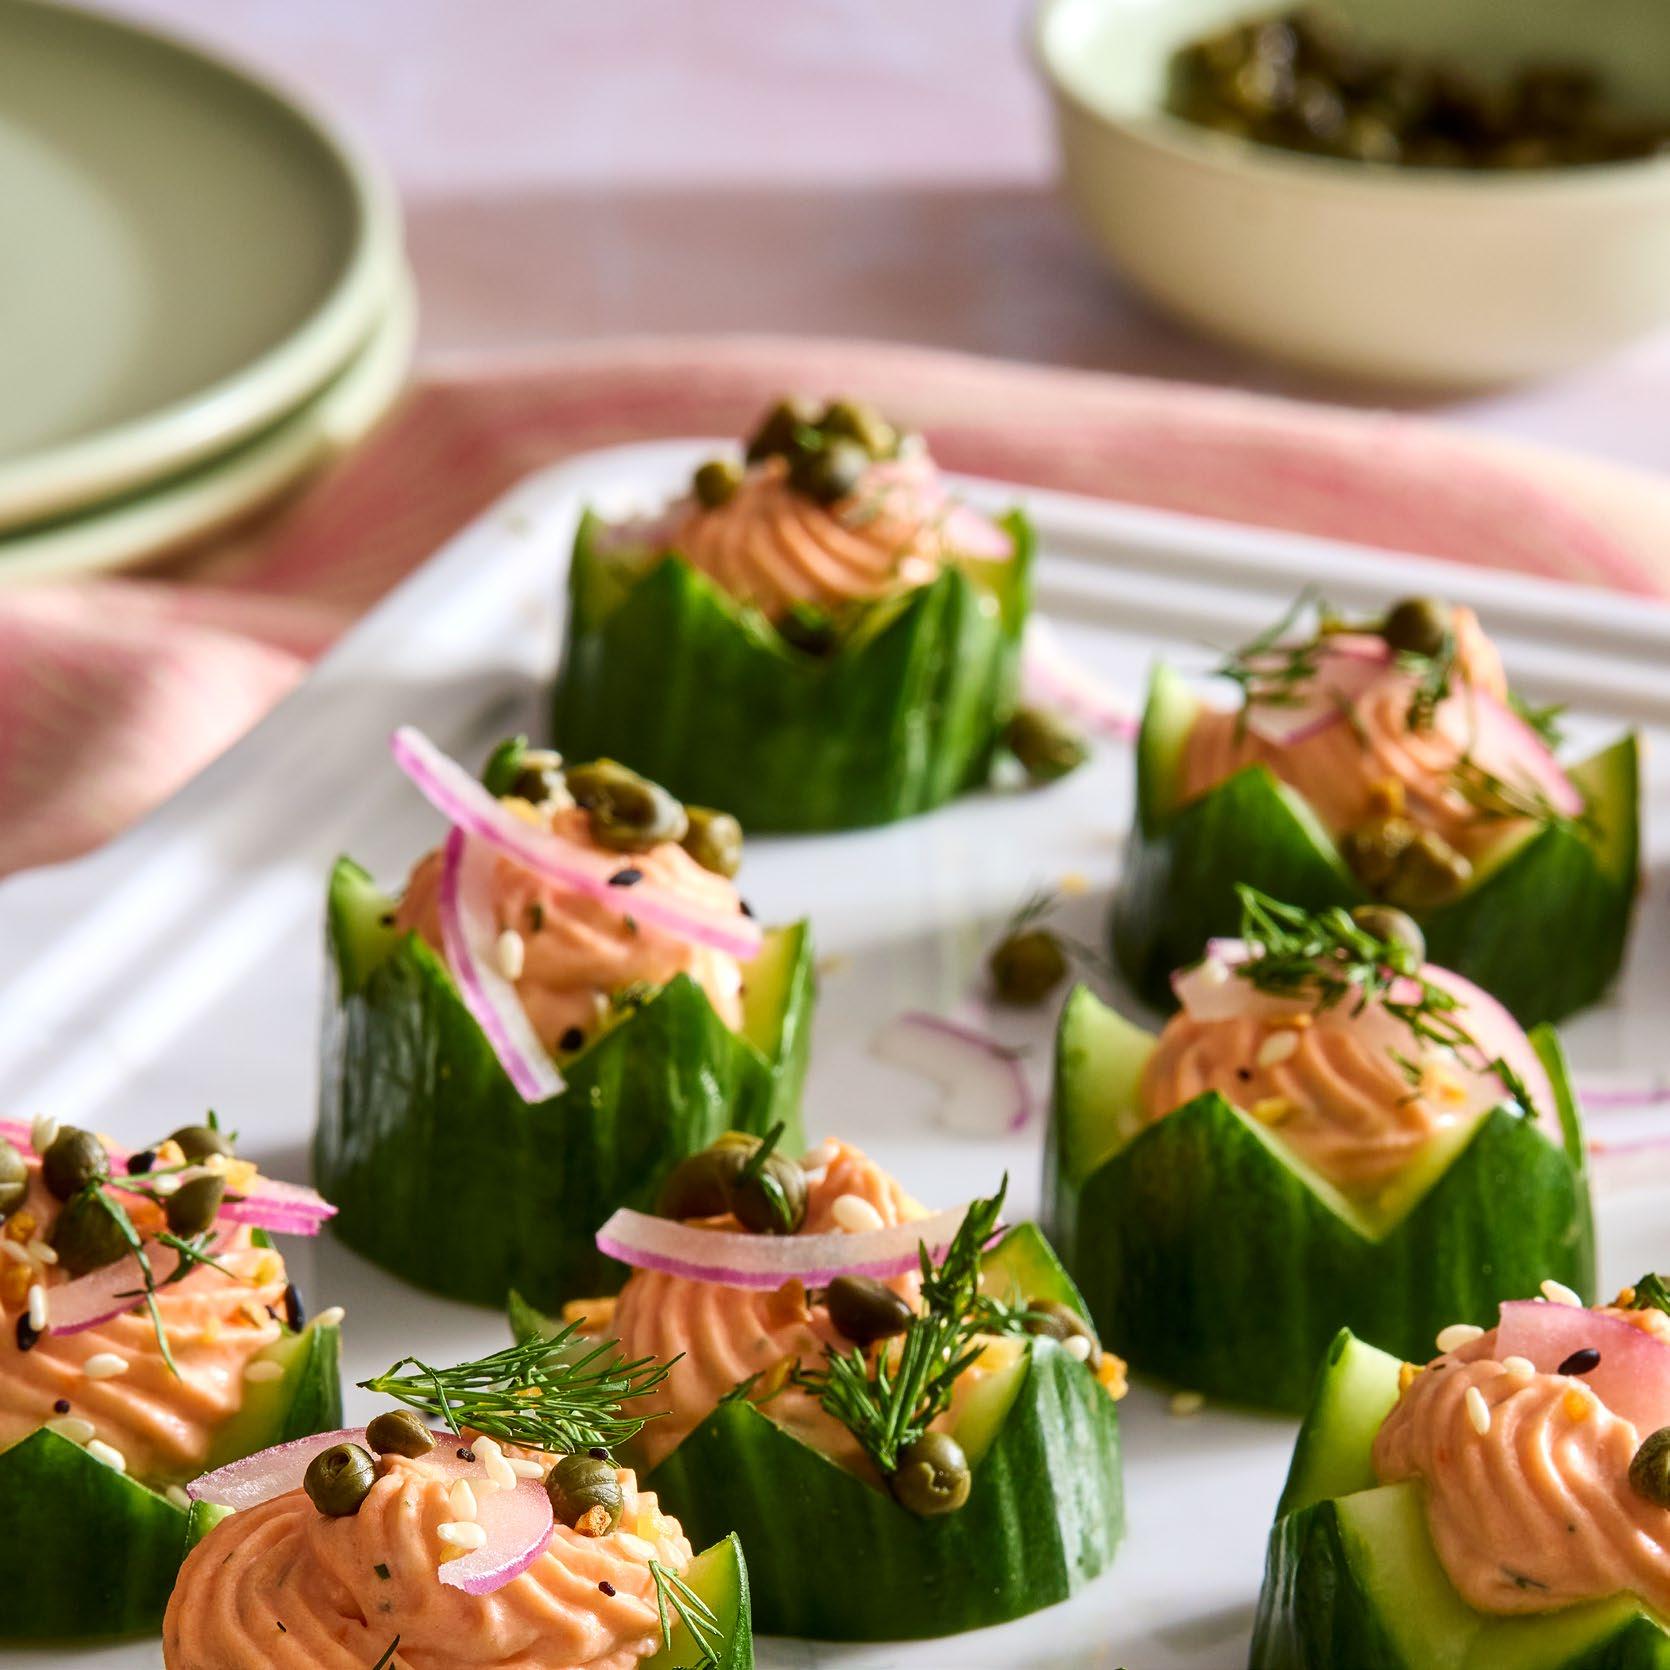
Toppings: Capers, thinly sliced red onion, Everything Bagel Seasoning, additional fresh dill, lemon zest
Cucumber & Smoked
Salmon Canapes
Directions
1. Combine the cream cheese and heavy cream in the bowl of the Electric Twist & Chop Press and blend until combined, about 3 seconds. Add the salmon and dill, and press . Blend until smooth, about 4–5 seconds.
2. Cut the cucumbers down to 1" (2.5-cm) pieces and cut each piece in two with the Decorative Food Cutter.
3. Transfer the cheese mixture into a piping bag or plastic bag with the corner snipped. Pipe onto the center of the cucumber pieces. Add toppings, if you’d like. Serve chilled.
Cook’s Tips
• If the cheese mixture is too stiff to pipe, add a little more cream.
• Don’t like salmon? Try blending the cream cheese with some drained and dried roasted red peppers.
• Keep your canapes cool before your event with the Chilled Serving Tray.
12 servings
15-min prep time | 30-min total time
Ingredients
6 large hard-boiled eggs
¼ cup (60 mL) garden vegetable cream cheese spread
3 tbsp (45 mL) mayonnaise
Salt and ground black pepper to taste
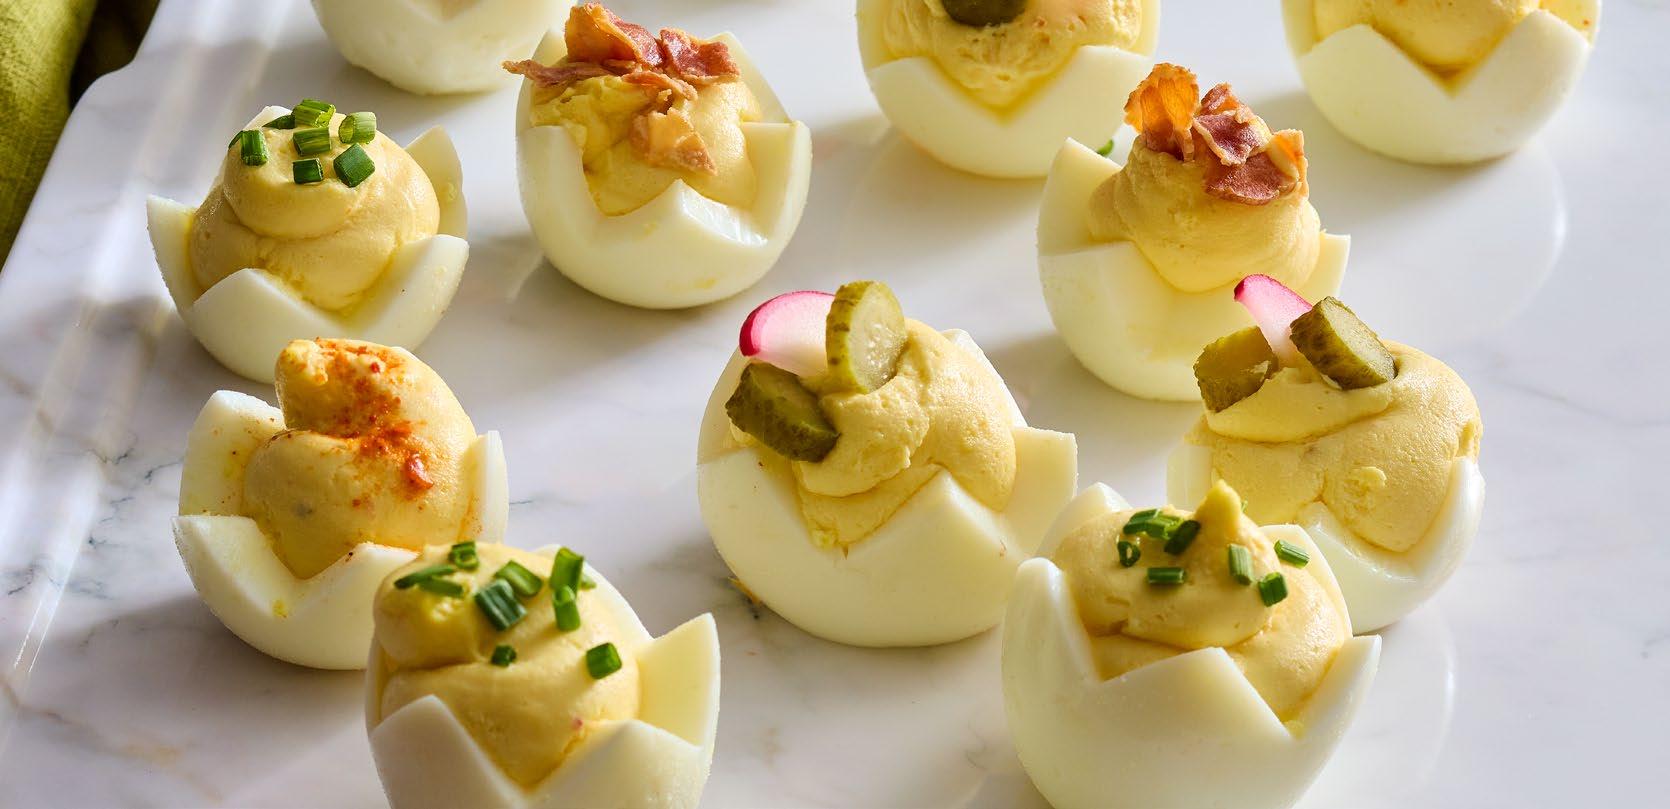
Optional garnishes: Chopped chives, bacon, pickles, radish, favorite seasoning
Fancy Deviled Eggs
Directions
1. Cut the eggs in half using the Decorative Food Cutter. Carefully remove the yolks to a mixing bowl. Mash the yolks with a fork and stir in the cream cheese and mayonnaise until well blended. Season to taste with salt and black pepper.
2. Transfer the yolk mixture into a piping bag or plastic bag with the corner snipped. Pipe into the egg whites. Add toppings, if you’d like, and serve chilled.
Cook’s Tips
• Cut a very thin slice off of the bottom of the egg whites if you’d like them to sit flat.
• Serve on the Chilled Serving Tray
• Make your hard-boiled eggs in the Deluxe Air Fryer & Oven. Set the bottom compartment to and adjust the temperature to 250°F (120° C) and the time to 25 minutes. Place the eggs on the Air Fryer Rack. Place in the oven and press . Transfer the eggs to a bowl of ice water to cool completely, about 8–10 minutes, before peeling.

4–6 servings
10-min prep time | 1-hr, 5-min total time
Chicken
1 whole chicken (about 4.5 lbs./2 kg)
1 lemon, zested
2 tbsp (30 mL) butter, melted
1 tbsp (15 mL) chives, minced
1 tbsp (15 mL) parsley, minced
1 tsp (5 mL) salt
½ tsp (2 mL) black pepper
Oil for spritzing
Potatoes
2 lbs. (1 kg) baby potatoes
1 tbsp (15 mL) Garlic-Parmesan
Dipping Oil
½ tbsp (7 mL) Garlic Parmesan
Seasoning
¼ tsp (1 mL) salt
Oil for spritzing
Lemon & Herb Roast Chicken
Directions
1. Spatchcock the chicken by removing the backbone with kitchen shears. Lay the chicken, breast-side up, on a cutting board and push down to flatten it. Tuck the wings behind the breasts. Pat the chicken with paper towels to thoroughly dry.
2. Combine the zest, butter, chives, parsley, salt, and pepper in a small bowl.
3. Set the Deluxe Air Fryer & Oven to . Set the bottom compartment to at 425°F (220°C) for 55 minutes. Set the top compartment to BAKE at 425°F (220°C) for 45 minutes. Press
4. Place the chicken, skin-side up, on a greased Air Fryer Rack (see cook’s tip). Brush the skin with the butter mixture. Cut the lemon in half and place it, cut-side up, on the pan with the chicken.
5. Cut the potatoes in half with the Decorative Food Cutter and place in a large bowl. Toss with the dipping oil, seasoning, and salt. Transfer to a greased sheet pan or Small Oven Baking Sheet.
6. When the display says, “Add Food,” add the rack to the bottom compartment and the pan (on the Wire Rack) to the top compartment. Press . Rotate the chicken halfway through cooking.
7. Transfer the chicken to a cutting board and rest for 5–10 minutes before carving. Squeeze the roasted lemon over the chicken and potatoes before serving, if you’d like.
Cook’s Tips
• You can use any herbs you have on hand—even dried herbs. After cooking, you can garnish the potatoes with more herbs.
• If your potatoes are too small to fit in the Decorative Food Cutter, you can leave them whole or cut them in half.
• Cooking the chicken on the Air Fryer Rack gives you crispy chicken skin. To minimize mess and save the drippings for a flavorful gravy, bake the chicken on the Small Oven Baking Sheet.

4 servings
10-min prep time | 50-min total time
Ingredients
Half of 1 prepared pie crust
2 eggs
½ cup (125 mL) half & half
¼ tsp (1 mL) each salt and pepper
2 oz. (60 g) cheese, grated (½ cup/125 mL) (cheddar, white cheddar, Gruyere, or pepper jack), plus additional for topping
½ cup (125 mL) add-ins (blanched broccoli, diced ham, cooked bacon or sausage, peppers and onions, spinach, etc.)
Half Pie Quiche
Directions
1. Preheat the oven to 350°F (174°C).
2. Place the pie crust in the Half Pie Pan and crimp the edges, as desired.
3. Whisk together the eggs, half & half, salt, and pepper in a mixing bowl. Stir in the cheese and add-ins. Pour the egg mixture over the dough. Sprinkle with additional cheese, if you’d like.
4. Bake for 35 minutes, or until a knife inserted in the center comes out clean. Cool for 5–10 minutes before serving.
Cook’s Tip
• Make this in the Deluxe Air Fryer & Oven using the setting at 325°F (165°C). Cook for 38 minutes. Tent with foil halfway through cooking to prevent over-browning.

8 servings
10-min prep time | 35-min total time
Chicken
2 lbs. (1 kg) chicken thighs
2 tbsp (30 mL) honey
1 tbsp (15 mL) Smoky Barbecue Rub
1 tbsp (15 mL) Chipotle Rub
1 tbsp (15 mL) oil
Corn Salsa
2 cups (500 mL) frozen corn
1 red bell pepper, seeded and finely chopped
½ small red onion, finely chopped
1 tsp (5 mL) Chipotle Rub
½ tbsp (7 mL) oil
¼ cup (60 mL) cilantro, finely chopped
1 lime, juiced
Toppings
Warm tortillas
Guacamole
Sour cream
Shredded lettuce
Diced tomatoes
Grated cheese
BBQ Chicken Tacos
Directions
1. Toss the chicken with the honey, seasonings, and oil. Place the chicken onto the Sheet Pan.
2. Set the Deluxe Air Fryer & Oven to . Set the Bottom compartment to for 20 minutes. Set the top compartment to and adjust the temperature to 425°F (220°C) and set the time to 25 minutes.
3. Toss the corn with the peppers, onions, rub, and oil and spread evenly onto a foil-lined Air Fryer Rack.
4. When the display says, “Add Food,” place the chicken in the bottom oven and the corn mixture in the top. Press . Rotate the chicken halfway through cooking.
5. Transfer the corn mixture to a large bowl and toss with the cilantro and lime juice.
6. Place the chicken in another large bowl and chop with the Salad Chopper. Serve the chicken on warm tortillas and top with the corn salsa, guacamole, and any other toppings.
Cook’s Tip
• This is a great recipe to meal prep for the week! Keep your corn salsa and other toppings in the Store & Serve, and keep guacamole fresh longer in the Guacamole Serve & Save

12 servings
15-min prep time
Ingredients
½ small red bell pepper, seeded and cut into chunks
½ jalapeño pepper, seeded and quartered
1 tsp (5 mL) lime zest
2 tbsp (30 mL) lime juice
¼ tsp (1 mL) salt
¼ cup (60 mL) loosely packed cilantro leaves
2 large ripe mangoes, peeled and cut into chunks (or 12 oz./350 g frozen, thawed and drained)
Fresh Mango Salsa
Directions
1. Add the bell pepper, jalapeño, lime zest, juice, and salt to the Electric Twist & Chop Pulse until coarsely chopped, about 8 times.
2. Add the cilantro and top with the mango (this helps blend evenly). Pulse until coarsely chopped and well blended, about 12 times.
12 servings
2-min prep time | 5-min total time
Spicy Pineapple
1½ cups (375 mL) prepared guacamole
1 tsp (5 mL) Everything Taco Seasoning, plus additional for topping
½ cup (125 mL) finely chopped pineapple (fresh, frozen or canned)

Roasted Corn
1½ cups (375 mL) prepared guacamole
1 tsp (5 mL) Crushed Peppercorn & Garlic Rub
½ cup (125 mL) charred corn (see cook’s tip), plus additional for topping
Barbecue Bacon
1½ cups (375 mL) prepared guacamole
1 tsp (5 mL) Smoky Barbecue Rub
½ cup (125 mL) chopped, cooked bacon (about 4 slices), plus additional for topping
Guacamole Variations
Directions
1. Combine all the ingredients for your variation. Add reserved toppings and additional seasoning, if you’d like.
2. Serve with chips, veggies, or as part of a taco bar.
Cook’s Tip
• To make your own roasted corn, toss ½ cup (125 mL) of frozen corn with 1 tsp (5 mL) of oil. Spread on a small sheet pan and broil in the oven or Deluxe Air Fryer & Oven for 3–5 minutes, or until charred.

8 servings
30-min prep time | 2-hr, 30-min total time
Crust
1¼ cups (300 mL) all-purpose flour
1 tbsp (15 mL) powdered sugar
¼ tsp (1 mL) salt
¼ cup (60 mL) solid vegetable shortening
3 tbsp (45 mL) cold butter
2–4 tbsp (30-60 mL) ice-cold water
Filling
1 pkg (4.3 oz./121 g) vanilla cook and serve pudding and pie filling (not instant)
2 cups (500 mL) milk
3 tbsp (45 mL) butter or margarine
½ tsp (2 mL) vanilla
2 cups (500 mL) sliced strawberries
Powdered sugar for dusting
Strawberry Custard Tart
Directions
1. For the crust, combine the flour, sugar, and salt in large bowl; mix well. Cut the shortening and butter into the flour mixture until the shortening and butter are the size of small peas. Sprinkle 1 tbsp (15 mL) of water over the flour mixture; gently toss with a fork. Repeat until the mixture is moist enough to form a ball.
2. Place the dough on lightly floured surface. Roll the dough from center to edges, forming an 11½" (29-cm) circle. Place the crust in the Tart Pan. Trim off any excess dough from the edge and pierce the bottom of the crust. Refrigerate for 30 minutes.
3. Preheat the oven to 400°F (205°C). Bake for 13–15 minutes, or until the crust is light golden brown. Remove the pan from the oven to a cooling rack; cool completely.
4. For the filling, in medium saucepan, combine the pudding mix and milk. Bring to a boil, stirring constantly; cook and stir for 1 minute, or until thickened. Remove the pan from the heat. Add the butter and vanilla; stir until smooth. Cool for 10 minutes, stirring occasionally. Pour the filling evenly over the crust. Arrange the strawberries over the filling. Refrigerate for 2 hours. Sprinkle generously with powdered sugar before serving.
Cook’s Tip
• Use the Shortbread Cookie Mix for the crust! Prepare the mix according to the package directions, then press the dough evenly into the Tart Pan and up the sides. Chill in the fridge for 20 minutes, pierce all over with a fork, and bake at 400°F (205°C) for 16–18 minutes, or until golden-brown. Cool completely before filling.
8 servings
15-min prep time | 30-min total time
Ingredients
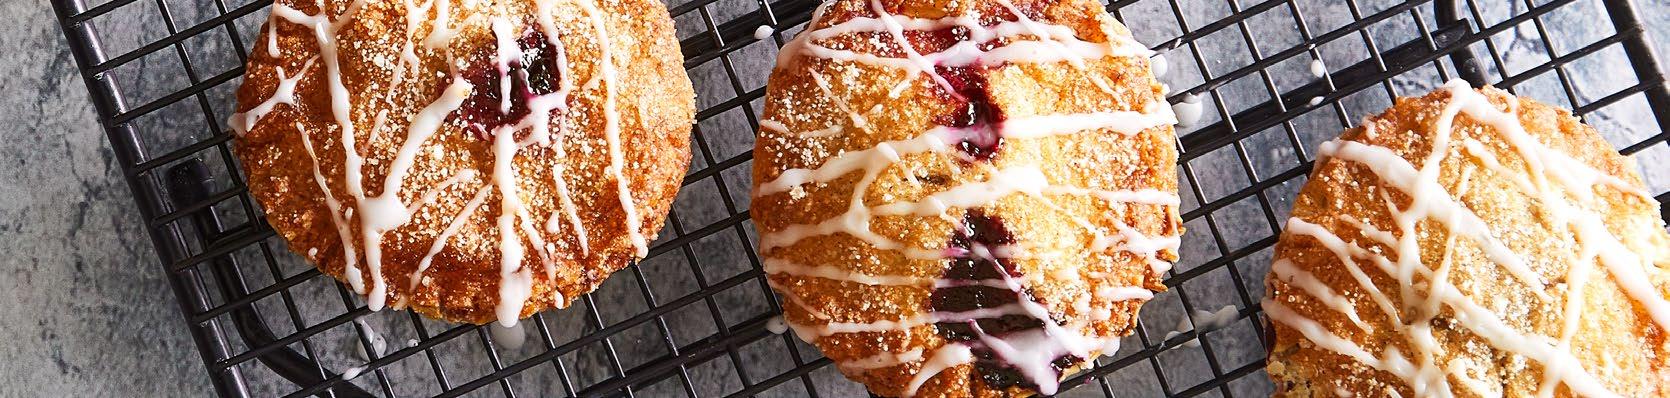
¼ cup (60 mL) blueberry jam
¼ cup (60 mL) fresh blueberries
1 lemon
Flour for dusting
1 pkg (14.1-oz./399-g) refrigerated pie crusts (2 crusts), softened according to directions
1 egg
2 tbsp (30 mL) sugar
¼ tsp (1 mL) ground cinnamon
Oil for spritzing
Optional: ¼ cup (60 mL) powdered sugar
Air Fryer Hand Pies
Directions
1. Set the Deluxe Air Fryer & Oven to for 20 minutes
3. Unroll the pie dough onto a lightly floured surface. Cut 4 dough rounds with the Hand Pie & Pocket Maker cutter (the thin edge of the mold below the lip) from each piece of pie dough.
4. Dust the base with flour. Place one piece of dough on the foldable base and add 1 tbsp (15 mL) of filling onto each circle using the scoop provided.
5. Using the handle, fold the dough and firmly press to crimp and seal. Cut 2 small slits in the middle of each pie to vent. Place the pies on the grease sheet pan.
6. Whisk the egg in a small bowl. Lightly brush the pies with the egg wash. Combine the sugar and cinnamon, then sprinkle over the pies.
7. When the display says, “Add Food,” place the pan (on the Wire Rack) in the oven; press .
8. If you’d like, juice the lemon to measure 1 tsp (5 mL). Mix the juice and powdered sugar in a small bowl until smooth, then drizzle over the pies.
Cook’s Tip
• To make this recipe in the Deluxe Air Fryer, cook on for 10–12 minutes, or until golden brown, rotating the trays halfway through cooking.

8–10 servings
15-min prep time | 1-hr, 10-min total time
Pasta
Oil for greasing
8 oz. (250 g) cream cheese
16 oz. (450) rotini or other short pasta
1 jar (24 oz./650 mL) marinara sauce
4 cup (1 L) chicken or vegetable broth
½–1 tsp (2–5 mL) red chili flakes (optional)
8 oz. (250 g) mozzarella cheese, grated (2 cups/500 mL)
Meatballs
Oil for greasing
1 lb. (450 g) ground beef
½ cup (125 mL) Italian seasoned breadcrumbs
¼ cup (60 mL) milk
½ oz. (15 g) Parmesan cheese, finely grated (¼ cup/60 mL)
1 egg
2 garlic cloves, crushed
½ tsp salt
¼ tsp (1 mL) black pepper
Optional: Hot marinara for serving
Meatball & Pasta Bake
Directions
1. Grease the Small Oven Baking Pan
2. Place the cream cheese in the center of the pan. Sprinkle the dry pasta around the cream cheese. Drizzle the marinara and broth over the pasta. Add the chili flakes, if using. Press the pasta down with a scraper to evenly submerge it. Cover the pan with foil.
3. Set the Deluxe Air Fryer & Oven to . Set the Bottom Compartment to . Adjust the temperature to 350°F (175°C) with low fan and the time to 55 minutes.
4. Set the Top Compartment to . Adjust the time to 25 minutes. Press .
5. Line the Air Fryer Rack with foil and grease it with oil.
6. Combine the meatball ingredients and shape into 20 meatballs using a Medium Scoop. Place them on the foil.
7. When display says, “Add Food,” place the meatballs in the Top Compartment and the pasta in the Bottom Compartment. Press
8. Remove the foil from the pasta in the last 10 minutes of cooking. Stir to mix in the cream cheese. Top the pasta with the mozzarella and place back in the Bottom Compartment.
9. Remove the pasta and meatballs from the oven and let rest for 5 minutes. Serve with additional marinara, if you’d like.
Cook’s Tips
• Half of the pasta recipe fits perfectly in an 8" (20-cm) square pan.
• To use gluten-free pasta, reduce the cook time by 10 minutes.
• To use frozen meatballs, set the Top Compartment to the time and temperature recommended on the package.

The Next Generation Is Here
Ask me how to get the Deluxe Air Fryer & Oven for less when you host a party.