

TREASURY SERVICES USER G UIDE For additional help, contact the Teasury Services team at treasuryservicesgroup@paducahbank.com or 270.575.5770

Table of CONTENTS LEFT HOME SCREEN MENU MANAGE PROFILE . . . . . . . . . . . . . . . . . . . . . . . . . . . . . . . . . . 3 • Sub-User Set Up . . . . . . . . . . . . . . . . . . . . . . . . . . . . . . . . . . . . . . . . . . 5 MOVE MONEY . . . . . . . . . . . . . . . . . . . . . . . . . . . . . . . . . . . . . 6 • Bill Pay 7 ACH . . . . . . . . . . . . . . . . . . . . . . . . . . . . . . . . . . . . . . . . . . . . . 8 • Creating a New Batch . . . . . . . . . . . . . . . . . . . . . . . . . . . . . . . . . . . . . . 8 • Scheduling an ACH Batch 10 • Editing an ACH Batch 10 • Creating Participants 11 • ACH History . . . . . . . . . . . . . . . . . . . . . . . . . . . . . . . . . . . . . . . . . . . . 12 • ACH Reporting . . . . . . . . . . . . . . . . . . . . . . . . . . . . . . . . . . . . . . . . . . 13 • ACH NOCs/Returns . . . . . . . . . . . . . . . . . . . . . . . . . . . . . . . . . . . . . . . 14 WIRES . . . . . . . . . . . . . . . . . . . . . . . . . . . . . . . . . . . . . . . . . . 17 • Editing a Submitted Wire 17 • Creating a Wire Template . . . . . . . . . . . . . . . . . . . . . . . . . . . . . . . . . . 17 • Wire History . . . . . . . . . . . . . . . . . . . . . . . . . . . . . . . . . . . . . . . . . . . . 17 POSITIVE PAY . . . . . . . . . . . . . . . . . . . . . . . . . . . . . . . . . . . . 18 • Imported Issued Check File 18 • Creating a Template . . . . . . . . . . . . . . . . . . . . . . . . . . . . . . . . . . . . . . 19 • Manual Issued Check Entry . . . . . . . . . . . . . . . . . . . . . . . . . . . . . . . . . 20 • Exceptions . . . . . . . . . . . . . . . . . . . . . . . . . . . . . . . . . . . . . . . . . . . . . 20 • Decisions 20 COMPANY MANAGEMENT . . . . . . . . . . . . . . . . . . . . . . . . . . . 21 • Participants . . . . . . . . . . . . . . . . . . . . . . . . . . . . . . . . . . . . . . . . . . . . 22 DEPOSIT CHECKS . . . . . . . . . . . . . . . . . . . . . . . . . . . . . . . . . 23 MANAGE CARDS . . . . . . . . . . . . . . . . . . . . . . . . . . . . . . . . . . 25 REPORTS . . . . . . . . . . . . . . . . . . . . . . . . . . . . . . . . . . . . . . . . 26 Appendix A: ACH Origination 28 Appendix B: Wire Origination 31 Appendix C: Positive Pay Information . . . . . . . . . . . . . . . . . . . . . . . . . . . 32
LEF T HOM E SCREEN MENU
n Edit company information and manage sub-users

n View account balances, view transactions details, and view account and routing numbers
n Transfer money between accounts, access Bill Pay, and make loan payments or advances
n Originate, edit, and view ACH batches and history
n Initiate, review for approval, edit, and view wire history
n Upload files, review exceptions, and void issued checks
n Add ACH participants and view company information
n Launch Remote Deposit Capture, or view SNAP Deposit history
n View and manage all company related debit cards
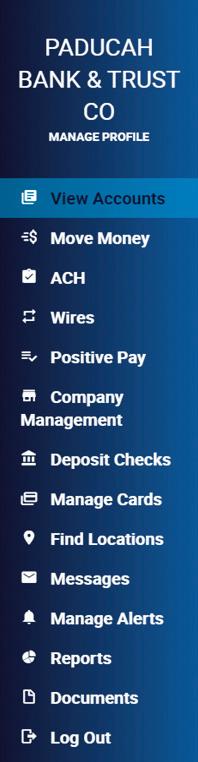
n Find your nearest Paducah Bank location
n Send a message to Paducah Bank
n Add or manage notifications from Paducah Bank
n Generate customized reports for your business
n View statements and notices
2 / TREASURY SERVICES USER GUIDE
MANAGE PROFILE
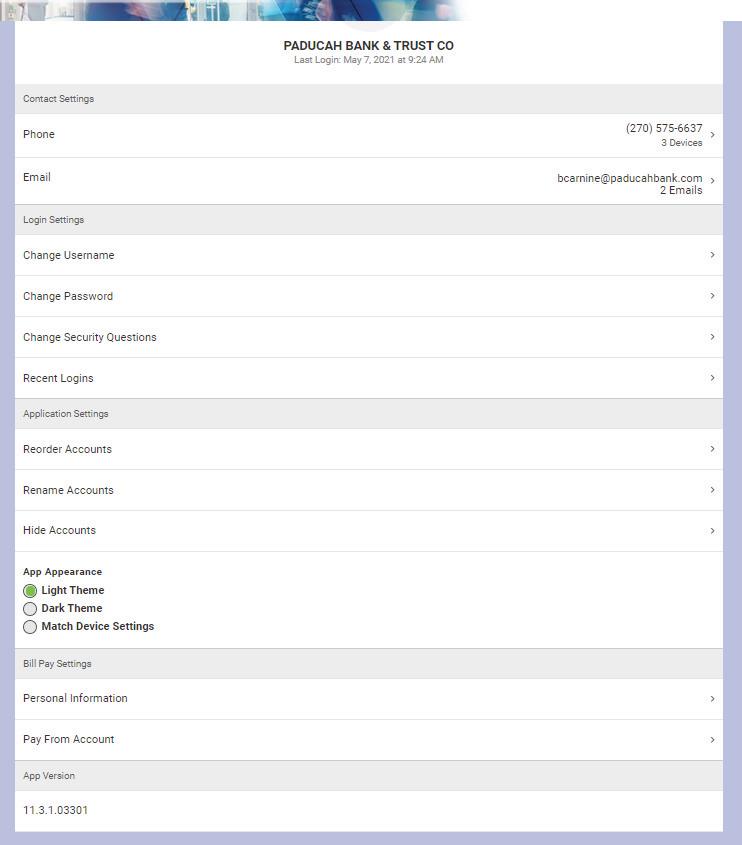


NAVIGATION
On the Left Home Screen Menu, click Manage Profile. The system will then prompt the following screen.
TREASURY SERVICES USER GUIDE / 3 *
MANAGE PROFILE CONTINUED


UTILIZATION
To change or review the phone number or email address associated with the Internet Banking profile

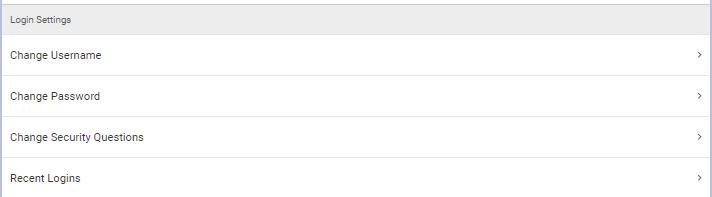

To change or review the Username, Password, Security Questions, or Login Activity for the Internet Banking profile.
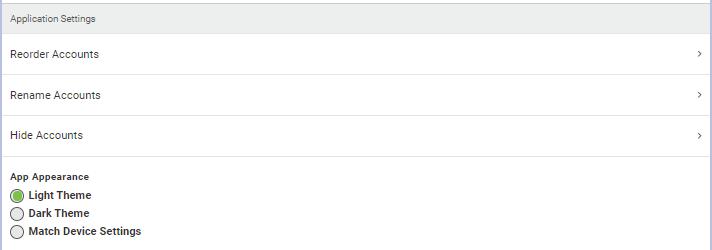
To Rearrange or Reorder Accounts in Internet Banking, Rename Accounts, Hide Accounts, or to change the Internet Banking System appearance.
To change or review Bill Pay account information, including Personal Information and Pay From Account details.
4 / TREASURY SERVICES USER GUIDE
MANAGE PROFILE CONTINUED
SUB-USER SETUP
To create a new sub user click on the +
n If there is already an established sub-user, permissions can be copied from the sub-user to the new sub-user
n Sub-user’s name
n Sub-user’s email address
n Display Name: for your records only
n A unique one-time code that you will provide to the sub-user. The sub-user will be prompted to enter this as the security code upon clicking the enrollment link for authentication
n If sub-user needs permissions for all accounts, click here
n When checked, the sub-user will have the ability to both add and modify categories assigned to account transactions
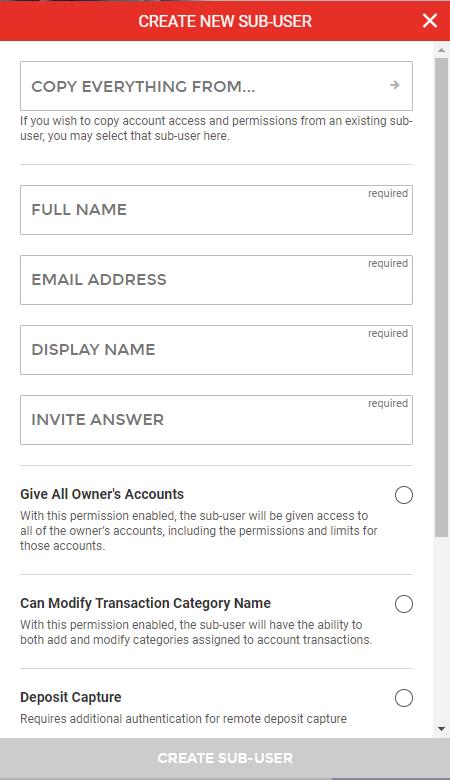
n If sub-user needs Remote Deposit Capture (CaptureIt) access, check here
Click “Create Sub-User” to complete set-up.


Once added, the system will give the option to “Add Another Sub-User” or “Edit New Sub-User.” By choosing “Edit New Sub-User” or by going back to your Manage Profile home screen, you will be able to choose the sub-user to add permissions.
n Change accessible permissions for the sub-user
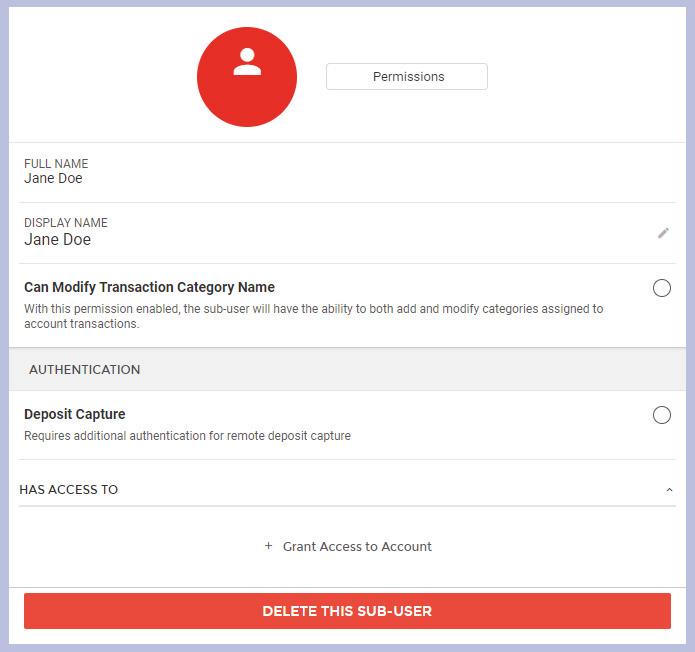
n Edit the sub-user’s display name
n Grant access to accounts for the sub-user
n Delete the sub-user
TREASURY SERVICES USER GUIDE / 5
MOVE MONEY
NAVIGATION
On the Left Home Screen Menu, click Move Money
The system will then prompt the following screen.
UTILIZATION
To view all scheduled and pending Bill Pay transactions

To view all or search for previous Bill Pay instructions.
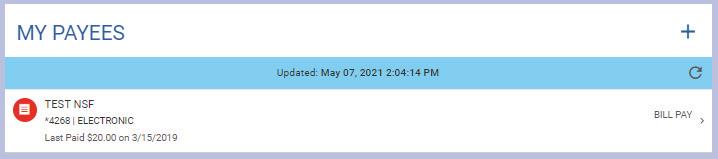
To manage, add, or delete Payees. A Payee is referencing any individual or business that will be sent money through Bill Pay
To create a new Bill Pay transaction, click “New Transaction.”


6 / TREASURY SERVICES USER GUIDE
MOVE MONEY CONTINUED
BILL PAY
n To utilize Paducah Bank’s Bill Pay function, follow the instructions on Page 7 to create a new Bill Pay transaction.
n Pick which account the transaction will fund from.
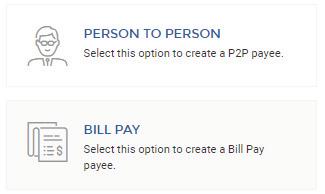
n Choose a Payee or choose “+ Add New Payee” at the bottom of the screen.
n If “+ Add New Payee” was chosen, please choose from the following options.
This will give you or your Payee the option to send instant money directly to their debit card
This will give you the option to input your Payee’s information to send money to their bank account
n If “Bill Pay” was chosen, then distinguish if the Payee is an Individual or Company.
• If supplied with account and routing number, choose “Individual,” even if Payee is a company.
n Enter Payee’s information, including Name, Address, Phone Number, and Account numbers.
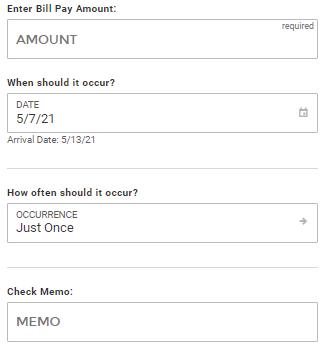
n The system will then prompt to input transaction specific information. See below.
Dollar amount of the Bill Pay transaction
Date the transaction should post to the Payee’s account
Determine if the transaction is one time payment or recurring
Transaction specific information *Optional
(Ex: Invoice #, Pay Dates)
n Click “Continue” to navigate to the Review Screen.


n Once all information is reviewed for accuracy, clicking
“Submit” will officially submit the transaction.
TREASURY SERVICES USER GUIDE / 7
| For additional ACH information and rules, please reference Appendix A: ACH Origination Information on page 28.
NAVIGATION
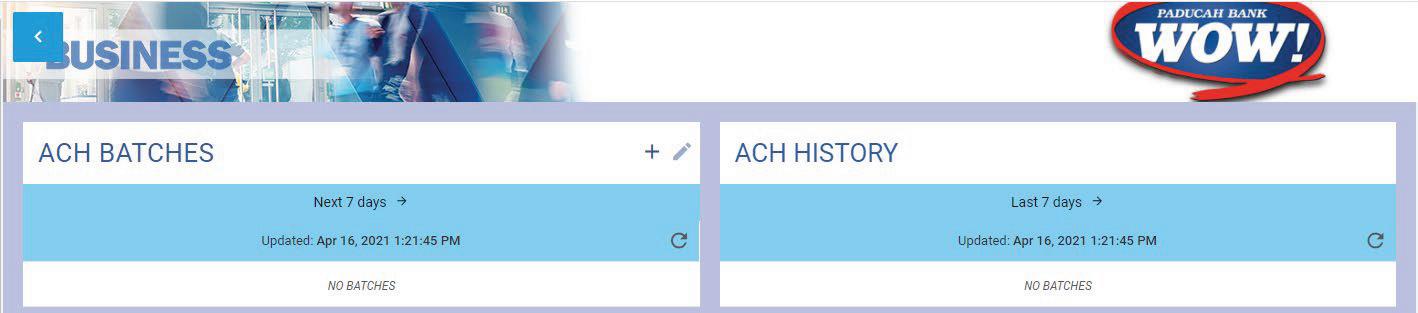
On the Left Home Screen Menu, click ACH The system will then prompt the following screen.
UTILIZATION
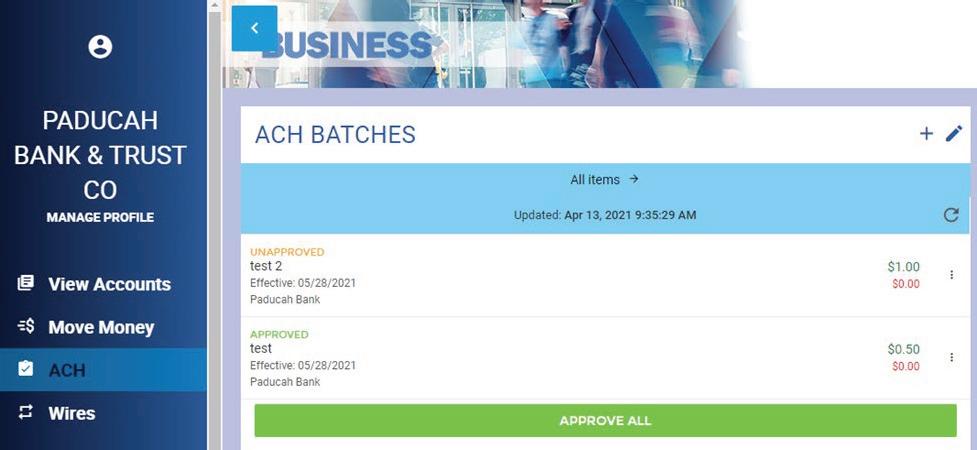
To begin an ACH batch, click the “+” button


Allows you to change date range to view all pending batches. Pending batches refers to batches that Paducah Bank HAS NOT processed.
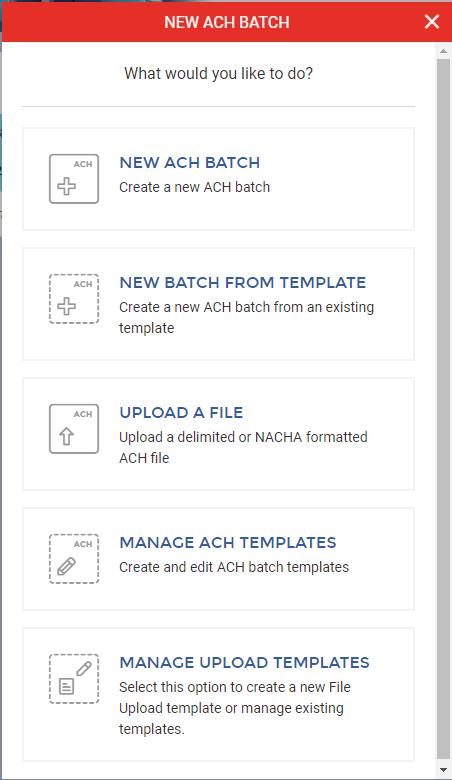
The following menu will then appear.
Allows you to change the date range to view all ACH origination history.
Create a new ACH batch
Create a new ACH batch from an existing template
Upload a NACHA formatted, or a delimited (.CSV) file
Create a new ACH batch template or edit an existing template
Create a new upload template or edit an existing upload template
ACH
8 / TREASURY SERVICES USER GUIDE
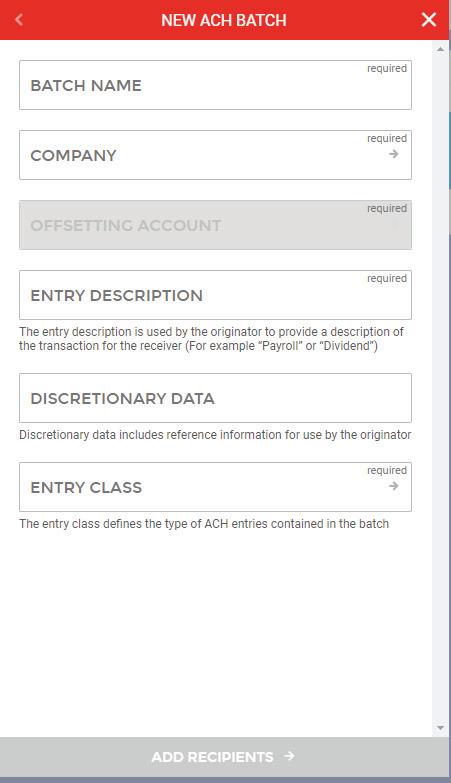
n After choosing “New ACH Batch” on the following page, the below menu will appear.
This field is to name the batch. Payee WILL NOT see this information (Ex. Payroll, Dues)
Select which company you will be originating from
Select which account you will be originating from
This is what the Payee will see as the description of the transaction in their bank account (Ex. Payroll, Rent, Billing)


Reference information for you as the originator. Payee WILL NOT see this information. *Optional
PPD – a consumer account is involved in the transaction CCD – a corporate account is receiving or sending the money CTX – used for corporate trade exchanges
n After inputting the required data, click “Add Recipients. ”
n On the “Create New Detail Record” page, you will be required to input your Payee’s information.
• Name
• Identification (Internal ID number; optional)
• Amount
• Payee’s Routing & Account numbers
• Transaction Type (Credit: Payee is receiving credit, Debit: Payee is being debited)
• Prenote (Reference Appendix A: ACH Origination Information) for more information.
• Account Type (Checking or Savings)
• Payment Related Information (If addenda information is required, include it in this field)
Saving as Participant will save the individual’s information under the company’s participant
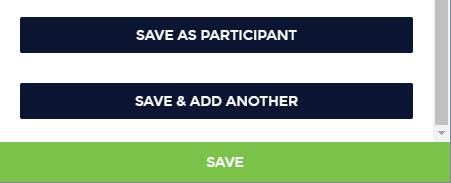
Save & Add Another will only save the individual to this specific batch and will prompt you to add another individual to the current batch
n Click “Save”
ACH CONTINUED
TREASURY SERVICES USER GUIDE / 9
*
SCHEDULING AN ACH BATCH
n After clicking “Save,” as illustrated on Page 8, the following screen will prompt to schedule the batch.


Select if payment is a One-Time or Recurring payment.
Effective date should reflect the date in which the transaction will post on the payees account
If the Effective Date falls on a holiday or a weekend, by checking the “After Holiday” box, the payment will post the first business day after the holiday or weekend. If left unchecked, the payment will post the last business day before the holiday or weekend.
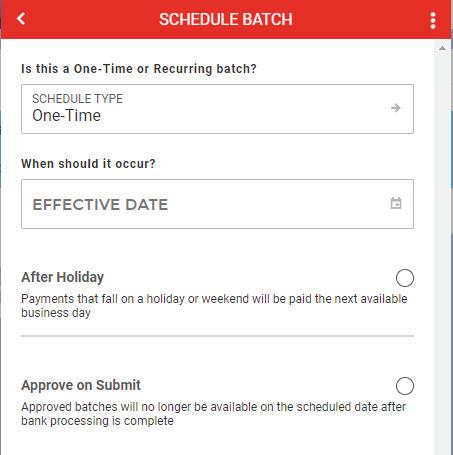
If checked, the batch will automatically approve when submitted
EDITING AN ACH BATCH
The Edit Batch option allows the user to make changes to the selected batch including header information, scheduling, and transaction details. By clicking the 3-Dot menu to the right of the batch, you can choose to view or edit the selected batch.
To view/edit, delete, or print a batch
ACH CONTINUED
10 / TREASURY SERVICES USER GUIDE
CREATING ACH PARTICIPANTS
n ACH Reporting allows for simple or customized reporting on ACH Transactions and Batches.
NAVIGATION
n Select the applicable Company

n Select the “Participants” tab
n Choose “+Add Participant” if inputting a new payee or “+Upload Participants” if you have multiple participants in a NACHA formatted or comma delimited (.CSV) file to upload.
UTILIZATION
n Input the Participants information. Please note email and notify by email are optional.
Manually input information for a new participant
Upload participant information using a NACHA formatted or delimited file.
Name of Participant
Internal Payee ID number. This field is for your records, and optional. (EX. Employee ID #, Invoice #, etc.)


Mailing Address of Participant
Email Address of Participant *Optional
If checked, will send notification to participant of processed batches that include the specific participant *Optional
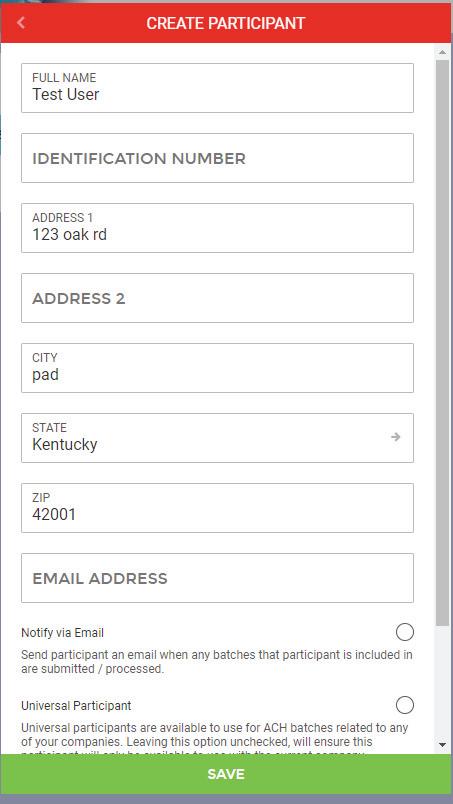
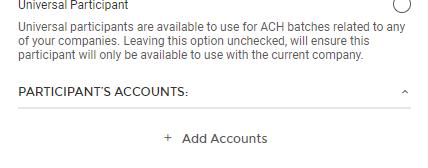
If checked, the specific Participant will be available to include in batches for any accessible company in your Internet Banking profile

ACH CONTINUED
TREASURY SERVICES USER GUIDE / 11
*
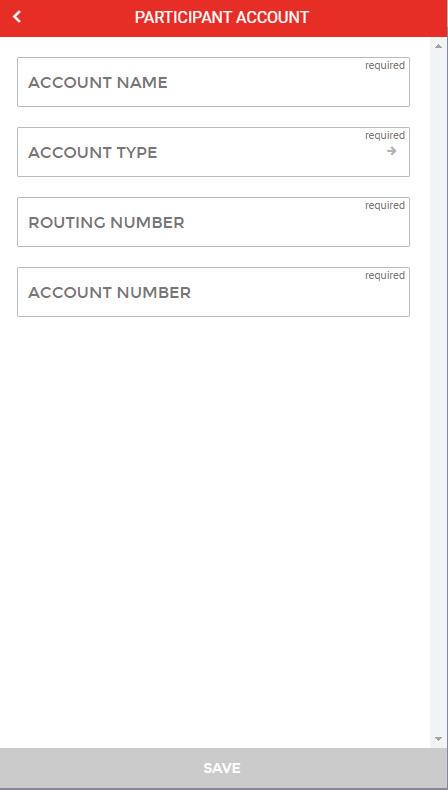
n Select “+ Add Accounts” at the bottom of the screen and input all required information.
Account Name as noted on ACH Authorization Form
Account Type as noted on ACH Authorization Form
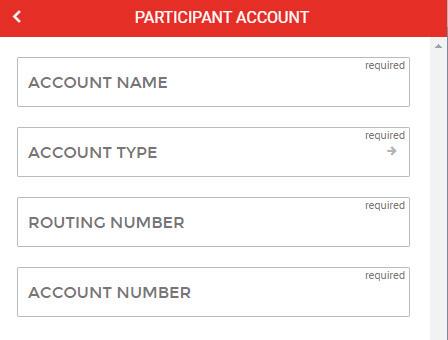
Payee’s Routing Number


Payee’s Account Number
Do not forget to save your work!
ACH REPORTING
n The ACH History tile will display any batches that have been processed by the Bank.
Allows you to change the date range to view all ACH origination history

View batch detail history
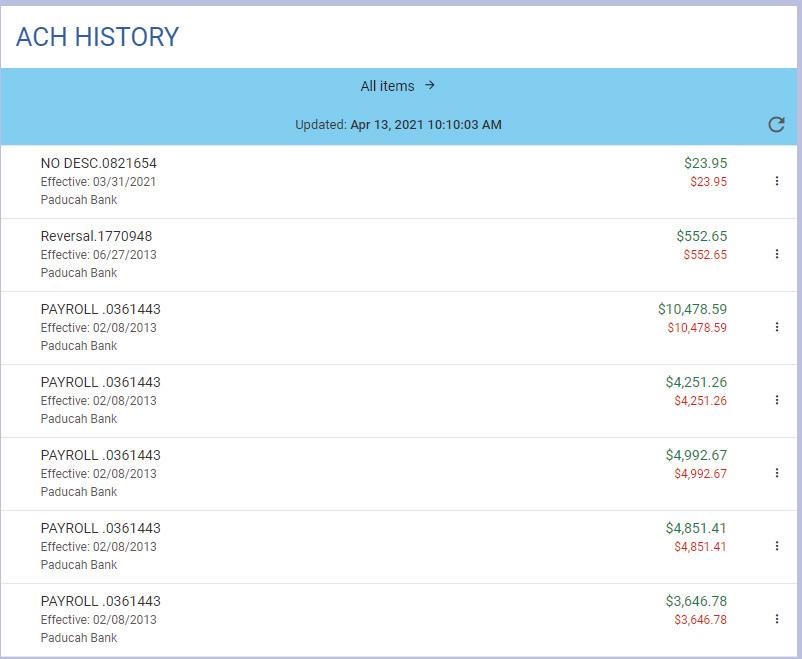
Copy the details of selected batch into a new batch
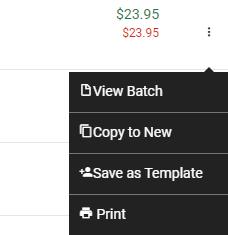
Save the details of selected batch as a template for future use (Ex. Recurring Payroll or Fixed Payments)
Print the selected batch history
ACH CONTINUED
12 / TREASURY SERVICES USER GUIDE
ACH REPORTING NAVIGATION
On the Left Home Screen Menu, click Reports. The system will then prompt the following screen.
Generate a new report.


UTILIZATION
n ACH Reporting allows for simple or customized reporting on ACH Transactions and Batches.
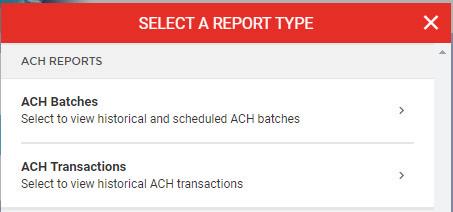
n Depending on the selected report type, additional information will be required to further generate the report. This information could include payee names, date ranges, and/or dollar amounts.
ACH
CONTINUED
TREASURY SERVICES USER GUIDE / 13 *
ACH CONTINUED
ACH NOCS/RETURNS
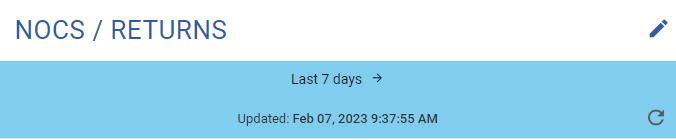
n ACH NOCS / Returns can be found on the bottom right-hand side of the ACH tab.
UTILIZATION
n ACH NOCS / Returns allow for quick and easy access to all received Notice of Changes (NOCs) and ACH Returns. This function allows for the revision and resolution of all erroneous ACH items.

ACH NOCS
n To begin resolving a NOC, click the three dots to the right of the available transaction, and choose “View/Edit Change.”


n The system will then automatically resolve the pending NOC which is reflected in the green status bar at the top of the screen.
ACH RETURNS
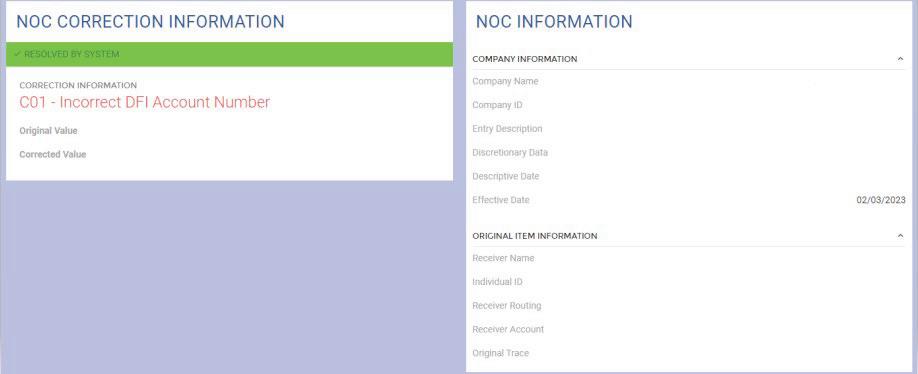
n To begin review on an ACH Return, click on the three dots to the right of the available transaction, and choose “View Return”
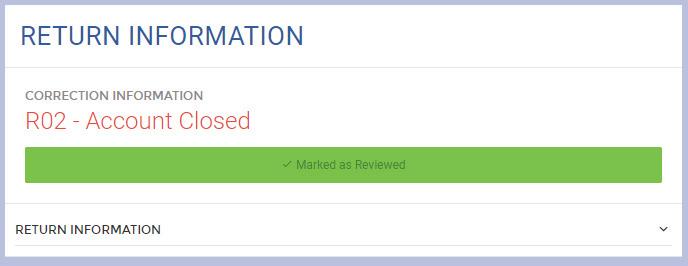
n The system will then display the Correction Information at the top of the screen, giving specific details on why the item was returned.
n For further return information details, click the downward carrot on the right hand side.
Please note this will not automatically correct and resend the erroneous ACH item. It is the responsibility of the ACH origination to complete the relevant correction and resubmit the item for processing.
14 / TREASURY SERVICES USER GUIDE
WIRES
For additional Wire information and rules, please reference Appendix B: Wire Origination on page 31.
NAVIGATION
On the Left Home Screen Menu, click Wires
The system will then prompt the following screen.
UTILIZATION
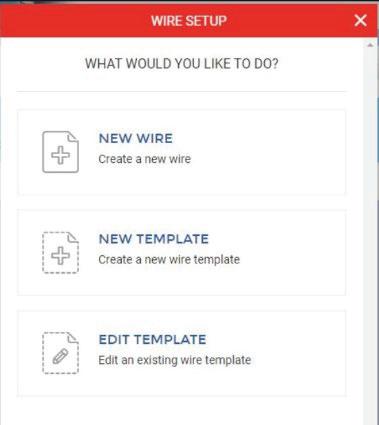
n Click the “+” icon included in the Wire Transfers tile show below.


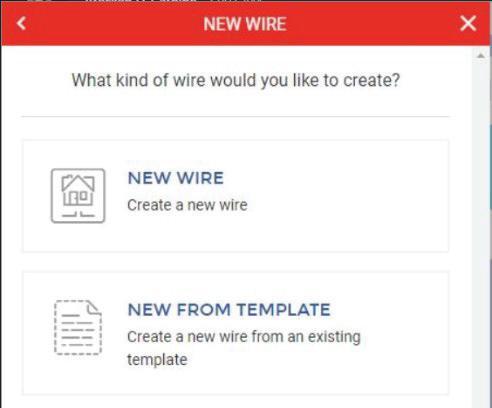
n The system will then prompt the choice to create a new wire, create a new wire template, or manage an existing template.
Initiate a new wire transfer request
Create a new wire template
Edit an existing wire template
n If “New Wire” is chosen, it will bring up the following menu giving the option to manually input information to create a new wire transfer request, or to create the wire transfer request using a pre-existing template.
TREASURY SERVICES USER GUIDE / 15
*
WIRES CONTINUED
n If needing to manually input wire information to create a new wire, choose “New Wire” again. This will prompt the below menu for you to input the appropriate information.
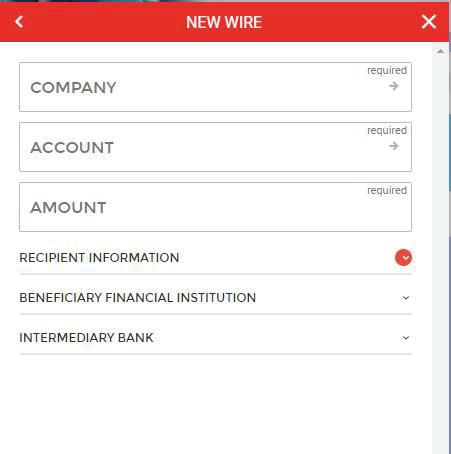
Choose which company the wire will come from Choose which account the wire funds will come out of Dollar amount of the wire
RECIPIENT INFORMATION: Input name, address, wire description, and routing & account number for the wire recipient
BENEFICIARY FINANCIAL INSTITUTION (BFI): If wiring instructions include a BFI, include the information here
INTERMEDIARY BANK: If wiring instructions include an Intermediary Bank, include that information here
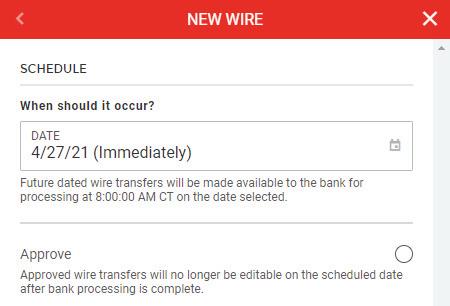
n Once all wiring information is accurately input in the system, click “Continue” to move forward. The system will then prompt you to schedule the wire. Whether it be for same day, or next week, the wire will send only on the date selected.
n If the “Approve” box is checked, the wire will no longer be eligible to edit on the scheduled date after bank processing is complete.
n Once the wire date has been established and the approval status has been determined, click “Continue. ” This will prompt a Wire Review Screen. “Create Wire” at the bottom of the Wire Review screen will submit the wire transfer request to the bank.


16 / TREASURY SERVICES USER GUIDE
WIRES CONTINUED
EDITING A SUBMITTED WIRE
n Once a Wire Transfer Request is submitted but has not been approved or processed by Paducah Bank, the option to edit, reject, or delete the pending wire is available by clicking the arrow (>) to the right of the Schedule Date.


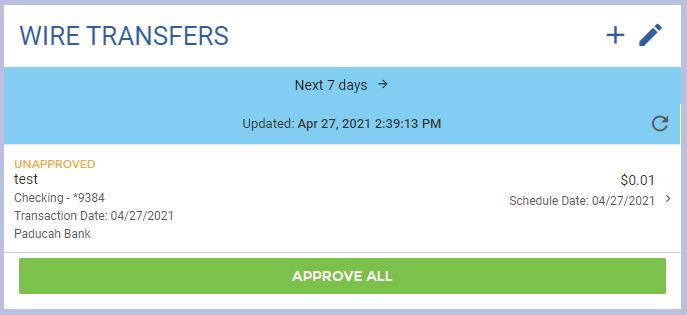

Click to approve, delete, or reject multiple wires at one time
Edit, reject, or delete the individual pending wire
Unanimously approve all pending wires (if permission applies).
CREATING A WIRE TEMPLATE
n Wire Templates are used to save wiring instructions for frequently wired Payees.
n To create a new template, after choosing the “+” at the top of the Wire Transfers tile, choose “New Template” as shown to the right.

n The template will require Name, Address, Wire Description, and Banking information (Routing & Account Number) for your Payee.
WIRE HISTORY
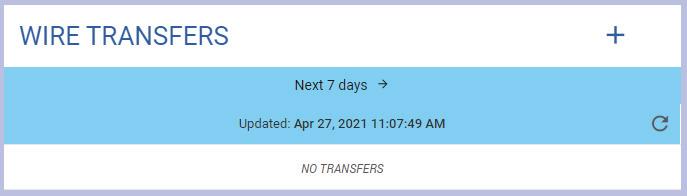
n Using the “Wire History” tile, you can search the history of your Wire Transfer Requests by date.

Search for specific wire details using the magnifying glass
Change the date range to include your desired search date
TREASURY SERVICES USER GUIDE / 17
POSITIVE PAY
For additional Positive Pay information and rules, please reference Appendix C: Positive Pay Information on page 32.
NAVIGATION
On the Left Home Screen Menu, click Positive Pay
The system will then prompt the following screen.
UTILIZATION
IMPORT ISSUED CHECK FILE


n To import an issued check file, the file must be in either comma delimited (.CSV) or a fixed length (.TXT) file. Each file must include:
• DDA Account number of the check
• Serial or check number
• Amount
• Write Date
*Fields can be in any order and may contain up to 6 header lines. Templates for field formatting may be saved.
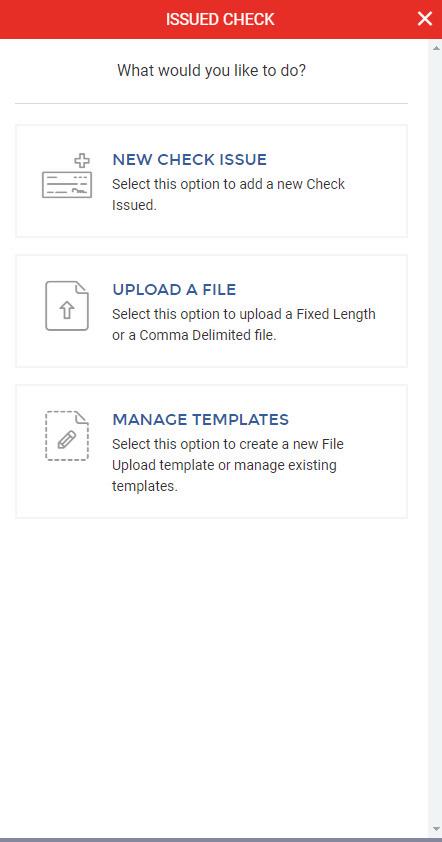
n To add a new Issued Check file, click on the “+” in the top right corner of the Positive Pay Checks Issued tile.

n There are three upload options to choose from. The first gives you an option to manually input individual heck information, the second to upload a .CSV (comma separated value) or .TXT (fixed length) file, and a third to manage existing templates.
Manually input individual check information
*Best if inputting a minimal number of checks
Upload a file
*Best if numerous checks are issued
Manage existing templates
18 / TREASURY SERVICES USER GUIDE
POSITIVE PAY CONTINUED
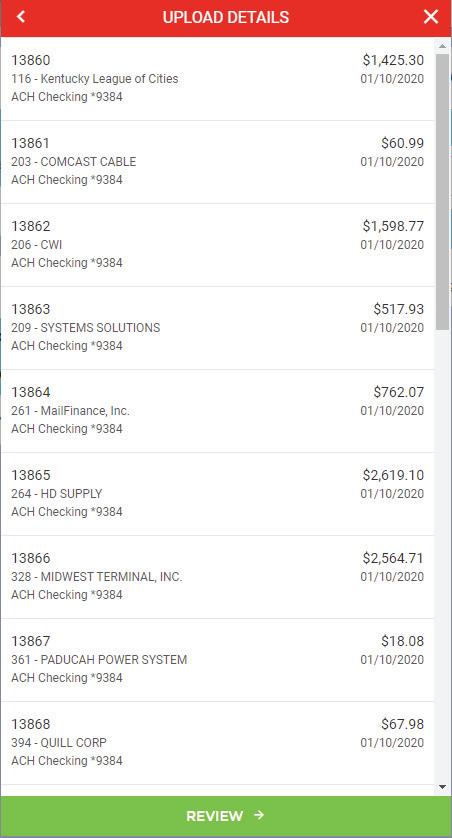
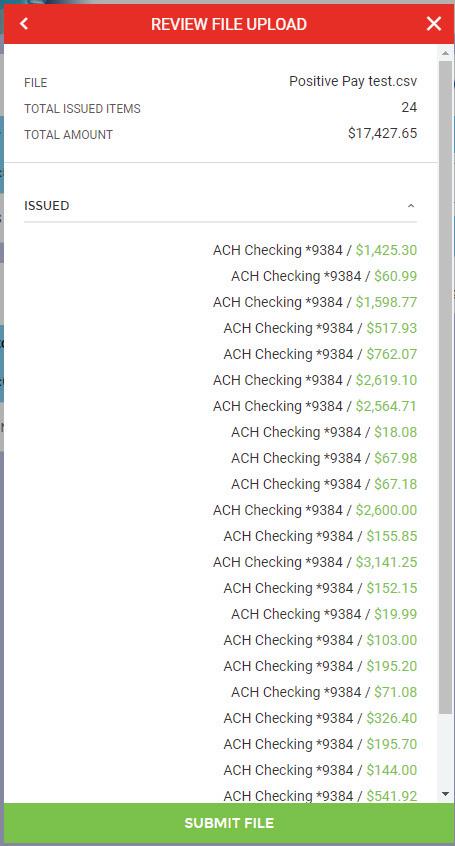
n Click “Upload a File, ” then follow the steps below:


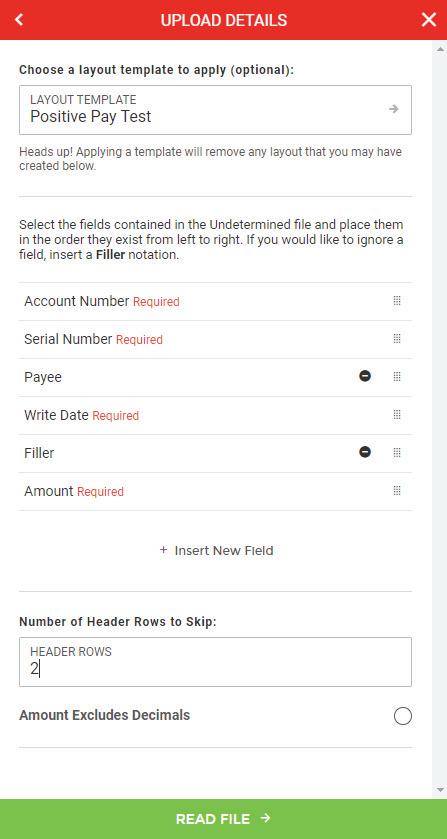
TREASURY SERVICES USER GUIDE / 19
A TEMPLATE
CREATING
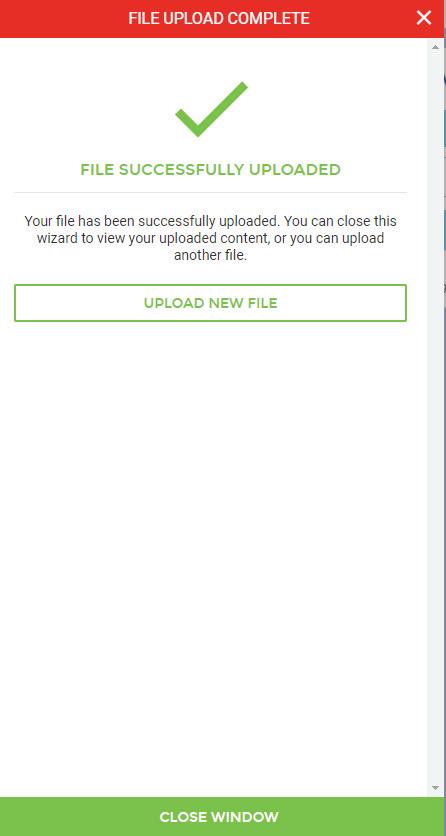
1 Choose a saved template or define guidelines for a new template. Then click “Read File.” 2 Review all file data for errors. Once everything is correct, click “Read File.” 3 This is the summary screen. Once the uploaded data is verified and correct, click “Read File.” 4 Completion screen. *
POSITIVE PAY CONTINUED
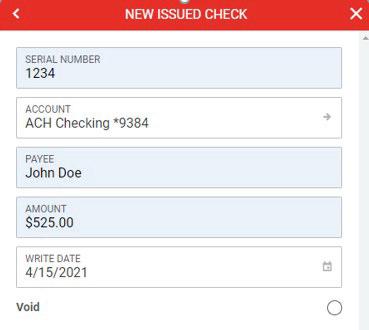
MANUAL ISSUED CHECK ENTRY
n Click “New Check Issue”


n Enter check information into the appropriate fields and click “Create Check” at the bottom of the screen.
n When searching for a previously entered check, search by the checks write date rather than the date entered into the system. Checks will only be displayed in the search list if the date range is updated to include the write date of the check.


EXCEPTIONS
Check number
Account number
Payee Name
Amount of Check
Check Write Date
Once all information is represented in the correct fields, click here to create a check
n Find the “Current Exceptions” tile on the Positive Pay home screen. Any checks that posted on the previous business date the did not match an Issued Check is considered an exception and will need to be decisioned.
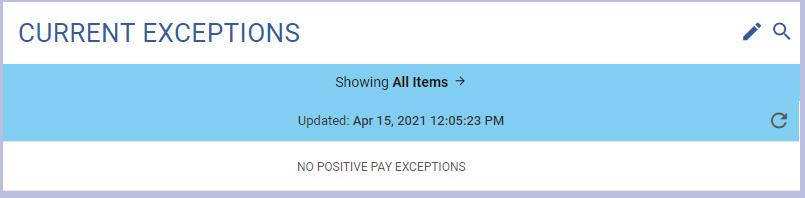
n To view the image, click on the serial/check number.
n If the item should be paid, click on “Approve Item,” If the item should be returned, click on “Return Item.”
DECISIONS
n Find the “Historical Decisions” tile from the Positive Pay home screen. Any checks that have been decisioned for the defaulted date range will be displayed. To view more items, change the date range.
20 / TREASURY SERVICES USER GUIDE
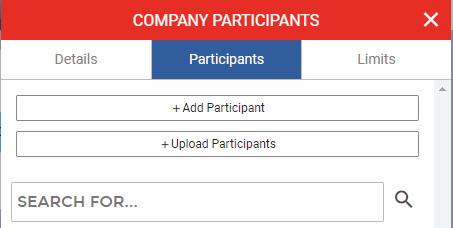
COMPANY MANAGEMENT NAVIGATION

On the Left Home Screen Menu, click Company Management
The system will then prompt a screen listing all applicable companies. Choose which company to manage. After choosing the applicable, the system will then prompt the following screen.
UTILIZATION
Manually input information for a new participant
Upload participant information using a NACHA formatted or delimited file
n The participants option allows you to manage frequently used payees in one central location.
n To create a new participant:
• Choose “+Add Participant” if inputting a new payee or “+ Upload Participants” if you have multiple participants in a NACHA formatted file to upload.
• Input the participants Name and Address.
• Email and Notify by Email are optional.
Name of Payee
Internal Payee ID number. This field is for your records, and optional. (Employee ID #, Invoice #)

Address of Payee
Email address of Payee


If checked, will send notification to Participant of processed batches that include the specific Payee
If checked, the specific Participant will be available to include in batches for any accessible company in your Internet Banking platform
TREASURY SERVICES USER GUIDE / 21
*
COMPANY MANAGEMENT CONTINUED
n Select “Add New Account” at the bottom of the screen, and input Account Number, Routing
Number, Account Type, and Account Name.
Account Name as noted on ACH Authorization Form

Account Type as noted on ACH Authorization Form
Payee’s Routing Number


Payee’s Account Number
Don’t forget to save your work!
22 / TREASURY SERVICES USER GUIDE
DEPOSIT CHECKS
NAVIGATION
On the Left Home Screen Menu, click Deposit Checks
The system will then prompt the following screen.
If application does not launch, the link to the RDC website is: paducahbank.msird.com
UTILIZATION
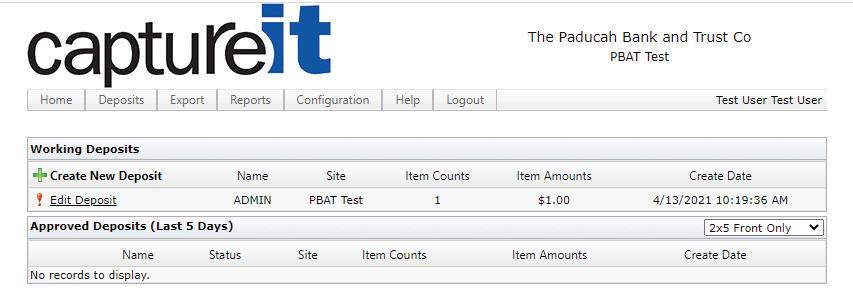
Upon arriving on the “Deposit Checks” Home Screen, the Remote Deposit Capture system, referred to as CaptureIT, will appear like below. Create a New Deposit by clicking :


After clicking “: Create New Deposit”
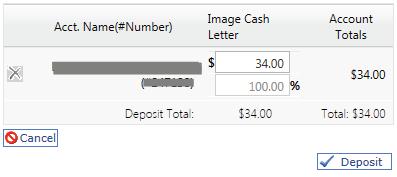
n Create a deposit name (typically date deposit is submitted)
n Select Site from dropdown menu
n Select Account from dropdown menu
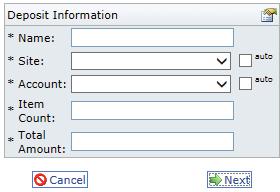
n Enter total number of checks
n Enter total amount of deposit
After clicking “Next,” a scan box will appear.
TREASURY SERVICES USER GUIDE / 23
*
DEPOSIT CHECKS CONTINUED
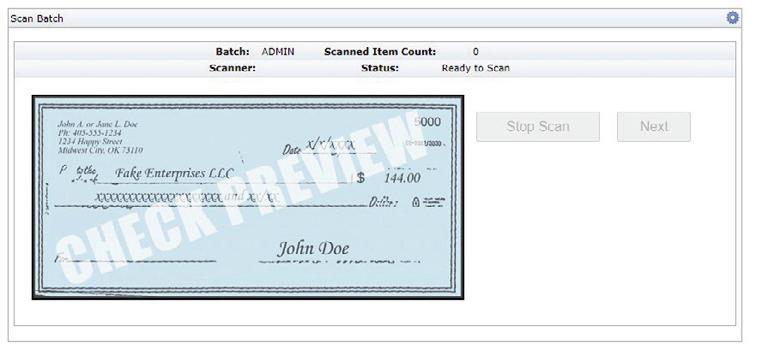
n Insert checks into feeder (front of the check should face the outside of the machine), and the scanner will automatically start scanning.
n Once all checks have been scanned, click “Stop Scan” and then “Next. ”


n The system will process CAR/LAR (Courtesy Amount Recognition/Legal Amount Recognition) and IQA (Image Quality Analysis). Any fields unread by the system will be flagged and errors will need to be corrected.
n Click “Step Through Errors” or the number in the Errors column to make corrections.
n If deposit shows “Out of Balance” and there are no errors shown, click on the icon to the far left of the first item and select “Next” from the edit screen to review all checks and ensure that all amounts are correct.
n You may select “Scan Additional Items” to open the Scan Window and add additional items to the existing deposit.
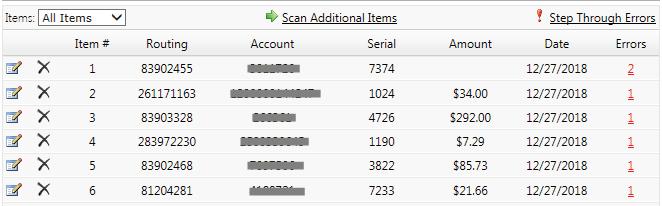
n Checks may be omitted from the deposit by clicking the 7 icon to the left of the Item # to delete.
n Once all items are repaired and the deposit has balanced, the deposit approval page will display. Click the button to submit the deposit to the Bank.
n There are two different types of Deposit Receipts that may be printed. One includes an itemized list of checks and one contains the images of the checks.

24 / TREASURY SERVICES USER GUIDE
MANAGE CARDS

NAVIGATION
On the Left Home Screen Menu, click Manage Cards
The system will then prompt the following screen.
UTILIZATION
All debit cards associated with the business will appear as shown below.
For more editing options click the arrow.
Turn off Card in the event of fraud or if lost/stolen
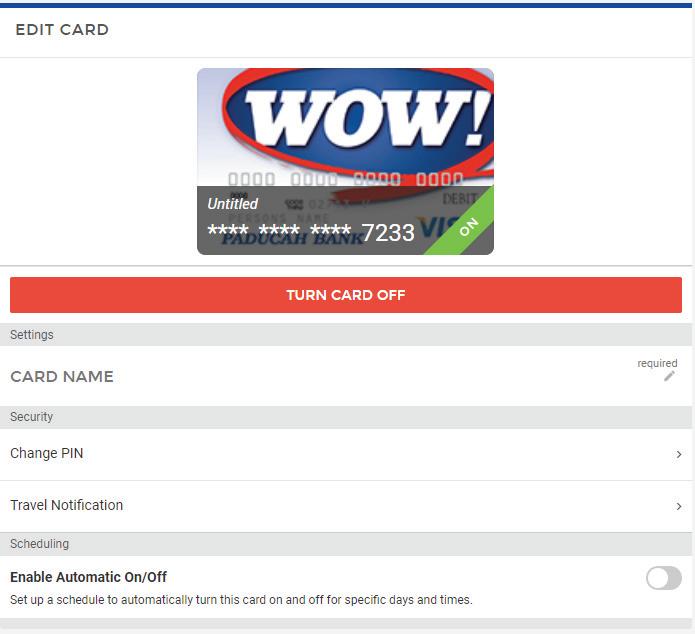
Change card’s name
Change the card’s PIN


Enable travel notifications to the bank to avoid any travel related card disruptions
To set a schedule to automatically turn card on and off for specific periods of time

TREASURY SERVICES USER GUIDE / 25
REPORTS

NAVIGATION
On the Left Home Screen Menu, click Reports The system will then prompt the following screen.
UTILIZATION
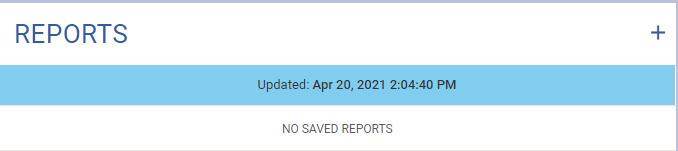
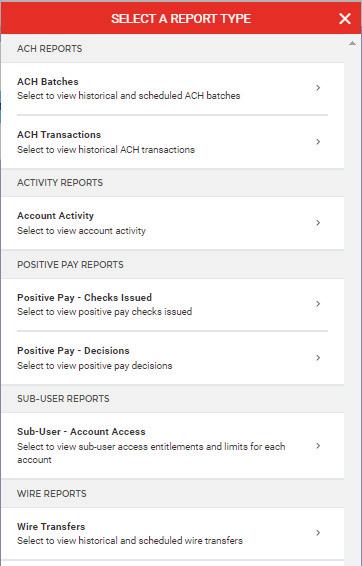
To generate a new report, click the +.
Dependent on the report type selected, additional information will be required to further generate the report This information could include Payee name, date ranges, and/or dollar amount.


26 / TREASURY SERVICES USER GUIDE
APPENDIX A: ACH ORIGINATION INFORMATION
This ACH Origination Guide and Appendix were designed to provide an overview of important information that you should know as an ACH Originator. This information corresponds with the guidelines in the NACHA Operating Rules and is not intended to provide the complete and necessary knowledge required for ACH Originators. For full details, we encourage you to read and become familiar with the ACH Rule Book. The ACH Rule Book can be viewed online at achrulesonline.org. Site registration is required and is free.
WHAT IS ACH?
The Automated Clearing House, or ACH, is an electronic network for financial transactions governed by the National Automated Clearing House Association, or NACHA. ACH transactions and the parties involved (Banks, ACH operators, consumers, and businesses) must follow strict rules that have been detailed in the NACHA Operating Rules and Guidelines, which is published annually and updated from time to time to cover rule changes and other supplements. Common examples of ACH transactions are payroll or government benefit direct deposits (credits) and automated loan or other payments (debits). ACH entries must be authorized by the owner of the account that is being debited or credited, though the type of authorization varies. The Bank reserves the right to restrict types (i.e. Standard Entry Classes) available for processing and generally allows only consumer (“PPD”) and business (“CCD,” “CTX”) transactions
ACH LEGAL FRAMEWORK
You are required to abide by multiple rules and agreements including, but not limited to, the following when submitting ACH transactions. Paducah Bank may ask to see your agreements from time to time, as we are audited.
• NACHA Operating Rules (www.nacha.org)
• Regulation E (for consumer entries)
• UCC4A (for corporate credits)
ACH FACTS
• ACH is a batch system (not real time).
• ACH is capable of crediting or debiting checking or savings accounts.
• Most banks and credit unions receive ACH entries.
• An ACH limit is assigned to you and restricts the total dollar amount of ACH entries that can be initiated per banking day.
• Deposit Agreement with Paducah Bank
• Customer Authorizations
• Paducah Bank’s ACH Originator Agreement
• An ACH Originator is any entity or person that originates ACH transactions.
• The Bank requires that all credit entries be pre-funded prior to being sent.
• An ACH Originator sending debit entries must maintain a reserve amount based on a percentage of the ACH limit.
TREASURY SERVICES USER GUIDE / 27 *
YOUR RESPONSIBILITIES AS AN ORIGINATOR
• Obtain proper authorization—dependent on transaction type—and retain authorizations for two years past revocation.
• Provide a copy of such authorization if requested by the bank.
• Give appropriate notice to debtor if changing amount or date.
• Make necessary changes to payee account information within six banking days when notified by Paducah Bank.
• Protect the banking information received.
• Send entries on proper date.
• Cease subsequent entries when appropriate.
• Check payees against OFAC compliance checklists.
• Ensure your computer is protected by the guidelines listed in the ACH Originator Agreement, Section 7 “Physical and Electronic Security.”
DIRECT DEPOSIT PAYROLL AUTHORIZATIONS (CONSUMERS)
• Neither ACH Rules, nor Regulation E, requires an authorization for ACH credit or reversals.
• The Bank recommends you use direct deposit authorization forms that allow the company to debit the employees account for adjustments. The forms may also be used to collect the proper employee account information.
• Obtain a voided check, not a deposit slip, from the employee.
• The most common code for direct deposit is “PPD.”
CONSUMER DEBIT AUTHORIZATIONS
• For consumers, an authorization to debit his or her account must be in writing or “similarly authenticated.”
• The most common SEC code is PPD (used for consumer debits and credits).
CORPORATE AUTHORIZATIONS
• For companies, there must be an agreement between the two parties, but rules do not define what business practices constitute agreements.
• The most common SEC code is CCD (used for debits and credits).
CHANGING DATE OR AMOUNT OF DEBITS
• ACH Rules require you to notify your debtors of any changes in date or amount debited under the following circumstances:
- Seven calendar days’ notice for change of date (consumer and corporate).
- Ten calendar days’ notice for a change in amount (consumer only).
- Sending the notice via U.S. Mail is acceptable.
PRENOTES
• The purpose of a prenote is to verify account information.
• Prenotes are optional. However, if sent, prenote rules must be followed. A prenote must precede the first live entry by at least three banking days.
• The Receiving Bank is not required to validate the name of the payee of the prenote, although many do; they are only required to check the account number. You must understand that there is still a risk if the subsequent entry debits or credits the wrong account (this is true for all originations, not just prenotes).
28 / TREASURY SERVICES USER GUIDE
APPENDIX A: ACH ORIGINATION INFORMATION CONTINUED
APPENDIX A: ACH ORIGINATION INFORMATION CONTINUED
NOTICE OF CHANGE
• When ACH information is incorrect, a Notification of Change (NOC) is sent by the Receiving Bank requesting that future entries contain correct information. ACH Rules require you to make the change within six banking days of receiving the information from Paducah Bank.
• The Receiving Bank warrants that the information they provide is correct.
• Paducah Bank will notify you of any NOC’s received on your behalf.
RETURNS
• Returns must be processed by the Receiving Bank within 24 hours of settlement. Returns that are unauthorized beyond the 24 hours are the company’s liability, and any disputes need to be settled outside the banking network.
• An exception to the 24-hour rule is consumer unauthorized returns, which may be returned within 60 days of the posting.
• The use of consumer (PPD) or corporate (CCD) entry codes determines applicable ACH return rules.
• You may re-initiate a debit entry up to two times if you receive a return entry of “NSF” or “Uncollected Funds.” This gives the Originator a total of three attempts at debiting an account.
REVERSALS
• Reversals may only be made for the following two conditions: 1) erroneous file i.e., wrong amount or incorrect account number, or 2) duplicate transaction.
• If a reversing entry must be made, please contact the Bank for instructions.
• When doing a reversal, the reversing entry must be for the full amount, must be sent within five banking days of original entry and within 24 hours of discovering the error.
• If the Receiving Bank receives a dispute claiming a debit was unauthorized, the Receiving Bank must get a signed Written Statement of Unauthorized Debit (WSUD) from the account holder. You may obtain a copy of the WSUD by requesting a copy through Paducah Bank.
• A “Stop Payment” return may be reinitiated only if you receive approval from the payee to re-send the item.
• It is a violation of ACH Rules to re-initiate the debit entry if a return is received for any other reason.
• For erroneous reversing entries, a correcting entry must also be sent.
• The Receiving Bank is under no obligation to post the reversing debit if it overdraws the payee’s account or if the payee’s account is closed.
• A payee must be notified if a reversing entry debits his or her account; however, a payee does not need to authorize the reversing debit.
TREASURY SERVICES USER GUIDE / 29
APPENDIX B: WIRE ORIGINATION INFORMATION
n All Online Wire Originators must have a Wire Transfer Agreement on file.
n Internet Banking allows users to create domestic wire transfer requests to submit to the Bank for processing. Complete Terms and Conditions can be found on the Wire Transfer Agreement.
n It is the responsibility of the customer to properly identify the beneficiary and provide complete and accurate instructions to the Bank. The Bank shall have no duty to review or verify the information provided by the customer.
n Many banks and credit unions do not send and receive wires directly through the Federal Reserve. It is important that Wire Originators obtain wiring instructions directly from the Beneficiary to ensure that a wire is sent accurately. It is the practice of some Banks to charge a fee for any unposted wires that are returned to our Bank. The fee will be debited from the wire amount prior to being returned.
n Customer is solely responsible for safeguarding security information and codes which pertain to the Customer and the Customer’s accounts.
n Customer agrees to promptly review the monthly account statements and report unauthorized transactions and discrepancies to the Bank immediately.
30 / TREASURY SERVICES USER GUIDE
APPENDIX C: POSITIVE PAY INFORMATION
Positive Pay is a risk mitigation service that verifies paid checks on an account against an issued check file.
EXCEPTIONS
Exceptions are checks that have cleared the account that the system was unable to match with a previously submitted item.
TIME FRAMES
Issued check files should be uploaded to the Internet Banking system prior to distribution of such checks. Positive Pay Exceptions must be decisioned no later than 10:00 am CST. It is the customer’s responsibility to log in and review exceptions each banking day.
TREASURY SERVICES USER GUIDE / 31
MEET OUR TEAM
GALE
VICE PRESIDENT
SENIOR TREASURY MANAGEMENT & PAYMENTS CONSULTANT
ghatton@paducahbank.com
Office: 270.575.6646
Cell: 270.217.2049
TAYLOR D. EUBAN KS


TREASURY MANAGEMENT & PAYMENTS CONSULTANT
teubanks@paducahbank.com
Office: 270.575.6228
Cell: 270.559.1551
NI NA CRON
TREASURY SUPPORT SPECIALIST
ncron@paducahbank.com
Office: 270.575.6680
BRECKEN CARNINE, AAP
ASSISTANT VICE PRESIDENT

TREASURY OPERATIONS MANAGER
bcarnine@paducahbank.com
Office: 270.575.5795
HAI
TREASURY OPERATIONS
SPECIALIST
hkell@paducahbank.com
Office: 270.575.5798
32 / TREASURY SERVICES USER GUIDE
HAT TON, CTP
LEY KEL L

555 JEFFERSON PADUCAH, KY 42001 270.575.5700 PADUCAHBANK.COM MEMBER FDIC