

BUTLER SINKS INSTRUCTIONS


BUTLER SINK INSTALLATION
Thank you for purchasing our Butler Sink
If you have any questions during the installation of this product, veiw further doscuments and videos on our website at wwww.ottiaustralia.com.au.
Variations
Every sink is individual hence no cut-out templetes are not provided, due to the natural variation in the ceramic farmhouse butler sinks in the manufacturing process.
Only markout and make cuts when you have the sink on site due to variations that occur with this item.
• Prior to installation, unpack the new sink and inspect for any damage. Return the sink to its protective carton until you are ready to install it.
• It is very important that proper high-quality materials and silicones are used with your sink.
• The cabinet and frame shown in these instructions are generic and may not represent the actual design or structure.
• Due to the nature of this sink, installations, it is recommended that butler sink installations be performed by trained and experienced installers - joiner, plumber or builder

• To ensure a safe and damage-free installation, two people should install the sink.
*All information in these instructions is based on the latest product information available at the time of publication.

PLEASE RETURN TO HOME OWNER - IMPORTANT CARE & WARRANTY INFORMATION INSIDE. For more information www.ottiaustralia.com.au
THIS BUTLER SINK MUST BE INSTALLED BY A QUALIFIED TRADESPERSON.
Please read the installation instructions BEFORE INSTALLATING BEGINS.
DO NOT markout or make cuts until you have the sink on site due to variations that occur with this item.
•Observe all local plumbing and building codes for your state.
If the product is not installed in accordance with these instructions, your Otti Australia warranty may be void and the homeowner may have a claim against you (the installer).
IMPORTANT - It is the responsibility of the installer to make any adjustments after installation if required. Do not install if there is damage to the box or product.
BUTLER SINK INSTALLATION
Cabinet and Supporting Frame Construction
1. Starting off, confirm your cabinet it level.

Measure the height of your sink, and use that as the guide to the placement of your sink support system inside the cabinetry.
The cabinet opening should equal the maximum sink width to ensure a minimum gap between the sink and the cabinet. Allow adequate clearance for the pipes between the support
2. Support

Position the support frame in the cabinet opening so that when installed, the top of the sink will be level and flush with the top of the cabinet.
Install your support system, ensuring it is level. Secure the support frame to the cabinet. Position the securing hardware to allow for easy removal should the sink need to be removed or replaced.
3. Placement
Place your Sink on the cabinet support with the front protruding. Apron style:- It is recommend the sink extends 30 to 50mm beyond the front of the cabinet, but this is only for aesthetic reasons, and it at your discretion.
On some styles you can rotate the basin as there are 2 facings to get the look you want.
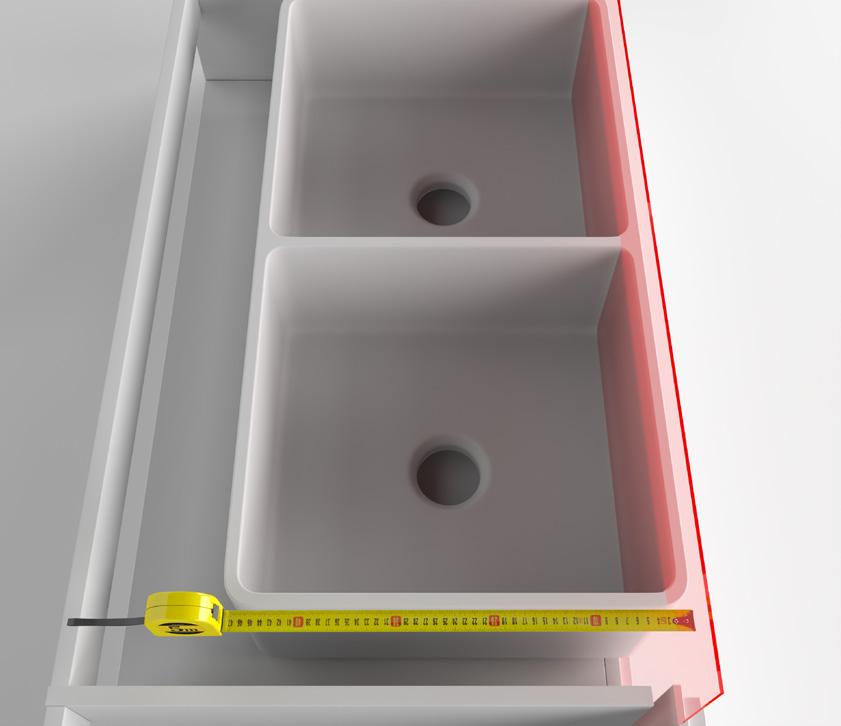
Measure the width of the sink from the top edging.
Locate and cut out the waste outlet clearance hole in the support.
The hole diameter must clear the garbage disposal mounting system, if used.
* Please note as ceramic is a material that is subject to variations of +/- 3% this is normal and acceptable tolerance. Never construct cabinetry without first measuring your actual purchased sink as each sink will vary.


Should you not have the sink on site ready for installation, make allowances to add filler strips and spacers to the cabinet opening after the frame and before the sink is installed.
Ensure the sink is on site to get the perfect fit.
Should you not have the sink on site ready for installation, make allowances to add filler strips and spacers to the cabinet opening after the frame and before the sink is installed.
This Product is subject to changing size in the heating and cooling processes in manufacturing and can vary from the specifications by as much as 2 percent.
BUTLER SINK INSTALLATION
BUTLER SINK INSTALLATION
BUTLER SINK INSTALLATION
Next step is to prepare your benchtop.
BUTLER SINK
Next step is to prepare your benchtop.
Next step is to prepare your benchtop.
Next step is to prepare your benchtop.
4. Measure - Place the benchtop on top and measure the distance from the face of the cabinet to the back of your sink. Also markout side cut location.
4. Measure - Place the benchtop on top and measure the distance from the face of the cabinet to the back of your sink. Also markout side cut location.
Consider your preference for undermount or side mount finish when marking out.
4. Measure - Place the benchtop on top and measure the distance from the face of the cabinet to the back of your sink. Also markout side cut location.
Consider your preference for undermount or side mount finish when marking out.
4. Measure - Place the benchtop on top and measure the distance from the face of the cabinet to the back of your sink. Also markout side cut location.
Consider your preference for undermount or side mount finish when marking out.
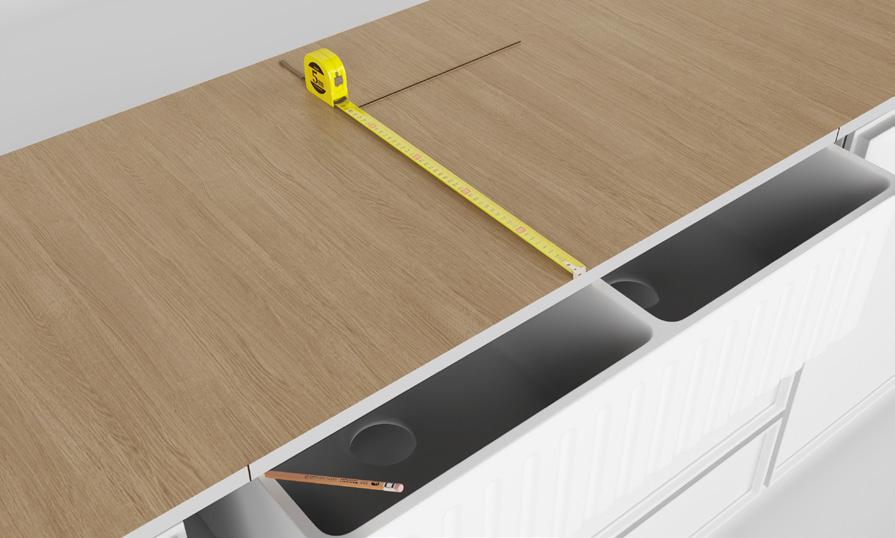
5. Markout - Then move your benchtop to secure safe location to mark and cut.
Consider your preference for undermount or side mount finish when marking out.
5. Markout - Then move your benchtop to secure safe location to mark and cut.
5. Markout - Then move your benchtop to secure safe location to mark and cut.
Place the sink upside down, use your marking loactions as a guide, then trace your sink.
Place the sink upside down, use your marking loactions as a guide, then trace your sink. This will be you cutting line.
5. Markout - Then move your benchtop to secure safe location to mark and cut.
This will be you cutting line.
Place the sink upside down, use your marking loactions as a guide, then trace your sink. This will be you cutting line.
Place the sink upside down, use your marking loactions as a guide, then trace your sink.
This will be you cutting line.
6. Cut - Then measure the benchtop, allowing for a 5 millimetre internal overhang, or similar overhang of your choice.
6. Cut - Then measure the benchtop, allowing for a 5 millimetre internal overhang, or similar overhang of your choice.
6. Cut - Then measure the benchtop, allowing for a 5 millimetre internal overhang, or similar overhang of your choice.
6. Cut - Then measure the benchtop, allowing for a 5 millimetre internal overhang, or similar overhang of your choice.
7. Carefully slide your sink into the cabinet from the front. Place the bench top onto the cabinet.
7. Carefully slide your sink into the cabinet from the front. Place the bench top onto the cabinet.
Check this is your desired location and the overhang (undermount) or flush mount finish is correct. Trim and polish the benchtop edges.
7. Carefully slide your sink into the cabinet from the front. Place the bench top onto the cabinet.
Check this is your desired location and the overhang (undermount) or flush mount finish is correct. Trim and polish the benchtop edges.
7. Carefully slide your sink into the cabinet from the front. Place the bench top onto the cabinet.
Check this is your desired location and the overhang (undermount) or flush mount finish is correct. Trim and polish the benchtop edges.

Check this is your desired location and the overhang (undermount) or flush mount finish is correct. Trim and polish the benchtop edges. 5


4 5 6 7

BUTLER SINK INSTALLATION
Next step is to prepare your benchtop.
8. Apron -
Add a panel to the front the fits where your sink is located.
9. Markout where the internal cabinet and benchtops edges are.
10. Remove the sink and use your sink to trace the front face cutout.


11. Install the apron front facing, check and confirm the sink is level.
Finish off with
Waste Outlet - Markout in the cabinet the location of the waste out let. Remove the sink and apron panel. Then cut the cabinet to allow waste outlet.
Taphole - Next, drill the tap holes in the benchtop for your selected tapware.
Silicon - Reassemble the sink and apron panel. Then silicone around the sink.
Plumbing - Install your Wastes and pipework by qualified plumber. Taphole - Next, drill the tap holes in the benchtop for your and install the tapware.
Use silicone to seal all edges of the sink against the benchtop and the cabinetry, and wipe away excess silicone immediately.


Finally, the basket waste needs to be installed. Use silicone when installing to ensure no leaking around the flange.
A removable stainless-steel grid or silicone protector mat can be purchased separately for protecting the base of the sink. You may now enjoy your fully installed Otti Australia butler sink.
Modern art interior design is all about creating a sleek, sophisticated space that reflects your personal style and aesthetic.