Experience and education - Chess Dynamics, Bluefrog Design Consultancy, Freelance Designer, De Montfort ‘17 1st, Crofts & Assinder Young Furniture Makers Design Awardee, DMU Data
Analysist Researcher
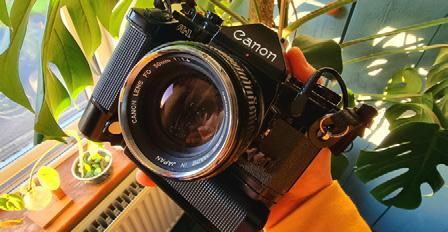
Interests - Kayaking, biking, working my classic cars, photography and film photography, travel and culture, drumming and music
Brief bio
A background of 9+ years of industry, 1st class qualification, and freelance experience, has gained me a broad range of experience in software and practical skills. Working on projects for market-leading companies has kept me up to pace with what is required by professional companies, from accurate scale models, detailed renderings, to surface modelling in Solidworks.
I’ve been with Chess Dynamics for over 6 years as their Product Design Engineer. The role expanded to incorporate my additional skills, which ultimately led to me being responsible for creating detailed, functioning scale models, detailed visuals, datasheet and brochures, and running their in-house 3D printing facility, as well the original responsibility of concept design and styling.
Prior to this I was freelancing, working with a range of companies on varied products. Before freelancing was with BlueFrog Design as their Junior Designer, before finishing university with my 1st in Product Design.
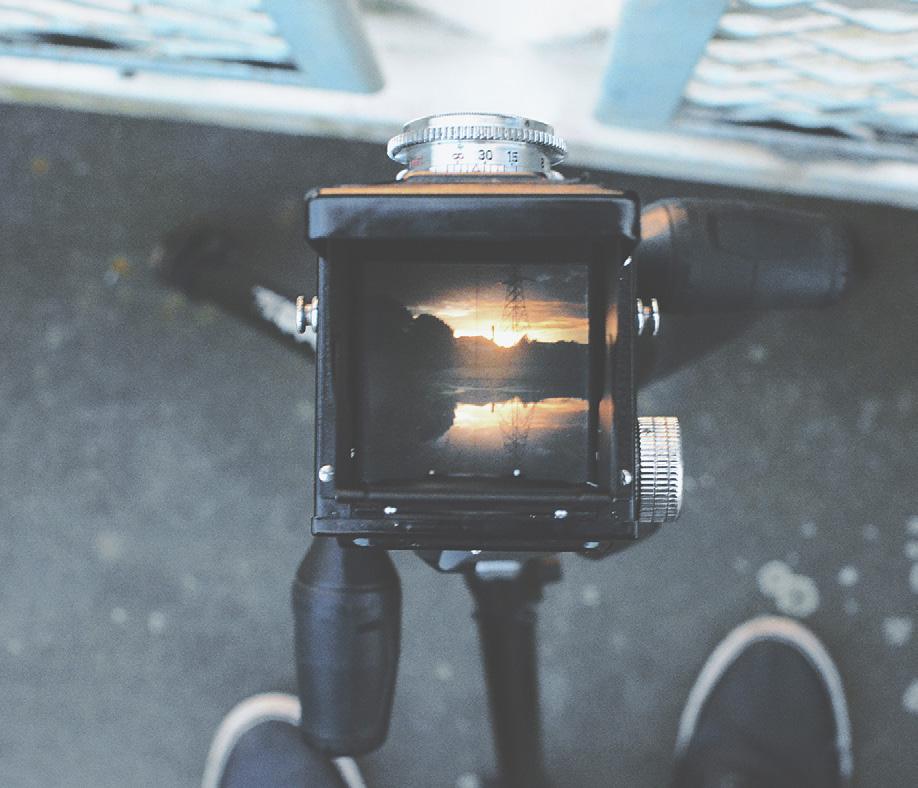
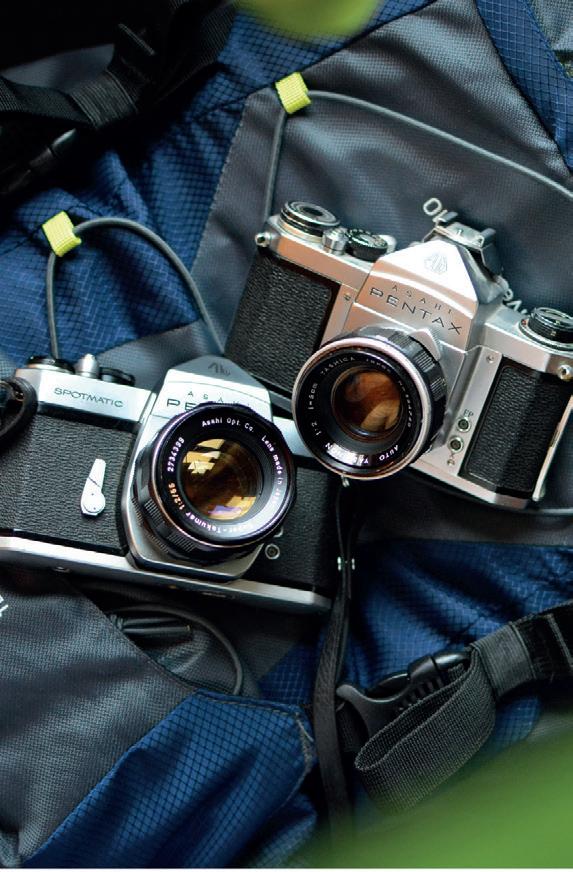
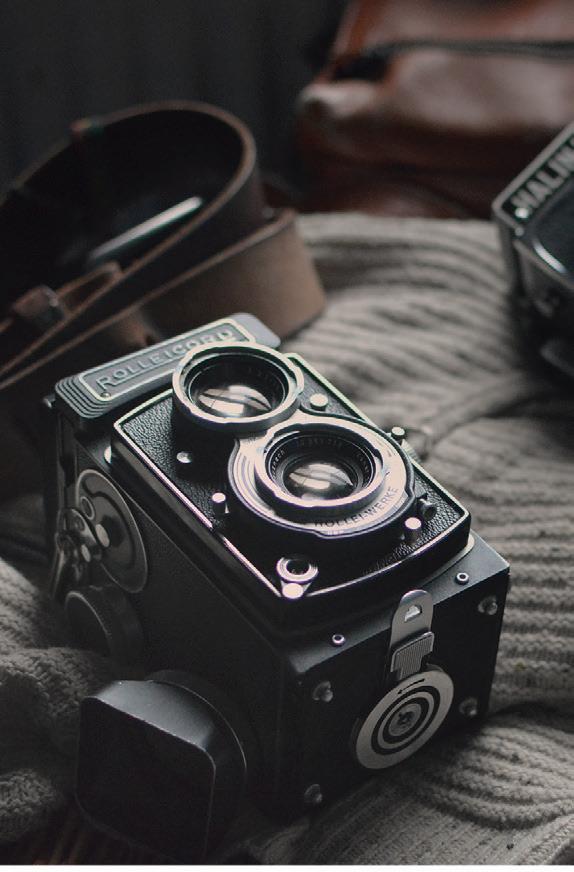
Growing up on the South Coast has allowed me to develop interests in cycling and kayaking. A big interest of mine is photography, developing into a sizeable vintage camera collection. Working on my classic car currently takes up most of my time, despite all efforts, and when I can I enjoy working on personal projects, home improvements and hopefully squeezing in some social time with good friends. A fond interest is traveling, seeing more of what’s around us, and enjoying time outside, hopefully with a camera in hand.
The designer in me
Having always been hands on and creative, it’s no surprise I’m where I am today. Problem solving, a mechanical mindset and a healthy dose of curiosity have always been in my nature. From taking things apart as a kid, to building 3D printers and working on home projects I’m often busy doing something constructive or creative. Fortunately, this persistent nature has led me to develop my abilities which has helped elevate the level of detail and quality from my work, whether it’s for a professional use or personal.
3DS MAX SOLIDWORKS KEYSHOT INVENTOR PHOTOSHOP ILLUSTRATOR INDESIGN PREMIERE PRO AFTER EFFECTS SKETCHBOOK
3D PRINTING LASER CUTTING CNC HAND MODELLING METALFAB SPRAY PAINTING SANDING MECHANICAL
CLIENT COMMUNICATION SKETCHING PHOTOGRAPHY RESEARCH TECHNICAL DRAWINGS DIGITAL RENDERING GRAPHIC DESIGN VIDEO PRODUCTION DESIGN FOR MANUFACTURE TEAM WORK CRITICAL THINKING
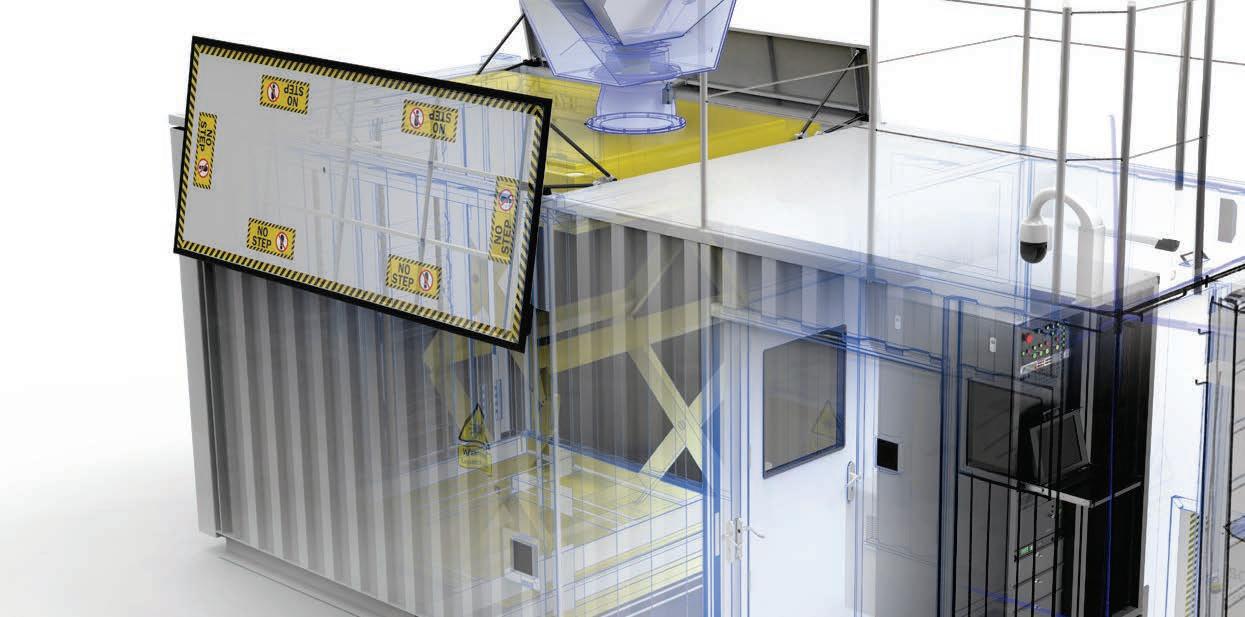
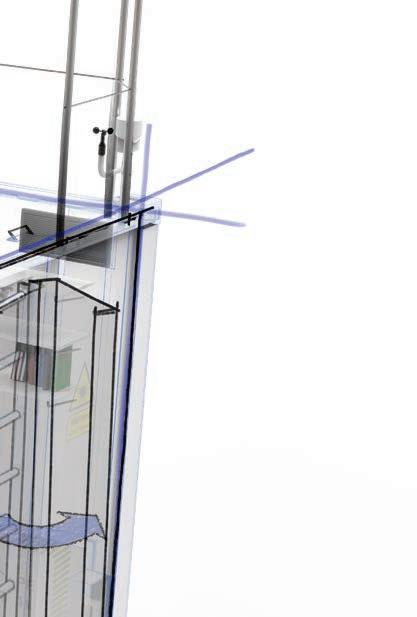
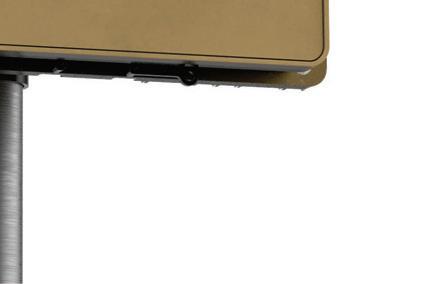
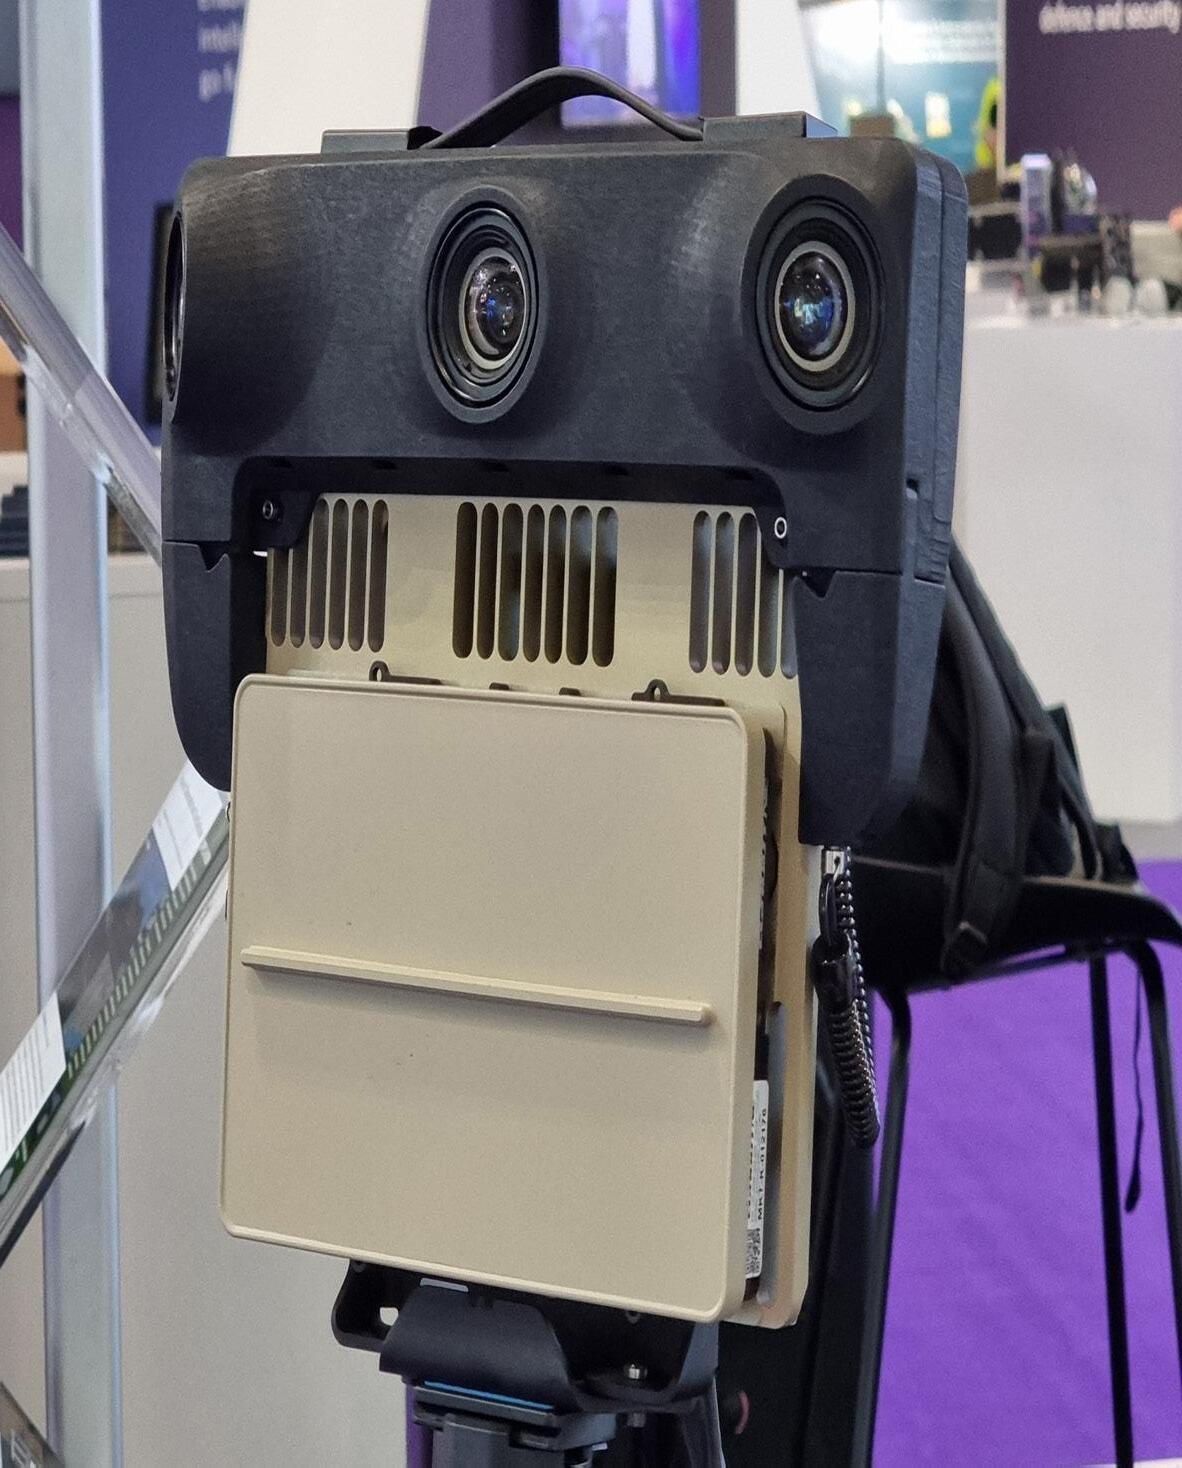
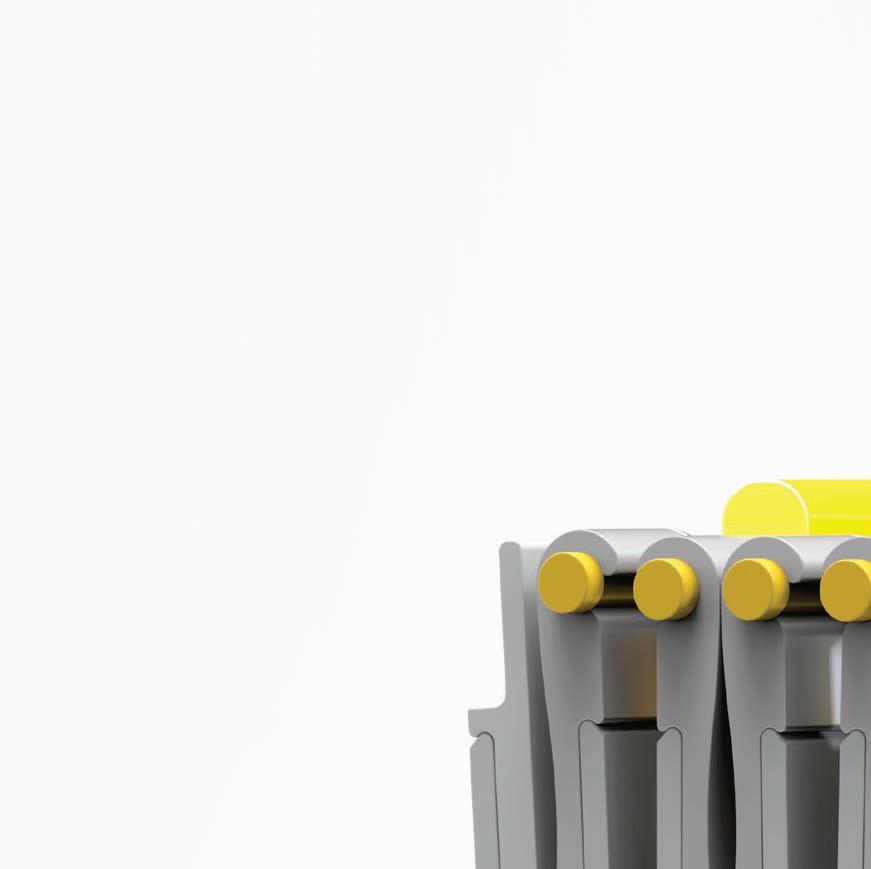
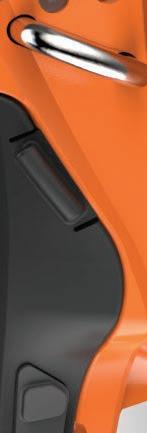
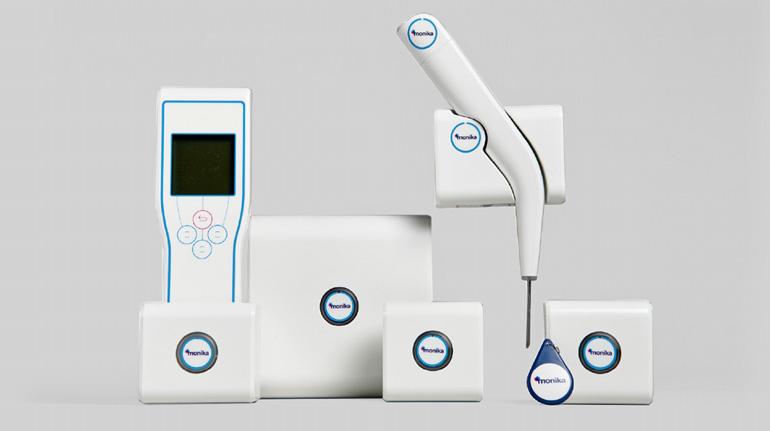
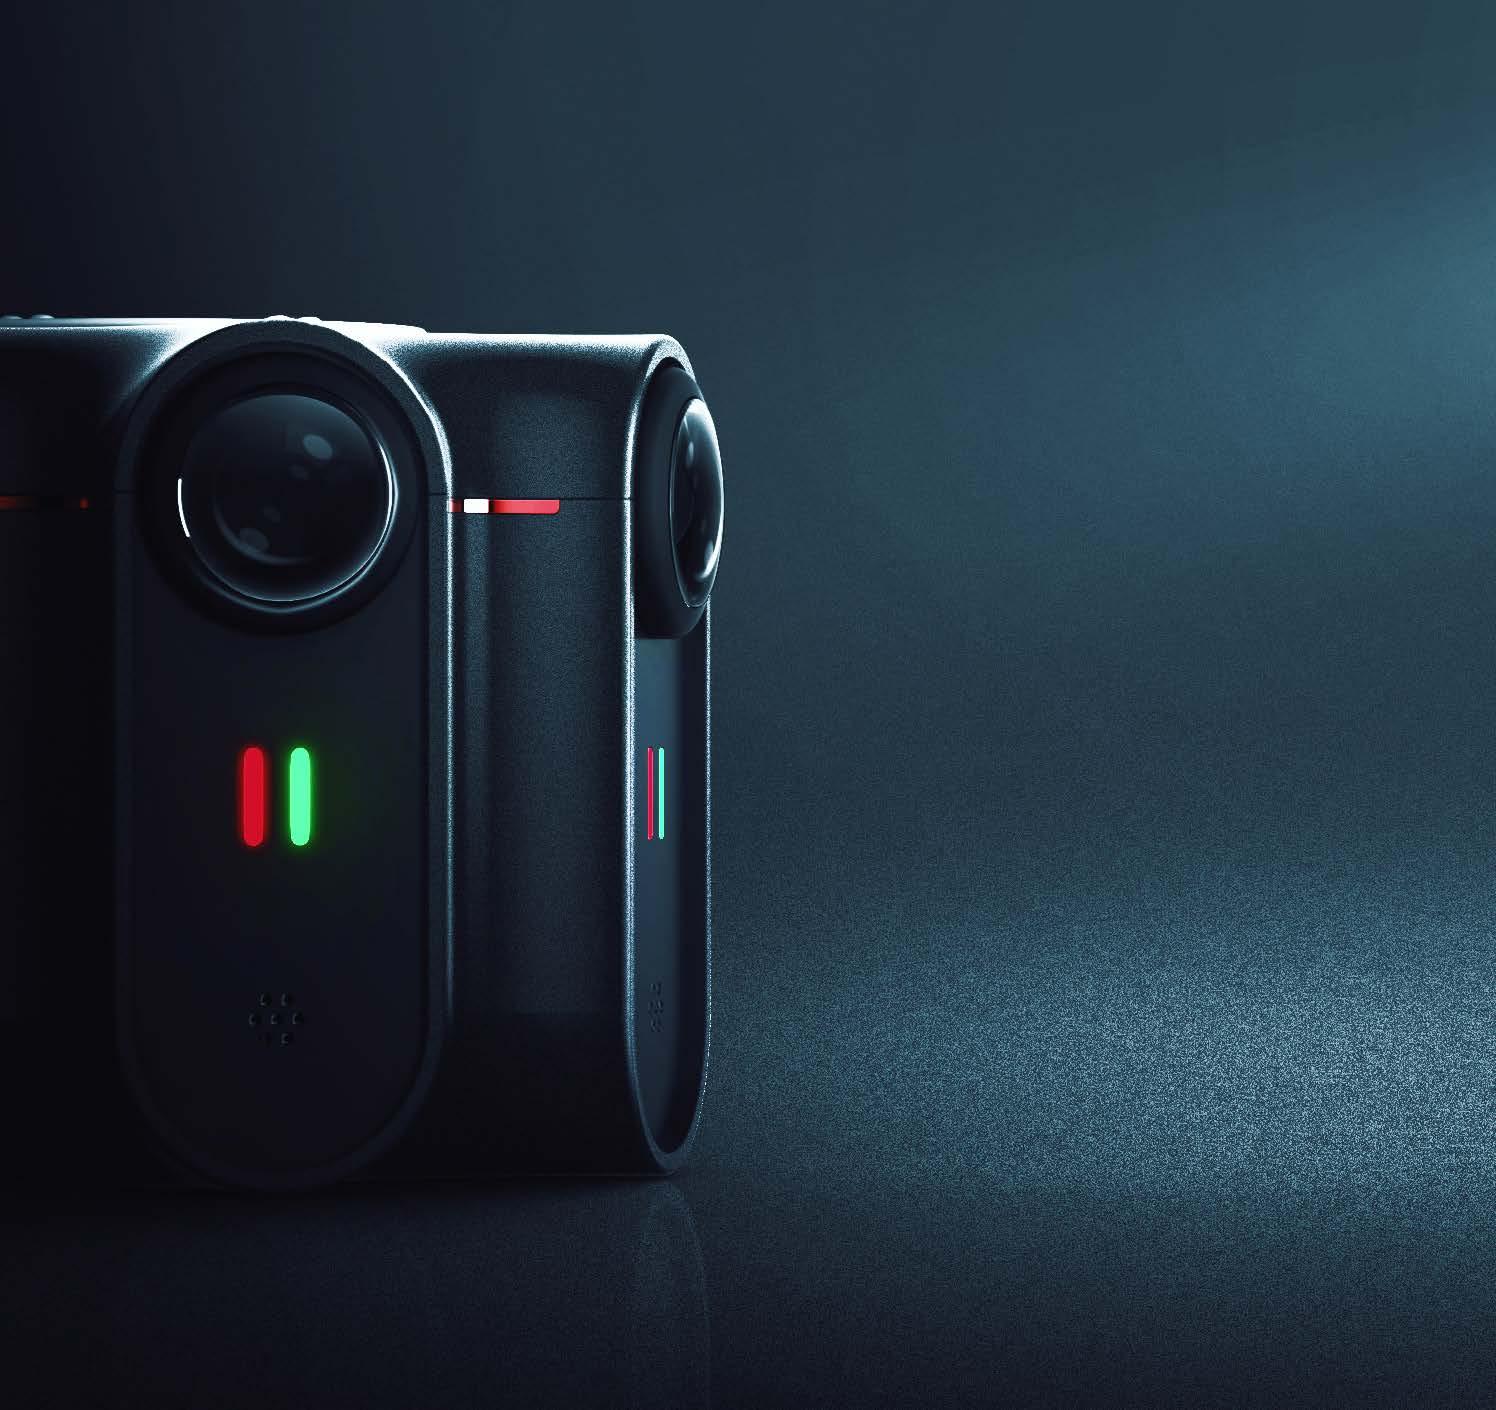
Detection System
Aero:UV Sheild
QD Anchor System
Chess Dynamics
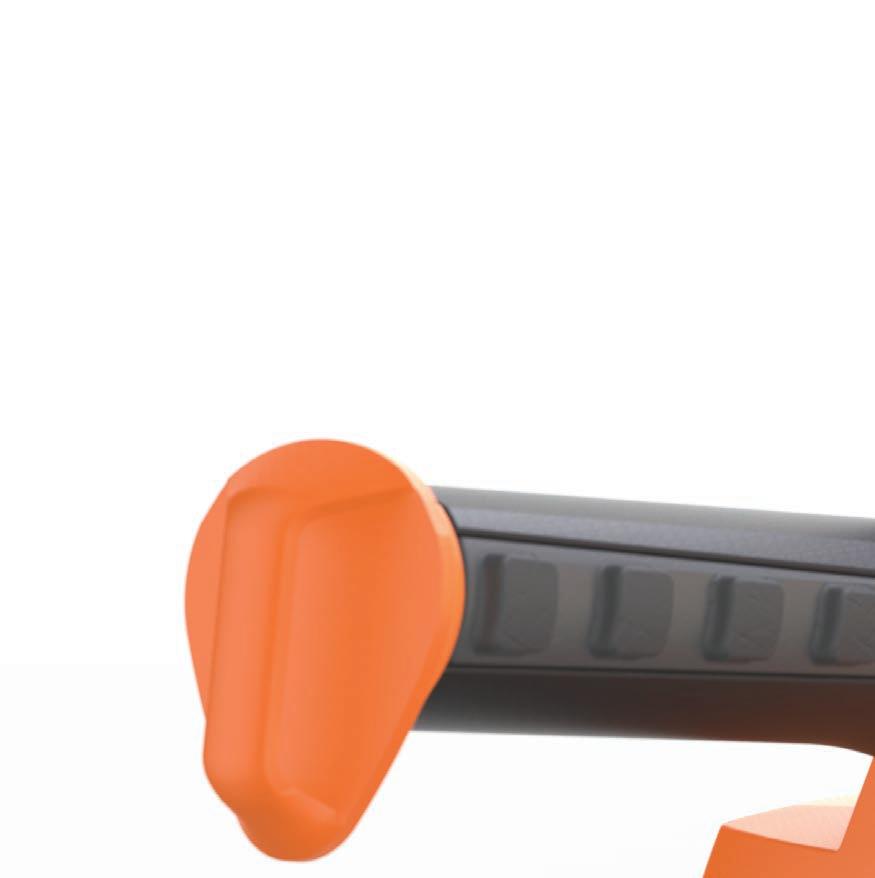
Crofts & Assinder Small Space Handle
RSA:SDA Agile Ageing
Personal Work
BlueFrog Design
DJI Inspire Protection Pack
Dysesthesia Chest Guard
Plug Snug Cable Tidy
External Work Visuals
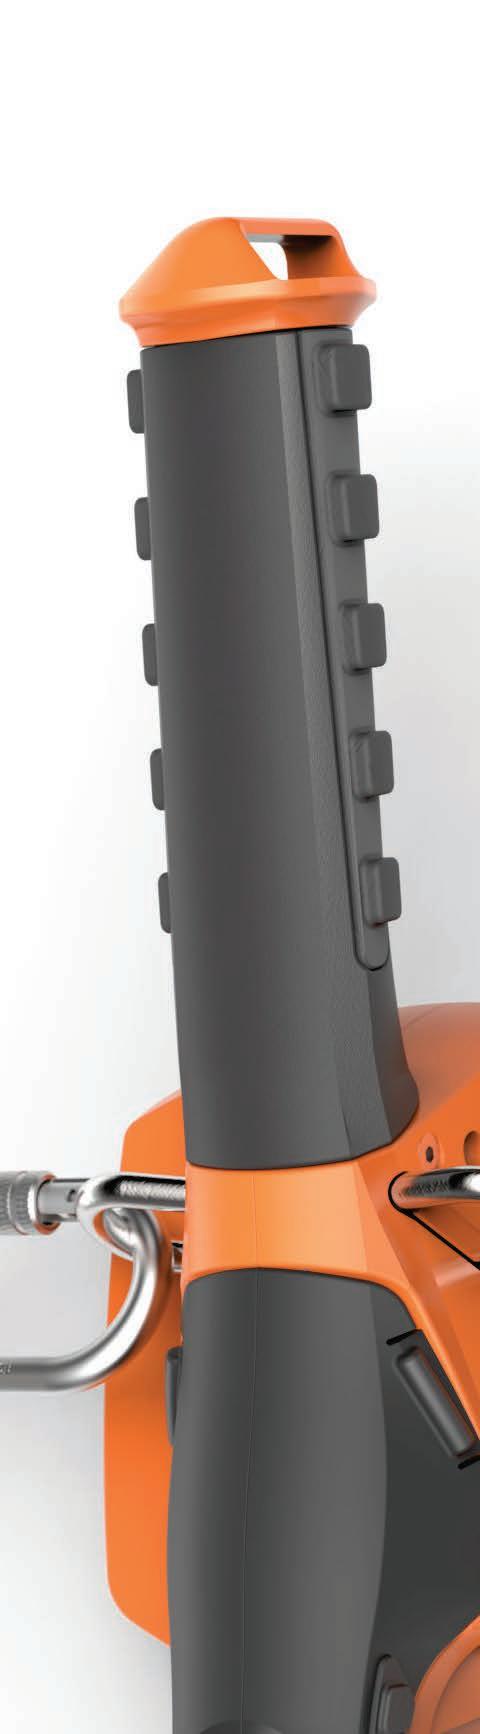
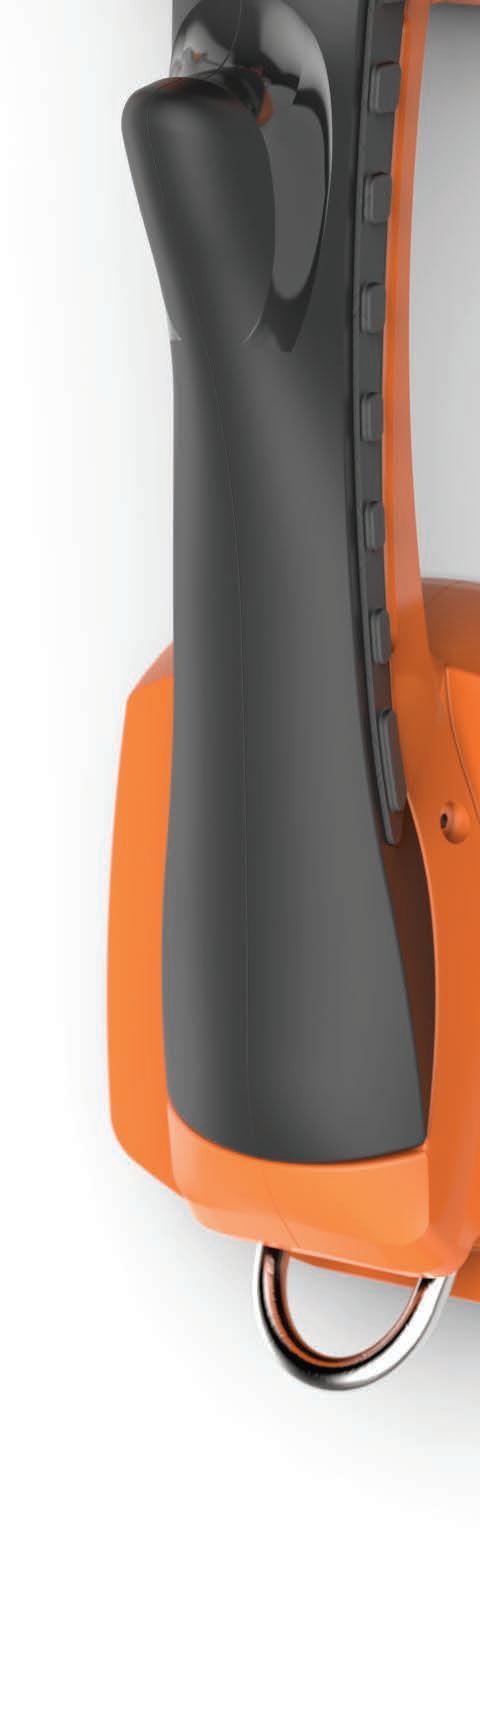
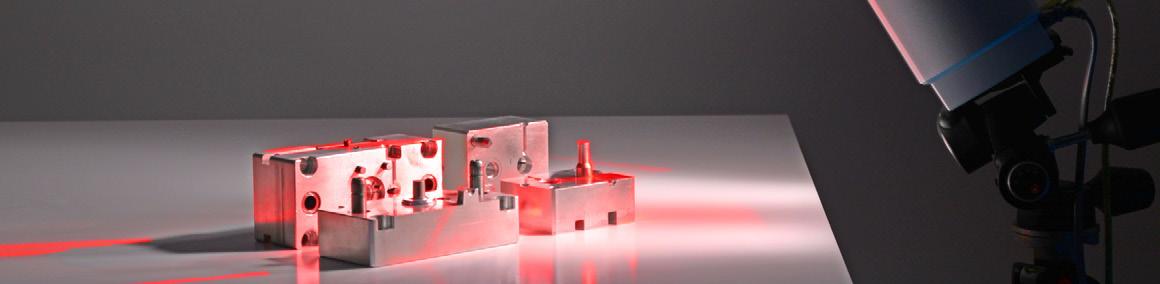
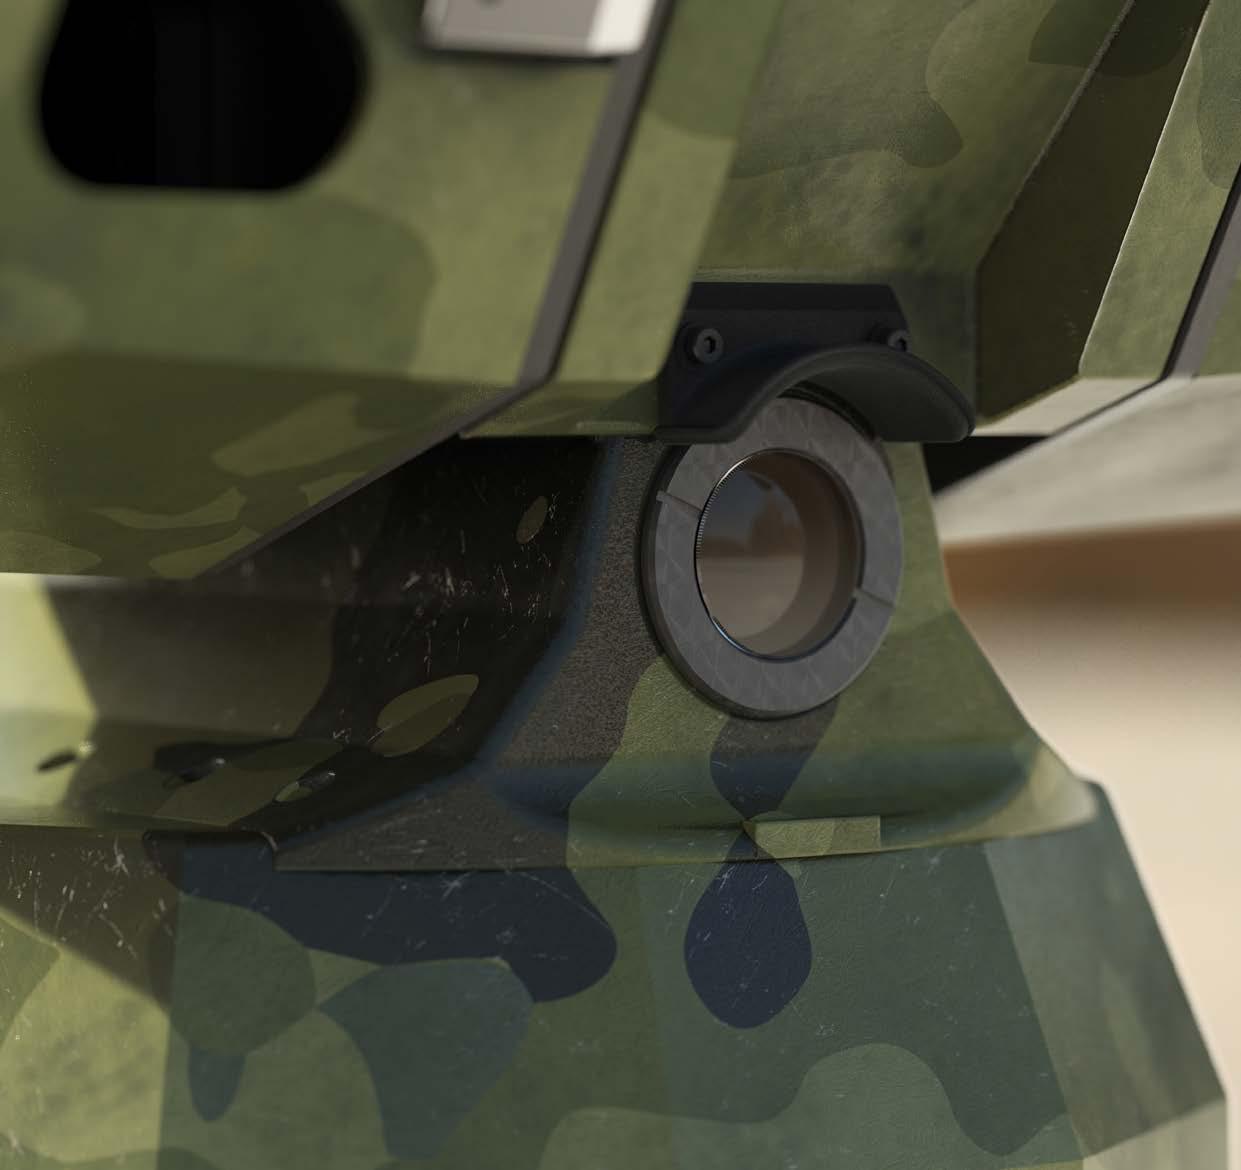
Detection System
Freelance
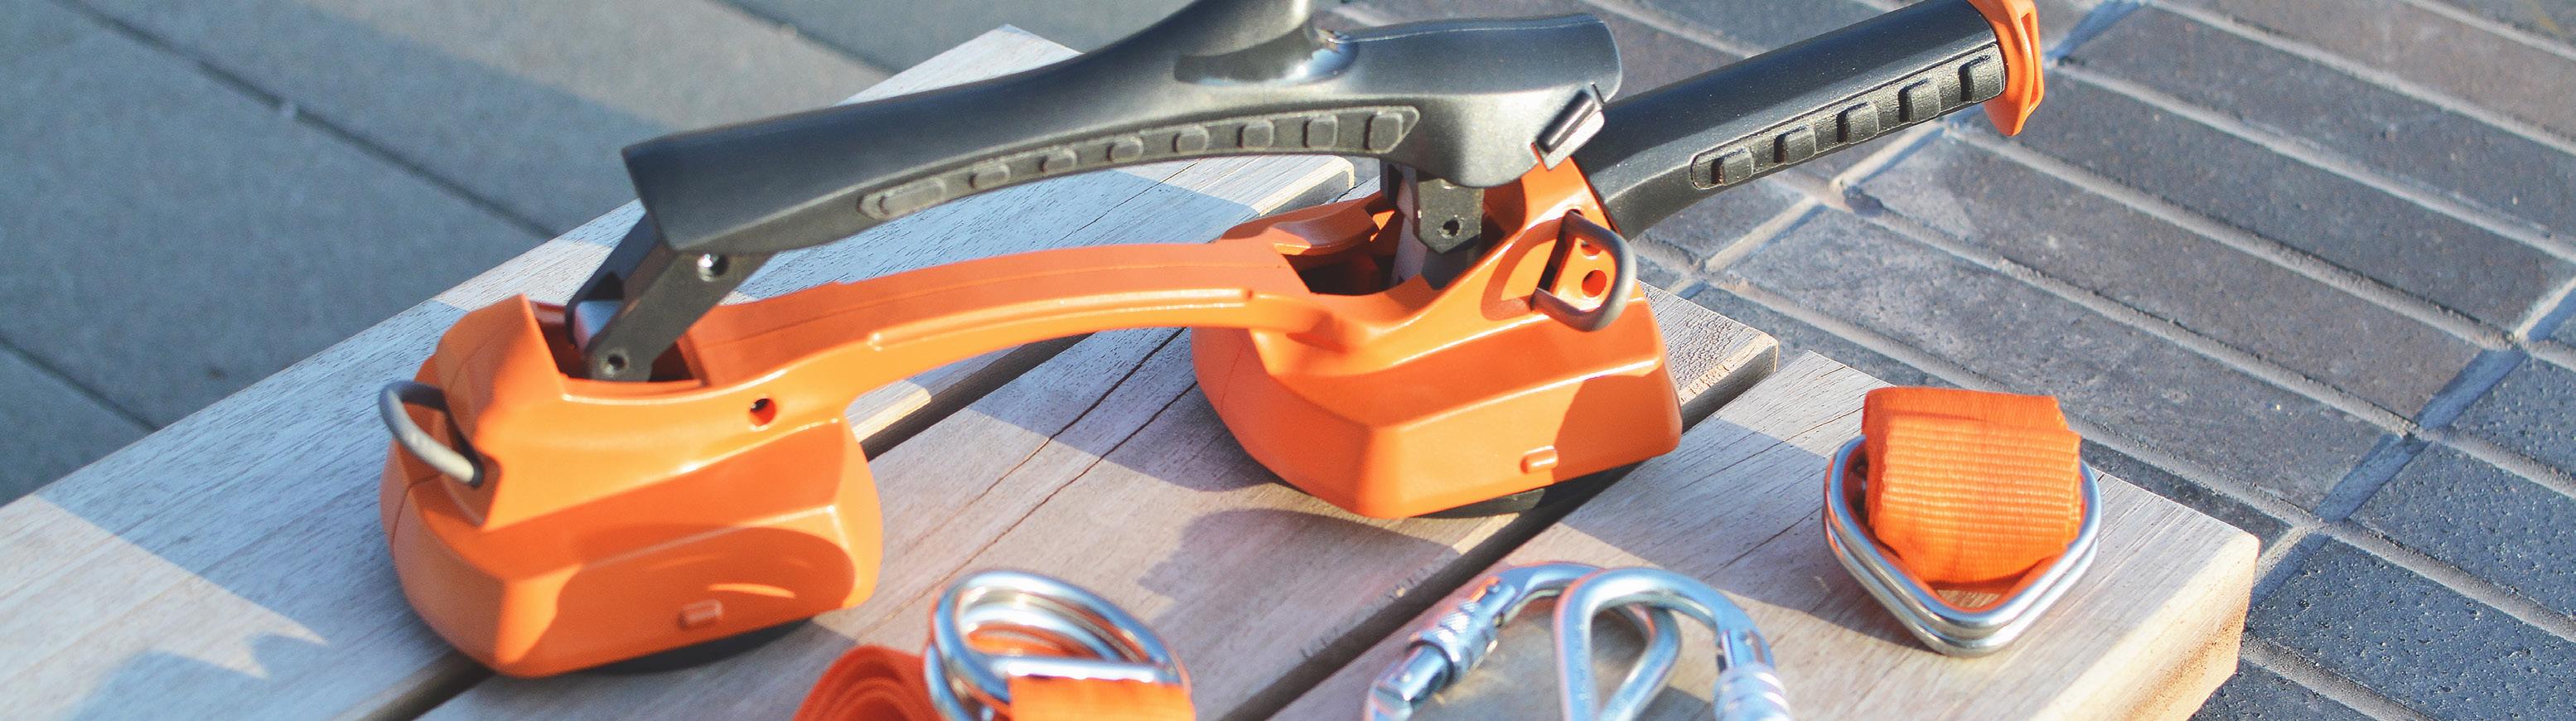
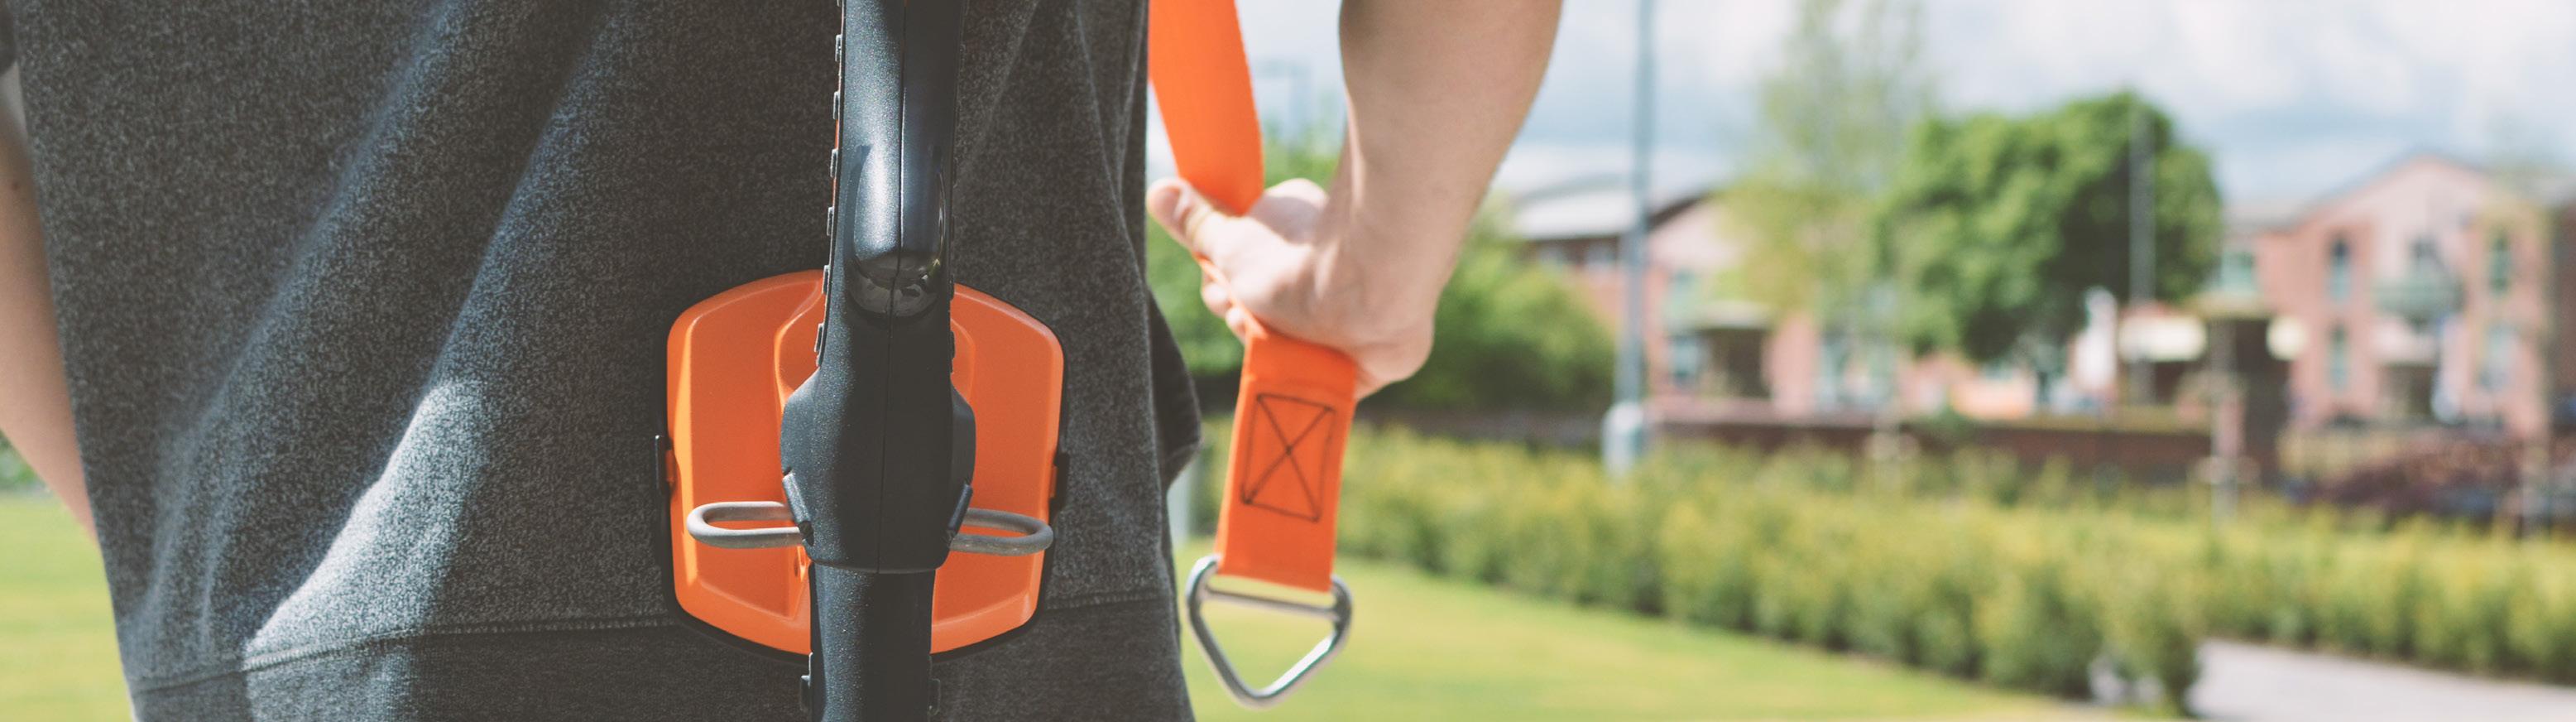
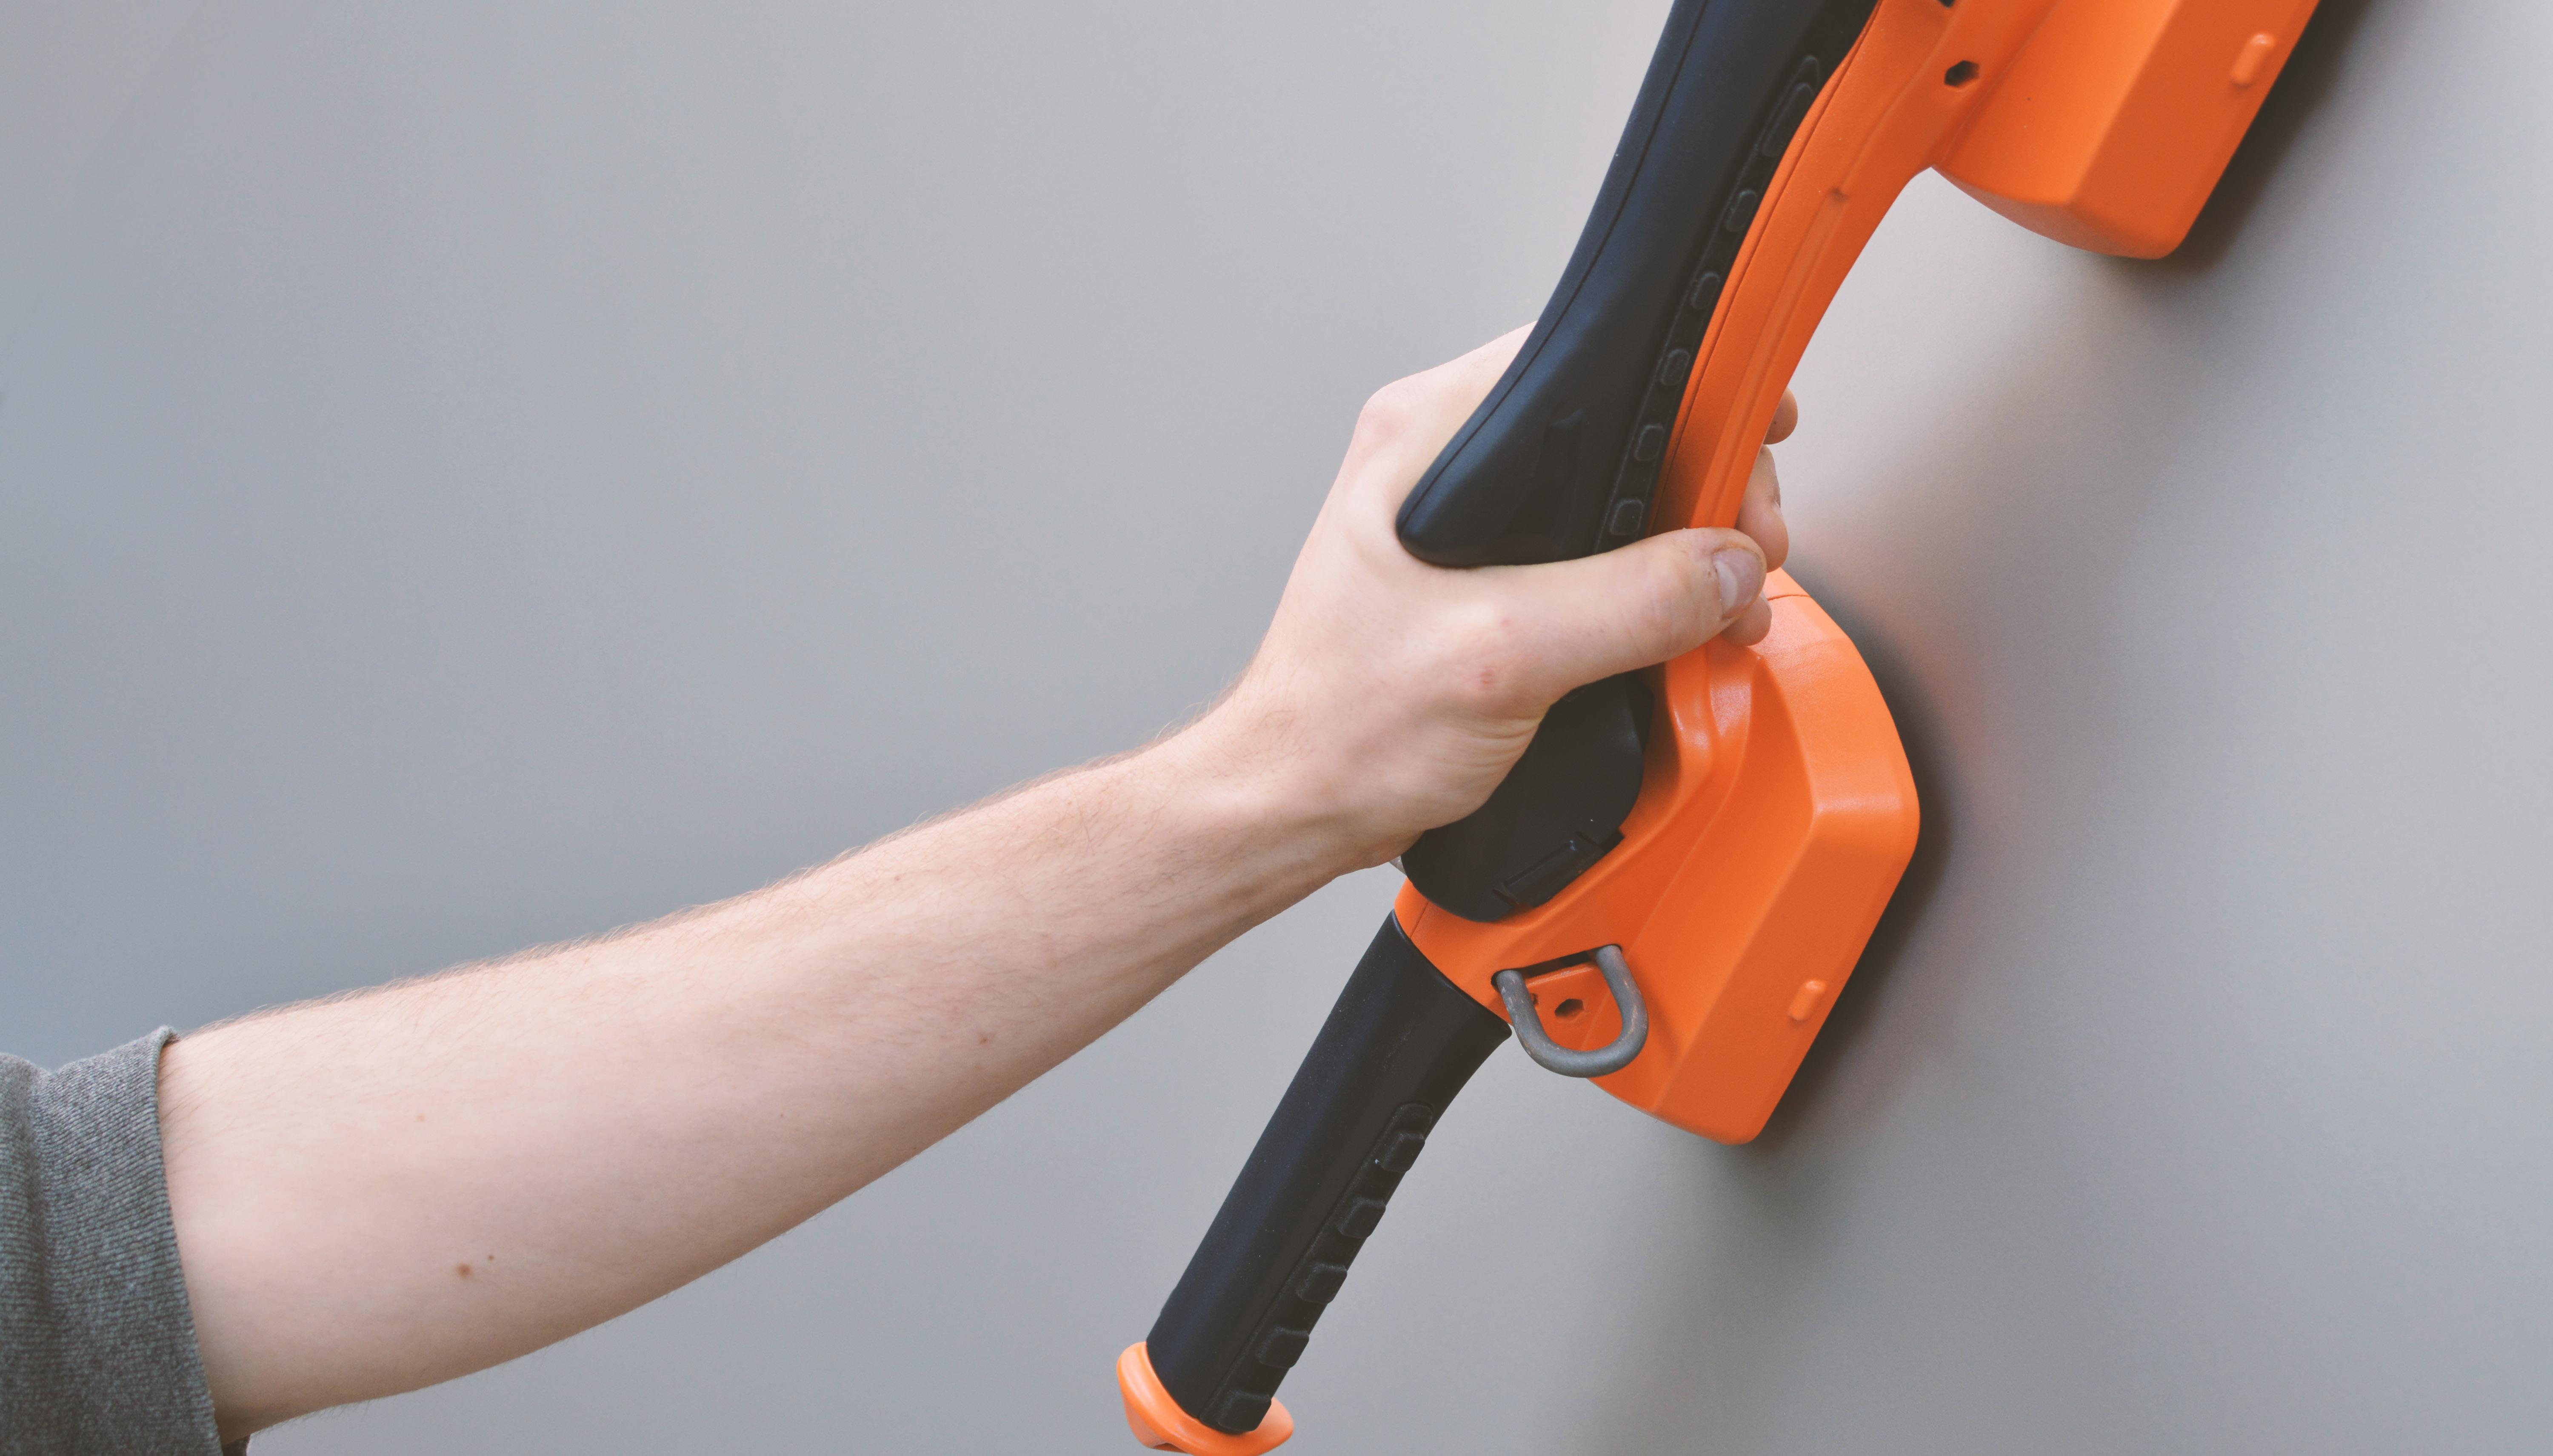
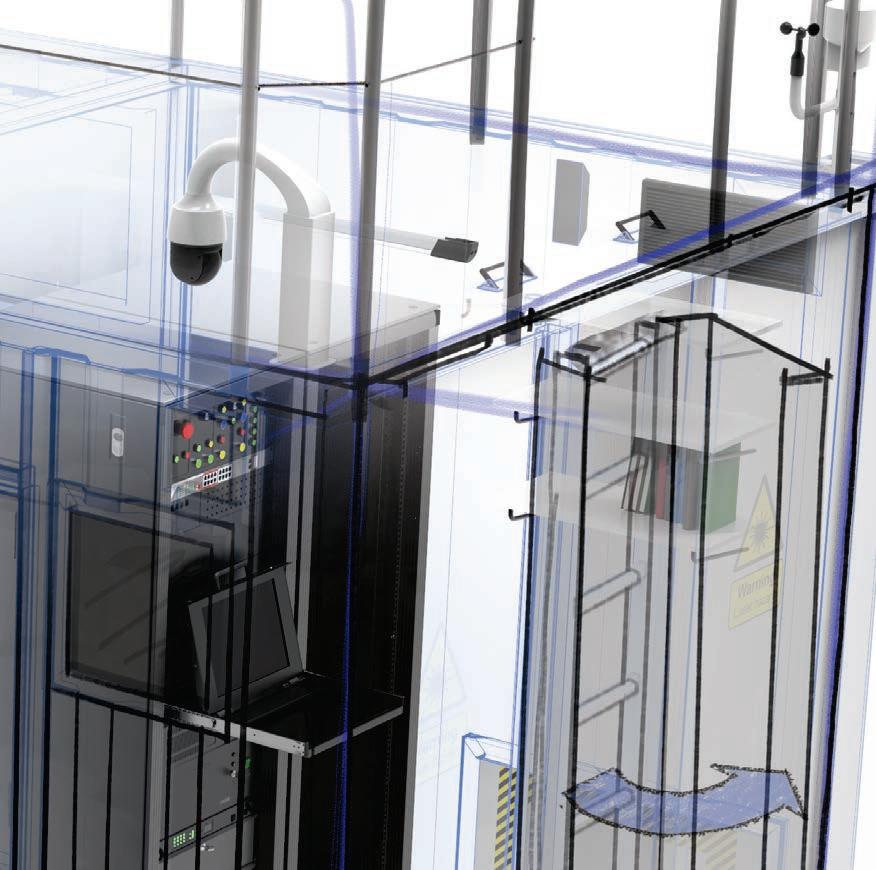
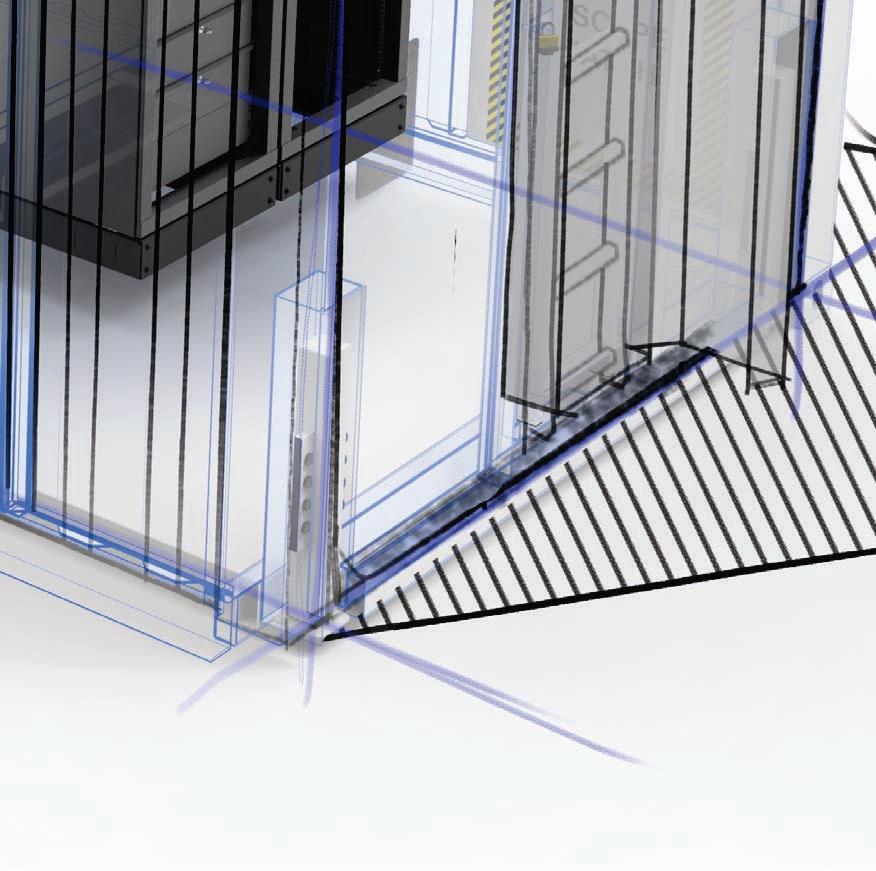
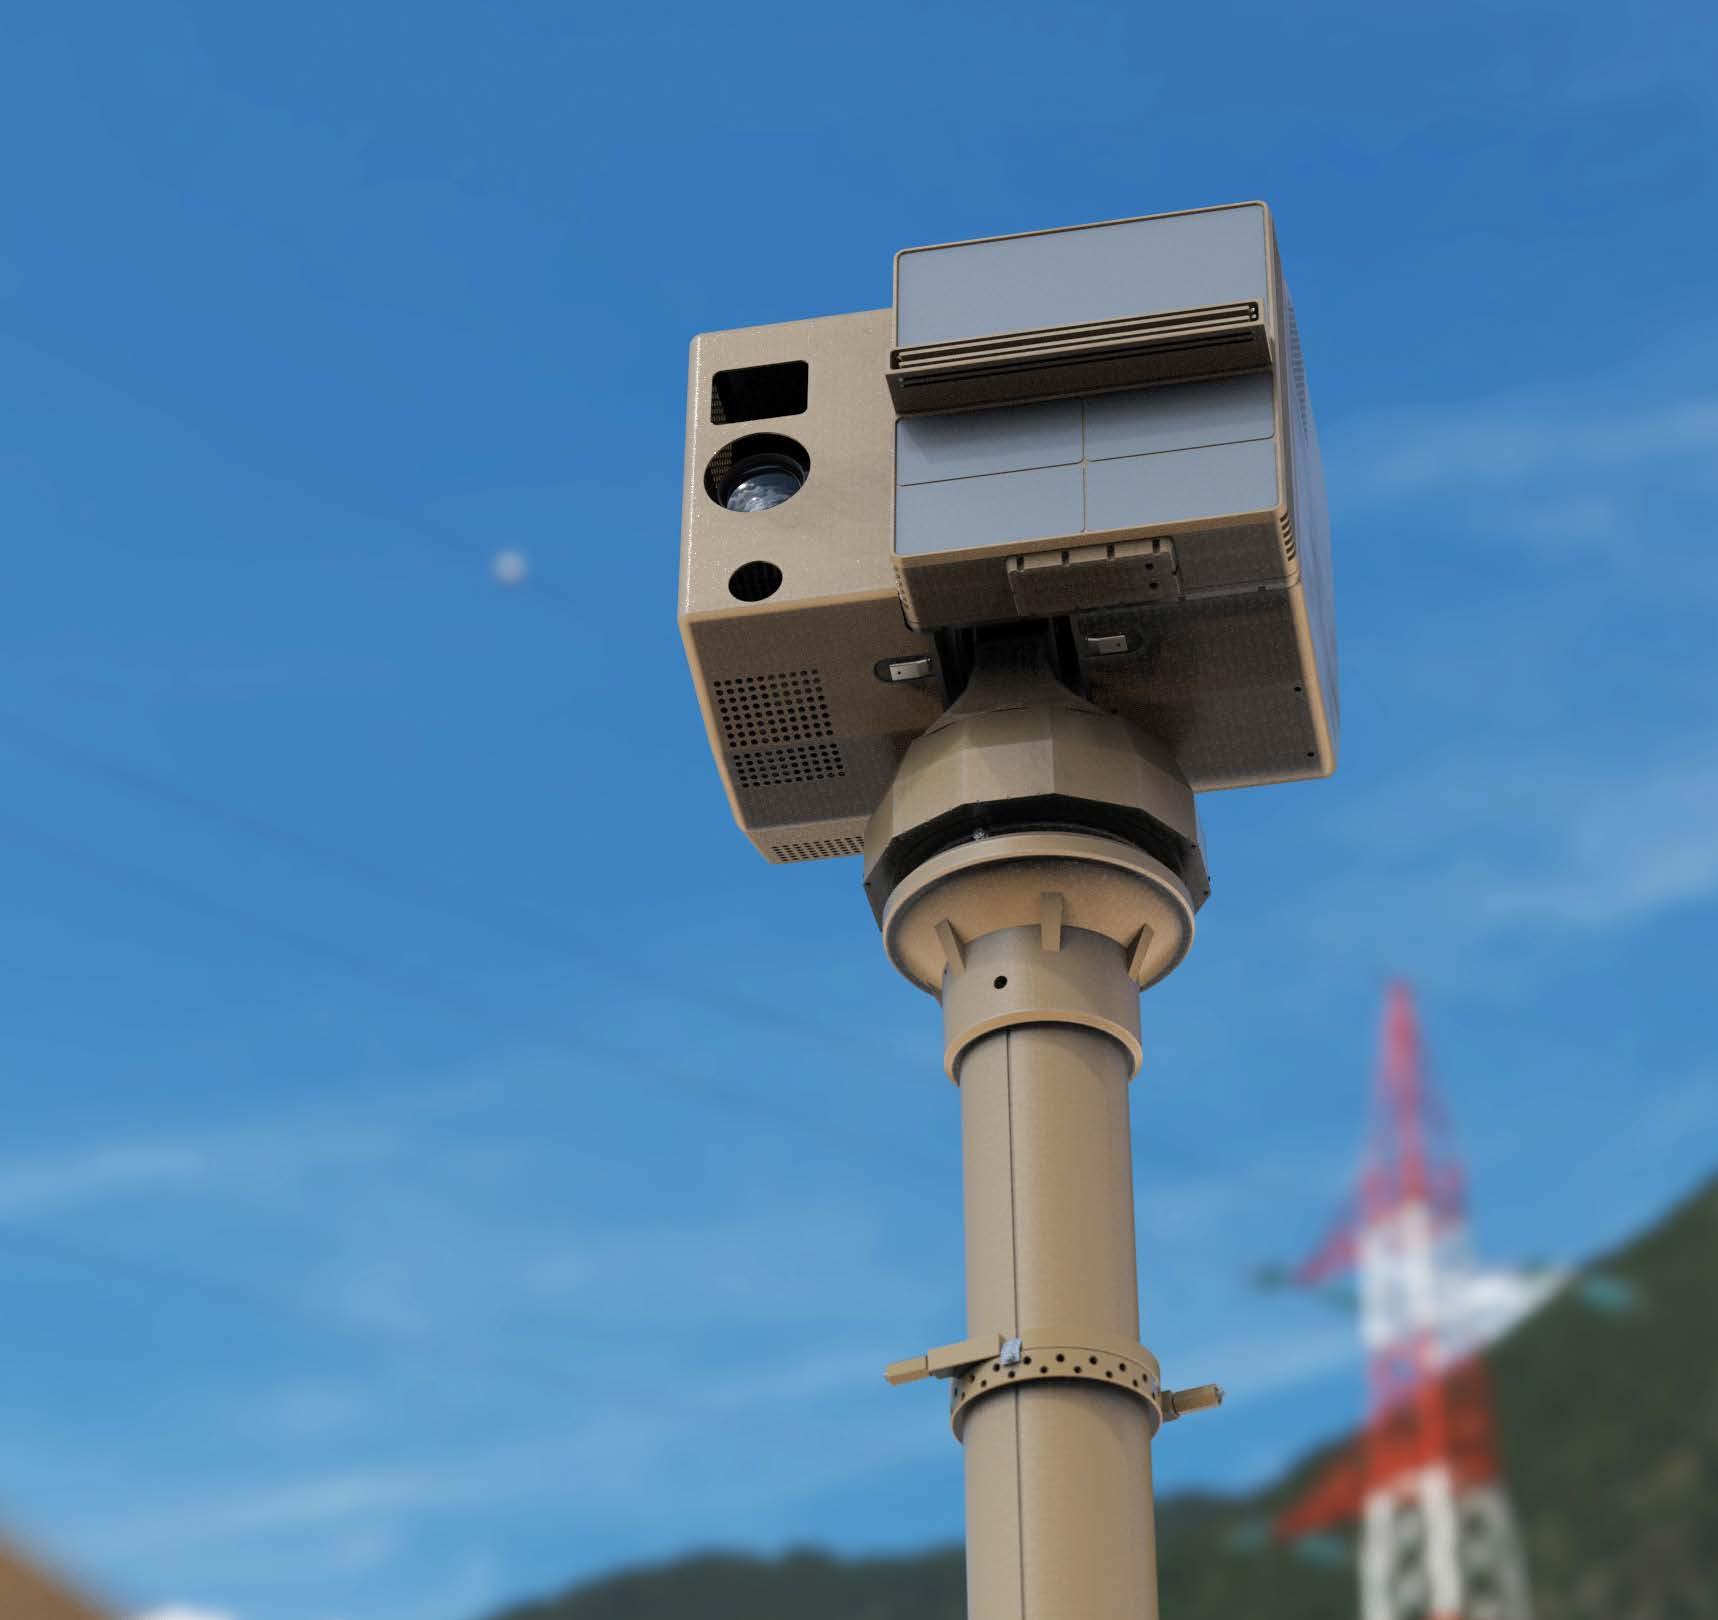
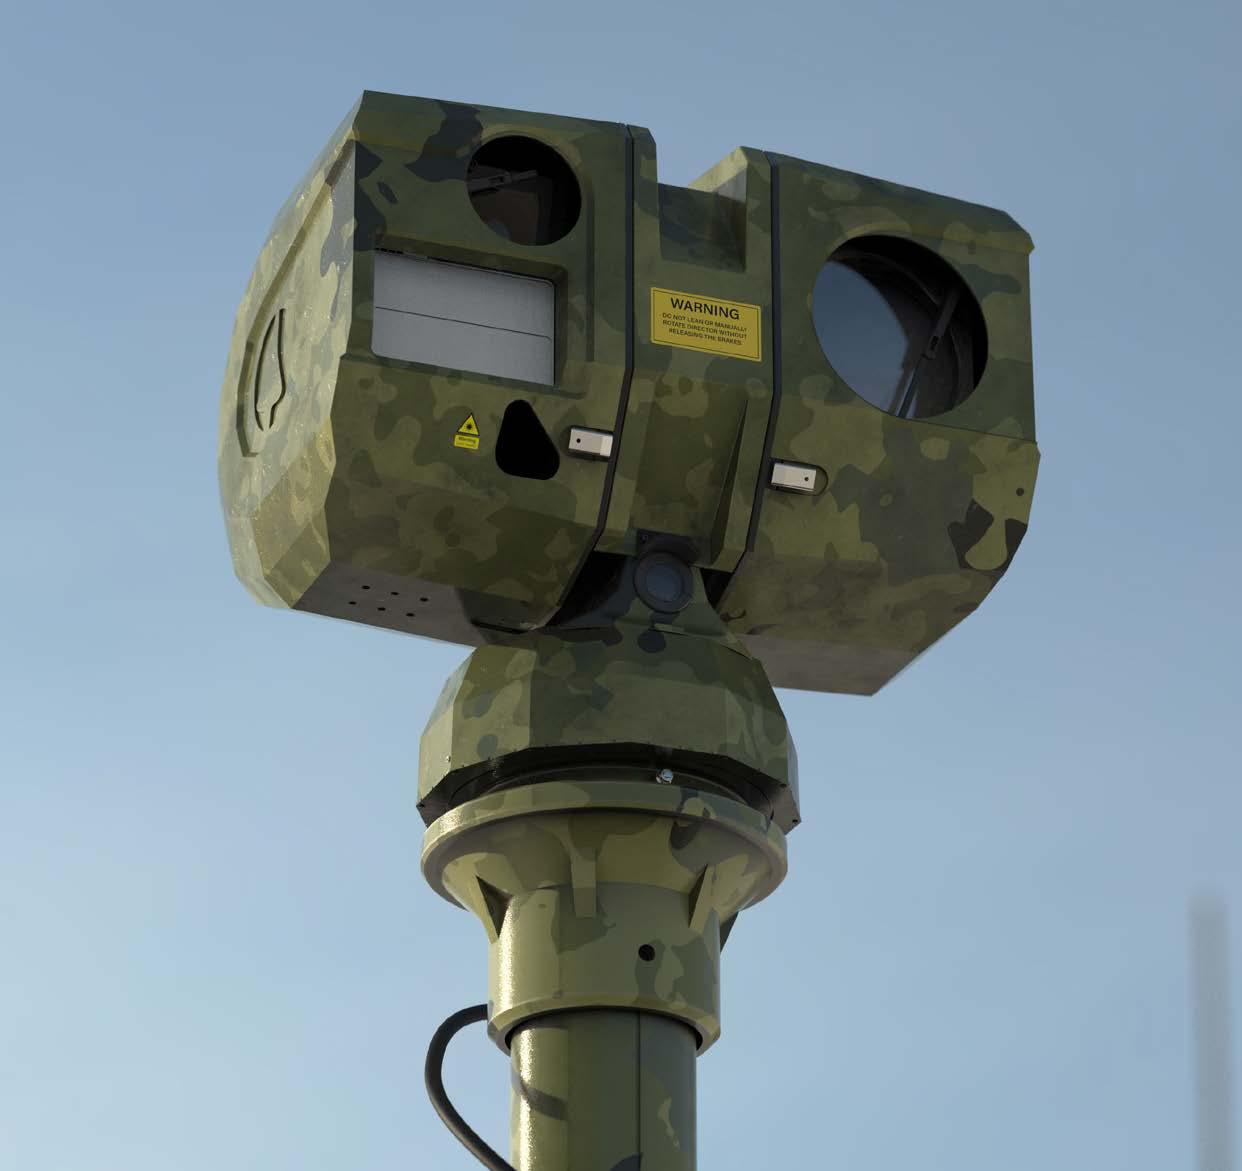
Starting from scratch on a detection system. Housing the electronics, considering the user’s needs, how the product will be used and how to keep cost down.
Technologies
Detection System
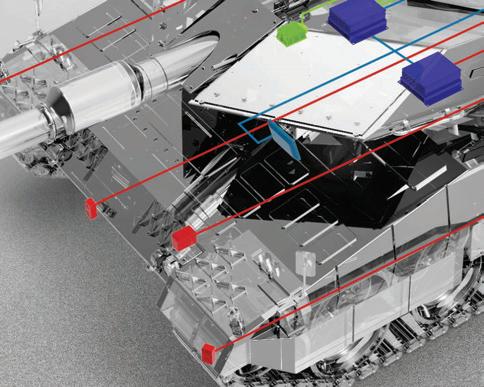
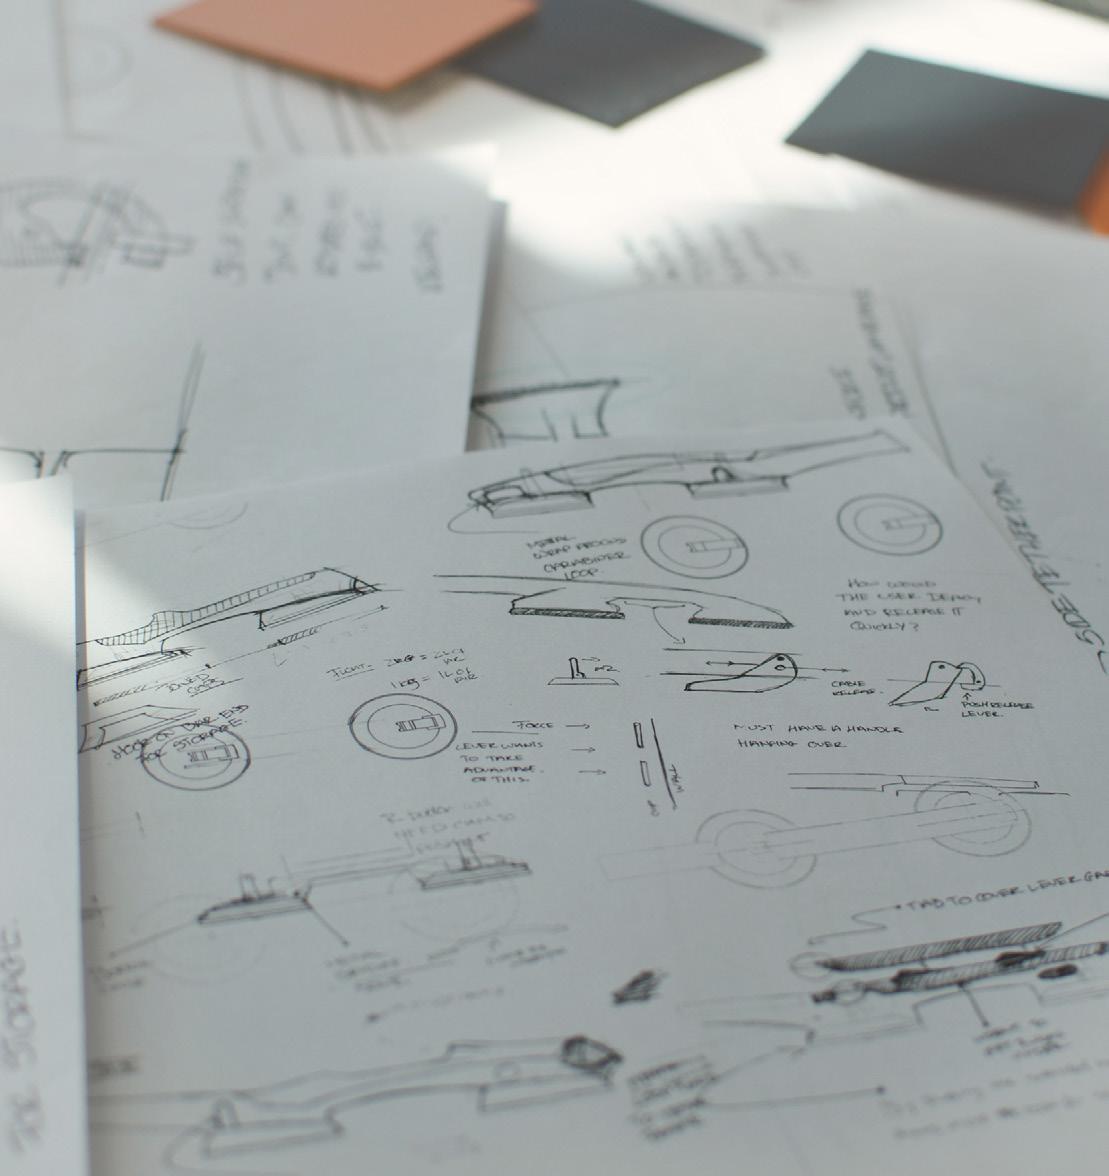
A freelance project to create this system. Used in potential battle situations, the product must endure the harsh environments and be user friendly as to not impede their duties.
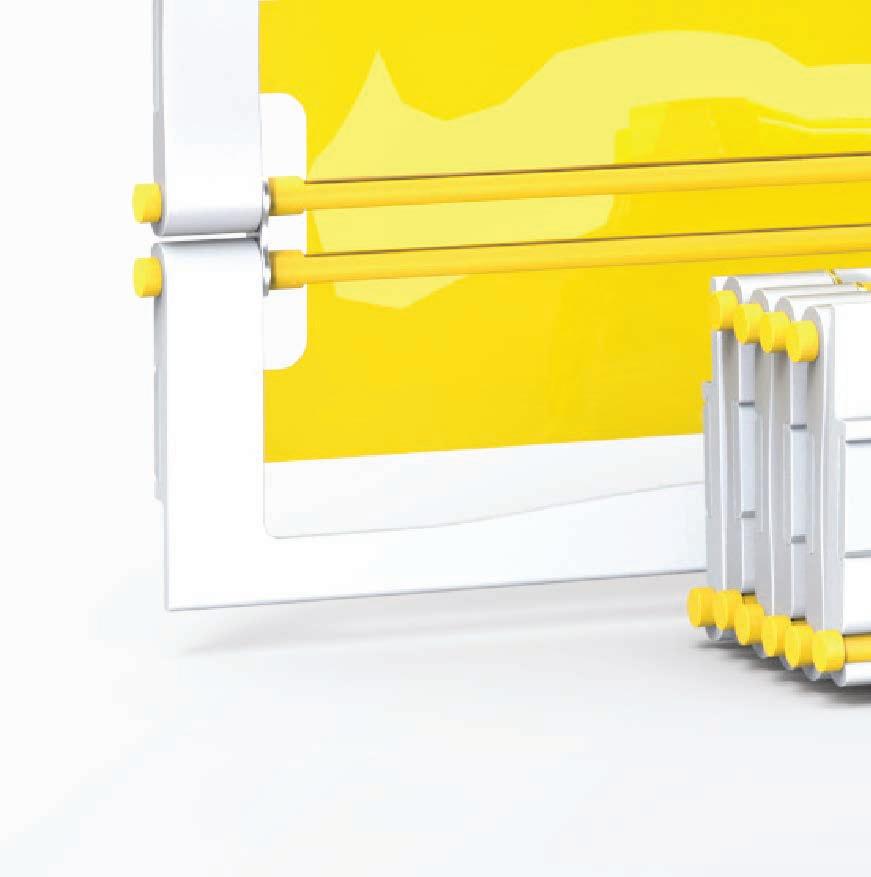
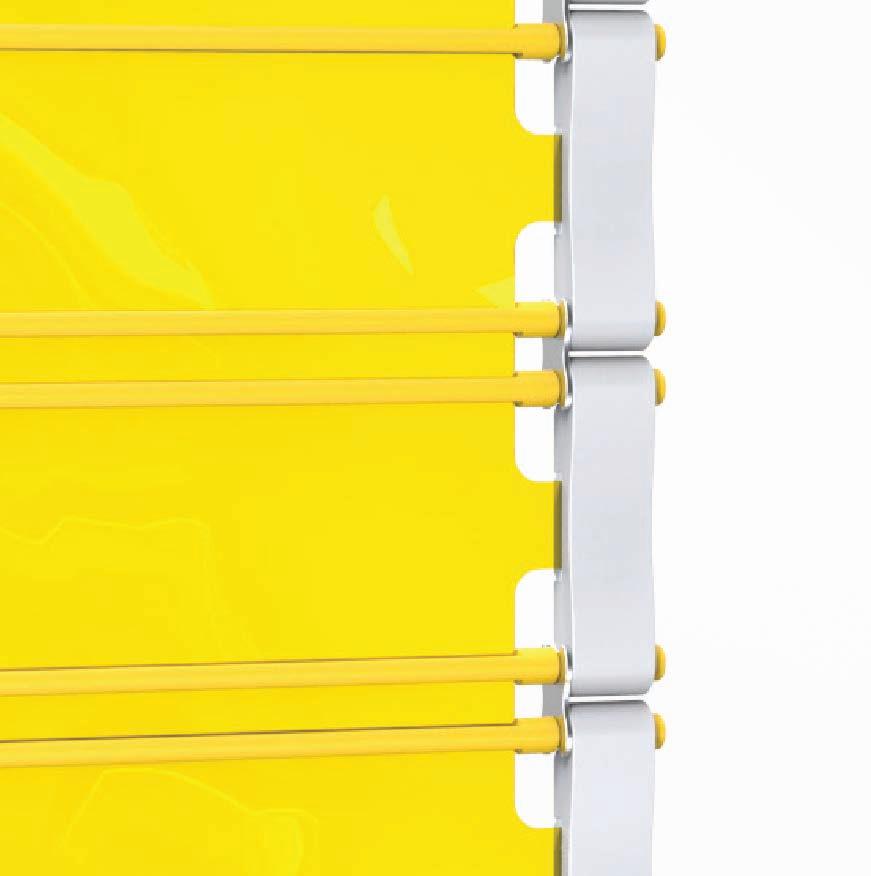
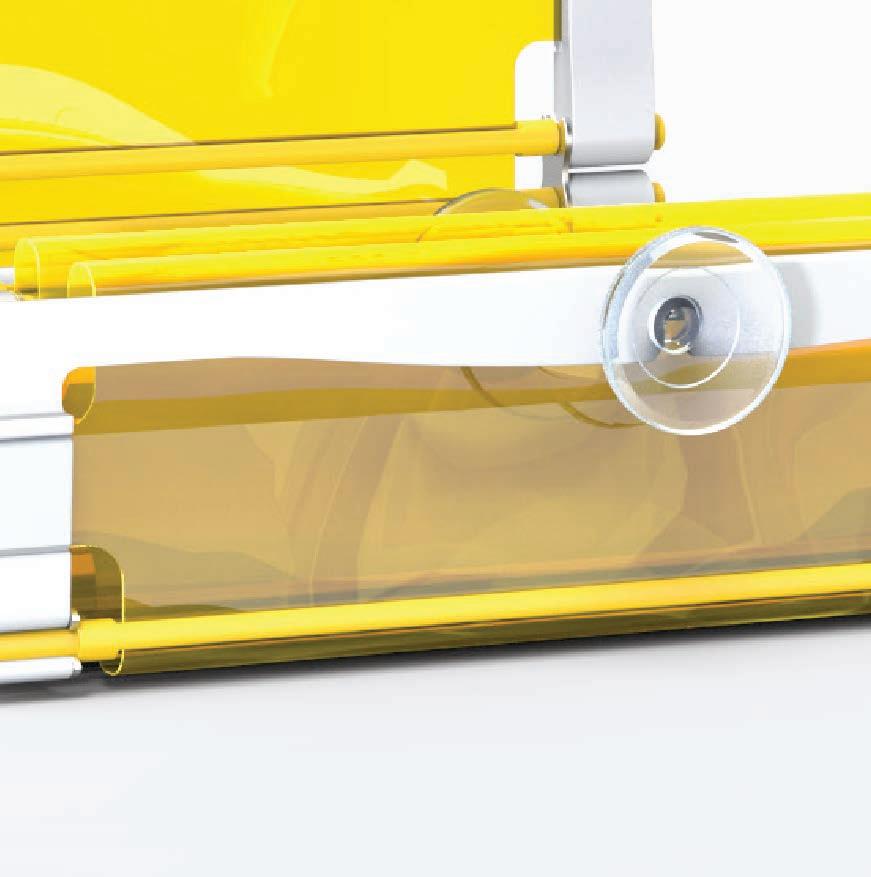
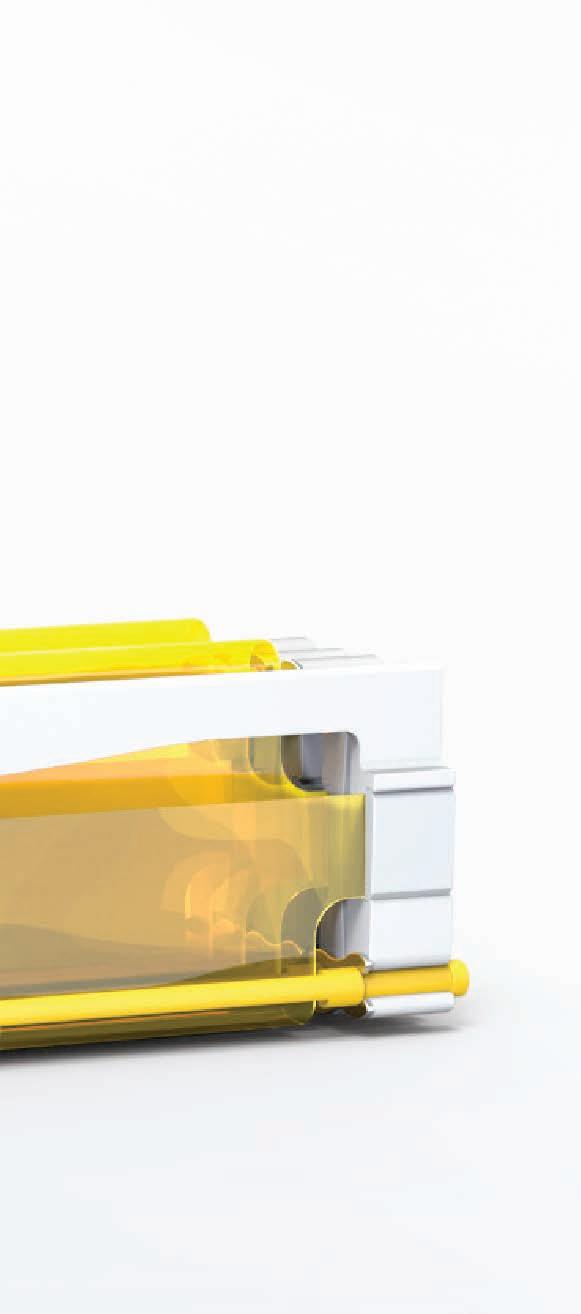
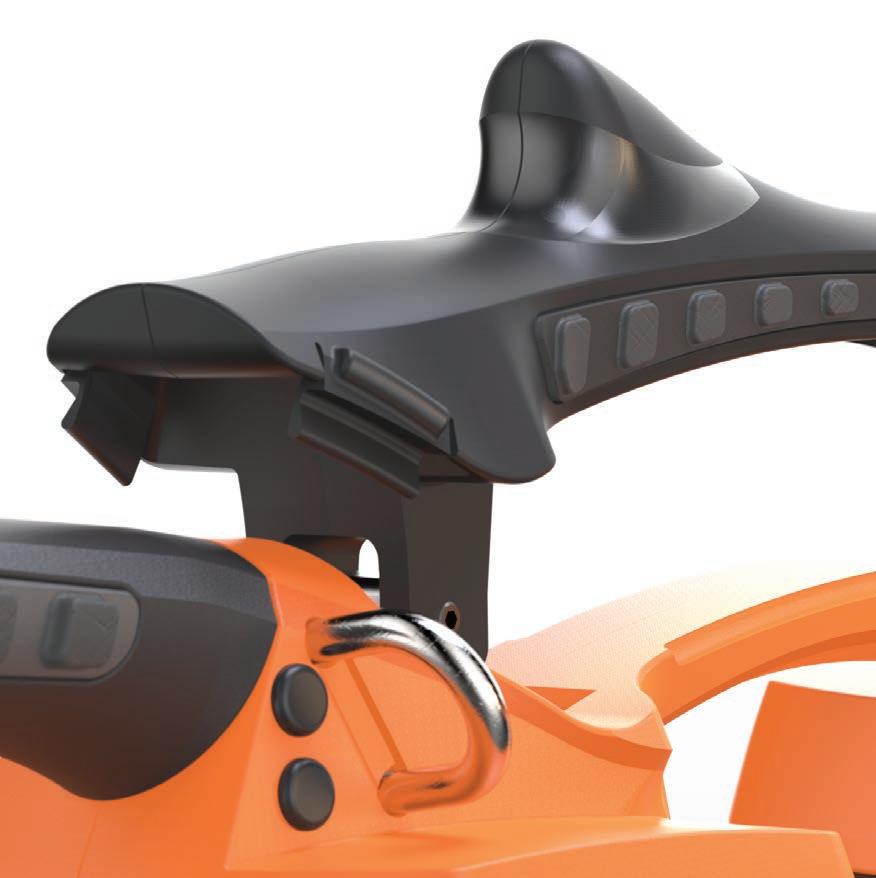
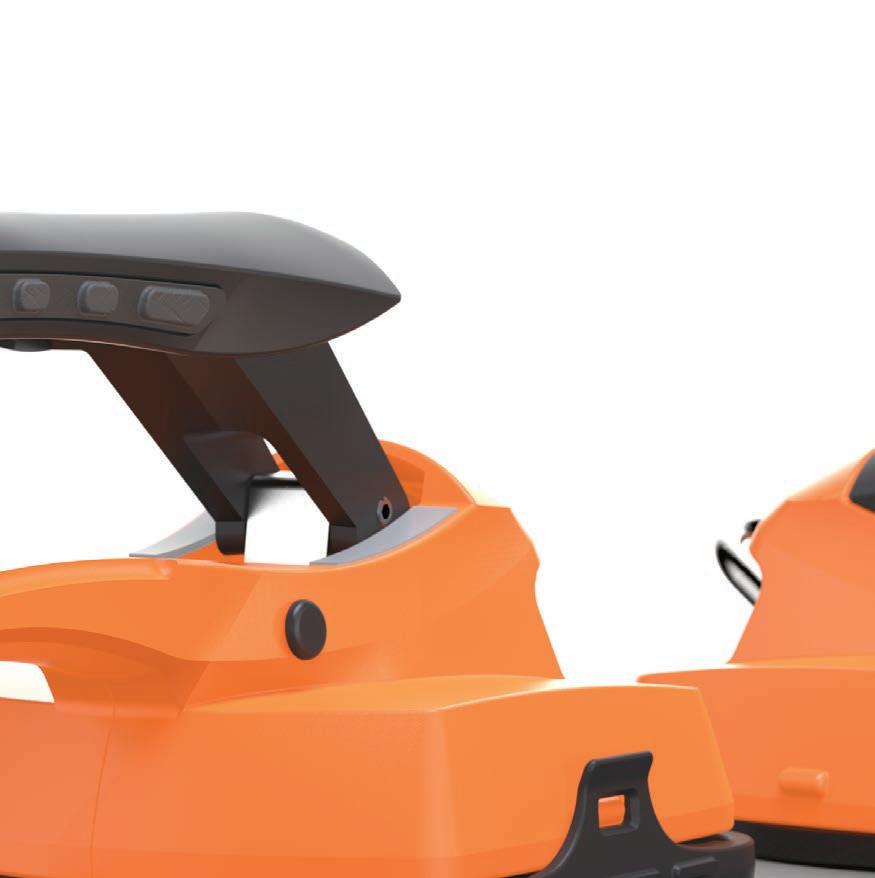
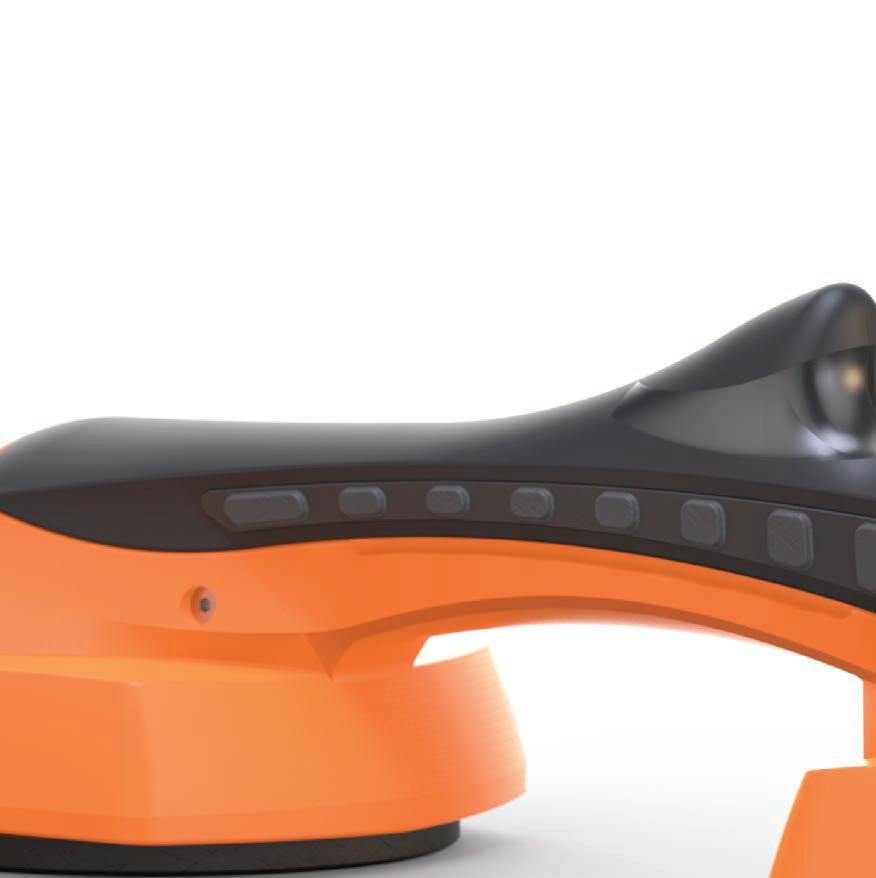
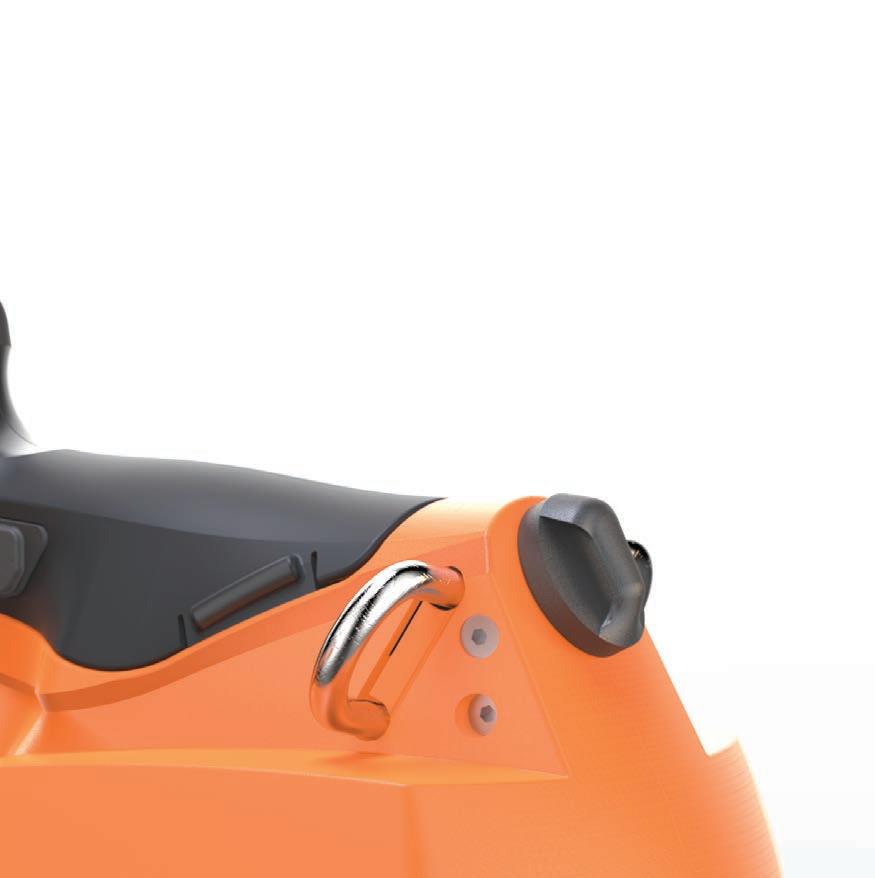
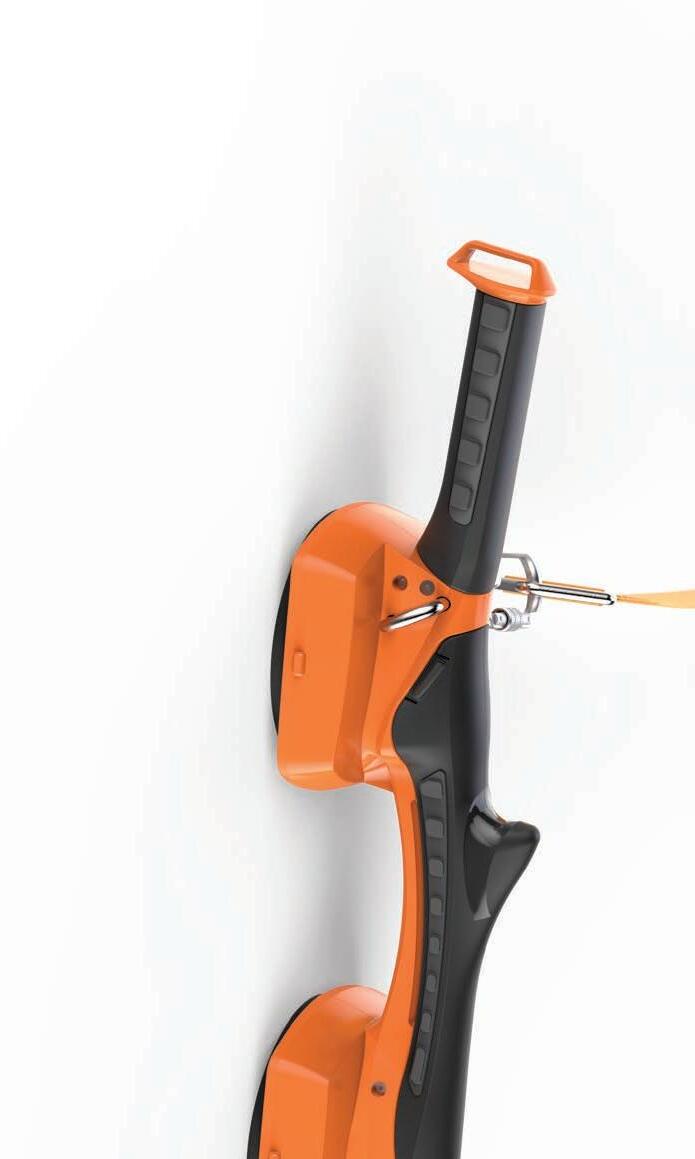
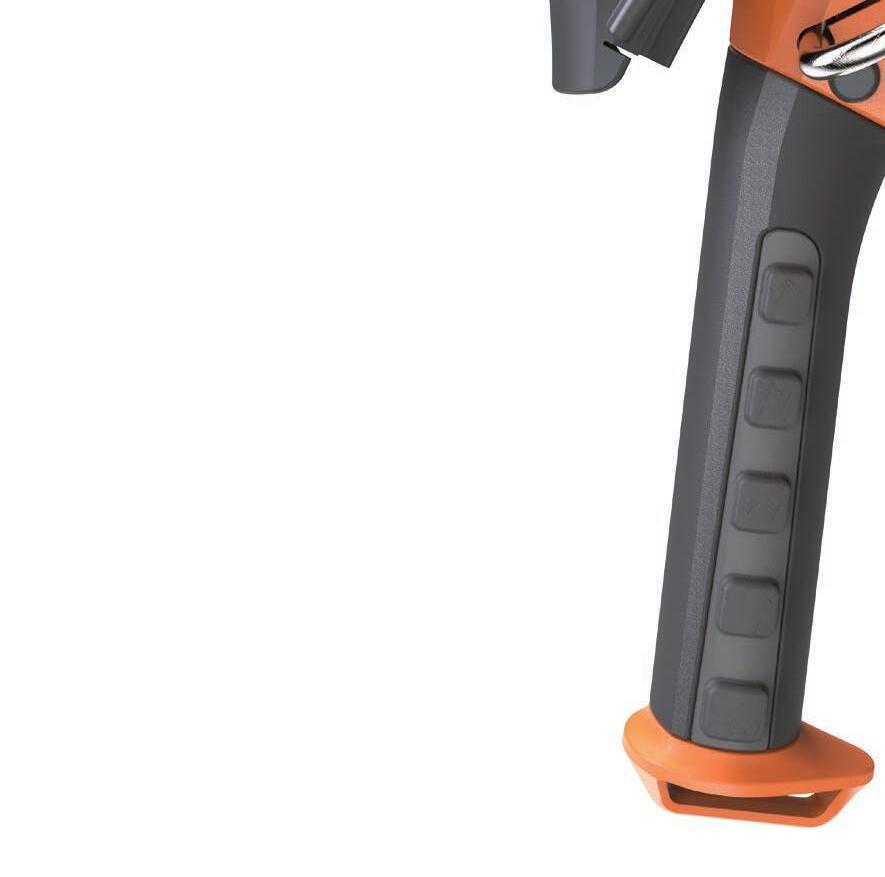
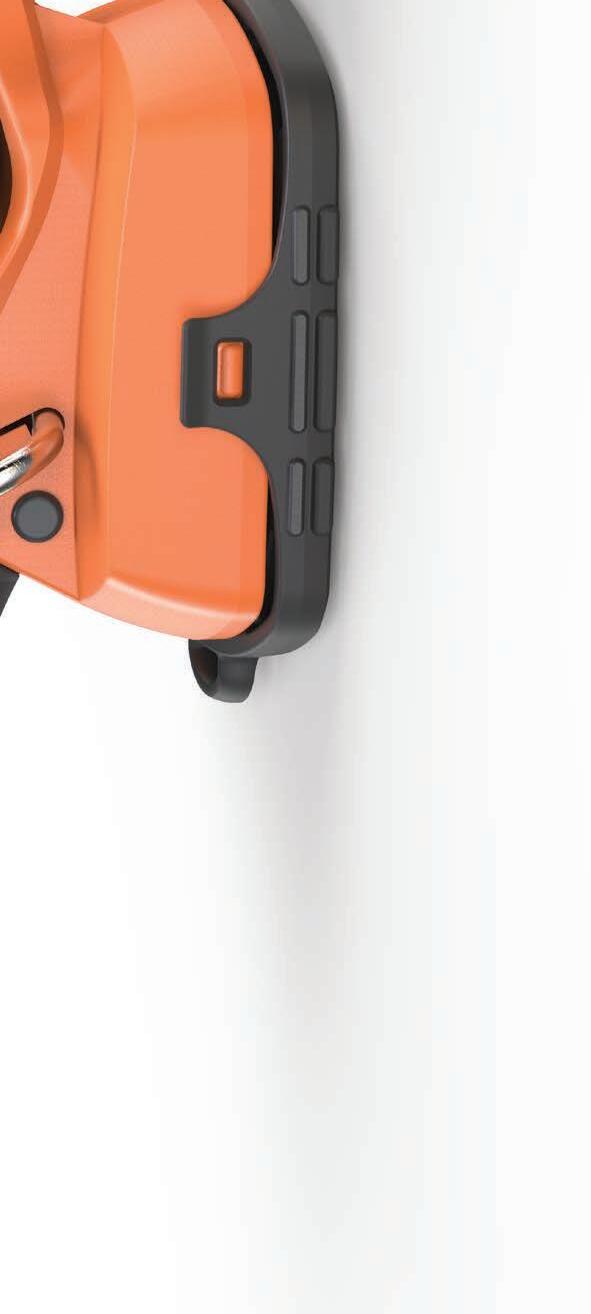
Going from a pile of a parts with a goal in mind, to that goal is a journey that can vary each time, creating the need to adapt to each project. Working with a company to create this detection system was an enjoyable and rewarding one. I started with mapping the internals out, constraining them against the specs laid out, and then the enclosure evolved around them. Taking into consideration all aspects of the user and the way this will be used influenced the design, and materials used and ultimately, the appearance.
My surface modelling played a large part to create something sleek and simple with flowing surfaces what ran throughout the design. It was critical all parts aligned to provide the necessary clamping over the radar it sits on. The side legs needed to fold while being part of the clamping element.
Overall, this project was a success and was featured at the UK’s largest exhibition for its market sector, seen by thousands and ultimately got good reviews which led to the products development.
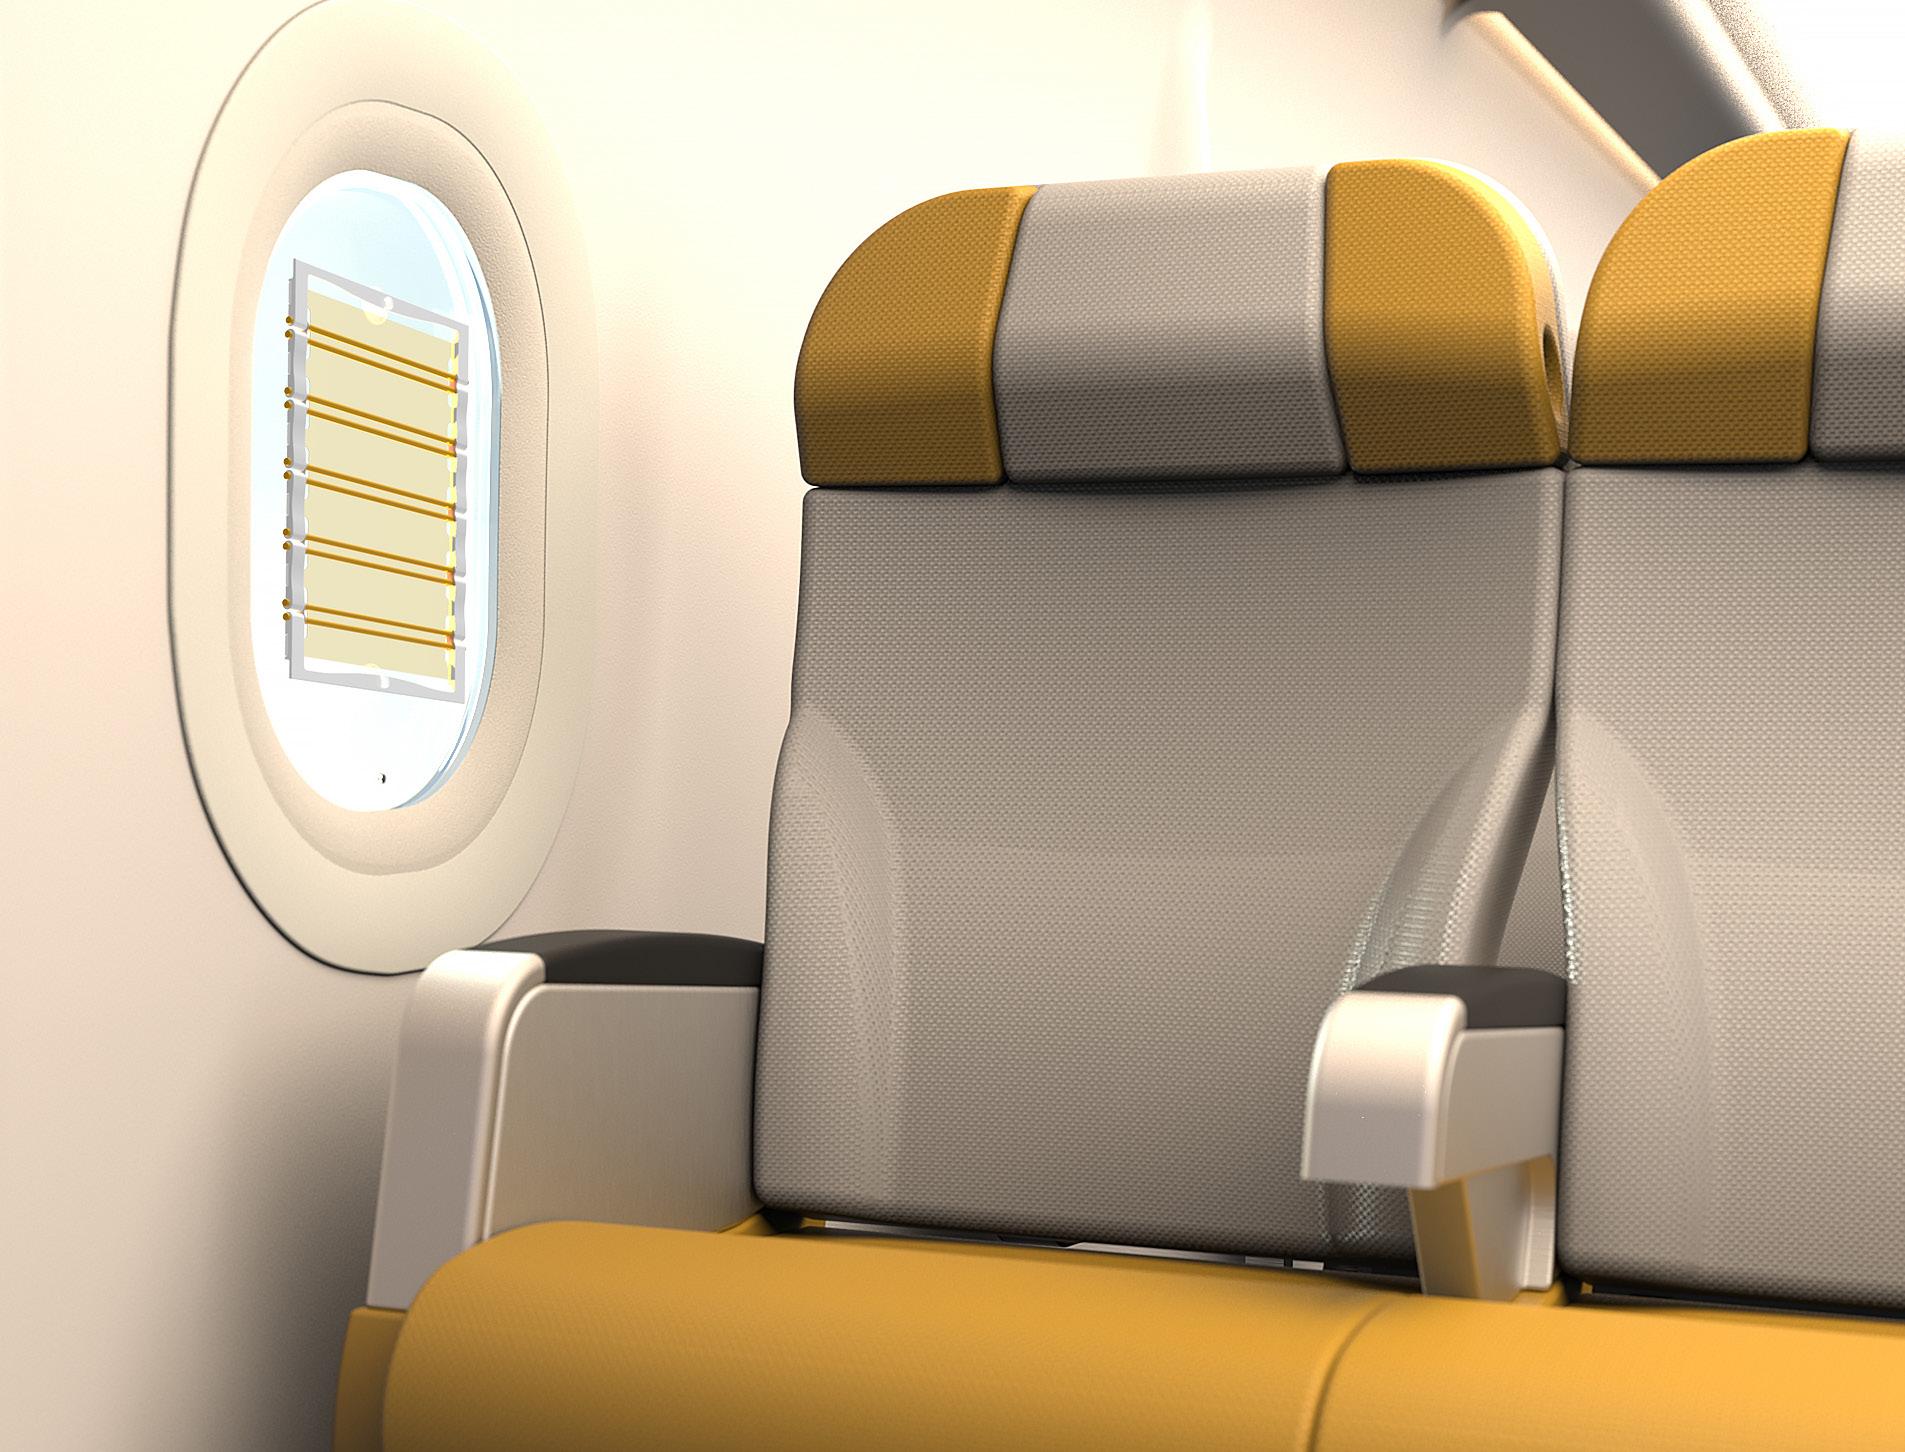
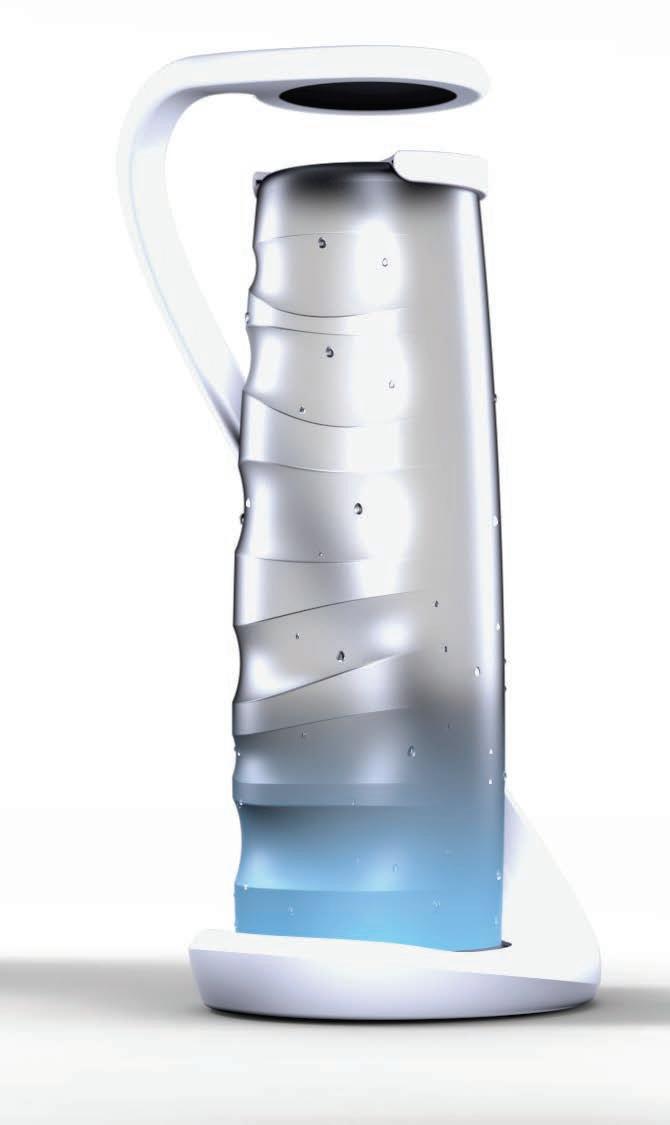
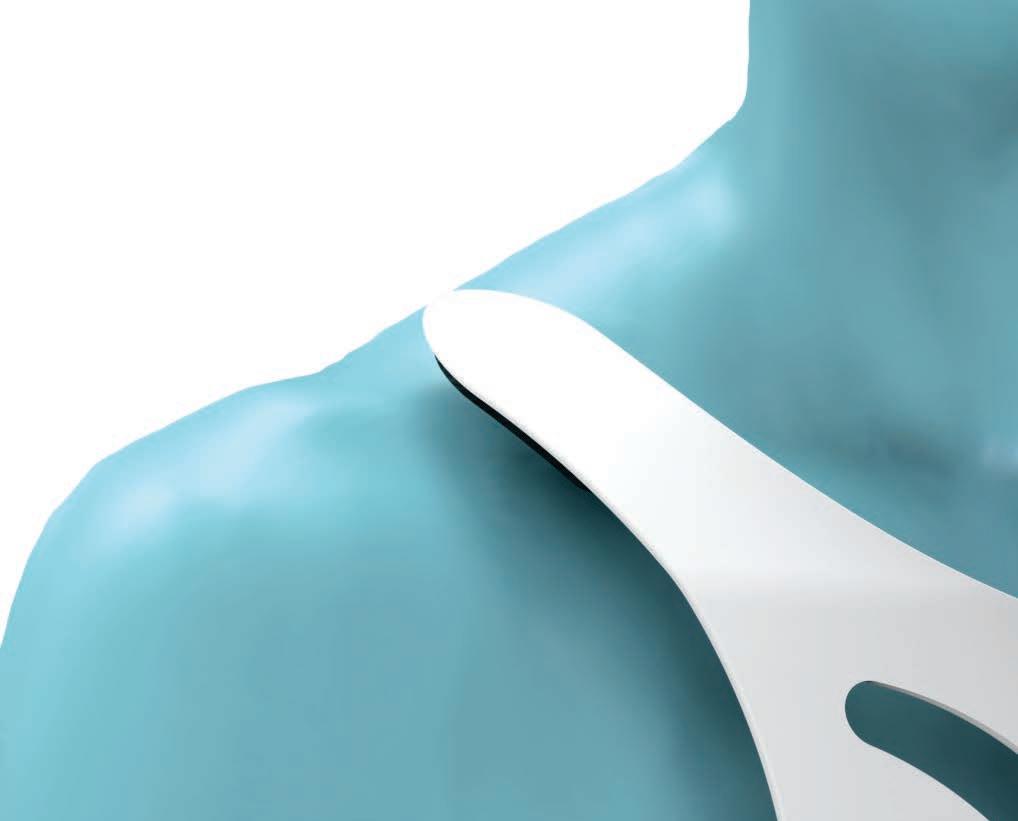
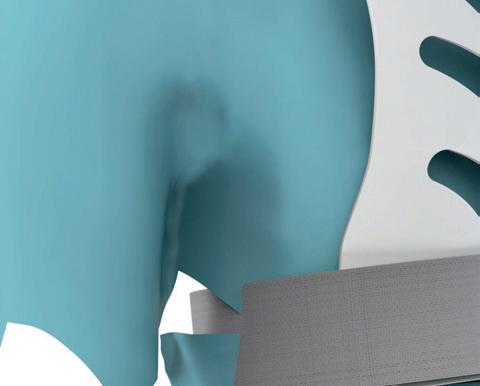
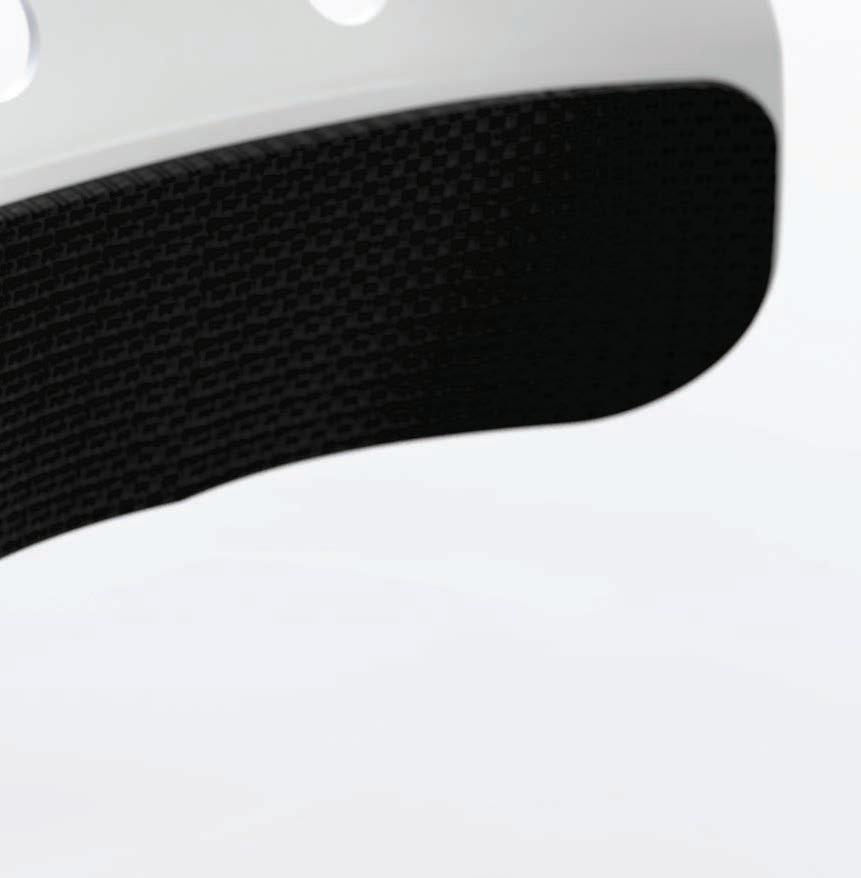
Aero:UV Sheild, UV Protection
Design in Innovation and Plastics Competition
60 minutes at 30,000 feet causes as much harm as 20 minutes in a tanning bed. Guidelines state there should be no more than 10 hours per year tanning. This would equal 30 hours a year flying, pilots are limited to 1000 hours per year, getting 100 times more harmful exposure to UVA. Design need Free gift from airline for UV protection
Aero:UV Sheild
At 30,000 feet, 60 minutes exposed to the sun can be as harmful as 20 minutes in a tanning bed. Guidelines state a max of 10 hours per year tanning. This equals 30 hours a year flying. There are people flying up to 14 days a month. Pilots are limited to 1000 hours per year, getting 100 times more harmful exposure to UVA than the tanning guidelines state.
Design Process
- Deep vein thrombosis
- Cosmic radiation
- Jet lag (circadian rhythm)
- Disrupted sleep
- Ear pain
- Body gas
- UV radiation
- Cabin air quality
- Cabin stress
- Cabin hypoxia
- Cabin noise hum
- Cabin dehydration
- Cabin air pollution
Initial research opened up issues to target. Each issue was looked into to see how it could be tackled, and from there one was selected to be the driver for the project. Concepts took half a day, and then it was straight onto CAD and prototyping with physical models.
A list of product considerations gave the product a target
Low cost
Branding
Gender neutral
Hygiene
Perceived quality
Size
Packaging
End of life
Environmental impact
Weight
Flammable
Universal language
All possible users
User interaction
With quality research gathered on the chosen issue, concept generation laid out the basic forms. Within a day, a solid set of concepts were soft modelled. From here the chosen design went forward into development.
With the product being a free gift to paying fliers, the item must be quality and reflect the service. The idea is to make customers feel welcome and cared for, to encourage them to fly again.
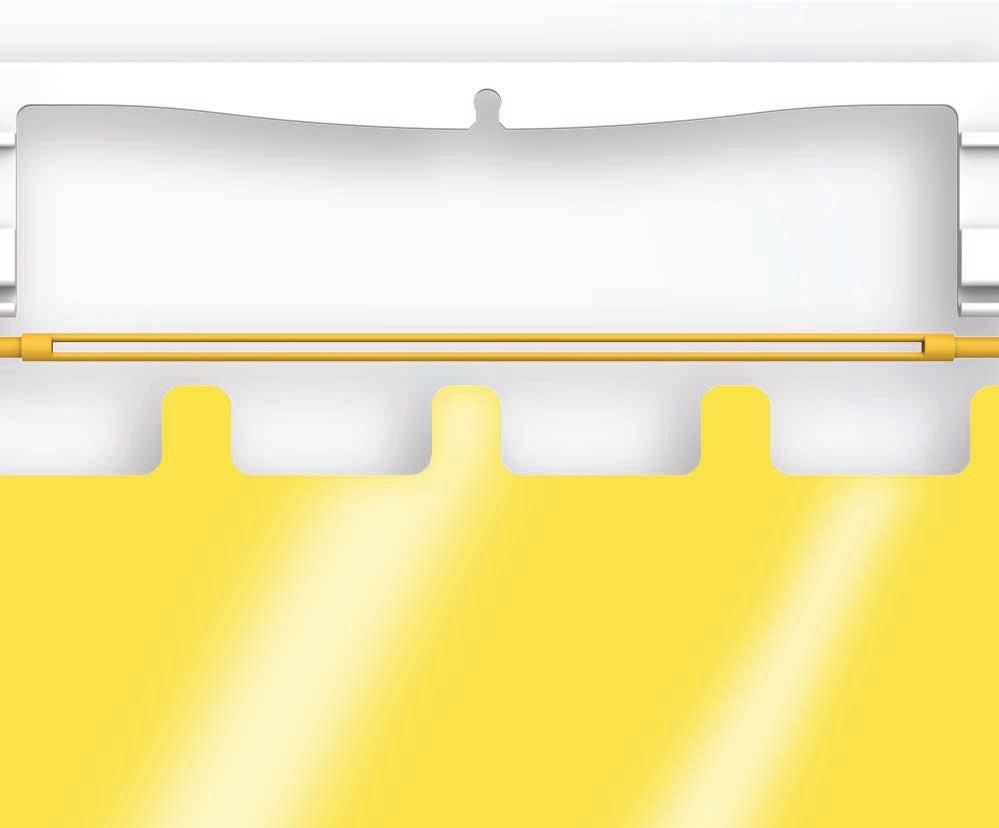
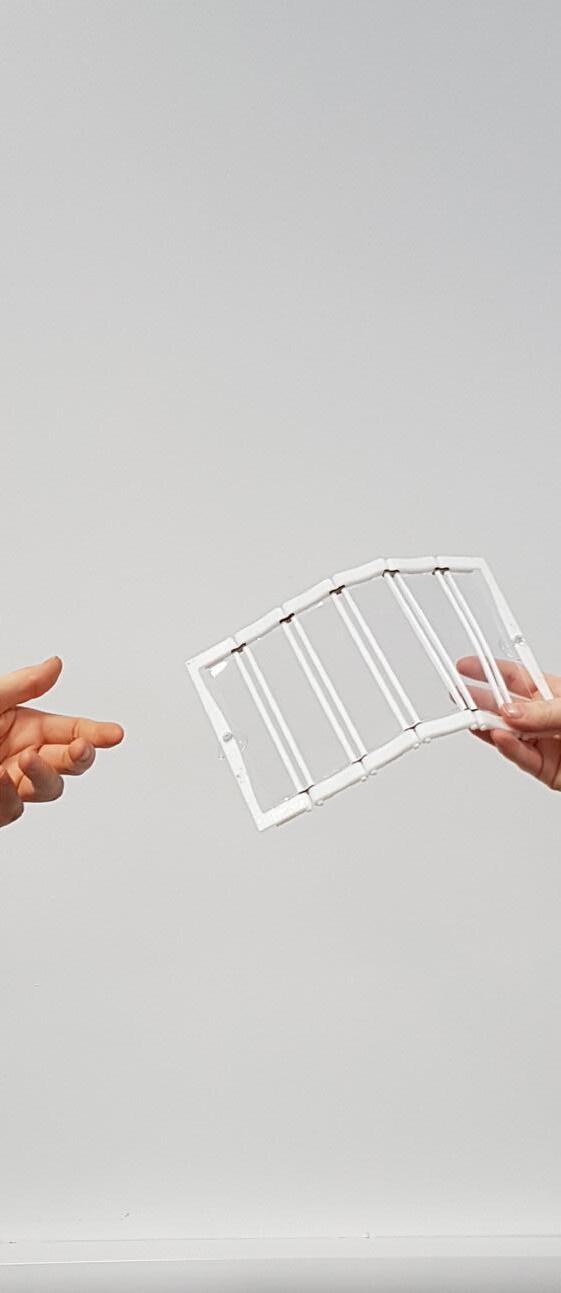
The shield folds up into a small, pocket-sized form, because when exiting the aircraft, you do not want to be rushing to pack things away. In the case of a water landing, the product would float which helps minimalise environmental impact. As hundreds of these would be on board, weight is kept low to save fuel.
The production is primarily extrusion. This is cheap and fast. Even with low production costs.
There is room for branding, to suit varied airlines, and a small pouch could house the product while in storage, which adds to the premium feel and branding.
The Outcome
The Aero:UV Sheild will help guard against UVA rays while maintaining visual contact with the aircraft exterior and with minimal disruption to the scenic views.
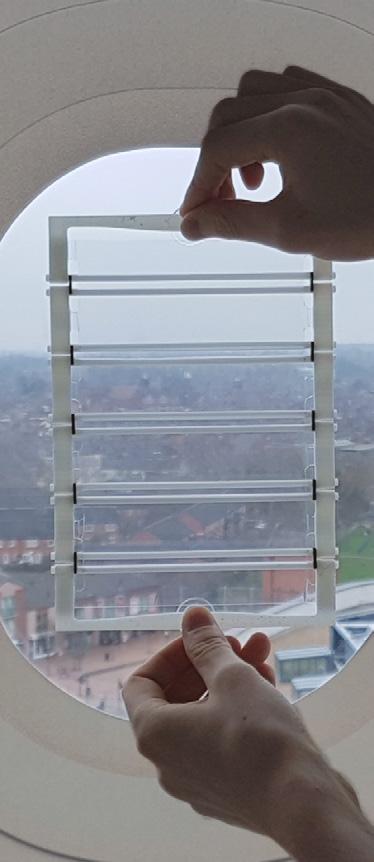
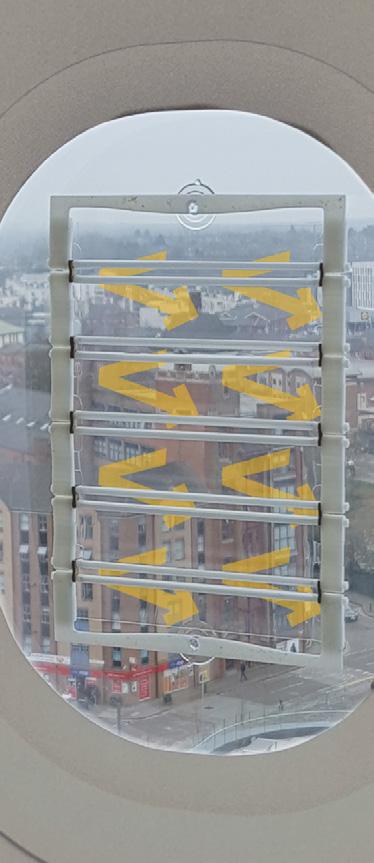
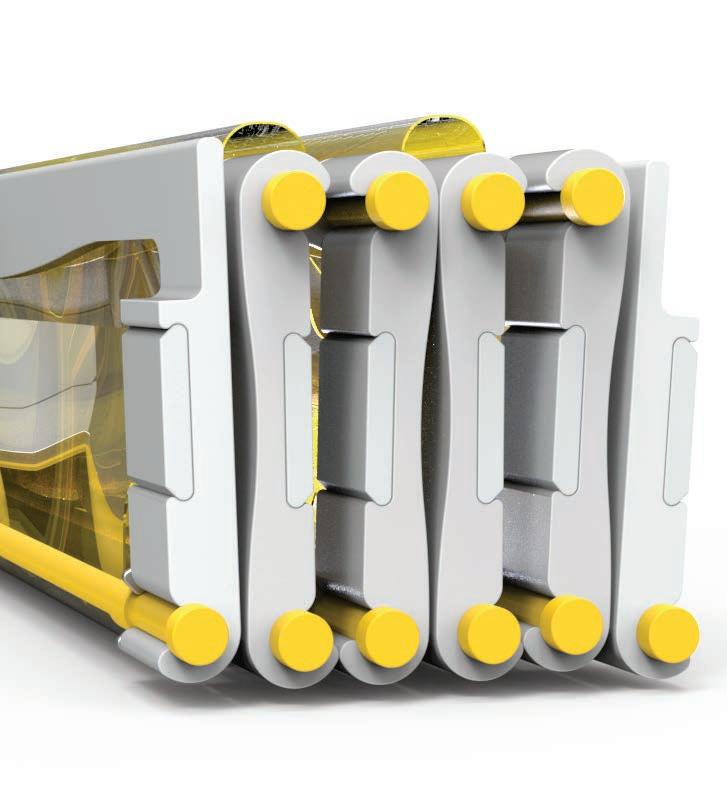
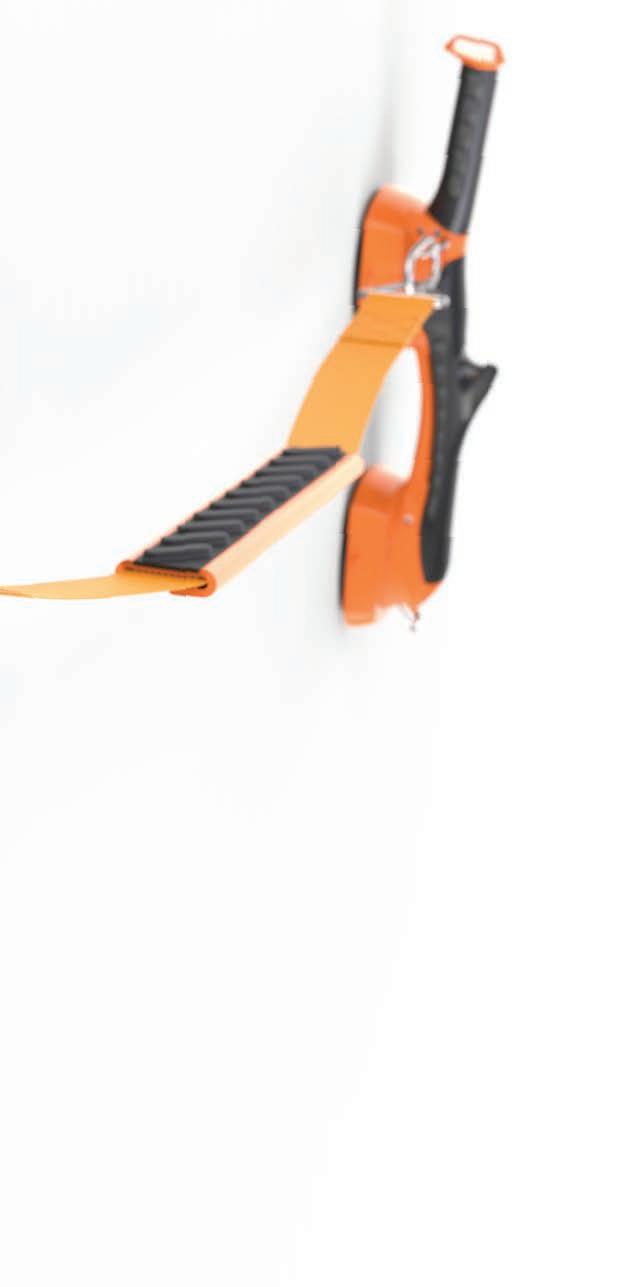
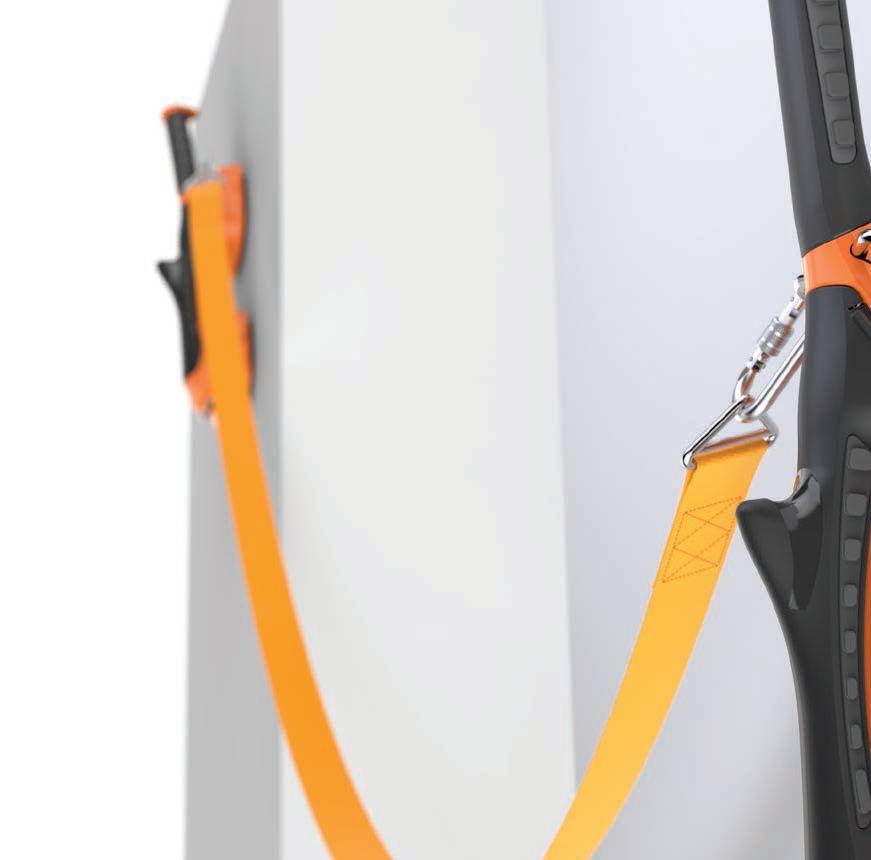
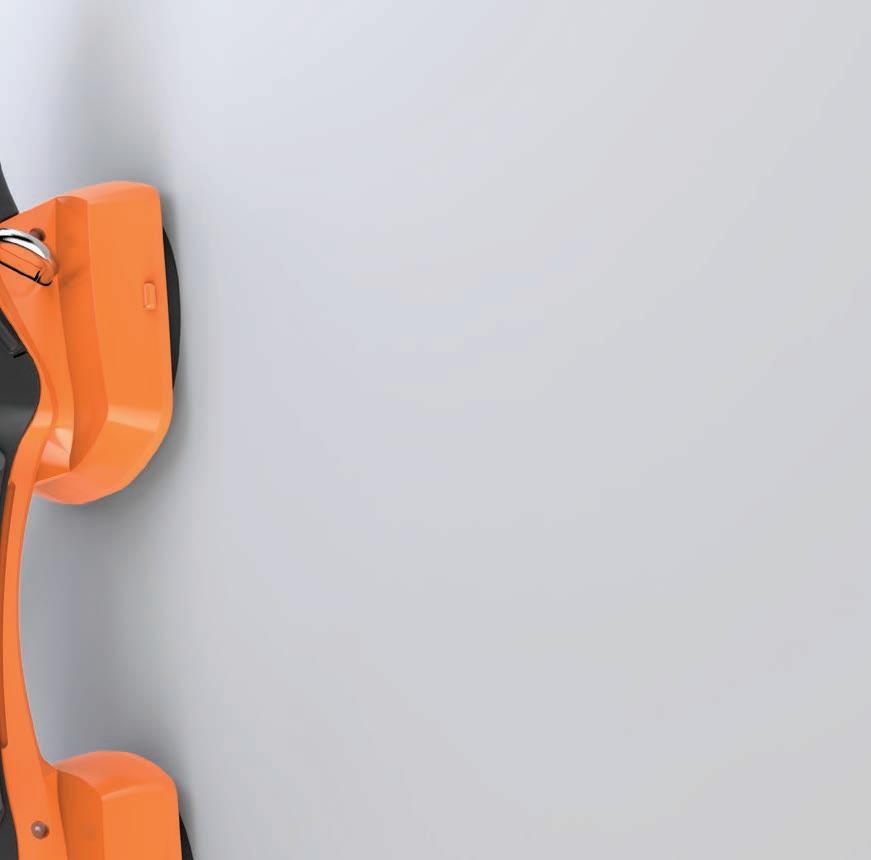
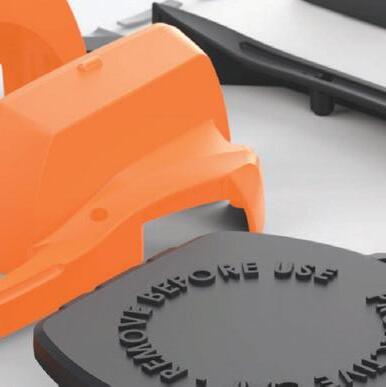
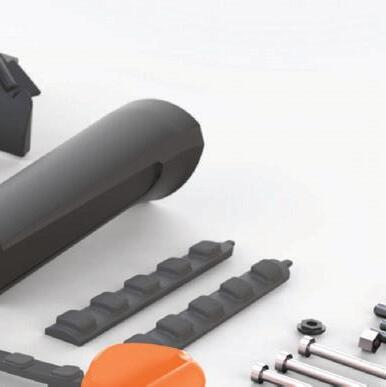
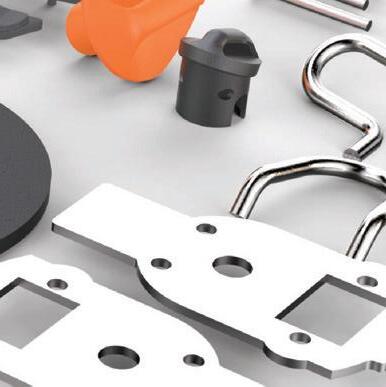
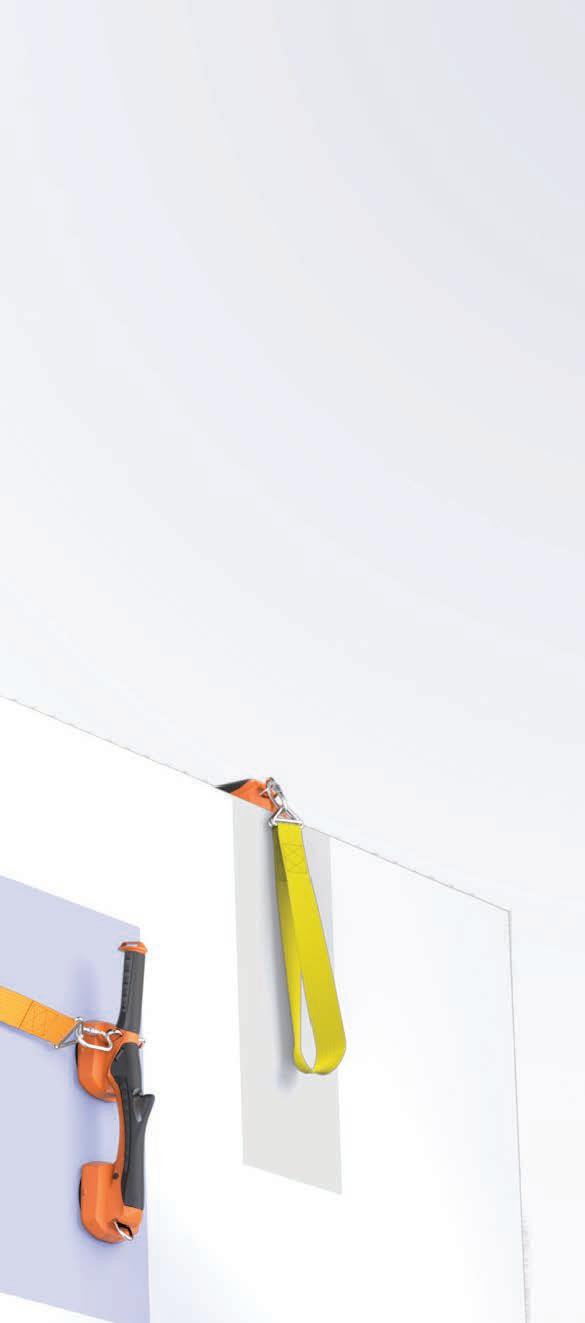
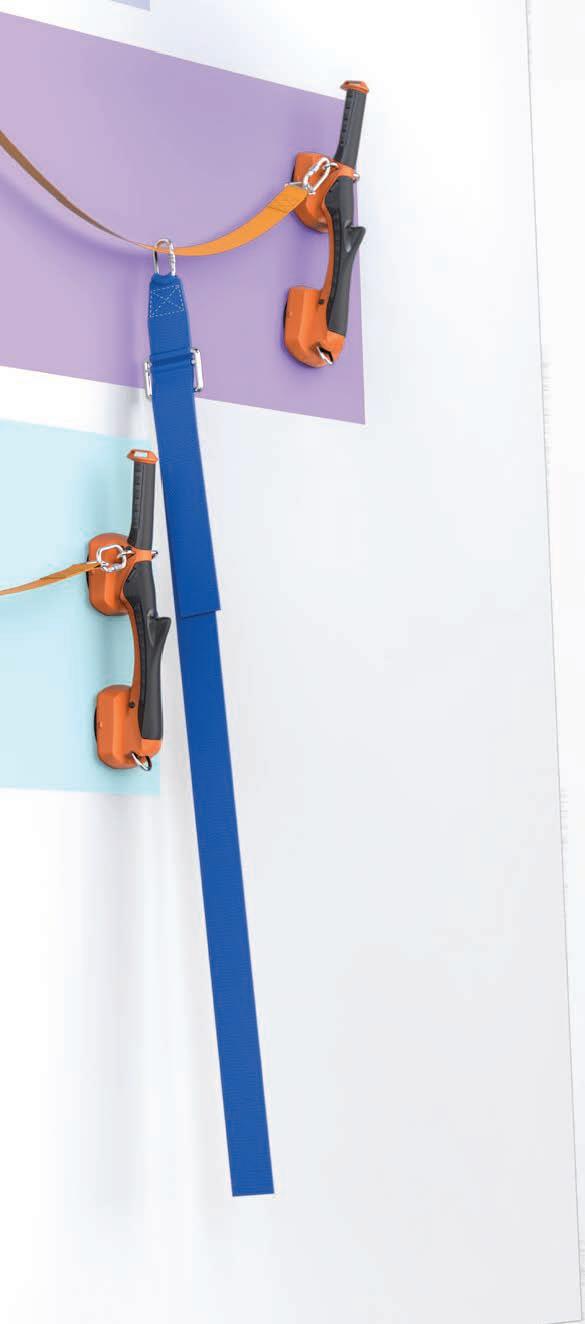
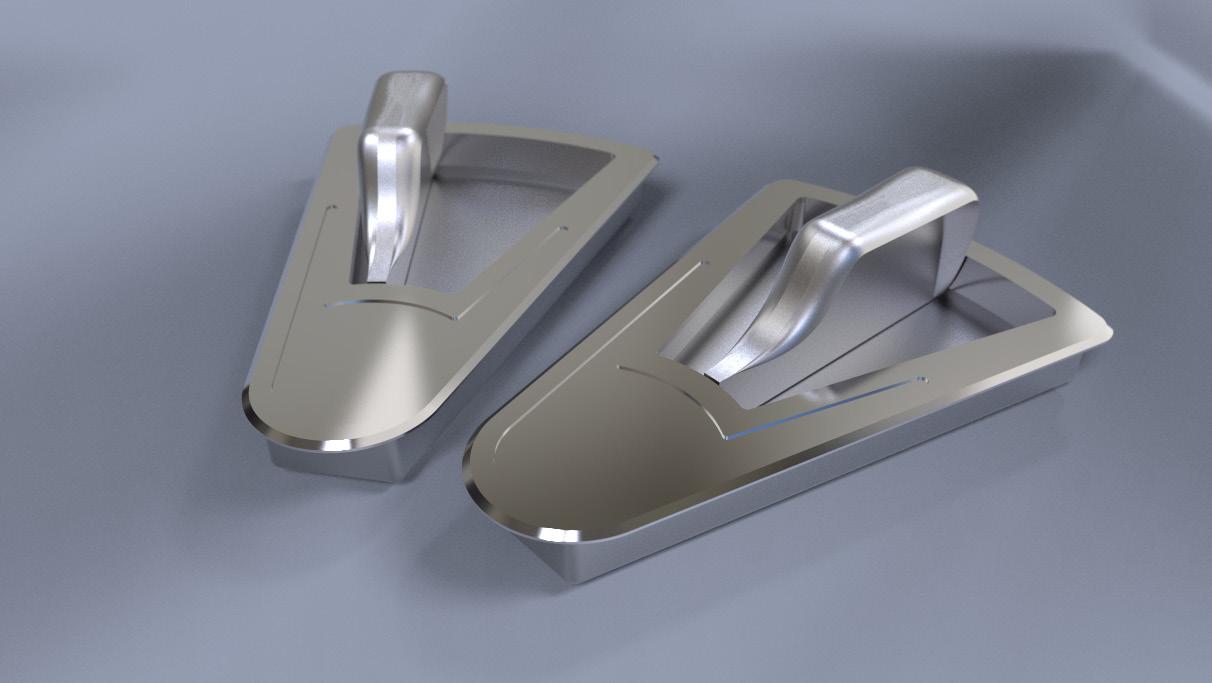
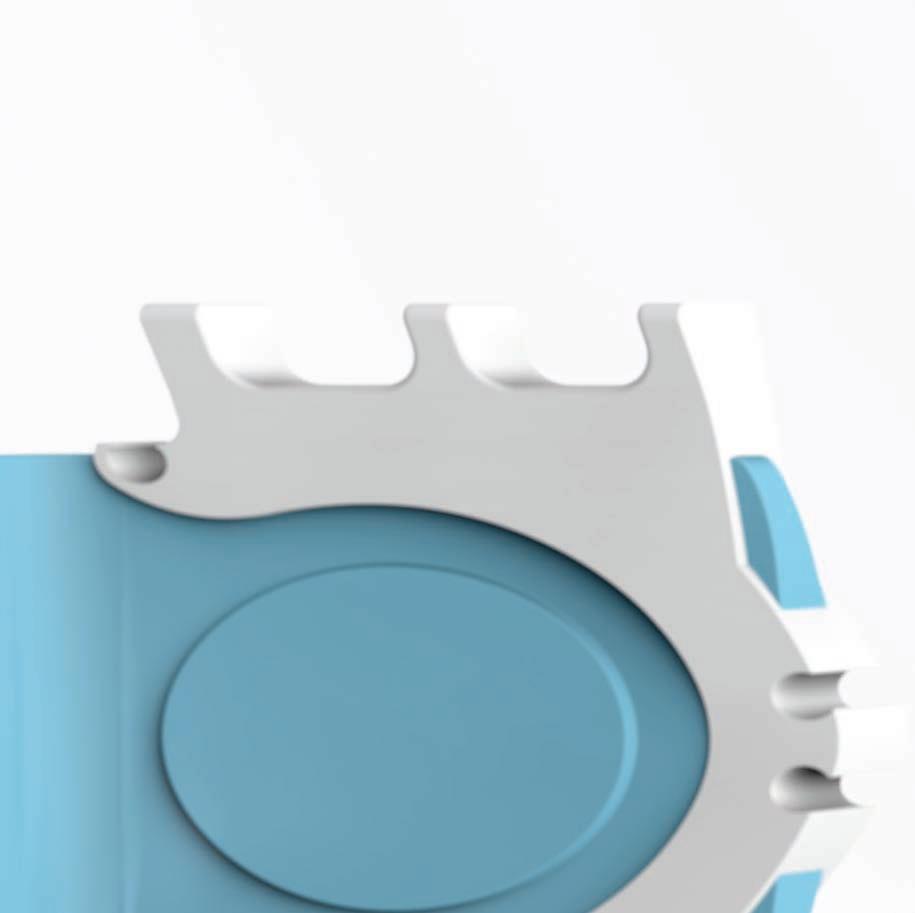
QD Anchor System
University major
Rescue response time is vital. Making the rescue task as efficient and as safe as possible for both the rescue crew and the victim is the priority. The quick deployment anchor point system will increase ease of rescue and safety while decreasing rescue time, while maintaining a costeffective design.
Design need
Increase purchase on cars during rescues
Technologies
Injection moulding
Project futures
Suction indication, increased buoyancy, additional pads, expansion in market sectors
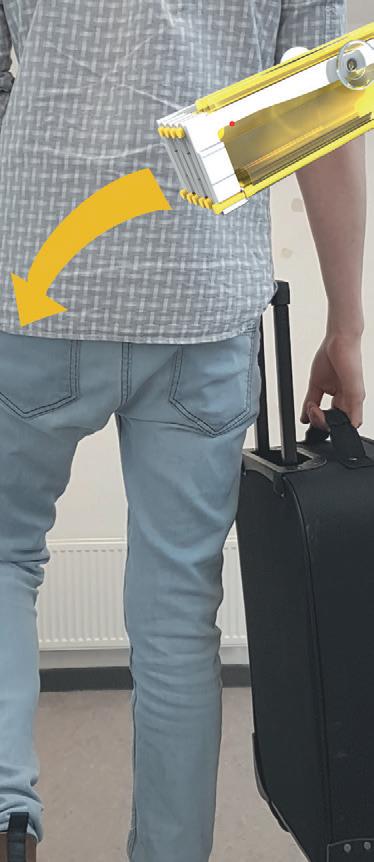
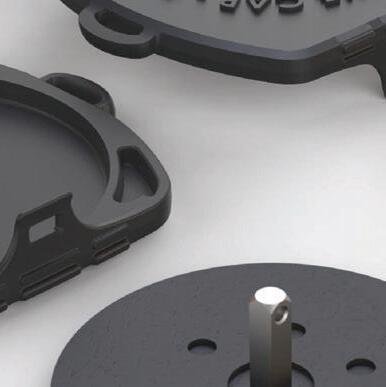
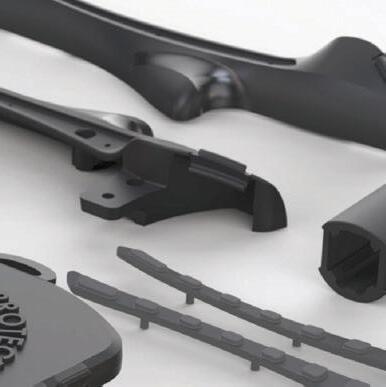
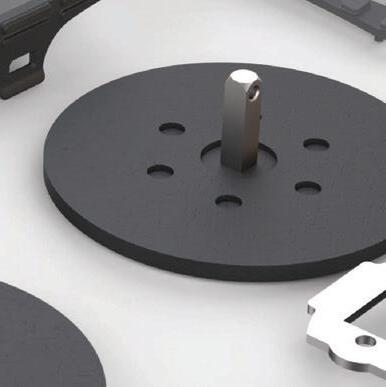
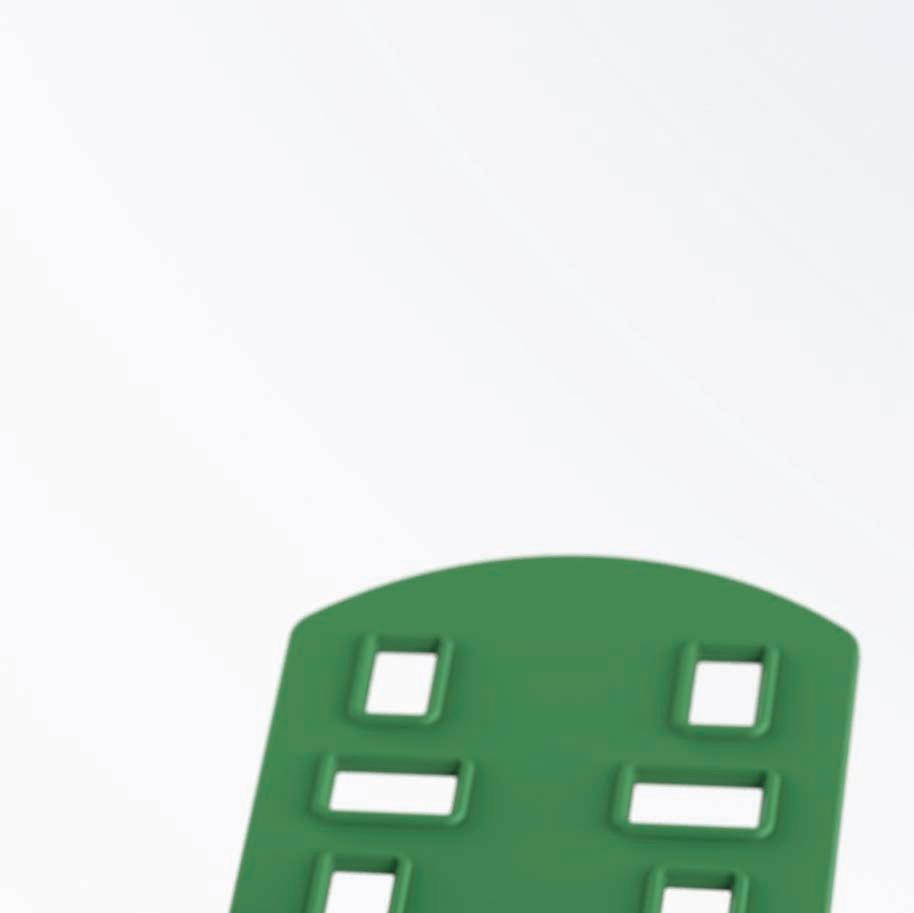
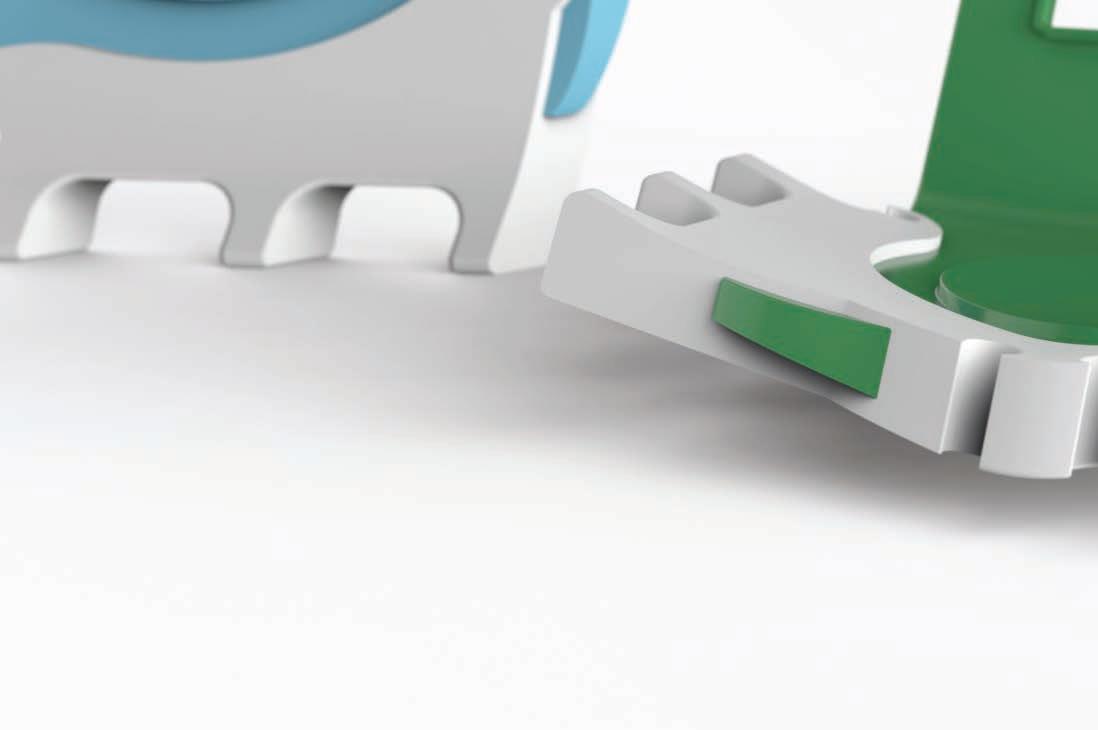
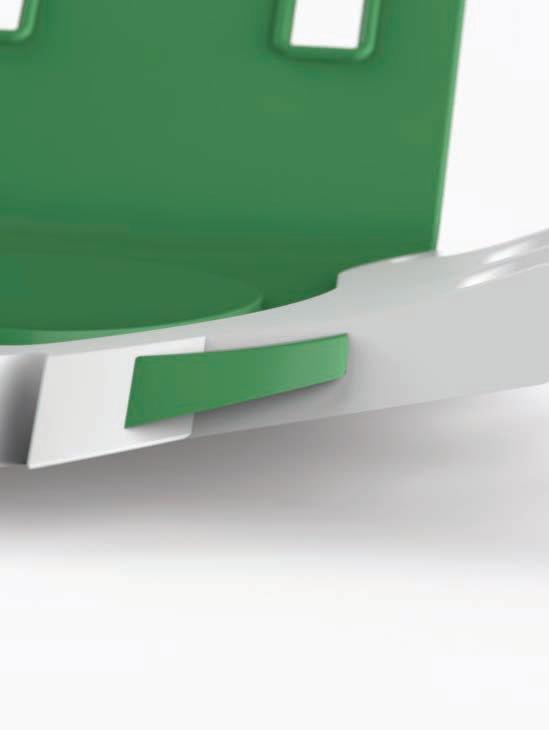
Quick Deployment Anchor System
Majoring in rescue and recovery equipment, BSI standards and testing was key.
Through all the work and research, the result was a versatile anchor system which provided various modes, such as:
•Anchor
•Step
•Handle
•Belay tether
•Zipline system
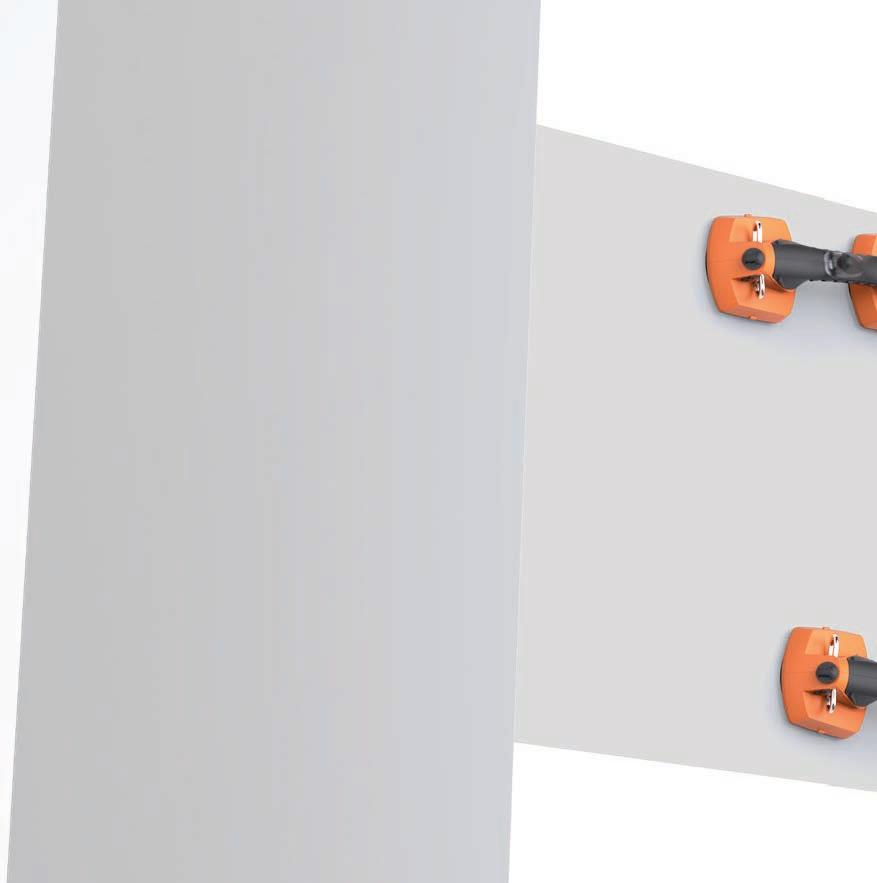
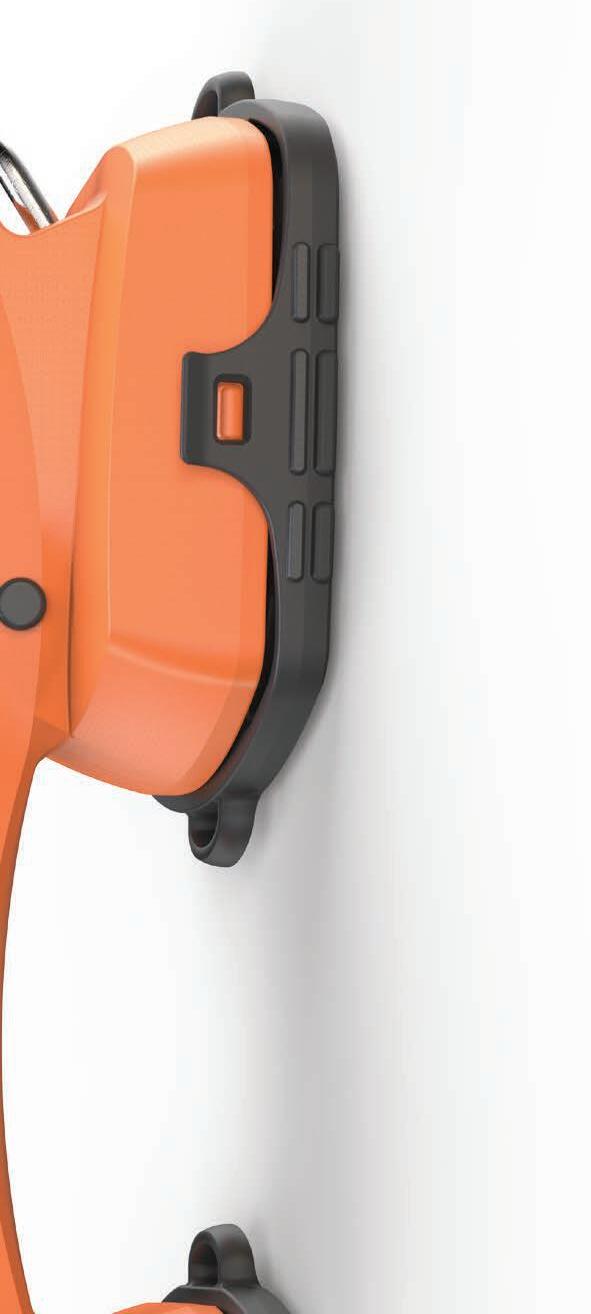
By creating a versatile anchor and strap system via the use of suction cups, those involved can gain additional purchase and tether points in tricky situations.
Mechanical Thinking
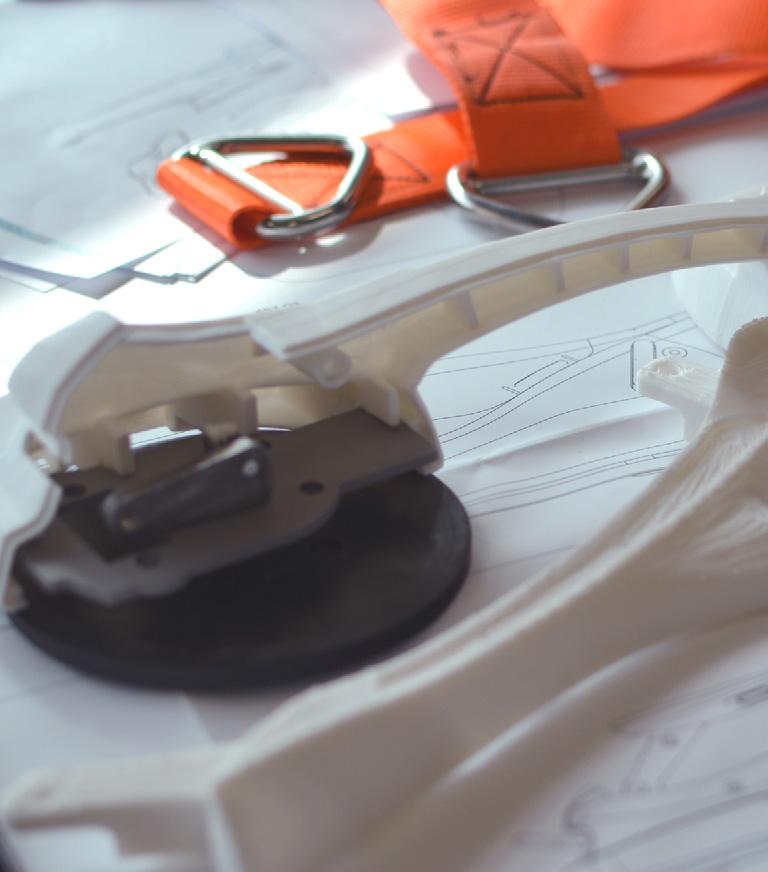
Iterative design process through RP and hand modelling refined the mechanisms, to get them to work as required.
Design for manufacture was a strong driver for me, wanting to create fully mouldable components. Using tools like Protolabs and Solidworks Mould Flow aided my progression and understanding.
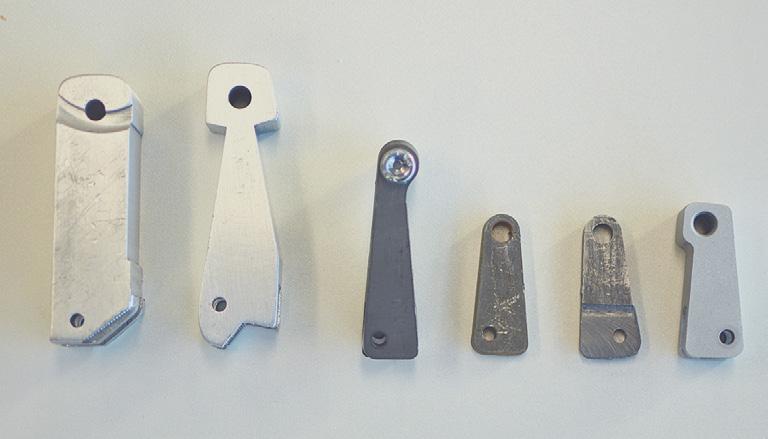
Minimal component count reduces product cost and assembly time. As the target market sector relied on equipment costs being low, this too had to be as cost effective as posible without reducing performance. A total of 38 parts were needed to build a QD Anchor System unit.
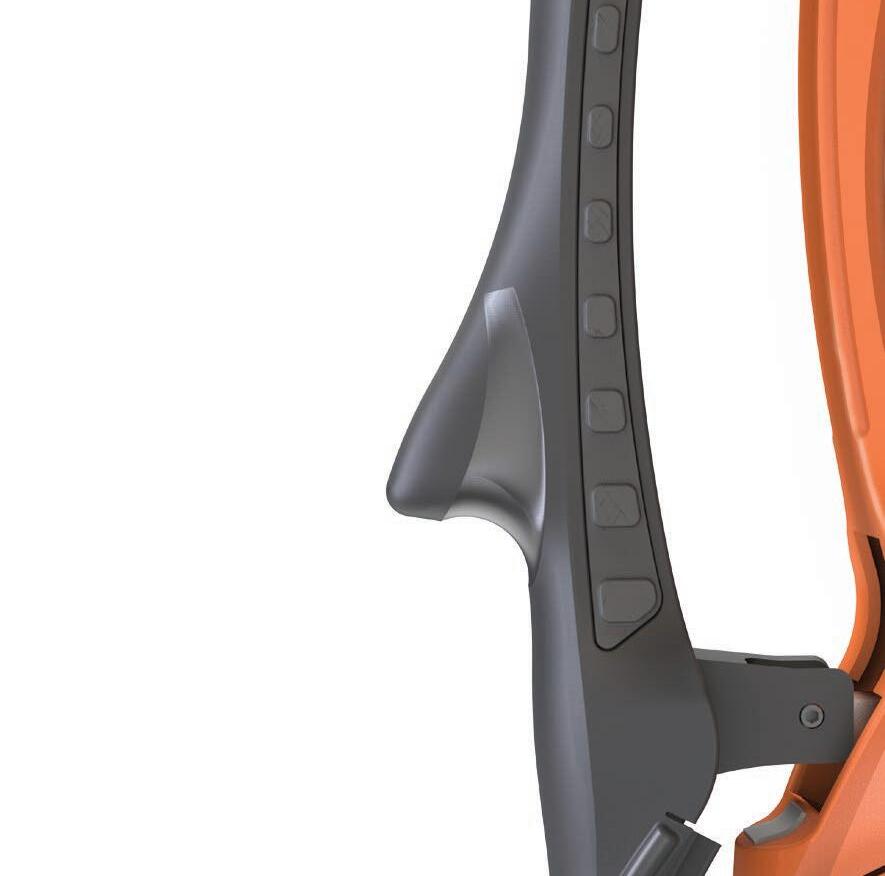
Tether points are joined to a metal base plate. These plates are the core of the product, acting as the cam plate, and tether point anchors. Two casings encase the two plates to secure their position. The removable extended handle allows for increased grip. This can be removed and capped off for a lighter and small unit.
Designing For The User
A main part to a product’s success is the user experience. Using this as a project driver from the start made sure the relationship between the user and the product worked.
Much of the prototyping stage was not only about the mechanisms and load testing, but about the user. Various aspects and features point back to the need for the anchor to be quick to deploy, portable, and easy to use for all.
Thinking about each part of the product, and aiming it to have a purpose to benefit the functionality and aid the user.
Deployment
Hours
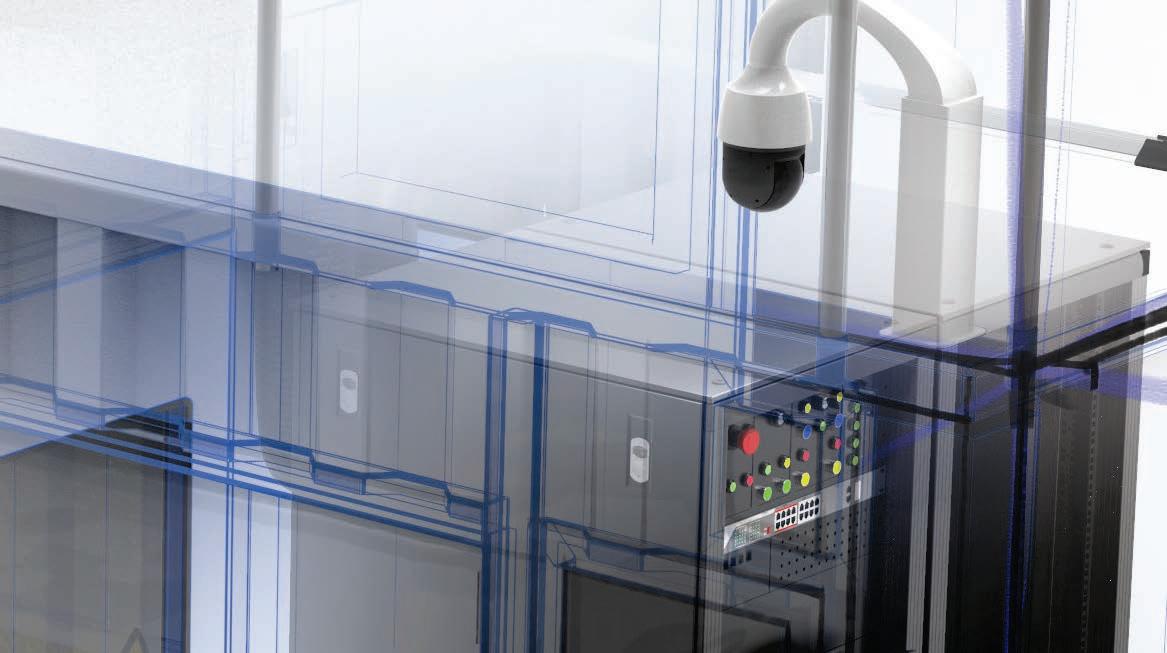
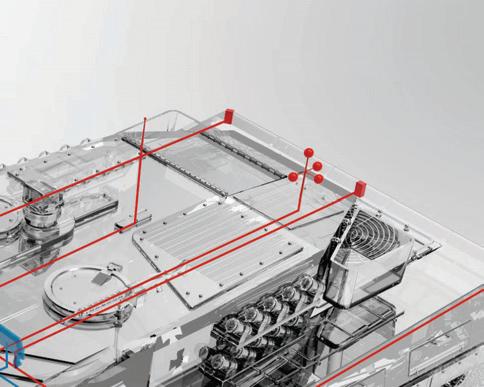
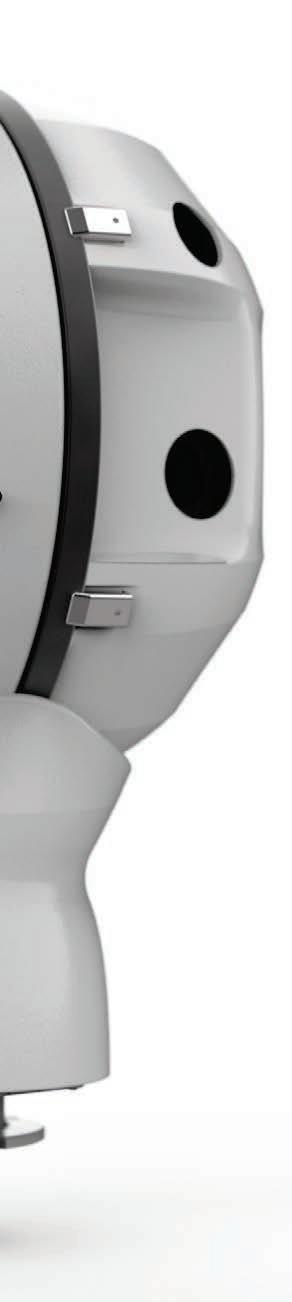
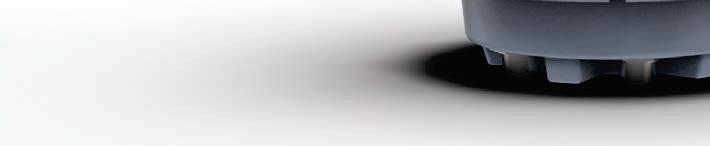
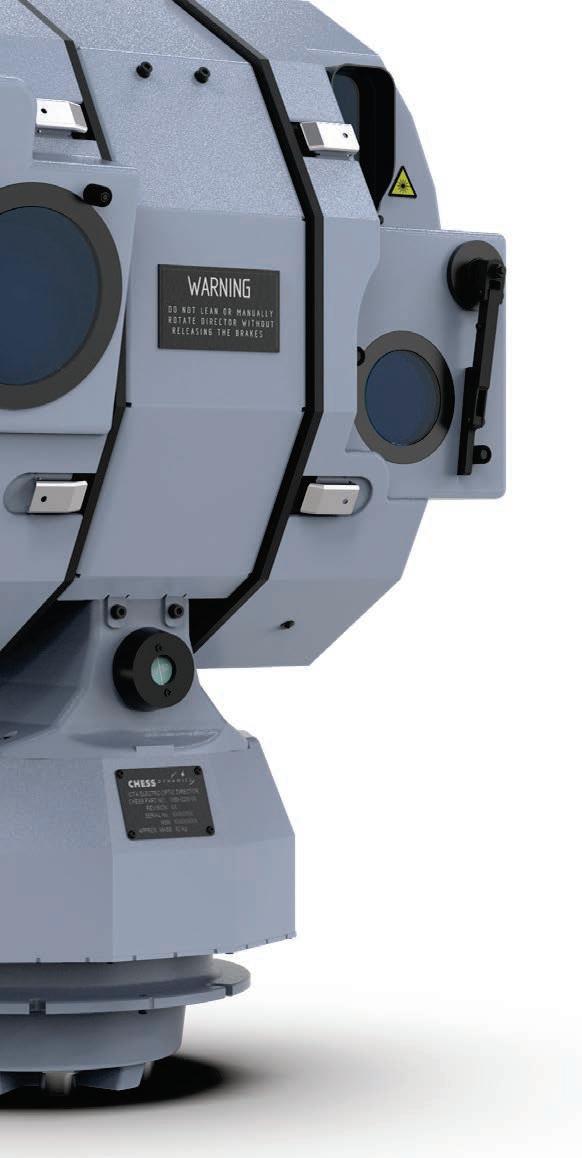
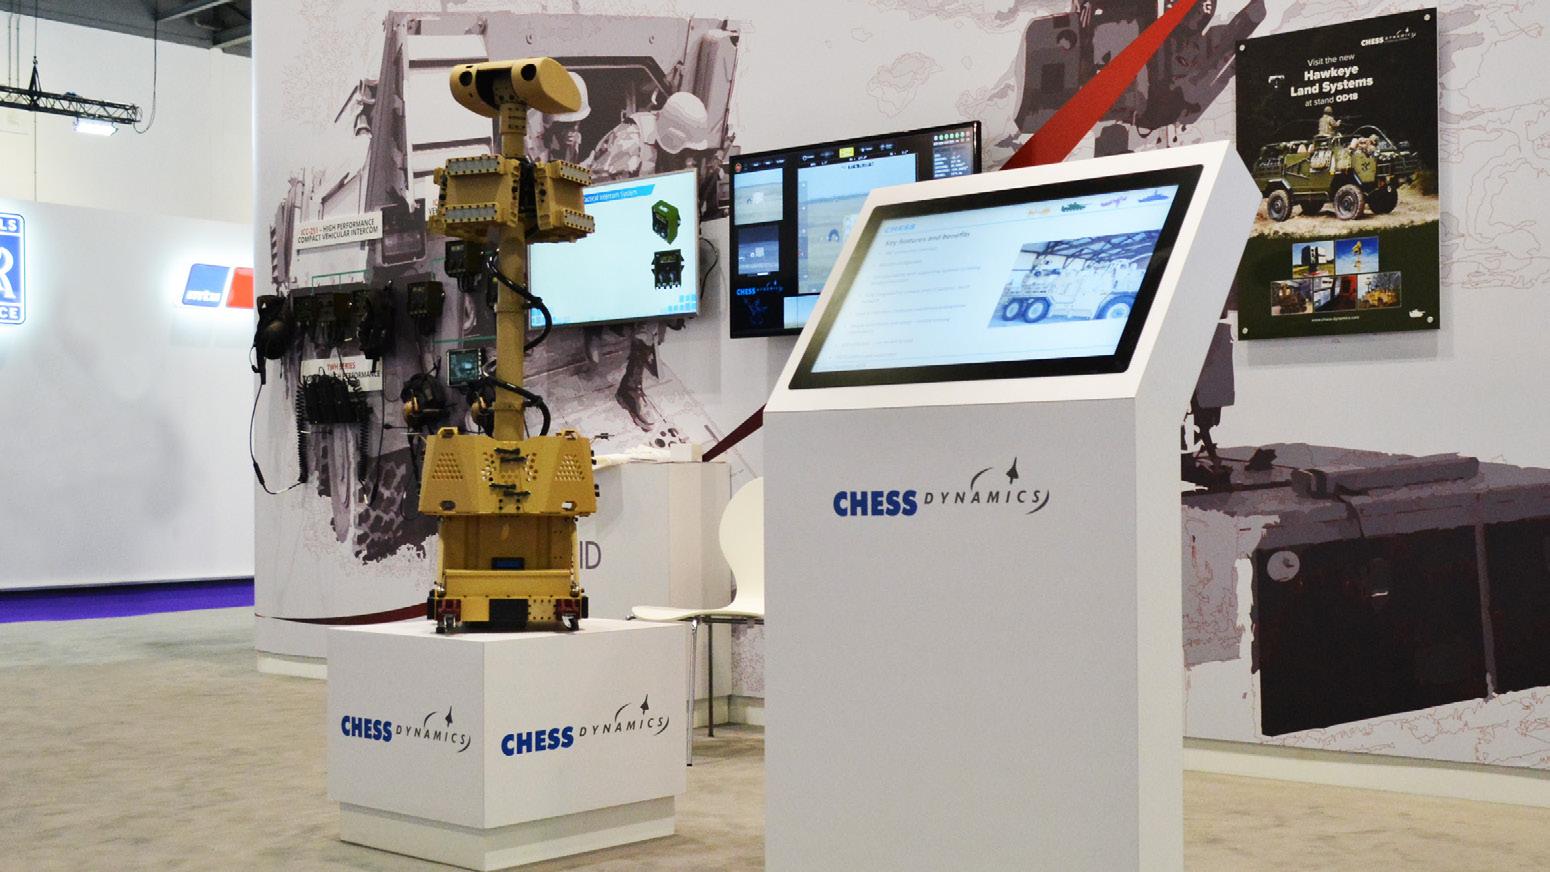
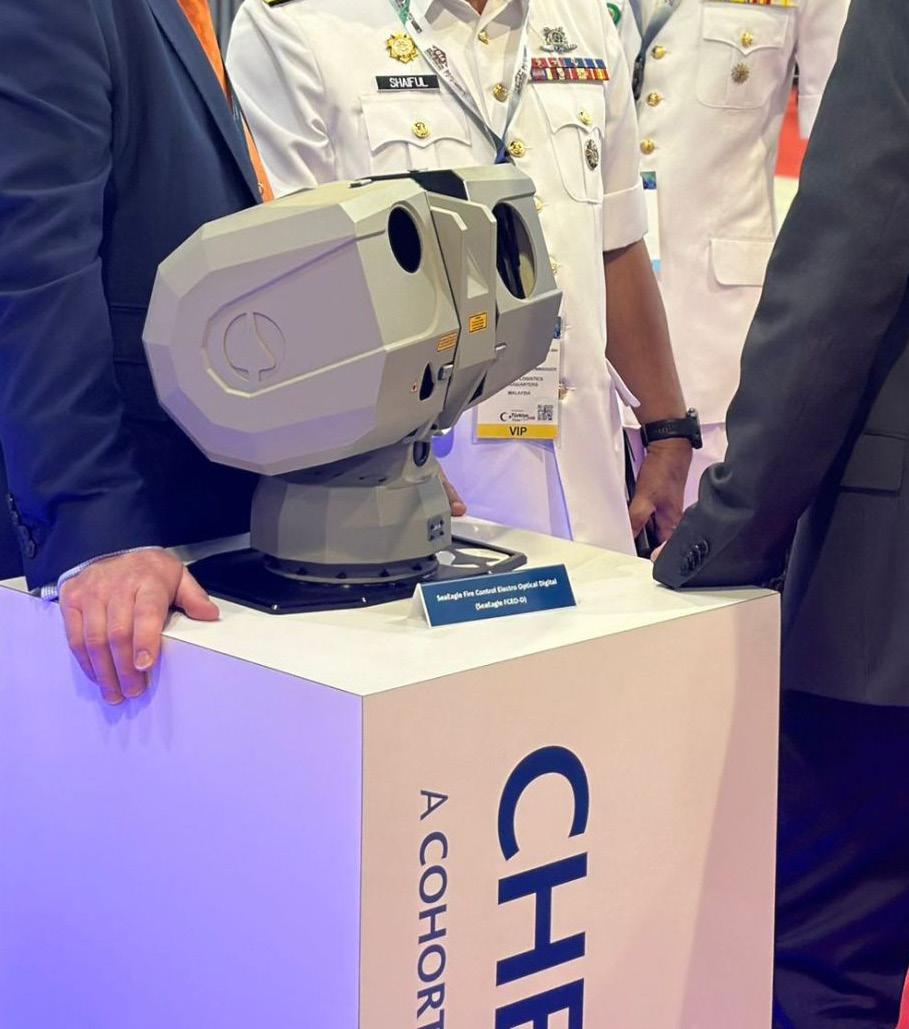
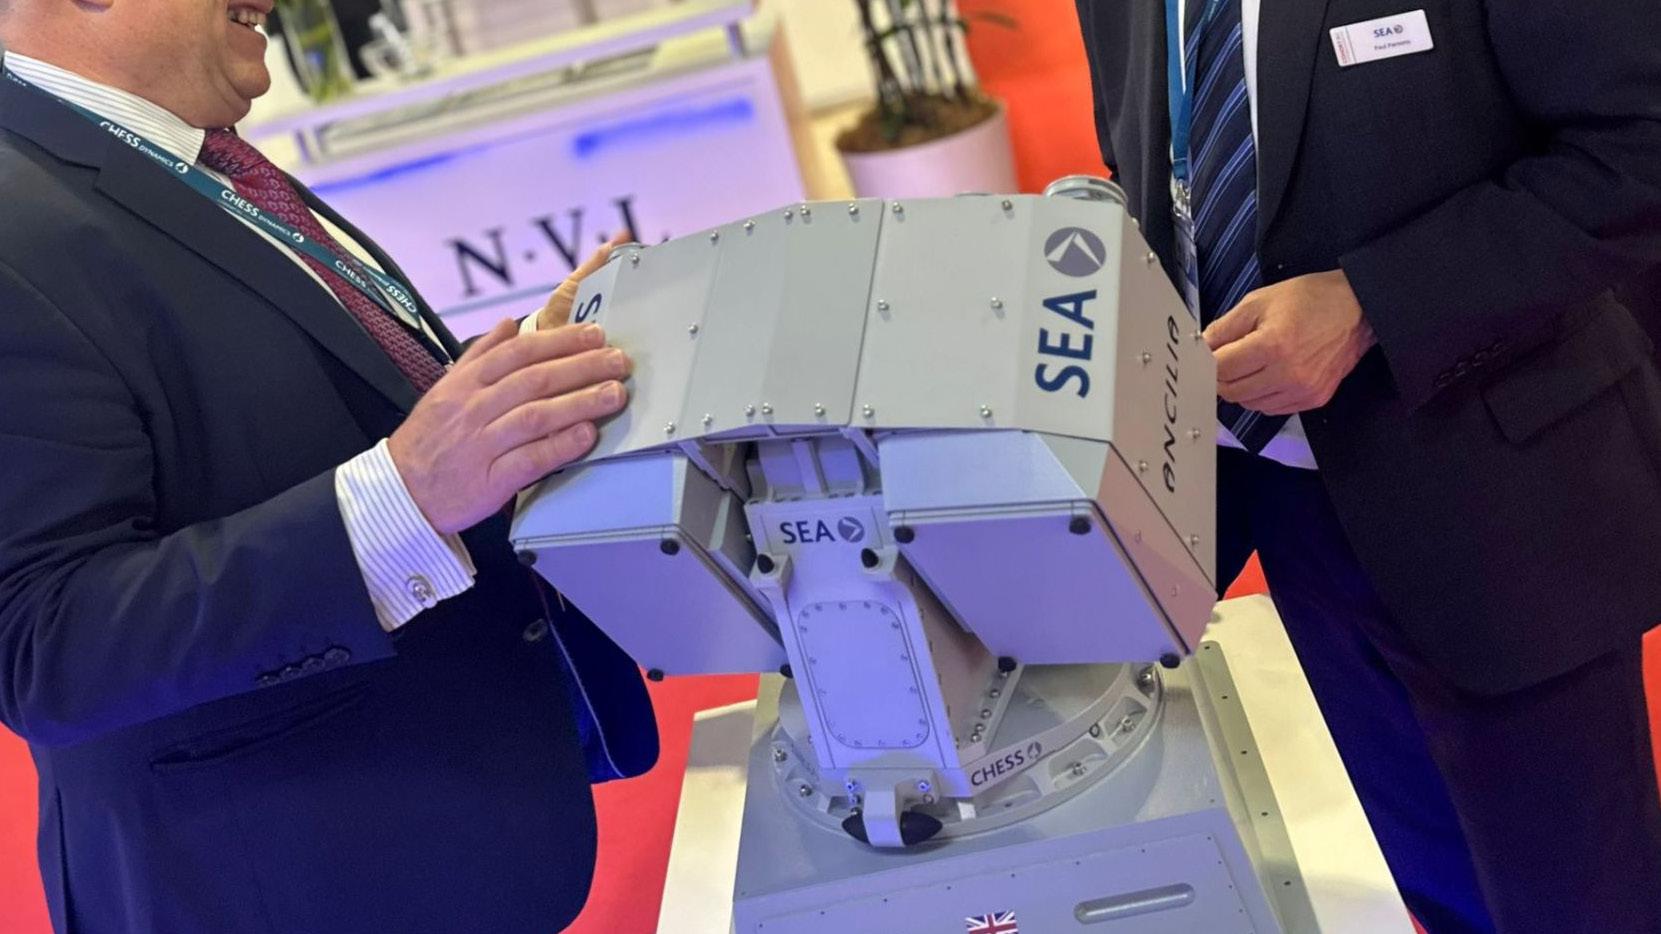
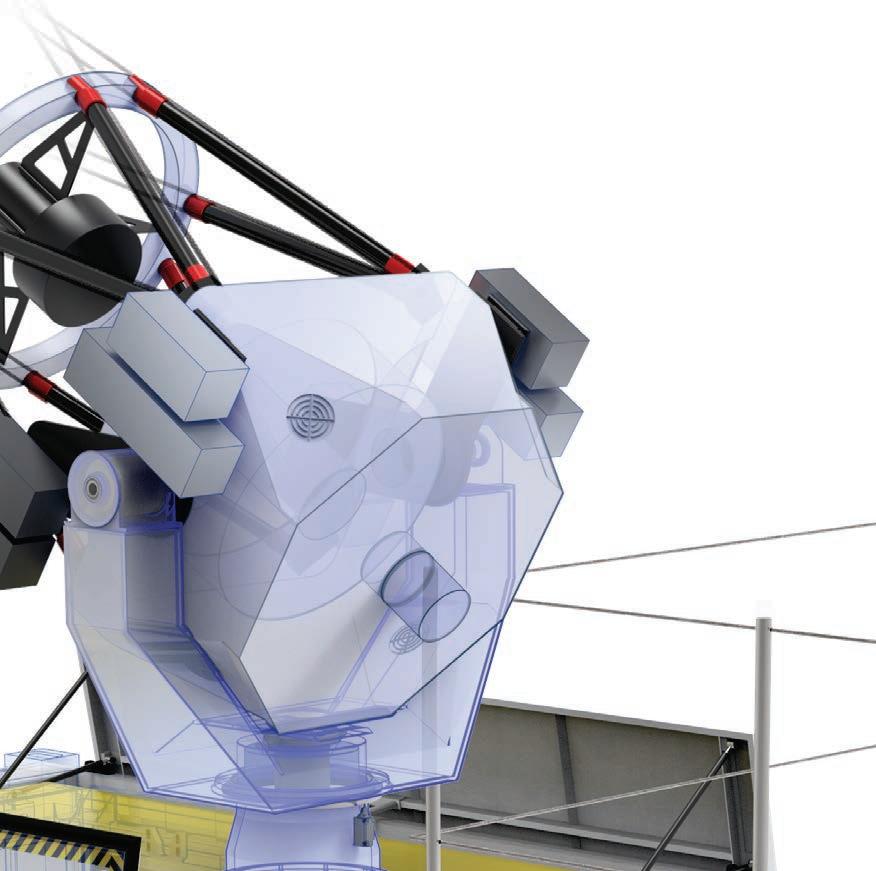
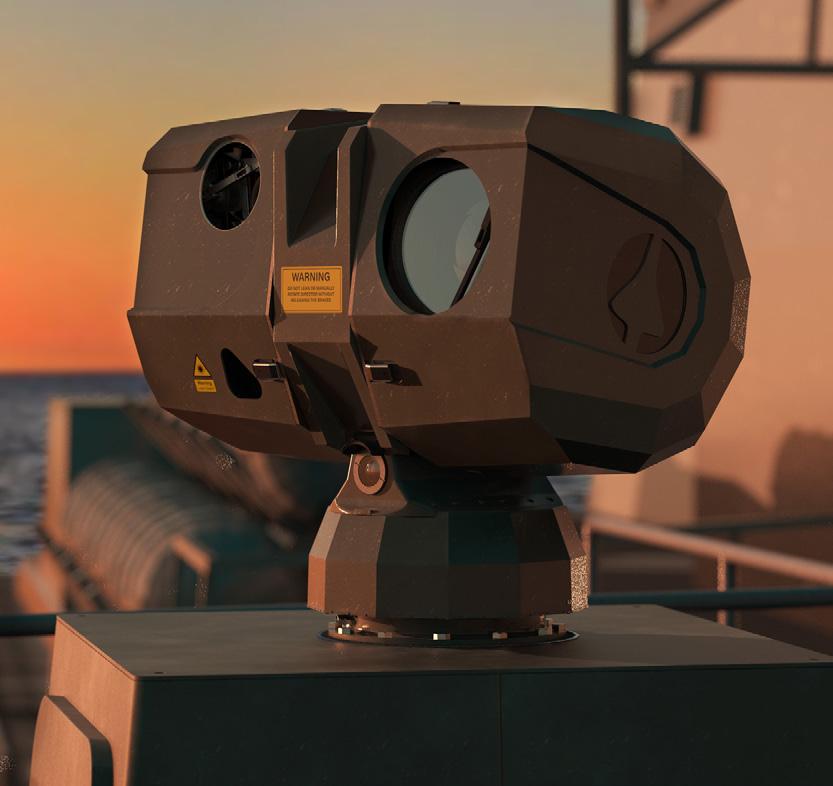
Chess Dynamics
Chess Dynamics
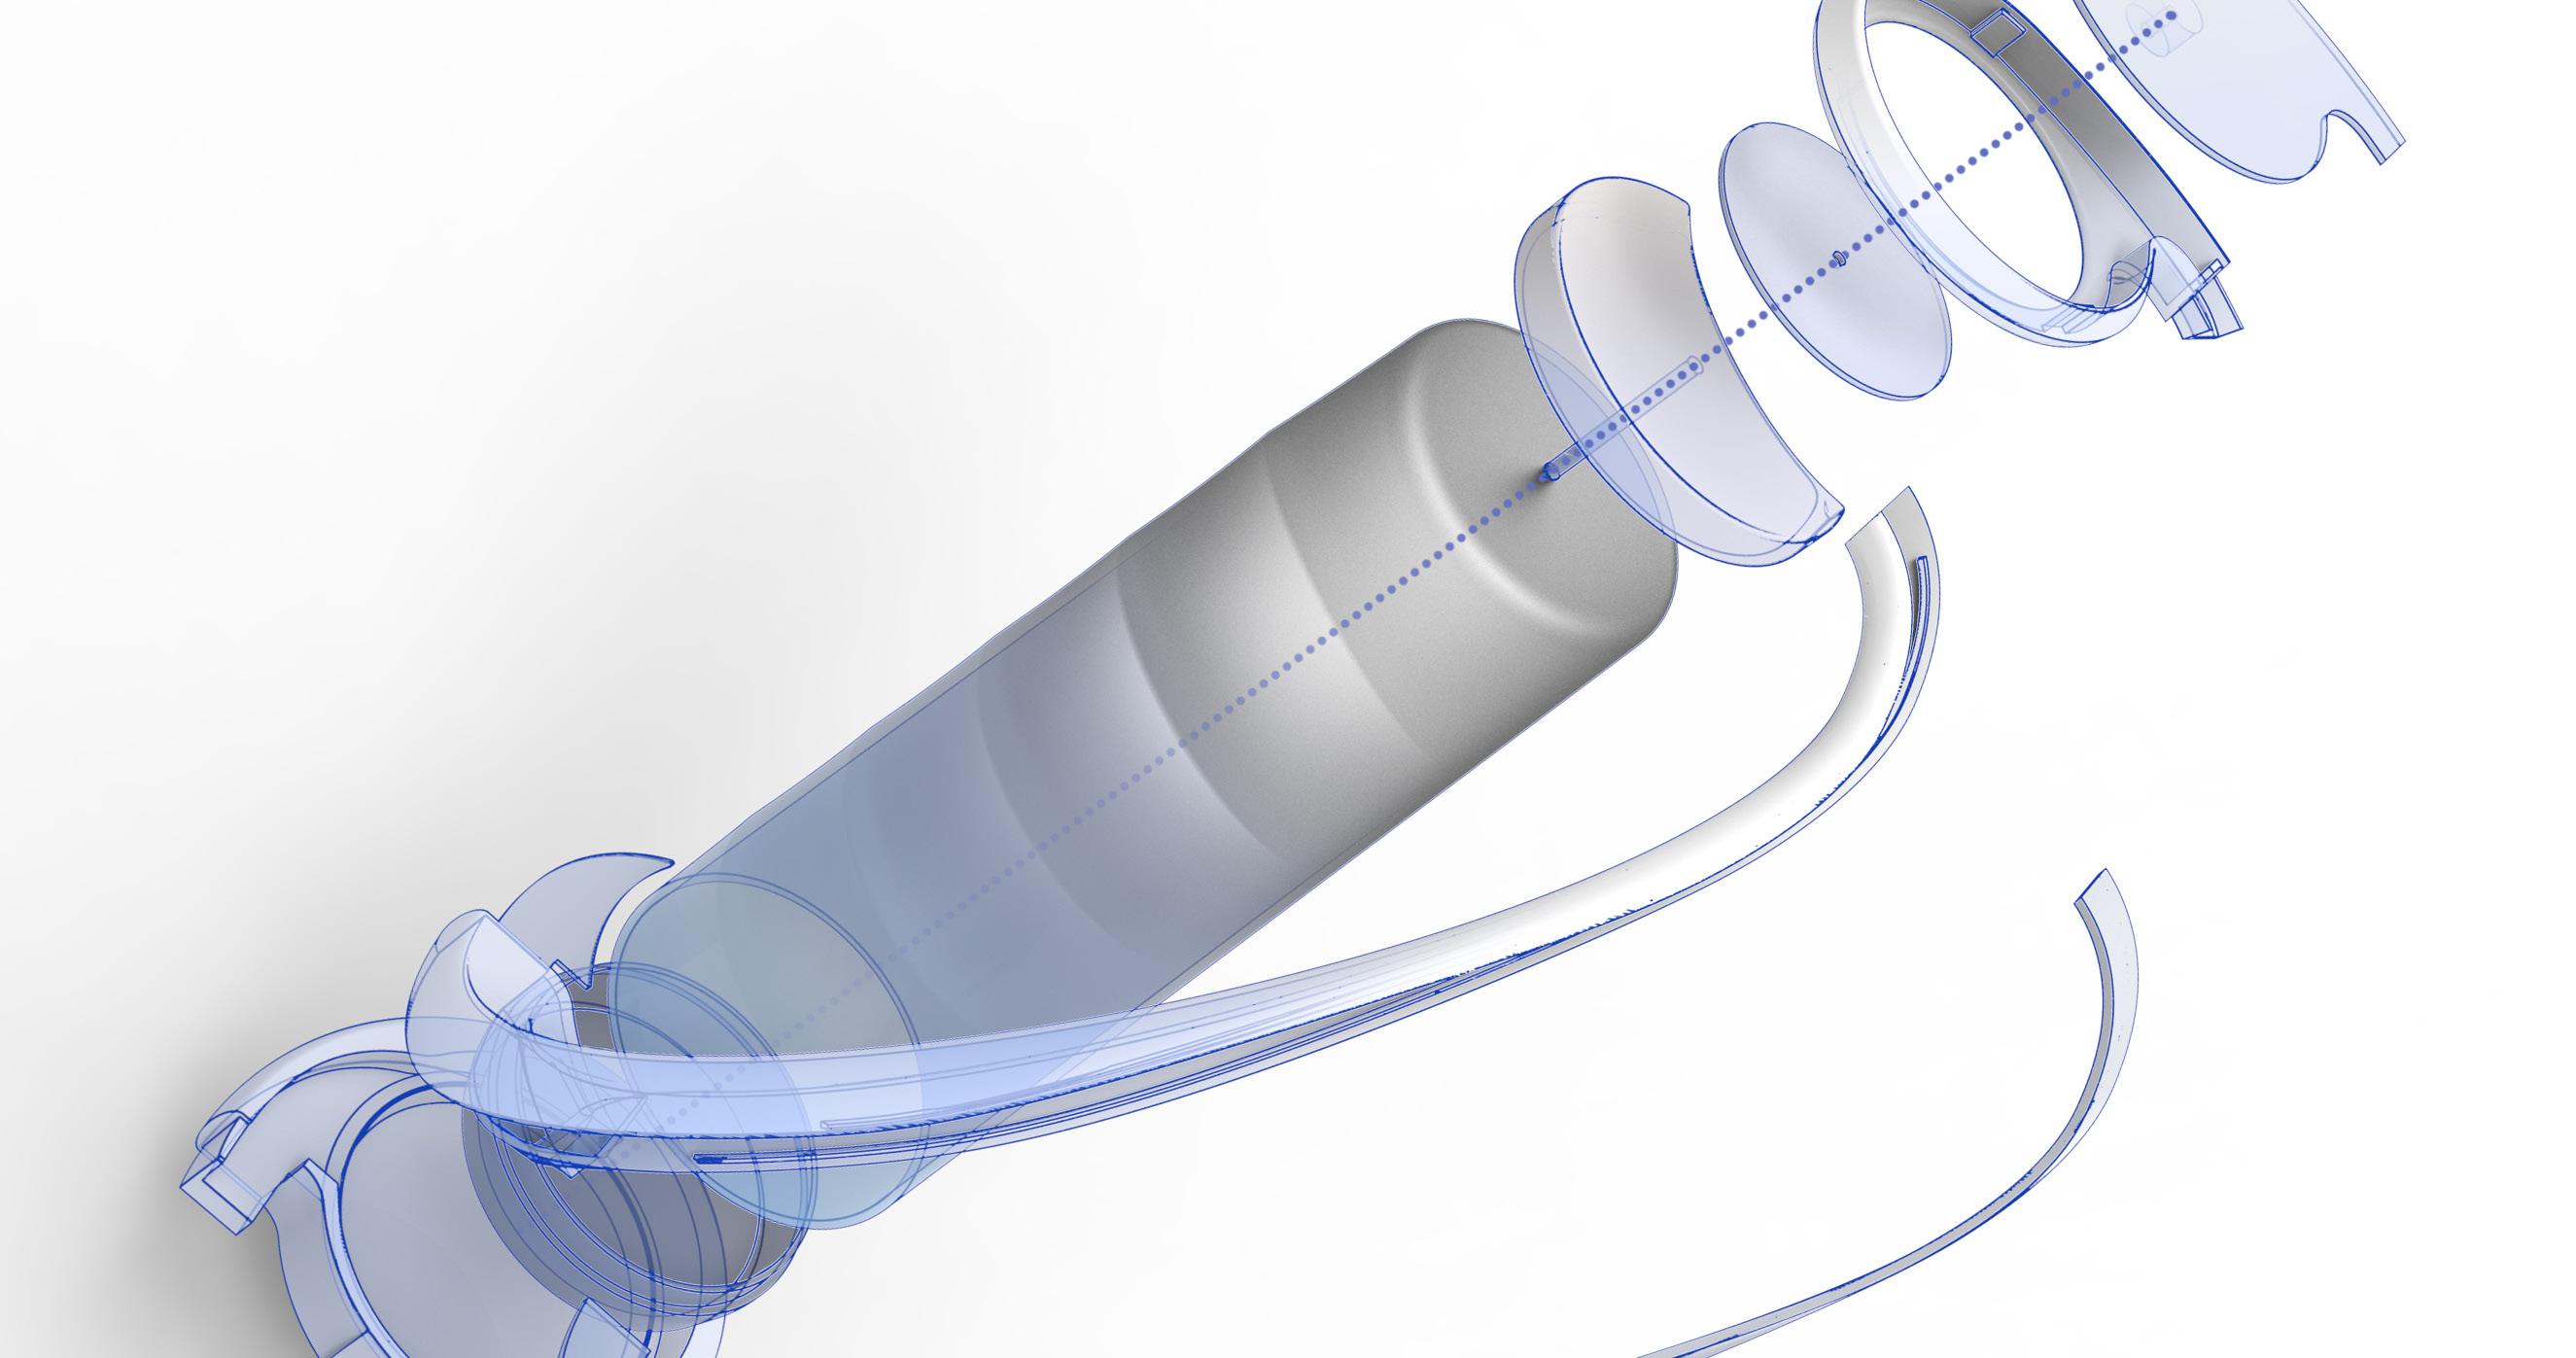
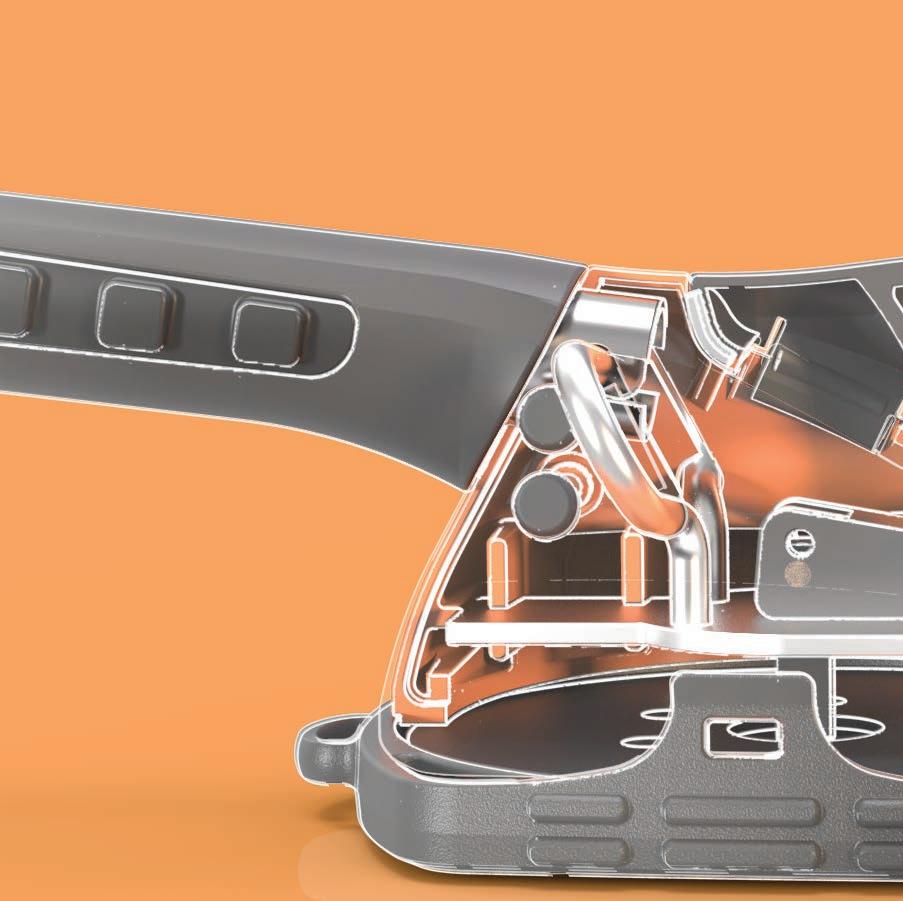
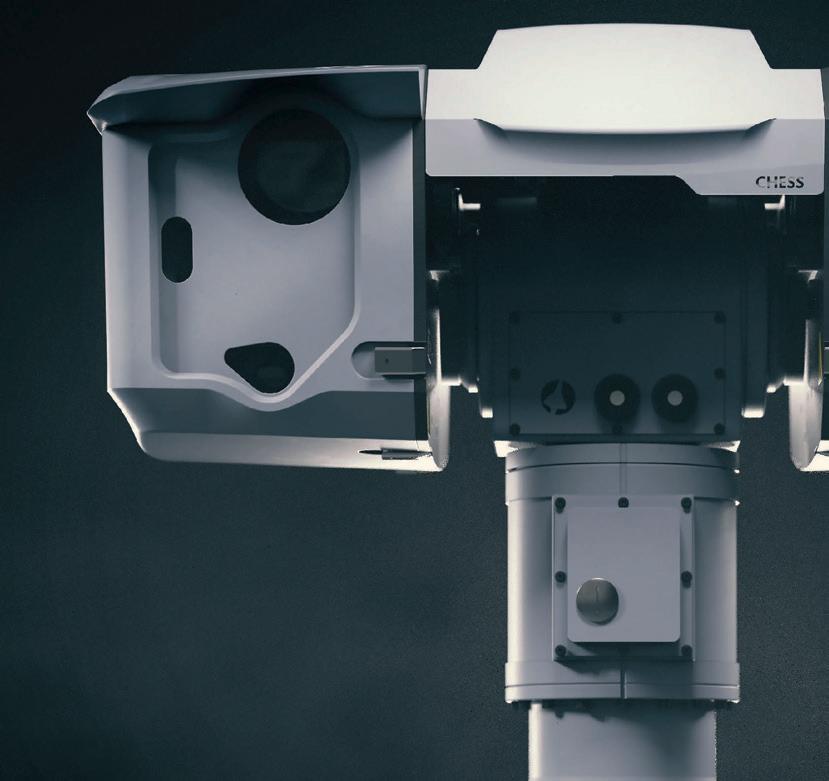
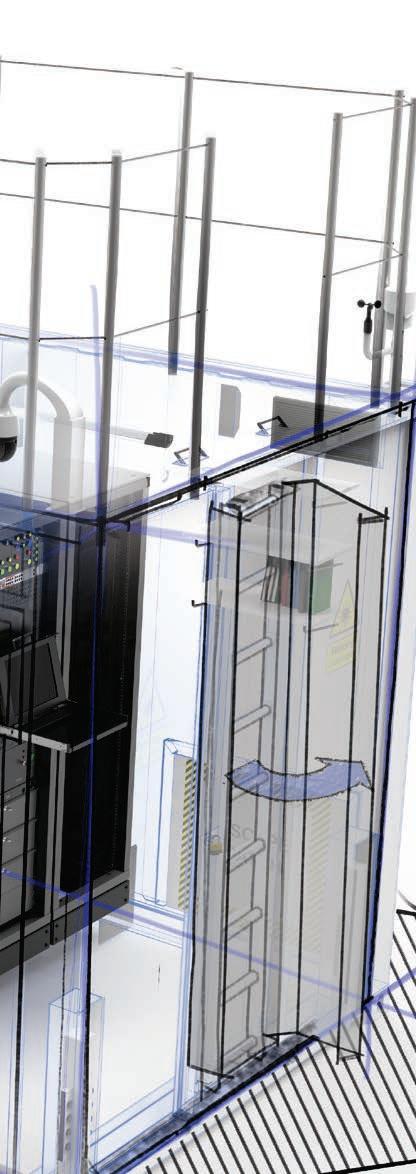
In my role as the Product Design Engineer, part of my responsibility was to get new projects off the ground via concept generation, CAD, artistic renders and animations, and scale models. These would enable a new client to understand our solution. This content would assist the Sales team and Engineering team when the system moved forward from the concept stage. My mechanical skills were built up to the point where I was creating a system concept with a fair number of considerations of the end goal.
(Right) Applying my Solidworks surfacing skills to modernise the look and improve the appearance of system to match the customer brief and specifications.
Chess Dynamics specialise in precision stabilised and nonstabilised multi-axis platforms; fire control directors and positioners for electro-optic; radar, communication, security, surveillance and targeting systems.
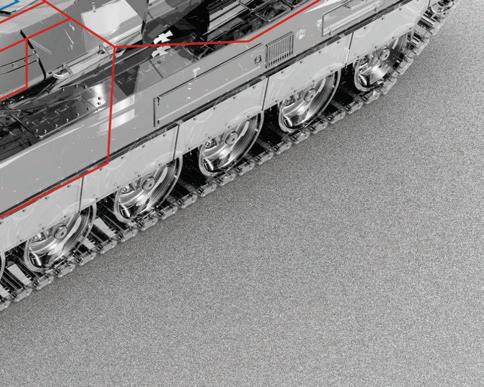
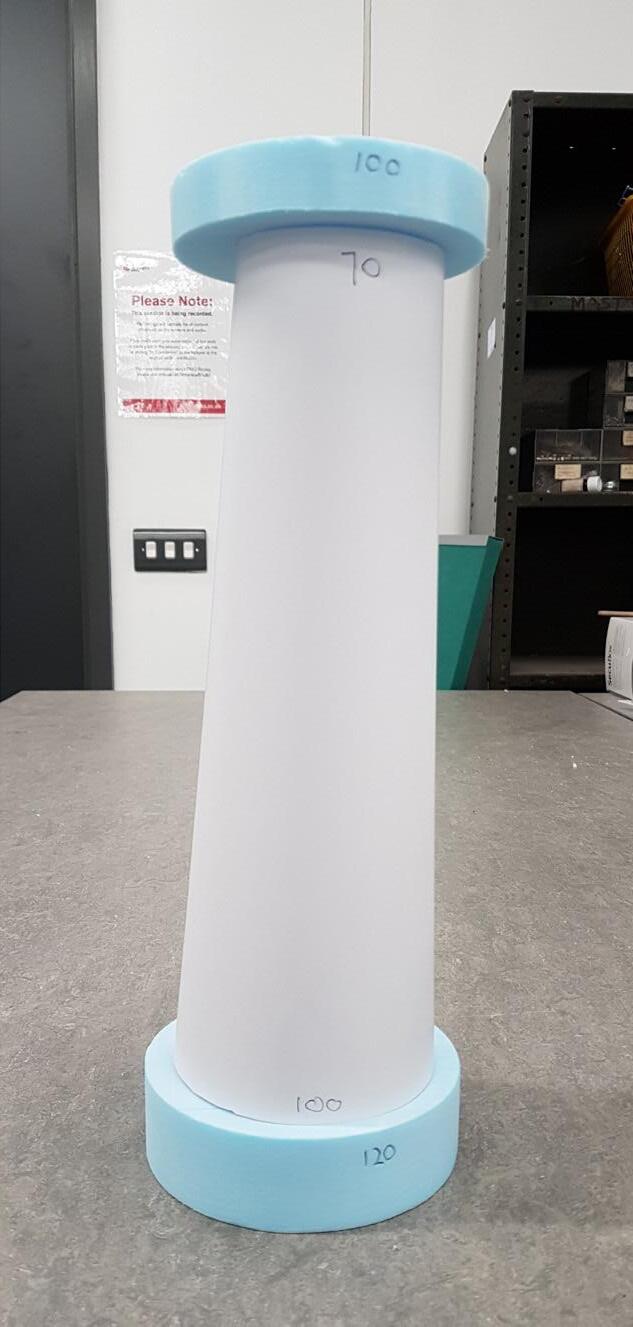
Scale Replica Models
When I joined, Chess had very little in the way of conveying their systems across to customers apart from the real thing. I developed a set of scale models enabling the company to showcase their offerings to customers and at exhibitions.
These models expanded potential customers understanding, as well as creating a talking point. This bought Chess up to the standard you tend to see at exhibitions.
I aimed to get the models as representative of the real system possible. This meant incorporating moving parts and swapable parts to mimic the real thing.
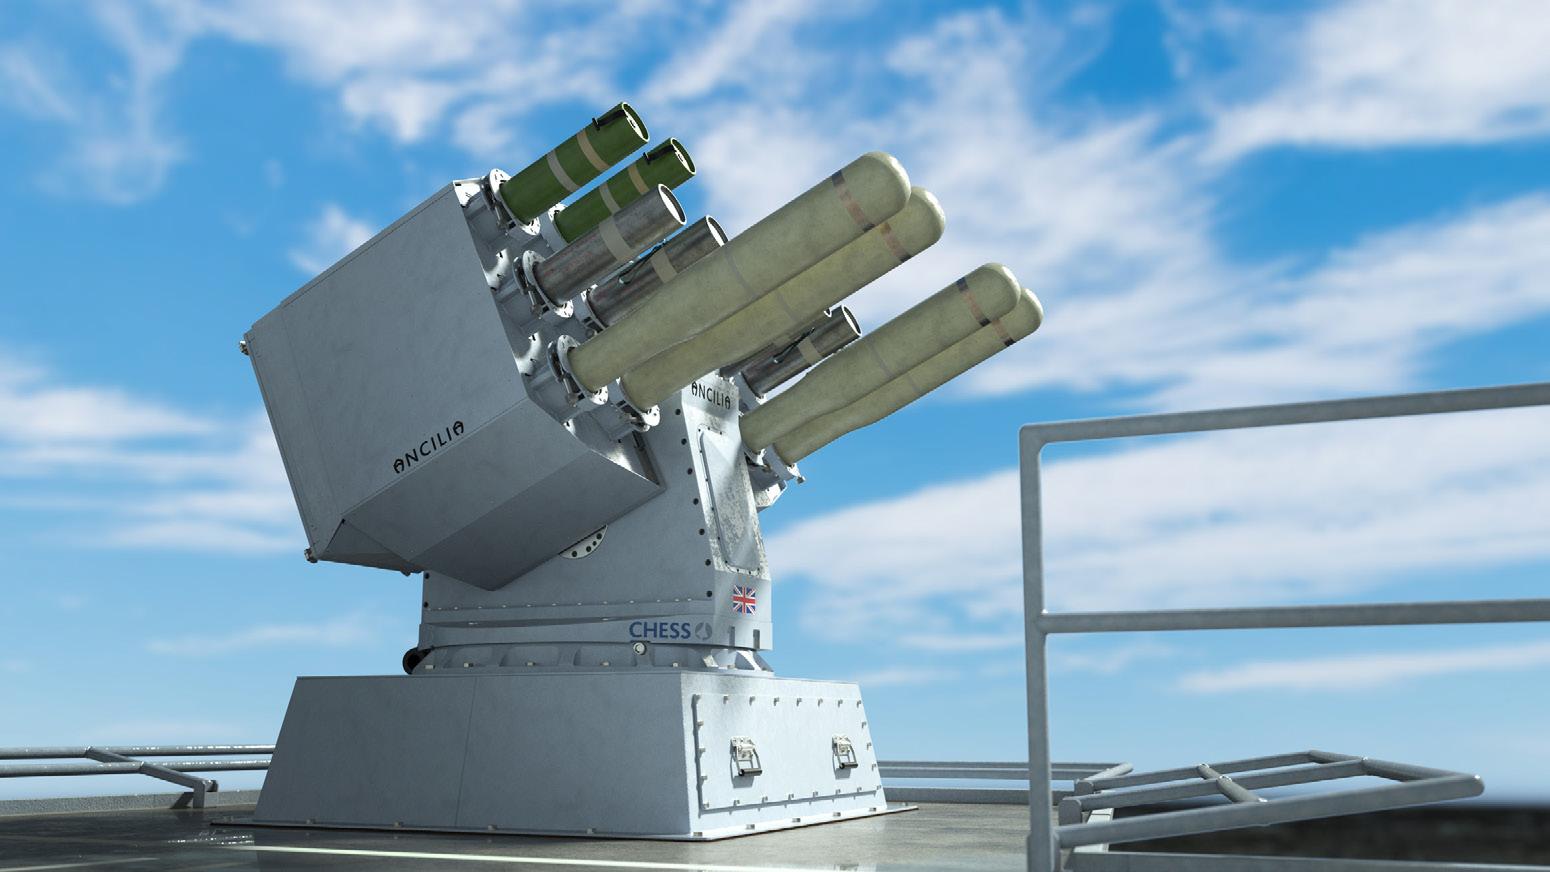
Chess Dynamics
(Right)
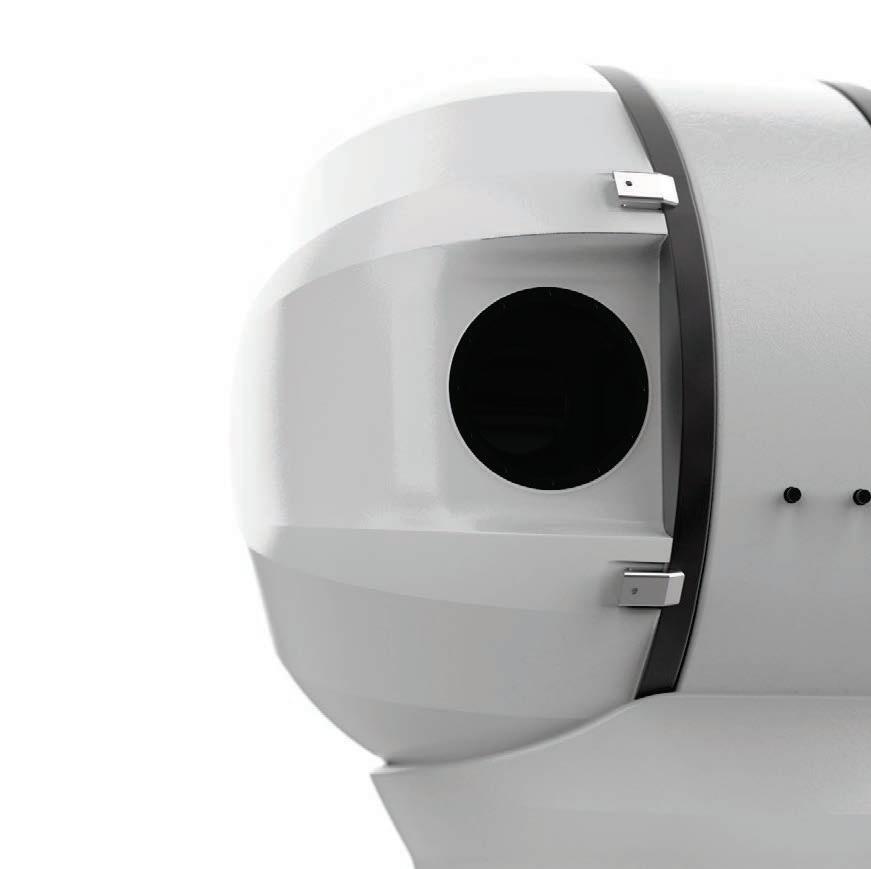
One of the many renders produced for Chess’ sister company for the release of their new decoy launcher system, Ancilia. These were used across the web on product release posts, and well as across their marketing material for upcoming exhibitions. Animations were also made from this file to show it in use.
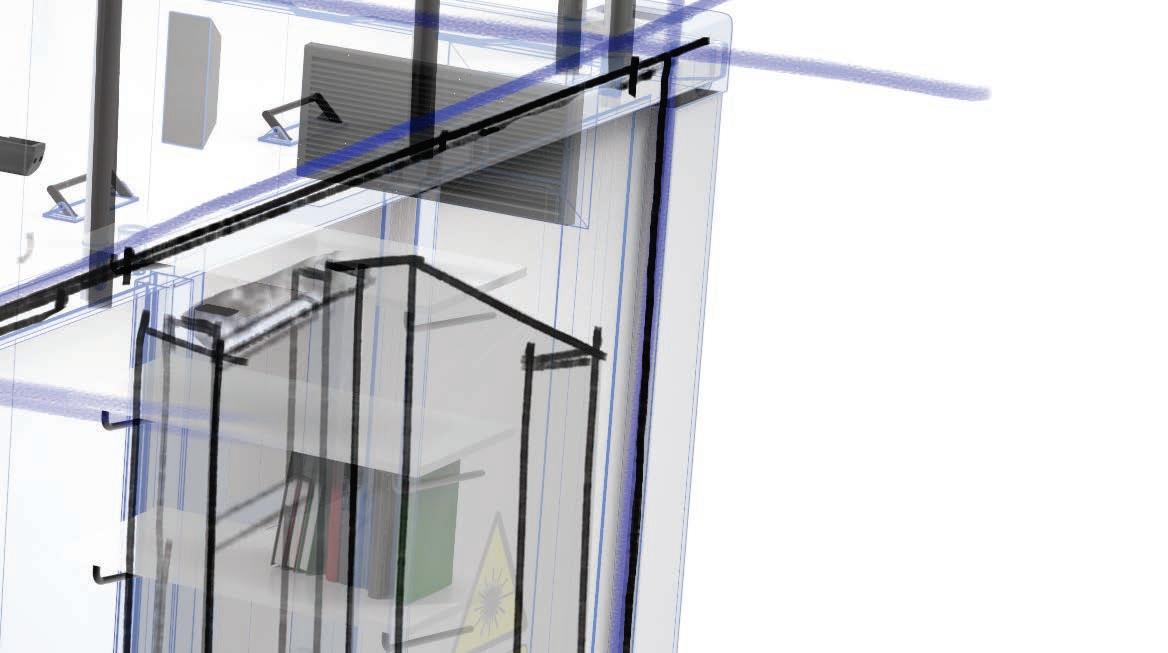
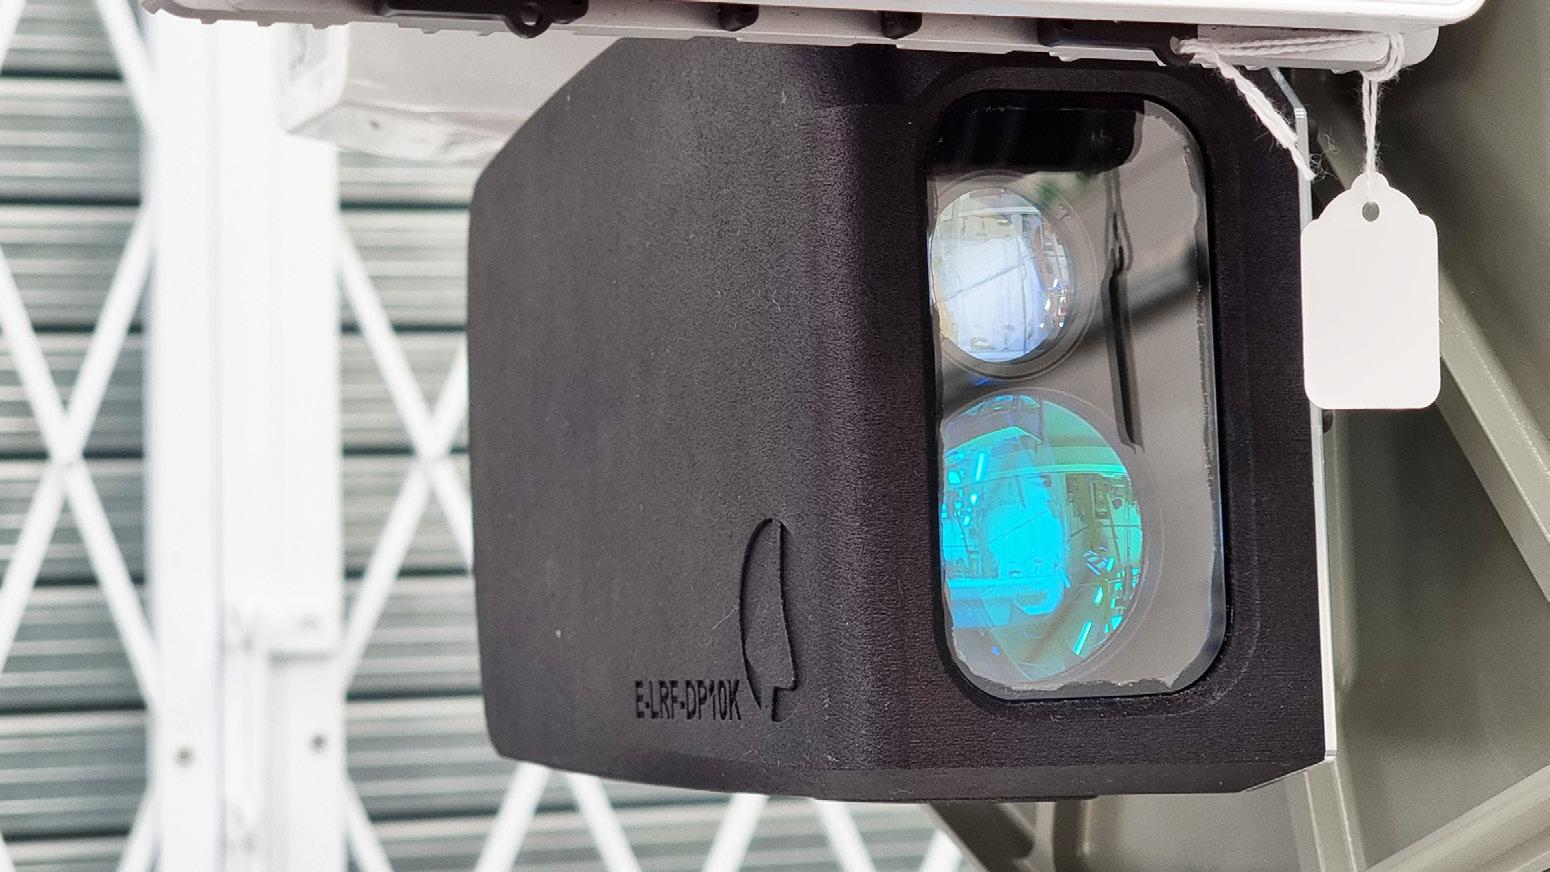
(Bottom)
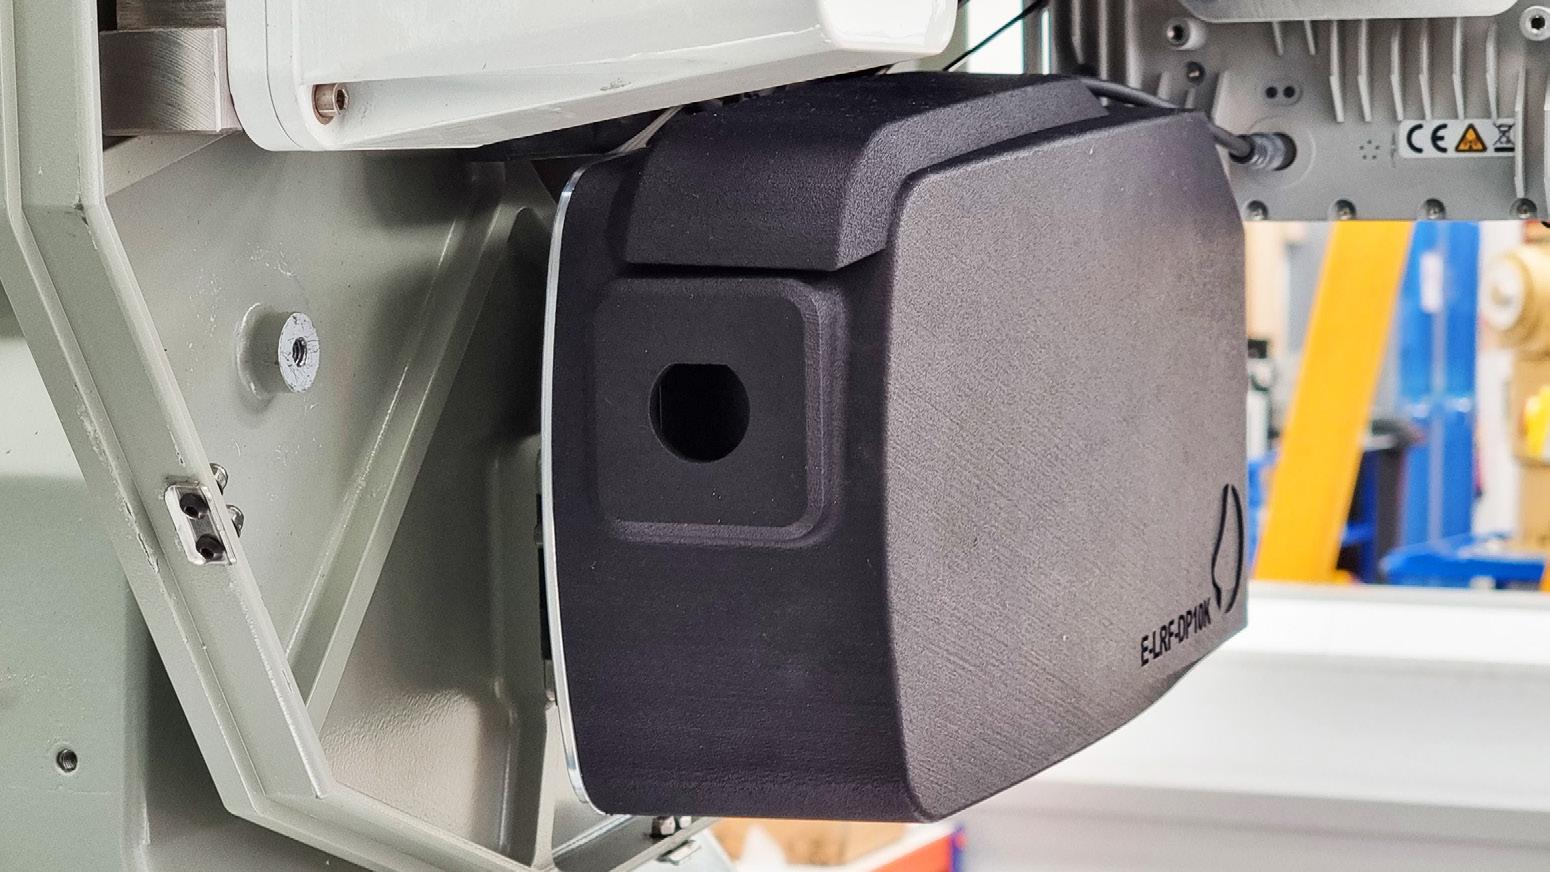
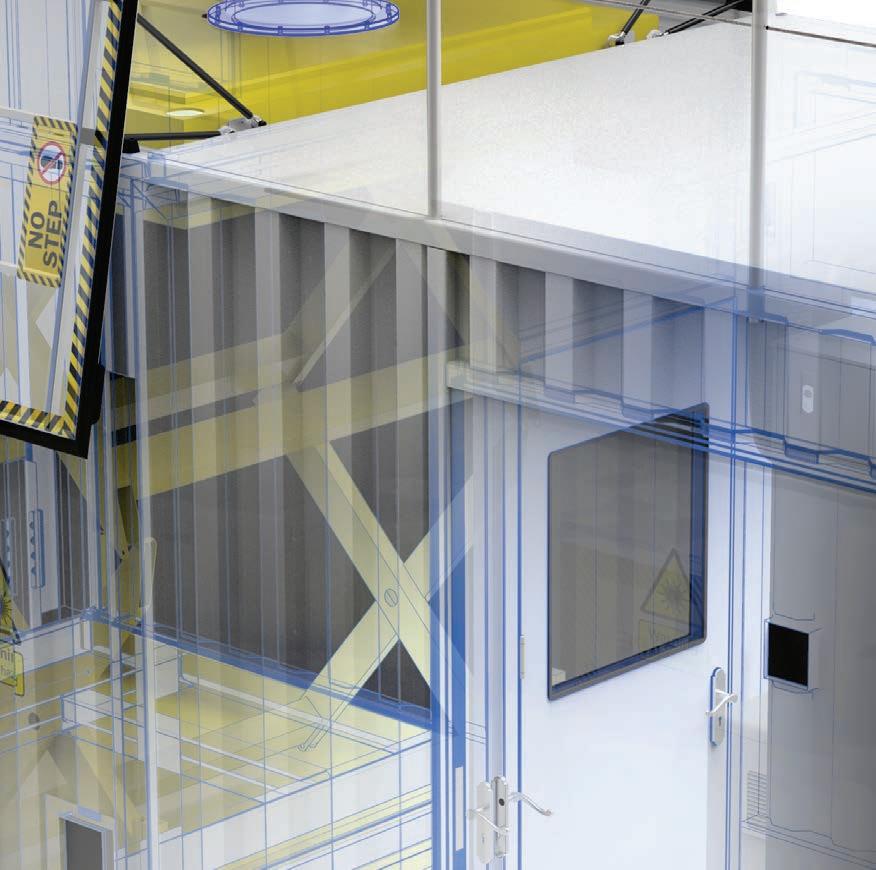
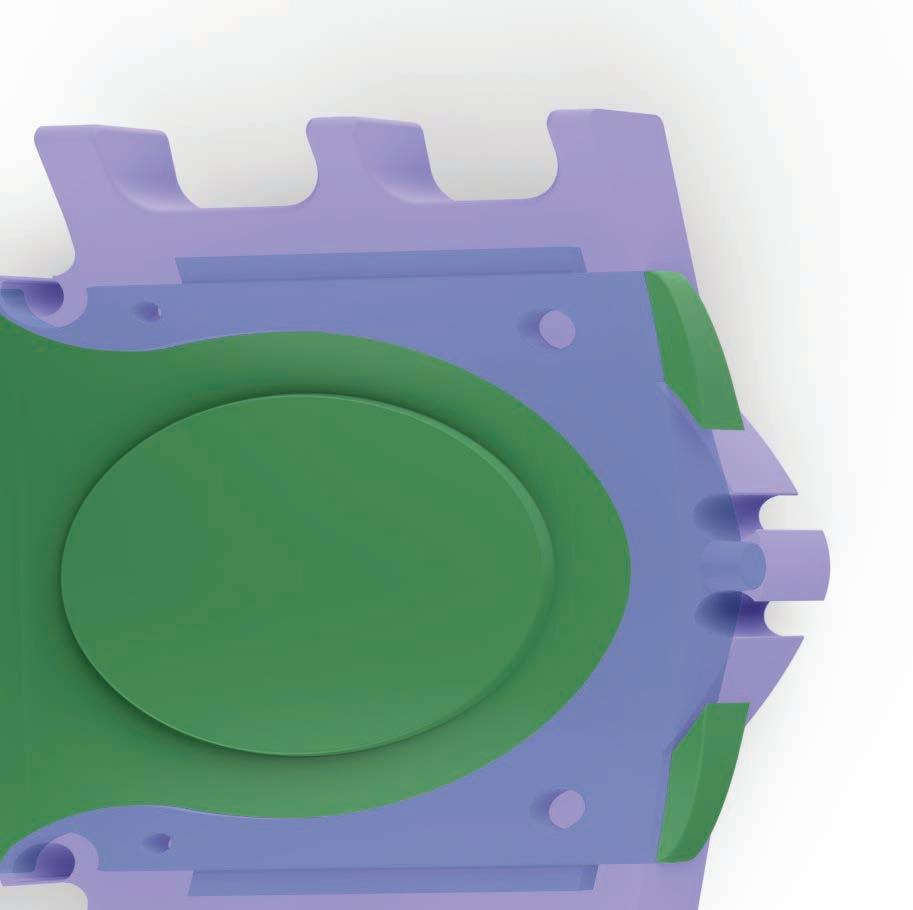
An enclosure made to protect an LRF during trials. The enclosure needed to fit within the larger outer case, allow room for cabling, allow for heat cooling while being splash proof and not disturb the balance too much. With time being tight I had one week to design and print this ready for the following week. It fitted first time without issue.
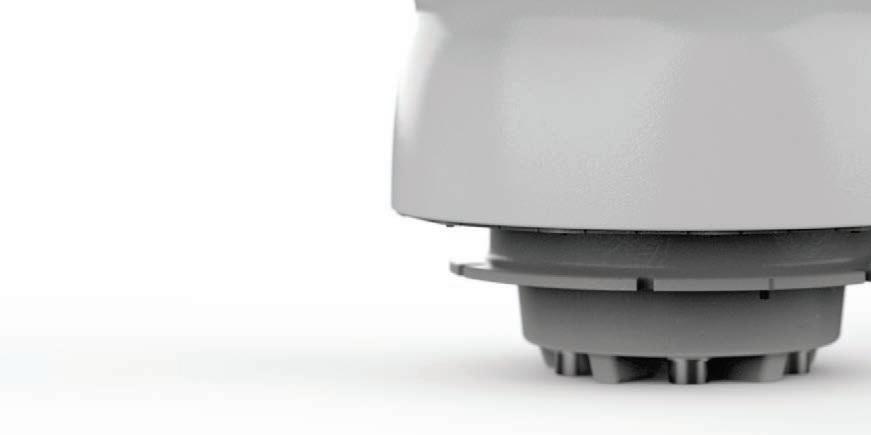
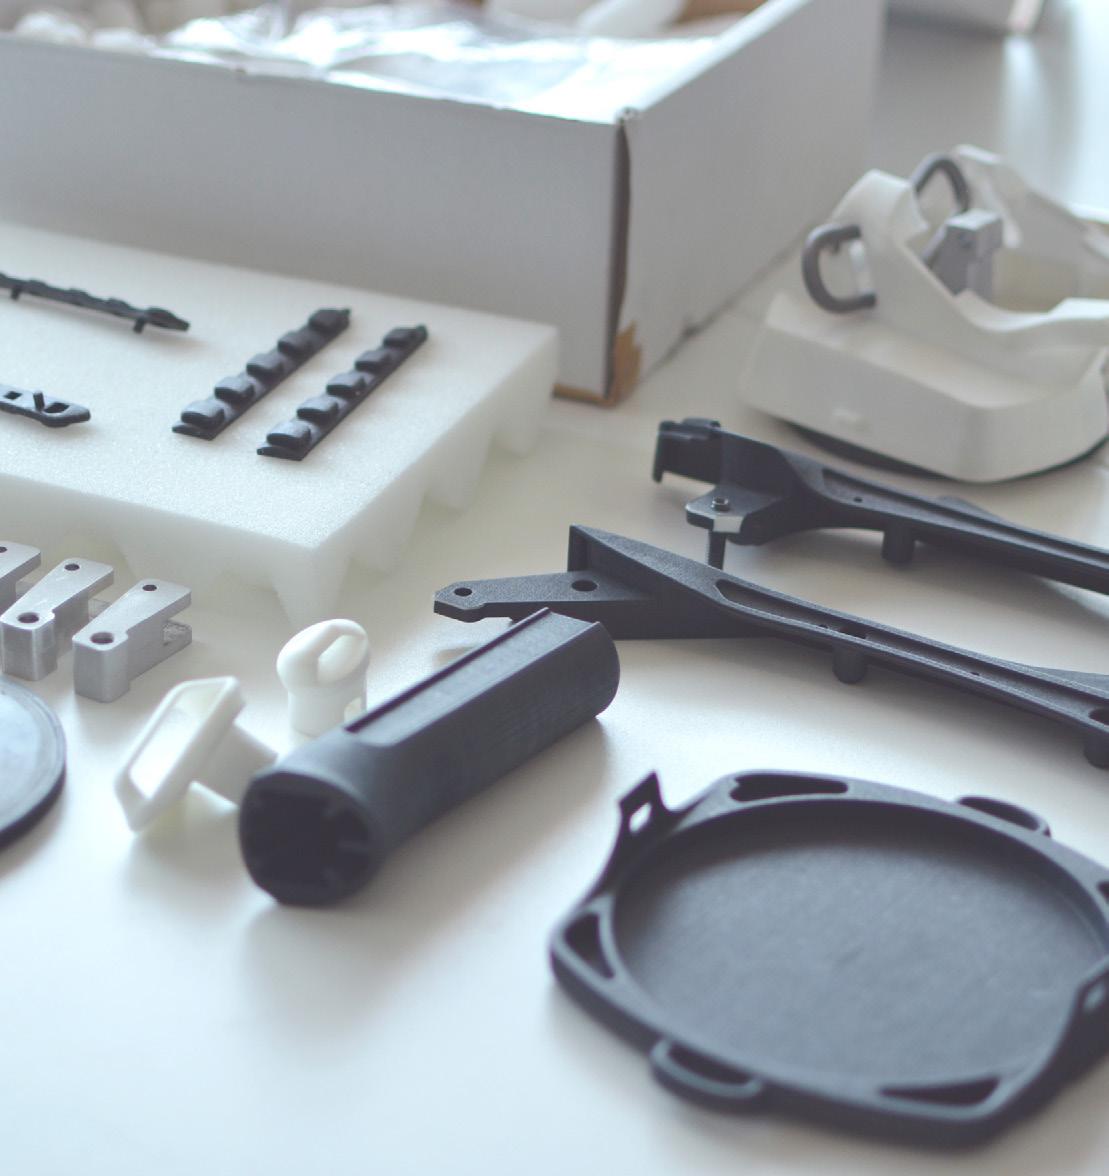
Some other examples of work produced while at Chess Dynamics.
The Design Process
This was used to represent and market the design process. Created with Keyshot and Photoshop, the various elements create a visual story to the work that goes into creating a system, from mapping out specifications to the final product.
Detailed Visuals
Visuals play a large part in conveying ideas, couple that with the notion that people buy with their eyes, it’s critical your solution is portrayed accurately and in an appealing manor. These renders aided Chess with capturing new projects.
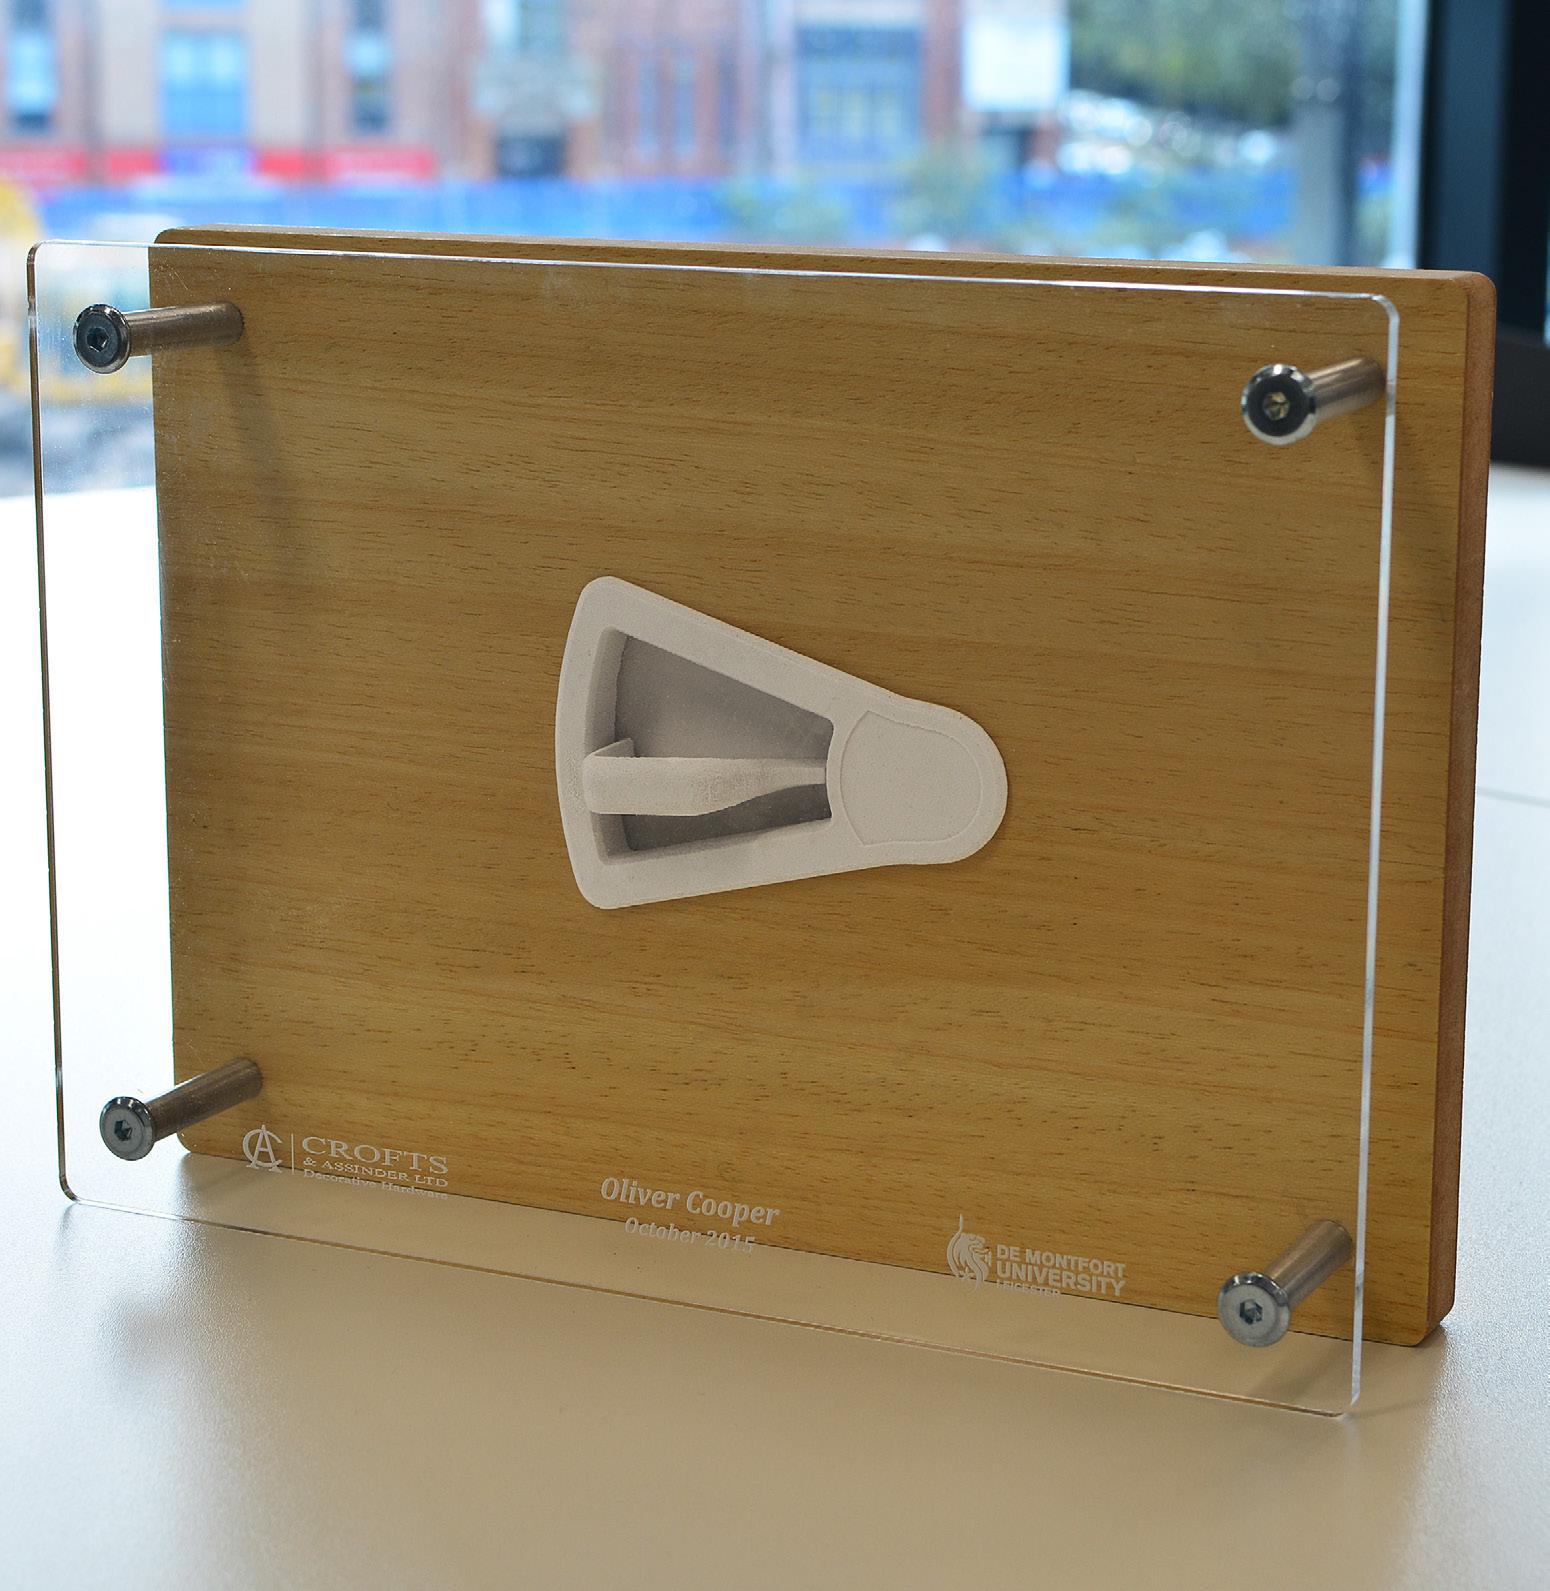
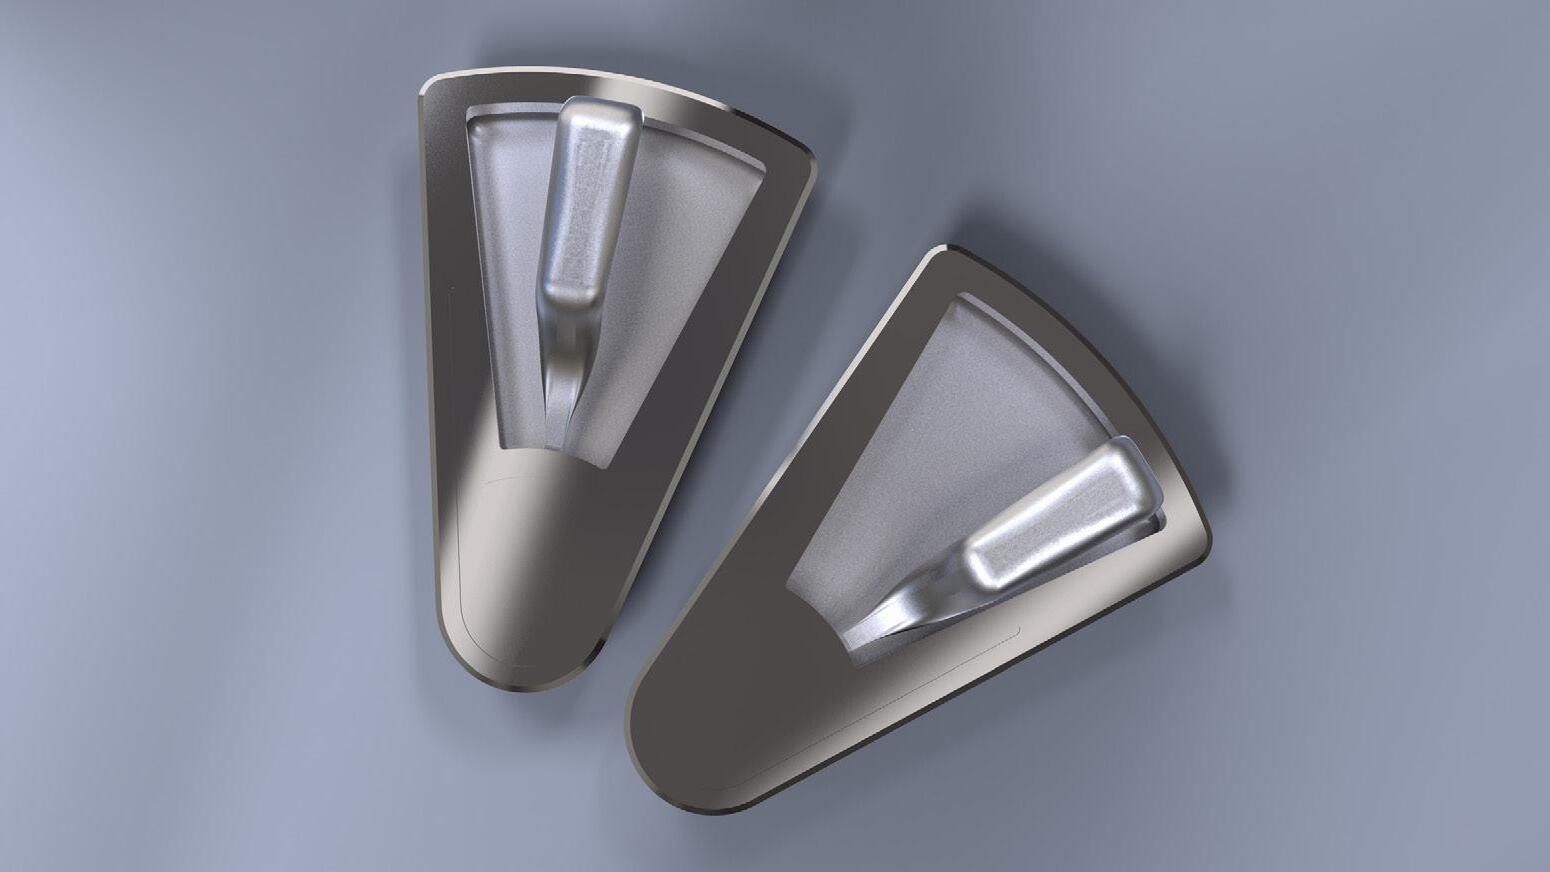
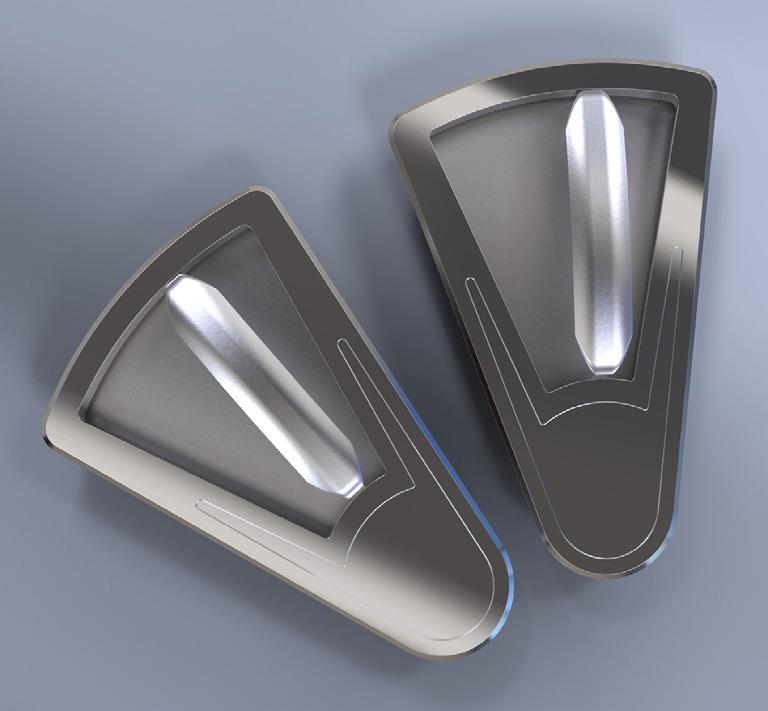
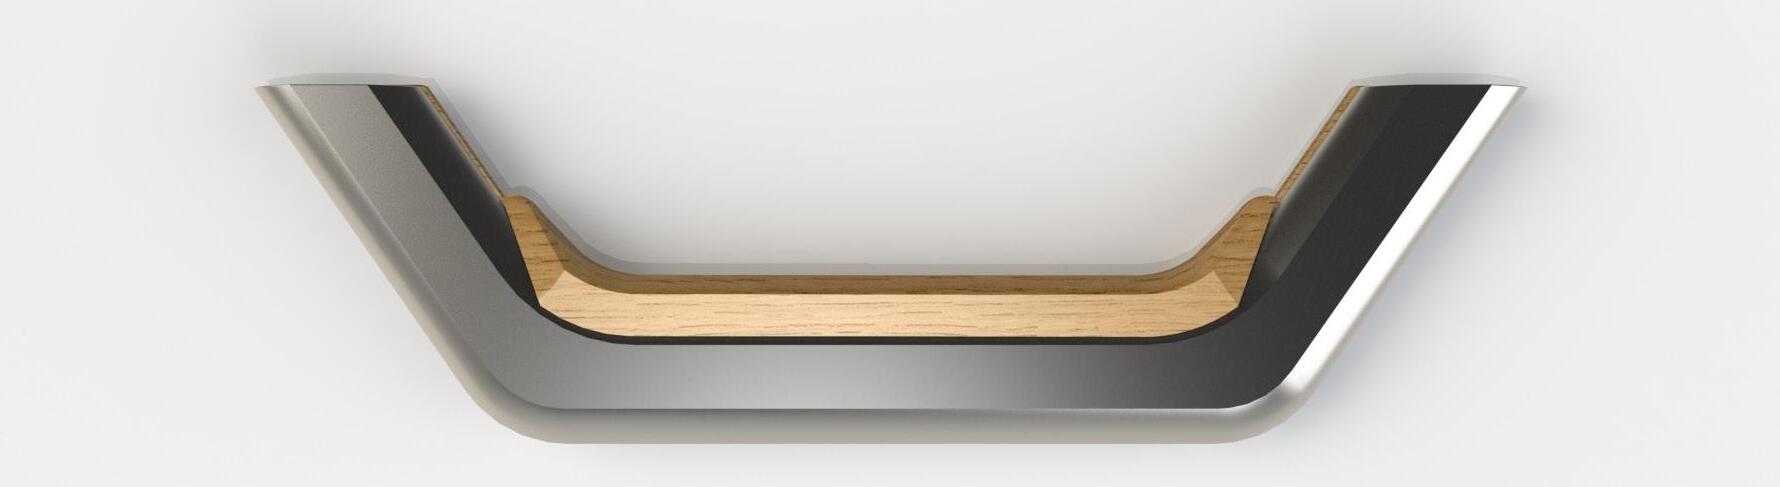
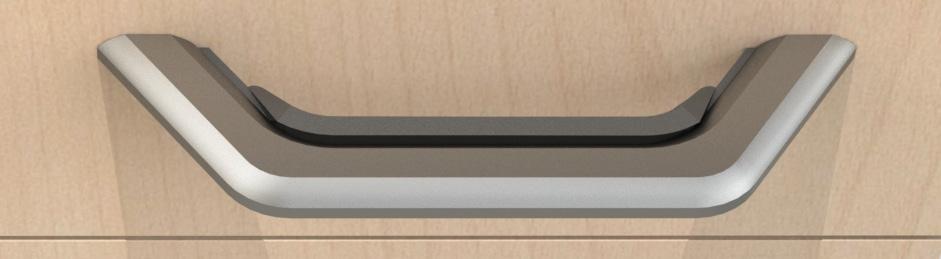
Crofts & Assinder Handle
Design competition award
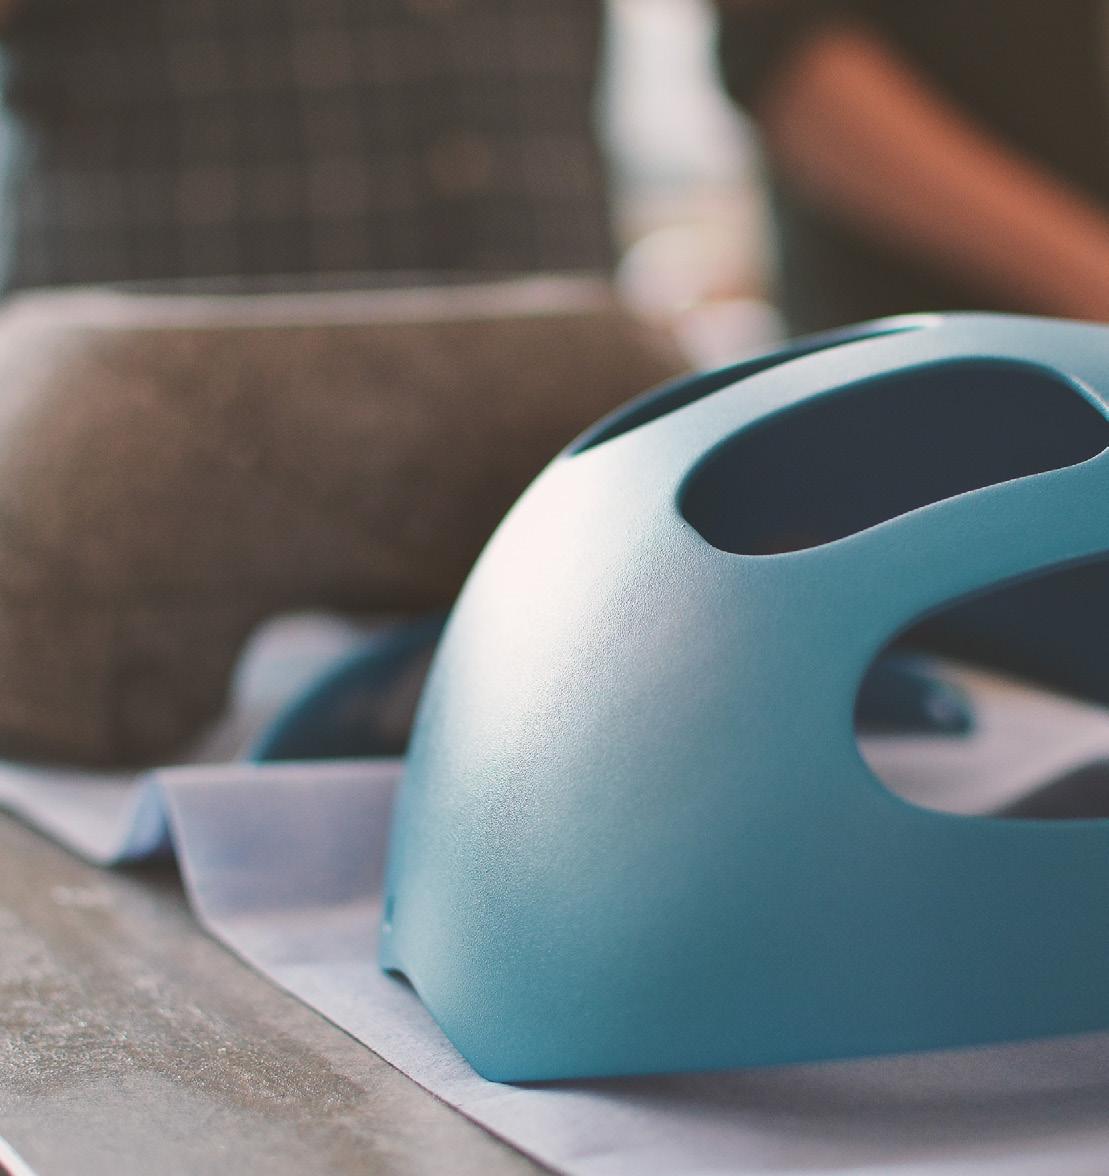
For small space living. Doors must be secured in caravans and boats. Latched handles can be implemented, but these can protrude into the narrow spaces, increasing the risk of getting snagged on when passing by. This shallower design is a stylish solution for lockable doors.
Design need
Suited for small space living Technologies Cost effective, and close to production
Small Living Space Handle
Award show presentation model
Live brief with Crofts & Assinder, picked for the final award show in London, hosted by Young Furniture Makers.
Rotary latch mechanism allows doors to be secured shut. The large flanged handle allows for use by arthritic people by simple knocking the handle up or down.
Soft and large radiused corners provide minimal snagging when walking by. The shelled-out design allows for more of the handle to be used, while maintaining a low profile forward of the face plate.
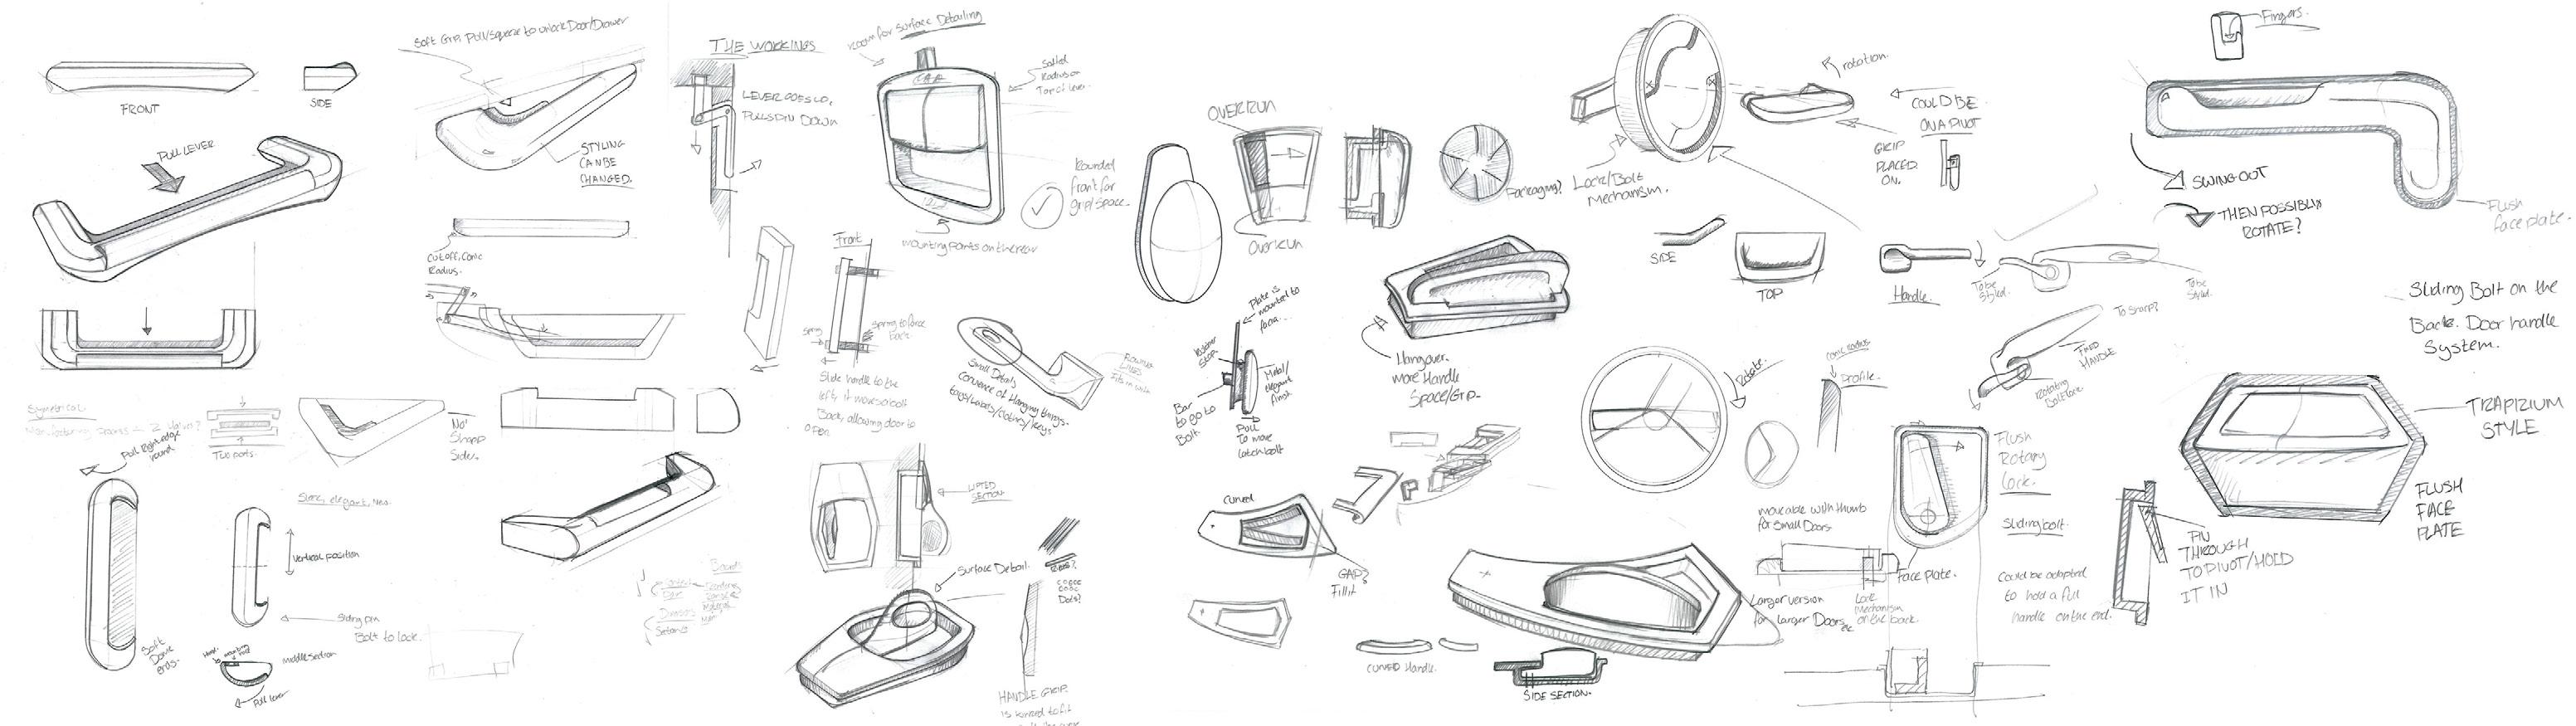
Grip variation
Design Process
The concept stage was all on paper, fast paced for four days with daily liaison with the project leader. Below is a selection of sketch work, along with the second concept pitched.
This live project was a valuable early on experience into my university life. Working with a client and seeing the design go from brief to presentation within a strict time frame shined a light the real-world expectations of designers. The award show at the end topped of the project, meeting big industry names, and getting to see what other people are working on. The quality of the work produced encouraged me to improve my own work.
Crofts & Assinder
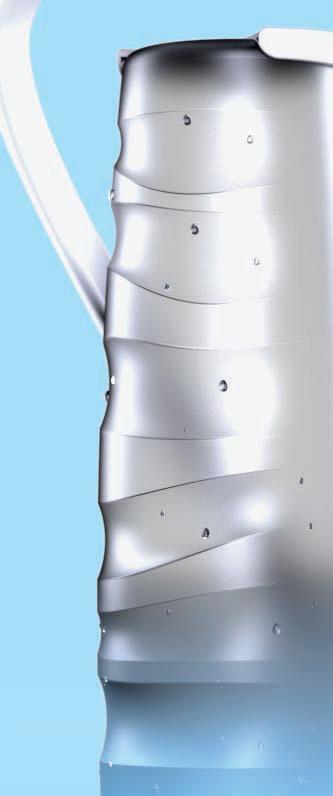
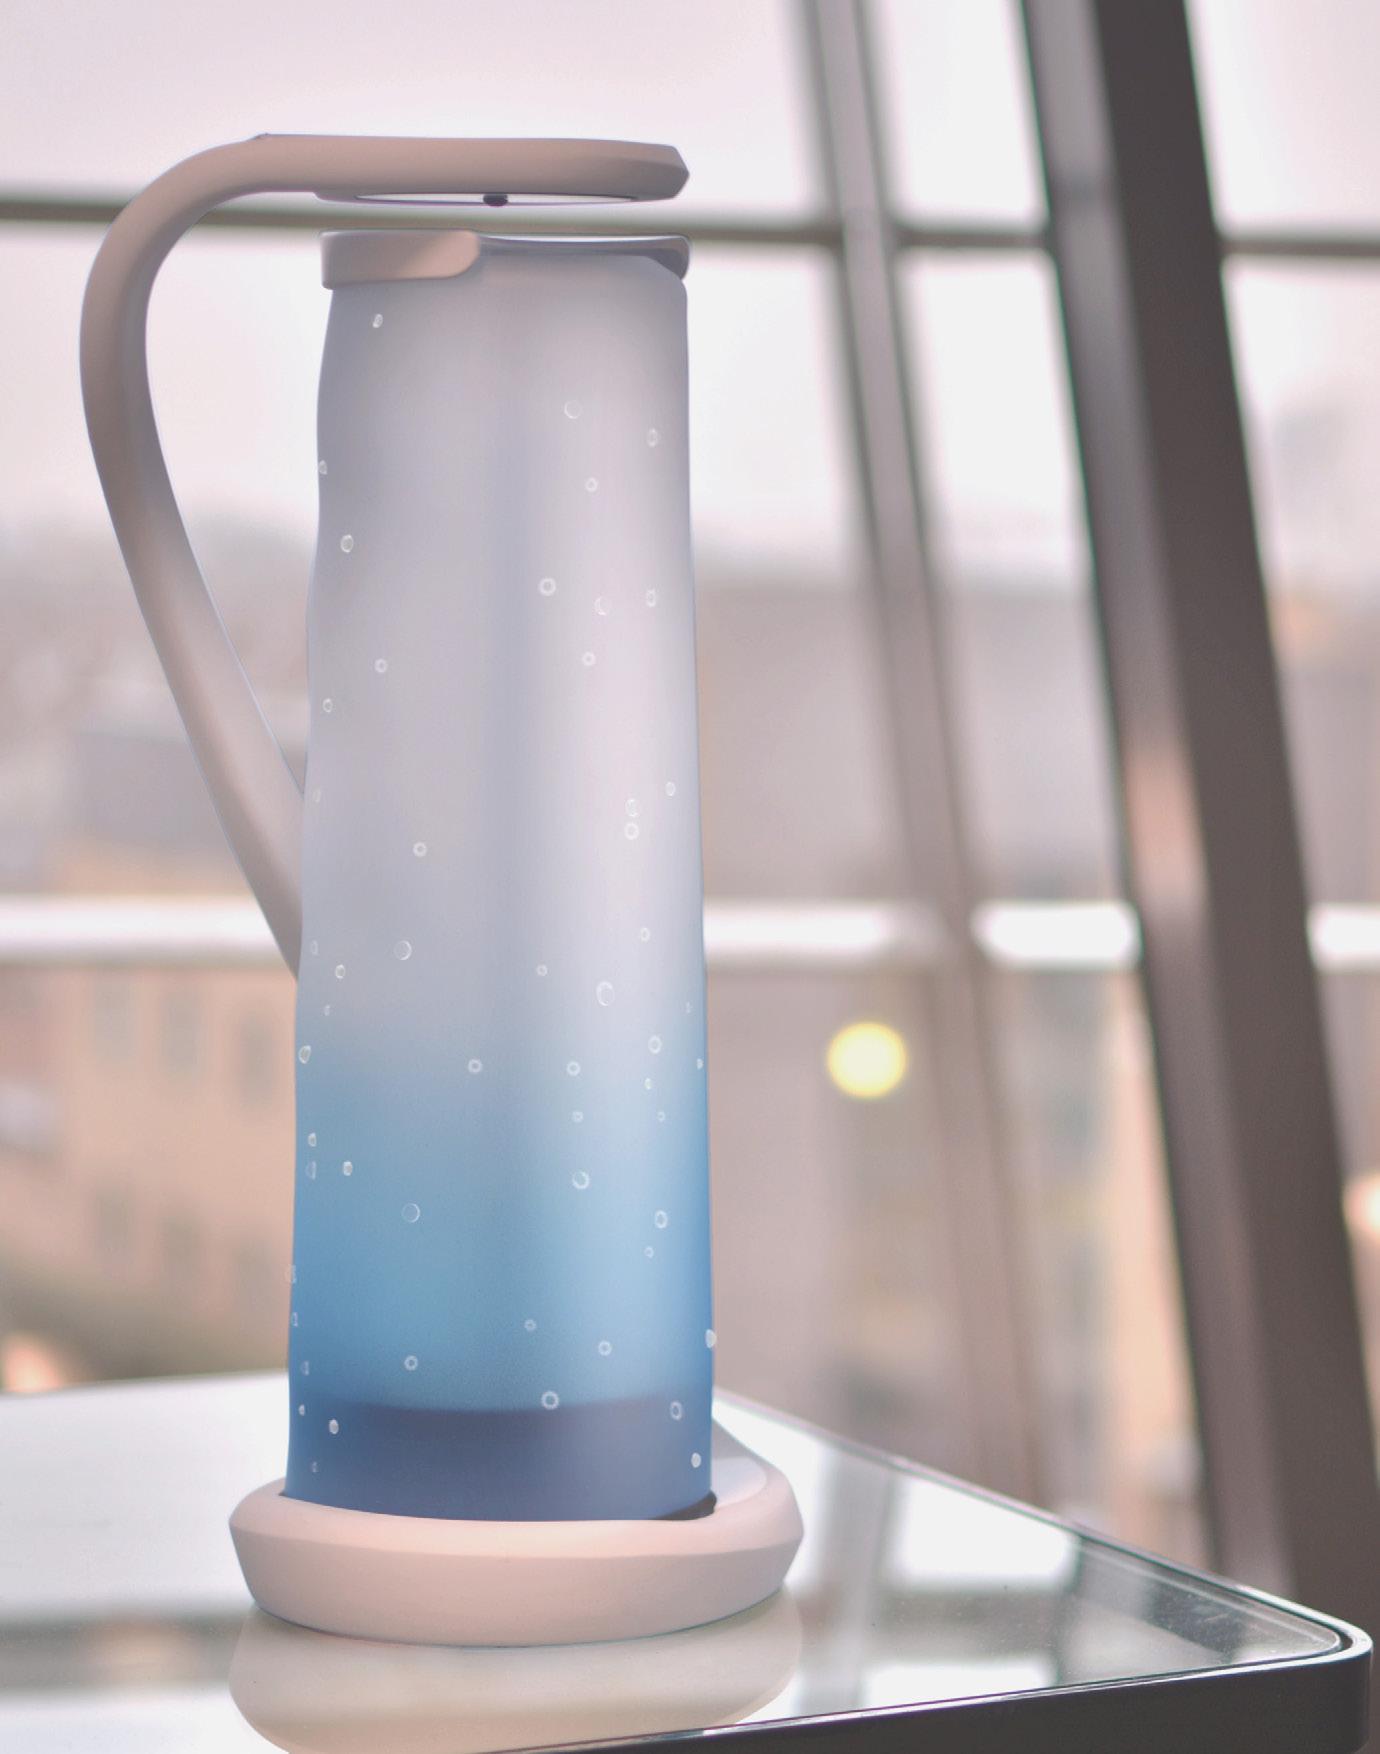
RSA:SDA Agile Ageing
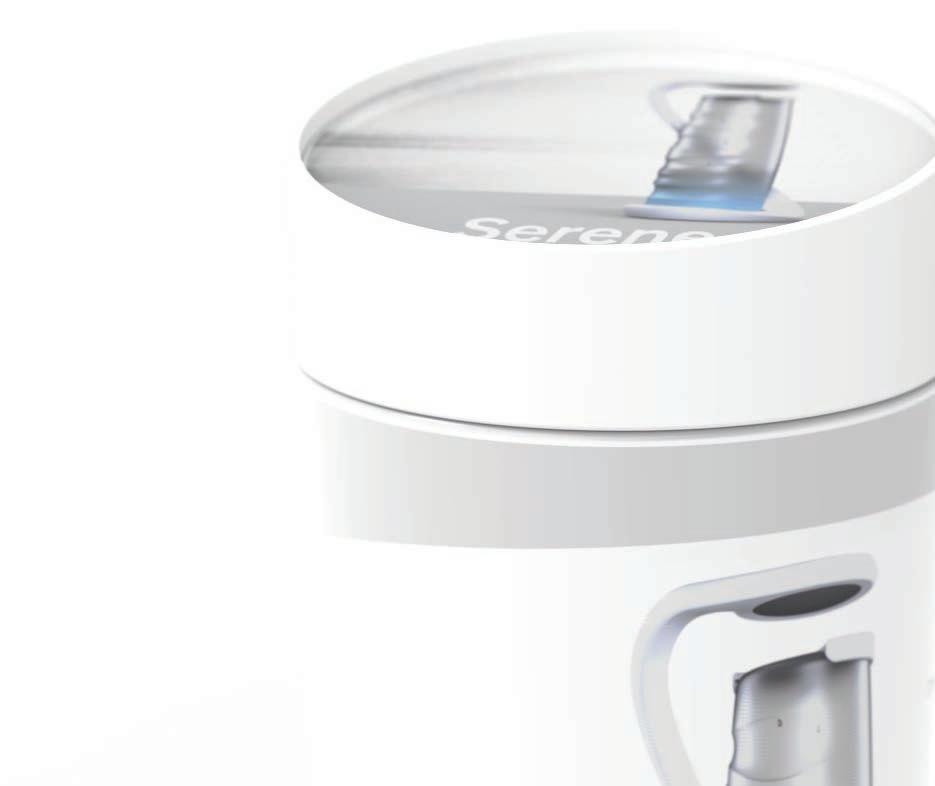
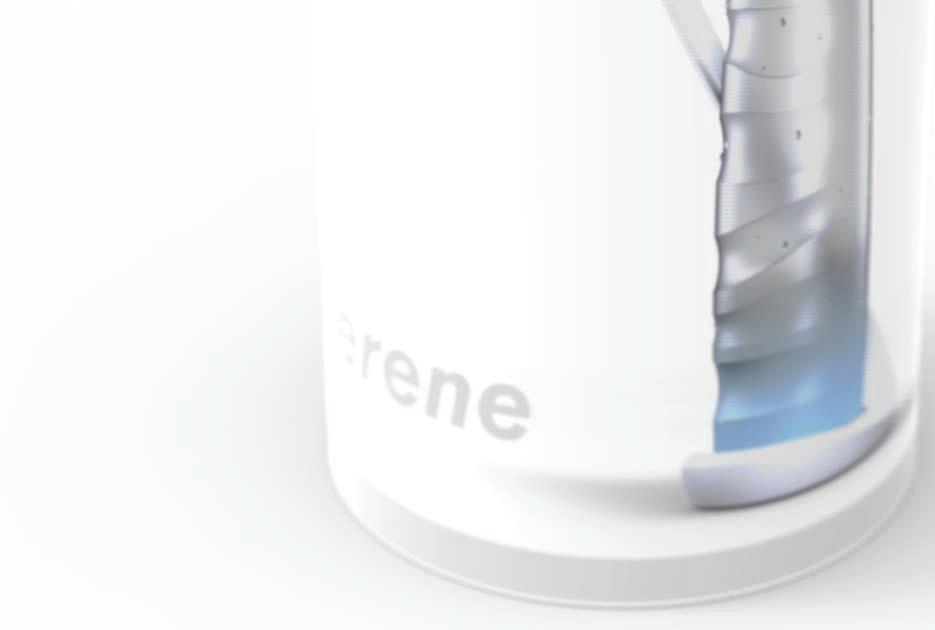
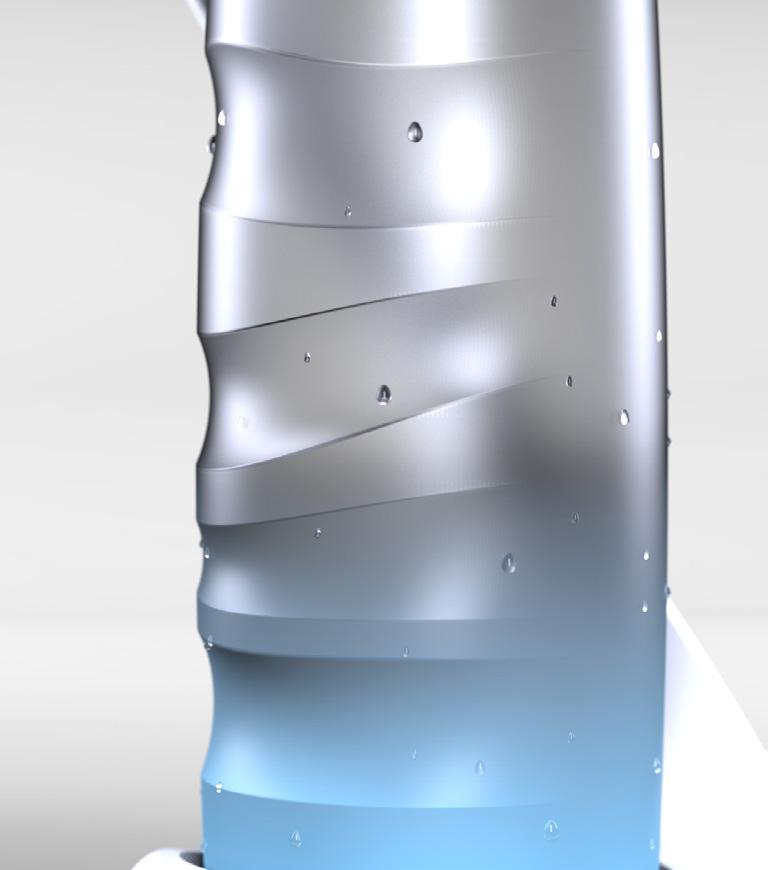
Stress in the workplace can have serious detrimental effects to health. People go into retirement worn out from work, unable to make the most of life due to the constant daily grind in an office. As well as physical health, mental health plays a huge part in our well-being.
Team
Solo
Target user
Office workers
Market sector
Office furniture
Design need
Relieve stress caused by working
Technologies
Water system, blown glass
Project futures
Varied range, incorporate natural smells and lighting
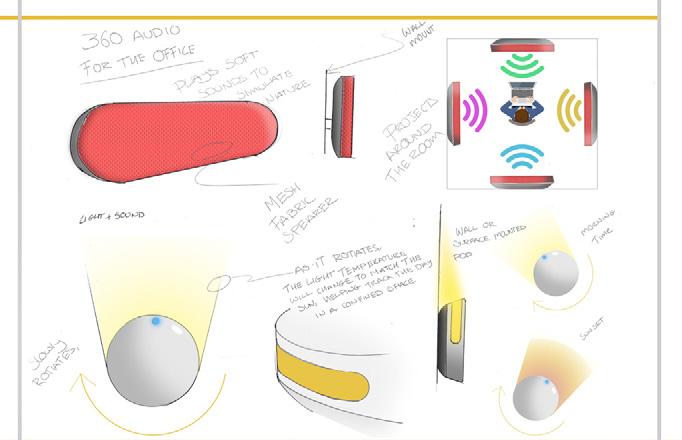
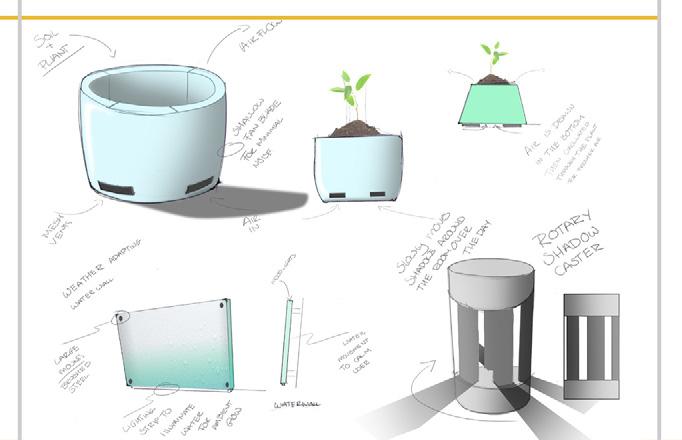
Water Therapy In The Office
Whether the office is in the home or in a work place, stress grinds everyone down, which can make retirement less fulfilling as the body and mind have degraded over years.
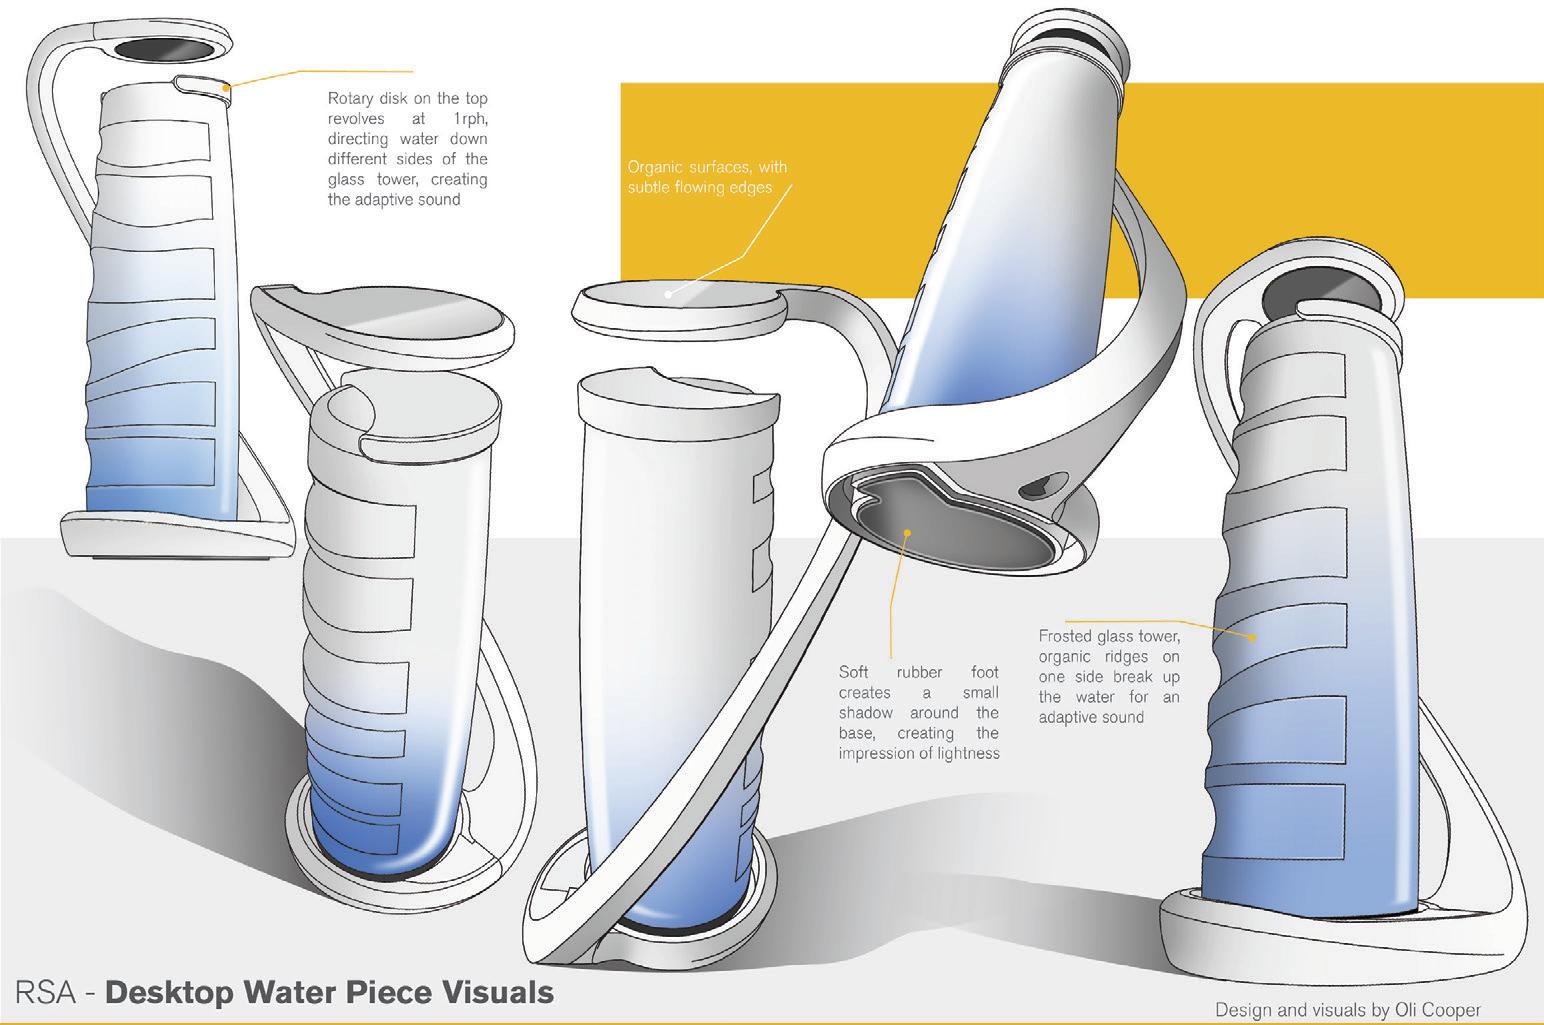
RSA submission for 2017, the desktop water piece. Targeted at long-term workers, closer to retirement, aimed at reducing office stress over time.
Studies show water calms, this is evident in cities with large exposure to water, such as Venice and Amsterdam.
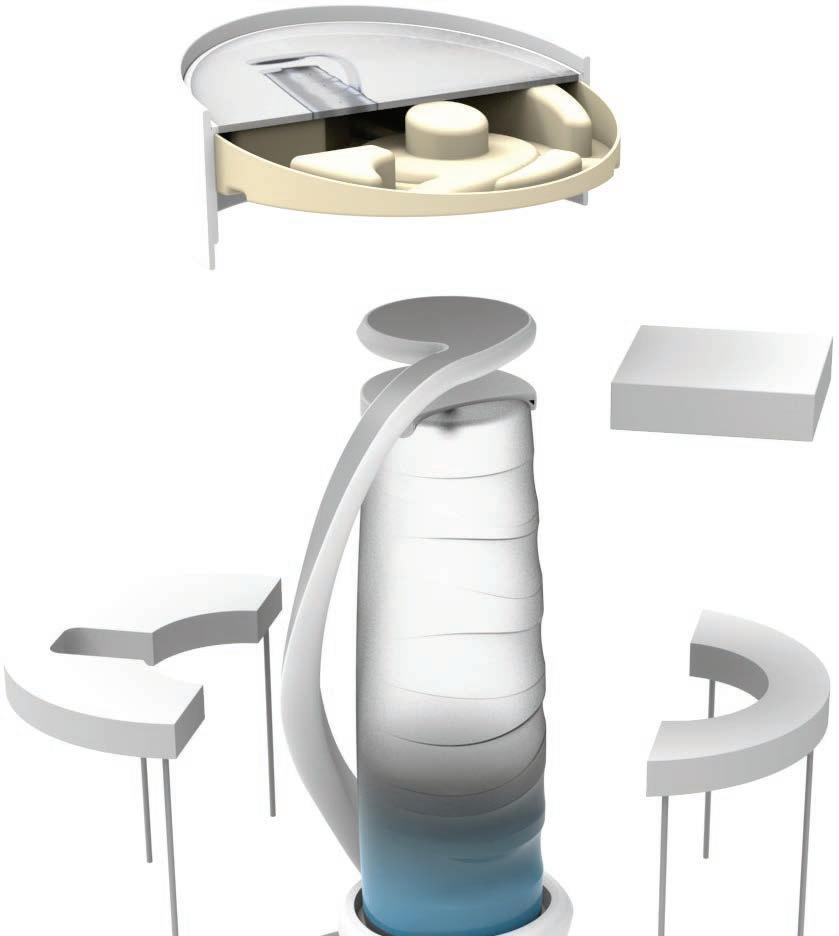
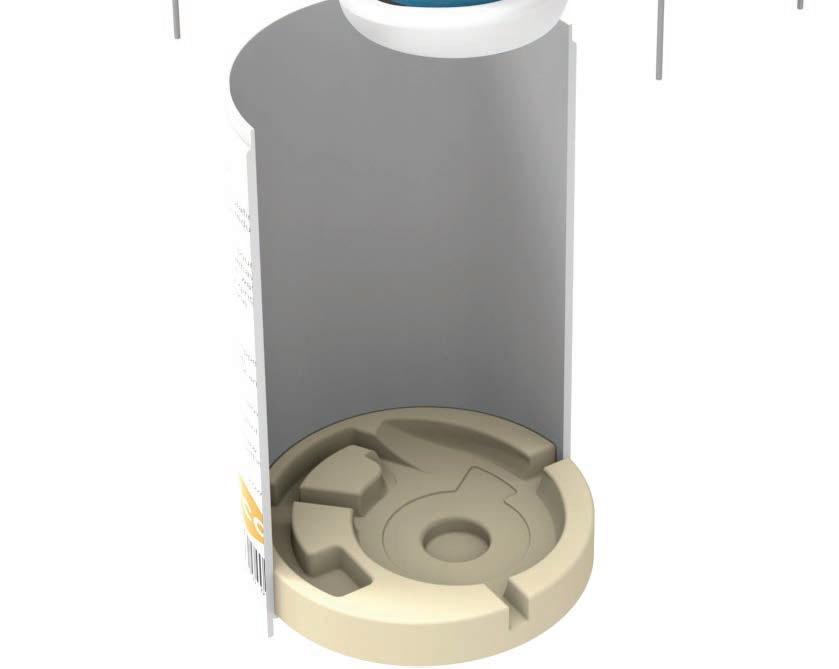
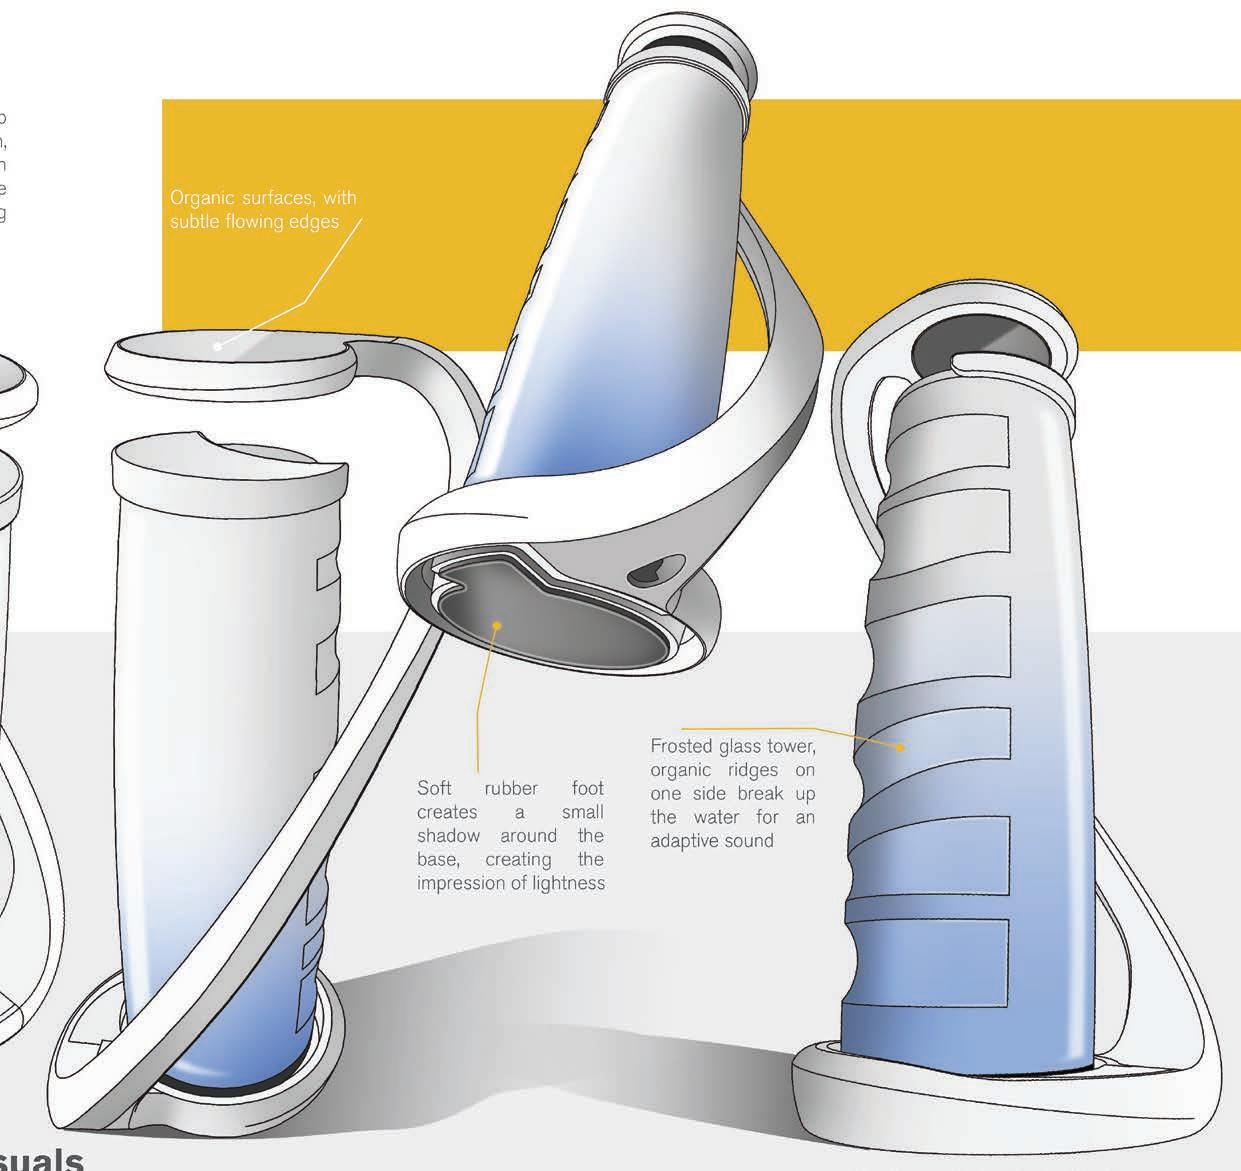
A gentle flow of water falls from the nozzle, which is designed to create a random trickle, falls onto a pad which is rotating once an hour. This pad directs the water off in varied directions. The surfaces on the glass centrepiece are varied, which changes the sound of the water flow as it goes round.
This ever-changing flow of water creates an adapting sound. This is so the brain doesn’t cancel the sound out so easily. The rise and fall of the sounds bring a natural element into the sterile workplace.
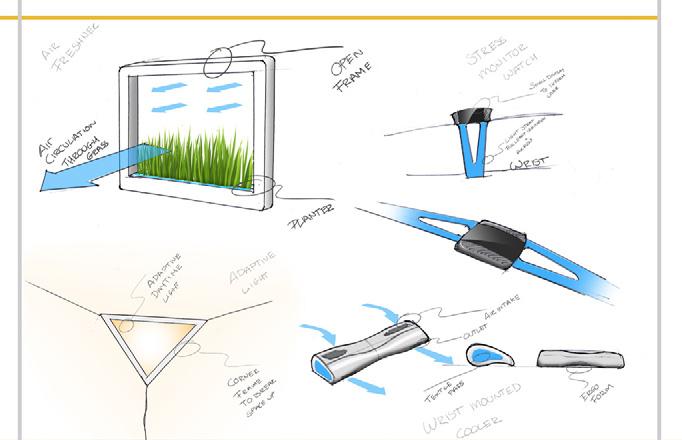
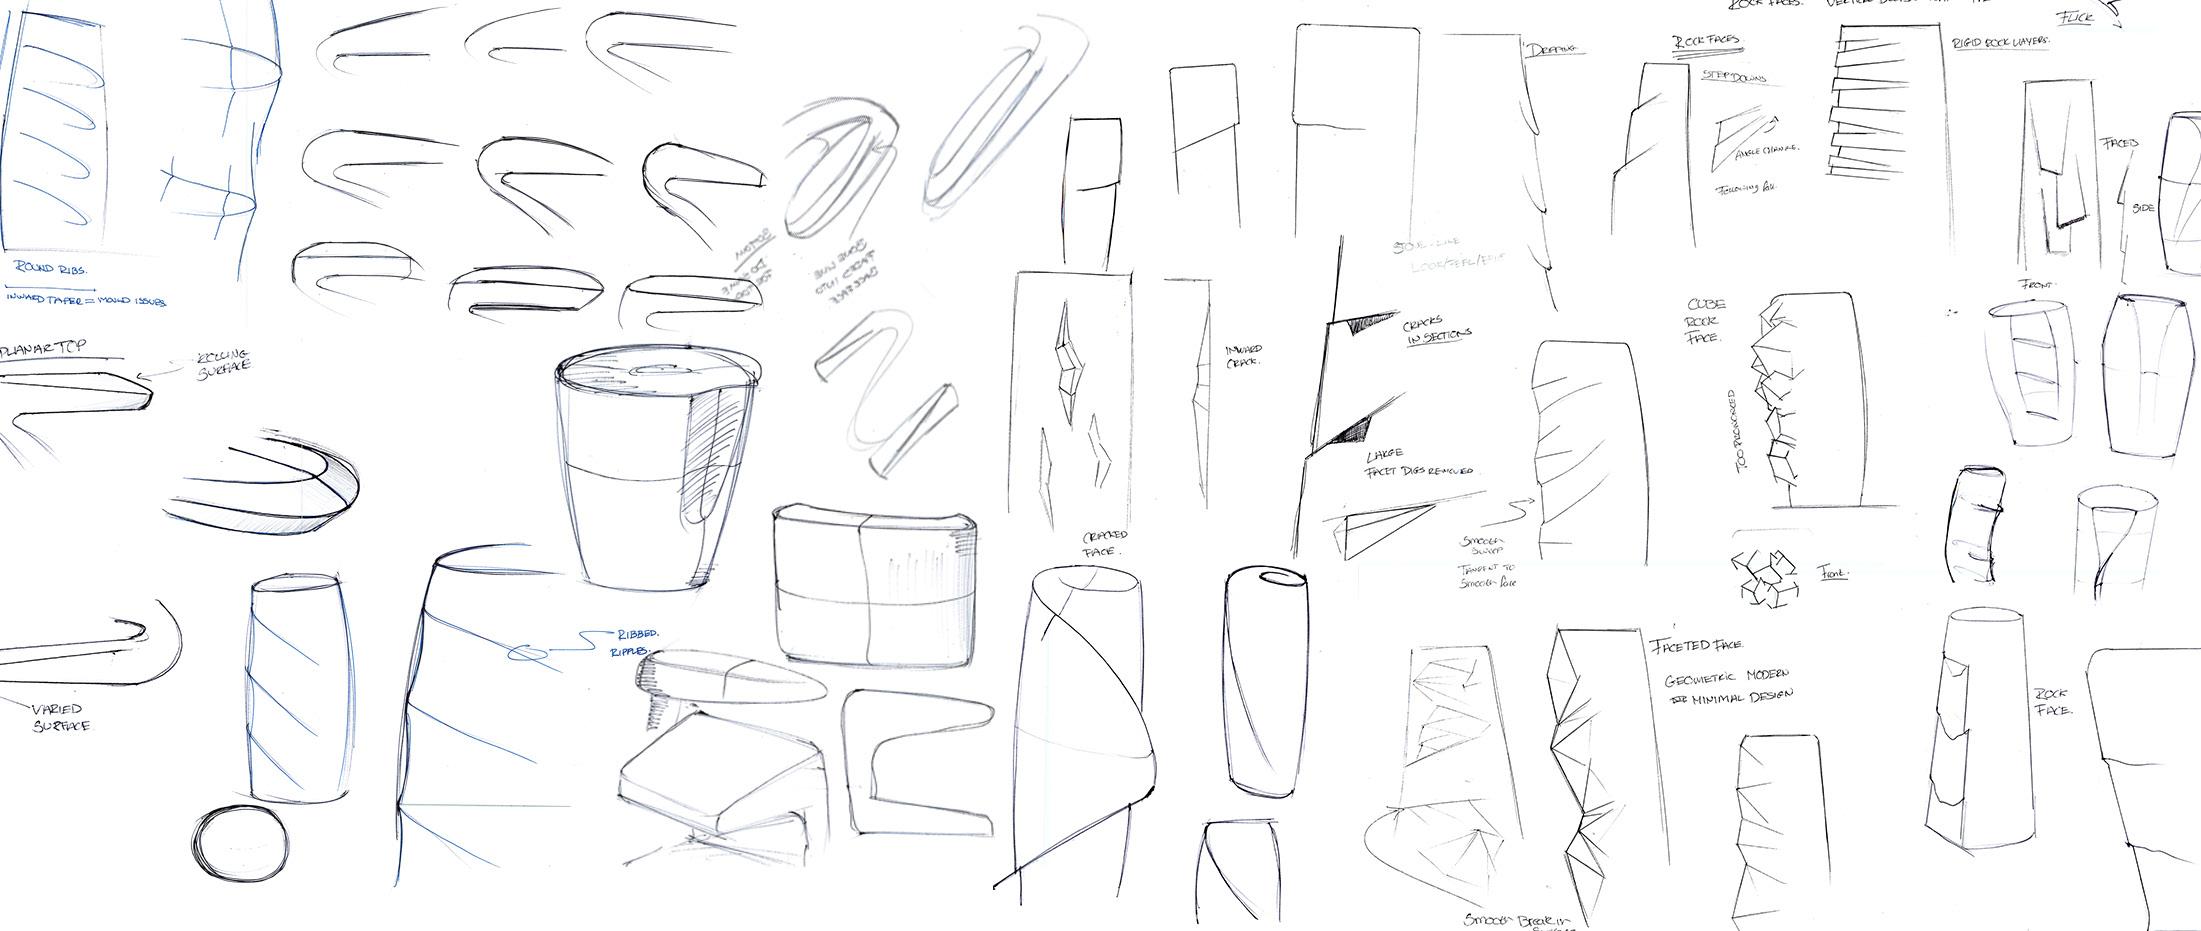
Design Process
Research looked into office environments and health and social statistics. Concept generation kick started quick paper sketches. Hand rendering in photoshop added to the value of the concept communication.
Concept evaluation with feedback groups filtered the designs down to 7, then 3, and finally down to one over the course of a week.
With the final design selected, testing, development, and refinement took the concept from paper to the real world.
After a year in industry, my head was fresh with new approaches to projects. I aimed to exercise new skills as much as possible to become a more independent and efficient.
The Concept
This product was largely user based. A large amount of time was spent researching, conducting studies, and getting feedback from potential users. As a result, the design was much more informed and suited to the market sector.
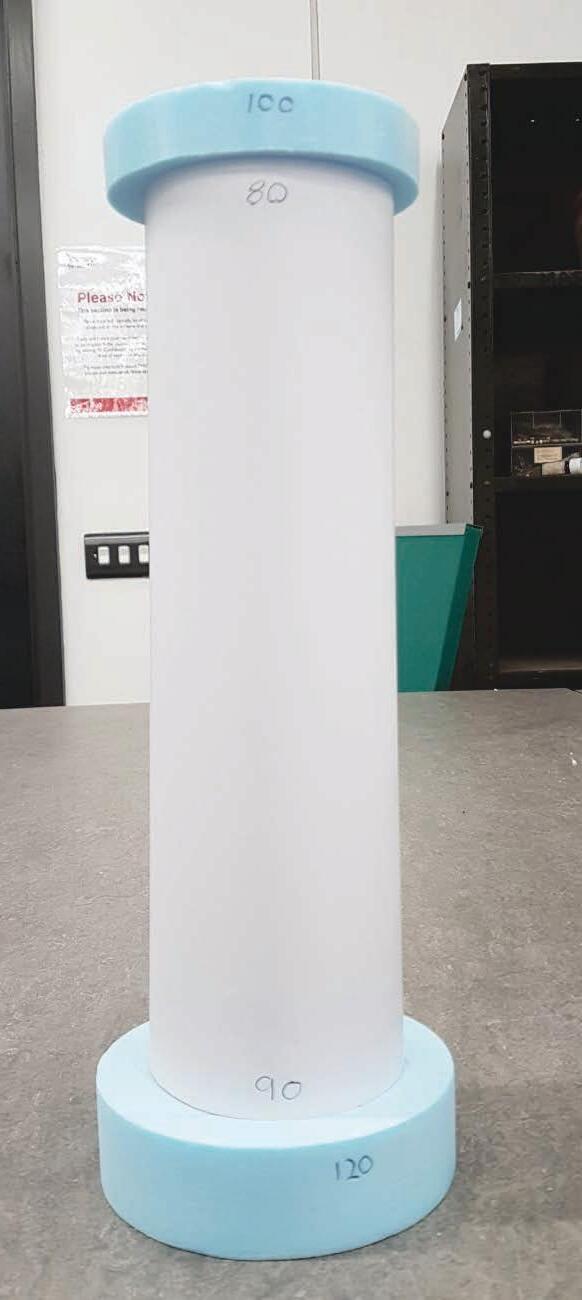
Packaging and graphics are a key part of a product. The packaging was to reflect the product, and carry design elements from the product, through to the box.
A round tube, with 2 mulch inserts that support the product, 2 collars for the glass, and a spacer for the top make up the packaging.
Personal Work
Learning
without borders
Combining design with my personal interests not only expands my self-taught knowledge, but it increases the joy of the hobby. By using a product specifically designed for my need I am able to eliminate issues I face, while enjoying the rewards of own work.
Design need
Improve my experience with my interests
Technologies 3D printing and laser cutting
Project futures
Small scale production for selling
Personal Work
During spare time I‘m working on my own mini projects. Being someone who likes to be productive I find this to be a perfect way to develop, as well as use design to aid my own interests.
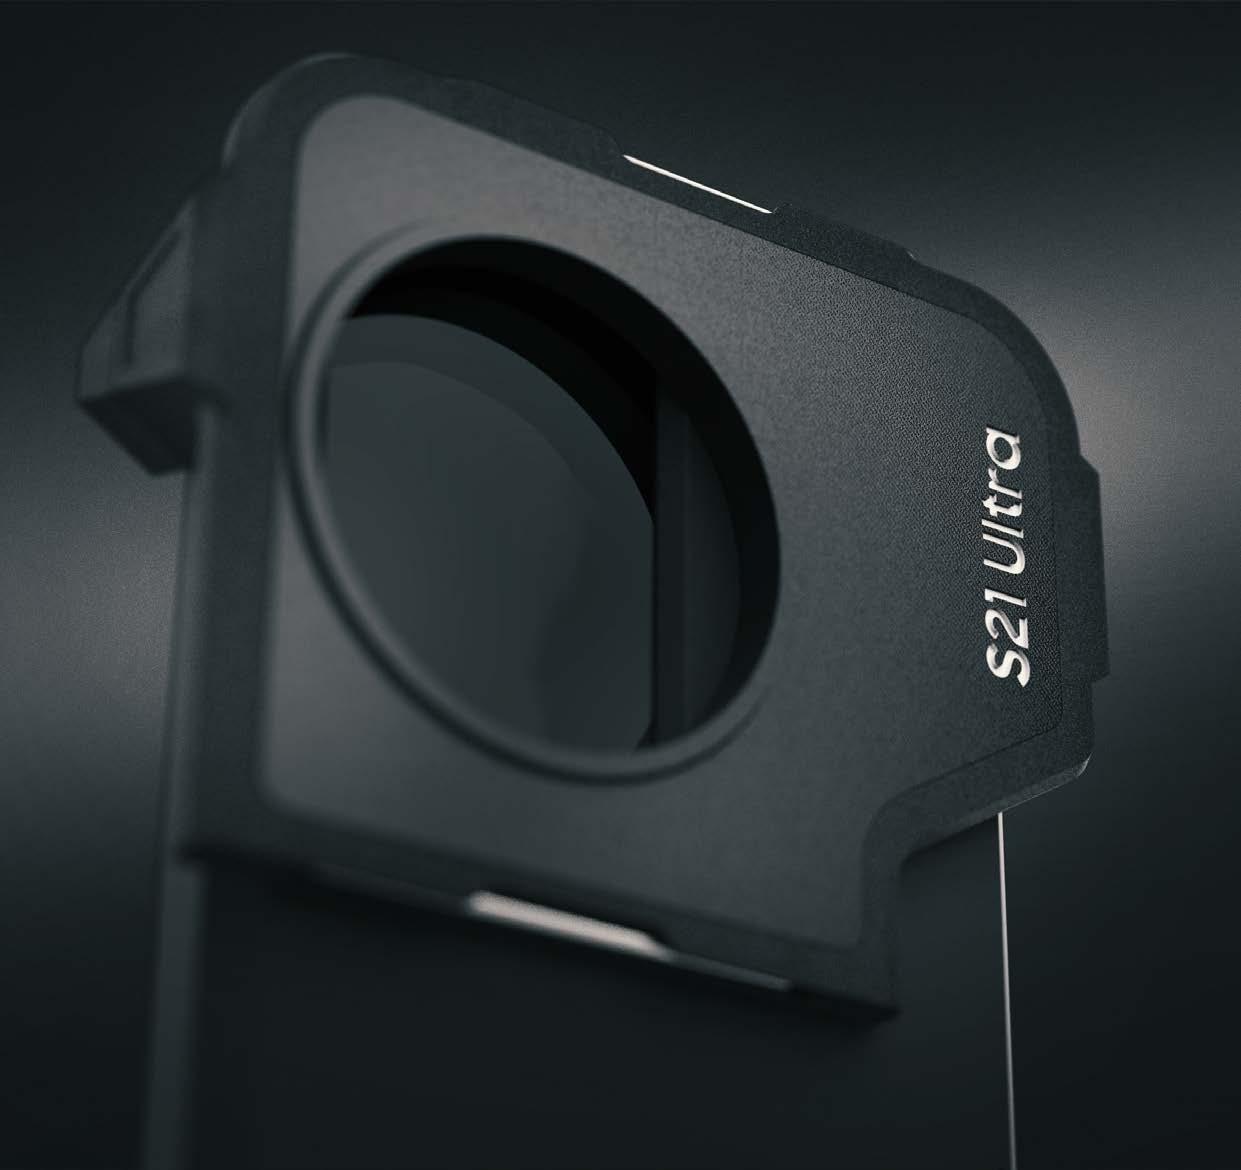
Mixing my interest in cameras, I wanted to use my filters on my phone to expand my creative possibilities without relying on a larger camera. The phone was captured with a 3D scanner, and from there the filter mount was moulded around it. It built off the same design language as my S7 mount, however it incorporated some additional features like a swappable filter mount for different sizes.
This was done with a metal rod that acted as a pin to secure the back plate. A simple yet quality solution that worked well with the limited space.
This version also features adjustable clamps to vary how secure you want it, depending on if you’re planning to remove it during use.
Additional features to be added are a tripod mount and lanyard loop.
Photography, mainly film photography plays a large part in my life. Having taken thousands of photos, I found I wasn’t making use of any. Being inspired by certain photobooks, I created a set of triptychs, based around different themes. Some of these are now displayed around my office. This evolved into making around 40 mid-century modern artworks through a mixture of CAD, rendering and Illustrator.
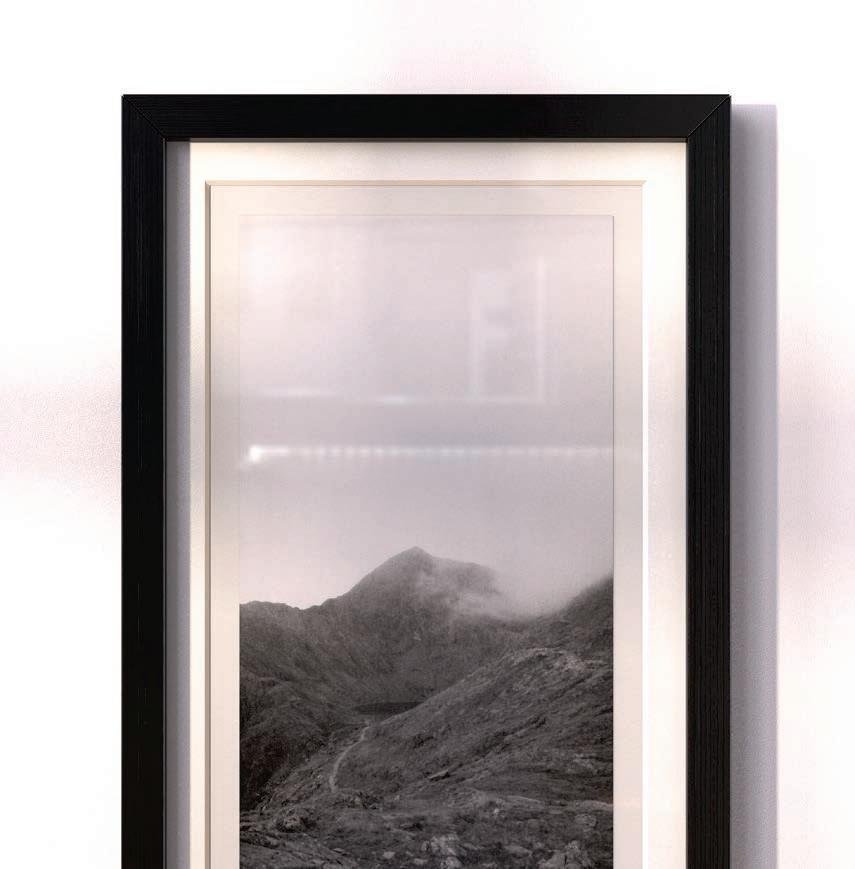
Building on this, I love vertical panoramic photos, having found a fondness for panoramic film cameras. To get a better idea of how some my prints would look, I designed and rendered up a photo frame. This aided in getting the right balance of frame to mount, as well as pushed me to make a realistic interior render.
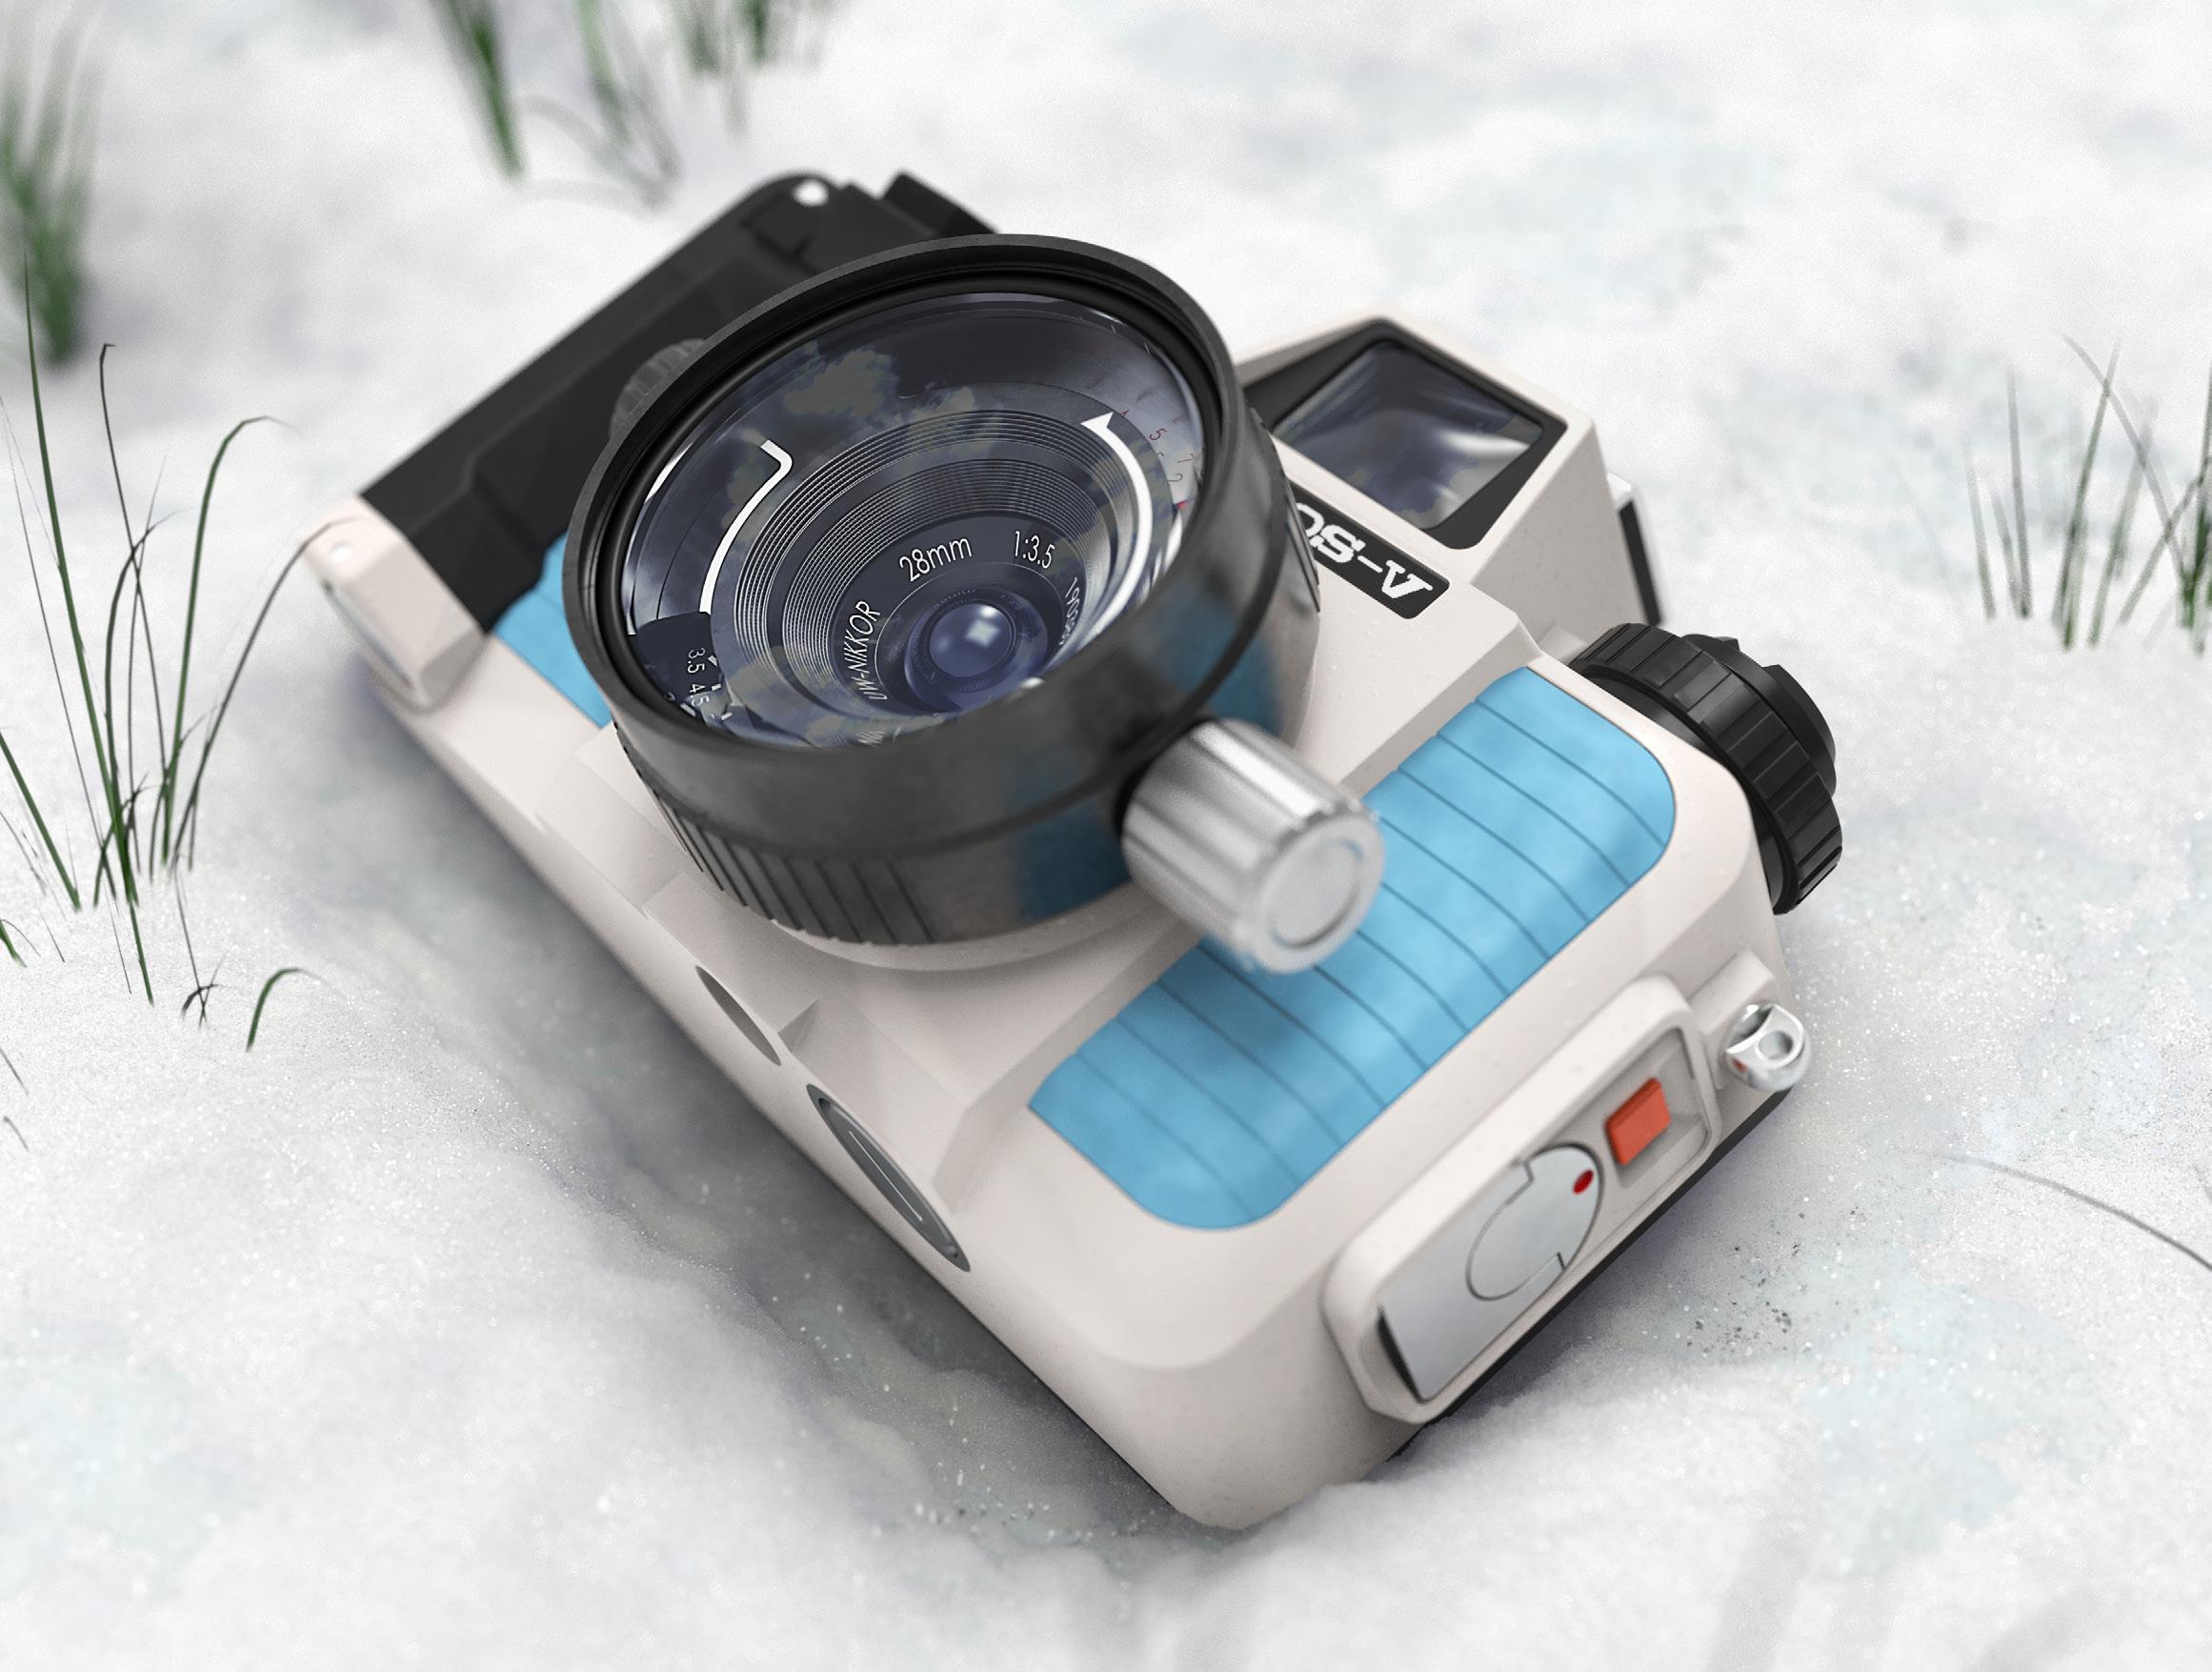
Digitizing The Nikonos V Camera
My fondness for underwater photography led me to create a near perfect digital version of the Nikonos V camera. I spent a day measuring every external part, and building an assembly, with 0.1mm tolerances throughout. Once create, rendering up visuals for it proved a valuable experience. I often worked with larger, further away subjects, but being a handheld product, it required more detail and finesse.
I wanted to create an arctic variant to go alongside the water and land version produced by Nikon. After some variations I concluded with this colourway. Being arctic themed, I felt snow would aid in conveying the theme. After some trial and error, I ended up with this fluffy and glittering texture, which resembled snow to a good degree.
I did get in trouble with some Nikonos users who thought the image was real and started a heated debate about the existence of an arctic edition, only for me to say it wasn’t real and got some words for causing confusion, but I guess that’s a compliment about the image though.
Expanding my rendering and visuals is something I’m always working towards. This Nikonos project turned out to be a good exercise in creating more realistic materials and learning new ways to create more creative materials.
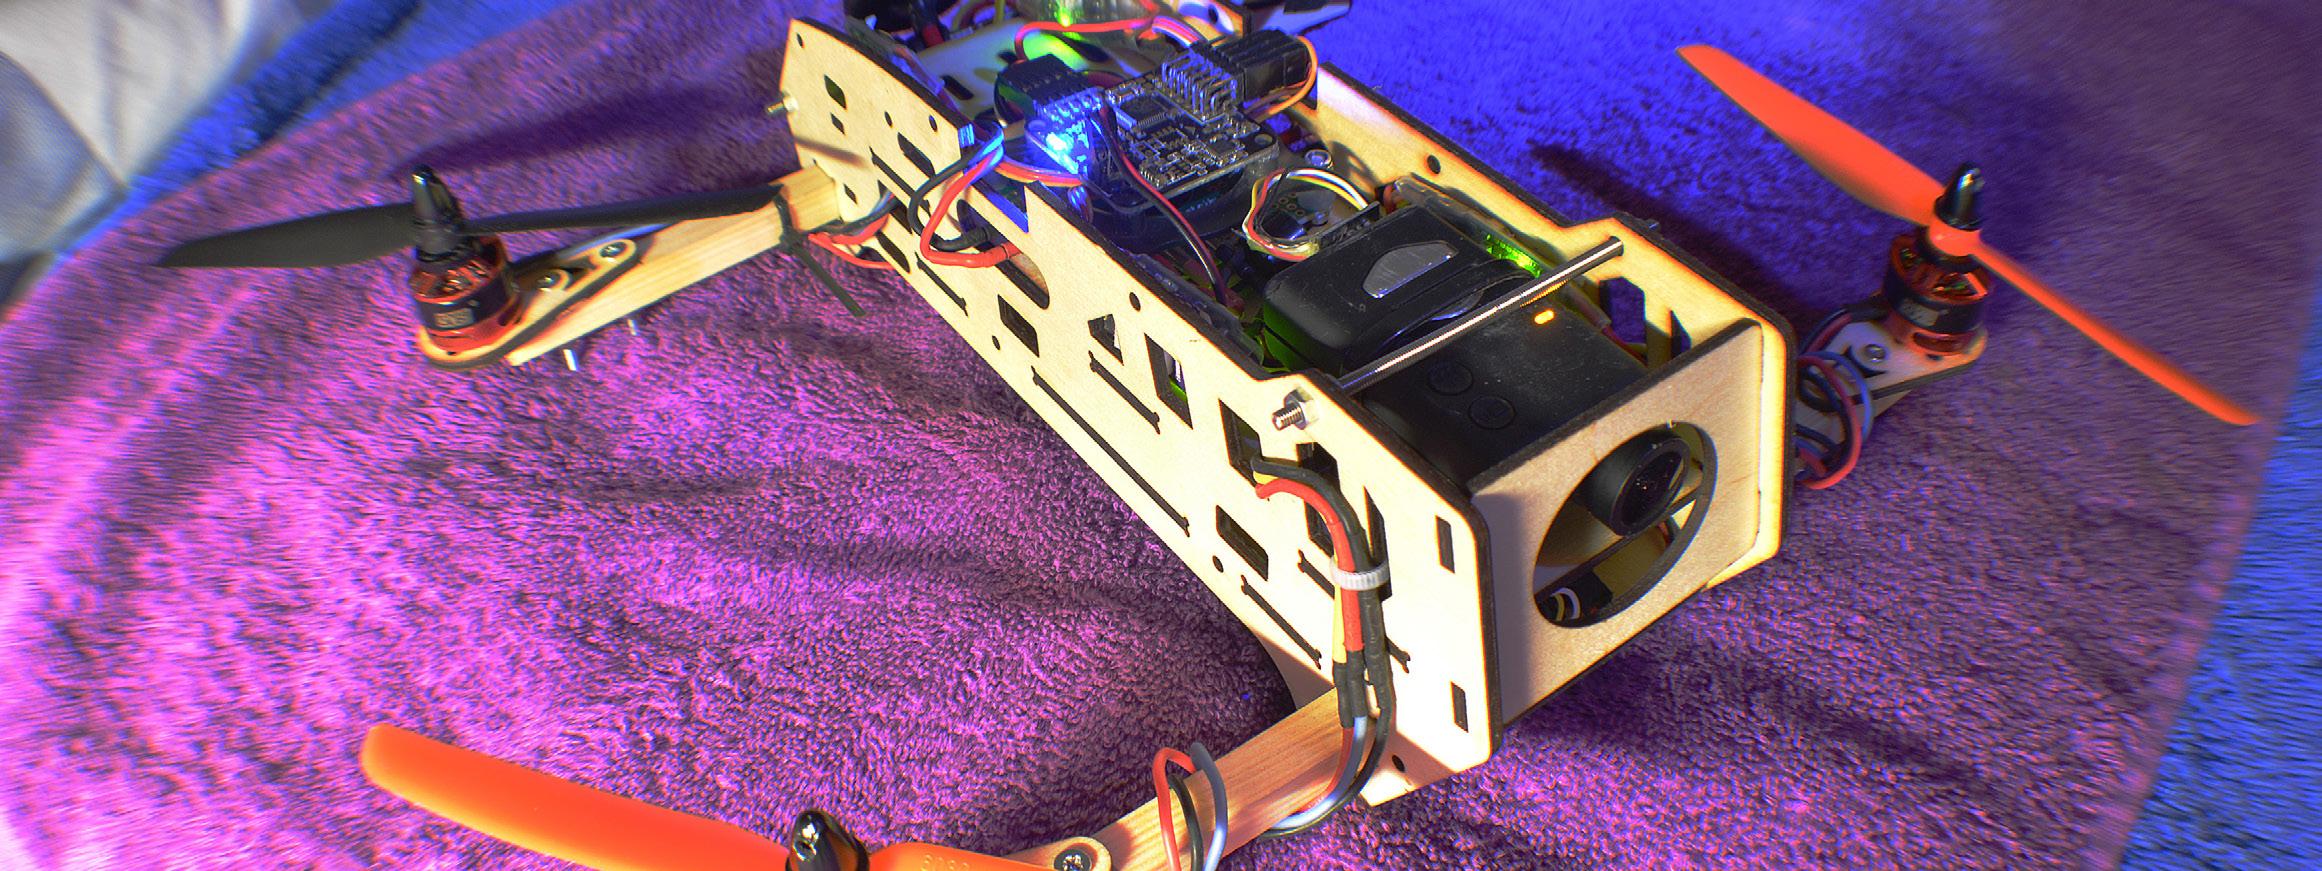
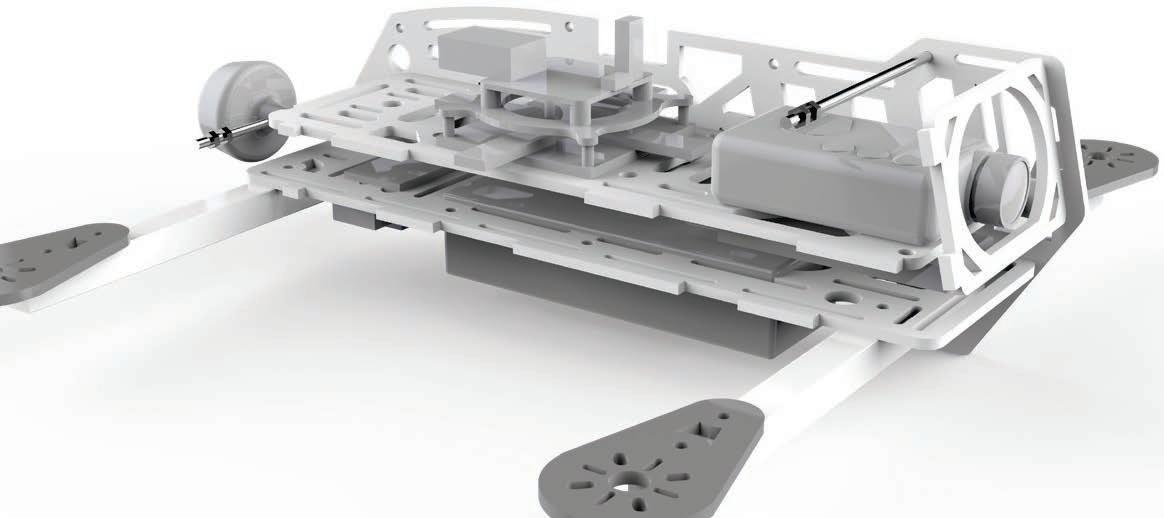
Homebuilt Quadcopters And Aerial Photography
With the explosion in drone technology, my interest in RC natural grew to include quadcopters. I soon developed my own frame stemming from the need to reduce cost with tradition shop-bought frames.
Carbon and composite frames are expensive and postage time delays flying. Taking inspiration from HPI’s Savage X twin vertical chassis, the frame is very strong and light.
Material reduction reduced the weight to be below the composite competitor. Chassis placement enabled delicate parts to be protected.
10mm baton made the arms, which resist impacts, and can produce 34 arms for £2.50.
Since using this, hobby costs have decreased, and flying skill has improved due to less down time.
A laminated card slotted on the top displays contact information, as well and covered the flight controller.
BlueFrog Design
BlueFrog Design
During the time spent on this product, I was tasked with adjusting boss depths to fine tune an even click of the 4-way button. Adding to the boss height was the sensible solution as it is a “metal off” process in the tool, saving on cost and time. Through the process of creating custom spacers, the spacing was decided.
A component was to be changed, and it was my duty to CAD up the new component adjustments, made to fit within the tolerances and process of moulding.
A brief collection of works to which I was involved. Time at BlueFrog broadened my view and vastly expanded my understanding and knowledge within design and the workplace environment. My communication skills with clients advanced throughout the year.
The DJI Inspire protection Pack was work done within BlueFrog Design. See page 36 for the full project.
Visuals and photography were mostly done by myself. With a small professional studio, I was able to create most of the website photography, and large visuals on Keyshot for clients and media sites.
The Dysesthesia chest plate was work done within BlueFrog Design. See page 38 for the full project.
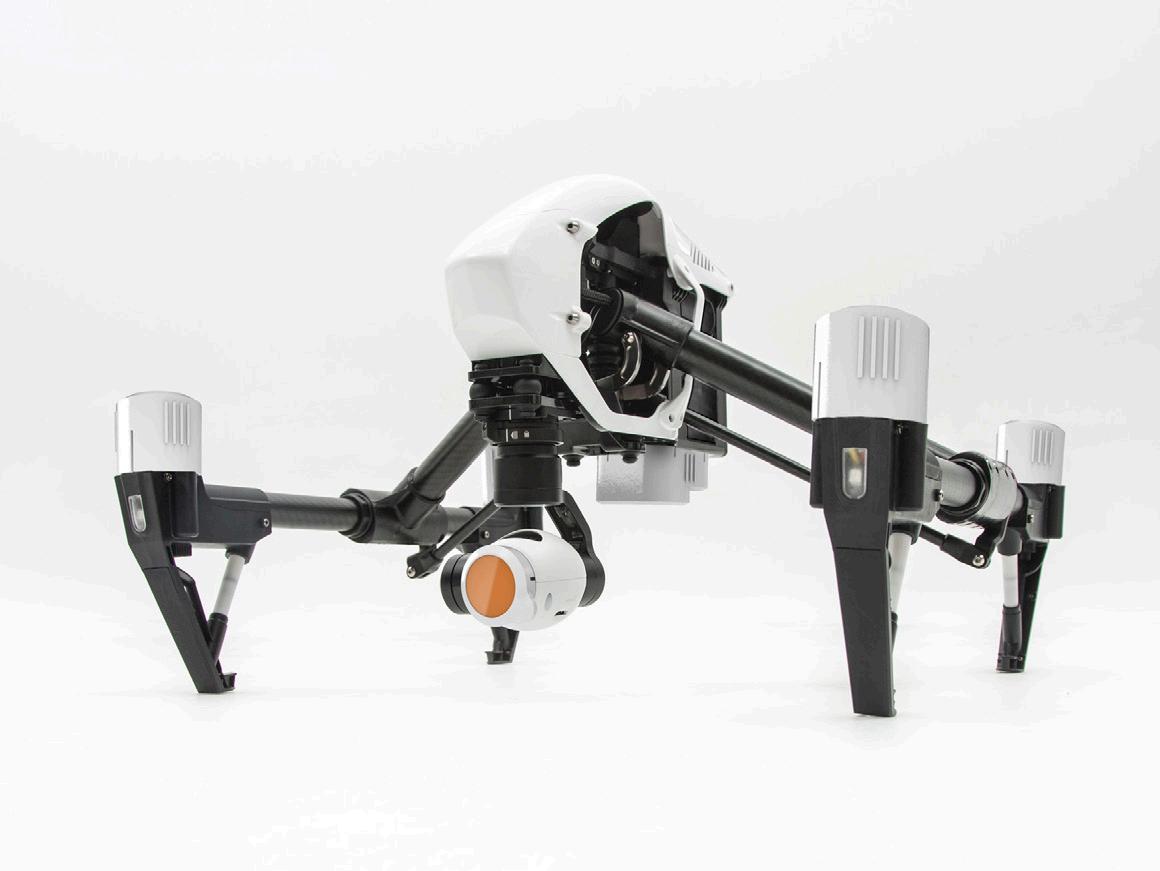
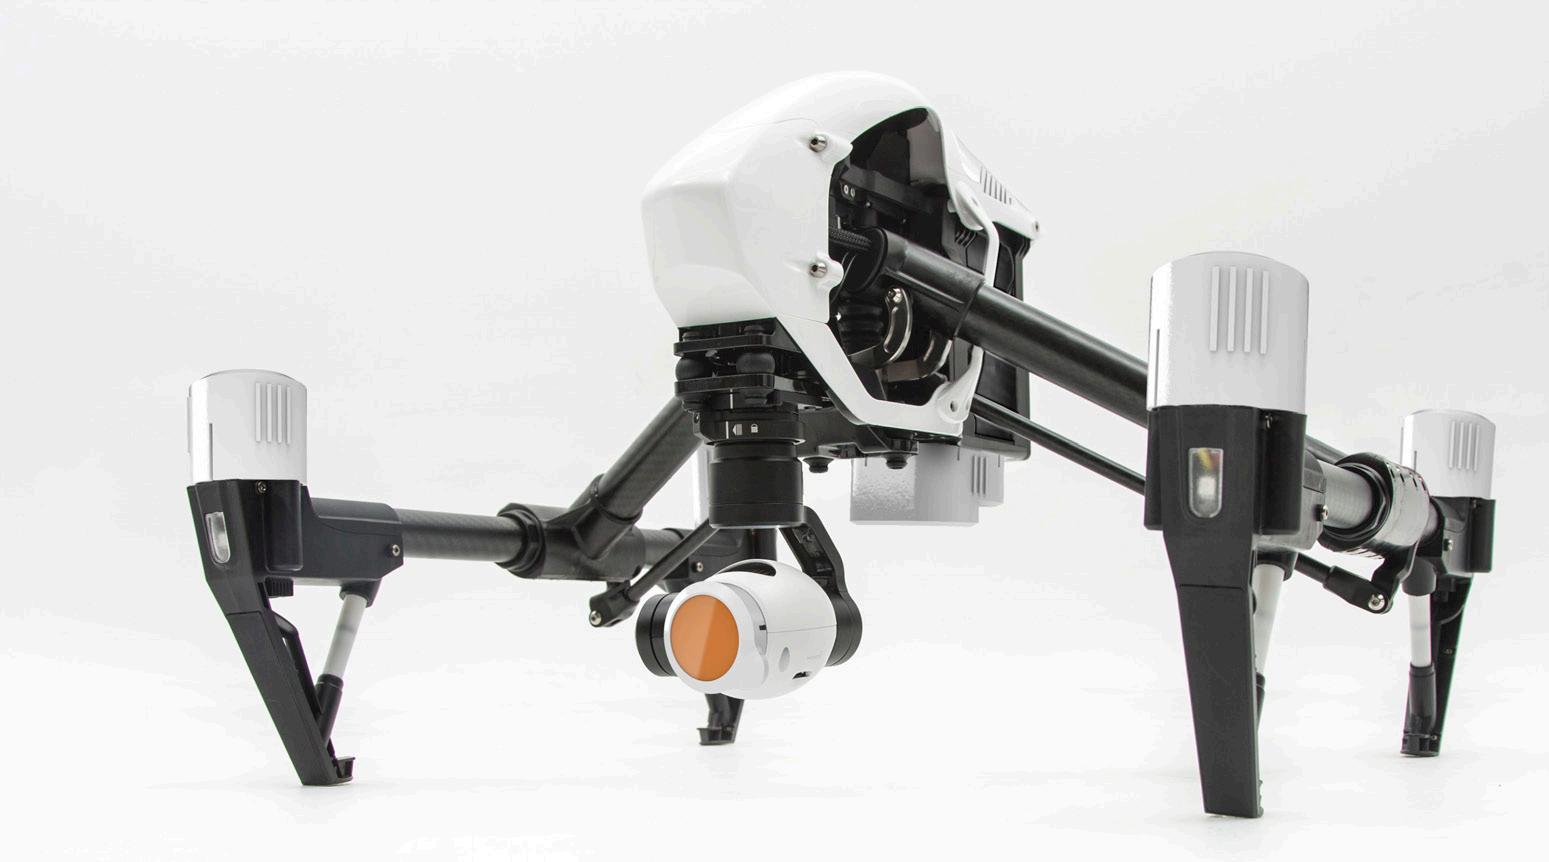
DJI Inspire Protection Pack
Bluefrog Design
Filming on set is expensive and time is limited. Rushing to the next location before the weather and lighting change is common. In these rushes equipment can be at risk. The DJI Inspire drone has fragile parts exposed, and failure of these is costly. Protecting them is vital.
Team
Solo within company
Target user
Videographer
Market
Videography
Design need
Sheild vulnerable areas while on set and in transit
Technologies 3D printing for production size
Project futures
Move into injection moulding and market packs
DJI Inspire Protection Pack
Originally optimised for 3D printing, due to production scale. The design can be easily taken into injection tooling to produce larger quantities if the demand and profit allow for it. The kit from here could be reshaped in order to nest inside itself when not in use.
A cost-effective system for protecting critical areas of the expensive DJI Inspire aerial filming platform.
The 13-piece accessory set includes 4 motor caps to stop dirt and liquids from entering the motor bells. The sonar sensor on the belly of the craft is delicate and is used to control the aircrafts position 10 feet from the ground. This is capped along with the battery terminals. Lastly the camera lens is capped to stop damage and potential issues with footage.
A black lens hood shields the lens from sun flares while filming. The 2 stick extensions provide much greater control by increasing the sticks leverage. Two controller rings are used with elastic bands to provide resistance, which some pilots prefer.
Design
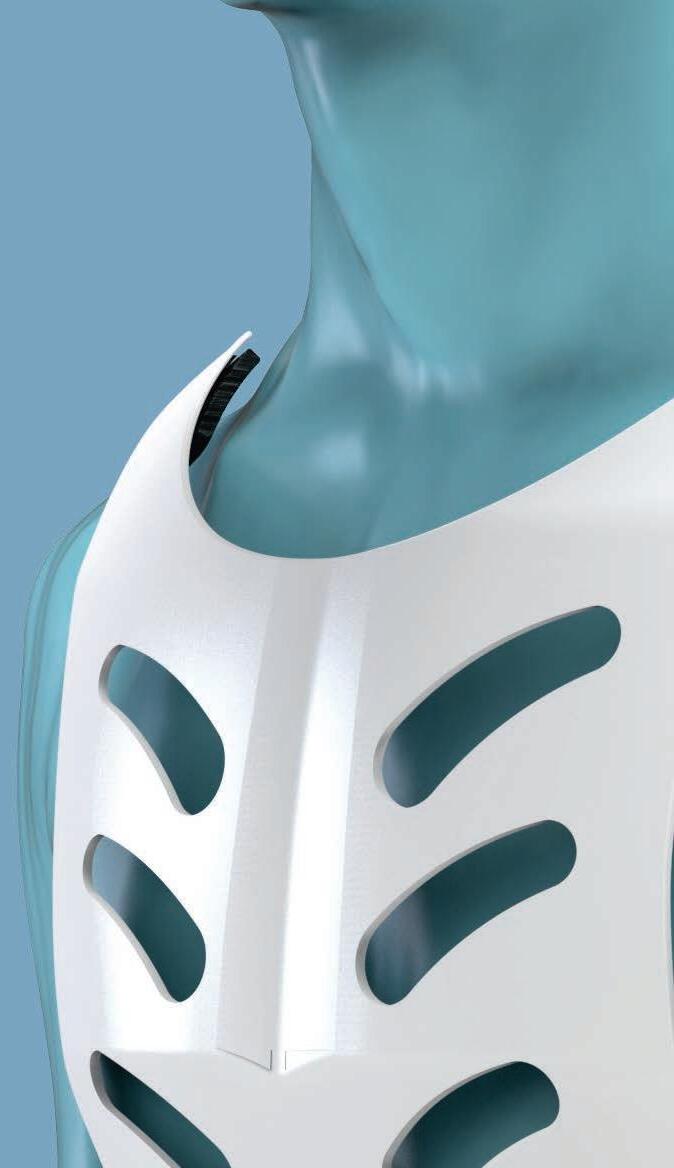
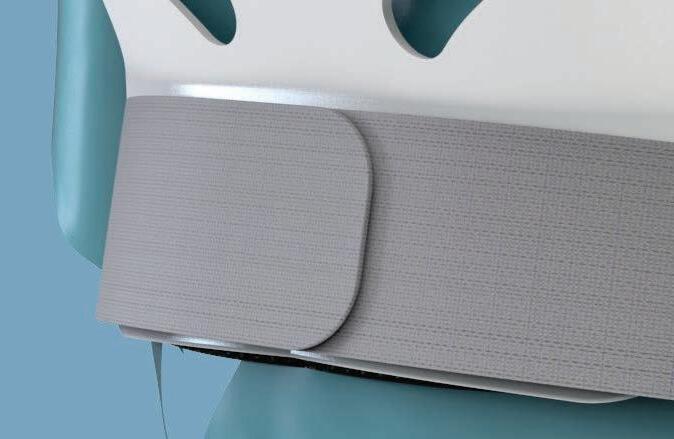
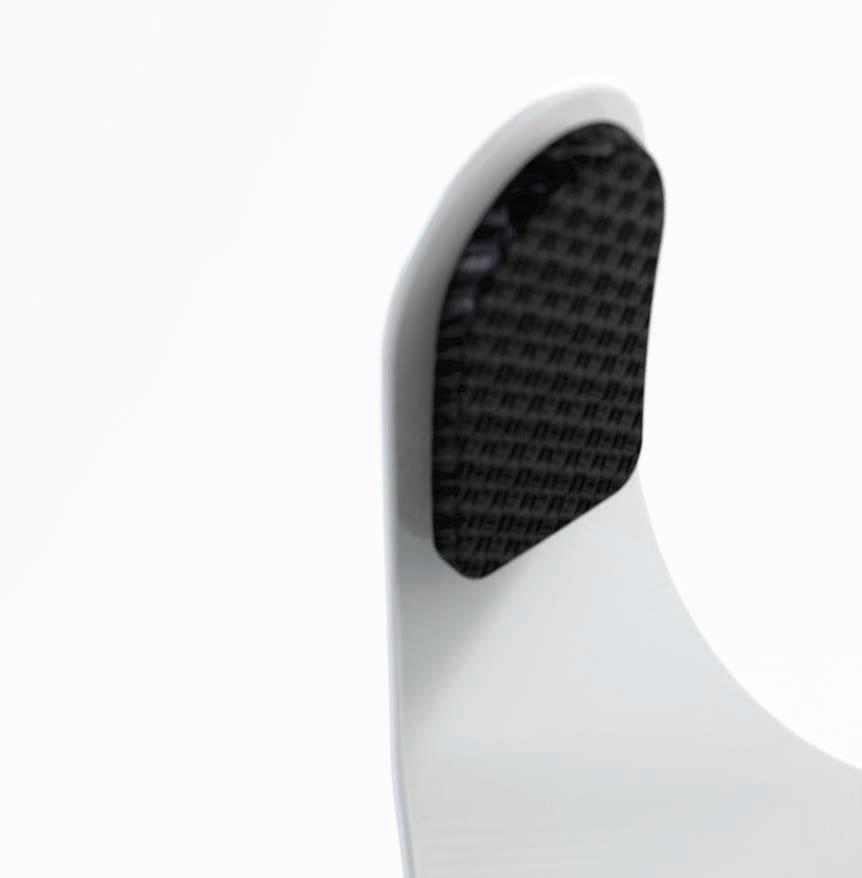
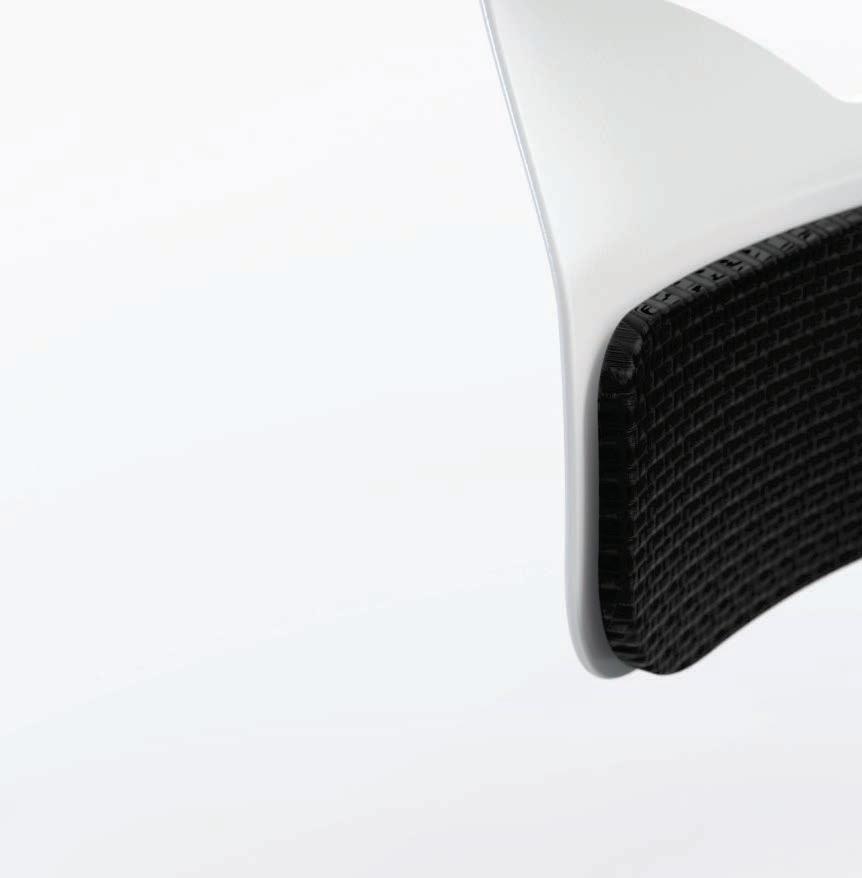
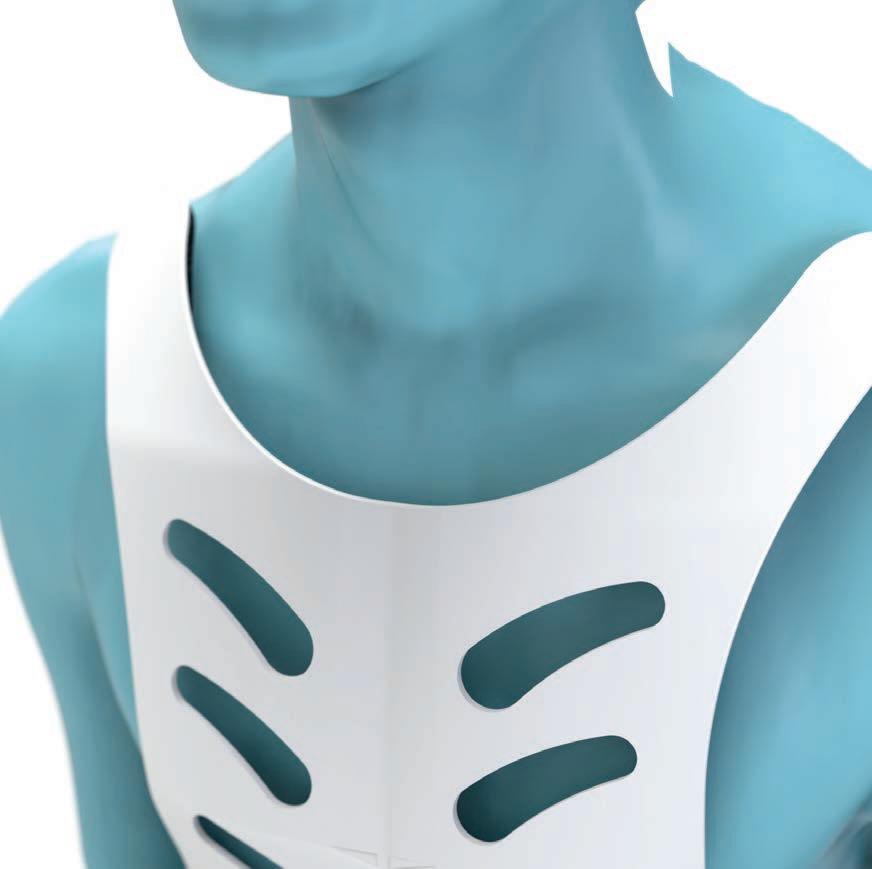
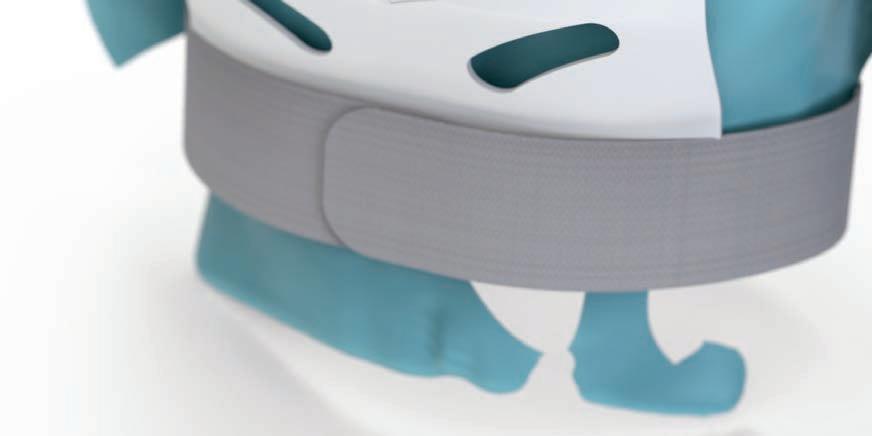
Dysesthesia Chest Guard
BlueFrog Design
Origin, greek word “dys” which means “notnormal” and “aesthesis” meaning “sensation”, dysesthesia is a painful and uncomfortable condition. For sufferers everyday life is stressful and can make the skin feel like it’s burning, crawling, itching and pins and needles.
Team
BlueFrog Design
Target user
Tailored towards individual
Market sector
Design need
Prevent irritation of chest from clothing
Technologies
Cost effective, easy to clean and durable
Project futures
Can be batch produced for people with a similar issue
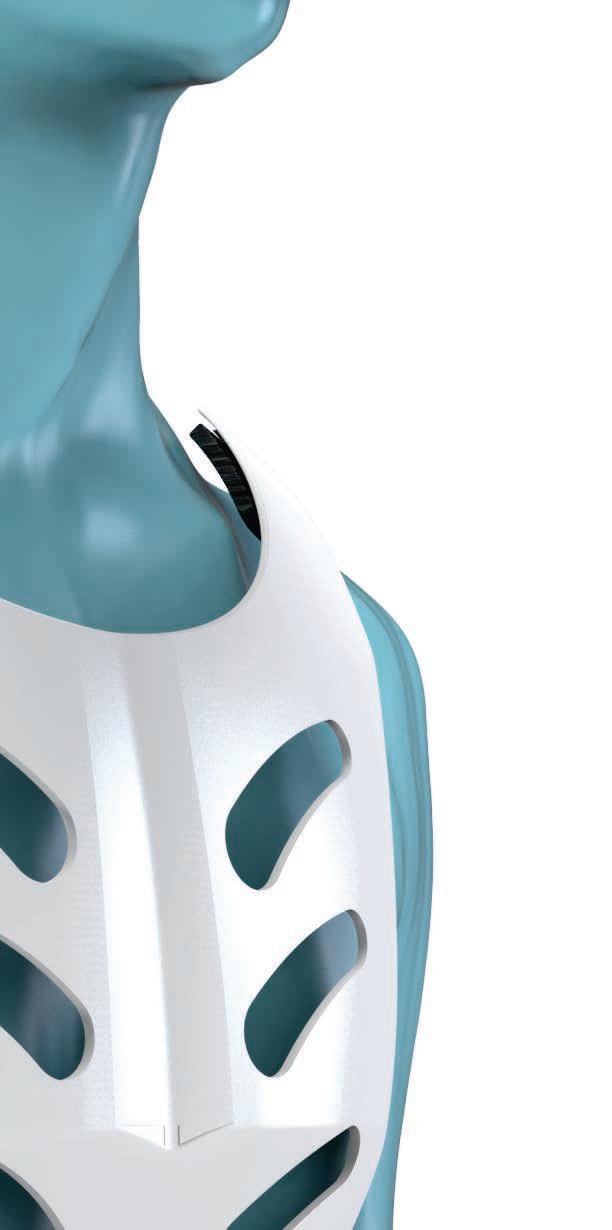
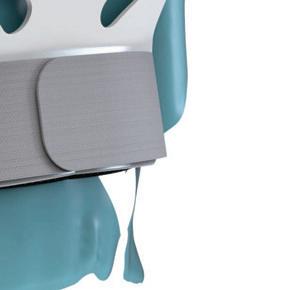
Dysesthesia Chest Guard
The condition is a huge burden in the client’s life. The guard enabled clothing to be worn without irritation. Vacuum formed plastic created the main plate, with hand cut vents for weight and styling to the client’s taste. Padding was added areas where it mattered and an elastic belt secured it.
Provided with a 3D scan of the client, I was in charge of designing the style, and modelling up the model. Quick sketches were the foundation of modelling, within half a day the CAD was being worked up. Surface modelling created the form, and from there, various vent patterns were drawn and modelled.
Restrictions drove the CAD and design, so keeping these in mind throughout was vital.
Plug Snug Cable Tidy
University 2nd year
Research shows that many device users don’t keep cables safe. Damaged charger cables can cause issues for both charger and device, as well as be a safety risk. This project was pushed towards manufacturing, mainly over moulding, for which a tool and silicone over moulded product was made.
Design need
Resolve cable mess and damage
Target user Tech users
Technologies Over moulding
Project futures
Cheap to tool, small run productions Team Solo
Market sector Home organisation
Snug Plug Cable Tidy
Such a simple product provided a good opportunity for design for manufacture. Silicone over moulding pushed my understanding to a new level, along with making the tooling and masters.
A 99% scale master was printed, finished and sprayed gloss to make the silicone tool. With the tooling set up and split, the master is removed and a full scale printed and sprayed plastic component is inserted into the tool.
The 1% scale difference ensures the new part fits tightly in the tool to prevent flash. Paint thickness has to be accounted for otherwise the part will not fit.
With the part removed, any flash is carefully cut off and the painted surface is cleaned as residue can stick.
The result is a fully functioning model, and as an exercise, it helped with understanding many aspects of manufacturing.
The plastic component requires detailing to aid the silicone flow, and to secure the silicone to prevent it sliding off. Details like these are what taught me valuable lessons about this process.
External Work
Additional Work
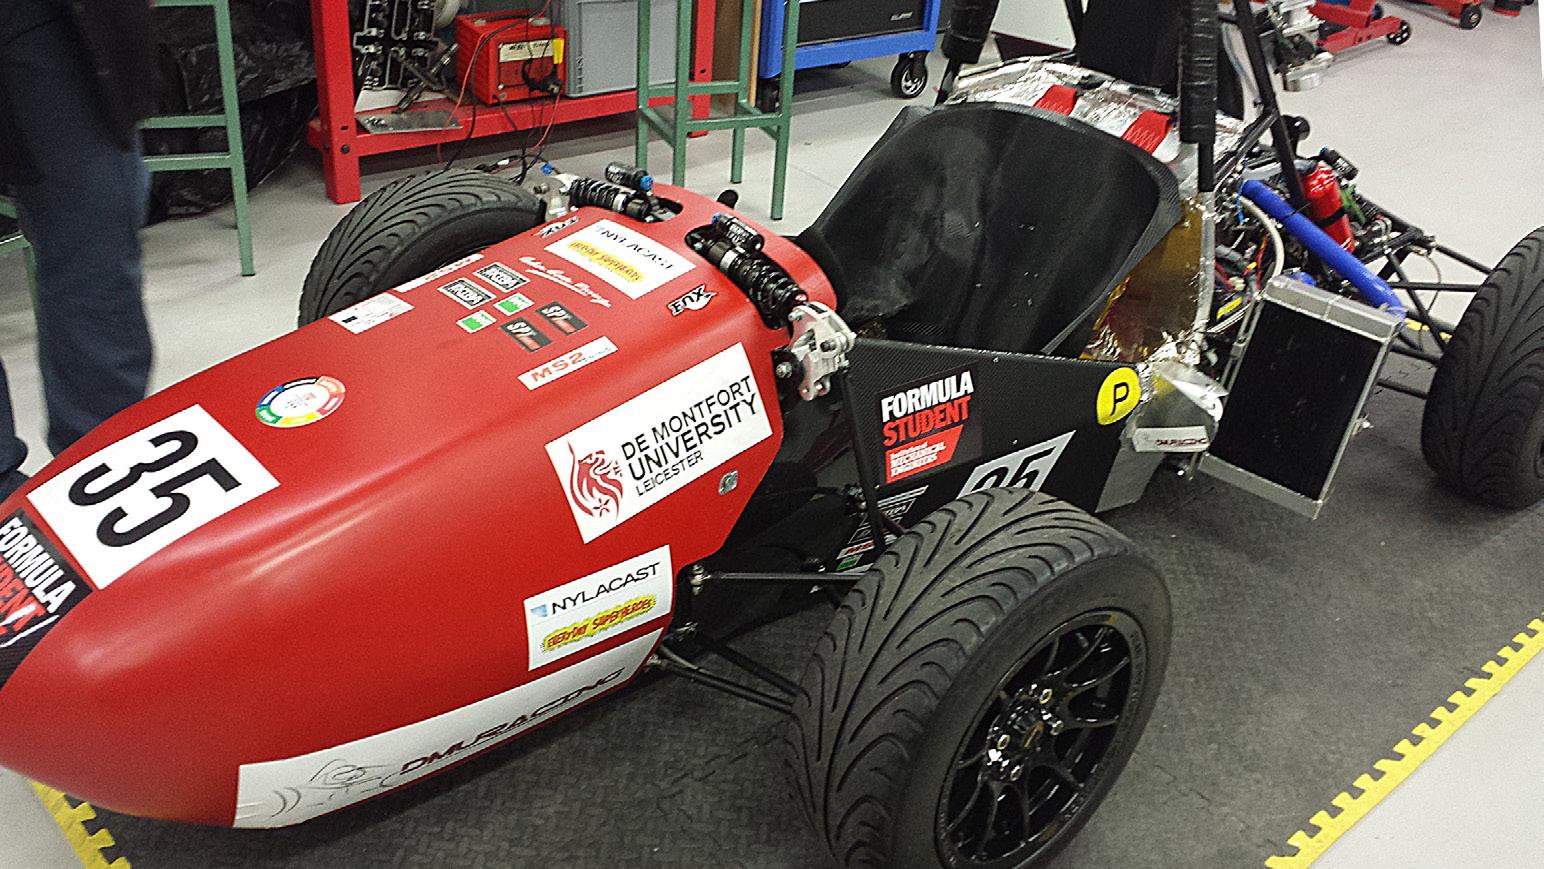
De Montfort takes part in IMechE’s Formula Student project to build a single seat race car. A small team including myself were chosen to work together to produce the front body cone, as well as other smaller aspects of the car. While collaborating with the engineering department, designs were drawn up and evaluated, which led to design development and small-scale models. The small-scale models gave a sense of appearance and provided a good start for wind tunnel tests. From then on, the final design was produced in fibreglass and potentially carbon fibre.
Additoinal work done outside of university and work
Front Runner data Analysist Researcher
De Montfort University hired me to compile a workshop user booklet for the facilities. The aim of the booklet was to inform students on workshop locations, equipment, technicians and essential information which would help them use their time more efficiently. My project plan was to document each workshop, get an understanding of what the space is used for, photograph key points and gather all essential information. With a page layout and theme decided on, the information was laid down and the booklet quickly took shape.