8
THE PLANT PROPAGATOR'S BIBLE
9
ABOUT THIS BOOK
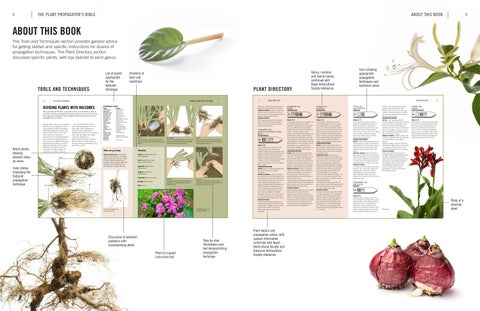
ABOUT THIS BOOK The Tools and Techniques section provides general advice for getting started and specific instructions for dozens of propagation techniques. The Plant Directory section discusses specific plants, with tips tailored to each genus.
TOOLS AND TECHNIQUES 62
PLANT DIRECTORY DIVIDING PLANTS WITH RHIZOMES
When you think of rhizomes, you probably think of the bearded iris with its prominent rhizomes emerging from the ground. But as you can see from the list at right, this certainly isn’t the only garden plant that grows and can be propagated from a rhizome.
Color photos displaying the featured propagation technique
Checklist of tools and conditions
TOOLS AND TECHNIQUES
DIVIDING PLANTS WITH RHIZOMES
Detail photos showing relevant closeup views
List of plants appropriate for the featured technique
Timing matters when you are dividing rhizomes. In most regions it’s best to wait until after the plant has finished blooming to dig up the rhizome and divide it. But if you live in a cold, short-season area, this may be impractical because divisions planted in late summer and early fall don’t have time to become established before the ground freezes. In this case, divide in spring and snap off any flower buds that form so the plant can put its energy into creating a strong root system for a year before it blooms.
You may wonder how often to divide rhizomatous plants. Some of them suffer if their rhizomes are allowed to grow unchecked, so dividing them every 3 to 5 years keeps them vital and strong. Once again, rather than adhering to a predetermined schedule, watch the plant and divide it when flowering decreases, flower size diminishes, or it just looks crowded.
rhizome
63
APPROPRIATE PLANTS COMMON CUPID’S BOWERS BANEBERRIES MAIDENHAIR FERNS ELEPHANT’S EARS PERUVIAN LILIES WILD GINGERS BLACKBERRY LILY BERGENIAS CUCKOO Flower BEARDED IRISES LOTUS MAYAPPLES TUBEROSE SOLOMON’S SEALS WALL ROCKCAP FERNS CHRISTMAS FERNS SWORD FERNS BLOODROOT WAKEROBINS WOOD LILIES
Trillium spp.
Wait to sever layered plants from the parent stock until they have a strong root system. Otherwise, they may not be able to acquire enough moisture to survive.
Calycanthus spp.
Sweetshrubs, Carolina Allspices, California Allspices CALYCANTHACEAE 1 LIFT Dig up the entire rhizome of the plant you want to divide, trying not to damage the root system.
2 EXAMINE Divisions will reestablish best if they have at least two growth buds with leaves growing from them as well as many roots.
3 CUT Use a very sharp knife to cut the divisions. A dull knife can bruise tissues because you have to press so hard on it.
What can go wrong
Checklist
Rhizome doesn’t grow: If you plant a rhizome with no buds, it cannot grow leaves and will die. If you are cutting a rhizome before the leaves have emerged, check to make certain that each piece has at least one, but preferably two, strong growth buds.
Season: Spring or after plants finish blooming
The three species in this genus come from North America and grow wild along the margins of woods and on stream banks. They are grown for their compact habit and unusual flowers. The blooms are a dark dusky red or mahogany brown and grow at the ends of branches. They last for many weeks, spreading a fragrance similar to cloves through the garden. The leaves smell almost like camphor when crushed.
Tools: Garden fork, trowel, garden knife, pruners Equipment: Garden hose, cutting board
PROPAGATION METHODS Easiest: Suckers. Suckers grow naturally. Dig
Supplies: Compost, soil amendments Temperature: Cool, not windy Humidity: Not important stems and leaves
PLANT DIRECTORY
Light: Cloudy
4 TRIM Cut back the leaves so that the plant isn’t stressed by having to provide water for a large leaf area.
5 PLANT Replant the rhizome at the same depth it was growing, and water it well to exclude air pockets from around the roots.
them in early spring, and transplant immediately. Additional methods: Layering. Plants also layer naturally, so it’s easy to propagate them in this way. Bend the stems down to the ground in early spring, wound the bark, and pin them in place. By the following spring, the new plants will be large enough to transplant easily. Softwood cuttings. Take cuttings in spring. They root quickly, but you may want to hold them in pots in a cold frame for one winter. Seed. Seeds are available from specialty companies. Plant them in fall, as soon as they are ripe. Keep the seed flats in a cold frame over winter, and they will germinate in spring.
Potential Problems
This rhizome should have more growth buds.
Propagate bergenia by dividing rhizomes.
Discussion of potential problems with accompanying photo Photo to support instructive text
Step-by-step illustrations and text demonstrating propagation technique
Let both suckers and layered plants grow a strong root system before severing them from the parent plant. Otherwise, they may not be able to survive on their own. Seeds can germinate erratically; don’t throw out the seeding flat.
Plant details and propagation advice, with species information confirmed with Royal Horticultural Society and American Horticultural Society references
147
Campanula spp.
Campsis spp.
Canna spp.
Zones: 5–9
Zones: 5–9
Zones: 8–11
Easiest: Seed. Seed is available from
Zones: 3–8
The more than 300 species in this genus come from temperate regions in the northern hemisphere, particularly Turkey and southern Europe. In addition to the huge number of species, there are hundreds and hundreds of cultivars. The genus includes annuals, biennials, and perennials, some evergreen and some deciduous. They vary tremendously in habit; you can find trailing plants; spreading, mat-forming species; mounded forms; and tall, upright specimens. Flowers range in color from white through pink, blue, and purple; most are bell shaped, as are C. persicifolia ‘Telham Beauty’ and C. ‘Burghaltii’, but some (as in C. carpatica species) have a more open form.
The two species in this genus come from China and North America. This vine is grown for its bright orange or red trumpet-shaped blooms. The vines have a long bloom period, generally from mid- to late summer until early fall, and are covered with flowers when in full bloom. In addition to its decorative qualities, this vine is grown because it is a favorite food of hummingbirds. Many people trellis it just outside a window so they can watch the parade of hummingbirds that visit every day.
The 50 species in this genus come from tropical and subtropical areas in Asia and North and South America. Cannas are spectacular specimen plants, thanks to both their dramatic leaves and striking flowers. Leaves can be as long as 24 inches in cultivars such as ‘Pretoria’, marked with stripes of yellow or red. Flowers range in color from yellow to pink, orange, and red.
The six species in this genus come from North America. They are well loved because of their white, pink, or purple flowers that rise above the leaves. The tall plants make a striking accent in beds and borders simply because they stand so tall and straight. In late summer, when they begin to bloom, they make an even stronger impact. Flowers are long lasting and stand up well to early fall wind and rain.
PROPAGATION METHODS
Lift the rhizomes in spring, if these plants are growing outside, and cut into pieces. If you lift the rhizomes and store them for the winter, divide them when you replant them in the spring. Additional methods: Seed. Plant seeds in early spring. Nick the seedcoat, and soak it for 24 hours before planting it in a deep flat filled with a humus-rich seed starting mix. Keep the soil around 70º to 75ºF using a heating mat. Seeds will germinate in 3 weeks to 2 months.
specialty companies. Plant as soon as the seed is ripe, and place the planting flats in a cold frame over the winter months. Seeds will germinate erratically in spring. Or hold the ripe seeds in the refrigerator until spring, and give them alternating day and night temperatures after you plant them in spring. Additional methods: Softwood cuttings. Take cuttings in spring, before they begin to harden up, and start them in a fresh, soil-less medium. Hardwood cuttings. In late fall to early winter, take hardwood cuttings. Bundle and bury them in a container under the soil under a cold frame or protected garden spot for the winter.
Bellflowers CAMPANULACEAE
Trumpet Vines BIGNONIACEAE
Cannas, Indian Shots CANNACEAE
Potential Problems
Zones: 3–9
roots
Icons showing appropriate propagation techniques and hardiness zones
PLANT DIRECTORY
want to wait until the following spring to sever them from the parent plant and move them. Additional methods: Semiripe cuttings. Take cuttings in early to midsummer, as soon as they are ready. They will root quite quickly and should be ready to plant out by fall.
BOTANICAL Achimenes spp. Actaea spp. Adiantum spp. Alocasia spp. Alstroemeria spp. Asarum spp. Belamcanda chinensis Bergenia spp. Cardamine pratensis Iris spp. Nelumbo spp. Podophyllum spp. Polianthes tuberosa Polygonatum spp. Polypody Polypodium spp. Polystichum spp. Sanguinaria canadensis
146
Genus, common, and family names, confirmed with Royal Horticultural Society references
preserves or pie. Popular quinces include cultivars such as ‘Enchantress’, ‘Apple Blossom’, ‘Red Chief’, and ‘Pink Lady’, and suppliers continually introduce new cultivars, some thornless and others with increasingly attractive flowers and fruit.
Chelone spp.
Turtleheads SCROPHULARIACEAE
PROPAGATION METHODS
PROPAGATION METHODS Easiest: Seed. All species of Campanula are easy to grow from seed. Plant them on the surface of a vermiculite-covered flat, and mist them into small crevices. They need light to germinate. Cover the flat with plastic film until they germinate, which takes anywhere from 2 weeks to a month, depending on the species. Maintain soil temperatures about 60º to 65ºF. Additional methods: Division. All perennial species can be divided. Lift and divide them in spring or fall, depending on where you live. Allow them at least 40 days to become established before the full heat of summer or the ground freezes in fall. Softwood cuttings. Take softwood cuttings from shoots that grow at the base of the plant when they are about 6 inches long. Root them in a soil-less medium. They root quickly.
Potential Problems Seeds grow slowly, so they are prone to fungal diseases such as damping off. Keep air circulation high in the area where they are growing, and don’t mist their leaves after about 2:00 p.m.—the leaves must be dry by nightfall. Divide plants so that each section has a portion of the root mass as well as top growth, and replant the divisions immediately. Keep them moist until they become reestablished.
Easiest: Semiripe cuttings. Take cuttings in early summer, as soon as they are ready. They root quickly and, unless you live in a climate with harsh winters, will be ready to transplant to the garden in fall. Additional methods: Seed. Seeds are available from specialty seed companies, and you can also save your own. Plant the seeds in a flat, and place it in a cold frame over the winter. Seeds will germinate erratically the following spring. Alternatively, you can stratify the seeds for 2 to 3 months in the refrigerator, and then start them inside the house. Place them on a heating mat set for 70º to 75ºF. They will germinate in 4 to 12 weeks. Hardwood cuttings. Take these cuttings in late fall, as soon as the wood is truly hard. Hold them over the winter in a cold frame. They will root the following spring. Root cuttings. Take cuttings just before the ground freezes in winter, and bring them inside the house or greenhouse to root. They should form roots in early to mid-spring.
PROPAGATION METHODS Easiest: Division. Plants grow from rhizomes.
Potential Problems To survive on their own, divisions must have a prominent “eye” where a stem, leaves, and flowers will grow. Examine the rhizomes carefully before you cut them into pieces. When scarifying the seeds, make only a shallow nick in the seedcoat; don’t cut into the interior of the seed.
Potential Problems Seeds will not germinate uniformly, so it’s important to keep the seedling flat for at least the season, preferably into the following season. Stray plants may surprise you as the months go by. Fungal diseases will attack if the cuttings are too moist. Protect the buried hardwood cuttings from excess moisture over the winter months by keeping them in a cold frame or covered with a protective barrier.
Chaenomeles spp. Flowering Quinces ROSACEAE
Potential Problems All cuttings are prone to fungal attack. Protect your plants by rooting them on a heating mat set at 60º to 65ºF, using only fresh rooting media and keeping air circulation high in the area where they are rooting. Seeds will not germinate well if they do not receive a long chilling period. If you live where winters are mild, stratify them in the refrigerator rather than by having them spend the winter months in a cold frame.
Zones: 5–9 The three species in this genus come from China and Japan. These large shrubs or small trees are grown for their early spring flowers and fall fruit. They are not self-fertile; two varieties are needed to produce fruit. The white, pink, or red blooms coat the tree, both before and after the leaves enlarge. The tart fruits are edible when cooked and used in
Canna spp.
Photo of a directory plant
30
TOOLS AND TECHNIQUES
SCARIFICATION
SCARIFICATION
APPROPRIATE PLANTS
Scarification happens naturally when a bird swallows a seed that then passes through the digestive system. Acids there eat through the tough seedcoat. When the bird eliminates the seed, it's ready to germinate.
It’s easy to remember what scarification means because the root of the word is “scar,” and that’s what you do when you scarify a seed—you scar the seedcoat. Many seeds that birds inadvertently plant can either tolerate scarification or require it, but this is not always true. For example, birds are responsible for seeding many thousands of multiflora roses (Rosa multiflora) every year, but the roses you start from seed don’t need scarification. Scarifying a seed that doesn’t require it can kill it, so it’s best to check a good reference if you have a tough seed that looks as if it
31
might need this treatment but isn’t listed on this page. This procedure might alarm you the first time you do it, but it’s really not frightening. You simply want to scratch the seedcoat just enough so that water can penetrate it. As shown right, you can do this by nicking the seedcoat with the tip of a very sharp, small paring knife or by scratching it with sandpaper. Nick or scratch the side of the seed to avoid injuring the hilum, or “eye” of the seed, where the first root and shoot will emerge.
COMMON MALLOWS HOLLYHOCK FALSE INDIGOS ANGEL’S TRUMPETS CANNA MOONFLOWER MORNING GLORIES
BOTANICAL Abelmoschus spp. Alcea rosea Baptisia spp. Brugmansia spp. Canna × generalis Ipomoea alba Ipomoea spp.
Checklist Season: Spring Tools: Small, sharp paring knife
1 SELECT SEEDS Pour seeds into a bowl to examine them.
Equipment: 2 small bowls Supplies: Seeds, fine sandpaper
2 NICK Use a very sharp knife to nick the seedcoat. Do not injure the hilum, or “eye,” because the first root and stem emerge from this area.
3 SORT Place the nicked seed in another bowl to keep your piles separate. Scarify the remaining seeds, one by one.
Fine sandpaper is best for scratching seeds.
Below: Scarified and soaked morning glory seeds tend to grow well.
ALTERNATIVE METHOD: SANDPAPER Alternatively, scarify seeds by rubbing them on a piece of fine sandpaper. If you are working with large seeds, simply draw each seed over the sandpaper, but if you are working with a group of seeds, rub them between two pieces.
Sandpaper is a good choice with hollyhock seeds, left, and also does a nice job on the sweet peas, above.
42
TOOLS AND TECHNIQUES
SAVING SEEDS
SAVING SEEDS
Checklist
Saving seeds opens up one of the most exciting aspects of gardening. Simple techniques allow you to breed plants especially adapted to your garden’s environment, learn to create your own hybrids, and breed back from commercially produced hybrids to create open-pollinated plants.
Saving seeds is thrilling—once you begin, you’ll wonder why more people don’t do it. The basic techniques of improving a variety are simple and prepare you for the more complicated, but still easily achievable, procedures associated with developing hybrids and breeding back from hybrid cultivars. Aside from some basic equipment, three things are essential for this work: • A basic understanding of the biology of seed production • The patience to continue working on your improvements over the years • Organizational skills, so that you can keep your seeds sorted and labeled and also maintain accurate records.
Below: Ensure seeds are neatly organized and labeled.
43
Most people begin seed-saving and breeding experiments with vegetable plants, and it’s easy to find good books and resources that cover procedures for these. But if you want to work with ornamental plants, don’t be dismayed— you can easily adapt the information about vegetable plants to the ornamentals you want to improve.
DISTINCTIONS Teach yourself to save seeds and breed plants by working with an openpollinated (OP) variety or cultivar first. Open-pollinated plants come “true to type,” which means that plants from their seeds will be very similar to their parents, as long as they are fertilized by pollen from a plant of the same variety or cultivar. In contrast, a hybrid is produced by crossing a species, variety, or cultivar of one plant with another related plant. It’s also useful to know if a plant is a variety or a cultivar. This distinction can be hard to draw because a cultivar is simply a variety that has been selectively bred for its particular characteristics. Once these qualities are stable from one generation to the next, the variety has become a cultivar—or cultivated variety. You will be creating cultivars for your own garden.
ISOLATION In some cases, all you need to do is collect the dry seedheads or pods at the end of the season and keep them over the winter. But this only works if you and every other gardener in the neighborhood are growing only one species of an open-pollinated plant—
Season: Spring through fall Tools: Small watercolor brush Equipment: Wire plant cage Supplies: Floating row cover material, strong packing tape, string 1 CAGING Place a cage around the plants you’ll isolate long before their blooms open.
2 ENCLOSING Use row cover material to completely enclose the caged plants. Pile soil on the bottom and put a top on the cage to completely exclude insects or flying pollen.
3 POLLINATING When blooms open, use a fine brush to move pollen from one flower to another to fertilize the seeds.
ISOLATING WIND POLLINATORS and that’s hard to count on. Some flowers are pollinated by insects or birds that fly many miles in their search for nectar; others are pollinated when wind carries the pollen from one flower to another; still others are self-pollinated when pollen from their anthers drops onto their stigmas. The ease with which pollen travels between plants means that you have to guard against accidental pollination. The only way to be absolutely sure that you are growing out the seeds you want is to “isolate” the plants. Commercial seed growers do this by putting long distances between different crops. But this is impractical on a home basis, so you’ll have to be a little more innovative. As shown in the illustrations at right, there are a number of ways to isolate crops—choose the method that serves you best.
Many plants, including ornamental grasses, have pollen that floats on the air between one flower and another. Isolate them in cages or make “bags” for their flower heads.
What can go wrong Improper pollination: Sometimes you will end up with seeds you never meant to get. This occurs often in the squash family when one of the plants yields fruit with characteristics from two different parents—not the one you wanted.
1 BAG Surround the flower heads with row cover material, and tie it at the base. Wrap cotton wool around the stems, just under your tie, to exclude stray pollen grains and prevent developing seeds from dropping to the ground.
Too few seeds: Some isolated plants will develop too few seeds unless you hand-pollinate them—remember to carry through on your plans. A few supplies form the basis of this extremely satisfying technique.
2 HARVEST Once the stems are dry and brown, the seeds are ripe. Tip the bag to catch falling seeds and cut the stems. Let the seeds finish drying inside the house once you’ve collected them.
88
TOOLS AND TECHNIQUES
LEAF PETIOLE CUTTINGS
LEAF PETIOLE CUTTINGS
APPROPRIATE PLANTS
The petioles of some leaves are capable of growing whole new plants. But as you’ll see by looking at the list of appropriate plants, right, this ability is restricted to tropical and subtropical plants with fleshy leaves.
Growing new plants from petioles is a simple propagation technique. As long as your environment is suitable, it’s almost guaranteed. If you hanker for the garden all winter long or want to introduce your children to the joys of propagating plants, try working with leaf petiole cuttings.
89
A sharp knife is mandatory for success. You’ll be cutting the petiole at an angle, and a dull knife could injure it badly enough to prevent it from transporting water or nutrients. If you’re extremely dexterous, you can use a razor blade. Otherwise, a longhandled utility knife (available from any artist’s supply store) does the trick. petiole
COMMON JADE PLANT FLAME VIOLETS HOYAS PEPEROMIAS AFRICAN VIOLETS SEDUMS
BOTANICAL Crassula ovata Episcia spp. Hoya spp. Peperomia spp. Saintpaulia cvs. Sedum spp.
Checklist Season: Any season Tools: Sharp scissors, razor blade, or long-handled utility knife; dibble Equipment: 4-inch pot, plastic bottle for cover, 2¼-inch pot
1 CUT Use sharp scissors to cut a young but fullsize leaf, including its petiole, from the parent plant.
2 TRIM Remove some of the top of the leaf, then cut the petiole to a length of about ½ to 1 inch. Next, cut the bottom of the petiole at an angle of about 45 degrees to expose the interior to the rooting medium.
3 DIBBLE Make a hole for the petiole so you don’t damage it when you insert it into the medium. Gently firm the medium around it.
4 COVER Place the cutting in a moderately warm spot with diffused light. If indoor humidity is low, cover the pot while the cutting is rooting. Remember to lift the bottle to allow fresh air into the enclosure several times a day.
5 SEPARATE In about 4 months, the plantlets that have grown from the petiole are large enough to be separated. Gently tease them apart, remembering to touch only the bottom leaves of each one.
6 TRANSPLANT Transplant your plantlets into your normal soil mix when they seem large enough to be handled without injury.
Supplies: Plant labels Medium: 1 part perlite and 1 part vermiculite for rooting; soil mix for growing on angled cut
Temperature: Minimum of 75ºF Humidity: Relatively high; at least 50 percent
leaf
Light: Diffused
Insert the petiole into the rooting medium. petiole
What can go wrong Cutting rots: Like all cuttings, these are susceptible to various fungal diseases. Avoid problems by keeping the rooting medium moist but not soggy. If you are covering the plants to keep relative humidity levels high, remember to introduce fresh air several times a day. Don’t allow moisture to condense on the covering, either—it will drip onto the leaf and promote problems.
This medium is so wet that the petiole is likely to rot.
PLANT DIRECTORY The following pages present a selection of plants to propagate, organized alphabetically by genus and supplying recommended propagation methods and potential problems. Tips help you get the most out of each technique. Choose the easiest method or others, depending on your interests and the circumstances of your garden. Check the handy icon strips to see at a glance which techniques you can choose from and which plants are appropriate for your hardiness zone (see page 183 for a zone map).
KEY TO SYMBOLS seed
root cutting
leaf cutting
division
stem cutting
layering
grafting