A lot of early Japanese motorcycles used crosshead screws to fasten the engine cases to the block. The crosshead screws looked OK until the first time they needed to be removed. Then they became damaged and most required replacement. The most commonly used tool to remove engine case screws is the impact driver. This is the only screwdriver designed to survive repeated blows from a hammer. It is worth getting a cheap impact driver.
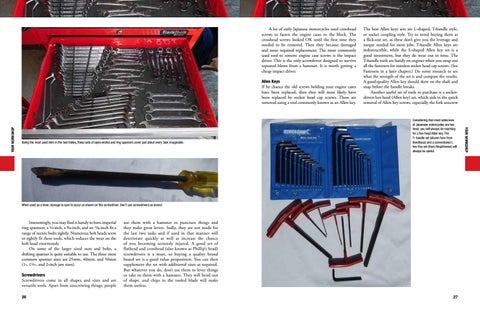
Being the most used item in the tool trolley, these sets of open-ended and ring spanners cover just about every task imaginable.
Considering that most setscrews of Japanese motorcycles are hex head, you will always be reaching for a hex head Allan key. The T- handle set (shown here from Bondhaus) and a conventional L hex Key set (from Kingchrome) will always be useful.
When used as a lever, damage is sure to occur as shown on this screwdriver. Don’t use screwdrivers as levers!
Interestingly, you may find it handy to have imperial ring spanners; a ½-inch, a 9⁄16-inch, and an 11⁄16-inch fit a range of metric bolts tightly. Numerous bolt heads seem to tightly fit these tools, which reduces the wear on the bolt head enormously. On some of the larger sized nuts and bolts, a shifting spanner is quite suitable to use. The three most common spanner sizes are 25mm, 40mm, and 50mm (1-, 1½-, and 2-inch jaw sizes). Screwdrivers Screwdrivers come in all shapes and sizes and are versatile tools. Apart from unscrewing things, people 26
use them with a hammer to puncture things and they make great levers. Sadly, they are not made for the last two tasks and if used in that manner will deteriorate quickly as well as increase the chance of you becoming seriously injured. A good set of flathead and crosshead (also known as Phillip’s head) screwdrivers is a must, so buying a quality brand boxed set is a good value proposition. You can then supplement the set with additional sizes as required. But whatever you do, don’t use them to lever things or take to them with a hammer. They will bend out of shape, and chips in the tooled blade will make them useless. 27
Your Workshop
Your Workshop
Allen Keys If by chance the old screws holding your engine cases have been replaced, then they will most likely have been replaced by socket head cap screws. These are removed using a tool commonly known as an Allen key.
The best Allen keys sets are L-shaped, T-handle style, or socket coupling style. Try to avoid buying them as a flick-out set, as these don’t give you the leverage and torque needed for most jobs. T-handle Allen keys are indestructible, while the L-shaped Allen key set is a good investment, but they do wear out in time. The T-handle tools are handy on engines when you swap out all the fasteners for stainless socket head cap screws. (See Fasteners in a later chapter.) Do some research to see what the strength of the set is and compare the results. A good-quality Allen key should skew on the shaft and snap before the handle breaks. Another useful set of tools to purchase is a socketdriven hex head (Allen key) set, which aids in the quick removal of Allen key screws, especially the fork setscrew
Fasteners such as cylinder head nuts and con rod bolts typically use elongation to provide the correct and maximum preload. Bolts used to mount disc brake calipers to forks and swingarms are typically subjected to a high shearing force; therefore, the correct fastener must be used. In this case the fastener must have both the yield and shear characteristics well above the forces that are likely to be exerted by the clamped component.
Shearing Force (sideways force) The majority of metric fasteners do have the grades stamped on them; however, the ones used on most motorcycles do not. Assume they are the lowest rating when replacing them.
Most frame and suspension components are subject to shearing force, which acts to sever the fastener through sideways stresses.
Yield or Plastic Deformation Force Failure Point!
Pulling Force Connecting rods, camshaft caps, and the dampers in the front forks are all perfect examples of items under an elongation force that can lead to “plastic deformation” when a failure occurs.
78
SAE Grade Comparison Table Inch Grade
Marks on Head
Material
Tensile Strength
Yield Strength
N/mm2
psi
N/mm2
psi
2
none
Steel
510
74,000
393
57,000
5
3
Steel
827
120,000
634
92,000
8
6
Alloy steel
1030
150,000
896
130,000
SHCS
none
Alloy steel
1240
180,000
965
140,000
18-8
none
302 stainless
690
100,000
448
65,000
316
none
316 stainless
690
100,000
448
65,000
Fasteners
Fasteners
Pulling force
Material Strength and Finish Early bikes from the 1970s typically used zinc- and cadmium-plated steel fasteners. These were cheap to source and looked shiny when new. The strength of these bolts varied, but generally they were specified at between 70,000 psi and 100,000 psi and were manufactured to ISO metric screw thread standards of the time. Carbon steel and alloy steel fasteners that are fabricated for the American market with an imperial thread size are typically specified using an SAE grading scale. This scale has a wide range of grades, but the three common ones are SAE grade 2, SAE grade 5, and SAE grade 8. Grades 5 and 8 are identified by lines on the bolt surface. On a Japanese motorcycle of the vintage concerned, you should not see any of these bolts; but it’s worth knowing about them as the strength of the metric fasteners is often quoted in relation to the SAE grades for comparison. Many fasteners used on early motors featured a chrome-plate finish. Aftermarket engine case kits arrived soon after new models were released that featured aluminum alloy socket-head cap screws. There was little in the way of stainless-steel bolts and virtually no titanium bolts available to the general public in the 1970s and early 1980s. Most restorations from this period and up to the end of the 1980s featured chromeplating on original bolts.
the strength of SAE grade 5, and if no markings are present, then they could be a Class 50 fastener, which typically has a tensile strength of only 72,000 psi. Apart from stainless steel, steel metric fasteners are also manufactured to international specifications, with grade 12.9 being the highest (above SAE grade 8) followed by grade 10 (rated between SAE grade 5 and 8) and a small progression of grades down to 8.8. Some socket-head cap screws have a grade 12.9 rating, so if a high-tensile strength is desired, these fasteners can be chromed and used in place of a stainless fastener. In most cases an A2-70 stainless fastener will not experience any failures on a motorcycle, even when used in securing brake calipers as the alloy brackets the fasteners are attached to often have a significantly lower tensile strength than the fasteners. Fasteners originally used on some classic bikes are often rated as low as SAE grade 2 standard, which is significantly less than common 304 stainless fasteners available locally.
An alternative to chrome-plating bolts is to use stainless fasteners. There are three common grades of metric stainless fasteners, grades A1, A2, and A4, which are more commonly known as 303, 304, and 316 (and 304 stainless and 316 stainless are the most common). Apart from grades of stainless bolts, there are also three classes of each, which are class 50, 70, and 80. A typical A2 class 70 bolt may have a marking on it of “A2-70,” indicating that it is a grade 304 stainless-steel bolt. Stainless-steel fasteners have a tensile strength that is typically lower than an SAE grade 5 fastener. Having said that, A2-70 bolts typically have a tensile strength of 100,000 psi and A4-80 fasteners are around the 116,000-psi rating. From the tables above we can see that an SAE 5 fastener is usually quoted as having a tensile strength around 120,000 psi and SAE grade 8 fastener at 150,000 psi. It is important to understand the strength of the metric stainless fasteners, as they are less than
ISO Metric Comparison Table Metric Class
Marks on Head
Material
Tensile Strength
Yield Strength
N/mm2
psi
N/mm2
psi
8.8
8.8
Steel
800
116,000
640
93,000
10.9
10.9
Steel
1,040
151,000
940
136,000
12.9
12.9
Alloy steel
1,220
177,000
1100
160,000
A2-70
A2-70
302 stainless
700
102,000
450
65,000
A4-80
A4-80
316 stainless
800
116,000
600
87,000
79
Chapter 8 Inspection, Repair, and Renovation • Frame • Suspension • Brakes • Wheels • Electrical • Instruments and Controls • Fuel Systems • Engine • Splitting the Engine Cases • Engine Case Separation • Driveshaft Motorcycles • Closing Thoughts on Engine Design • Bodywork
F
136
Inspection To perform a visual inspection, look for any cracks on the downtubes and any broken welds at every joint.
Prior to beginning the reassembly of the motorcycle, the frame, centerstand, swingarm, and triple clamps need to be inspected, repaired, and restored first. Once these items are renovated, they form the base to bolt on all further restored items.
Frame The frame forms the central point to which almost everything on the motorcycle is attached. It must have structural integrity to correctly and safely carry the rider and any passengers from point A to point B, and it must have correct alignment to ensure it travels in a straight line. The removal of all the components from the frame provides the opportunity to perform a careful and thorough inspection of the frame for damage. An initial visual inspection should be performed to identify cracks and obvious damage, such as bent brackets that may have been incurred in small accidents and drops. Cracks in the frame are usually attributed to serious collision damage, abuse, or misadventure while riding. If you acquire a second-hand motorcycle, have had the opportunity to ride it, and it shows any sign of pulling to the left or right, then sending it to a specialist frame engineer for checking and straightening will be money well spent. If the frame appears to need expert repair, ask the repairer to identify what parts are required to remain on the bike. Often the engine needs to remain in the frame for the straightening process, and the wheels are needed to assist mobility of the motorcycle while it’s in their workshop. Everything else is usually not needed and should be removed for security and safety purposes. If the ultimate project goal is to build a custom or street fighter, then the bare frame, prior to any repainting or finishing process, provides the opportunity to make any required modifications. If a restoration to factoryoriginal condition is desired, then modifications to the frame are to be avoided at all cost. If the frame you have is modified, then the options are either to remove the welded-in bits, or get another frame that is original.
The rear blinker mount shows damage and a repair attempt. However, the damage was not just limited to the blinker. The result was a twist in the frame that needed professional straightening.
The tires on these two bikes could not be more different. The wear on the foreground front wheel shows the frame had a bend, and the rider has been subconsciously compensating for it by leaning the bike over to counteract the bent frame.
The most common failures on a frame are bent steering stop pins, bent blinker brackets, cracks at the front downtubes, and cracked or bent rear shock absorber mounts. Typically, an old frame may also have several patches of rust forming; the most common area is around the battery where acid can leak out or overflow. Often a frame can be twisted slightly enough that visually it still looks fine, but in reality it pulls to the left or right. In this case, it needs to be put into a frame jig and bent back into shape by an expert. If there is any suspicion surrounding the frame integrity, run a string line down the center and measure from the centerline out to all parts of the frame to determine if anything is amiss. A bent frame may be salvageable if given to a specialist with the right equipment. In most cases they will need the engine and the bike to be a basic rolling frame. All other components (electrical items, headlight, instruments, brakes, front guard, rear taillight, rear guard, seat, etc.) can be removed to reduce disassembly time, reduce any chance of damage, and ultimately reducing costs. The frame engineer will hang the bike by the steering head and check everything from that point. If the frame is bent, hydraulic rams will be used to bend the frame back into alignment. Even a brand new motorcycle can have bent frames if the quality control at the factory is not up to scratch. 137
Inspection, Repair, and Renovation
ew people who restore a bike will strip every single part down to the smallest item and at the same time get all the parts sent out simultaneously to be renovated. If you were to do this, it would be quite expensive, perhaps a logistics nightmare, and possibly strain your budget. When completed components return, you would have the undesirable situation where a large number of parts are simply sitting around gathering dust as they wait their turn to be reassembled. A better strategy is to have components renovated and ready to reassemble in some logical sequence so that while parts are getting worked on by an expert at their workshop, you are able to spend the time in yours to work on the parts that have arrived back. Many of these items will require minimal effort for immediate reassembly; some will take time. But before you can do any reassembly, most of the parts you remove will need at the minimum a cleanup, possibly replacement bits and pieces, and often a repair to return it to working condition. This little exercise is going to take time and effort. If replacement parts are required, then time and effort needs to be found to put into those activities as well. If a repair requires tools you don’t have, then some of your restoration budget is going to be expended or depleted to acquire special tools. On the bright side, once you have the tools, they are there for the next restoration project.
Since most frame and engine numbers are not matched in the factory, this will not be an issue if it is the same model and production year.
Ejecting a stuck piston is an easy task if air is injected into the bleed nipple hole while the banjo bolt hole is blocked. Extreme care should be taken since the piston will fly out rapidly once it is loosened from the caliper. Fingers should not be used to hold the caliper when this is being done, for obvious reasons. Instead, a thick rag should be placed under the piston to catch it and any residual fluid that will fly out everywhere. The caliper bodies should be cleaned and checked for wear inside the bore. Refer to the manual for the service limit of the bore and piston. Only very neglected calipers show signs of corrosion that result in the calipers being beyond the service limit and repair. Calipers can be water-blasted clean if needed and recoated if desired. The cleaning process will ensure that the surfaces are optimal for the piston to slide in. During reassembly by a seal replacement kit, avoid reusing the old seals and rubber components if the age is unknown and likely to be several years old.
1. Use anti-seize on the bleed nipple and all brake screw fittings; you can use copper-based or chromium-based anti-seize, but always use some. 2. Use a new piston seal and replace any other O-rings during reassembly. 3. Use special purpose “rubber grease” when assembling dust covers that typically fit around the piston and any internal sliding parts inside the caliper. This grease is designed for brake components. Due to the simple nature of brake pistons, a damaged one can be replaced easily, either by an OEM replacement or an aftermarket version made from steel. If the piston has some form of corrosion on it, then some wet and dry sandpaper might salvage it. The goal is to remove any buildup on the surface of the piston so that the surface is perfectly flat. If the piston is pitted, replace it. Pits will wear into the seal and cause it to fail. If you are unable to obtain an OEM replacement, then an engineering shop that performs hard chrome rebuilds on cylinders and rams (this includes forks) might be a cost-effective solution (maybe your only solution!) for getting a piston machined up and plated. 164
When assembling rubber components in brake calipers, always use a brake (rubber) grease compound. This enables the parts to go together smoothly without damage and will not cause any long-term issues.
Failure to use a perfectly sound piston will cause the fluid to leak past, and leaking fluid will spray on the frame and any painted surfaces and cause the paint to peel. If the caliper is showing signs of wear and tear from decades of use, consider renovating it back to brand new. First, have it water blasted and burnished to return it back to that “just-popped-out-of-the-mold” look, then consider powder coating, anodizing, or applying a tinted clear coat as needed. Caliper mounting plates can be renovated with a coating in gold zinc or nickel plate if they are steel. For aluminum mounting hardware, consider anodizing or just water blasting, burnishing, and then, if needed, coating them with a marine or industrial two-pack clear to seal them. Brake Pistons The most common failures with calipers are pistons that are seized in the bore of the caliper. Seized pistons usually result when brake fluid leaks past the piston seal and combines with water to allow rust to corrode the pistons. The corrosion allows dirt to accumulate, and the combined crud damages the seal and eventually impedes the movement of the piston to a point that it no longer can move under any circumstances. Removal of the piston using air pressure is most effective. The application of heat during this process can also be of assistance. Always ensure that there is a pad or thick cloth in front of the piston to capture it. Never use your hands or fingers to capture a piston being ejected by air pressure. The air should be applied
Use extreme caution when using compressed air to pop out a piston. The force can send the piston rocketing across the garage. If you are holding the caliper, use rags or a solid piece of rubber packed under the piston to dampen the release force.
These pistons have classic corrosion damage and show marks from some mild force that was applied to remove them from the brake housing. Because brake fluid absorbs water, traces of it form where the sealing O-ring stops; combined with road grime and dust from the pads, the sludge deposits quickly and begins to corrode the piston.
Inspection, Repair, and Renovation
Inspection, Repair, and Renovation
Helpful Hints Some helpful renovation and assembly hints for brake calipers are listed below:
of some kind, using high-performance aftermarket fluid lines might be both a cost-effective solution and, due to the range of colors, ideal for the style of bike you are building. In most cases, aftermarket fluid lines will give better braking capability; however, avoid screw-in banjo bolt fittings, as most transportation departments will not accept any kind of fitting other than a crimp fitting on a motorcycle brake line. Check with a reputable motorcycle roadworthy specialist on what is allowed prior to spending any money.
Here the piston has released. Note the compression on the rubber. Be careful it’s not your fingers! You have no control as to the rate of release.
via the bleed nipple hole while the banjo bolt hole is blocked off. Apply the air slowly! A visual inspection will quickly detect any buildup of material. Cleaning the pistons is relatively straightforward, and the effects of corrosion will quickly be detected. If corrosion is present, then it is advisable to replace the pistons. If they cannot be obtained as an OEM part, then any machine shop can manufacture them in any material desired. When the caliper is being stripped, a new seal kit should be installed. Fluid Lines For a concourse restoration, the fitment of the correct original-style fluid lines and cable clamps is a must. If you are building a street fighter, café racer, or retro mod
Crimp-style fittings are generally considered best and in line with OEMsupplied brake lines. Even on custom fluid lines, crimp-on style will look cleaner and less cluttered. Old lines can be renewed with water blasting, but the ends are often plain steel on OEM lines so they might need a clear coat to prevent rusting.
165
The reality is you have a new machine that should be treated as if it’s just been bought from the factory. Generally, I replace oil and filters at the 3,000‑, 6,000-, and 9,000-kilometer increments of the odometer. That way, my oil is at most 3,000-4,000 kilometers old. At around $25 for an oil and filter service, it’s cheap insurance. However, some bikes do
have 5,000 and 10,000 kilometer service intervals, so check what yours will be. If you went through the process of doing a full rebuild and restoration for a factory-perfect concourse machine to show at bike shows, then be aware that the people who will scrutinize it will spot non-genuine parts and finishes. So in a serious competition, a
Another Suzuki model slowly gaining more popularity is the rock solid GS1000. More are turning up at Show-n-Shines in restored states. A beautifully restored KH500, built between 1972 and 1975. These are genuine collectors’ items.
234
dry. If you had the tank Kreem coated or coated with some other compatible coating, then it should be OK to drain and sit between rides and shows. Check with the coating manufacturer on this.
Usage and Care If you built your bike to ride, then expect chips in all the surfaces, a buildup of road grime, and the effects of the weather to take their toll. Over the years to come, you will need to renew a lot of the surfaces if it’s ridden frequently. There is an old saying, “Ridden not hidden.” Your bike will need to be kept in top condition if you ride it often. Bikes left parked in garages do tend to suffer deterioration in rubbers and seals more frequently than those that get ridden, so this may be an incentive to take it out and get fresh fuel, a coffee, and at the minimum attend a club meeting or two. Take care when cleaning painted surfaces, and make sure the paint polish and wax solution is compatible. Car shampoo is a good start, followed by drying it down to avoid hidden rust from sitting water and then careful paint polish compatible to the paint type. Chrome can be cleaned via numerous methods; high-flashpoint solvent followed by a dedicated chrome polish does wonders. When storing your bike, remove the battery to avoid fumes from the battery breather, which may cause corrosion. Petrol should be turned over often, and the tank area that is still bare metal will rust if the tank goes
This chapter has covered in a very generic way the reassembly of our rebuilt component assemblies to produce essentially a new bike. 1. The process to reassemble the bike is very flexible in terms of rolling frame first or motor in frame first. 2. Use new gaskets and oil seals and use assembly lube on engine components. 3. Study the service manual so you know the engine assembly process in great detail, especially the camshaft timing. 4. If you have kept the bike complete and only rebuilt and reassembled small components over time, then the final strip and rebuild can be turned over in a matter of a few days. 5. Install body parts last to avoid damage and source original painted pieces to get matching exact. 6. Your bike is new and will need a run-in period “just like a bought one.” 7. If you use it frequently, it’s going to deteriorate. Avoid substituting poor-quality parts at all costs. Keeping it as original as possible will always pay off in the end. 8. The motto of many: “Ridden not hidden.”
Chapter Summary
235
reassembly
Reassembly
An early CB750 K0 model in superb form.
powder coated frame may not score highly compared to a factory-spray finish. Polished pieces that were satin/ matte finished from the factory and stainless setscrews and bolts will result in deduction of points, as will incorrect paint finishes, missing decals, and so forth.