Start a Quick and Easy
also produce a year’s supply of several tasty herbs, which will attract droves of pollinators and other beneficial insects. If you’re new to food gardening, your biggest challenge may be planting crops at the right times. A food garden should be planted in phases, so that every crop gets the type of weather it prefers. The following season-byseason instructions for our easy food garden (see the plan on Page 158) show how seasonal planting sequences work. You’ll also find a few labor-saving tips, such as letting pole beans twine up tall sunflowers.
Food Garden This season-by-season planting plan for a no-dig, easy-care bag garden features 25 favorite crops.
I
f your yard has a space that’s at least 20 by 28 feet and gets full or almost full sun, you can grow enough vegetables to have fresh food all season with surprisingly little effort. Go ahead and dig beds if you’re lucky enough to have naturally fertile, welldrained soil, but don’t let soil flaws stop you from starting a food garden. Instead, use this quick and simple bag-gardening technique. This method is almost too easy to believe, but it absolutely works! Gardening in bags of topsoil lets you get a garden going today, and offers these additional benefits: • In the course of a season, the topsoil bags will smother the grass underneath them, so you won’t have to dig up and remove the grass sod. • The bags eliminate aggravation from seedling-killing cutworms, which are caterpillars
Early Spring
commonly found in soil where lawn grass has been growing. • Bag gardens have few (if any) weeds, because bagged soils and planting mixes are pasteurized to kill weed seeds. • You can eventually gather up the plastic bags and dig their contents into permanent beds, or just lay down a new batch of bags.
What Can I Grow? Whether you dig right in or start with bags, you can’t go wrong with the selection of 25 easy-to-grow crops on Page 158. In addition to plenty of fresh veggies to put on the table and to store, this garden plan will CLOCKWISE FROM LEFT: WILLIAM HOWELL GOLSON; KEITH WARD/JOHN GRUEN; KEITH WARD
By Barbara Pleasant
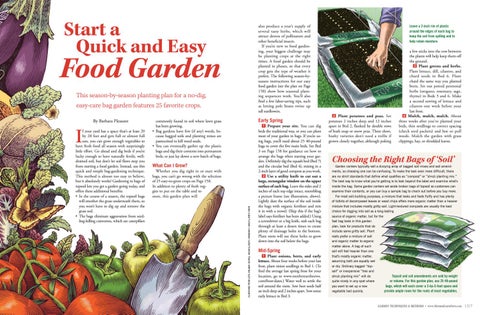
1 Prepare your site. You can dig beds the traditional way, or you can plant most of your garden in bags. If you’re using bags, you’ll need about 25 40-pound bags to cover the five main beds. See Bed 3 on Page 158 for guidance on how to arrange the bags when starting your garden. Definitely dig the squash bed (Bed 7) and the circular bed (Bed 4), mixing in a 2-inch layer of good compost as you work. 2 Use a utility knife to cut out a large, rectangular window on the upper surface of each bag. Leave the sides and 2 inches of each top edge intact, resembling a picture frame (see illustration, above). Lightly dust the surface of the soil inside the bags with organic fertilizer and mix it in with a trowel. (Skip this if the bag’s label says fertilizer has been added.) Using a screwdriver or a big knife, stab each bag through at least a dozen times to create plenty of drainage holes in the bottom. Plant roots will use these holes to grow down into the soil below the bags.
Mid-Spring 1 Plant onions, beets, and early lettuce. About four weeks before your last frost, plant onion seedlings in Bed 1. (To find the average last spring frost for your location, go to www.motherearthnews. com/frost-dates.) Water well to settle the soil around the roots. Sow beet seeds half an inch deep and 2 inches apart. Sow some early lettuce in Bed 3.
Leave a 2-inch rim of plastic around the edges of each bag to keep the soil from spilling and to help retain moisture.
2 Plant potatoes and peas. Set potatoes 2 inches deep and 12 inches apart in Bed 2, flanked by double rows of bush snap or snow peas. These short, bushy varieties don’t need a trellis if grown closely together, although poking
a few sticks into the row between the plants will help keep them off the ground. 3 Plant greens and herbs. Plant lettuce, dill, cilantro, and chard seeds in Bed 6. Plant chard the same way you planted beets. Set out potted perennial herbs (oregano, rosemary, sage, thyme) in Beds 3 and 6. Make a second sowing of lettuce and cilantro one week before your last frost. 4 Mulch, mulch, mulch. About three weeks after you’ve planted your beds, thin seedlings to correct spacing (check seed packets) and hoe or pull weeds. Mulch the garden with grass clippings, hay, or shredded leaves.
Choosing the Right Bags of ‘Soil’
Garden centers typically sell a dizzying array of bagged soil mixes and soil amendments, so choosing one can be confusing. To make the task even more difficult, there are no strict standards that define what qualifies as “compost” or “shrub planting mix.” The best way to know what you’re getting is to look beyond the label and examine what’s inside the bag. Some garden centers set aside broken bags of topsoil so customers can examine their contents, or you can buy a sample bag to check out before you buy more. For most soil-building purposes, a mixture that looks and feels fluffy and has plenty of tidbits of decomposed leaves or wood chips offers more organic matter than a heavier mixture that includes mostly gritty soil. Light-textured composts are usually the best choice for digging into soil as a long-lasting source of organic matter, but for the fast bag beds in this garden plan, look for products that do include some gritty soil. Plant roots prefer a mixture of soil and organic matter to organic matter alone. A bag of such soil will feel heavier than one that’s mostly organic matter, assuming both are equally wet or dry. Ordinary bagged “topsoil” or inexpensive “tree and shrub planting mix” will do Topsoil and soil amendments are sold by weight quite nicely in any spot where or volume. For this garden plan, use 25 40-pound you want to set up a new bags, which will each cover a 2-by-3-foot space and vegetable bed quickly. provide ample room for the roots of most vegetables.
GARDEN TECHNIQUES & METHODS • www.MotherEarthNews.com 157