1. You approach a river... STOP AND DISCUSS AS A GROUP
DO WE NEED TO CROSS?
• Is there a bridge or alternative track?
• How comfortable and experienced is everyone in the group with making a crossing?
• Unless you are experienced, do not attempt to cross alone. Either wait for another party to support, find a bridge or turn back.
IS THE RIVER SAFE TO CROSS?
Signs of an unsafe river are:
Water moving faster than normal walking pace
Discoloured, cloudy, surging water
Debris in the river such as tree branches
The sound of rolling boulders on the riverbed
THE RIVER IS UNSAFE, WHAT NOW?
• Wait for the river to drop, pitch a tent or seek shelter if needed
• Use a ‘Plan B’ on your map and detour using a track that doesn’t require crossing the river
• Return the way you came.
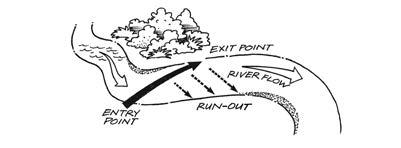
THE RIVER IS DEEMED SAFE, CHOOSE A CROSSING POINT
Use crossing points you know already, but don’t plunge in, it could have changed. Observe the river from a high point for a better view and consider the following:
River Safety
2. Making the crossing
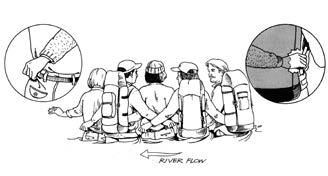
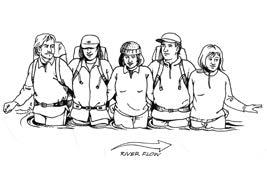
The mutual support method is the safest way to attempt a river crossing as a group. Every crossing should be taken seriously.
1. Put your strongest group members at the upstream end and less confident members in the middle. Practice crossing on the riverbank first - agreeing on signals in case the river noise makes communication difficult.
2. Remove baggy clothing such as jackets or anything outside your pack - keep boots on.
3. Undo your pack chest straps, this makes it easier to remove if you need to. Keep your waist belt done up, but loosen it off slightly. This will keep your pack balanced on your back.
4. Stand side by side and travel closely together with hands woven (see below) holding each other in a line parallel to the current. Go slowly and communicate, especially if you need to retreat.
5. Concentrate on footing and the exit point, not at the water moving around you.
Ideal crossing is:
• Shallow depth (up to knee deep) or deep and very slow for experienced group members
• Check the downstream runout. Don’t cross where the run-out (where the current will take you) leads into conditions that are more dangerous such as waterfalls, rapids, debris such as trees and big boulders.
When crossing:
• Keep your body side on to the current to reduce resistance
• Take small shuffling steps , don’t lift your feet too much
• Don’t grasp at logs or boulders underwater or you could lose balance
• Move diagonally downstream and conserve energy, watching your exit point.
RETREATING
The person at the upstream end co-ordinates the group and ensures that they keep almost parallel to the current. It is the strength of the group as a whole that gets you across safely, so don’t let go or split up while crossing. If you need to turn back, take extra care with your footing and go slowly against the current. There are methods to this that would be worth training in.
RECOVERY
If you lose your footing, the safe runout you chose earlier means there is no in-the-moment decision making needed.Your pack can provide buoyancy and you can travel with the current towards the bank, try to position yourself feet first. There are techniques to this that have advantages and disadvantages that should be practiced to gain confidence and remaining calm.
Whether it is a smooth crossing or not, once everyone is across safely, regroup and keep warm with additional clothing.
Further learning
• Watch the river crossing video on our website
• NZ Bushcraft Manual, free on the MSC website
• Plan My Walk for track alerts
The current is faster and deeper on the outside of a bend. You can use this to your advantage by planning the crossing between two bends.
IF IN DOUBT, STAY OUT!
• Regional council river level websites
• MetService and NIWA weather forecasts
• Get training on these skills with a course or with experienced trampers.
OUTDOOR SAFETY INFO SHEET | RIVER SAFETY 2023 mountainsafety.org.nz | avalanche.net.nz | planmywalk.nz
MUTUAL SUPPORT METHOD
SCAN + WATCH OUR HOW-TO VIDEO
Water depth Water speed White water Steep banks Obstacles in the water Entry and exit points River bed surface Run out
About Rivers
Rivers are one of the greatest hazards in New Zealand’s outdoors. The topography of our landscape, combined with our weather, means that rivers and streams are a regular feature throughout our backcountry. Knowing how to identify if a river is unsafe, and the right techniques to use when crossing, are essential outdoor skills.

About rivers
Rivers change with time and weather.
• Widespread rain can cause large floods, sudden heavy rain can make side streams impassable and rain in a distant area or snowmelt can bring a new flow of water.
• Rivers can be impassable for hours or several days, however, the water level can drop as quickly as it rises.
ELEMENTS OF A RIVER

Eddy lines: Where the water circulates behind boulders and back upstream, creating an unpredictable flow. It can be exhausting crossing these currents. It’s best to assess these currents upstream.
Strainers: Obstructions in rivers that water flows through but stops and holds objects that don’t, such as trees or fencing. The force of the river can trap objects and even people against them.
Recirculating water: Occurs when water drops over an obstacle, usually a rock, with such force it is pushed back up towards the obstacle. This creates strong currents flowing directly into the obstacle.
SECTIONS FEATURES
Upper and side streams: Have torrents in narrow channels with waterfalls and steep banks.

Be aware of run-outs, use boulders carefully or wade through deep pools. If water levels are high, wait for it to drop or turn back.
YOU AND RIVERS
RIVER TYPES
Middle: Powerful river flow, affected by snowmelt and wide deep flows over boulders.
Carefully choose your crossing point. Take care with your footing as the steepness and flow can often make it them too powerful to cross.
Lower: Shingle beds and multiple deep and slow braided channels. Less sudden river level changes, but distant rain can increase levels. Levels can persist for many days.
Often deceptively powerful flows even if it looks slow. However, normally many places to cross. Give yourself the option to turn back if unsure.
• Rivers should never be underestimated, so it’s important to stop and think at each one.
• You need to decide whether to cross and further monitor your decisions throughout the whole process.
• Avoid flooded rivers and boulder hopping and use bridges/ cables/cages where possible.
• You need to understand how a river works, its characteristics and the recommended mutual-support method.
• Practical training or learning from other experienced people can boost your confidence and skills.
Before you go outdoors
Preparation is crucial. During trip planning identify points where you will need to cross rivers. For each, identify what your plan will be if the river is unsafe to cross.
• Look for where bridges are on your intended route
• Check the weather forecast and any track alerts using PlanMyWalk.nz
• Consider alternative routes or where you can backtrack if it is unsafe to cross
• Pack a shelter, warm clothes and food in case you have to wait out a swollen river. Put everything in a waterproof bag or dry sack, and spread important items amongst your group.
• Have a plan if you need to wait, such as take a communications device to tell your trusted contact you will be late.
Understand your route and look for:
OUTDOOR SAFETY INFO SHEET | RIVER SAFETY 2023 mountainsafety.org.nz | avalanche.net.nz | planmywalk.nz BRIDGES
ROUTES
BACKUP
Food and water Phone + distress beacon Waterproof Emergency shelter/ survival bag
Pack the essentials:
TURN OVER TO LEARN ABOUT CROSSINGS HAVE A QUESTION ABOUT THIS CONTENT? CONTACT US AT INFO@MOUNTAINSAFETY.ORG.NZ Headtorch + batteries

