
MAUI LED RECESSED DOWNLIGHTER INSTRUCTIONS
Issue 01 on 15th February 2023
THANK YOU for buying this product. To help ensure itgivescomplete satisfaction please install it according to these instructions and then pass theinstructions to the appropriate person for retention and futurereference.
SAFETYThis is a mains powered product. It is designed to be installed by suitably qualified personnel only and in accordance with the applicable building and electrical regulations. Before installation or maintenance the electrical supply to the product must be isolated.

INSTALLATION SUPPORT If installation advice or accessories are required, please contact us at the above address. Wewill do our best to help. When reporting a suspected fault or seeking installation support the problem is likely to be resolved most quickly if you have fullproductdetails to-hand, as well as details of when and where it was purchased.
INSTALLATION
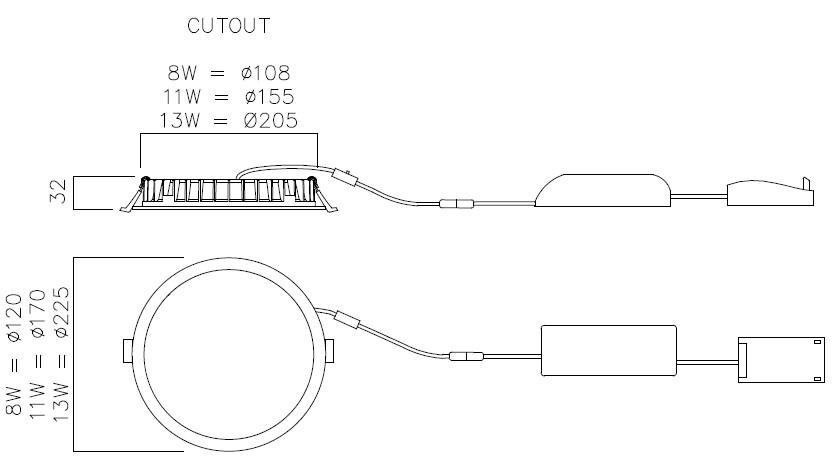
1. Decide the mounting position in ceiling & cut a round hole to the required diameter (see diagram). Care should be taken when cutting the hole toavoid structures & to not exceed the specified cutting diameter so as not to expose the cut edge.
Note! This product should not be covered with insulation. Doing this could impair thermal performance of the heat sink & affect performance & lifetime ofthe LED’s.
2. Pass the mains supply cable down through the hole& route to the LED driver.
3. Disconnect the driverunit from the fitting via the twist lock connectors.
Note! The driver comes with apre-fitted mains connection box. This is to speed up installation &allows “loop in / loop out” of the mains supply.
4. Open the mains connection box by squeezing together the two pegs & hinging the cover up. This willexpose the mains terminal block.
5. Route the mains supply cable(s) to appropriate connection points & terminate, ensuring correct polarity is observed. Note! These luminaires are Class II so no earth is actually required, but there is an earth terminal for the mains circuit.
6. Fit the cable clamp to restrain the mains cable(s).
7. Close the connection box cover & press down toensure it secures in closed position.
8. Locate the driver unit into the ceiling gridby passing it through the aperture & laying it in position.
Note! The driver unit should be placed in a suitably ventilated area to ensure prolonged life.
9. Select therequired CCT by sliding the switch tothe allocated colour temperature.
10. Reconnect the driver unit to the fitting using the twist lock connectors.
11. Hold the two retaining spring clips (located on each side of the luminaire) away from the front bezel & push the rear of the head unit up through the hole. Allow the spring clips to locate on to the top face of the mounting surface to pull the luminaire up against the mounting surface.
12. Reconnect power supply & check for correct operation.
Note! Luminaires fitted with electronic drivers are exempt from insulation resistance tests as this may cause irreparable damage.
MAINTENANCE
1. Cleaning should be carried outat regular intervals so as not impairthephotometric performance of the luminaire.