
Rose Bay Laminate Flooring Installation Guide
Thank you for choosing our flooring. When properly installed and cared for, your new flooring will be easy to maintain and will keep its great look for years.
Please read all the instructions before you begin the installation. Improper installation will void the warranty.
important notice
All wood-based products, even those specifically designed to have increased resistance to moisture, are hygroscopic (they will react to the moisture in the environment) and as a result will expand or contract accordingly. All sources of under floor moisture must be rectified prior to the installation of the floor. Any construction dampness must be completely dry. It is important that you check each plank for any manufacturing defects. Any faults must be reported back to the store of purchase for an immediate refund or replacement prior to the flooring being installed.
I. Preparations
• Prior to installation, inspect material in daylight for visible faults/damage, including defects or discrepancies in colour or gloss; check the edges of the flooring for straightness and any damage. No claims on surface defects will be accepted after installation.
• It is preferable to lay boards perpendicular to the window, following the direction of the main source of light. For the best result, make sure to always work from 3 to 4 cartons at a time, mixing the planks during the installation.
• Check if subfloor/site conditions comply with the specifications described in these instructions. If you are not satisfied, do not install, and contact your supplier.
• Flooring products can be damaged by rough handling before installation. Exercise care when handling and transporting these products. Store, transport and handle the cartons in a manner to prevent any damage. Store cartons flat, never on edge.
Please always visit nationaltiles.com.au/flooringresources for the most up-to-date version of our installation instructions, warranty, product catalogue, and care and maintenance guide as it may have been revised and updated. Version Update: October 2025 | This document replaces all previous versions
• Flooring products can be heavy and bulky. Always use proper lifting techniques when handling these products. Whenever possible, make use of material-handling equipment such as dollies or material carts. Never lift more than you can safely handle; get assistance.
• Calculate the room surface prior to installation and plan an extra 10% of flooring for cutting allowance.
• The flooring is intended to be installed in interior locations only. It is not to be installed in areas that are exposed to the elements, such as outdoor areas, semicovered / “alfresco” outdoor areas, porches, etc.
• Keep the boards in room temperature for at least 48 hours in unopened package before you start the installation. The room temperature must be between 18–24ºC and the relative humidity should be maintained between 40–65% before and during installation.
• After installation the room temperature must be between 18-30ºC at 40-65% relative humidity.
• Expansion mouldings: When installing flooring through tight or narrow areas— such as doorways, hallways, pantries, or transitional spaces—additional expansion joints and mouldings must be used to accommodate natural floor movement. Expansion mouldings are also required when the installation area exceeds 10 metres in length or width, or when the flooring extends across multiple rooms. These joints help manage natural expansion and contraction and are essential for separating each room or defined area to prevent damage or buckling over time.
Failure to install the required expansion joints will void the product warranty. If the appearance of expansion joints is not acceptable to the customer, we recommend selecting an alternative flooring product that better suits their preferences. note
II. Subfloor Information
• The flooring can be installed over most existing hard surface floor coverings, provided that the existing floor surface is clean, flat, dry, securely fastened, structurally sound, and level to 5mm within a 3m radius.
• The product can be installed on substrates with grout joints or grooves if these are less than 5mm in width and 4mm in depth. Depressions, deep grooves, expansion joints and other subfloor imperfections that do not meet this requirement must be filled with approved patching and levelling compound prior to installation.
• Substrates must be free from excessive moisture or alkali. Remove dirt, paint, varnish, wax, oils, solvents, any foreign matter and contaminants.
• The subfloor must be dry. Comply with MC requirements and be tested using one of the methods below:
• Concrete moisture vapour emissions should not exceed 3.63kg MVER (Moisture Vapour Emission Rate) per 100m2 per 24 hours. This can be measured with the calcium chloride test (ASTM F1869).
• 90% RH (ASTM F2170) with a pH limit of 9.
• Max. 2.5% moisture content (CM method / ASTM F2659).
note
It is the floor covering installer’s responsibility to ensure these tests have been conducted and that the results are acceptable prior to installing the floor covering. When moisture tests are conducted, they indicate the conditions only at the time of the test. The floor should not be installed on a subfloor with excessive moisture emission.
Wood Subfloors
• If this flooring is intended to be installed over an existing wood floor, it is recommended to repair any loose boards or squeaks before beginning the installation.
• Wood subfloors must have no more than 12% MC (Moisture Vapour Content).
• Basements and crawl spaces must be dry. Use of a 0.15mm poly-film is required to cover 100% of the crawl space earth.
• Lay the flooring crossways to the existing floorboards.
• All other subfloors - plywood, OSB, particleboard, chipboard, waferboard, etc. must be structurally sound and must be installed following their manufacturer’s recommendations.
• Double-layered APA rated plywood subfloors should be a minimum 25mm total thickness, with at least 45cm well ventilated air space beneath.
• A minimum 0.15mm poly-film must be installed between the subfloor and the flooring to provide moisture barrier protection and allow for friction-free movement of the floor.
Concrete Subfloors
• Existing concrete subfloors must be fully cured, at least 60 days old, smooth, permanently dry, clean and free of all foreign material such as dust, wax, solvents, paint, grease, oils, and old adhesive residue.
• The subfloor must be dry. Comply with MC requirements and be tested using one of the methods below:
• Concrete moisture vapour emissions should not exceed 3.63kg MVER (Moisture Vapour Emission Rate) per 100m2 per 24 hours. This can be measured with the calcium chloride test (ASTM F1869).
• 90% RH (ASTM F2170) with a pH limit of 9.
• Max. 2.5% moisture content (CM method / ASTM F2659).
• A minimum 0.15mm poly-film must be installed between the subfloor and the flooring to provide moisture barrier protection and allow for friction-free movement of the floor.
Do Not Install Over
• Wet areas, including bathrooms, laundries, toilets, or areas exposed to regular moisture or water.
• Any type of carpet.
• Existing cushion-backed vinyl flooring.
• Any type of floating floor.
• Hardwood flooring / wood subfloors that lie directly on concrete or over dimensional timber or plywood used over concrete.
• If the floor has a pre-attached underlayment, the use of an additional underlayment could damage the locking mechanism and will void the warranty.
important notice
• In-floor Radiant Heat: due to the speed of sudden temperature changes, which has the potential to negatively affect laminate flooring construction, it is not recommended to install over any electrical radiant heating system. Installation over electrical radiant heating systems will not be covered by the manufacturer’s warranty. Below instructions are for radiant heating systems using water.
• Maximum operating temperature should never exceed 27ºC. Use of an in-floor temperature sensor is recommended to avoid overheating.
• Turn the heat off for 48 hours before, during, and 24 hours after installation when installing over radiant-heated subfloors.
• Operate the system at maximum capacity for 48 hours to force any residual moisture from the cementitious topping of the radiant heat system at least 4 days before installation.
• The maximum moisture content of the screed is 1.5% (CM method).
• Make sure that the temperature in the room is maintained consistently between 18–24ºC and the relative humidity between 40–65% before and during installation.
• Once the installation is completed, the heating system should be turned on at ambient temperature and increased gradually in 5ºC increments every 12 hours until reaching normal operating conditions.
• Refer to the radiant heat system’s manufacturer recommendations for additional guidance.
The best way to maximise the effectiveness of your heating system is to schedule “ON” times at a comfort temperature and “OFF” times with setback temperatures which are typically 4ºC lower than your comfort temperature. The setback temperatures are particularly important, as they prevent the room temperature from dropping too low, meaning it is much quicker to heat your room back to comfort levels when needed.
III. Installation
Tools and supplies required:
Foam underlay (if not pre-attached)
Spacers
Saw
Adhesive tape
0.15mm or thicker poly-film vapour barrier
Ruler
Pencil
Tape measure
Pull bar
Wedges
Tapping block
Rubber mallet
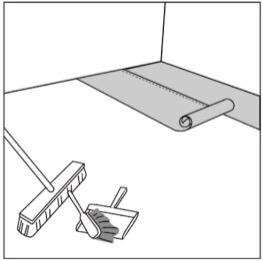
• Remove baseboards, quarter-round mouldings, wall base, appliances, and furniture from the room. For best results, door trim should be undercut to allow the flooring to move freely without being pinched. After preparation work, sweep and vacuum the entire work area to remove all dust and debris.
• With a floating floor, you must always ensure you leave a 10mm gap between walls and fixtures such as pillars, stairs, etc. When installing around pipes, drill the holes 20mm larger than the diameter of the pipes.
• Do not install heavy fixed objects such as kitchen cabinets directly over the floor planks. The floating installation requires that the planks can move freely.
• Underlay: If the floor does not have a pre-attached underlayment, an additional underlayment is recommended in order to improve acoustic performance and absorb some irregularities on the substrate. Best results can be expected with an underlayment thickness not more than 3mm. If the floor has a pre-attached underlayment, the use of an additional underlayment could damage the locking mechanism and will void warranty.
• Whenever possible, plan the layout so that the joints in the planks do not fall on top of joints or seams in the existing substrate. The end joints of the planks should be staggered a minimum of 20cm apart. Do not install over expansion joints. Avoid installing pieces shorter than 30cm at the beginning or end of rows.
• Measure the area to be installed: The board width of the last row shall not be less than 50mm. If so, adjust the width of the first row to be installed. In narrow hallways, it is recommended to install the floor parallel to the length of the hall.
• Begin laying in the left-hand corner, with the grooved edge visible and facing outward. Use spacers between the wall and the floorboard in order to keep a 10mm gap.
1. After thoroughly cleaning the subfloor, you should install a foam underlay (unless your product has a pre-attached pad). Run the foam underlay in the same direction as the flooring planks. The underlay should be butted side-by-side with no overlap. Tape seams together. If you are installing over a concrete subfloor, a min 0.15mm plastic poly sheeting is to be installed under the foam underlay.
note
Many foam underlays already have this plastic sheeting pre-attached.
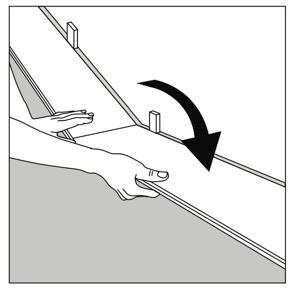
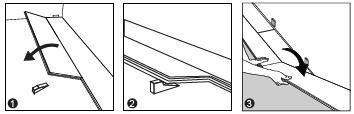
2. First row, second plank: Insert the end tongue on the short side of the second plank into the end groove of the first plank and rotate downward to assemble. Make sure both planks are perfectly aligned.
note
If you notice both planks aren’t at the same height or are not well locked together, please follow the disassembly instructions at the bottom of the page, disassemble and check if any debris stuck inside the lock is obstructing.
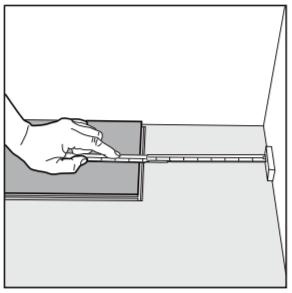
3. At the end of the first row: Leave a gap of 10mm to the wall to avoid any damage while installing your floor and measure the length of the last plank to fit. Insert the short side and tap it closed, using a pull bar.
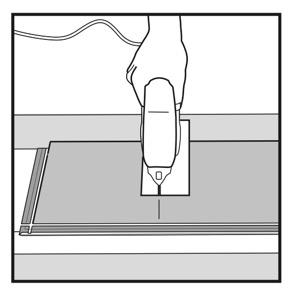
Cutting Tip: If cutting with a jig saw, the laminate surface should be turned down. If cutting with a hand saw, the laminate surface should be face up.
Important: When cutting this product please use a dust mask or other safeguards for personal protection, it is advised to cut in a well-ventilated area.
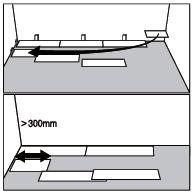
4. Starting second row: Rows can be started with end cuts if the cut plank is at least 30cm long. If an end cut is used for a subsequent row, a stair-step pattern is established. Starting planks of random lengths will create a more aesthetic random stagger. Short end joints must not be closer than 20cm to each other.
5. Starting row, first and second planks:
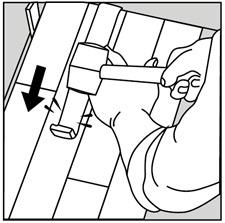
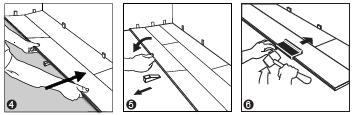
a.) Main Method: At a slight angle, click the long side of the first plank into the previous row and slide it against the spacer on the wall on the left. To complete the row, click the long side of the plank into the previous row at a slight angle and slide it close to the short end of the previous plank. Use a tapping block to gently tap along the long side until the joint is closed tightly, then tap in the short side of the second plank using the tapping block or cutoff into a locked position. Before tapping in the short side of the second plank, to make sure that adjacent planks are at the same height and aligned, please use a cutoff plank as a bridge as shown in the image below; only then tap them in.
note
Uneven tapping or use of excessive force may damage the joint.

Tip: After finishing the installation of every row, use a tapping block or cutoff and a rubber mallet to gently tap the planks into the click of the previous row to make sure they are tightly clicked together and make sure there is no gap between the long side of the planks installed. Any gapping can compromise the whole installation.
b.) Alternative Method: At a slight angle, click the long side of the first plank into the previous row, slide it against the spacer on the wall on the left and place an installation wedge under the board. Place the short end of the plank at an angle against the short side of the previously installed floorboard and fold down. Slide down the long side of the board into the locking groove of the adjacent floorboard in the previous row. When the whole row is complete, remove the wedge and fold the row down. Use a tapping block or cutoff to gently tap along the long side until the joint is closed tightly.
6. To lay the last row: Position a loose board exactly on top of the last row laid. Place another board on top, with the tongue side touching the wall. Draw a line along the edge of this board to mark the first board. Cut along this line to obtain the required width. Insert this cut board against the wall. The last row should be at least 50mm wide. Using a pull bar and hammer, work evenly along the length of the plank and lightly tap the joint closed. The spacers can then be removed.

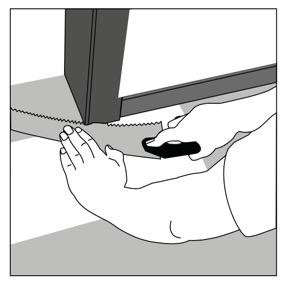
7. Holes for pipes: Measure the diameter of the pipe and drill a hole that is 20mm larger. Saw off a piece as shown in the figure, and lay the board in place on the floor. Then lay the sawn-off piece in place.
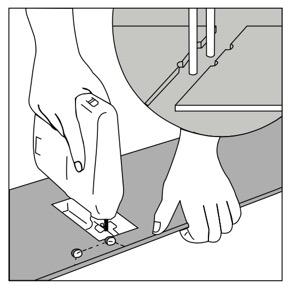
8. Door moulding and skirting: Lay a board (with the decorative side down) next to the door moulding and saw as shown in the figure. Then slide the floorboard under the moulding.
IV. Finishing the Installation
Replace moulding or wall base. Nail the moulding to the wall surface, not through the flooring. In areas where the flooring planks meet other flooring surfaces, the use of a transition moulding is required to cover the exposed edge but do not pinch the planks. Leave a 10mm gap between the planks and the adjoining surface.
important notice
• The use of silicone or caulking compound is not allowed.
• During installation of scotias, skirting boards, trims, and door jambs, ensure no downward pressure is applied to the boards. It is recommended that a minimum 0.5mm gap allowance is given where the accessories meet the boards.
V. Maintenance
Clean the floor regularly with a vacuum cleaner or dry mop. Wet and dry electric vacuum cleaning method is not allowed under any circumstances. Avoid using solvents of any kind to clean the floor. Methylated spirits, turpentine, bleach, ammonia, eucalyptus, citrus, and/or similar solutions will damage the floor surface and will void the warranty. To protect the floor from sand, we recommend you use doormats at entries (but do not use mats with a rubber backing).
VI. Disassembling
To disassemble, simply lift the planks one by one, following the opposite sequence of the installation.