This should be easy, just follow our instruc tions and you will be back to Net flix in no time.
Estimated time for assembly
What you need
• Phillips-head screwdriver
• Some of your favourite bubbly or your preferred relaxant
• Use the packaging car ton as a working sur face to prevent produc t damage during assembly
• 1/4” Drill Bit.
Weight Limitation
The good s
IMPORTANT
1. Do not tighten bolts / screws completely until all bolts / screws are lined up and inser ted into holes
2 . Do not over tighten screws and bolts to avoid stripping.
Step
1
Let ’ s get this thing fired up!
First, slide one 1/4” x 13mm Flat Washer (2) onto each 1/4” x 55mm Hex Button Head Bolt (1).
Next, align the Stretchers (C) with their respective holes on the bottom of the cabinet before finally using the flat washers + bolts to secure the Stretchers (C) in place on the bottom of the cabinet.
Screw t wo M6 x 35mm Cam Bolts (3) on to each of the Side Leg Frame (B).
Next, slide the Side Leg Frames (B) in to their respective holes on each side of the Stretchers (C) that were just installed. Step 2
How to use c a m lock s
Did you know?
Cam locks are used to join t wo panels together, usually the edge of one to the flat side of another.
First, your cam bolt (or cam pin) will need to be properly inser ted into the flat side of the board.
Impor tant Note: Only tighten the cam bolt until it is secure. Do not over-tighten.
Nex t, you will fit the proper hole on the edge of the associated joining panel over the cam bolt.
Impor tant Note: When installed properly, the head of the cam bolt will be visible through the larger hole on the side of the joining panel.
Nex t, you will notice the cam lock has a “C ” shaped back Commonly, an arrow on the front of the cam lock points in the same direc tion as the open sec tion on back.
Using these as your cue, inser t the cam lock into the large hole so the opening of the “C ” fits over the head of the cam bolt
Impor tant Note: Only turn the cam lock until the panels are fully engaged & feel secure. Turning too far may lead to hardware failure
Using a screwdriver, you will turn the cam lock until it stops, usually bet ween 130º or 180º You will feel the panels pulling closer until they are secured. If
Still having issues?
If you are
cam b olt
lightly (le
Step 3
Now it ’ s time to secure the Side Leg Frames (B). Begin securing the Side Leg Frames (C ) to the Cabinet Assembly (1) using four sets of 1/4” x 13mm Flat Washers (2) and 1/4” x 55mm Hex But ton Head Bolts (1).
Nex t, finish securing the Side Leg Frame (B) and the Stretcher (C ) using the Cam Locks (4).
Finally, tighten all Hex But ton Head Bolts
Step 4
Safet y first!
Secure the Plastic Bracket (6) to the back of the cabinet using the M3 5 x 14mm Screws (7 ).
Step 5
Find the desired location for your cabinet before beginning the installation of the Wall Anchors (10). Use a 1/4” drill bit with the Plastic Bracket (6) as a drilling guide. Drill t wo holes in the wall, then inser t the Wall Anchors (10) into the holes. Secure the Plastic Bracket (6) to your wall by screwing the M4 x 50mm Screws (8) into the wall anchors Nex t, loop the Plastic Strap (9) through both Plastic Brackets and pull it through itself to secure the cabinet in place.
Step 6
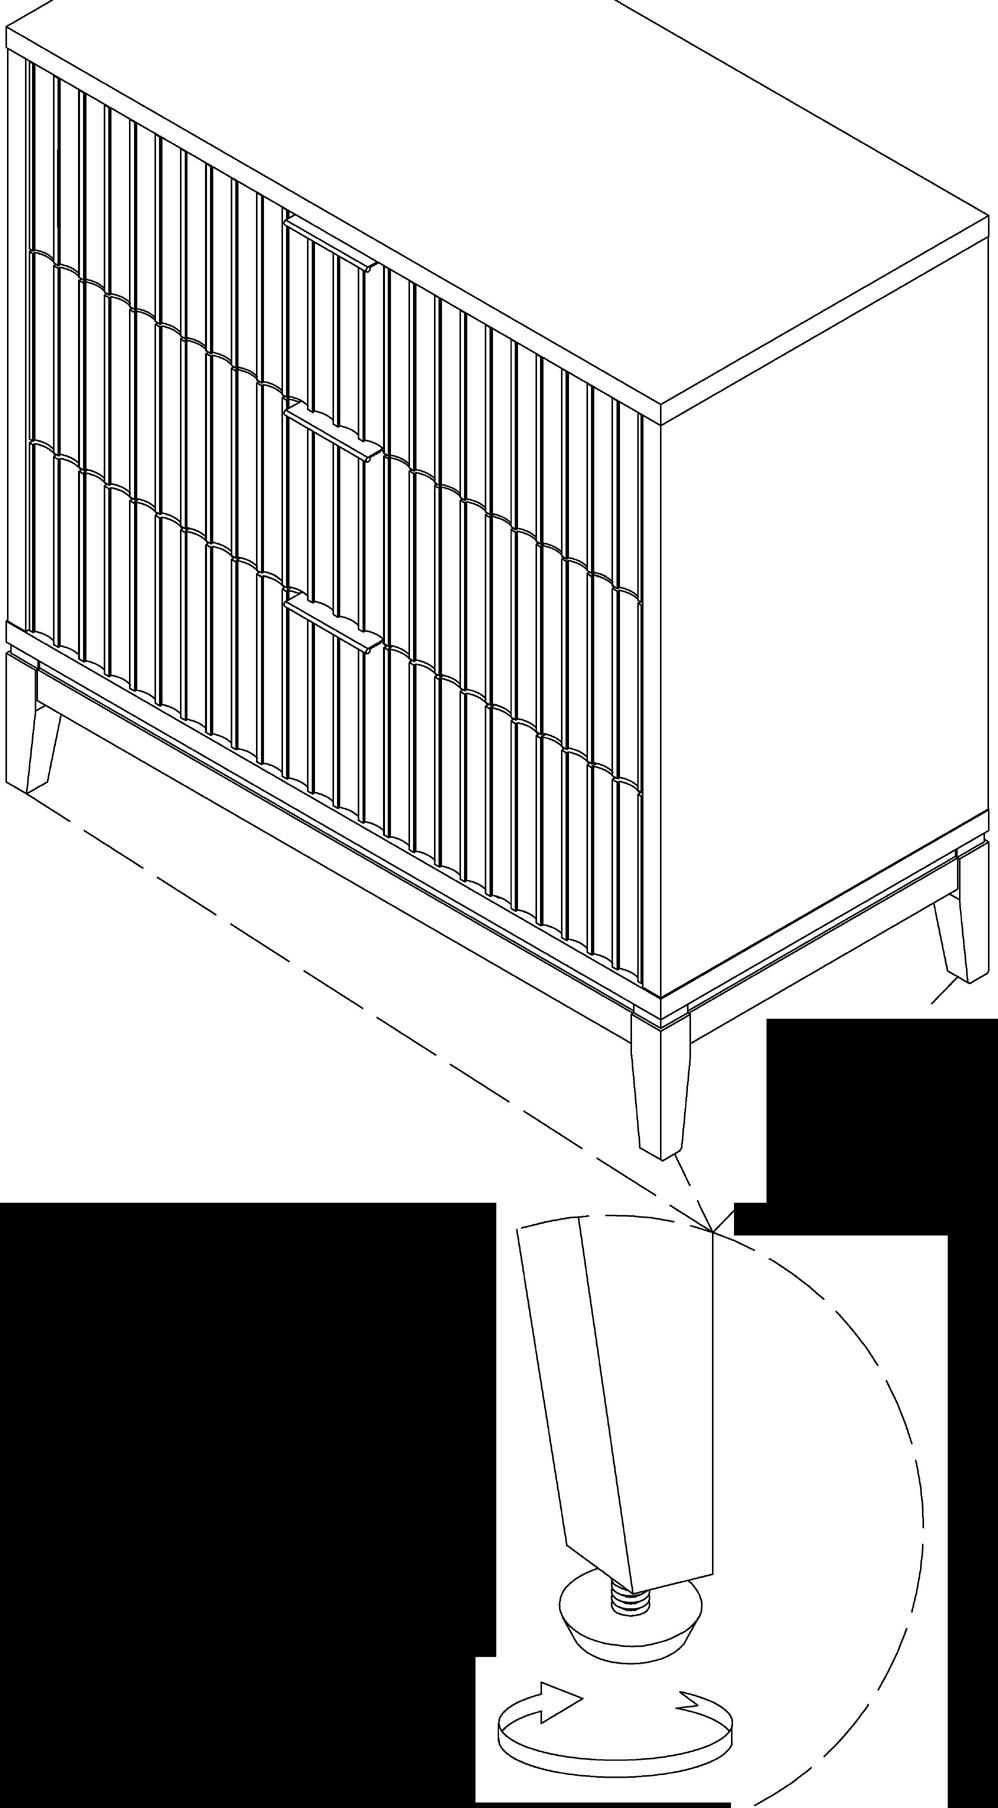
Now go ahead and check that your Jasper dresser is level and not wobbly. If it ’s looking a lit tle unlevel, adjust the levelers on the feet until it ’ s nice and level.
Wobbly or unlevel? Adjust feet until stable.
Step 7
You did it! Time to put away all those cute clothes.
Note: Only one drawer can be opened at a time
E xample: If the top drawer is open, both the middle and bot tom drawers must be completely closed.
No hear tbur n, when we ha ndle t he retur n
Give us a call 1- 866 -619-1004 or shoot us a message at help@nathanjames.com we will issue you a free replacement with zero hassle.
Our way Their way
Give us a call
Replacement
You
Re-package item
Schedule pick up
Track package
Replacement
You
We really don’t want you to go through the hassle of re -packaging your item and sending it back , because let ’ s be honest nobody has time for that
Sa fet y first, f un later
We want your produc t to last as long as possible, so we recommend that you tighten the screws 2 weeks af ter assembly and for added safet y check the tightness of all screws ever y 2 months.
For proper care and treatment of wood and metal please check our website at NathanJames.com/products
Safe use of this produc t star ts with you.
Use this produc t responsibly with the primar y concern for your safet y. Follow assembly instruc tions carefully and inspec t produc t upon receipt and each use.
Nathan James and its parent companies cannot be held legally responsible for any injuries or death resulted from failure to follow instruc tions or improper use of this produc t
Do not modif y the struc ture of this produc t in any way.
Our produc ts have been tested to meet specific safet y measures as they were originally intended to be sold. Any modifications will present the risk of creating significant safet y issues which NJ will not be responsible for.
DO NOT use for commercial purposes
DO NOT climb on dresser
Proper use
DO NOT exceed weight limit
DO NOT leave spilled liquid on dresser
DO NOT use if dresser is damaged or broken
DO NOT make temporar y repairs
DO NOT use outdoors
We are only in business if you’re happy
For star ters, thanks for being you.
Toll-free at 1-866-619-1004
Help@nathanjames.com
NathanJames.com/help
We do our best to ensure your furniture arrives without any problems, but occasionally mistakes happen as humans we are imper fec t beings. In the event that a par t is damaged or missing, we will be more than happy to provide you with replacement par t(s) for free.
Warrant y
This produc t comes with a lifetime warrant y from the date of purchase Please use your phone to scan the QR code to register your produc t or visit ht tps://goo.gl/i9dk3q
Did we do alright? Please spread the love!
If you are happy with your produc t, tell your friends and family about us or even bet ter leave us a review online. Spreading the word gives us the oppor tunit y to make more people happy and keep our prices low for your nex t purchase