INDUSTRIAL DEHUMIDIFIER
INDUSTRIAL DEHUMIDIFIER
MANUAL
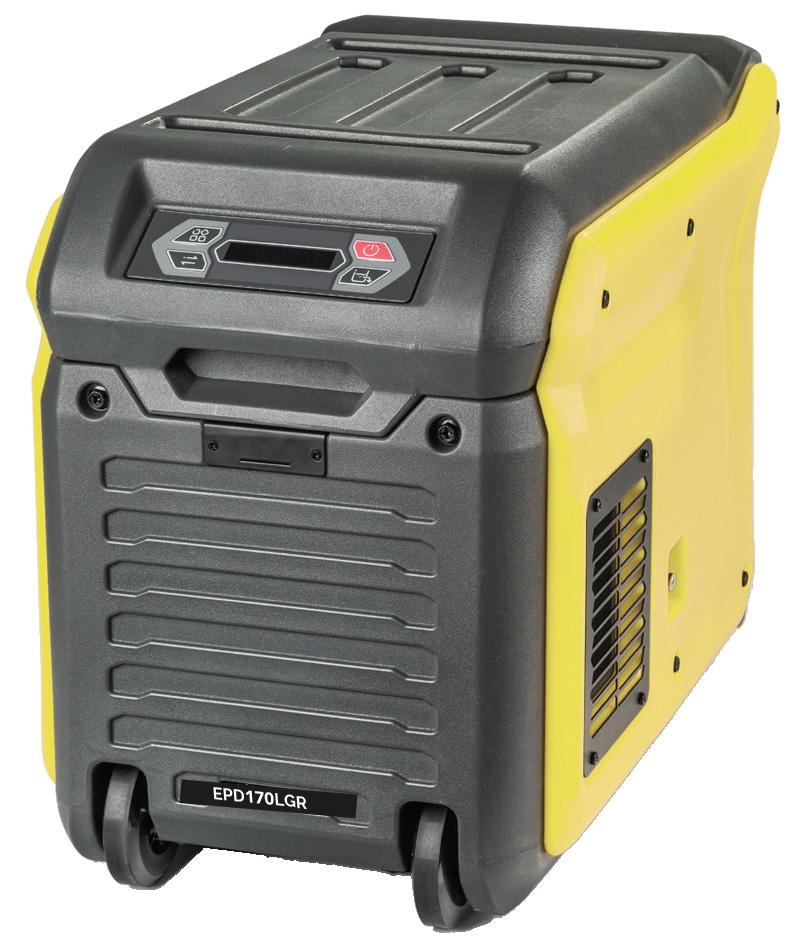
LGR refrigerant dehumidifier
EPD170LGR (Low Gas Refrigerant)
EPD330LGR (Low Grain Refrigerant)
EPD330LGR (LowGrainRefrigerant)
Warning:
Warning:
Warning:
To reduce the risk of injury, the user must read and understand this manual before using this product.
To reduce the risk of injury, the user must read and understand this manual before using this product.
Toreducetheriskofinjury,theusermustreadand understandthismanualbeforeusingthisproduct.
Thank you!
Thankyou!
Thank you!
Thank you for choosing this product. Save this manual for future reference.
Thank you for choosing this product. Save this manual for future reference.
Thankyouforchoosingthisproduct. Savethismanualforfuturereference.
This ECOR PRO dehumidifier is a powerful dehumidifier suitable for professional use.
ThisECOR PROdehumidifier isapowerful dehumidifiersuitable forprofessionaluse.
For more than 50 years, we have specialised in both air treatment and the production and development of dehumidifiers and mobile air conditioners.
Our quality products are manufactured according to the latest technological developments and are specially designed to achieve a clean, better and more pleasant indoor climate.
This ECOR PRO dehumidifier is a powerful dehumidifier suitable for professional use. For more than 50 years, we have specialised in both air treatment and the production and development of dehumidifiers and mobile air conditioners. Our quality products are manufactured according to the latest technological developments and are specially designed to achieve a clean, better and more pleasant indoor climate.
Formorethan50years,wehavespecialisedinboth airtreatmentandtheproductionanddevelopment ofdehumidifiers andmobile airconditioners. Ourquality productsare manufacturedaccording to thelatesttechnologicaldevelopmentsandarespeciallydesignedtoachieveaclean,betterandmore pleasantindoorclimate.
Toensurethatyougetthemostoutofallthepossibilities,werecommendthatyoureadtheseoperatinginstructionscarefully.Keeptheinstructionsina safeplacewithineasyreach,sothatyoucanreferto themagainatalaterdateifnecessary.
To ensure that you get the most out of all the possibilities, we recommend that you read these operating instructions carefully. Keep the instructions in a safe place within easy reach, so that you can refer to them again at a later date if necessary.
To ensure that you get the most out of all the possibilities, we recommend that you read these operating instructions carefully. Keep the instructions in a safe place within easy reach, so that you can refer to them again at a later date if necessary.
Safety instructions
Safety
instructions
Safetyinstructions
For safety reasons, please read these operating instructions carefully before using your appliance. The device is intended exclusively for professional use by qualified personnel. Persons who are not familiar with this device should not use it.
Forsafetyreasons,pleasereadtheseoperatinginstructionscarefullybeforeusingyourappliance.The deviceisintendedexclusivelyforprofessionaluseby qualifiedpersonnel. Personswhoare notfamiliar with thisdeviceshouldnotuseit.
For safety reasons, please read these operating instructions carefully before using your appliance. The device is intended exclusively for professional use by qualified personnel. Persons who are not familiar with this device should not use it.
Check the mains with the rating plate.
Checkthemainswiththeratingplate.
Check the mains with the rating plate.
The dehumidifier is suitable for indoor use only with a grounded electrical outlet.
Thedehumidifier issuitable forindoor useonly witha groundedelectricaloutlet.
The dehumidifier is suitable for indoor use only with a grounded electrical outlet.
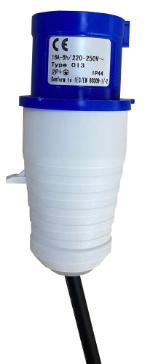
Connectionvoltage:
220-240Volt(50Hz)-IEC60309plugforUKandEU.
Connection voltage: 220-240 Volt (50 Hz) - IEC 60309 plug for UK and EU, 115V (60Hz) - USA plug for USA and Canada.
Connection voltage: 220-240 Volt (50 Hz) - IEC 60309 plug for UK and EU.


PROFESSIONAL (BUILDING) DEHUMIDIFIER
Humid air is drawn into the device by a rotating fan.
Humid air is drawn into the device by a rotating fan.
After passing through the filter, which stops dust particles, the air is cooled by a cooling coil.
After passing through the filter, which stops dust particles, the air is cooled by a cooling coil.
Humid air is drawn into the device by a rotating fan.
After passing through the filter, which stops dust particles, the air is cooled by a cooling coil.
The water vapour in the air condenses into water, which is discharged via a discharge hose.
The water vapour in the air condenses into water, which is discharged via a discharge hose.
The water vapour in the air condenses into water, which is discharged via a discharge hose.
The drier air is then heated by a heat exchanger and blown back into the room by the fan.
The drier air is then heated by a heat exchanger and blown back into the room by the fan.
The drier air is then heated by a heat exchanger and blown back into the room by the fan.
GENERAL AND SAFETY (1)
The installation must be in full accordance with the local regulations, provisions and standards.
Please note that the dehumidifier must have stood upright for at least one hour before use.
• When you are not using the dehumidifier, always unplug it from the wall socket.
• Keep children out of reach of the device.
• Maintenance and repairs should only be carried out by certified personnel. Otherwise the warranty will become void.
• This dehumidifier is a safe device (CE). However, as with any electrical appliance, care should be taken.
The environmentally friendly R290 refrigerant is in a closed circuit; it is highly flammable. Please observe the following:! No open flames or sources of heat in the vicinity of the appliance in the same room. Do not open the closed refrigeration circuit. Only qualified personnel, trained, certified and accustomed to using flammable refrigerants may carry out maintenance work. See warning next page.
• Always disconnect the power supply before cleaning the unit or any part of it.
• Never clean the dehumidifier by spraying it with water or immersing it in water.
• Do not cover or insert anything into the openings of the dehumidifier.
• Only install the device in an area that corresponds to its IP rating.
NEVER connect the unit using an extension cord.
If a suitable earthed socket is not available, have this installed by a certified professional.
The plug must always be easily accessible when the appliance is connected.
Important: The appliance MUST always be connected to earth. If the power supply is not earthed, do not connect the device at all.
Warning! Never use the appliance if the cord or plug is damaged. If the cord is damaged, have it replaced by an authorised professional to avoid danger and accidents.
WARNING FOR R290 REFRIGERANT!
R290 refrigerant is a flammable natural gas and may only be used by certified personnel.
Leaking refrigerant can cause fire and explosion, therefore NEVER work on the device yourself! Store, install and use the dehumidifier in rooms with at least 15 m2 of floor space.
R290 is heavier than air. If the unit is leaking gas, the highest concentration will be near the floor. R290 (propane gas) is odourless.
NEVER USE THE DEHUMIDIFIER:
• in the vicinity of open fire (such as a cigarette, candle, etc.) or a heat source (stove, hot lamp).
• in an industrial environment with a risk of gas and/or dust explosions
• in places where the cord can easily be damaged or trapped
• when children are present without supervision
• where there is a risk of liquid falling on or into the device
• where the appliance can be damaged by chemicals.
The appliance is NOT suitable for DIY repair.
If a gas leak is suspected, have a certified service engineer investigate. Stay away from the unit. Evacuate the area.
Before start-up
Before start-up
Location
LOCATION
For best results, run your dehumidifier in a closed space. Close doors and windows. Place the unit by a wall, free of obstacles and free of anything that obstructs the airflow (inlet and outlet).
For best results, run your dehumidifier in a closed space. Close doors and windows. Place the unit by a wall, free of obstacles and free of anything that obstructs the airflow (inlet and outlet).
Discharge hose connection
Discharge hose connection
Your dehumidifier comes with a drainage hose. The hose can be attached to the unit with a quick connector. Unwind the drainage hose and place the end into a sink, drain, bucket or outside the area to be dehumidified where the water can drain away. If using a bucket, empty the bucket regularly so that it does not overflow.
Position
POSITION
Always leave the device upright for at least one hour after transport. Oil from the compressor can then flow back into the compressor from the cooling coils. The device must be upright and level.
Always leave the device upright for at least one hour after transport. Oil from the compressor can then flow back into the compressor from the cooling coils. The device must be upright and level.
Your dehumidifier comes with a drainage hose. The hose can be attached to the unit with a quick connector. Unwind the drainage hose and place the end into a sink, drain, bucket or outside the area to be dehumidified where the water can drain away. If using a bucket, empty the bucket regularly so that it does not overflow.
NB. Always roll out the drainage hose completely. Never place the end higher than 3.5 metres. Check the hose for kinks and obstacles, so that the condensation water is not obstructed in its flow. This prevents leakage from the pump.
NB. Always roll out the drainage hose completely. Never place the end higher than 3.5 metres. Check the hose for kinks and obstacles, so that the condensation water is not obstructed in its flow. This prevents leakage from the pump.
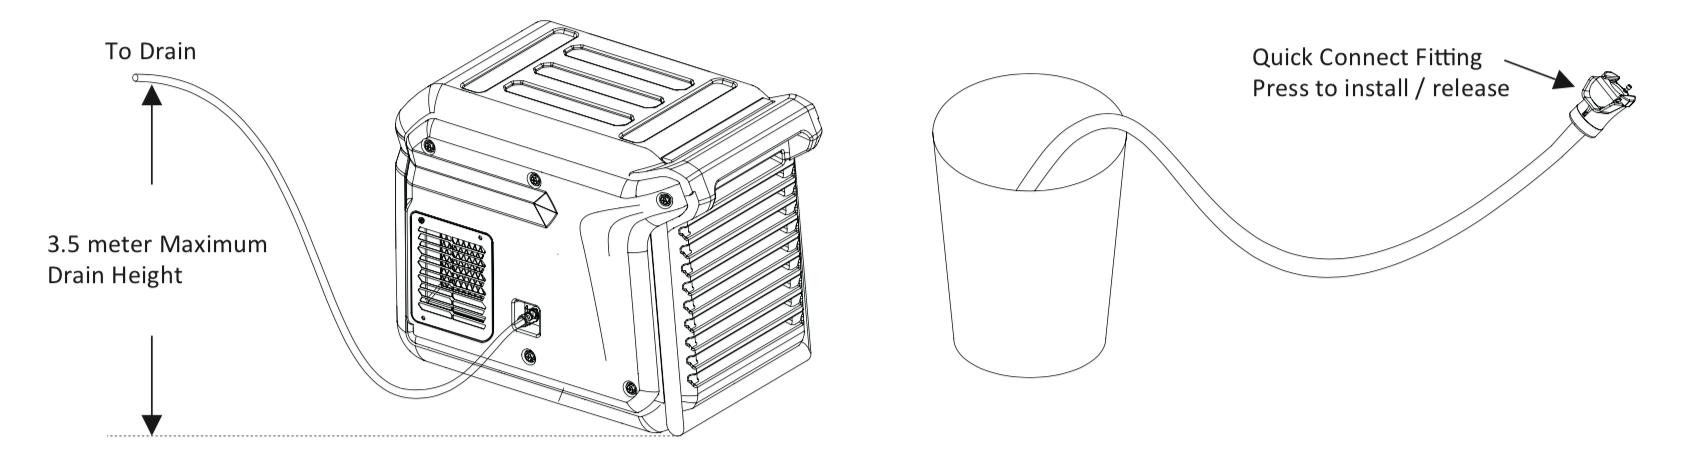
Quick-connect fitting Press to install / release
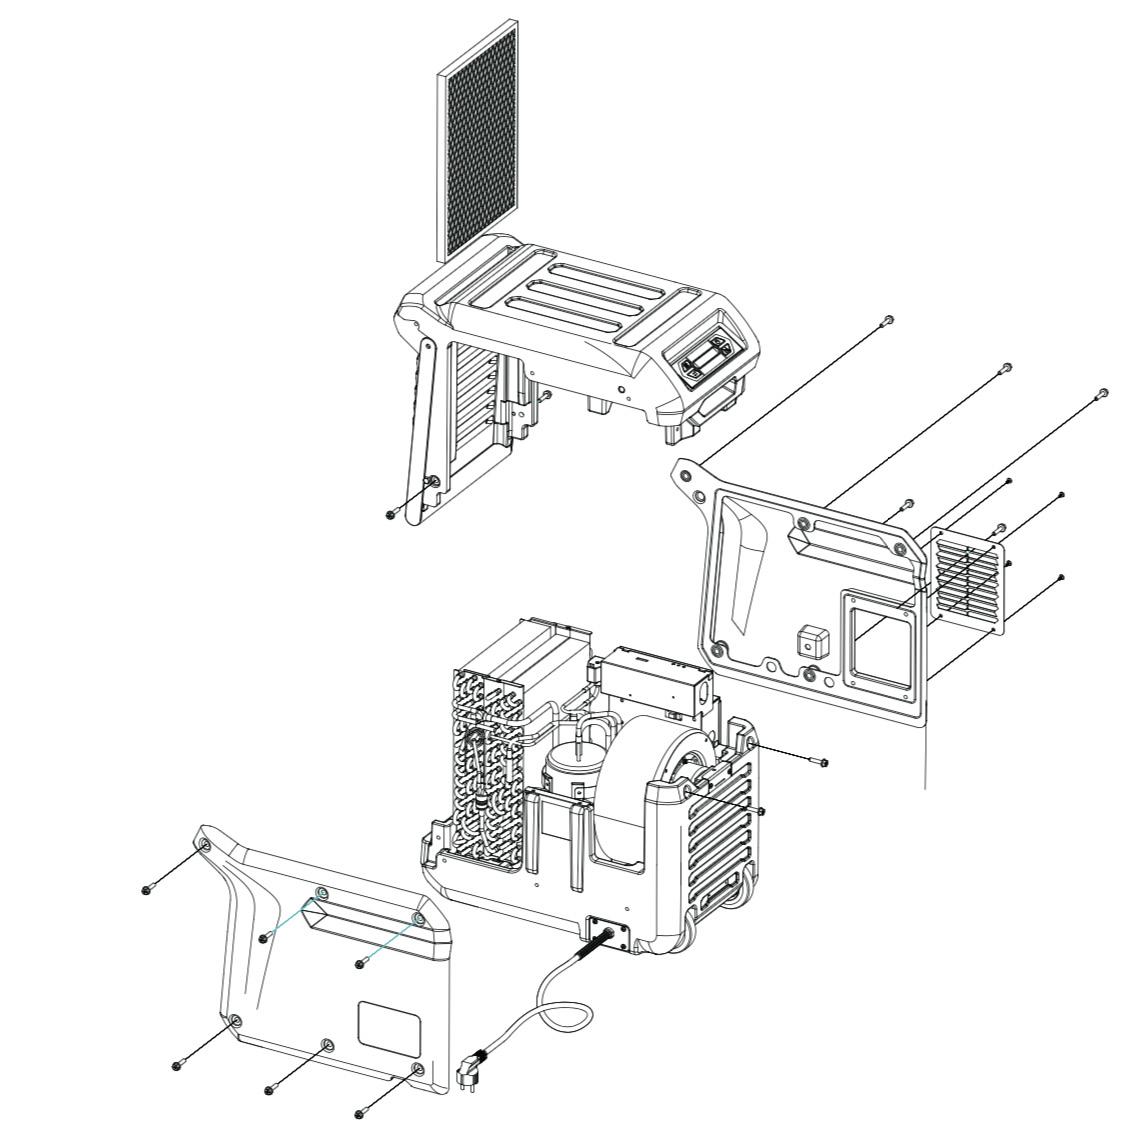
INSTALLATION (2)
INSTALLATION (2)
Installation of additional hose / dry air outlet
Installation of additional hose / dry air outlet
An external hose can be optionally mounted on the discharge grille. This can be useful for certain drying requirements.
An external hose can be optionally mounted on the discharge grille. This can be useful for certain drying requirements.
1) loosen the four screws of the air outlet channel
1) Loosen the four screws of the air outlet channel.
2) replace the adapter turned
2) Mount the adapter on the grille using the four screws.
3) attach the hose to the adapter
3) Attach the hose to the adapter.
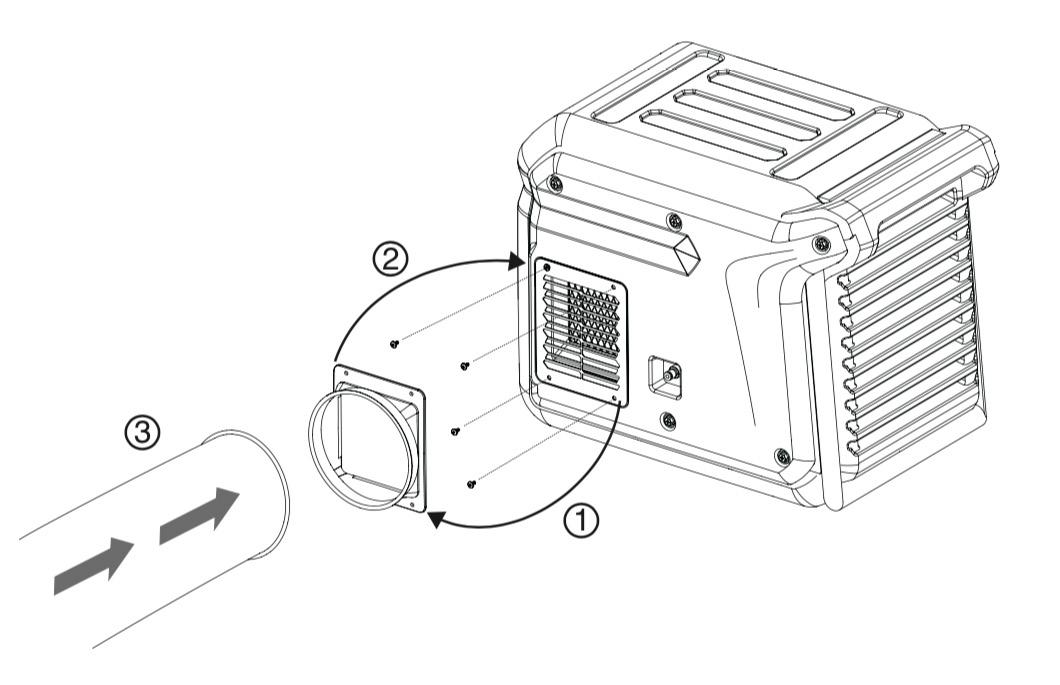
Mounting of duct adapter
An external hose can optionally be mounted on the outlet grille.
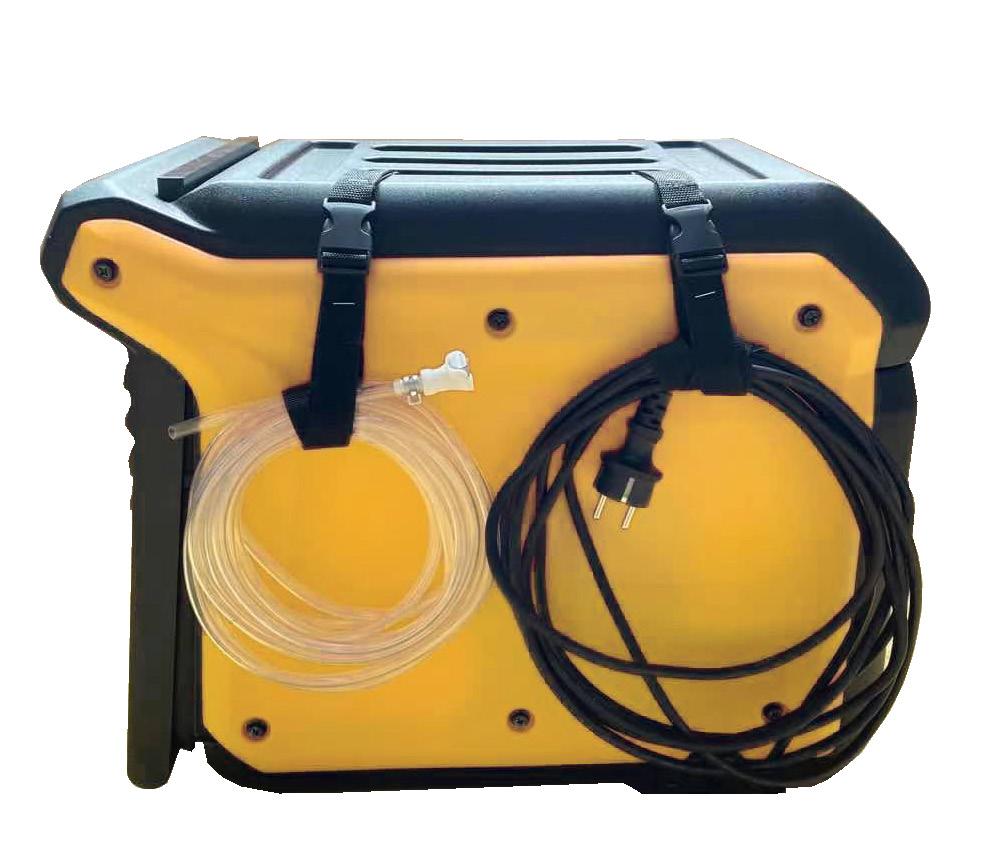
Straps can be used to easily secure the power cord and drain hose.
Straps can be used to easily secure the power cord and drain hose.
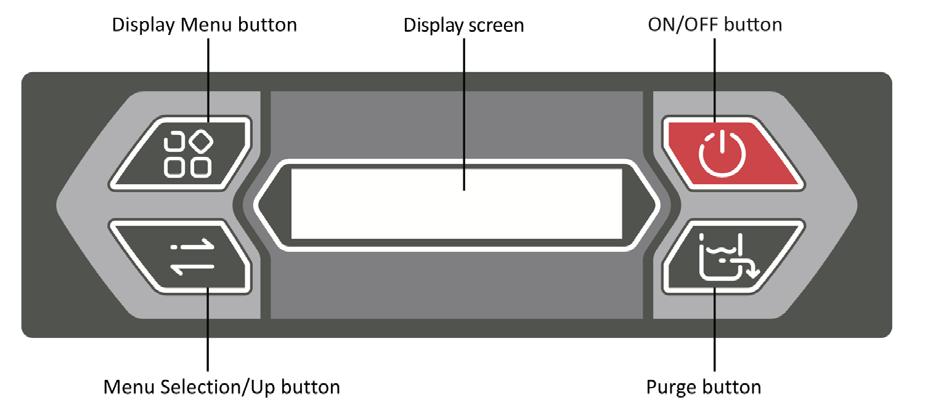


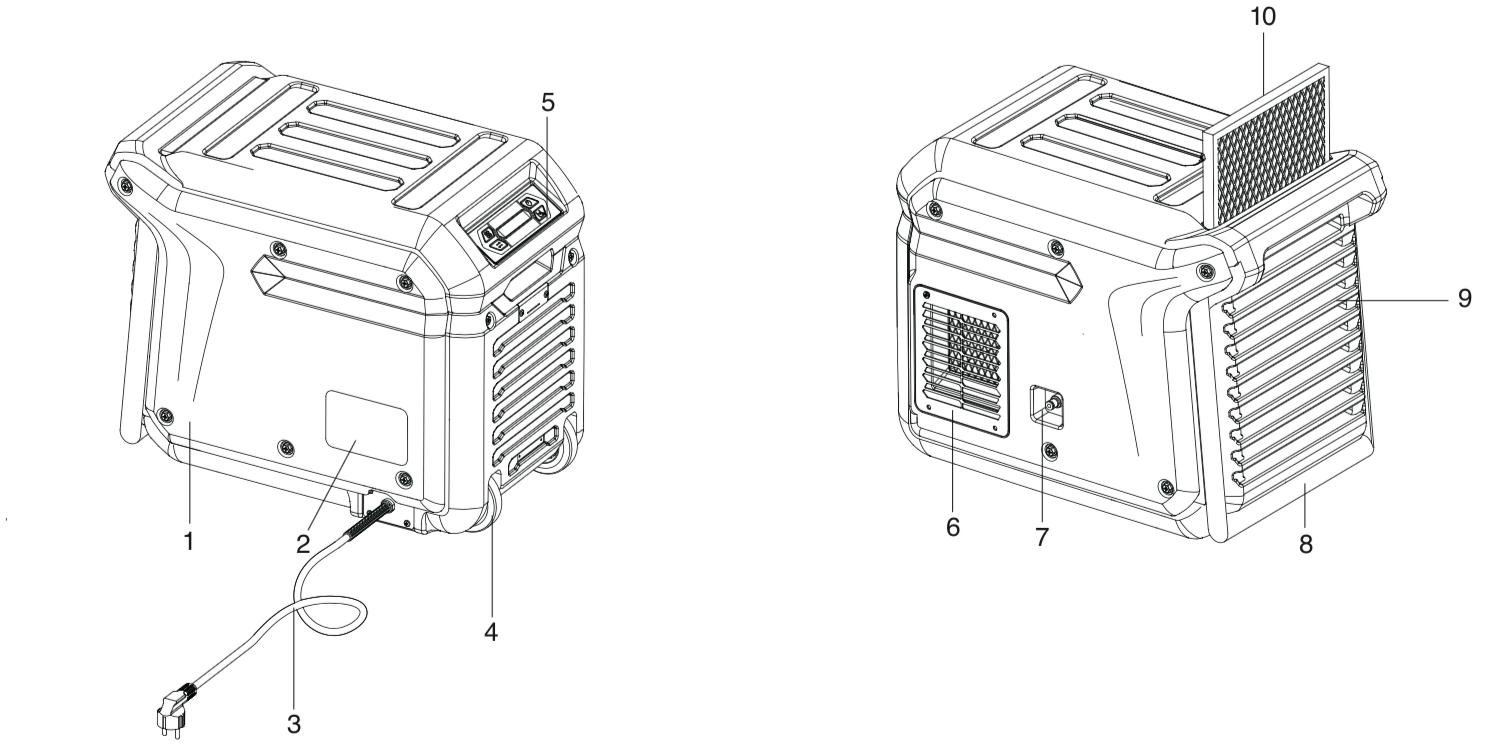
Control panel
Control panel
Menu - Display screen - On/off button
MENU button
Menu selection / Up - Pump button
DISPLAY SCREEN
ON / OFF button
Main Menu - Display
MENU SELECTION / UP button
Insert plug into earthed socket
PUMP button
When the unit is connected, it starts the diagnostic procedure.
MAIN MENU - DISPLAY
Insert plug into earthed socket.
The display shows “self diagnosis”. When the unit is ready, the display shows “stand by”.
When the unit is connected, it starts the diagnostic procedure.
The display shows "SELF DIAGNOSIS".
When the unit is ready, the display shows "STAND BY".
Switching the unit on/off
Switching the unit on/off.
Press the “on/off” button. The unit starts up, the display shows “unit on”.
Press the ON/OFF button. The unit starts up, the display shows "UNIT ON".
Operating time 00:00, set value (00%), current temperature 00 oC and current humidity 00%.
Operating time 00:00, set value (00%), current temperature 00 oC and current humidity 00%.


If the display reads PLEASE WAIT COMP DELAY and performs a numeral count down from a maximum of 180 seconds to 0, this is the compressor delay protection. Once the unit completes the compressor delay protection, the unit will start working immediately.
If the display reads PLEASE WAIT COMP DELAY and performs a numeral count down from a maximum of 180 seconds to 0, this is the compressor delay protection. Once the unit completes the compressor delay protection, the unit will start working immediately.
If the display reads "PLEASE WAIT COMP DELAY" and performs a numeral count down from a maximum of 180 seconds to 0, this is the compressor delay protection. Once the unit completes the compressor delay protection, the unit will start working immediately.
Purge
Purge
Pump
Press the purge button, the unit will pump for 50 seconds to manually empty water from the condensate pump reservoir.
Press the purge button, the unit will pump for 50 seconds to manually empty water from the condensate pump reservoir.
Press the PUMP button, the unit will pump for 50 seconds to manually empty water from the condensate pump reservoir.
During normal operation, the pump purges 90 seconds when the reservoir is full. The display will flash P in top right corner.
During normal operation, the pump purges 90 seconds when the reservoir is full. The display will flash P in top right corner.
During normal operation, the pump purges 90 seconds when the reservoir is full. The display will flash P in top right corner.
Notice: Always press the PUMP button prior to move the unit.
Notice: Always press the PURGE button prior to move the unit.
Notice: Always press the PURGE button prior to move the unit.

Display Menu
Display Menu
Display Menu
Press the DISPLAY MENU button cycle through the display of additional dehumidifier conditions and User Setting. To return to the Main Menu, wait for 10 seconds no operation or keep pressing DISPLAY MENU button till it back to the Main Menu.
Press the MENU button to cycle through the display of additional dehumidifier conditions and user setting. To return to the MAIN MENU, wait for 10 seconds or keep pressing MENU button till it back to the MAIN MENU.
Press the DISPLAY MENU button cycle through the display of additional dehumidifier conditions and User Setting. To return to the Main Menu, wait for 10 seconds no operation or keep pressing DISPLAY MENU button till it back to the Main Menu.


Menu selection
Menu Selection
Press the MENU SELECTION button to change / check the value on the "User Setting Menu Display".
Press the MENU SELECTION button to change / check the value on the “User Setting Menu Display”. The MENU SELECTION button acts as the UP button for adjusting the set value for humidistat mode operation.
The MENU SELECTION button acts as the UP button for adjusting the set value for humidistat mode operation.
User can use DISPLAY MENU and MENU SELECTION buttons to check and set some functions.
User can use MENU and MENU SELECTION buttons to check and set some functions. Each press of MENU button, will show next parameter. See list below. To select the parameter you wish to adjust, press the MENU SELECTION button, the arrow shows in the left top corner means you can adjust the parameter or the screen is locked now. Press MENU button to exit the locked interface.
Each press of DISPLAY MENU button, will show next parameter. See list below. When you wish the parameter you wish to adjust, press the MENU SELECTION button, the arrow shows in the left top corner means you can adjust the parameter or the screen is locked now. Press DISPLAY MENU button to exit the locked interface.
JOB HOURS
Job hours
Press MENU SELECTION to reset the working hours to zero.
Shows the total number of operating hours on a specific task. Press MENU SELECT to reset the operating time when the job is completed.
Live hours
LIFE HOURS
Shows total of unit hours. Value cannot be modified.
Shows total of unit hours. Value cannot be modified.
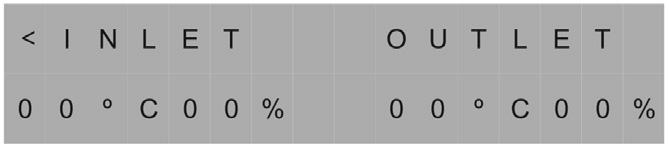
Temperature
Temperature
of INLET / OUTLET
of Inlet / Outlet
Shows current temperature and relative humidity of inlet and outlet.
Shows current temperature and relative humidity of inlet and outlet.


Humidistat Mode
Humidistat Mode
Humidistat Mode
Humidistat Mode
HUMIDISTAT MODE
Ad on mode press MENU SELECTION to adjust the set value from CO-35%-40%-45%-50%-55%-60%-65%-70%-75%-80%-85%90%. Choose the desired value and wait for 5 seconds, the sett will be kept. CO means continuous dehumidifying.
Humidistat Mode
Ad on mode press MENU SELECTION to adjust the set value from CO-35%-40%-45%-50%-55%-60%-65%-70%-75%-80%-85%90%. Choose the desired value and wait for 5 seconds, the sett will be kept. CO means continuous dehumidifying.
Ad on mode press MENU SELECTION to adjust the set value from CO-35%-40%-45%-50%-55%-60%-65%-70%-75%-80%-85%90%. Choose the desired value and wait for 5 seconds, the sett will be kept. CO means continuous dehumidifying.
Ad on mode press MENU SELECTION to adjust the set value from CO-35%-40%-45%-50%-55%-60%-65%-70%-75%-80%-85%90%. Choose the desired value and wait for 5 seconds, the sett will be kept. CO means continuous dehumidifying.
Ad on mode press MENU SELECTION to adjust the set value from CO-35%-40%-45%-50%-55%-60%-65%-70%-75%-80%-85%-90%. Choose the desired value and wait for 5 seconds, the sett will be kept. CO means continuous dehumidifying.
Temp Units
Ad on mode press MENU SELECTION to adjust the set value from CO-35%-40%-45%-50%-55%-60%-65%-70%-75%-80%-85%90%. Choose the desired value and wait for 5 seconds, the sett will be kept. CO means continuous dehumidifying.
Temp Units
Temp Units
TEMP UNITS
Temp Units
Shows the current temperature scale. Press MENU SELECTION to set Fahrenheit or Centigrade scale.
Shows the current temperature scale. Press MENU SELECTION to set Fahrenheit or Centigrade scale.
Shows the current temperature scale. Press MENU SELECTION to set Fahrenheit or Centigrade scale.
Shows the current temperature scale. Press MENU SELECTION to set Fahrenheit or Centigrade scale.
Shows the current temperature scale. Press MENU SELECTION to set Fahrenheit or Centigrade scale.
Temp Units
COIL TEMP
Coil Temp
Coil Temp
Coil Temp
Coil Temp
Shows the evaporator coil temperature.
Shows the current temperature scale. Press MENU SELECTION to set Fahrenheit or Centigrade scale.
Shows the evaporator coil temperature.
Shows the evaporator coil temperature.
Shows the evaporator coil temperature.
Shows the evaporator coil temperature.
Comprss Current
Coil Temp
Comprss Current
Comprss Current
COMPRSS CURRENT
Comprss Current
Shows the current draw in amps.
Shows the current draw in amps.
Shows the evaporator coil temperature.
Shows the current draw in amps.
Shows the current draw in amps.
Shows the current draw in amps.
If the unit can not detect the compressor current, the display shows - - A.
If the unit can not detect the compressor current, the display shows - - A.
If the unit can not detect the compressor current, the display shows - - A.
If the unit can not detect the compressor current, the display shows - - A.
Comprss Current
Shows the current draw in amps.
ENERGY METER
Code Message
Code Message
Code Message
Code Message
If the unit can not detect the compressor current, the display shows - - A.
Display shows total hours of use in kWh. The displayed value cannot be adjusted. Note down kWh consumption before and after each job.
If the unit on-board diagnostics discover a problem, the unit will display the error message, see the Code Message next page.
If the unit on-board diagnostics discover a problem, the unit will display the error message, see the Code Message next page.
Code Message
CODE MESSAGE
If the unit on-board diagnostics discover a problem, the unit will display the error message, see the Code Message next page. 12
If the unit on-board diagnostics discover a problem, the unit will display an error code. See the error codes next page.
If the unit on-board diagnostics discover a problem, the unit will display the error message, see the Code Message next page. 12
If the unit on-board diagnostics discover a problem, the unit will display the error message, see the Code Message next page.
Code message (error code)
E1
Explanation
Temperature sensor error
E2 Inlet sensor error
E3 Cooling system failure
E4 Pump error
E5 Outlet sensor error
EC Overcurrent protection
D Defrosting
P Pump / Purging
CLEANING AND MAINTENANCE (1)
Attention! Always disconnect from the mains before cleaning or servicing.
- Maintenance may only be carried out by qualified personnel.
- The appliance must be disconnected from the mains before the covers are removed.
- If the appliance is not running, the heating element may still be hot.
REFRIGERANT R290 - EPD170LGR
Cooling is achieved by using R290 refrigerant, a natural gas - propane - in a closed system. Since it is highly flammable, caution is advised: no open flame or source of heat near the appliance, use and storage in a room with a floor space of at least 15 m2, annual inspection by an authorised professional, who will top up the refrigerant if necessary.
Cleaning the filter
To remove the filter, first loosen the screw in the middle. (e.g. with a coin).
The unit has an intake air filter that must be checked periodically and checked and cleaned if necessary. Clean it with a hoover or wash it.
The filter must be completely dry before being replaced.
CAUTION: Never run the unit without the filter, dust will adversely affect operation.
Housing
Wipe regularly with a damp cloth using a mild household detergent.
CLEANING AND MAINTENANCE (2)
Attention! Always disconnect from the mains before cleaning or servicing.
Attention! Always disconnect from the mains before cleaning or servicing.
Keep the filter, spirals and all grilles clean. This will help ensure proper operation.
Keep the filter, spirals and all grilles clean. This will help ensure proper operation.
1) remove the hose from the air outlet (if fitted)
1) Remove the hose from the air outlet (if fitted).
2) unscrew the side panels (6 screws)
2) Unscrew the side panels (6 screws).
3) Take out the filter and clean it.
3) Take out the filter and clean it.
4) Remove dust from the panels with a soft dry cloth.
4) Remove dust from the panels with a soft dry cloth.
5) Clean the inside carefully with a hoover, be careful not to damage delicate parts.
5) Clean the inside carefully with a hoover, be careful not to damage delicate parts.
6) Attach the side panels in the reverse order.
6) Attach the side panels in the reverse order.