INDUSTRIELLE LUFTENTFEUCHTER - INDUSTRIAL DEHUMIDIFIER
INDUSTRIAL DEHUMIDIFIER

GEBRAUCHSANLEITUNG
LGR Kondensations-Luftentfeuchter
MANUAL
LGR refrigerant dehumidifier

INDUSTRIELLE LUFTENTFEUCHTER - INDUSTRIAL DEHUMIDIFIER
INDUSTRIAL DEHUMIDIFIER
LGR Kondensations-Luftentfeuchter
MANUAL
LGR refrigerant dehumidifier
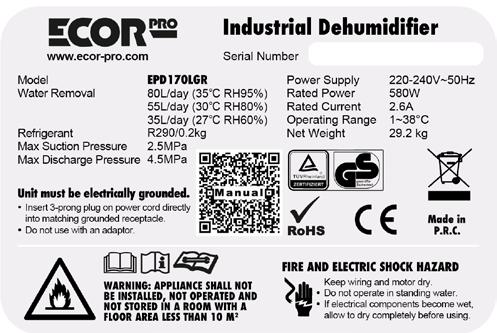
Connection voltage:
Warning:
Warnung:
To reduce the risk of injury, the user must read and understand this manual before using this product.
Bitte lesen Sie das Benutzerhandbuch sorgfältig durch, bevor Sie Ihr Gerät benutzen.
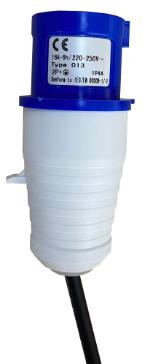
220-240 Volt (50 Hz) - IEC 60309 plug for UK and EU, 115V (60Hz) - USA plug for USA and Canada.
For safety reasons, please read these operating instructions carefully before using your appliance. The device is intended exclusively for professional use by qualified personnel. Persons who are not familiar with this device should not use it.
Bitte lesen Sie diese Anleitung aus Sicherheitsgründen sorgfältig durch, bevor Sie Ihr Gerät in Betrieb nehmen. Das Gerät ist nur für den professionellen Einsatz durch qualifiziertes Personal bestimmt. Personen, die mit diesem Gerät nicht vertraut sind, sollten es nicht verwenden.
Check the mains with the rating plate.
Thank you!
Vielen Dank!
Thank you for choosing this product. Save this manual for future reference.
USA CAN UK EU
This ECOR PRO dehumidifier is a powerful dehumidifier suitable for professional use.
For more than 50 years, we have specialised in both air treatment and the production and development of dehumidifiers and mobile air conditioners.
Vielen Dank, dass Sie sich für den ECOR PRO Luftentfeuchter entschieden haben. Er ist ein leistungsstarker Luftentfeuchter für den professionellen Einsatz. Seit mehr als 50 Jahren haben wir uns sowohl auf die Luftaufbereitung als auch auf die Produktion und Entwicklung von Luftentfeuchtern und mobilen Klimageräten spezialisiert.
Our quality products are manufactured according to the latest technological developments and are specially designed to achieve a clean, better and more pleasant indoor climate.
Unsere Qualitätsprodukte werden nach den neuesten technologischen Entwicklungen hergestellt und sind speziell darauf ausgerichtet, ein sauberes, besseres und angenehmeres Raumklima zu erreichen.
To ensure that you get the most out of all the possibilities, we recommend that you read these operating instructions carefully. Keep the instructions in a safe place within easy reach, so that you can refer to them again at a later date if necessary.
Um sicherzustellen, dass Sie alle Funktionen optimal nutzen können, empfehlen wir Ihnen, dieses Handbuch sorgfältig zu lesen. Bewahren Sie die Anleitung an einem sicheren Ort in Reichweite auf, damit Sie bei Bedarf später darauf zurückgreifen können.
The dehumidifier is suitable for indoor use only with a grounded electrical outlet.
Connection voltage: 220-240 Volt (50 Hz) - IEC 60309 plug for UK and EU, 115V (60Hz) - USA plug for USA and Canada.
Prüfen Sie die Netzspannung anhand des Typenschilds. Der Luftentfeuchter ist nur für die Verwendung in Innenräumen mit einer geerdeten Steckdose, Spannung 220240V (50Hz) für Europa.
Humid air is drawn into the device by a rotating fan.
Humid air is drawn into the device by a rotating fan.
After passing through the filter, which stops dust particles, the air is cooled by a cooling coil.
After passing through the filter, which stops dust particles, the air is cooled by a cooling coil.
Ein rotierender Ventilator saugt feuchte Luft in das Gerät.
Nach dem Durchgang durch den Filter, wodurch Staubpartikel zurückgehalten werden, wird die Luft durch eine Kühlspirale abgekühlt.
The water vapour in the air condenses into water, which is discharged via a discharge hose. The drier air is then heated by a heat exchanger and blown back into the room by the fan.
The water vapour in the air condenses into water, which is discharged via a discharge hose. The drier air is then heated by a heat exchanger and blown back into the room by the fan.
Der Wasserdampf in der Luft kondensiert zu Wasser, das durch einen Ablaufschlauch abgeleitet wird. Die trockenere Luft wird danach mit Hilfe eines Wärmetauschers erwärmt und durch den Ventilator in den Raum zurückgeblasen.
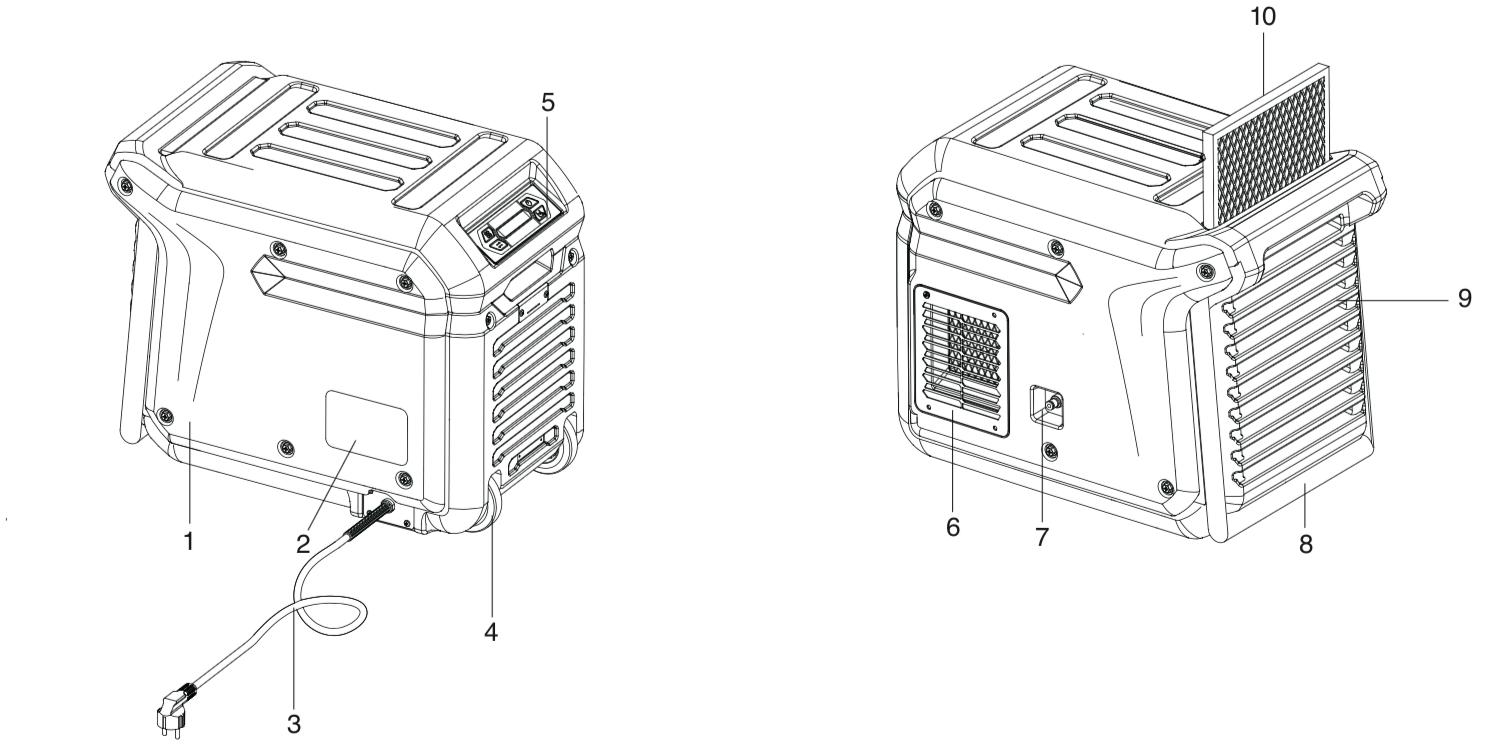
Beschreibung Teile
Räder 5 Bedienfeld/display 6 Luftauslass
Kondenswasser-Ablauf 8 Griff/Hebel 9 Lufteinlass 10 Filter
• When you are not using the dehumidifier, always unplug it from the wall socket.
• Keep children out of reach of the device.
• Maintenance and repairs should only be carried out by certified personnel. Otherwise the warranty will become void.
Die Installation muss in vollem Umfang den örtlichen Vorschriften, Bestimmungen und Normen entsprechen.
Bitte beachten Sie, dass der Luftentfeuchter vor der Verwendung mindestens eine Stunde lang aufrecht gestanden haben muss.
• This dehumidifier is a safe device (CE). However, as with any electrical appliance, care should be taken.
The installation must be in full accordance with the local regulations, provisions and standards. Please note that the dehumidifier must have stood upright for at least one hour before use.
• Wenn Sie den Luftentfeuchter nicht benutzen, ziehen Sie immer den Netzstecker.
• Halten Sie Kinder von dem Gerät fern.
• When you are not using the dehumidifier, always unplug it from the wall socket.
• Keep children out of reach of the device.
• Wartung und Reparaturen sollten nur von zertifiziertem Personal durchgeführt werden. Andernfalls erlischt die Garantie.
• Maintenance and repairs should only be carried out by certified personnel. Otherwise the warranty will become void.
• Dieser Luftentfeuchter ist ein sicheres Gerät (CE). Seien Sie jedoch, wie bei jedem elektrischen Gerät, vorsichtig.
The environmentally friendly R290 refrigerant is in a closed circuit; it is highly flammable. Please observe the following:! No open flames or sources of heat in the vicinity of the appliance in the same room. Do not open the closed refrigeration circuit. Only qualified personnel, trained, certified and accustomed to using flammable refrigerants may carry out maintenance work. See warning next page. -
• This dehumidifier is a safe device (CE). However, as with any electrical appliance, care should be taken.
Das umweltfreundliche Kältemittel R290 befindet sich in einem geschlossenen Kreislauf; es ist hochentzündlich. Achten Sie darauf, dass sich keine offenen Flammen oder Wärmequellen in der Nähe des Geräts im gleichen Raum befinden. Der geschlossene Kühlkreislauf darf nicht geöffnet werden. Nur qualifiziertes, geschultes, zertifiziertes und im Umgang mit brennbaren Kältemitteln geübtes Personal darf die Wartung durchführen.
- Only install the device in an area that corresponds to its IP rating.
The environmentally friendly R290 refrigerant is in a closed circuit; it is highly flammable. Please observe the following:! No open flames or sources of heat in the vicinity of the appliance in the same room. Do not open the closed refrigeration circuit. Only qualified personnel, trained, certified and accustomed to using flammable refrigerants may carry out maintenance work.
See warning next page.
• Dieses Gerät ist nicht für die Verwendung durch unqualifizierte Personen geeignet.
- Always disconnect the power supply before cleaning the unit or any part of it.
• Ziehen Sie immer den Netzstecker, bevor Sie das Gerät oder Teile davon reinigen.
• Reinigen Sie den Luftentfeuchter niemals durch Besprühen mit Wasser oder durch Eintauchen in Wasser.
- Never clean the dehumidifier by spraying it with water or immersing it in water.
NEVER connect the unit using an extension cord. If a suitable earthed socket is not available, have this installed by a certified professional. The plug must always be easily accessible when the appliance is connected.
• Decken Sie die Öffnungen des Luftentfeuchters nicht ab und stecken Sie keine Gegenstände hinein.
- Do not cover or insert anything into the openings of the dehumidifier.
Important: The appliance MUST always be connected to earth. If the power supply is not earthed, do not connect the device at all.
• Installieren Sie das Gerät nur in einem Bereich, der seiner IP-Schutzart entspricht.
- Only install the device in an area that corresponds to its IP rating.
Vorsicht! Verwenden Sie das Gerät niemals, wenn das Kabel oder der Stecker beschädigt ist. Wenn das Kabel beschädigt ist, lassen Sie es von einer qualifizierten Fachkraft austauschen, um Gefahren und Unfälle zu vermeiden. ALLGEMEINES
Schließen Sie das Gerät NIEMALS über ein Verlängerungskabel an. Wenn keine geeignete Schutzkontaktsteckdose vorhanden ist, lassen Sie diese von einem zertifizierten Fachmann installieren.
Warning! Never use the appliance if the cord or plug is damaged. If the cord is damaged, have it replaced by an authorised professional to avoid danger and accidents.
NEVER connect the unit using an extension cord. If a suitable earthed socket is not available, have this installed by a certified professional.
The plug must always be easily accessible when the appliance is connected.
Der Stecker muss immer leicht zugänglich sein, wenn das Gerät angeschlossen ist.
Important: The appliance MUST always be connected to earth. If the power supply is not earthed, do not connect the device at all.
Wichtig! Das Gerät MUSS immer mit der Erde verbunden sein. Wenn die Spannungsversorgung nicht geerdet ist, schließen Sie das Gerät auf keinen Fall an.
Warning! Never use the appliance if the cord or plug is damaged. If the cord is damaged, have it replaced by an authorised professional to avoid danger and accidents.
GENERALANDSAFETY(2)
WARNINGFORR290REFRIGERANT!
Das Kältemittel R290 ist ein brennbares natürliches Gas und darf nur von zertifiziertem Personal verwendet werden. Auslaufendes Kältemittel kann Feuer und Explosion verursachen, deshalb NIEMALS selbst das Gerät öffnen! Lagern, installieren und verwenden Sie den Luftentfeuchter in Räumen mit einer Grundfläche von mindestens 10 m2.
R290refrigerantisa flammablenatural gasand mayonlybeusedbycertified personnel.Leaking refrigerantcancause fireand explosion,therefore NEVERworkonthedeviceyourself! Store,install andusethedehumidifierin roomswithatleast 15 m
2 of floorspace.
Verwenden Sie den Luftentfeuchter niemals:
NEVERUSETHEDEHUMIDIFIER
• inthevicinityofopen fire(suchasacigarette, candle, etc.)oraheatsource(stove,hotlamp).
• In der Nähe von offenen Flammen (z. B. Zigarette, Kerze usw.) oder einer Wärmequelle (Ofen, heiße Lampe);
•inanindustrialenvironmentwithariskofgasand/or dustexplosions
• In einer industriellen Umgebung mit der Gefahr einer Gas- und/oder Staubexplosion;
•inplaceswherethecordcaneasilybedamagedor trapped
•whenchildrenarepresentwithoutsupervision
• Wo das Kabel leicht beschädigt oder eingeklemmt werden kann;
• Wenn Kinder unbeaufsichtigt anwesend sind;
•wherethereisariskofliquidfallingonorintothe device
R290isheavierthanair.Iftheunitisleakinggas, thehighestconcentrationwillbenear the floor. R290(propanegas)isodourless.
R290 ist schwerer als Luft. Wenn aus dem Gerät Gas austritt, befindet sich die höchste Konzentration in Bodennähe. R290 (Propangas) ist geruchlos.
•wheretheappliancecanbedamagedbychemicals
• Wenn die Gefahr besteht, dass Flüssigkeit auf oder in das Gerät verschüttet wird;
• Wo das Gerät durch Chemikalien beschädigt werden kann.
TheapplianceisNOTsuitable forDIYrepair.
Das Gerät ist NICHT zur Selbstreparatur geeignet.
Ifagasleakis suspected,haveacertifiedserviceengineerinvestigate.Stayaway fromthe unit.Evacuatethearea.
Wenn ein Gasleck vermutet wird, lassen Sie dies von einem zertifizierten Servicetechniker untersuchen.
Halten Sie sich dann von dem Gerät fern. Evakuieren Sie den Raum.
Anschluss Ablaufschlauch
Location
For best results, run your dehumidifier in a closed space. Close doors and windows. Place the unit by a wall, free of obstacles and free of anything that obstructs the airflow (inlet and outlet).
Die besten Ergebnisse erzielen Sie, wenn Sie Ihren Luftentfeuchter in einem geschlossenen Raum betreiben. Schließen Sie Türen und Fenster. Stellen Sie das Gerät in der Nähe einer Wand auf, frei von Hindernissen und frei von allem, was den Luftstrom (Einlass und Auslass) behindert.
Position
STAND
Always leave the device upright for at least one hour after transport. Oil from the compressor can then flow back into the compressor from the cooling coils. The device must be upright and level.
Lassen Sie das Gerät nach dem Transport immer mindestens eine Stunde lang aufrecht stehen. Das Öl aus dem Kompressor kann dann von den Kühlspiralen zurück in den Kompressor fließen. Das Gerät muss aufrecht und waagerecht stehen.
Ablaufschlauch
3,5 Meter maximale Abflusshöhe
Your dehumidifier comes with a drainage hose. The hose can be attached to the unit with a quick connector. Unwind the drainage hose and place the end into a sink, drain, bucket or outside the area to be dehumidified where the water can drain away. If using a bucket, empty the bucket regularly so that it does not overflow.
Ihr Luftentfeuchter wird mit einem Ablaufschlauch geliefert. Der Schlauch kann mit einer Schnellkupplung am Gerät befestigt werden. Rollen Sie den Ablaufschlauch ab und legen Sie das Ende in ein Waschbecken, einen Abfluss, einen Eimer oder außerhalb des zu entfeuchtenden Bereichs, wo das Wasser gut ablaufen kann. Wenn Sie einen Eimer verwenden, leeren Sie den Eimer regelmäßig, damit er nicht überläuft.
PS: Rollen Sie den Ablaufschlauch immer vollständig ab. Platzieren Sie das Schlauchende niemals höher als 3,5 Meter. Prüfen Sie den Schlauch auf Knicke und Verstopfungen, damit das Kondenswasser ungehindert abfließen kann. Dadurch wird verhindert, dass die Pumpe undicht wird.
NB. Always roll out the drainage hose completely. Never place the end higher than 3.5 metres. Check the hose for kinks and obstacles, so that the condensation water is not obstructed in its flow. This prevents leakage from the pump.
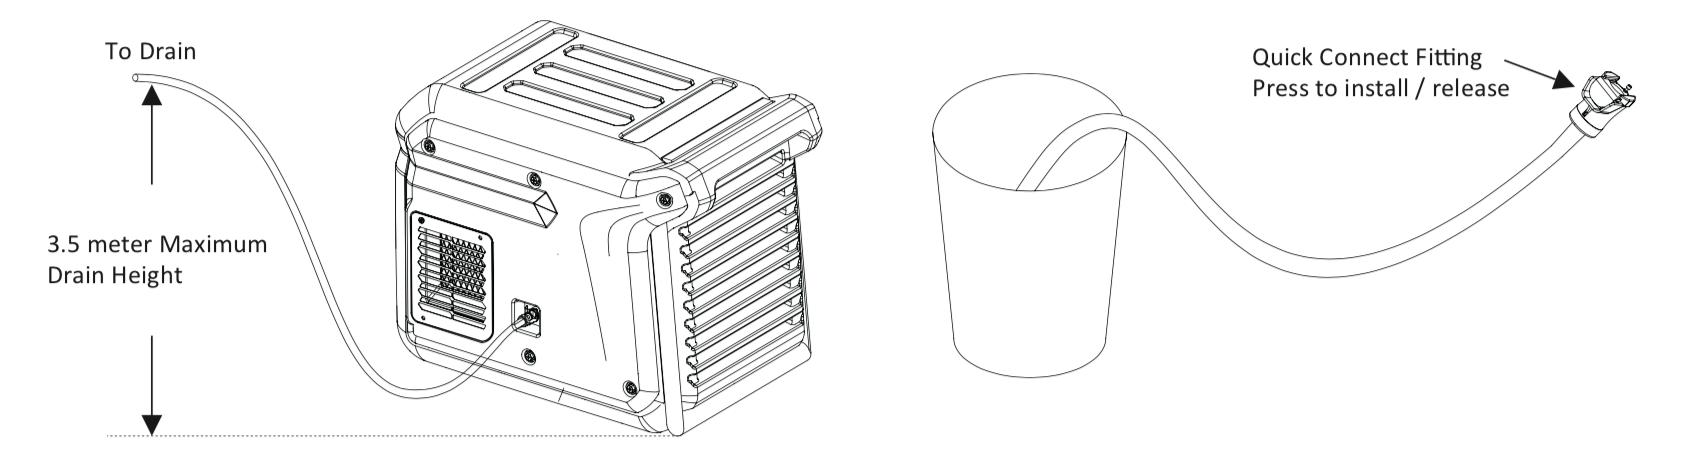
Schnellkupplung.
Drücken zum Installieren / Lösen
INSTALLATION (2)
INSTALLATION (2)
Installation eines zusätzlichen Schlauchs
Installation of additional hose / dry air outlet
Am Ausblasgitter kann optional ein externer Schlauch montiert werden. Dies kann bei bestimmten
Trocknungsanforderungen sinnvoll sein.
An external hose can be optionally mounted on the discharge grille. This can be useful for certain drying requirements.
1) loosen the four screws of the air outlet channel
1) Entfernen Sie die vier Schrauben des Luftauslassgitters.
2) replace the adapter turned
3) attach the hose to the adapter
2) Setzen Sie den mitgelieferten Adapter oben auf das Auslassgitter.
3) Bringen Sie die vier Schrauben wieder an, die den Adapter und das Gitter halten.
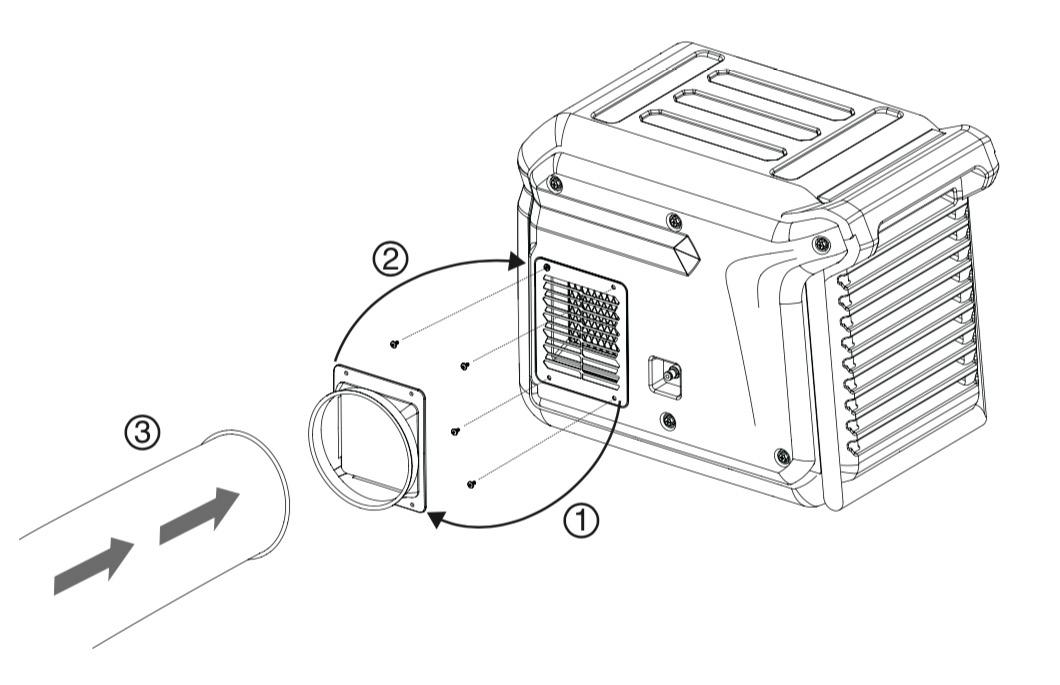
Montage des Schlauchbeuteladapters
Optional kann am Ausblasgitter ein externer Schlauch montiert werden.
Straps can be used to easily secure the power cord and drain hose.
Das Netzkabel und der Abflussschlauch können mit Hilfe von Gurten einfach gesichert werden.


If the display reads PLEASE WAIT COMP DELAY and performs a numeral count down from a maximum of 180 seconds to 0, this is the compressor delay protection. Once the unit completes the compressor delay protection, the unit will start working immediately.


Wenn das Display "PLEASE WAIT COMP DELAY" mit einer Zahl dahinter anzeigt, ist der Kompressor-Verzögerungsschutz eingeschaltet und es wird ein Countdown von 180 auf 0 Sekunden durchgeführt. Danach startet das Gerät.
If the display reads PLEASE WAIT COMP DELAY and performs a numeral count down from a maximum of 180 seconds to 0, this is the compressor delay protection. Once the unit completes the compressor delay protection, the unit will start working immediately.
Purge
Purge
Press the purge button, the unit will pump for 50 seconds to manually empty water from the condensate pump reservoir.
Press the purge button, the unit will pump for 50 seconds to manually empty water from the condensate pump reservoir.
Drücken Sie die Pumpentaste, das Gerät pumpt 50 Sekunden lang das Kondenswasser aus dem Behälter. Während des Gebrauchs pumpt die Pumpe den Behälter leer, wenn er voll ist. Dies dauert 90 Sekunden.
During normal operation, the pump purges 90 seconds when the reservoir is full. The display will flash P in top right corner.
Auf dem Bildschirm erscheint ein P in der oberen rechten
During normal operation, the pump purges 90 seconds when the reservoir is full. The display will flash P in top right corner.
Ecke.
Notice: Always press the PURGE button prior to move the unit.
Wichtig! Entleeren Sie den Tank, bevor Sie das Gerät bewegen!
Notice: Always press the PURGE button prior to move the unit.
Display Menu
Menü anzeigen
Display Menu
Press the DISPLAY MENU button cycle through the display of additional dehumidifier conditions and User Setting. To return to the Main Menu, wait for 10 seconds no operation or keep pressing DISPLAY MENU button till it back to the Main Menu.
Durch Drücken der Menütaste werden die verschiedenen Einstellungen und Zustände des Luftentfeuchters auf dem Display angezeigt. Warten Sie 10 Sekunden, bis Sie wieder zum Hauptmenü zurückgelangen. Oder drücken Sie die Taste so lange, bis das Hauptmenü wieder angezeigt wird.
Press the DISPLAY MENU button cycle through the display of additional dehumidifier conditions and User Setting. To return to the Main Menu, wait for 10 seconds no operation or keep pressing DISPLAY MENU button till it back to the Main Menu.


MenuSelection
MenuSelection
MenuSelection
MenuSelection
PresstheMENUSELECTIONbuttontochange/checkthe valueon the“User SettingMenu Display”.TheMENU SELECTIONbuttonactsastheUPbuttonforadjustingthesetvalue forhumidistatmodeoperation.
PresstheMENUSELECTIONbuttontochange/checkthe valueon the“User SettingMenu Display”.TheMENU SELECTIONbuttonactsastheUPbuttonforadjustingthesetvalue forhumidistatmodeoperation.
Drücken Sie die MENÜAUSWAHLTASTE , um die Einstellung des "User Setting Menu Display" zu prüfen oder zu ändern. Die Taste dient als „UP-Button” (Aufwärts-Taste), um den eingestellten Wert des Vorgangs anzupassen.
PresstheMENUSELECTIONbuttontochange/checkthe valueon the“User SettingMenu Display”.TheMENU SELECTIONbuttonactsastheUPbuttonforadjustingthesetvalue forhumidistatmodeoperation.
PresstheMENUSELECTIONbuttontochange/checkthe valueon the“User SettingMenu Display”.TheMENU SELECTIONbuttonactsastheUPbuttonforadjustingthesetvalue forhumidistatmodeoperation.
UsetheDISPLAYMENUandMENUSELECTIONbuttonsto checkandsetsomefunctions.
UsetheDISPLAYMENUandMENUSELECTIONbuttonsto checkandsetsomefunctions.
Mit der MENÜTASTE und der MENÜAUSWAHLTASTE können verschiedene Funktionen überprüft und eingestellt werden. Jedes Mal, wenn die MENÜTASTE gedrückt wird, wird der nächste Parameter sichtbar. Wenn Sie bei dem Parameter angekommen sind, den Sie einstellen möchten, verwenden Sie die MENÜAUSWAHLTASTE , um den Parameter zu ändern. Der Pfeil in der oberen linken Ecke zeigt an, dass Einstellungen vorgenommen werden können.
UsetheDISPLAYMENUandMENUSELECTIONbuttonsto checkandsetsomefunctions.
UsetheDISPLAYMENUandMENUSELECTIONbuttonsto checkandsetsomefunctions.
EachpressofDISPLAYMENUbutton,willshowthenextparameter.Whenyouwishtoadjust,presstheMENUSELECTIONbutton,thearrowshowninthelefttopcornermeans youcanadjusttheparameterorthescreenislocked.Press DISPLAYMENUbuttontoexitthelockedinterface.
EachpressofDISPLAYMENUbutton,willshowthenextparameter.Whenyouwishtoadjust,presstheMENUSELECTIONbutton,thearrowshowninthelefttopcornermeans youcanadjusttheparameterorthescreenislocked.Press DISPLAYMENUbuttontoexitthelockedinterface.
EachpressofDISPLAYMENUbutton,willshowthenextparameter.Whenyouwishtoadjust,presstheMENUSELECTIONbutton,thearrowshowninthelefttopcornermeans youcanadjusttheparameterorthescreenislocked.Press DISPLAYMENUbuttontoexitthelockedinterface.
EachpressofDISPLAYMENUbutton,willshowthenextparameter.Whenyouwishtoadjust,presstheMENUSELECTIONbutton,thearrowshowninthelefttopcornermeans youcanadjusttheparameterorthescreenislocked.Press DISPLAYMENUbuttontoexitthelockedinterface.
Jobhours
Jobhours
Zeigt die Gesamtzahl der Betriebsstunden für eine bestimmte Aufgabe an. Drücken Sie die MENÜAUSWAHLTASTE , um die Betriebsstunden auf 0 zurückzusetzen.
PressMENUSELECTIONtoresettheworkinghourstozero.
Jobhours
Jobhours
PressMENUSELECTIONtoresettheworkinghourstozero.
PressMENUSELECTIONtoresettheworkinghourstozero.
PressMENUSELECTIONtoresettheworkinghourstozero.
Lifehours
Lifehours
Showstotalofunithours.Thisvaluecannotbemodified.
Showstotalofunithours.Thisvaluecannotbemodified.
Lifehours
Lifehours
Zeigt die Gesamtzahl der Maschinenstunden an. Dieser Wert kann nicht eingestellt werden.
Showstotalofunithours.Thisvaluecannotbemodified.
Showstotalofunithours.Thisvaluecannotbemodified.
TemperatureofInlet /Outlet
TemperatureofInlet
Das Display zeigt die aktuellen Temperaturen und die Luftfeuchtigkeit an.
Showscurrenttemperatureandrelativehumidityofinlet andoutlet.
Showscurrenttemperatureandrelativehumidityofinlet andoutlet.
Showscurrenttemperatureandrelativehumidityofinlet andoutlet.
Showscurrenttemperatureandrelativehumidityofinlet andoutlet.
Humidistat Mode


Humidistat Mode
Humidistat Mode
Humidistat Mode
Ad on mode press MENU SELECTION to adjust the set value from CO-35%-40%-45%-50%-55%-60%-65%-70%-75%-80%-85%90%. Choose the desired value and wait for 5 seconds, the sett will be kept. CO means continuous dehumidifying.
Drücken Sie im "ON"-Modus die MENÜAUSWAHLTASTE , um die gewünschte Luftfeuchtigkeit einzustellen. Die Optionen lauten CO-35-40-45-50-55-60-65-70-75-80-85-90 %.
Ad on mode press MENU SELECTION to adjust the set value from CO-35%-40%-45%-50%-55%-60%-65%-70%-75%-80%-85%90%. Choose the desired value and wait for 5 seconds, the sett will be kept. CO means continuous dehumidifying.
Ad on mode press MENU SELECTION to adjust the set value from CO-35%-40%-45%-50%-55%-60%-65%-70%-75%-80%-85%90%. Choose the desired value and wait for 5 seconds, the sett will be kept. CO means continuous dehumidifying.
Ad on mode press MENU SELECTION to adjust the set value from CO-35%-40%-45%-50%-55%-60%-65%-70%-75%-80%-85%90%. Choose the desired value and wait for 5 seconds, the sett will be kept. CO means continuous dehumidifying.
Wählen Sie den gewünschten Wert und warten Sie 5 Sekunden. Die Einstellung wird gespeichert.
CO auf dem Display bedeutet "kontinuierliche Entfeuchtung".
Temp Units
Ad on mode press MENU SELECTION to adjust the set value from CO-35%-40%-45%-50%-55%-60%-65%-70%-75%-80%-85%90%. Choose the desired value and wait for 5 seconds, the sett will be kept. CO means continuous dehumidifying.
Temp Units
Temp Units
Temp Units
Shows the current temperature scale. Press MENU SELECTION to set Fahrenheit or Centigrade scale.
Shows the current temperature scale. Press MENU SELECTION to set Fahrenheit or Centigrade scale.
Shows the current temperature scale. Press MENU SELECTION to set Fahrenheit or Centigrade scale.
Shows the current temperature scale. Press MENU SELECTION to set Fahrenheit or Centigrade scale.
Bei "TEMP UNITS" kann die Temperatur mit der MENÜAUSWAHLTASTE auf Celsius oder Fahrenheit eingestellt werden.
Temp Units
Coil Temp
Coil Temp
Coil Temp
Shows the evaporator coil temperature.
Coil Temp
Shows the current temperature scale. Press MENU SELECTION to set Fahrenheit or Centigrade scale.
Shows the evaporator coil temperature.
Shows the evaporator coil temperature.
Shows the evaporator coil temperature.
Die Temperatur des Verdampfers wird angezeigt.
Comprss Current
Coil Temp
Comprss Current
Comprss Current
Shows the current draw in amps.
Comprss Current
Shows the evaporator coil temperature.
Der Verbrauch in Ampere des Kompressors wird angezeigt.
Shows the current draw in amps.
Shows the current draw in amps.
Shows the current draw in amps.
Wenn eine Messung nicht möglich ist, erscheint im Display "- - A".
If the unit can not detect the compressor current, the display shows - - A.
If the unit can not detect the compressor current, the display shows - - A.
If the unit can not detect the compressor current, the display shows - - A.
If the unit can not detect the compressor current, the display shows - - A.
Comprss Current
Shows the current draw in amps.
Code Message
Code Message
Code Message
If the unit can not detect the compressor current, the display shows - - A.
Code Message
Das Display zeigt die Gesamtzahl der Betriebsstunden in kWh an. Der angezeigte Wert kann nicht verstellt werden. Notieren Sie den kWhVerbrauch vor und nach jedem Auftrag.
If the unit on-board diagnostics discover a problem, the unit will display the error message, see the Code Message next page.
If the unit on-board diagnostics discover a problem, the unit will display the error message, see the Code Message next page.
If the unit on-board diagnostics discover a problem, the unit will display the error message, see the Code Message next page.
Code Message
If the unit on-board diagnostics discover a problem, the unit will display the error message, see the Code Message next page. 12
Wenn die integrierte Diagnose des Geräts ein Problem feststellt, zeigt das Gerät einen Fehlercode an. Siehe Fehlercodes auf der nächsten Seite.
If the unit on-board diagnostics discover a problem, the unit will display the error message, see the Code Message next page.
Fehler Anweisung
E1
E2
Fehler des Temperatursensors
Fehler des Einlass-Sensors
E3 Fehler im Kühlanlage
E4 Pumpenfehler
E5 Fehler am Auslass-Sensor
EC Stromstärkeschutz
D Einfrierschutz
P Entleeren des Behälters
Wichtig! Trennen Sie das Gerät vor Reinigungs- oder Wartungsarbeiten immer von der Stromversorgung.
- Die Wartung darf nur von qualifiziertem Personal durchgeführt werden.
- Das Gerät muss vom Netz getrennt werden, bevor die Abdeckungen entfernt werden.
- Wenn das Gerät nicht in Betrieb ist, kann das Heizelement noch heiß sein.
KÄLTEMITTEL R290 - EPD170LGR
Die Kühlung wird durch die Verwendung des Kältemittels R290, ein natürlich vorkommendes Gas (Propan), in einem geschlossenen System erreicht. Da es leicht entflammbar ist, ist Vorsicht geboten: keine offene Flamme oder Wärmequelle in der Nähe des Geräts, Verwendung und Lagerung in einem Raum mit einer Grundfläche von mindestens 10 m2, jährliche Inspektion durch einen autorisierten Techniker, der das Kältemittel bei Bedarf nachfüllt.
Reinigung des Filters
Um den Filter zu entfernen, lösen Sie zunächst die Schraube in der Mitte (z. B. mit einer Münze).
Das Gerät verfügt über einen Einlassluftfilter, der regelmäßig überprüft und ggf. gereinigt werden sollte. Reinigen Sie ihn mit einem Staubsauger oder waschen Sie ihn ab.
Die Filter müssen vor dem Wiedereinbau vollständig trocken sein.
WICHTIG! Betreiben Sie das Gerät niemals ohne Filter, da Staub den Betrieb beeinträchtigt.
Regelmäßig mit einem feuchten Tuch und einem milden Haushaltsreiniger abwischen.
Attention! Always disconnect from the mains before cleaning or servicing.
Wichtig! Trennen Sie das Gerät vor Reinigungs- oder Wartungsarbeiten immer von der Stromversorgung.
Reinigen Sie regelmäßig den Filter, die Spiralen und alle Lüftungsgitter. Dies trägt zu einer guten Funktion bei.
Keep the filter, spirals and all grilles clean. This will help ensure proper operation.
1) remove the hose from the air outlet (if fitted)
2) unscrew the side panels (6 screws)
1) Entfernen Sie den Schlauch an der Auslassseite (falls vorhanden).
3) Take out the filter and clean it.
2) Schrauben Sie die Seitenteile ab (6 Schrauben).
4) Remove dust from the panels with a soft dry cloth.
3) Nehmen Sie den Filter heraus und reinigen Sie ihn.
5) Clean the inside carefully with a hoover, be careful not to damage delicate parts.
4) Entfernen Sie mit einem weichen, trockenen Tuch den Staub von den Platten.
6) Attach the side panels in the reverse order.
5) Reinigen Sie das Innere vorsichtig mit einem Staubsauger, achten Sie darauf, empfindliche Teile nicht zu beschädigen.
6) Bringen Sie die Seitenteile in umgekehrter Reihenfolge an.
TECHNICALSPECIFICATIONSEPD330LGR
TECHNICALSPECIFICATIONSEPD330LGR
UK
EU
EU
Drainhose TECHNICALSPECIFICATIONSEPD330LGR
TECHNICALSPECIFICATIONSEPD330LGR
UK
UK
Entfeuchtungsleistung
EU
EU
WaterRemovalCapacity
WaterRemovalCapacity
WaterRemovalCapacity
WaterRemovalCapacity
80 L/Tag (35 °C RH95%)
150L/day(35 0CRH90%)
150L/day(35 0CRH90%)
150L/day(35 0CRH90%)
150L/day(35 0CRH90%)
55 L/ Tag (30 °C RH80%)
90L/day(30 0CRH80%)
90L/day(30 0CRH80%)
90L/day(30 0CRH80%)
90L/day(30 0CRH80%)
35 L/ Tag (27 °C RH60%)
50L/day(27 0CRH60%)
50L/day(27 0CRH60%)
50L/day(27 0CRH60%)
50L/day(27 0CRH60%)
Spannung / Frequenz
Efficiency (30 0CRH80%)
Efficiency (30 0CRH80%)
Efficiency (30 0CRH80%)
Efficiency (30 0CRH80%)
Nennleistung
Voltage/Frequency
Voltage/Frequency
Voltage/Frequency
Voltage/Frequency
Nennstrom
RatedPower
RatedPower
RatedPower
Luftstrom
RatedPower
RatedCurrent
220-240 V / ~50 Hz
301WattsperLitre
301WattsperLitre
301WattsperLitre
301WattsperLitre
580 W (27 °C RH60%)
220-240V~50Hz
220-240V~50Hz
220-240V~50Hz
220-240V~50Hz
2,6 A (27 °C RH60%)
965W (27 0CRH60%)
965W (27 0CRH60%)
220-240Volt(50Hz)IEC60309 plug forUKandEU
965W (27 0CRH60%)
420 m3/Stunde
4.3A (27 0CRH60%)
RatedCurrent AirFlow
RatedCurrent
Schalldruckpegel
RatedCurrent AirFlow
965W (27 0CRH60%) 4.3A (27 0CRH60%)
4.3A (27 0CRH60%)
4.3A (27 0CRH60%)
55 dB (A)
1.000m3/h
1.000m3/h
Kältemittel R290 / 200 g
Noiselevel
Noiselevel
Noiselevel
Noiselevel
60dB(A)
Betriebstemperatur 1 ~38 °C
Refrigerant
Refrigerant
Refrigerant
Refrigerant
Gewicht 29 kg
OperationTemperature
OperationTemperature
OperationTemperature
OperationTemperature
60dB(A)
R290/0.265kg
Abmessungen (B x H x L) 34,5 x 45 x 56 cm
N.Weight
N.Weight
N.Weight
N.Weight
R290/0.265kg 1~38 0C 44.8kg
1~38 0C 44.8kg
Stromkabel 5 m
Dimensions(WxHxD)
Dimensions(WxHxD)
Dimensions(WxHxD)
Dimensions(WxHxD)
Ablaufschlauch 12 m
PowerCord
PowerCord
PowerCord
PowerCord
Drainhose
Drainhose
Drainhose
705x450x530mm 5m 5m


220-240Volt(50Hz)IEC60309 plug forUKandEU
220-240 Volt (50 Hz)IEC 60309-Stecker für Großbritannien und die EU
220-240Volt(50Hz)IEC60309 plug forUKandEU
Das Gerät muss elektrisch geerdet sein.
• Stecken Sie den dreipoligen Stecker des Netzkabels direkt in die entsprechende geerdete Steckdose ein.
• Nicht mit einem Adapter verwenden.
220-240Volt(50Hz)IEC60309 plug forUKandEU 15
WARNUNG: DAS GERÄT DARF NICHT IN EINEM RAUM MIT EINER BODENFLÄCHE VON WENIGER ALS 4 M2 INSTALLIERT, BETRIEBEN UND GELAGERT WERDEN.
15
15
FEUER- UND STROMSCHLAGGEFAHR
Halten Sie die Verkabelung und den Motor trocken. Nicht in stehendem Wasser betreiben. Wenn elektrische Komponenten nass werden, vor Gebrauch vollständig trocknen lassen.
Max. Saugdruck 2,5 MPa
Max.Suctionpressure2.5MPa
Max. Austrittsdruck 4,5 MPa
Max.Suctionpressure2.5MPa
Max.Suctionpressure2.5MPa
Max.Dischargepressure4.5MPa
Max.Dischargepressure4.5MPa
Max.Dischargepressure4.5MPa


Subjecttomodifications.
Subjecttomodifications.
Änderungen vorbehalten.
Subjecttomodifications.
Subjecttomodifications.
Humid air is drawn into the device by a rotating fan.
Humid air is drawn into the device by a rotating fan.
After passing through the filter, which stops dust particles, the air is cooled by a cooling coil.
After passing through the filter, which stops dust particles, the air is cooled by a cooling coil.
Humid air is drawn into the device by a rotating fan.
After passing through the filter, which stops dust particles, the air is cooled by a cooling coil.
The water vapour in the air condenses into water, which is discharged via a discharge hose.
The water vapour in the air condenses into water, which is discharged via a discharge hose.
The water vapour in the air condenses into water, which is discharged via a discharge hose.
The drier air is then heated by a heat exchanger and blown back into the room by the fan.
The drier air is then heated by a heat exchanger and blown back into the room by the fan.
The drier air is then heated by a heat exchanger and blown back into the room by the fan.
of parts
The installation must be in full accordance with the local regulations, provisions and standards. Please note that the dehumidifier must have stood upright for at least one hour before use.
• When you are not using the dehumidifier, always unplug it from the wall socket.
• Keep children out of reach of the device.
• Maintenance and repairs should only be carried out by certified personnel. Otherwise the warranty will become void.
• This dehumidifier is a safe device (CE). However, as with any electrical appliance, care should be taken.
The environmentally friendly R290 refrigerant is in a closed circuit; it is highly flammable. Please observe the following:! No open flames or sources of heat in the vicinity of the appliance in the same room. Do not open the closed refrigeration circuit. Only qualified personnel, trained, certified and accustomed to using flammable refrigerants may carry out maintenance work. See warning next page.
• Always disconnect the power supply before cleaning the unit or any part of it.
• Never clean the dehumidifier by spraying it with water or immersing it in water.
• Do not cover or insert anything into the openings of the dehumidifier.
• Only install the device in an area that corresponds to its IP rating.
NEVER connect the unit using an extension cord. If a suitable earthed socket is not available, have this installed by a certified professional.
The plug must always be easily accessible when the appliance is connected.
Important: The appliance MUST always be connected to earth. If the power supply is not earthed, do not connect the device at all.
Warning! Never use the appliance if the cord or plug is damaged. If the cord is damaged, have it replaced by an authorised professional to avoid danger and accidents.
GENERALANDSAFETY(2)
R290 refrigerant is a flammable natural gas and may only be used by certified personnel.
Leaking refrigerant can cause fire and explosion, therefore NEVER work on the device yourself! Store, install and use the dehumidifier in rooms with at least 10 m2 of floor space.
R290refrigerantisa flammablenatural gasand mayonlybeusedbycertified personnel.Leaking refrigerantcancause fireand explosion,therefore NEVERworkonthedeviceyourself! Store,install andusethedehumidifierin roomswithatleast
15 m
2 of floorspace.
NEVERUSETHEDEHUMIDIFIER
• in the vicinity of open fire (such as a cigarette, candle, etc.) or a heat source (stove, hot lamp).
• inthevicinityofopen fire(suchasacigarette, candle, etc.)oraheatsource(stove,hotlamp).
• in an industrial environment with a risk of gas and/or dust explosions
•inanindustrialenvironmentwithariskofgasand/or dustexplosions
• in places where the cord can easily be damaged or trapped
•inplaceswherethecordcaneasilybedamagedor trapped
• when children are present without supervision
•whenchildrenarepresentwithoutsupervision
•wherethereisariskofliquidfallingonorintothe device
R290isheavierthanair.Iftheunitisleakinggas, thehighestconcentrationwillbenear the floor.
R290 is heavier than air. If the unit is leaking gas, the highest concentration will be near the floor. R290 (propane gas) is odourless.
R290(propanegas)isodourless.
• where there is a risk of liquid falling on or into the device
•wheretheappliancecanbedamagedbychemicals
• where the appliance can be damaged by chemicals.
TheapplianceisNOTsuitable forDIYrepair.
The appliance is NOT suitable for DIY repair.
If a gas leak is suspected, have a certified service engineer investigate.
Ifagasleakis suspected,haveacertifiedserviceengineerinvestigate.Stayaway fromthe unit.Evacuatethearea.
Stay away from the unit. Evacuate the area.
Location
LOCATION
For best results, run your dehumidifier in a closed space. Close doors and windows. Place the unit by a wall, free of obstacles and free of anything that obstructs the airflow (inlet and outlet).
For best results, run your dehumidifier in a closed space. Close doors and windows. Place the unit by a wall, free of obstacles and free of anything that obstructs the airflow (inlet and outlet).
Your dehumidifier comes with a drainage hose. The hose can be attached to the unit with a quick connector. Unwind the drainage hose and place the end into a sink, drain, bucket or outside the area to be dehumidified where the water can drain away. If using a bucket, empty the bucket regularly so that it does not overflow.
Position
POSITION
Always leave the device upright for at least one hour after transport. Oil from the compressor can then flow back into the compressor from the cooling coils. The device must be upright and level.
Always leave the device upright for at least one hour after transport. Oil from the compressor can then flow back into the compressor from the cooling coils. The device must be upright and level.
Your dehumidifier comes with a drainage hose. The hose can be attached to the unit with a quick connector. Unwind the drainage hose and place the end into a sink, drain, bucket or outside the area to be dehumidified where the water can drain away. If using a bucket, empty the bucket regularly so that it does not overflow.
NB. Always roll out the drainage hose completely. Never place the end higher than 3.5 metres. Check the hose for kinks and obstacles, so that the condensation water is not obstructed in its flow. This prevents leakage from the pump.
NB. Always roll out the drainage hose completely. Never place the end higher than 3.5 metres. Check the hose for kinks and obstacles, so that the condensation water is not obstructed in its flow. This prevents leakage from the pump.
Quick-connect fitting Press to install / release
OPERATION AND SETTINGS
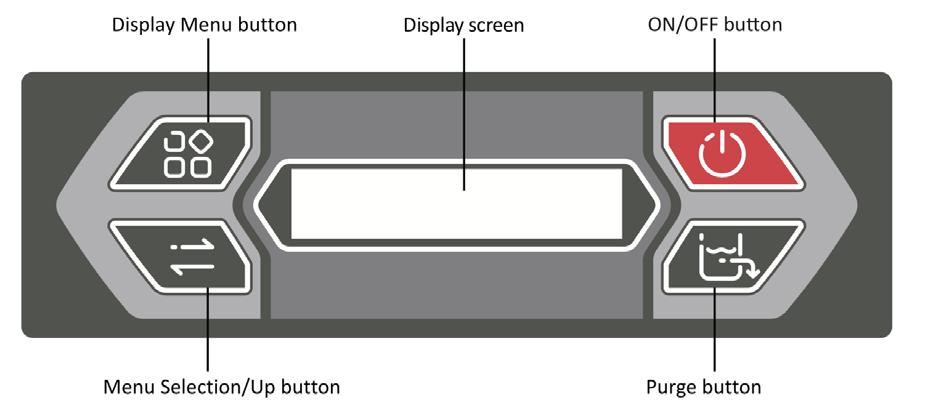


Control panel
Control panel
Menu - Display screen - On/off button
MENU button
Menu selection / Up - Pump button
DISPLAY SCREEN
ON / OFF button
Main Menu - Display
MENU SELECTION / UP button
Insert plug into earthed socket
PUMP button
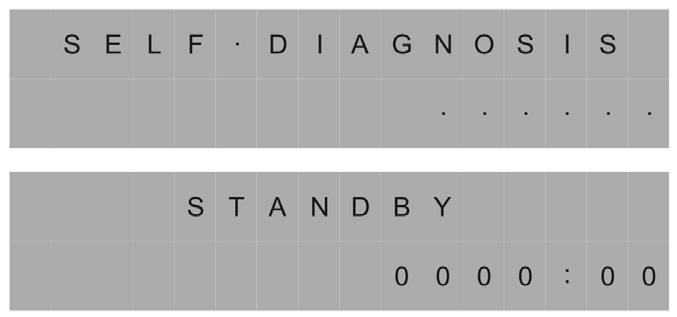
When the unit is connected, it starts the diagnostic procedure.
MAIN MENU - DISPLAY
Insert plug into earthed socket.
The display shows “self diagnosis”. When the unit is ready, the display shows “stand by”.
When the unit is connected, it starts the diagnostic procedure.
The display shows "SELF DIAGNOSIS".
When the unit is ready, the display shows "STAND BY".
Switching the unit on/off
Switching the unit on/off.
Press the “on/off” button. The unit starts up, the display shows “unit on”.
Press the ON/OFF button. The unit starts up, the display shows "UNIT ON".
Operating time 00:00, set value (00%), current temperature 00 oC and current humidity 00%.
Operating time 00:00, set value (00%), current temperature 00 oC and current humidity 00%.
If the display reads PLEASE WAIT COMP DELAY and performs a numeral count down from a maximum of 180 seconds to 0, this is the compressor delay protection. Once the unit completes the compressor delay protection, the unit will start working immediately.
If the display reads PLEASE WAIT COMP DELAY and performs a numeral count down from a maximum of 180 seconds to 0, this is the compressor delay protection. Once the unit completes the compressor delay protection, the unit will start working immediately.
If the display reads "PLEASE WAIT COMP DELAY" and performs a numeral count down from a maximum of 180 seconds to 0, this is the compressor delay protection. Once the unit completes the compressor delay protection, the unit will start working immediately.
Purge
Press the purge button, the unit will pump for 50 seconds to manually empty water from the condensate pump reservoir.
Press the purge button, the unit will pump for 50 seconds to manually empty water from the condensate pump reservoir.
Press the PUMP button, the unit will pump for 50 seconds to manually empty water from the condensate pump reservoir.
During normal operation, the pump purges 90 seconds when the reservoir is full. The display will flash P in top right corner.
During normal operation, the pump purges 90 seconds when the reservoir is full. The display will flash P in top right corner.
During normal operation, the pump purges 90 seconds when the reservoir is full. The display will flash P in top right corner.
Notice: Always press the PUMP button prior to move the unit.
Notice: Always press the PURGE button prior to move the unit.
Notice: Always press the PURGE button prior to move the unit.
Display Menu
Display Menu
Display Menu
Press the DISPLAY MENU button cycle through the display of additional dehumidifier conditions and User Setting. To return to the Main Menu, wait for 10 seconds no operation or keep pressing DISPLAY MENU button till it back to the Main Menu.
Press the MENU button to cycle through the display of additional dehumidifier conditions and user setting. To return to the MAIN MENU, wait for 10 seconds or keep pressing MENU button till it back to the MAIN MENU.
Press the DISPLAY MENU button cycle through the display of additional dehumidifier conditions and User Setting. To return to the Main Menu, wait for 10 seconds no operation or keep pressing DISPLAY MENU button till it back to the Main Menu.


Press the MENU SELECTION button to change / check the value on the "User Setting Menu Display".
Press the MENU SELECTION button to change / check the value on the “User Setting Menu Display”. The MENU SELECTION button acts as the UP button for adjusting the set value for humidistat mode operation.
The MENU SELECTION button acts as the UP button for adjusting the set value for humidistat mode operation.
User can use DISPLAY MENU and MENU SELECTION buttons to check and set some functions.
User can use MENU and MENU SELECTION buttons to check and set some functions. Each press of MENU button, will show next parameter. See list below. To select the parameter you wish to adjust, press the MENU SELECTION button, the arrow shows in the left top corner means you can adjust the parameter or the screen is locked now. Press MENU button to exit the locked interface.
Each press of DISPLAY MENU button, will show next parameter. See list below. When you wish the parameter you wish to adjust, press the MENU SELECTION button, the arrow shows in the left top corner means you can adjust the parameter or the screen is locked now. Press DISPLAY MENU button to exit the locked interface.
Press MENU SELECTION to reset the working hours to zero.
Shows the total number of operating hours on a specific task. Press MENU SELECT to reset the operating time when the job is completed.
Shows total of unit hours. Value cannot be modified.
Shows total of unit hours. Value cannot be modified.
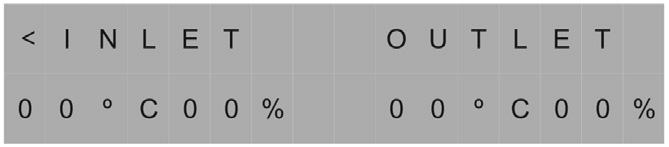
Temperature
Temperature
Shows current temperature and relative humidity of inlet and outlet.
Shows current temperature and relative humidity of inlet and outlet.
Humidistat Mode
Humidistat Mode
Humidistat Mode
Humidistat Mode
HUMIDISTAT MODE
Ad on mode press MENU SELECTION to adjust the set value from CO-35%-40%-45%-50%-55%-60%-65%-70%-75%-80%-85%90%. Choose the desired value and wait for 5 seconds, the sett will be kept. CO means continuous dehumidifying.
Humidistat Mode
Ad on mode press MENU SELECTION to adjust the set value from CO-35%-40%-45%-50%-55%-60%-65%-70%-75%-80%-85%90%. Choose the desired value and wait for 5 seconds, the sett will be kept. CO means continuous dehumidifying.
Ad on mode press MENU SELECTION to adjust the set value from CO-35%-40%-45%-50%-55%-60%-65%-70%-75%-80%-85%90%. Choose the desired value and wait for 5 seconds, the sett will be kept. CO means continuous dehumidifying.
Ad on mode press MENU SELECTION to adjust the set value from CO-35%-40%-45%-50%-55%-60%-65%-70%-75%-80%-85%90%. Choose the desired value and wait for 5 seconds, the sett will be kept. CO means continuous dehumidifying.
Ad on mode press MENU SELECTION to adjust the set value from CO-35%-40%-45%-50%-55%-60%-65%-70%-75%-80%-85%-90%. Choose the desired value and wait for 5 seconds, the sett will be kept. CO means continuous dehumidifying.
Temp Units
Ad on mode press MENU SELECTION to adjust the set value from CO-35%-40%-45%-50%-55%-60%-65%-70%-75%-80%-85%90%. Choose the desired value and wait for 5 seconds, the sett will be kept. CO means continuous dehumidifying.
Temp Units
Temp Units
TEMP UNITS
Temp Units
Shows the current temperature scale. Press MENU SELECTION to set Fahrenheit or Centigrade scale.
Shows the current temperature scale. Press MENU SELECTION to set Fahrenheit or Centigrade scale.
Shows the current temperature scale. Press MENU SELECTION to set Fahrenheit or Centigrade scale.
Shows the current temperature scale. Press MENU SELECTION to set Fahrenheit or Centigrade scale.
Shows the current temperature scale. Press MENU SELECTION to set Fahrenheit or Centigrade scale.
Temp Units
COIL TEMP
Coil Temp
Coil Temp
Coil Temp
Coil Temp
Shows the evaporator coil temperature.
Shows the current temperature scale. Press MENU SELECTION to set Fahrenheit or Centigrade scale.
Shows the evaporator coil temperature.
Shows the evaporator coil temperature.
Shows the evaporator coil temperature.
Shows the evaporator coil temperature.
Comprss Current
Coil Temp
Comprss Current
Comprss Current
COMPRSS CURRENT
Comprss Current
Shows the current draw in amps.
Shows the current draw in amps.
Shows the evaporator coil temperature.
Shows the current draw in amps.
Shows the current draw in amps.
Shows the current draw in amps.
If the unit can not detect the compressor current, the display shows - - A.
If the unit can not detect the compressor current, the display shows - - A.
If the unit can not detect the compressor current, the display shows - - A.
If the unit can not detect the compressor current, the display shows - - A.
Comprss Current
Shows the current draw in amps.
ENERGY METER
Code Message
Code Message
Code Message
Code Message
If the unit can not detect the compressor current, the display shows - - A.
Display shows total hours of use in kWh. The displayed value cannot be adjusted. Note down kWh consumption before and after each job.
If the unit on-board diagnostics discover a problem, the unit will display the error message, see the Code Message next page.
If the unit on-board diagnostics discover a problem, the unit will display the error message, see the Code Message next page.
Code Message
CODE MESSAGE
If the unit on-board diagnostics discover a problem, the unit will display the error message, see the Code Message next page. 12
If the unit on-board diagnostics discover a problem, the unit will display an error code. See the error codes next page.
If the unit on-board diagnostics discover a problem, the unit will display the error message, see the Code Message next page. 12
If the unit on-board diagnostics discover a problem, the unit will display the error message, see the Code Message next page.
Code message (error code)
E1
Explanation
Temperature sensor error
E2 Inlet sensor error
E3 Cooling system failure
E4 Pump error
E5 Outlet sensor error
EC Overcurrent protection
D Defrosting
P Pump / Purging
Attention! Always disconnect from the mains before cleaning or servicing.
- Maintenance may only be carried out by qualified personnel.
- The appliance must be disconnected from the mains before the covers are removed.
- If the appliance is not running, the heating element may still be hot.
Cooling is achieved by using R290 refrigerant, a natural gas - propane - in a closed system. Since it is highly flammable, caution is advised: no open flame or source of heat near the appliance, use and storage in a room with a floor space of at least 10 m2, annual inspection by an authorised professional, who will top up the refrigerant if necessary.
To remove the filter, first loosen the screw in the middle. (e.g. with a coin).
The unit has an intake air filter that must be checked periodically and checked and cleaned if necessary. Clean it with a hoover or wash it.
The filter must be completely dry before being replaced.
CAUTION: Never run the unit without the filter, dust will adversely affect operation.
Wipe regularly with a damp cloth using a mild household detergent.
Fault Cause Solution
Water drips out when moving the unit.
Unit was unplugged before purging/ pumping was complete.
Unit does not operate. - No power to machine.
Purge/pump out unit before moving.
- Unit not switched on.
- The set humidity level has been reached.
Water on the floor. The drain hose is loose. Not correct connected.
Unit collect too little water.
- Room temperature is too low.
- The doors and windows are open.
- The unit has not been used long enough.
- The air filter, coils are dirty.
- Plug in unit. Check power at outlet and base of unit.
- Switch on the unit.
- Choose CO (continuous) if you still want to dehumidifying after the set value has been reached.
Thighten the connection of the drain hose.
- Increase the room temperature.
- Close all doors and windows.
- Allow the unit to run more time.
- Check the filter and coils and clean.
TECHNICALSPECIFICATIONSEPD330LGR
Water removal capacity
WaterRemovalCapacity
80 L/day (35 °C RH95%)
150L/day(35 0CRH90%)
55 L/day (30 °C RH80%) 35 L/day (27 °C RH60%)
90L/day(30 0CRH80%)
50L/day(27 0CRH60%)
Voltage / Frequency 220-240 V / ~50 Hz
Efficiency (30 0CRH80%)
301WattsperLitre
Rated Power 580 W (27 °C RH60%)
Voltage/Frequency
220-240V~50Hz
Rated Current 2.6 A (27 °C RH60%)
RatedPower
RatedCurrent
965W (27 0CRH60%)
220-240 Volt (50 Hz)IEC 60309 plug for UK and EU
Keep wiring and motor dry. Do not operate in standing water. If electrical components become wet, allow to dry completely before using. UK EU
m3/h Noise
AirFlow
Refrigerant
Noiselevel
Refrigerant
OperationTemperature
N.Weight
Dimensions(WxHxD)
PowerCord
Drainhose
(A)
4.3A (27 0CRH60%) 1.000m3/h 60dB(A) R290/0.265kg 1~38 0C 44.8kg 705x450x530mm 5m 5m
Unit must be electrically grounded
• Insert 3-prong plug on power cord directly into matching grounded receptacle.
• Do not use with an adaptor.
WARNING: APPLIANCE SHALL NOT BE INSTALLED, NOT OPERATED AND NOT STORED IN A ROOM WITH A FLOOR AREA LESS
220-240Volt(50Hz)IEC60309 plug forUKandEU 15
Max.Suctionpressure2.5MPa Max.Dischargepressure4.5MPa