INDUSTRIEL AFFUGTER - INDUSTRIAL DEHUMIDIFIER

INDUSTRIAL DEHUMIDIFIER
BRUGERMANUAL
LGR kondensaffugter
MANUAL
LGR refrigerant dehumidifier
PROFESSIONEL (BYGNING) AFFUGTER
Humid air is drawn into the device by a rotating fan.
Humid air is drawn into the device by a rotating fan. After passing through the filter, which stops dust particles, the air is cooled by a cooling coil.
After passing through the filter, which stops dust particles, the air is cooled by a cooling coil.
Fugtig luft suges ind i enheden af en roterende ventilator.
The water vapour in the air condenses into water, which is discharged via a discharge hose.
The water vapour in the air condenses into water, which is discharged via a discharge hose.
Efter at have passeret gennem filteret, som stopper støvpartikler, afkøles luften af en kølespiral.
Vanddampen i luften kondenserer til vand, som udledes via en afgangsslange.
The drier air is then heated by a heat exchanger and blown back into the room by the fan.
The drier air is then heated by a heat exchanger and blown back into the room by the fan.
Den tørre luft opvarmes derefter af en varmeveksler og blæses tilbage i rummet af ventilatoren.
of parts
Beskrivelse af dele 1 Kabinet
Tørluft-udtag
Kondensafløb
Kontrolpanel/display

always unplug it from the wall socket.
• Keep children out of reach of the device.
• Maintenance and repairs should only be carried out by certified personnel. Otherwise the warranty will become void.
GENERAL AND SAFETY (1)
Installationen skal være i fuld overensstemmelse med de lokale forskrifter, bestemmelser og standarder.
• This dehumidifier is a safe device (CE). However, as with any electrical appliance, care should be taken.
Vær opmærksom på, at affugteren skal have stået oprejst i mindst en time før brug.
The installation must be in full accordance with the local regulations, provisions and standards. Please note that the dehumidifier must have stood upright for at least one hour before use.
• Når du ikke bruger affugteren, skal du altid tage stikket ud af stikkontakten.
• Hold børn uden for enhedens rækkevidde.
• When you are not using the dehumidifier, always unplug it from the wall socket.
• Keep children out of reach of the device.
• Vedligeholdelse og reparationer bør kun udføres af certificeret personale. Ellers bortfalder garantien.
- Only install the device in an area that corre sponds to its IP rating.
NEVER connect the unit using an extension cord. If a suitable earthed socket is not available, have this installed by a certified professional.
• Afbryd altid strømforsyningen før rengøring af enheden eller en del af den.
- Always disconnect the power supply before cleaning the unit or any part of it.
• Rengør aldrig affugteren ved at sprøjte den med vand eller nedsænke den i vand.
The plug must always be easily accessible when the appliance is connected.
- Never clean the dehumidifier by spraying it with water or immersing it in water.
• Dæk ikke til eller indfør ikke noget i åbningerne på affugteren.
• Maintenance and repairs should only be carried out by certified personnel. Otherwise the warranty will become void.
The environmentally friendly R290 refrigerant is in a closed circuit; it is highly flammable. Please observe the following:! No open flames or sources of heat in the vicinity of the appliance in the same room. Do not open the closed refrigeration circuit. Only qualified personnel, trained, certified and accustomed to using flammable refrigerants may carry out maintenance work. See warning next page.
• Denne affugter er en sikker enhed (CE). Men som med ethvert elektrisk apparat skal man være forsigtig.
• This dehumidifier is a safe device (CE). However, as with any electrical appliance, care should be taken.
Det miljøvenlige R290 kølemiddel er i et lukket kredsløb; det er meget brandfarligt. Vær opmærksom på følgende:
Ingen åben ild eller varmekilder i nærheden af apparatet i samme rum. Åbn ikke det lukkede kølekredsløb.
Kun kvalificeret personale, uddannet, certificeret og vant til at bruge brændbare kølemidler, må udføre vedligeholdelsesarbejde.
Se advarsel næste side.
The environmentally friendly R290 refrigerant is in a closed circuit; it is highly flammable. Please observe the following:! No open flames or sources of heat in the vicinity of the appliance in the same room. Do not open the closed refrigeration circuit. Only qualified personnel, trained, certified and accustomed to using flammable refrigerants may carry out maintenance work. See warning next page.
- Do not cover or insert anything into the openings of the dehumidifier.
• Installer kun enheden i et område, der svarer til dens IP-klassificering.
Important: The appliance MUST always be connected to earth. If the power supply is not earthed, do not connect the device at all.
- Only install the device in an area that corresponds to its IP rating.
Tilslut ALDRIG enheden med en forlængerledning.
NEVER connect the unit using an extension cord. If a suitable earthed socket is not available, have this installed by a certified professional.
Hvis en passende jordet stikkontakt ikke er tilgængelig, skal denne installeres af en autoriseret fagmand.
Warning! Never use the appliance if the cord or plug is damaged. If the cord is damaged, have it replaced by an authorised professional to avoid danger and accidents.
Stikket skal altid være let tilgængeligt, når apparatet er tilsluttet.
The plug must always be easily accessible when the appliance is connected.
Vigtigt: Apparatet SKAL altid være tilsluttet jord. Hvis strømforsyningen ikke er jordet, må du slet ikke tilslutte enheden.
Important: The appliance MUST always be connected to earth. If the power supply is not earthed, do not connect the device at all.
Advarsel! Brug aldrig apparatet, hvis ledningen eller stikket er beskadiget. Hvis ledningen er beskadiget, skal den udskiftes af en autoriseret fagmand for at undgå farer og ulykker.
Warning! Never use the appliance if the cord or plug is damaged. If the cord is damaged, have it replaced by an authorised professional to avoid danger and accidents.
GENERALANDSAFETY(2)
ADVARSEL FOR R290 KØLEMIDDEL!
WARNINGFORR290REFRIGERANT!
UK EU
R290 kølemiddel er en brandfarlig naturgas og må kun bruges af certificeret personale.
BRUG ALDRIG AFFUGTEREN:
NEVERUSETHEDEHUMIDIFIER
• i nærheden af åben ild (såsom en cigaret, stearinlys osv.) eller en varmekilde (komfur, varm lampe).
• inthevicinityofopen fire(suchasacigarette, candle, etc.)oraheatsource(stove,hotlamp).
Lækkende kølemiddel kan forårsage brand og eksplosion, derfor må du ALDRIG selv arbejde på enheden! Opbevar, installer og brug affugteren i rum med mindst 15 m2 gulvplads.
R290refrigerantisa flammablenatural gasand mayonlybeusedbycertified personnel.Leaking refrigerantcancause fireand explosion,therefore NEVERworkonthedeviceyourself! Store,install andusethedehumidifierin roomswithatleast
15 m
2 of floorspace.
R290 er tungere end luft. Hvis enheden lækker gas, vil den højeste koncentration være nær gulvet.
R290 (propangas) er lugtfri.
R290isheavierthanair.Iftheunitisleakinggas, thehighestconcentrationwillbenear the floor.
R290(propanegas)isodourless.
• i et industrielt miljø med risiko for gasog/eller støveksplosioner.
•inanindustrialenvironmentwithariskofgasand/or dustexplosions
• på steder, hvor ledningen let kan blive beskadiget eller fanget.
•inplaceswherethecordcaneasilybedamagedor trapped
• når børn er til stede uden opsyn.
•whenchildrenarepresentwithoutsupervision
•wherethereisariskofliquidfallingonorintothe device
• hvor der er risiko for, at væske falder på eller ind i enheden.
•wheretheappliancecanbedamagedbychemicals
• hvor apparatet kan blive beskadiget af kemikalier.
TheapplianceisNOTsuitable forDIYrepair.
Apparatet er IKKE egnet til gør-det-selv reparation.
Ifagasleakis suspected,haveacertifiedserviceengineerinvestigate.Stayaway fromthe unit.Evacuatethearea.
Hvis der er mistanke om en gaslækage, skal en autoriseret servicetekniker undersøge det. Hold dig væk fra enheden. Evakuer området.
Før opstart
Before start-up
PLACERING
Location
For best results, run your dehumidifier in a closed space. Close doors and windows. Place the unit by a wall, free of obstacles and free of anything that obstructs the airflow (inlet and outlet).
For de bedste resultater skal du køre din affugter i et lukket rum. Luk døre og vinduer. Placer enheden ved en væg, fri for forhindringer og fri for alt, der hindrer luftstrømmen (indtag og udløb).
POSITION
Position
Lad altid enheden stå oprejst i mindst en time efter transport. Olie fra kompressoren kan derefter strømme tilbage i kompressoren fra kølespiralerne. Apparatet skal være opretstående på en plan overflade.
Always leave the device upright for at least one hour after transport. Oil from the compressor can then flow back into the compressor from the cooling coils. The device must be upright and level.
Afløbsslange
3,5 meter maksimal afløbshøjde
Discharge hose connection
Afgangsslangetilslutning
Din affugter leveres med en afløbsslange. Slangen kan fastgøres til enheden med en hurtigkobling. Rul afløbsslangen ud og læg enden i en vask, afløb, spand eller uden for det område, der skal affugtes, hvor vandet kan løbe væk. Hvis du bruger en spand, skal du tømme spanden regelmæssigt, så den ikke løber over.
Your dehumidifier comes with a drainage hose. The hose can be attached to the unit with a quick connector. Unwind the drainage hose and place the end into a sink, drain, bucket or outside the area to be dehumidified where the water can drain away. If using a bucket, empty the bucket regularly so that it does not overflow.
NB. Rul altid afløbsslangen helt ud. Placer aldrig enden højere end 3,5 meter. Kontroller slangen for knæk og forhindringer, så kondensvandet ikke blokeres i dets flow. Dette forhindrer lækage fra pumpen.
NB. Always roll out the drainage hose completely. Never place the end higher than 3.5 metres. Check the hose for kinks and obstacles, so that the condensation water is not obstructed in its flow. This prevents leakage from the pump.

Quick-connect tilslutning
Tryk for at montere / frigøre
INSTALLATION (2)
INSTALLATION (2)
Montering af ekstra kanalpose / tørluftudtag
Installation of additional hose / dry air outlet
En ekstern slange kan valgfrit monteres på afgangsristen.
Dette kan være nyttigt til visse tørringskrav.
An external hose can be optionally mounted on the discharge grille. This can be useful for certain drying requirements.
1) Løsn de fire skruer i luftudløbskanalen.
1) loosen the four screws of the air outlet channel
2) replace the adapter turned
2) Montér adapteren på gitteret ved hjælp af de fire skruer.
3) attach the hose to the adapter
3) Fastgør kanalposen til adapteren.

Montering af kanalposeadaptor
En ekstern slange kan valgfrit monteres på afgangsristen.

Straps can be used to easily secure the power cord and drain hose.
Stropper kan bruges til nemt at fastgøre netledningen og afløbsslangen.


Control panel
Kontrolpanel
Menu - Display screen - On/off button
MENU knap
Menu selection / Up - Pump button
SKÆRMDISPLAY
TÆND / SLUK knap
Main Menu - Display
MENUVALG / OP knap
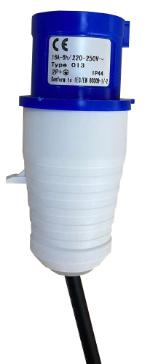
Insert plug into earthed socket
PUMPE knap
When the unit is connected, it starts the diagnostic procedure.
HOVEDMENU - DISPLAY
Sæt stikket i en jordet stikkontakt.
The display shows “self diagnosis”. When the unit is ready, the display shows “stand by”.
Når enheden er tilsluttet, starter den diagnosticeringsproceduren.
Displayet viser "SELF DIAGNOSIS".
Når enheden er klar, viser displayet "STANDBY".
Switching the unit on/off
Tænd eller sluk for enheden.
Tryk på knappen TÆND/SLUK.
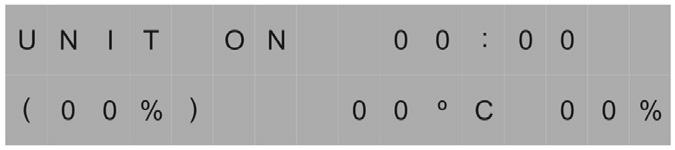
Press the “on/off” button. The unit starts up, the display shows “unit on”.
Enheten startar, displayen visar "UNIT ON" (enhed tændt).
Operating time 00:00, set value (00%), current temperature 00 oC and current humidity 00%.
Driftstid 00:00, indstillet værdi (00%), aktuel temperatur 00 oC og aktuel luftfugtighed 00%.
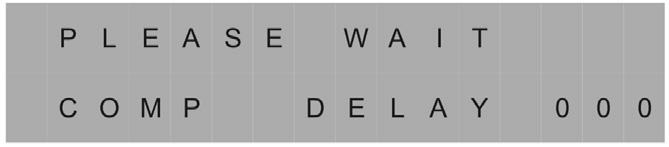
Hvis displayet viser "PLEASE WAIT COMP DELAY" og udfører en numerisk nedtælling fra maksimalt 180 sekunder til 0, er dette kompressor-forsinkelses-beskyttelsen.
If the display reads PLEASE WAIT COMP DELAY and performs a numeral count down from a maximum of 180 seconds to 0, this is the compressor delay protection. Once the unit completes the compressor delay protection, the unit will start working immediately.
If the display reads PLEASE WAIT COMP DELAY and performs a numeral count down from a maximum of 180 seconds to 0, this is the compressor delay protection. Once the unit completes the compressor delay protection, the unit will start working immediately.
Når enheden har fuldført kompressor-forsinkelses-beskyttelsen, begynder enheden straks at arbejde.


Purge
Purge
Udpumpning
Press the purge button, the unit will pump for 50 seconds to manually empty water from the condensate pump reservoir.
Press the purge button, the unit will pump for 50 seconds to manually empty water from the condensate pump reservoir.
Tryk på PUMPE-knappen, enheden vil pumpe i 50 sekunder for manuelt at tømme vand fra kondensatpumpens reservoir.
During normal operation, the pump purges 90 seconds when the reservoir is full. The display will flash P in top right corner.
Under normal drift udpumpes i 90 sekunder, når beholderen er fuld. Et P blinker i øverste højre hjørne af displayet.
During normal operation, the pump purges 90 seconds when the reservoir is full. The display will flash P in top right corner.

Bemærk: Tryk altid på PUMPE-knappen, før du flytter enheden.
Notice: Always press the PURGE button prior to move the unit.
Notice: Always press the PURGE button prior to move the unit.
Display Menu
Menu
Display Menu
Press the DISPLAY MENU button cycle through the display of additional dehumidifier conditions and User Setting. To return to the Main Menu, wait for 10 seconds no operation or keep pressing DISPLAY MENU button till it back to the Main Menu.
Tryk på knappen MENU for at bladre igennem yderligere affugter- og brugerindstillinger på displayet. For at vende tilbage til hovedmenuen skal du vente i 10 sekunder eller blive ved med at trykke på knappen MENU, indtil du vender tilbage.
Press the DISPLAY MENU button cycle through the display of additional dehumidifier conditions and User Setting. To return to the Main Menu, wait for 10 seconds no operation or keep pressing DISPLAY MENU button till it back to the Main Menu.


MenuSelection
Menuvalg
MenuSelection
PresstheMENUSELECTIONbuttontochange/checkthe valueon the“User SettingMenu Display”.TheMENU SELECTIONbuttonactsastheUPbuttonforadjustingthesetvalue forhumidistatmodeoperation.
PresstheMENUSELECTIONbuttontochange/checkthe valueon the“User SettingMenu Display”.TheMENU SELECTIONbuttonactsastheUPbuttonforadjustingthesetvalue forhumidistatmodeoperation.
Tryk på knappen MENUVALG for at ændre/kontrollere værdien på "User Setting Menu Display". MENUVALG-knappen fungerer som OP-knappen til justering af den indstillede værdi for drift med hygrostat.
Brugeren kan bruge knapperne MENU og MENU VALG til at kontrollere og indstille nogle funktioner.
UsetheDISPLAYMENUandMENUSELECTIONbuttonsto checkandsetsomefunctions.
UsetheDISPLAYMENUandMENUSELECTIONbuttonsto checkandsetsomefunctions.
Hvert tryk på MENU-knappen vil vise næste parameter.
Se listen nedenfor. Når du skal vælge den parameter, du ønsker at justere, skal du trykke på knappen MENUVALG.
Pilen, der vises i øverste venstre hjørne, betyder, at du kan justere parameteren, eller skærmen er låst nu. Tryk på knappen MENU for at forlade den låste grænseflade.
EachpressofDISPLAYMENUbutton,willshowthenextparameter.Whenyouwishtoadjust,presstheMENUSELECTIONbutton,thearrowshowninthelefttopcornermeans youcanadjusttheparameterorthescreenislocked.Press DISPLAYMENUbuttontoexitthelockedinterface.
EachpressofDISPLAYMENUbutton,willshowthenextparameter.Whenyouwishtoadjust,presstheMENUSELECTIONbutton,thearrowshowninthelefttopcornermeans youcanadjusttheparameterorthescreenislocked.Press DISPLAYMENUbuttontoexitthelockedinterface.
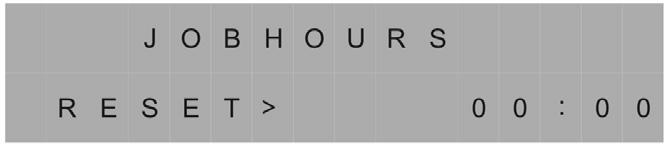
JOB HOURS
Jobhours
Jobhours
Viser det totale antal driftstimer på en konkret opgave.
PressMENUSELECTIONtoresettheworkinghourstozero.
PressMENUSELECTIONtoresettheworkinghourstozero.
Tryk på MENUVALG for at nulstille driftsstiden efter afsluttet job.
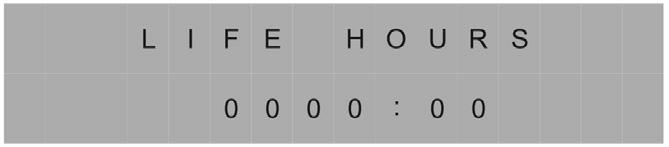
LIFE HOURS
Lifehours
Lifehours
Viser det samlede antal driftstimer. Værdien kan ikke ændres.
Showstotalofunithours.Thisvaluecannotbemodified.
Showstotalofunithours.Thisvaluecannotbemodified.
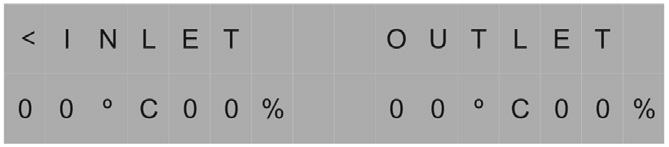
Temperatur på indtag (Inlet) / udtag (Outlet)
TemperatureofInlet /Outlet
TemperatureofInlet /Outlet
Viser den aktuelle temperatur og relativ luftfugtighed af ind- og udtag.
Showscurrenttemperatureandrelativehumidityofinlet andoutlet.
Showscurrenttemperatureandrelativehumidityofinlet andoutlet.


Humidistat Mode
Humidistat Mode
Humidistat Mode
HUMIDISTAT MODE
Humidistat Mode
Tryk på knappen MENUVALG og indstil "HUMIDISTAT MODE" til "ON" for at justere den indstillede hygrostat værdi fra CO-35-40-45-50-55-60-65-70-75-80-85-90 %.
Ad on mode press MENU SELECTION to adjust the set value from CO-35%-40%-45%-50%-55%-60%-65%-70%-75%-80%-85%90%. Choose the desired value and wait for 5 seconds, the sett will be kept. CO means continuous dehumidifying.
Humidistat Mode
Ad on mode press MENU SELECTION to adjust the set value from CO-35%-40%-45%-50%-55%-60%-65%-70%-75%-80%-85%90%. Choose the desired value and wait for 5 seconds, the sett will be kept. CO means continuous dehumidifying.
Ad on mode press MENU SELECTION to adjust the set value from CO-35%-40%-45%-50%-55%-60%-65%-70%-75%-80%-85%90%. Choose the desired value and wait for 5 seconds, the sett will be kept. CO means continuous dehumidifying.
Ad on mode press MENU SELECTION to adjust the set value from CO-35%-40%-45%-50%-55%-60%-65%-70%-75%-80%-85%90%. Choose the desired value and wait for 5 seconds, the sett will be kept. CO means continuous dehumidifying.
Vælg den ønskede værdi og vent i 5 sekunder – indstillingen bevares. CO betyder kontinuerlig affugtning.
Temp Units
Temp Units
Ad on mode press MENU SELECTION to adjust the set value from CO-35%-40%-45%-50%-55%-60%-65%-70%-75%-80%-85%90%. Choose the desired value and wait for 5 seconds, the sett will be kept. CO means continuous dehumidifying.
Temp Units
TEMP UNITS
Temp Units
Shows the current temperature scale. Press MENU SELECTION to set Fahrenheit or Centigrade scale.
Shows the current temperature scale. Press MENU SELECTION to set Fahrenheit or Centigrade scale.
Viser den aktuelle temperaturskala. Tryk på MENUVALG for at indstille Fahrenheit- eller Celsius-skalaen.
Shows the current temperature scale. Press MENU SELECTION to set Fahrenheit or Centigrade scale.
Shows the current temperature scale. Press MENU SELECTION to set Fahrenheit or Centigrade scale.
Temp Units
Coil Temp
COIL TEMP
Coil Temp
Coil Temp
Coil Temp
Shows the evaporator coil temperature.
Shows the current temperature scale. Press MENU SELECTION to set Fahrenheit or Centigrade scale.
Viser kølespiralens temperatur.
Shows the evaporator coil temperature.
Shows the evaporator coil temperature.
Shows the evaporator coil temperature.
Comprss Current
Coil Temp
Comprss Current
Comprss Current
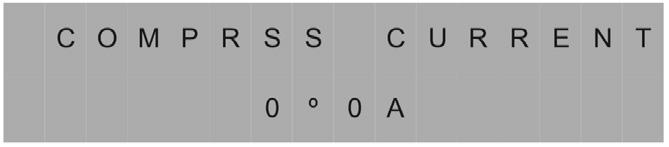
COMPRSS CURRENT
Comprss Current
Shows the evaporator coil temperature.
Shows the current draw in amps.
Shows the current draw in amps.
Shows the current draw in amps.
Viser det aktuelle forbrug i ampere.
Shows the current draw in amps.
If the unit can not detect the compressor current, the display shows - - A.
If the unit can not detect the compressor current, the display shows - - A.
If the unit can not detect the compressor current, the display shows - - A.
If the unit can not detect the compressor current, the display shows - - A.
Comprss Current
Shows the current draw in amps.
ENERGY METER
Code Message
Code Message
Code Message
Code Message
If the unit can not detect the compressor current, the display shows - - A.
Displayet viser det samlede antal timers brug i kWh. Den viste værdi kan ikke justeres. Notér kWh forbrug før og efter hvert job.
If the unit on-board diagnostics discover a problem, the unit will display the error message, see the Code Message next page.
If the unit on-board diagnostics discover a problem, the unit will display the error message, see the Code Message next page.
If the unit on-board diagnostics discover a problem, the unit will display the error message, see the Code Message next page.
Code Message
CODE MESSAGE
If the unit on-board diagnostics discover a problem, the unit will display the error message, see the Code Message next page.
Hvis enhedens indbyggede diagnostik opdager et problem, vil enheden vise en fejlkode. Se fejlkoder på næste side.
If the unit on-board diagnostics discover a problem, the unit will display the error message, see the Code Message next page. 12
Fejlkode Forklaring
E1 Fejl ved temperaturføler
E2 Fejl ved indløbssensor
E3 Fejl i kølesystemet
E4 Pumpe fejl
E5 Fejl ved udgangssensor
EC Overstrømsbeskyttelse
D Afrimning
P Udpumpning / Tømning