INDUSTRIELL AVFUKTER - INDUSTRIAL DEHUMIDIFIER

INDUSTRIAL DEHUMIDIFIER
Inkl. engelsk versjon
BRUKERMANUAL
LGR kondensavfukter
MANUAL
LGR refrigerant dehumidifier
PROFESJONELL (BYGNING) AVFUKTER
Humid air is drawn into the device by a rotating fan. After passing through the filter, which stops dust particles, the air is cooled by a cooling coil.
Humid air is drawn into the device by a rotating fan. After passing through the filter, which stops dust particles, the air is cooled by a cooling coil.
Fuktig luft suges inn i enheten av en roterende vifte.
Etter å ha passert filteret, som stopper støvpartikler, avkjøles luften av en kjølespiral.
The water vapour in the air condenses into water, which is discharged via a discharge hose.
The water vapour in the air condenses into water, which is discharged via a discharge hose.
Vanndampen i luften kondenserer til vann, som slippes ut via en utløpsslange.
The drier air is then heated by a heat exchanger and blown back into the room by the fan.
The drier air is then heated by a heat exchanger and blown back into the room by the fan.
Den tørre luften varmes deretter opp av en varmeveksler og blåses tilbake inn i rommet av viften.
Beskrivelse av deler 1 Kabinett 2 Typeskilt 3 Kabel 4 Hjul 5 Kontrollpanel/display 6 Tørluft-uttak
Kondensavløp

• Keep children out of reach of the device.
(1)
• Maintenance and repairs should only be carried out by certified personnel. Otherwise the warranty will become void.
GENERAL AND SAFETY (1)
Installasjonen må være i full overensstemmelse med lokale forskrifter, bestemmelser og standarder.
• This dehumidifier is a safe device (CE). However, as with any electrical appliance, care should be taken.
Merk at avfukteren må ha stått oppreist i minst én time før bruk.
The installation must be in full accordance with the local regulations, provisions and standards. Please note that the dehumidifier must have stood upright for at least one hour before use.
• Når du ikke bruker avfukteren, må du alltid koble den fra stikkontakten.
• Hold barn utenfor enhetens rekkevidde.
• When you are not using the dehumidifier, always unplug it from the wall socket.
• Keep children out of reach of the device.
• Vedlikehold og reparasjoner skal kun utføres av sertifisert personell. Ellers bortfaller garantien.
- Only install the device in an area that corre sponds to its IP rating.
NEVER connect the unit using an extension cord. If a suitable earthed socket is not available, have this installed by a certified professional.
• Koble alltid fra strømforsyningen før du rengjør enheten eller deler av den.
- Always disconnect the power supply before cleaning the unit or any part of it.
• Rengjør aldri avfukteren ved å spraye den med vann eller dyppe den i vann.
The plug must always be easily accessible when the appliance is connected.
- Never clean the dehumidifier by spraying it with water or immersing it in water.
• Ikke dekk til eller sett noe inn i åpningene på avfukteren.
• Maintenance and repairs should only be carried out by certified personnel. Otherwise the warranty will become void.
The environmentally friendly R290 refrigerant is in a closed circuit; it is highly flammable. Please observe the following:! No open flames or sources of heat in the vicinity of the appliance in the same room. Do not open the closed refrigeration circuit. Only qualified personnel, trained, certified and accustomed to using flammable refrigerants may carry out maintenance work. See warning next page.
• Denne avfukteren er en sikker enhet (CE). Men som med alle elektriske apparater, må man være forsiktig.
• This dehumidifier is a safe device (CE). However, as with any electrical appliance, care should be taken.
Det miljøvennlige R290-kjølemiddelet er i en lukket krets; det er svært brannfarlig. Vær oppmerksom på følgende: Ingen åpen ild eller varmekilder i nærheten av apparatet i samme rom. Ikke åpne den lukkede kjølekretsen. Kun kvalifisert personell, opplært, sertifisert og vant til å bruke brennbare kjølemidler, kan utføre vedlikeholdsarbeid. Se advarsel neste side.
The environmentally friendly R290 refrigerant is in a closed circuit; it is highly flammable. Please observe the following:! No open flames or sources of heat in the vicinity of the appliance in the same room. Do not open the closed refrigeration circuit. Only qualified personnel, trained, certified and accustomed to using flammable refrigerants may carry out maintenance work. See warning next page.
- Do not cover or insert anything into the openings of the dehumidifier.
• Installer kun enheten i et område som samsvarer med IP-klassifiseringen..
Important: The appliance MUST always be connected to earth. If the power supply is not earthed, do not connect the device at all.
- Only install the device in an area that corresponds to its IP rating.
ALDRI koble til enheten med en skjøteledning.
Hvis en egnet jordet stikkontakt ikke er tilgjengelig, må den installeres av en kvalifisert fagperson.
NEVER connect the unit using an extension cord. If a suitable earthed socket is not available, have this installed by a certified professional.
Warning! Never use the appliance if the cord or plug is damaged. If the cord is damaged, have it replaced by an authorised professional to avoid danger and accidents.
Støpselet må alltid være lett tilgjengelig når apparatet er tilkoblet.
The plug must always be easily accessible when the appliance is connected.
Viktig: Apparatet MÅ alltid være koblet til jord. Hvis strømforsyningen ikke er jordet, må du ikke koble til enheten i det hele tatt.
Important: The appliance MUST always be connected to earth. If the power supply is not earthed, do not connect the device at all.
Advarsel! Bruk aldri apparatet hvis ledningen eller støpselet er skadet. Hvis ledningen er skadet, må den skiftes ut av en autorisert fagmann for å unngå farer og ulykker.
Warning! Never use the appliance if the cord or plug is damaged. If the cord is damaged, have it replaced by an authorised professional to avoid danger and accidents.
Før oppstart
Before start-up
PLASSERING
Location
For best resultat, kjør avfukteren i et lukket rom. Lukk dører og vinduer. Plasser enheten mot en vegg, fri for hindringer og fri for hindringer for luftstrømmen (inntak og utløp).
For best results, run your dehumidifier in a closed space. Close doors and windows. Place the unit by a wall, free of obstacles and free of anything that obstructs the airflow (inlet and outlet).
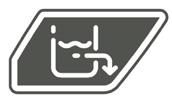
Discharge hose connection
Tilkobling av utløpsslange
Avfukteren din kommer med en avløpsslange. Slangen kan festes til enheten med en hurtigkobling. Rull ut avløpsslangen og plasser enden i en vask, avløp, bøtte eller utenfor området som skal avfuktes der vannet kan renne av. Hvis du bruker en bøtte, tøm bøtten regelmessig slik at den ikke renner over.
Position
POSISJON
La alltid enheten stå oppreist i minst én time etter transport. Olje fra kompressoren kan da strømme tilbake inn i kompressoren fra kjølespiralene. Apparatet må stå oppreist på en jevn overflate.
Always leave the device upright for at least one hour after transport. Oil from the compressor can then flow back into the compressor from the cooling coils. The device must be upright and level.
Your dehumidifier comes with a drainage hose. The hose can be attached to the unit with a quick connector. Unwind the drainage hose and place the end into a sink, drain, bucket or outside the area to be dehumidified where the water can drain away. If using a bucket, empty the bucket regularly so that it does not overflow.
NB. Rull alltid avløpsslangen helt ut. Plasser aldri enden høyere enn 3,5 meter. Kontroller slangen for sprekker og hindringer slik at kondensvannet ikke blokkeres i strømmen. Dette forhindrer lekkasje fra pumpen.
NB. Always roll out the drainage hose completely. Never place the end higher than 3.5 metres. Check the hose for kinks and obstacles, so that the condensation water is not obstructed in its flow. This prevents leakage from the pump.
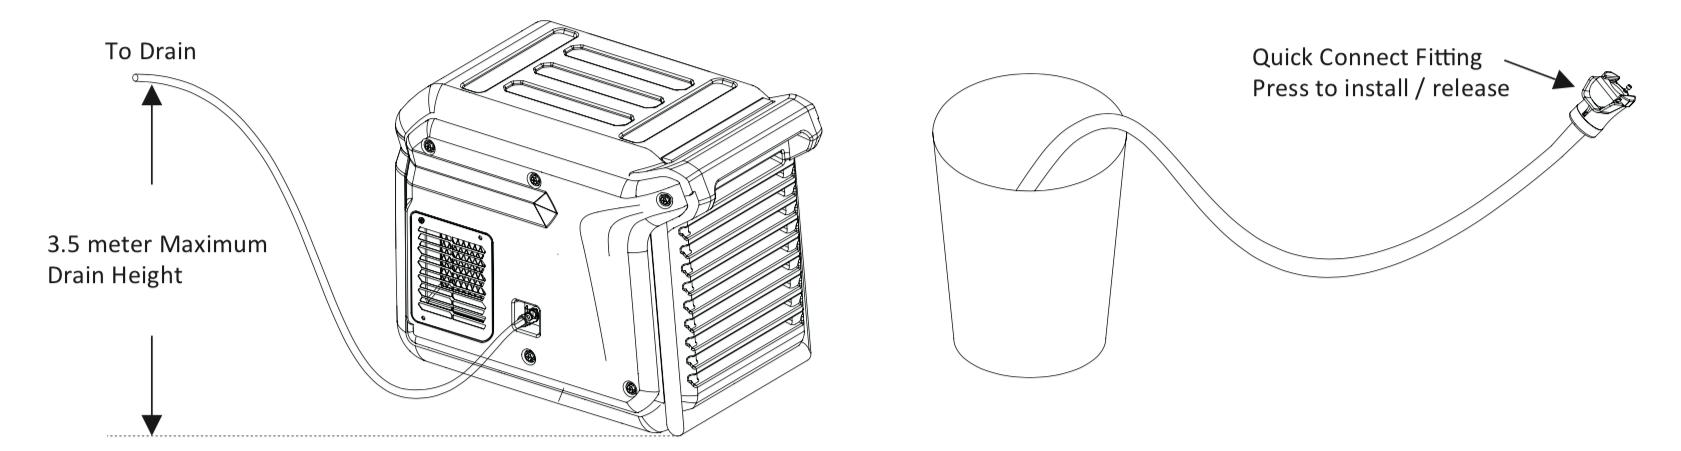
Avløpsslange
3,5 meter maksimal avløpshøyde
Hurtigkobling
Trykk for å montere/frigjøre


Control panel
Kontrollpanel
Menu - Display screen - On/off button
MENY-knapp
Menu selection / Up - Pump button
DISPLAY
PÅ / AV-knapp
Main Menu - Display
MENYVALG / OP-knapp
Insert plug into earthed socket
PUMP-knapp
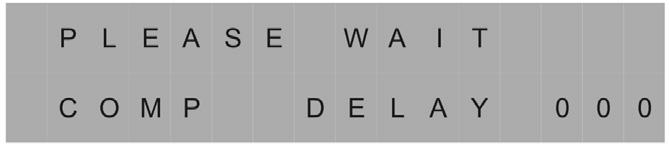
When the unit is connected, it starts the diagnostic procedure.
HOVEDMENY - DISPLAY
Koble til en jordet stikkontakt.
Når enheten er tilkoblet, starter den diagnostikkprosedyren.
The display shows “self diagnosis”. When the unit is ready, the display shows “stand by”.
Displayet viser "SELF DIAGNOSIS".
Når enheten er klar, viser displayet "STANDBY".
Slå enheten på eller av.
Switching the unit on/off
Trykk på PÅ/AV-knappen.
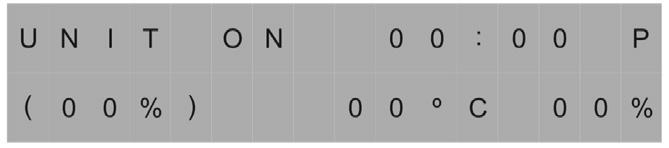
Press the “on/off” button. The unit starts up, the display shows “unit on”.
Enheten starter, displayet viser "UNIT ON".
Operating time 00:00, set value (00%), current temperature 00 oC and current humidity 00%.
Driftstid 00:00, innstilt verdi (00%), aktuell temperatur 00 oC og aktuell luftfuktighet 00 %.


MenuSelection
Menyvalg
MenuSelection
Trykk på MENYVALG-knappen for å endre/kontrollere verdien på "User Setting Menu Display". MENYVALG-knappen fungerer som OPP-knappen for å justere innstilt verdi for drift med hygrostat.
PresstheMENUSELECTIONbuttontochange/checkthe valueon the“User SettingMenu Display”.TheMENU SELECTIONbuttonactsastheUPbuttonforadjustingthesetvalue forhumidistatmodeoperation.
PresstheMENUSELECTIONbuttontochange/checkthe valueon the“User SettingMenu Display”.TheMENU SELECTIONbuttonactsastheUPbuttonforadjustingthesetvalue forhumidistatmodeoperation.
Brukeren kan bruke knappene MENY og MENYVALG for å kontrollere og stille inn noen funksjoner.
UsetheDISPLAYMENUandMENUSELECTIONbuttonsto checkandsetsomefunctions.
UsetheDISPLAYMENUandMENUSELECTIONbuttonsto checkandsetsomefunctions.
Hvert trykk på MENY-knappen vil vise neste parameter.
Se liste nedenfor. For å velge parameteren du vil justere, trykk på MENYVALG-knappen.
Pilen som vises i øvre venstre hjørne betyr at du kan justere parameteren eller skjermen er nå låst. Trykk på MENU-knappen for å gå ut av det låste grensesnittet.
EachpressofDISPLAYMENUbutton,willshowthenextparameter.Whenyouwishtoadjust,presstheMENUSELECTIONbutton,thearrowshowninthelefttopcornermeans youcanadjusttheparameterorthescreenislocked.Press DISPLAYMENUbuttontoexitthelockedinterface.
EachpressofDISPLAYMENUbutton,willshowthenextparameter.Whenyouwishtoadjust,presstheMENUSELECTIONbutton,thearrowshowninthelefttopcornermeans youcanadjusttheparameterorthescreenislocked.Press DISPLAYMENUbuttontoexitthelockedinterface.
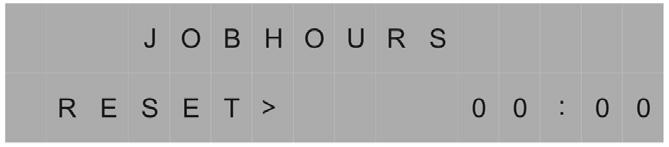
JOB HOURS
Jobhours
Jobhours
Viser totalt antall driftstimer på en spesifikk oppgave. Trykk på MENYVALG for å tilbakestille driftstiden etter at jobben er fullført.
PressMENUSELECTIONtoresettheworkinghourstozero.
PressMENUSELECTIONtoresettheworkinghourstozero.
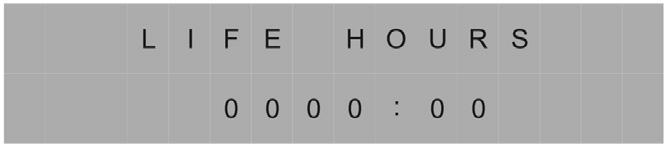
LIFE HOURS
Lifehours
Lifehours
Viser totalt antall driftstimer. Verdien kan ikke endres.
Showstotalofunithours.Thisvaluecannotbemodified.
Showstotalofunithours.Thisvaluecannotbemodified.
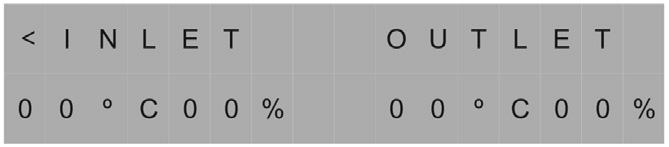
Temperatur på innløp (Inlet) / utløp (Outlet)
TemperatureofInlet /Outlet
TemperatureofInlet /Outlet
Viser gjeldende temperatur og relativ luftfuktighet for innløp og utløp.
Showscurrenttemperatureandrelativehumidityofinlet andoutlet.
Showscurrenttemperatureandrelativehumidityofinlet andoutlet.
Feilkode Forklaring
E1
E2
Feil ved temperatursensor
Feil ved innløpssensor
E3 Feil ved kjølesystemet
E4 Pumpefeil
E5 Feil ved innløpssensor
EC Overstrømsbeskyttelse
D Avriming
P Pumping / Tømning
CLEANING AND MAINTENANCE
Attention! Always disconnect from the mains before cleaning or servicing.
Merk følgende! Trekk alltid støpselet ut av stikkontakten før rengjøring eller service.
Keep the filter, spirals and all grilles clean. This will help ensure proper operation.
Hold filteret, spiralene og alle rister rene. Dette vil bidra til å sikre riktig drift.
1) remove the hose from the air outlet (if fitted)
1) Fjern slangen fra luftuttaket (hvis montert).
2) unscrew the side panels (6 screws)
3) Take out the filter and clean it.
2) Skru av sidepanelene (6 skruer).
3) Ta ut filteret og rengjør det.
4) Remove dust from the panels with a soft dry cloth.
4) Fjern støv fra panelene med en myk, tørr klut.
5) Clean the inside carefully with a hoover, be careful not to damage delicate parts.
6) Attach the side panels in the reverse order.
5) Rengjør innsiden forsiktig med en støvsuger, pass på at du ikke skader ømfintlige deler.
6) Fest sidepanelene i omvendt rekkefølge.

SPESIFIKASJONER MODELL EPD170LGR
TECHNICALSPECIFICATIONSEPD330LGR
UK
Avfuktingsevne
EU
WaterRemovalCapacity
Spenning / Frekvens
Efficiency (30 0CRH80%)
Nominell effekt
Voltage/Frequency
Nominell strømstyrke
Luftstrøm
RatedPower
RatedCurrent
80 L/dag (35 °C RH95%)
150L/day(35 0CRH90%)
55 L/dag (30 °C RH80%)
90L/day(30 0CRH80%)
35 L/dag (27 °C RH60%)
50L/day(27 0CRH60%)
220-240 V / ~50 Hz
301WattsperLitre
580 W (27 °C RH60%)
220-240V~50Hz
2,6 A (27 °C RH60%)
420 m3/t
Støynivå 55 dB (A)
AirFlow

220-240 Volt (50 Hz)IEC 60309 plugg for Storbritannia og EU
965W (27 0CRH60%)
4.3A (27 0CRH60%)
1.000m3/h
Kjølemiddel R290 / 200 g
Noiselevel
Driftstemperatur 1 ~38 °C
Refrigerant
Vekt 29 kg
Dimensjoner (B x H x D)
OperationTemperature
60dB(A)
34,5 x 45 x 56 cm
Strømkabel 5 m
N.Weight
Dimensions(WxHxD)
Avløpsslange 12 m
PowerCord
Drainhose
R290/0.265kg 1~38 0C 44.8kg 705x450x530mm 5m 5m


Enheten må være elektrisk jordet
• Koble den 3-pinners kontakten til strømledningen direkte inn i en jordet stikkontakt.
• Ikke bruk med en adapter.
ADVARSEL: ENHETEN MÅ IKKE INSTALLERES, BETJENES ELLER LAGRES I ET ROM MED ET GULVAREAL PÅ MINDRE ENN 10 M2
220-240Volt(50Hz)IEC60309 plug forUKandEU 15
FARE FOR BRANN OG ELEKTRISK STØT
Hold ledninger og motor tørre. Ikke bruk mens du står i vann. Hvis elektriske komponenter blir våte, la dem tørke helt før bruk.
Max. sugetryk 2,5 MPa
Max.Suctionpressure2.5MPa
Max.Dischargepressure4.5MPa
Max. utløpstrykk 4,5 MPa


Med forbehold om endringer.
Subjecttomodifications.