GENERAL INFORMATION
How to Assemble Permanent Hose Fittings
HYDRAULIC HOSE
Synflex SST Swaging Tool
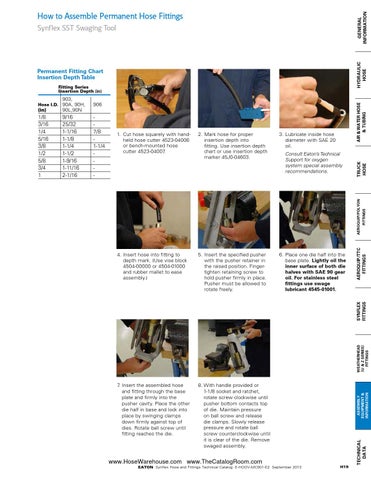
Permanent Fitting Chart Insertion Depth Table Fitting Series Insertion Depth (in)
2. Mark hose for proper insertion depth into fitting. Use insertion depth chart or use insertion depth marker 45J0-04603.
3. Lubricate inside hose diameter with SAE 20 oil.
4. Insert hose into fitting to depth mark. (Use vise block 4504-00000 or 4504-01000 and rubber mallet to ease assembly.)
5. Insert the specified pusher with the pusher retainer in the raised position. Fingertighten retaining screw to hold pusher firmly in place. Pusher must be allowed to rotate freely.
6. Place one die half into the base plate. Lightly oil the inner surface of both die halves with SAE 90 gear oil. For stainless steel fittings use swage lubricant 4545-01001.
7. I nsert the assembled hose and fitting through the base plate and firmly into the pusher cavity. Place the other die half in base and lock into place by swinging clamps down firmly against top of dies. Rotate ball screw until fitting reaches the die.
8. With handle provided or 1-1/8 socket and ratchet, rotate screw clockwise until pusher bottom contacts top of die. Maintain pressure on ball screw and release die clamps. Slowly release pressure and rotate ball screw counterclockwise until it is clear of the die. Remove swaged assembly.
SYNFLEX Fittings
AEROQUIP/TTC FITTINGS
AEROQUIP/POLYON FITTINGS
Consult Eaton’s Technical Support for oxygen system special assembly recommendations.
tRUCK Hose
1. Cut hose squarely with handheld hose cutter 4523-04006 or bench-mounted hose cutter 4523-04007.
WEATHERHEAD (U & Z SERIES) FITTINGS
7/8 1-1/4 -
www.HoseWarehouse.com www.TheCatalogRoom.com
EATON Synflex Hose and Fittings Technical Catalog E-HOOV-MC001-E2 September 2013
ASSEMBLY EQUIPMENT & Information
9/16 25/32 1-1/16 1-1/8 1-1/4 1-1/2 1-9/16 1-11/16 2-1/16
H19
Technical data
1/8 3/16 1/4 5/16 3/8 1/2 5/8 3/4 1
AIR & WATER HOSE & Tubing
903, Hose I.D. 90A, 90H, 906 (in) 90L,90N