Address CSO Architects 8831 Keystone Crossing, Indianapolis, IN 46240 P: (317) 848-7800
Photoshop Workflows Photoshop Setup and Visual Standards

Uptam eossum que aut que volor simentur, consed quis des venim ipienis et eatusantus se con consequ iatur? Optatur rernatus ad etur as ent ut quis quatem fugitinctur?
velesero beratiorum abo. Uptam eossum que aut que volor simentur, consed quis des venim ipienis et eatusantus se con consequ iatur?
Quia que digendi doluptatae dolorio. Agnisci ligenih iliquasped essi asseditae voluptat ut voluptiur am aut facepuda nobitas ium ut laborepuda dolore dolum sundandandi odia doluptat.
Verio consed ut aut as vendam, tem enda simoles ciatum exereruptur, sinvellab ipsam eum ra volupta ecatur, con culparciet ut esequid emquis adistem fugia es sitature quo maximol oreperupta quibusa ecaecto cus, comnis etum volori qui dus, impor a ium qui dolorit estiuntis eum num dolectur, tem doluptatur aliquae nonseri busamus as mollanisquo vel ipsam eaquid quia et lique in ne volor sinum sequam eiciis deritia
Optatur rernatus ad etur as ent ut quis quatem fugitinctur? Quia que digendi doluptatae dolorio. Agnisci ligenih iliquasped essi asseditae voluptat ut voluptiur am aut facepuda nobitas ium ut laborepuda dolore dolum sundandandi odia doluptat.
Verio consed ut aut as vendam, tem enda simoles ciatum exereruptur, sinvellab ipsam eum ra volupta ecatur, con culparciet ut esequid emquis adistem fugia es sitature quo maximol oreperupta quibusa ecaecto cus, comnis etum volori qui dus, impo.
Quia que digendi doluptatae dolorio. Agnisci ligenih iliquasped essi asseditae voluptat ut voluptiur am aut facepuda nobitas ium ut laborepuda dolore dolum sundandandi odia doluptat.
Verio consed ut aut as vendam, tem enda simoles ciatum exereruptur, sinvellab ipsam eum ra volupta
ecatur, con culparciet ut esequid
emquis adistem fugia es sitature quo maximol oreperupta quibusa ecaecto cus, comnis dolectur, tem doluptatur aliquae nonseri busamus as mollanisquo vel ipsam eaquid quia et lique
Trust in your abilities.
This is a specific text call-out, highlighting a key concept.
The following guide has been created to allow for the rapid learning and consistent application of schematic design workflow standards.
This guide contains material pertaining to Photoshop file drawing creation, print-setup standards, and more.
The following guide has been created to allow for the rapid learning and consistent application of schematic design workflow standards.
This guide contains material pertaining to CAD file drawing creation, print-setup standards, and more. Segoe SemiLight
This guide contains material pertaining to CAD file drawing creation, print-setup standards, and more. Segoe SemiLight
PSD Setup - Export PDF / Starting Template / Import PDF / Layers Standards
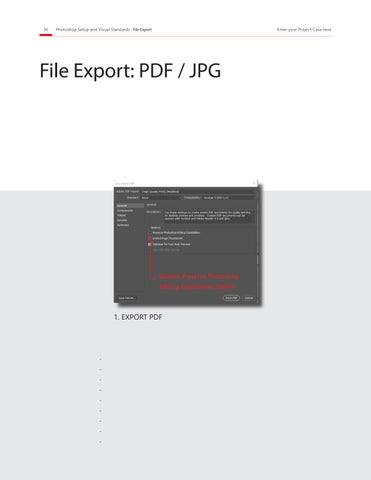
File Export - PDF /
Checklist (Final Selection)
1 2 3
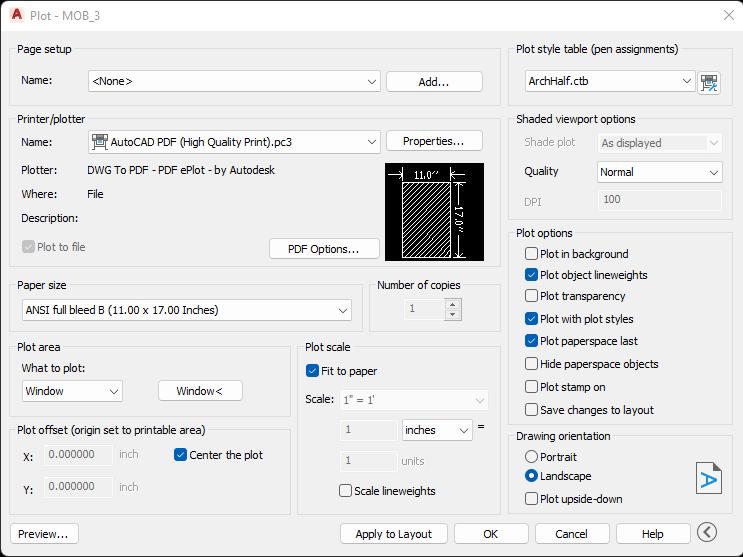
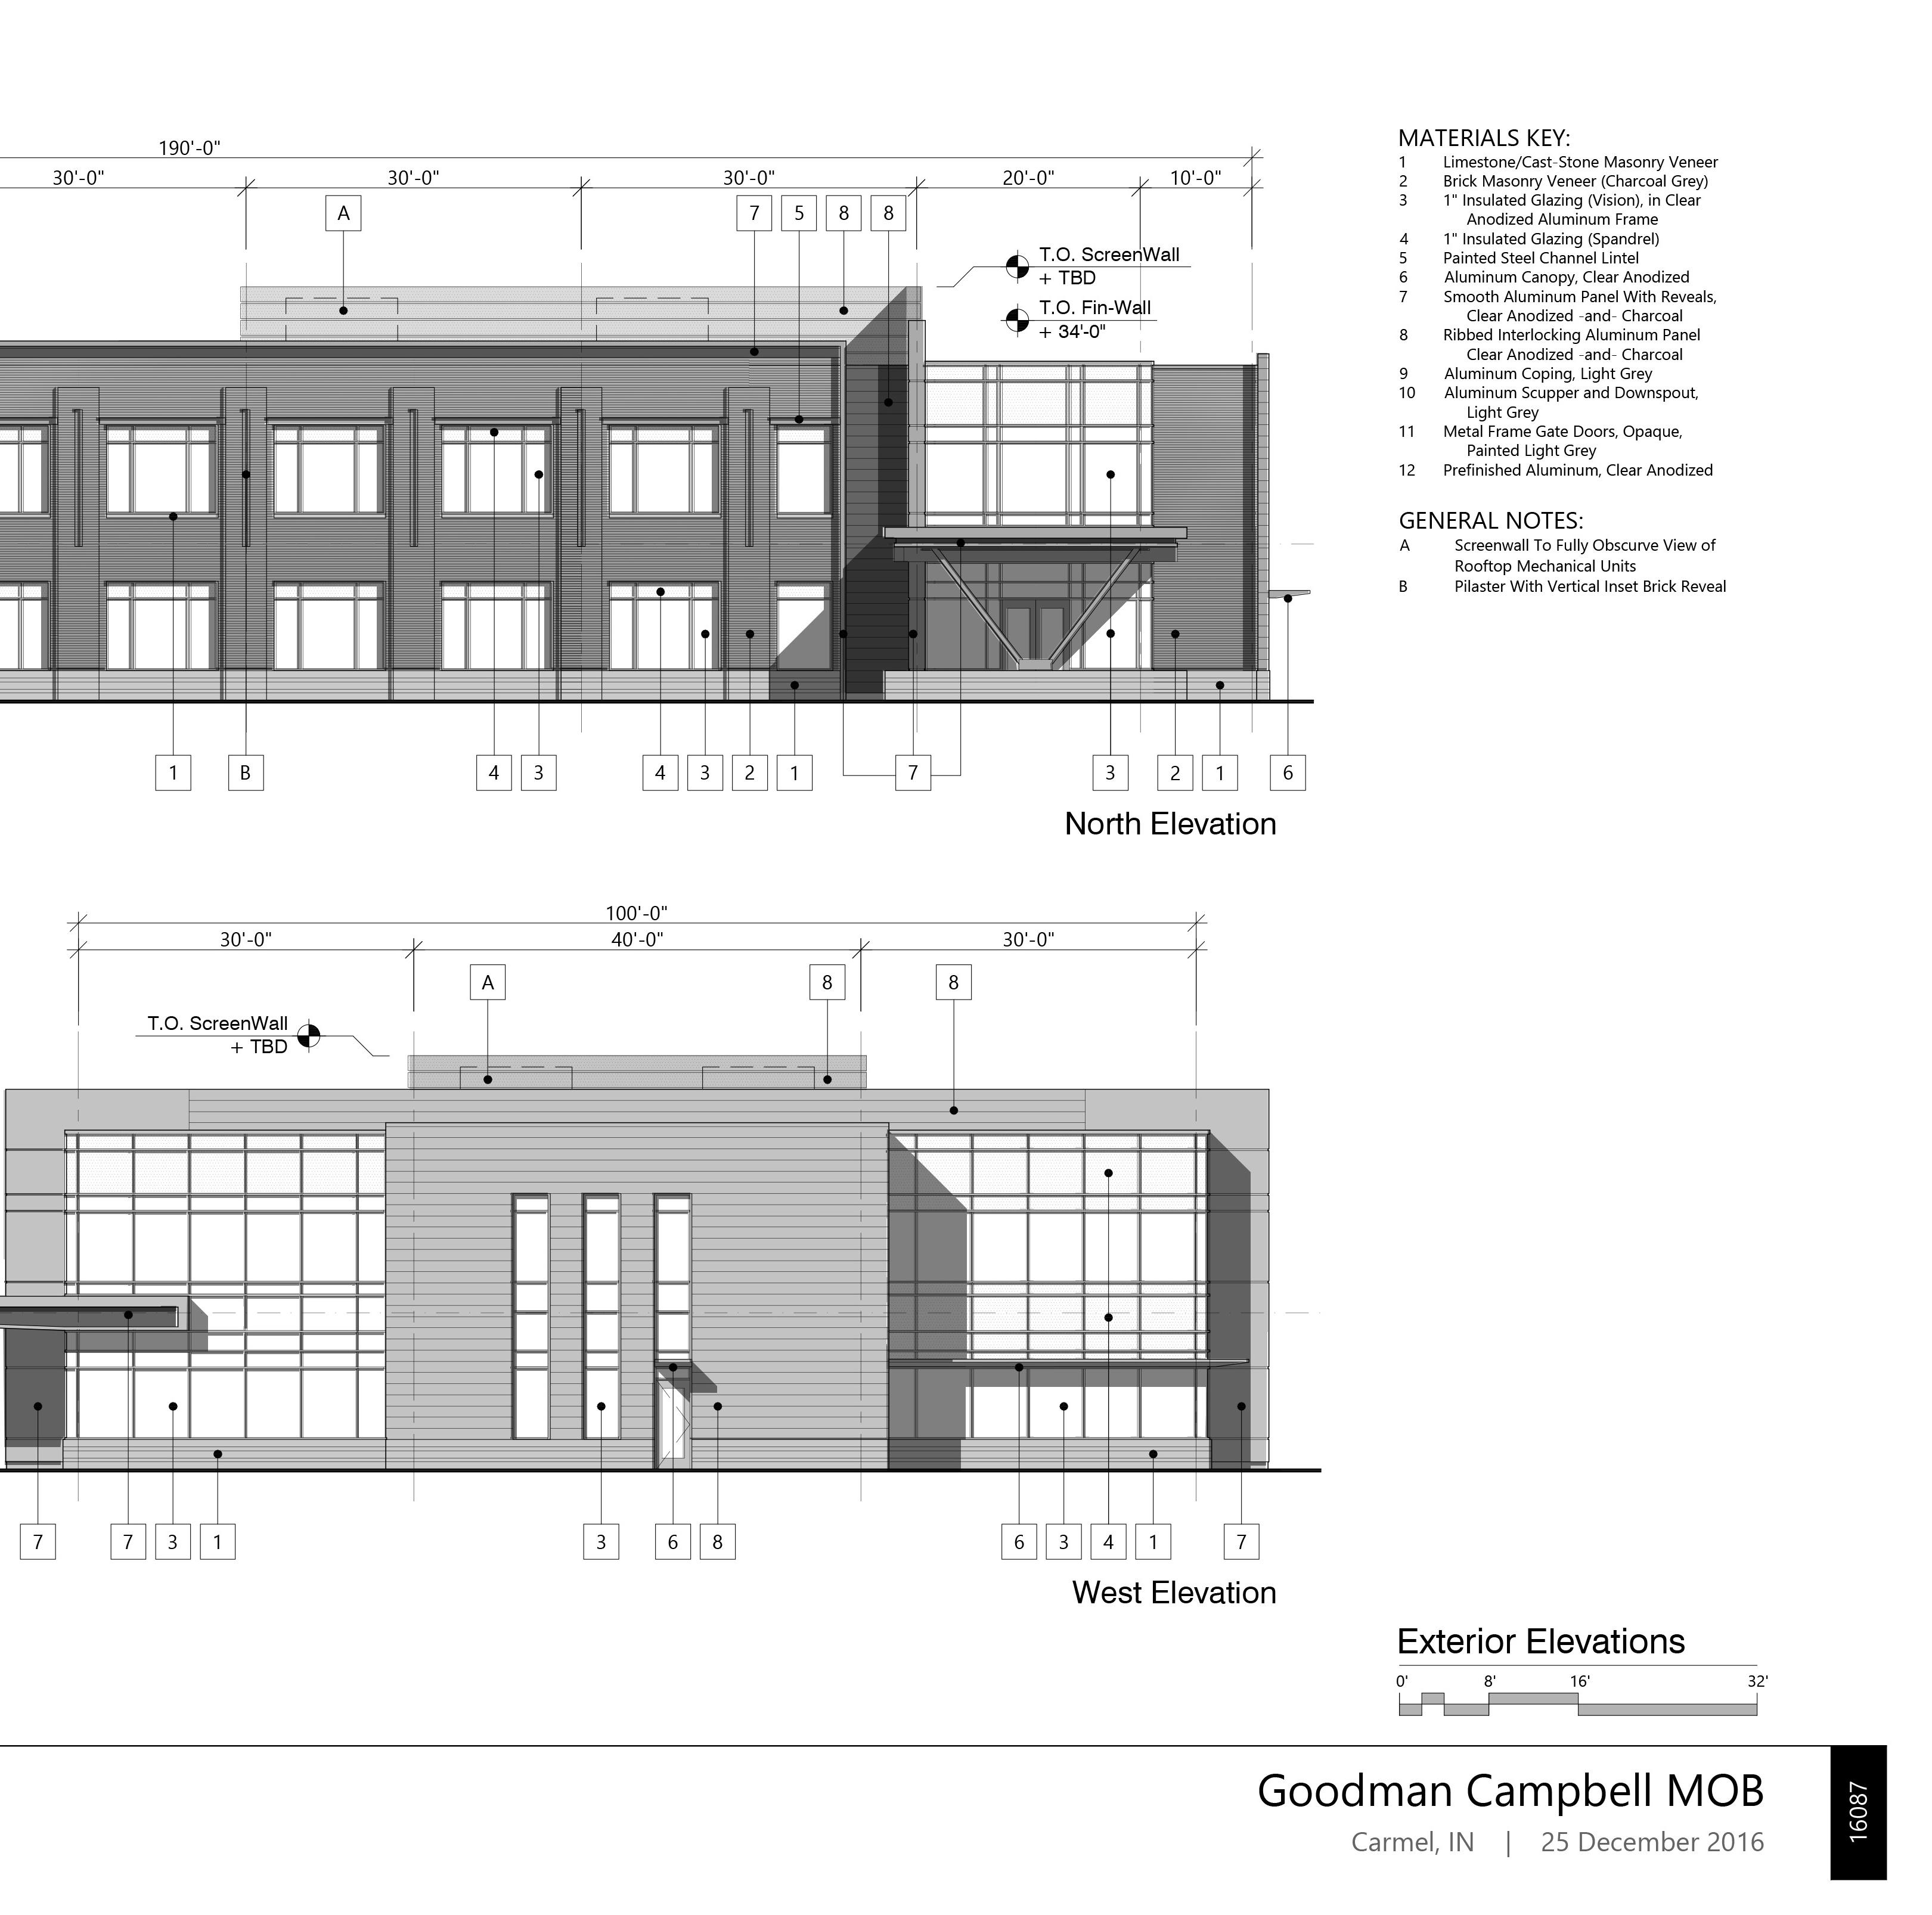
In Autocad. Select the print option and begin to complete the printing prompt.
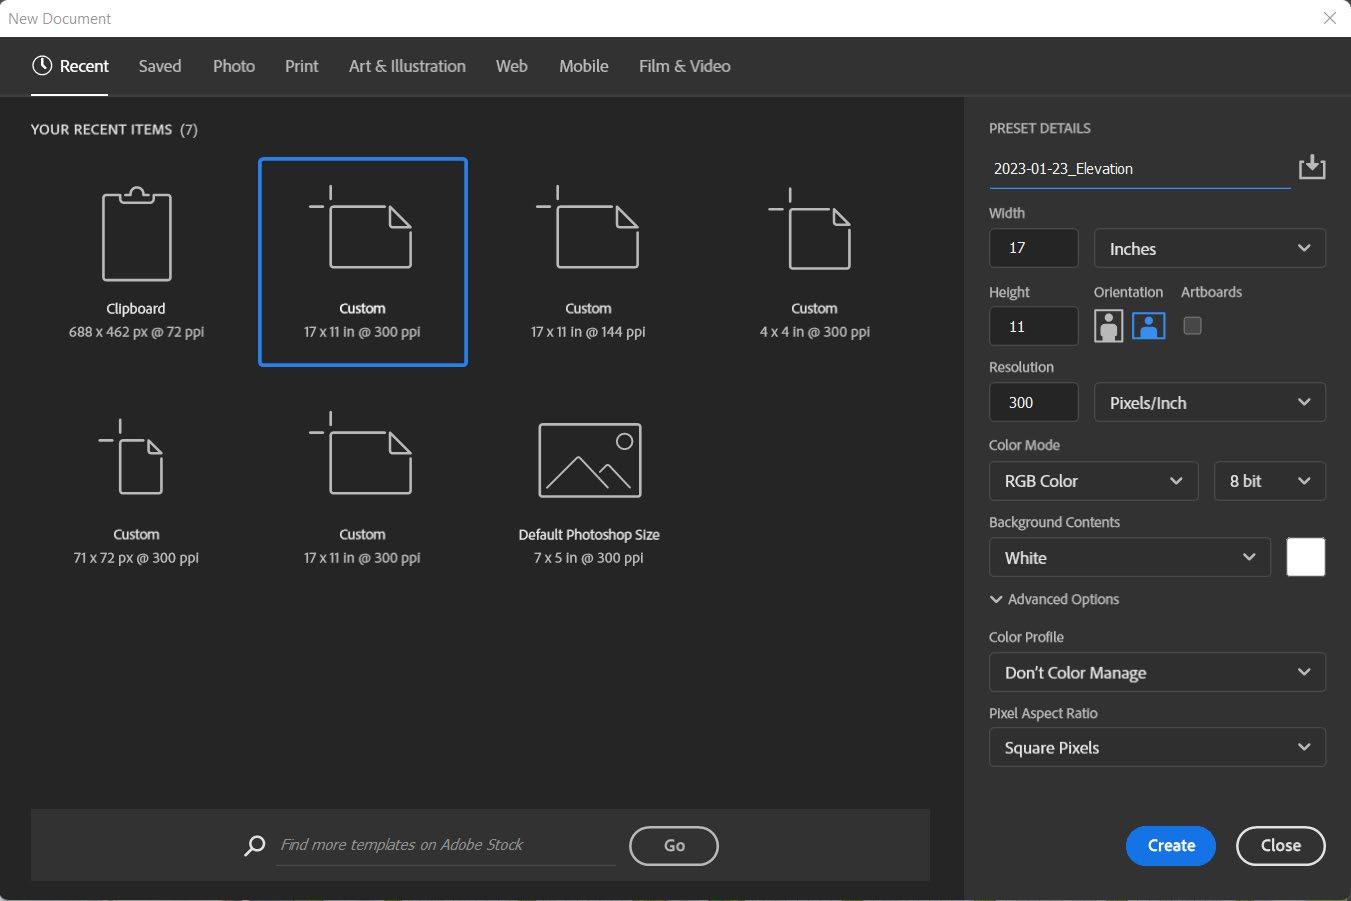
Start a new file in Photoshop and size the specificiations to your project’s needs
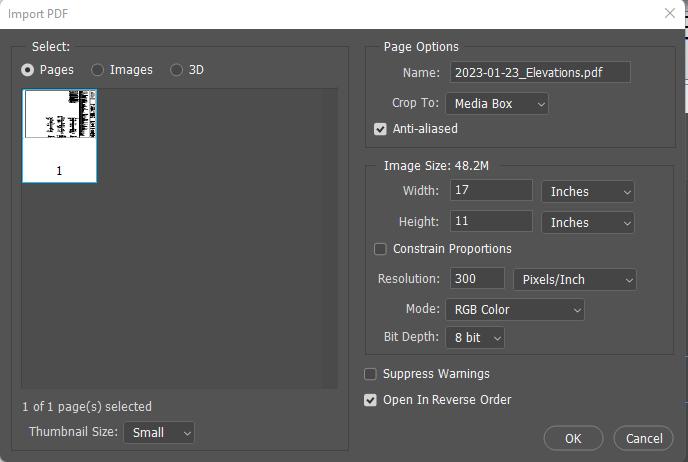
Once the file is created, Select file > Open and open/import your newly created PDF. Complete the following prompt.
Paper Dimensions
Resolution
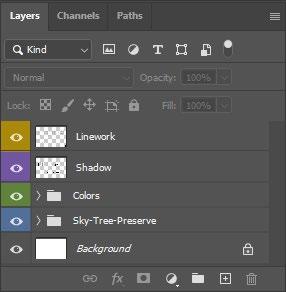
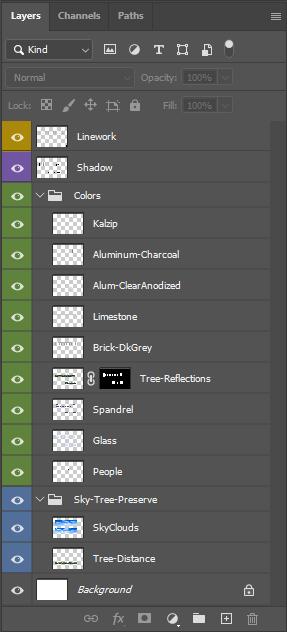
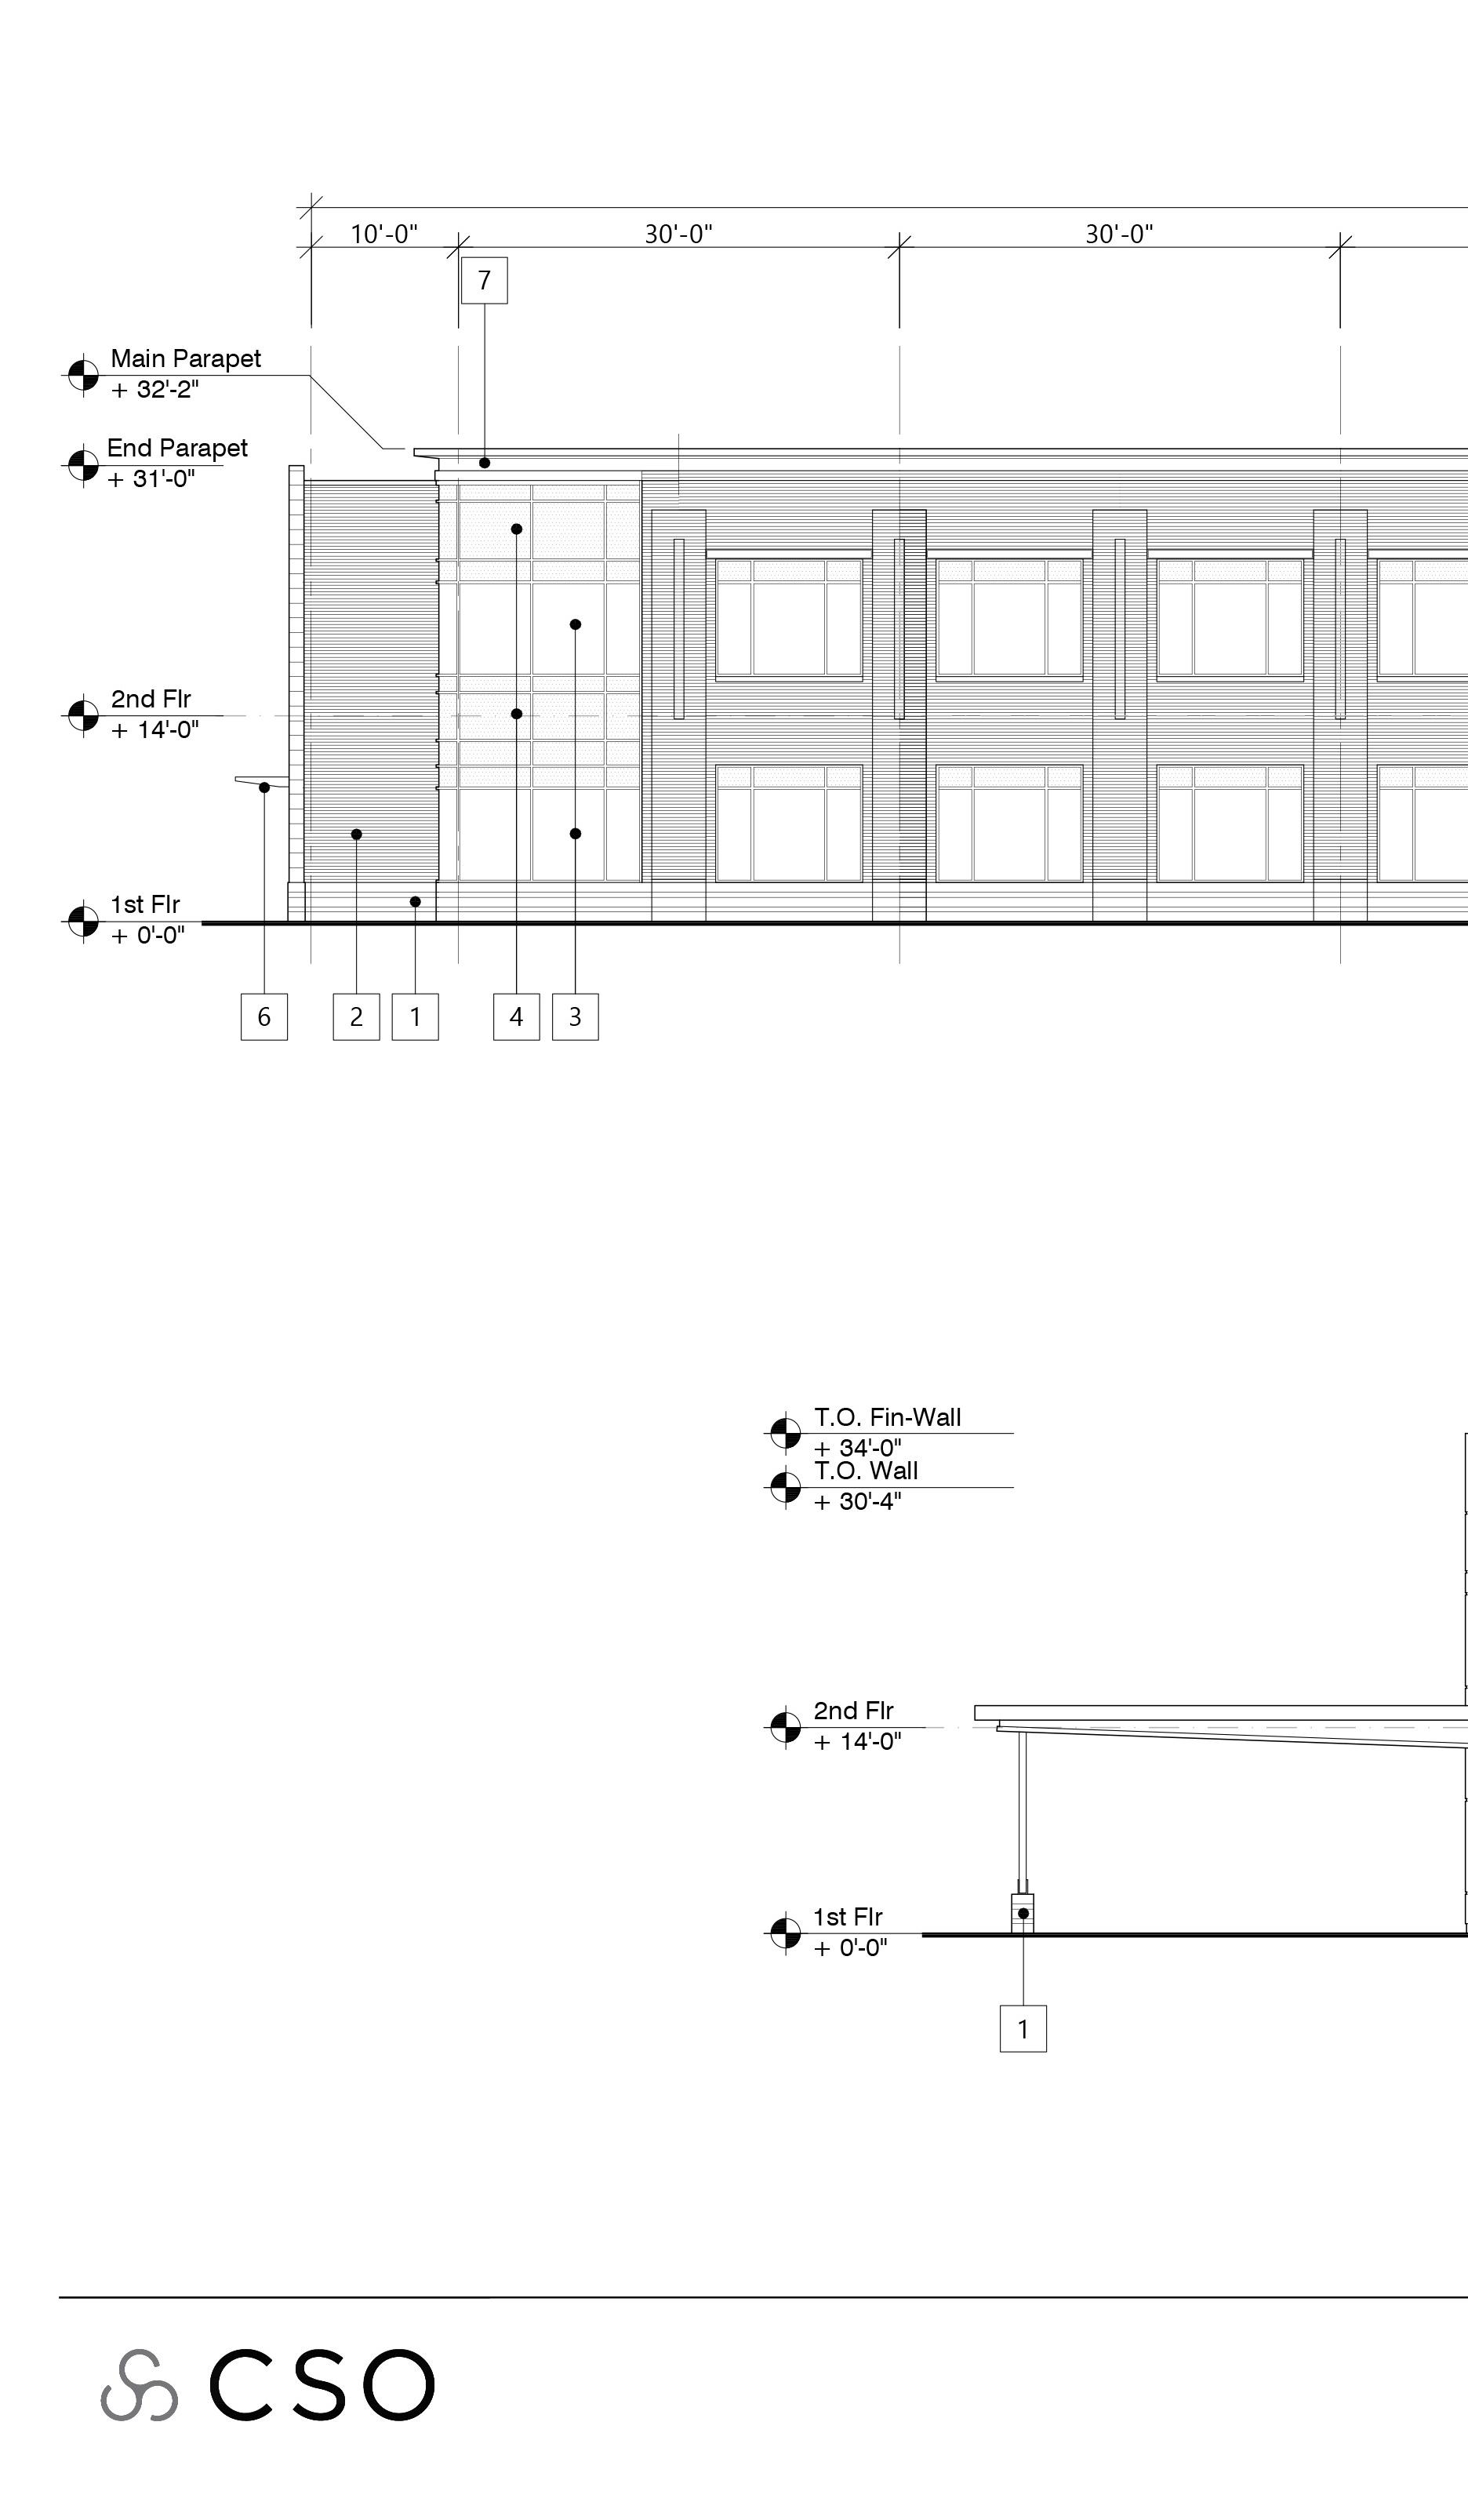
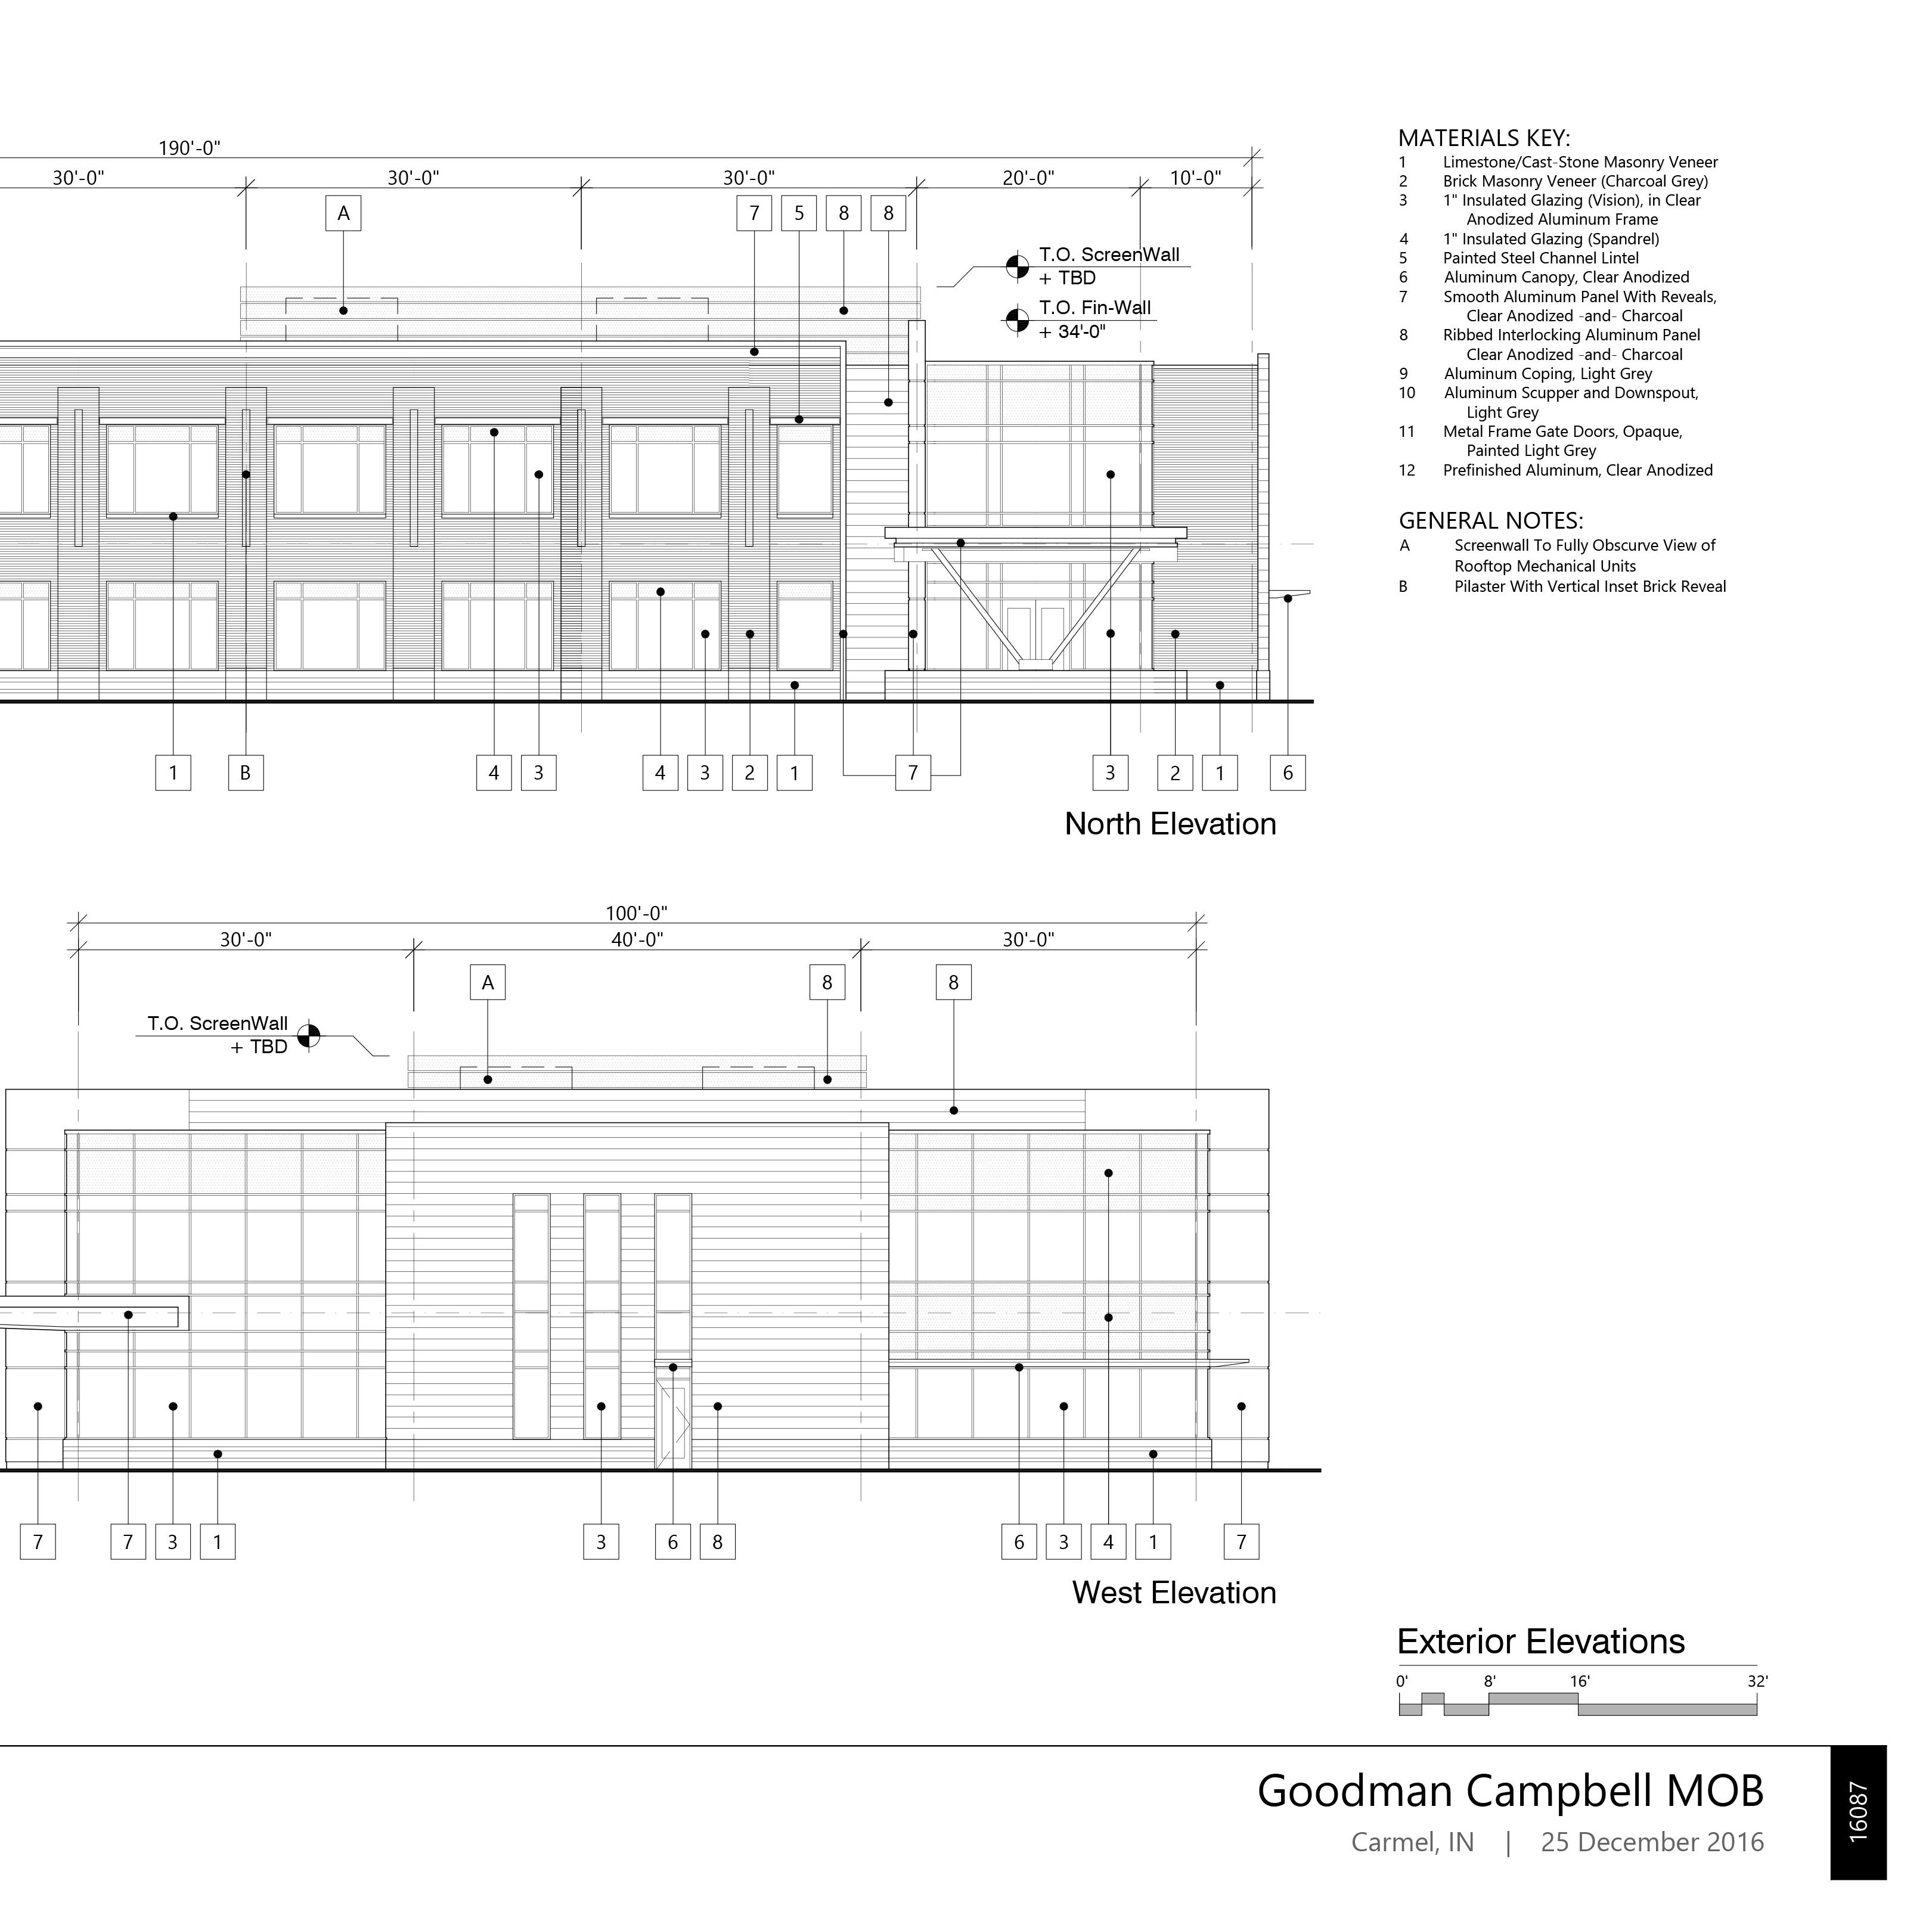
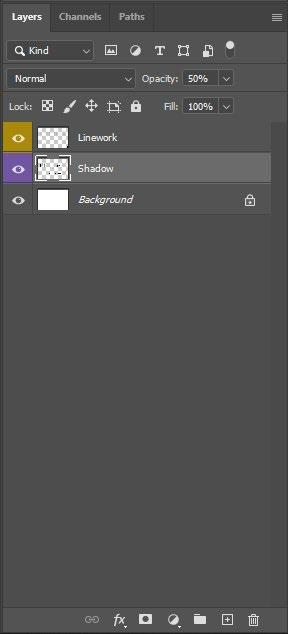
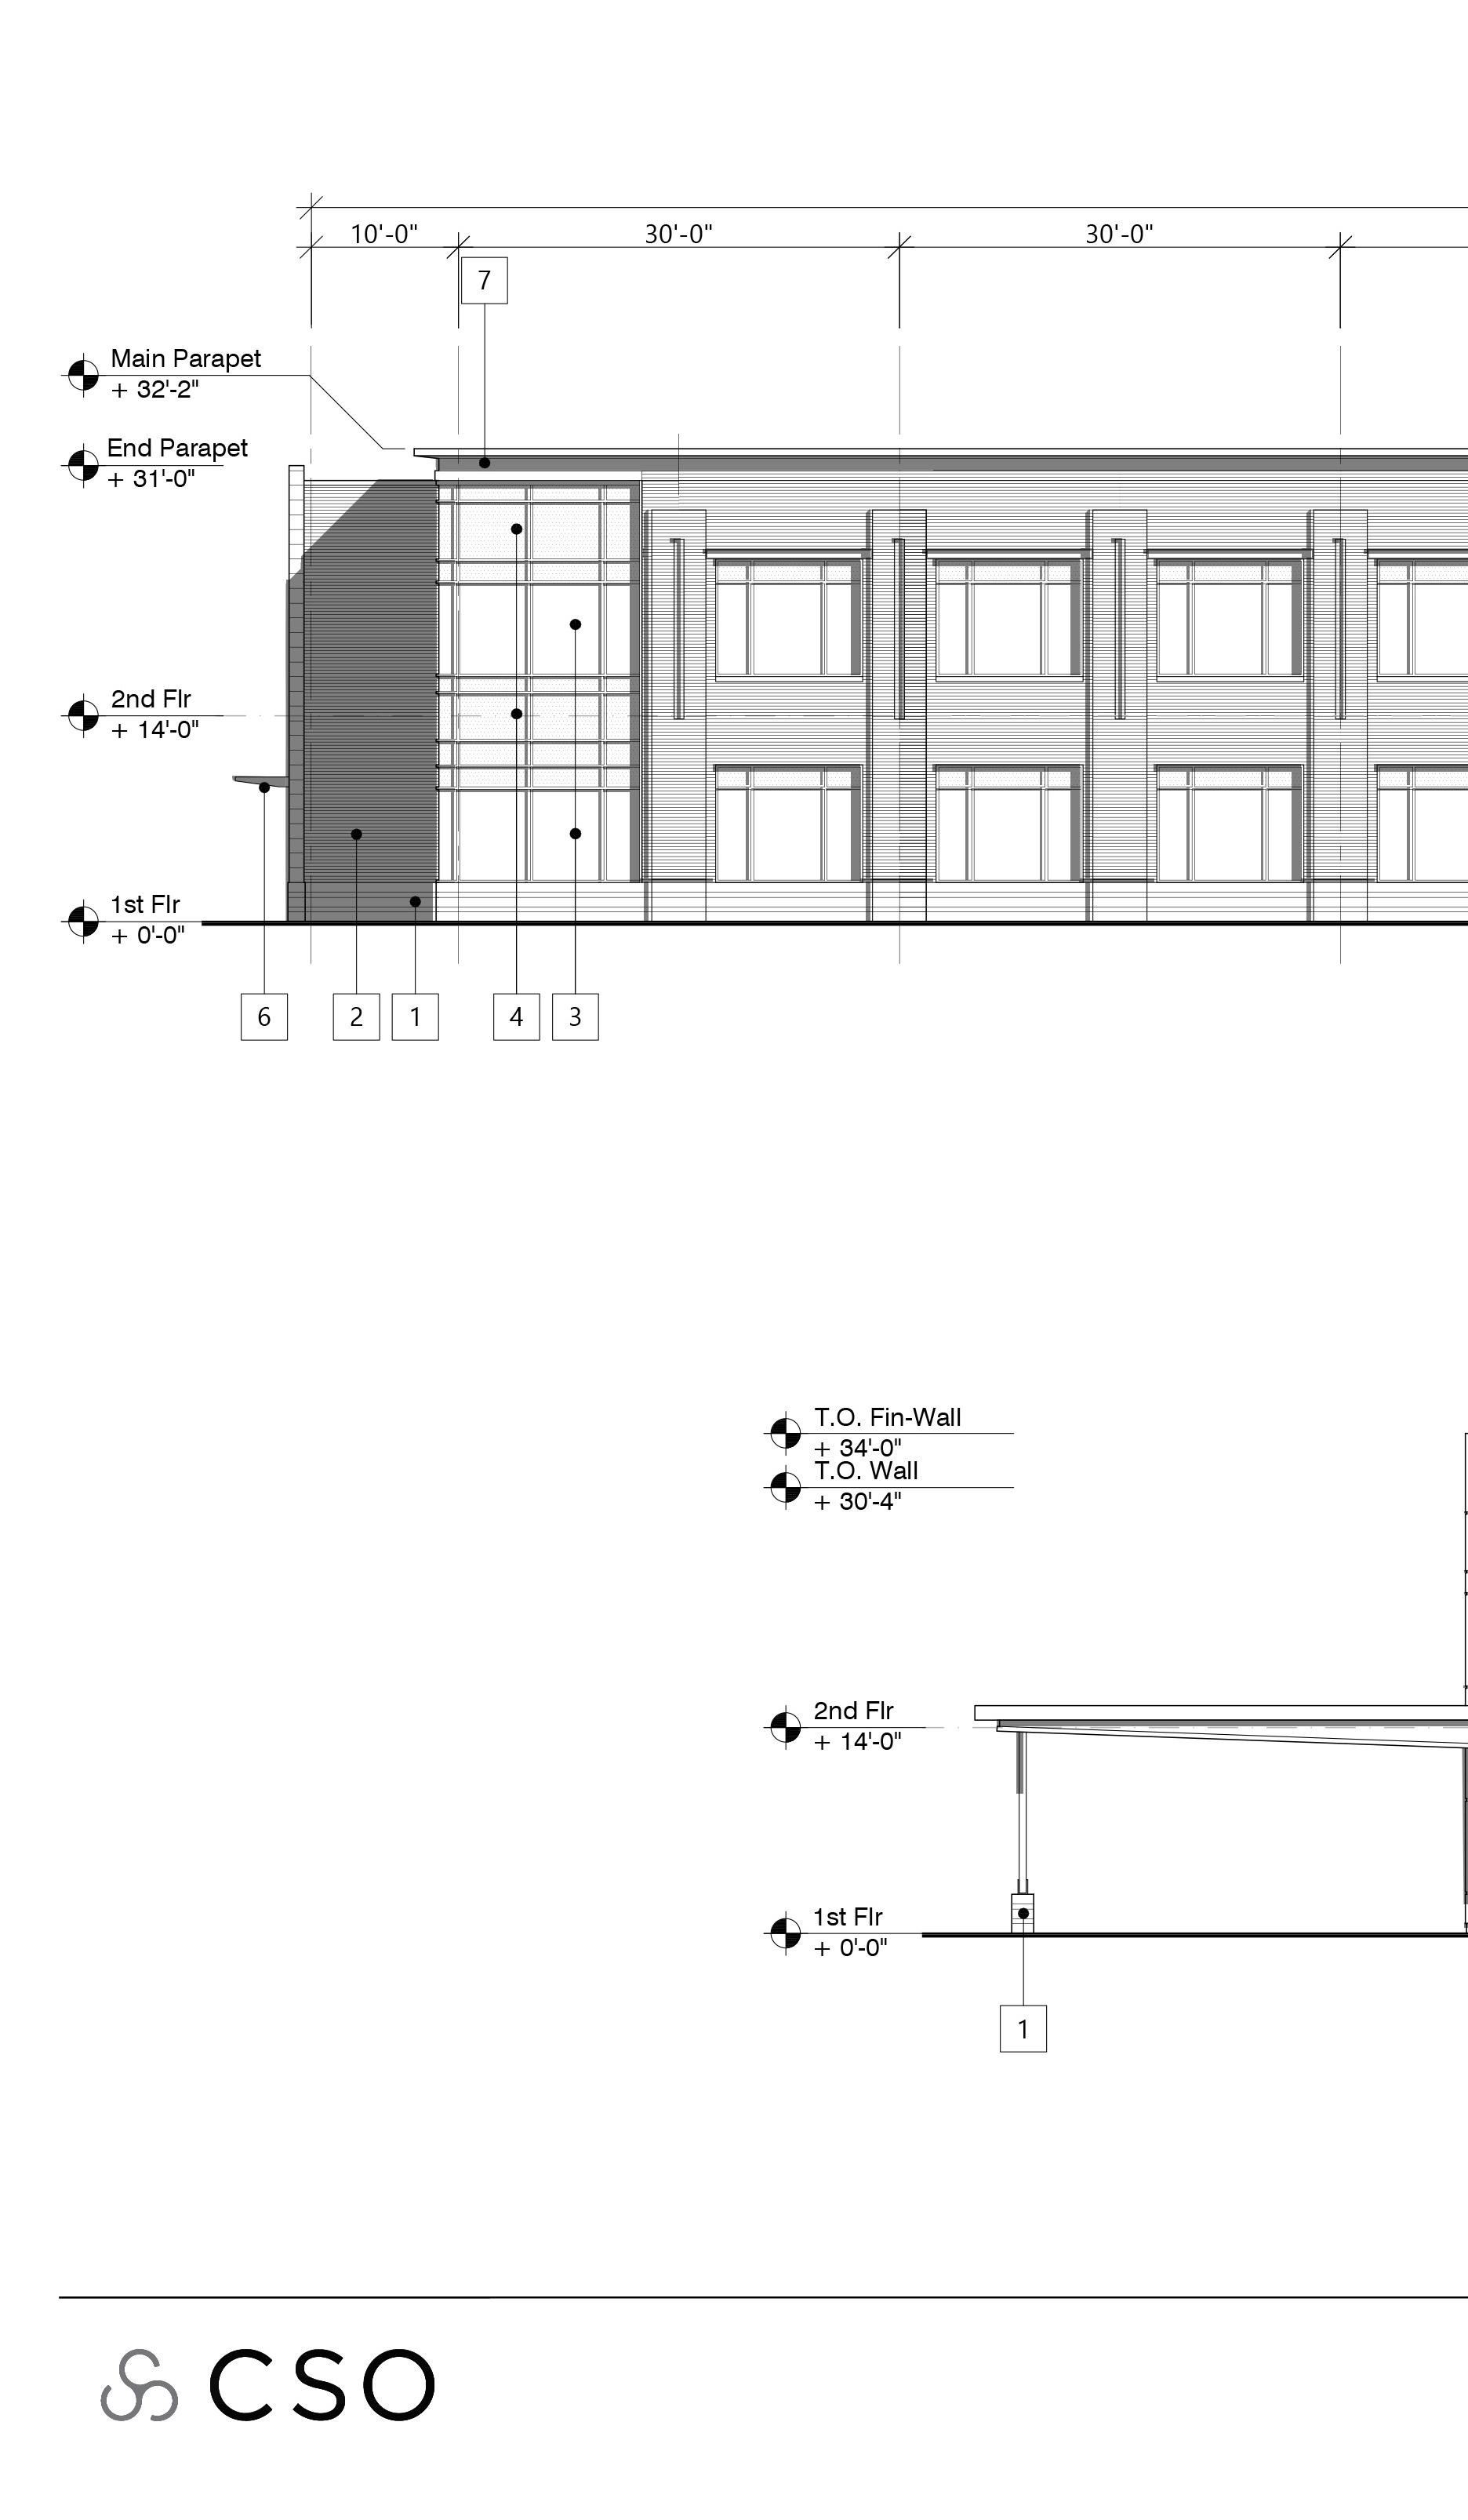
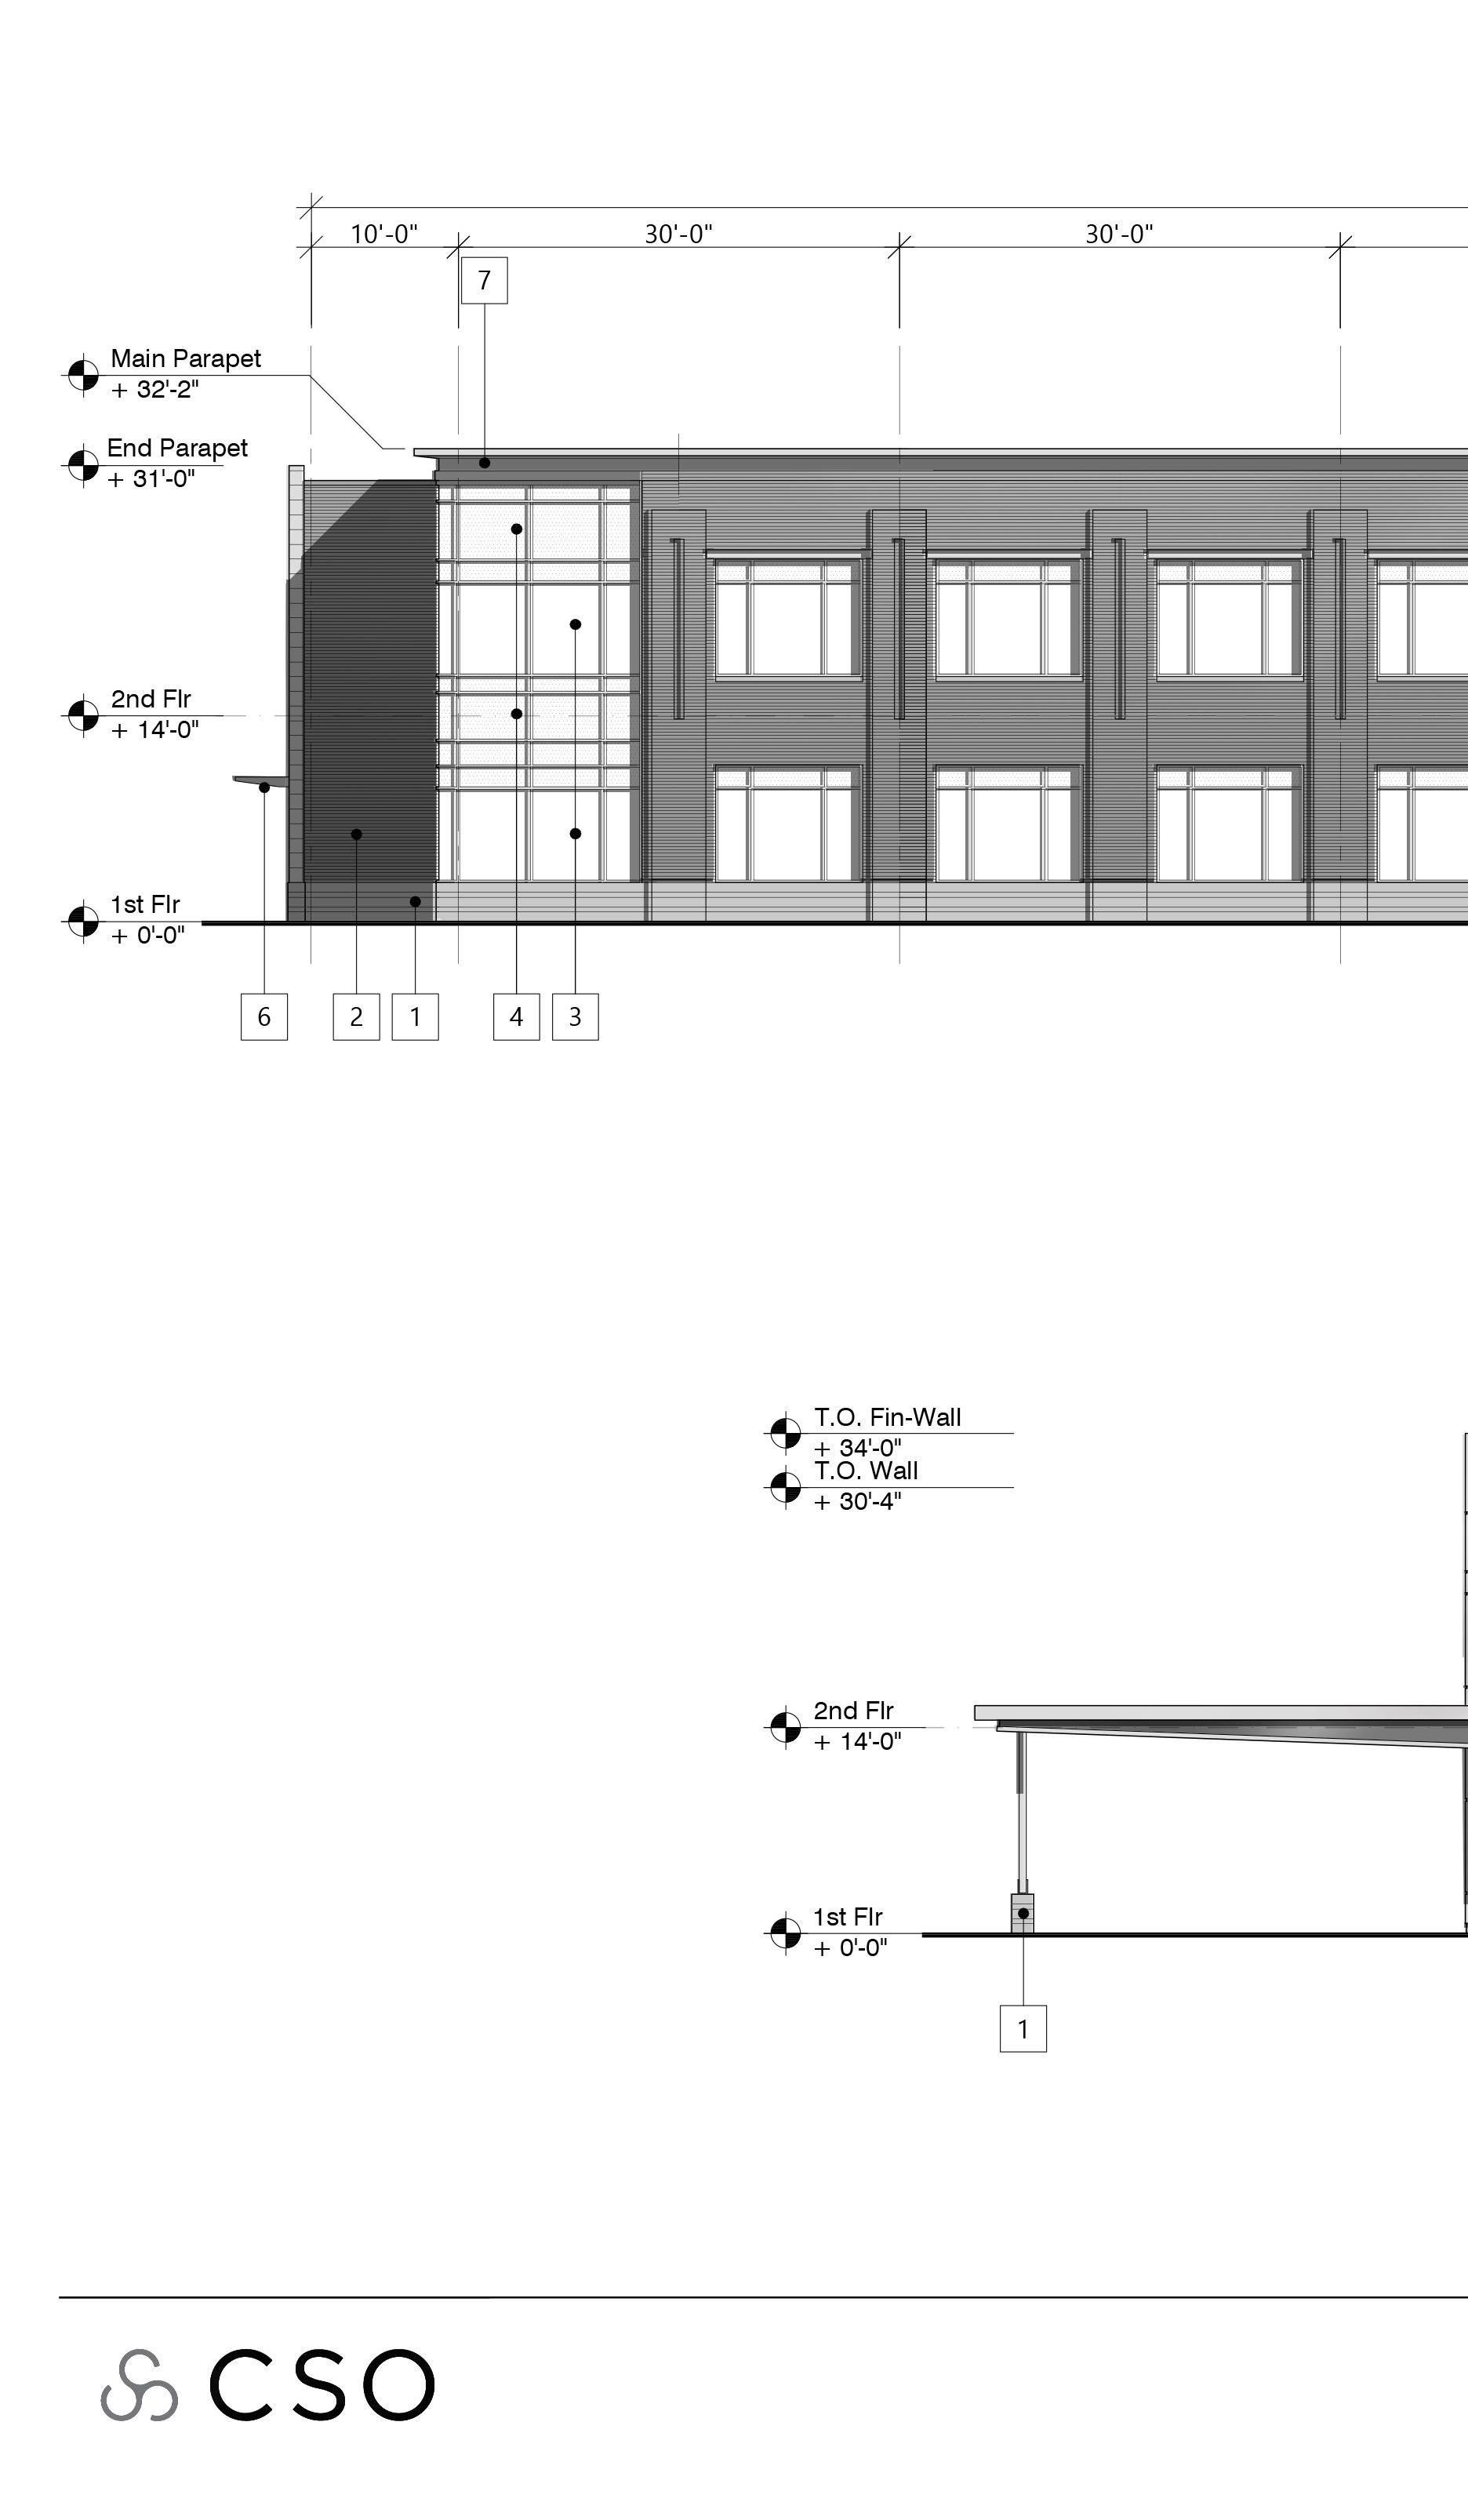
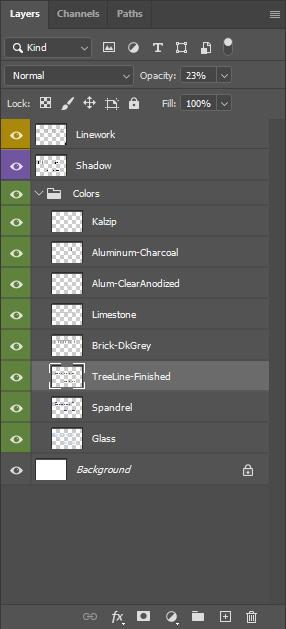
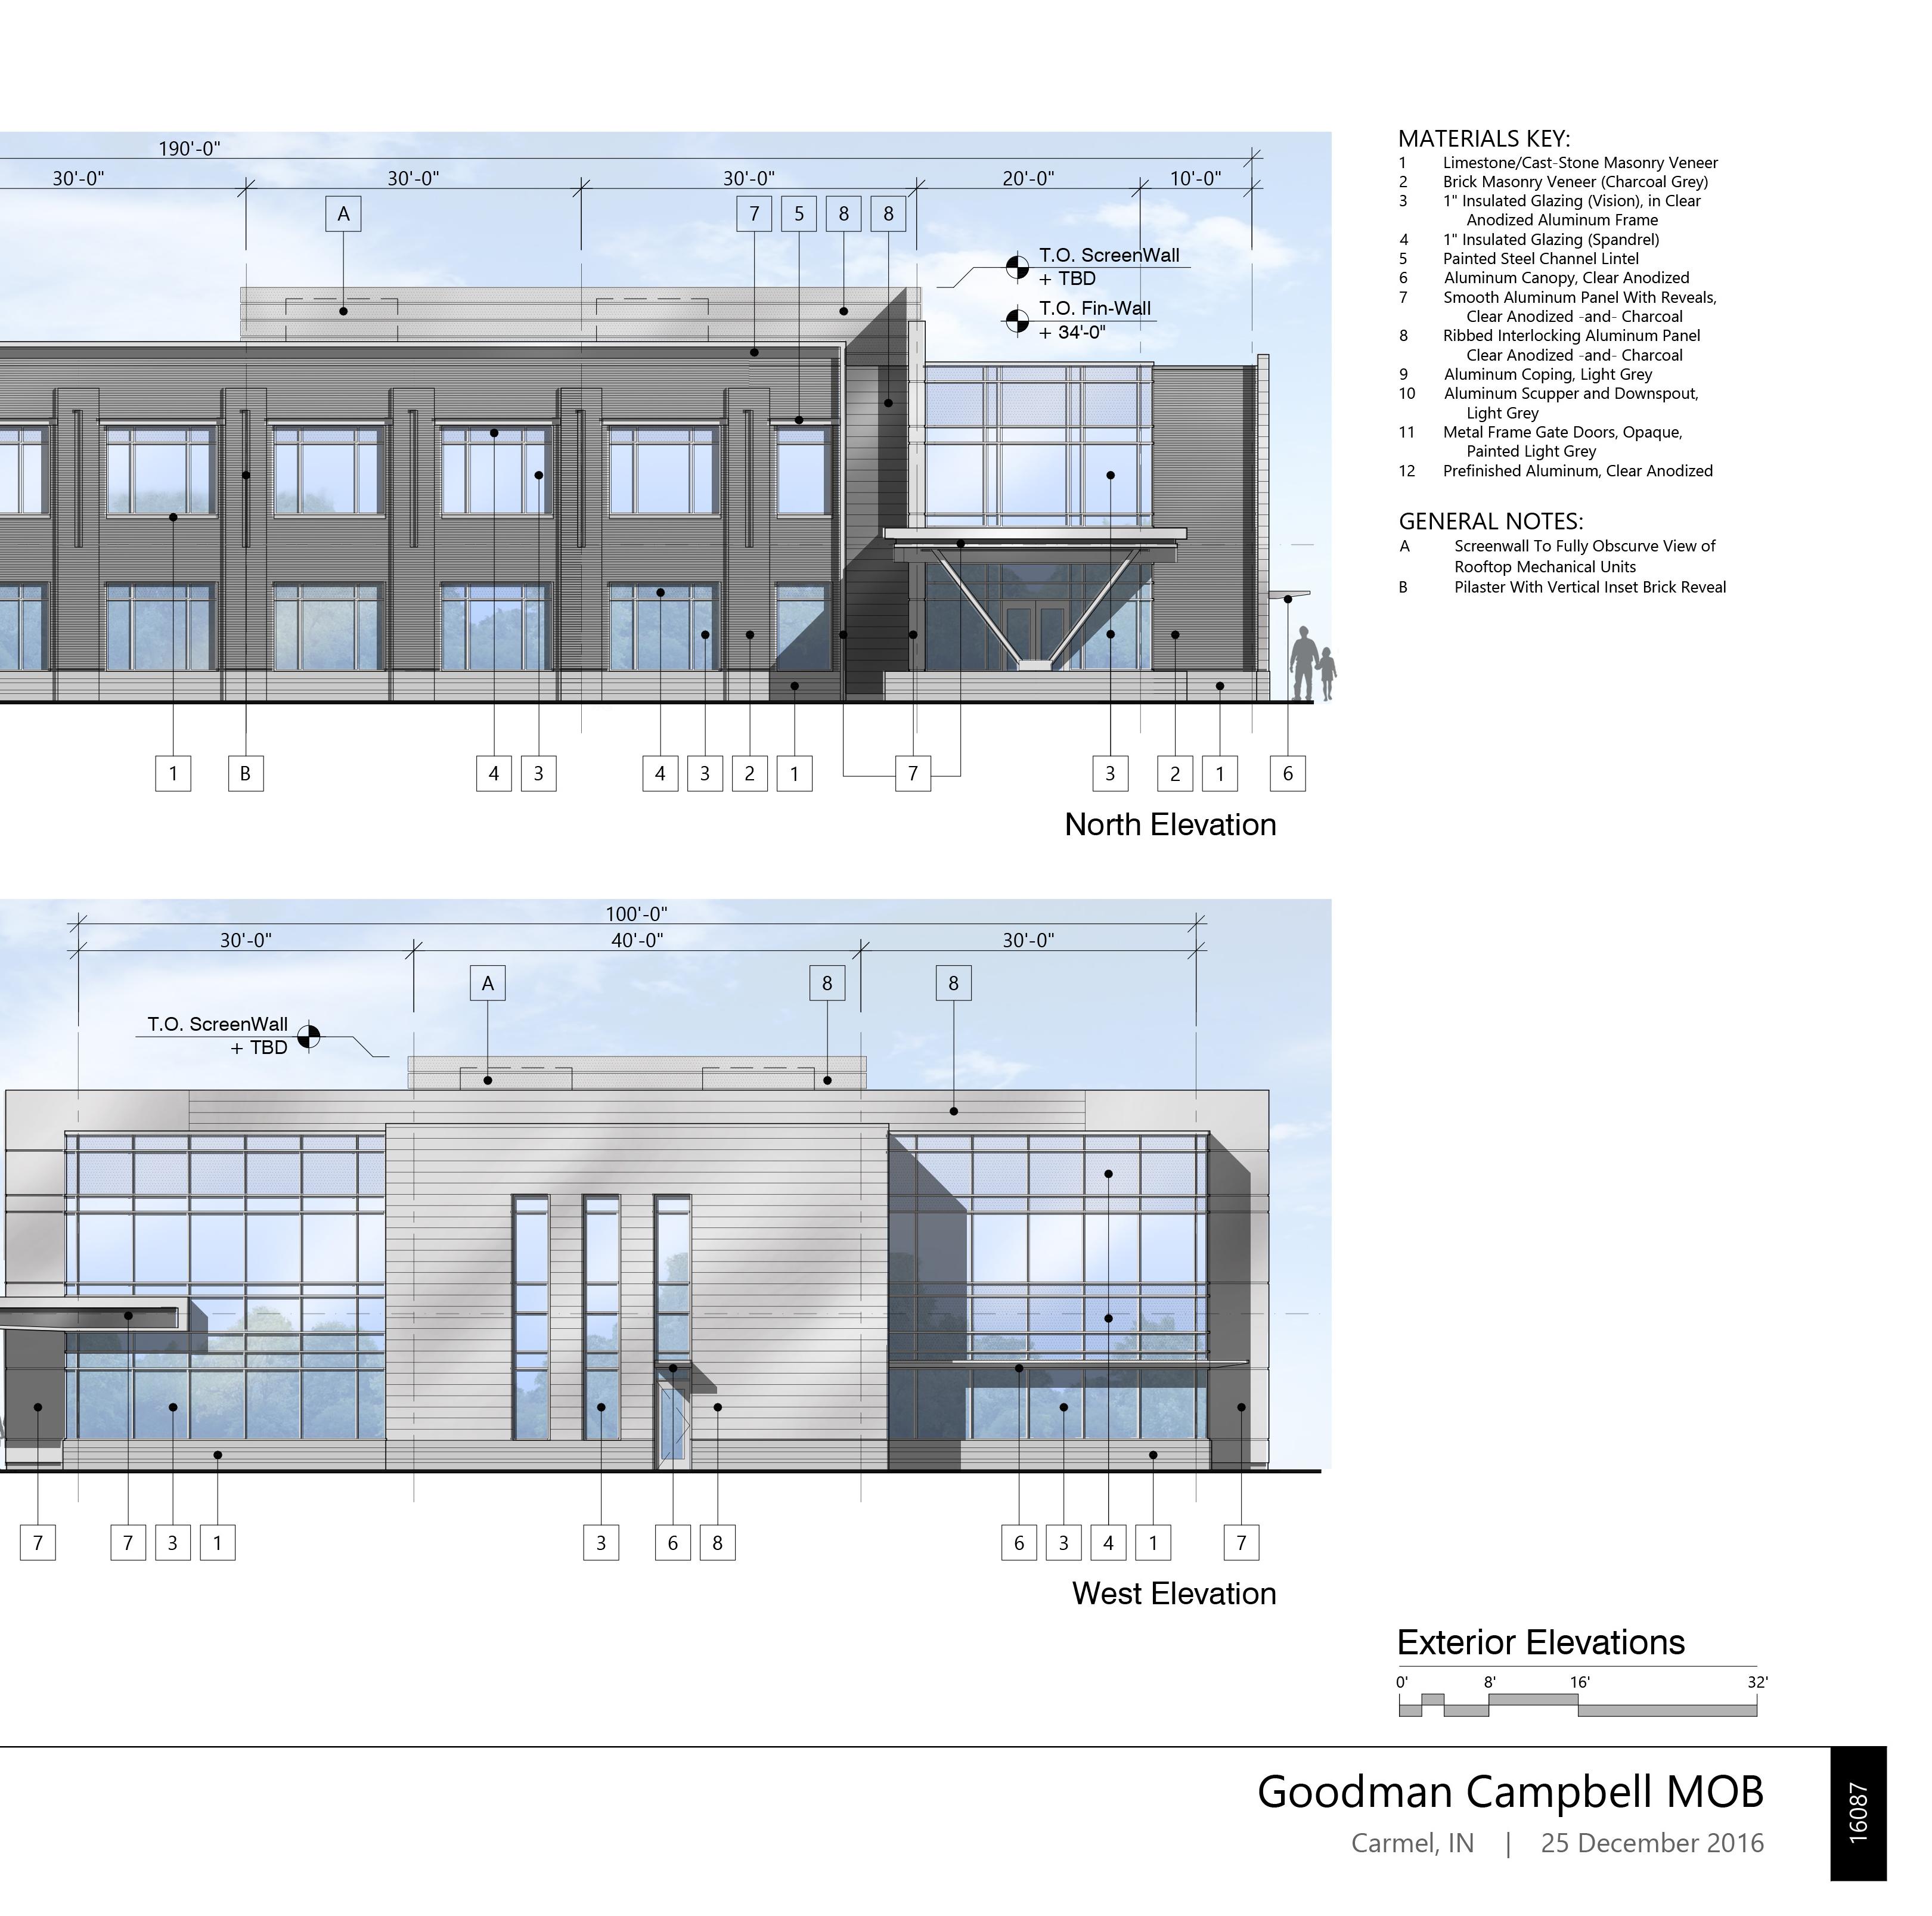
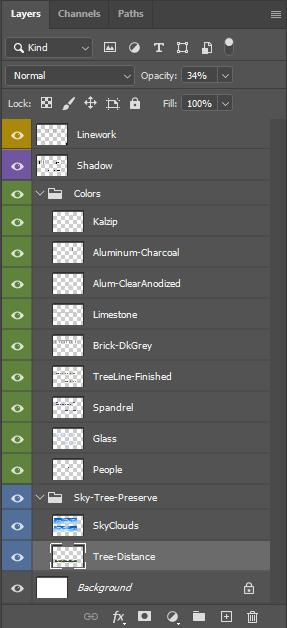
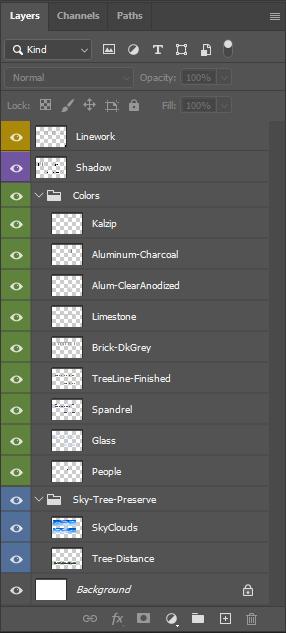
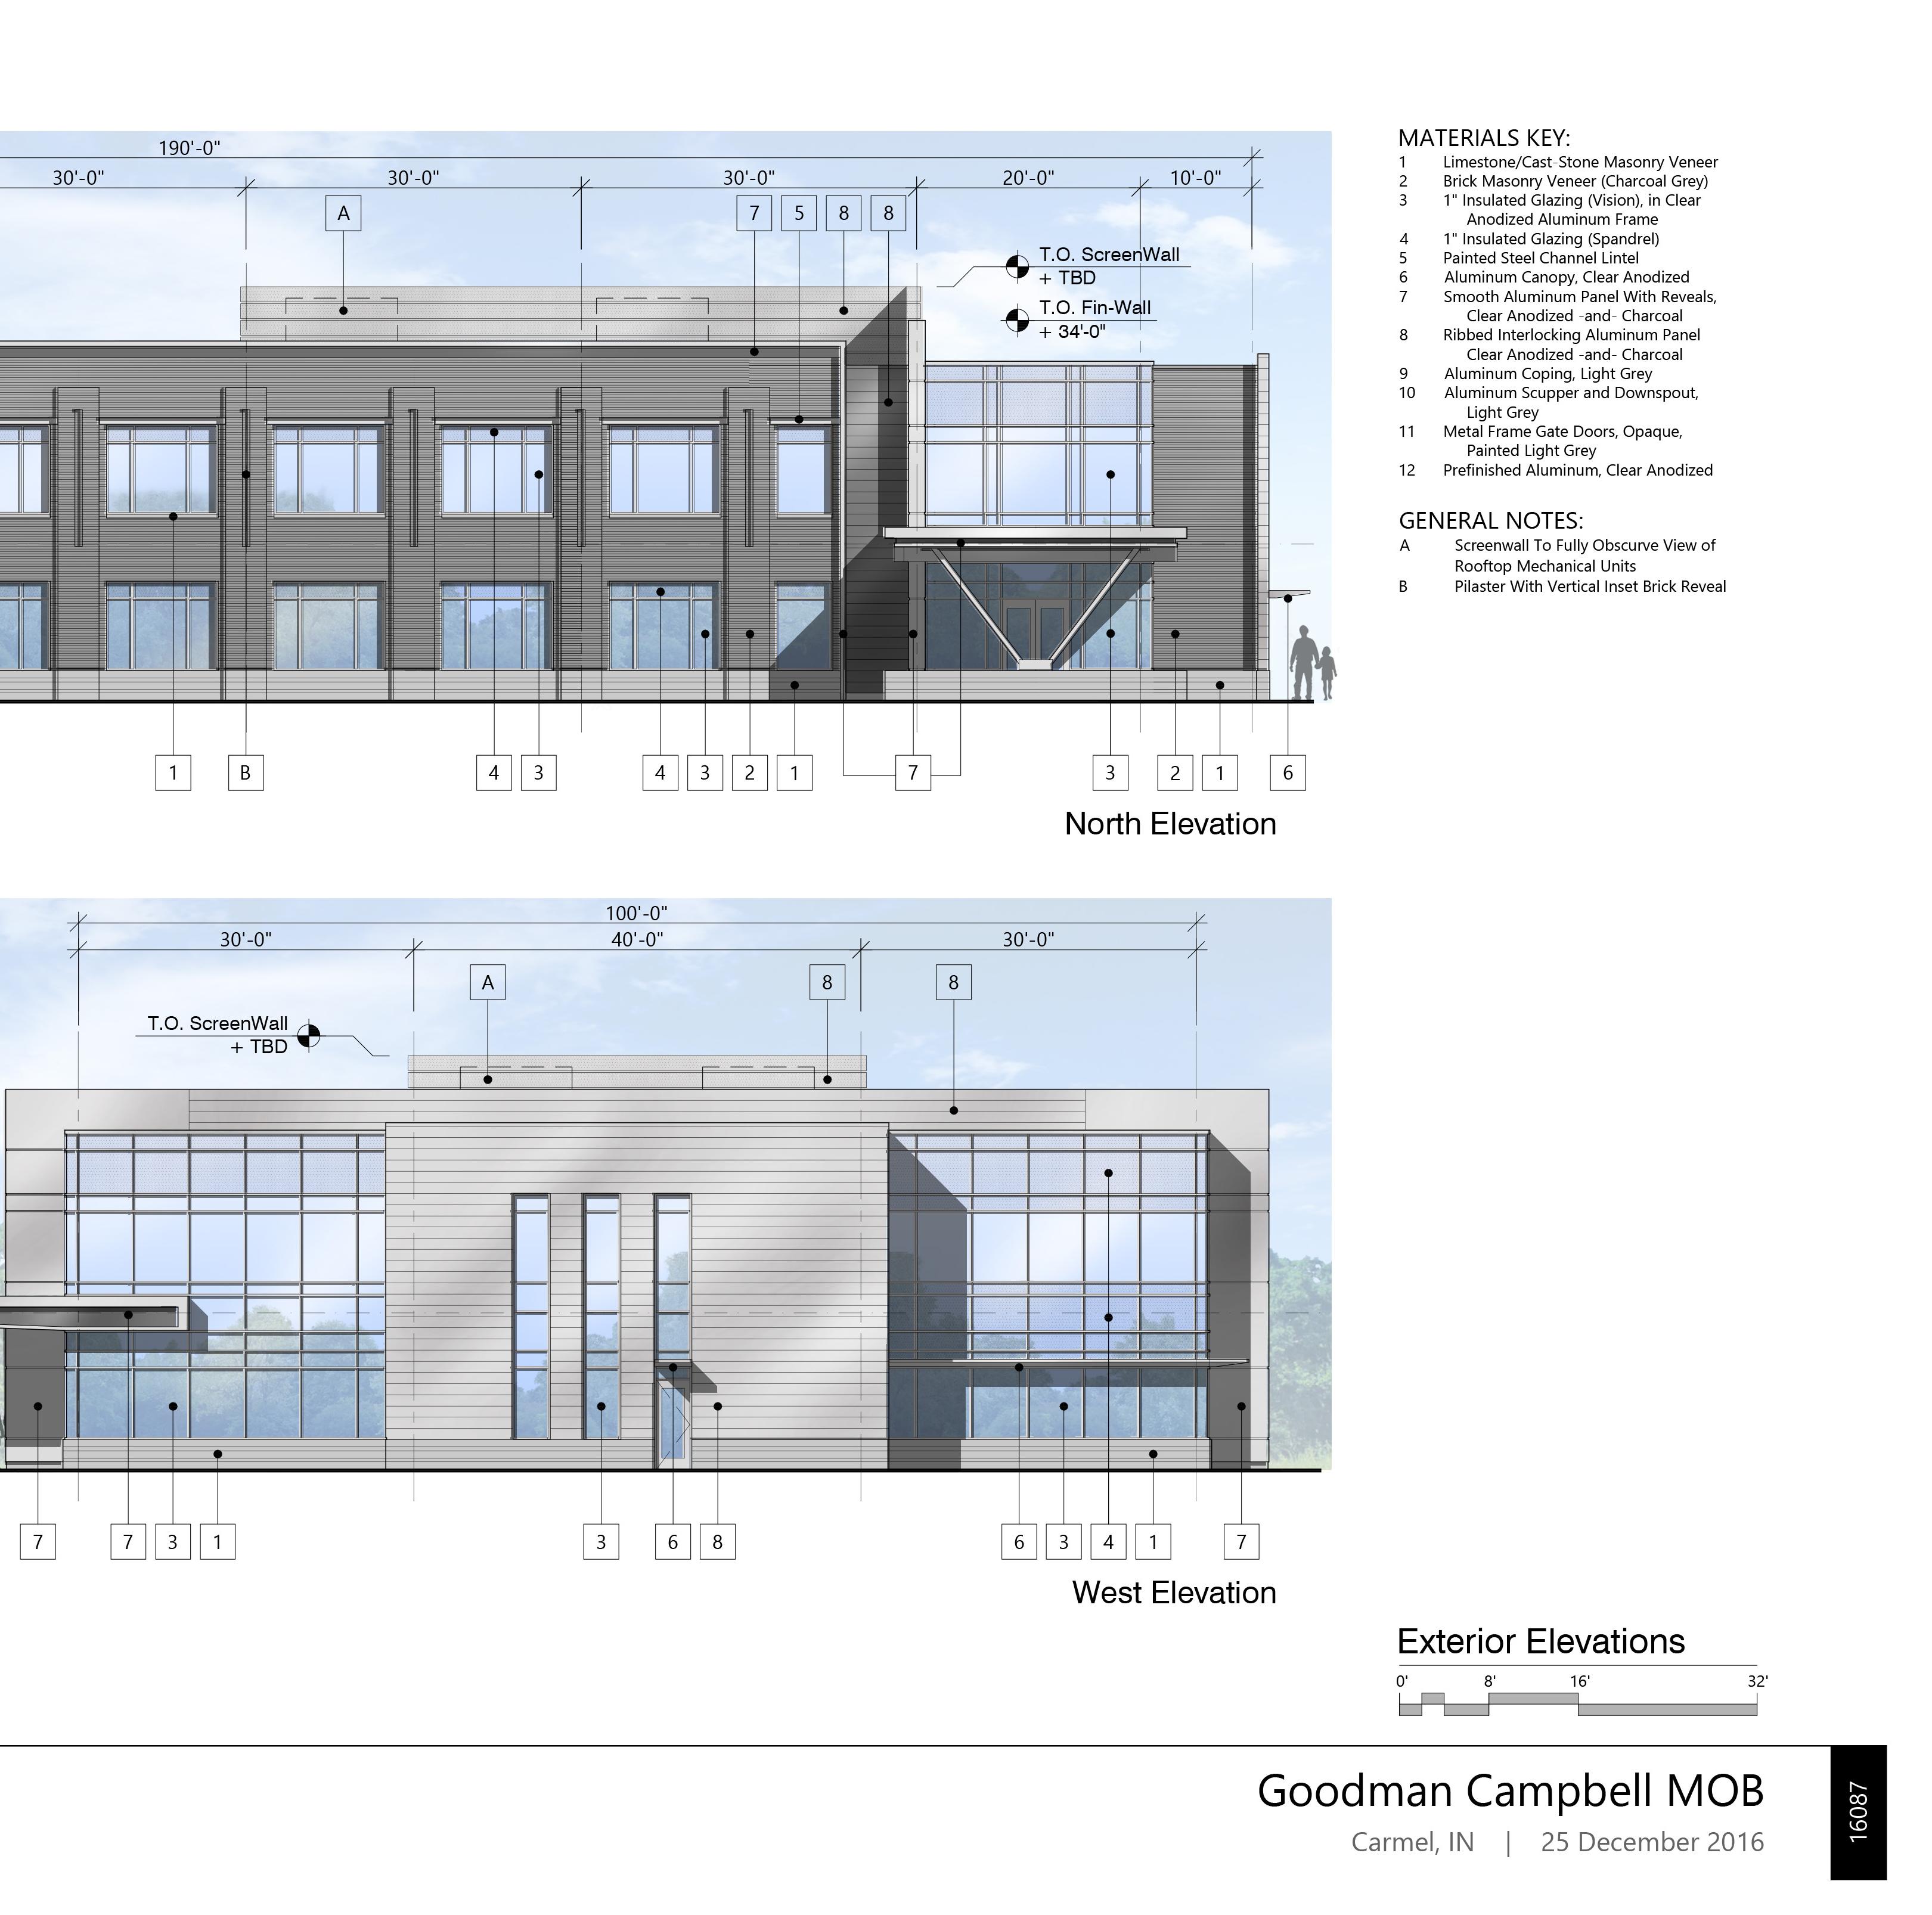
Linework: Contains elevation linework
Shadow:
This Includes:
- Site Linework, - Titleblock, - Site Notes/Data
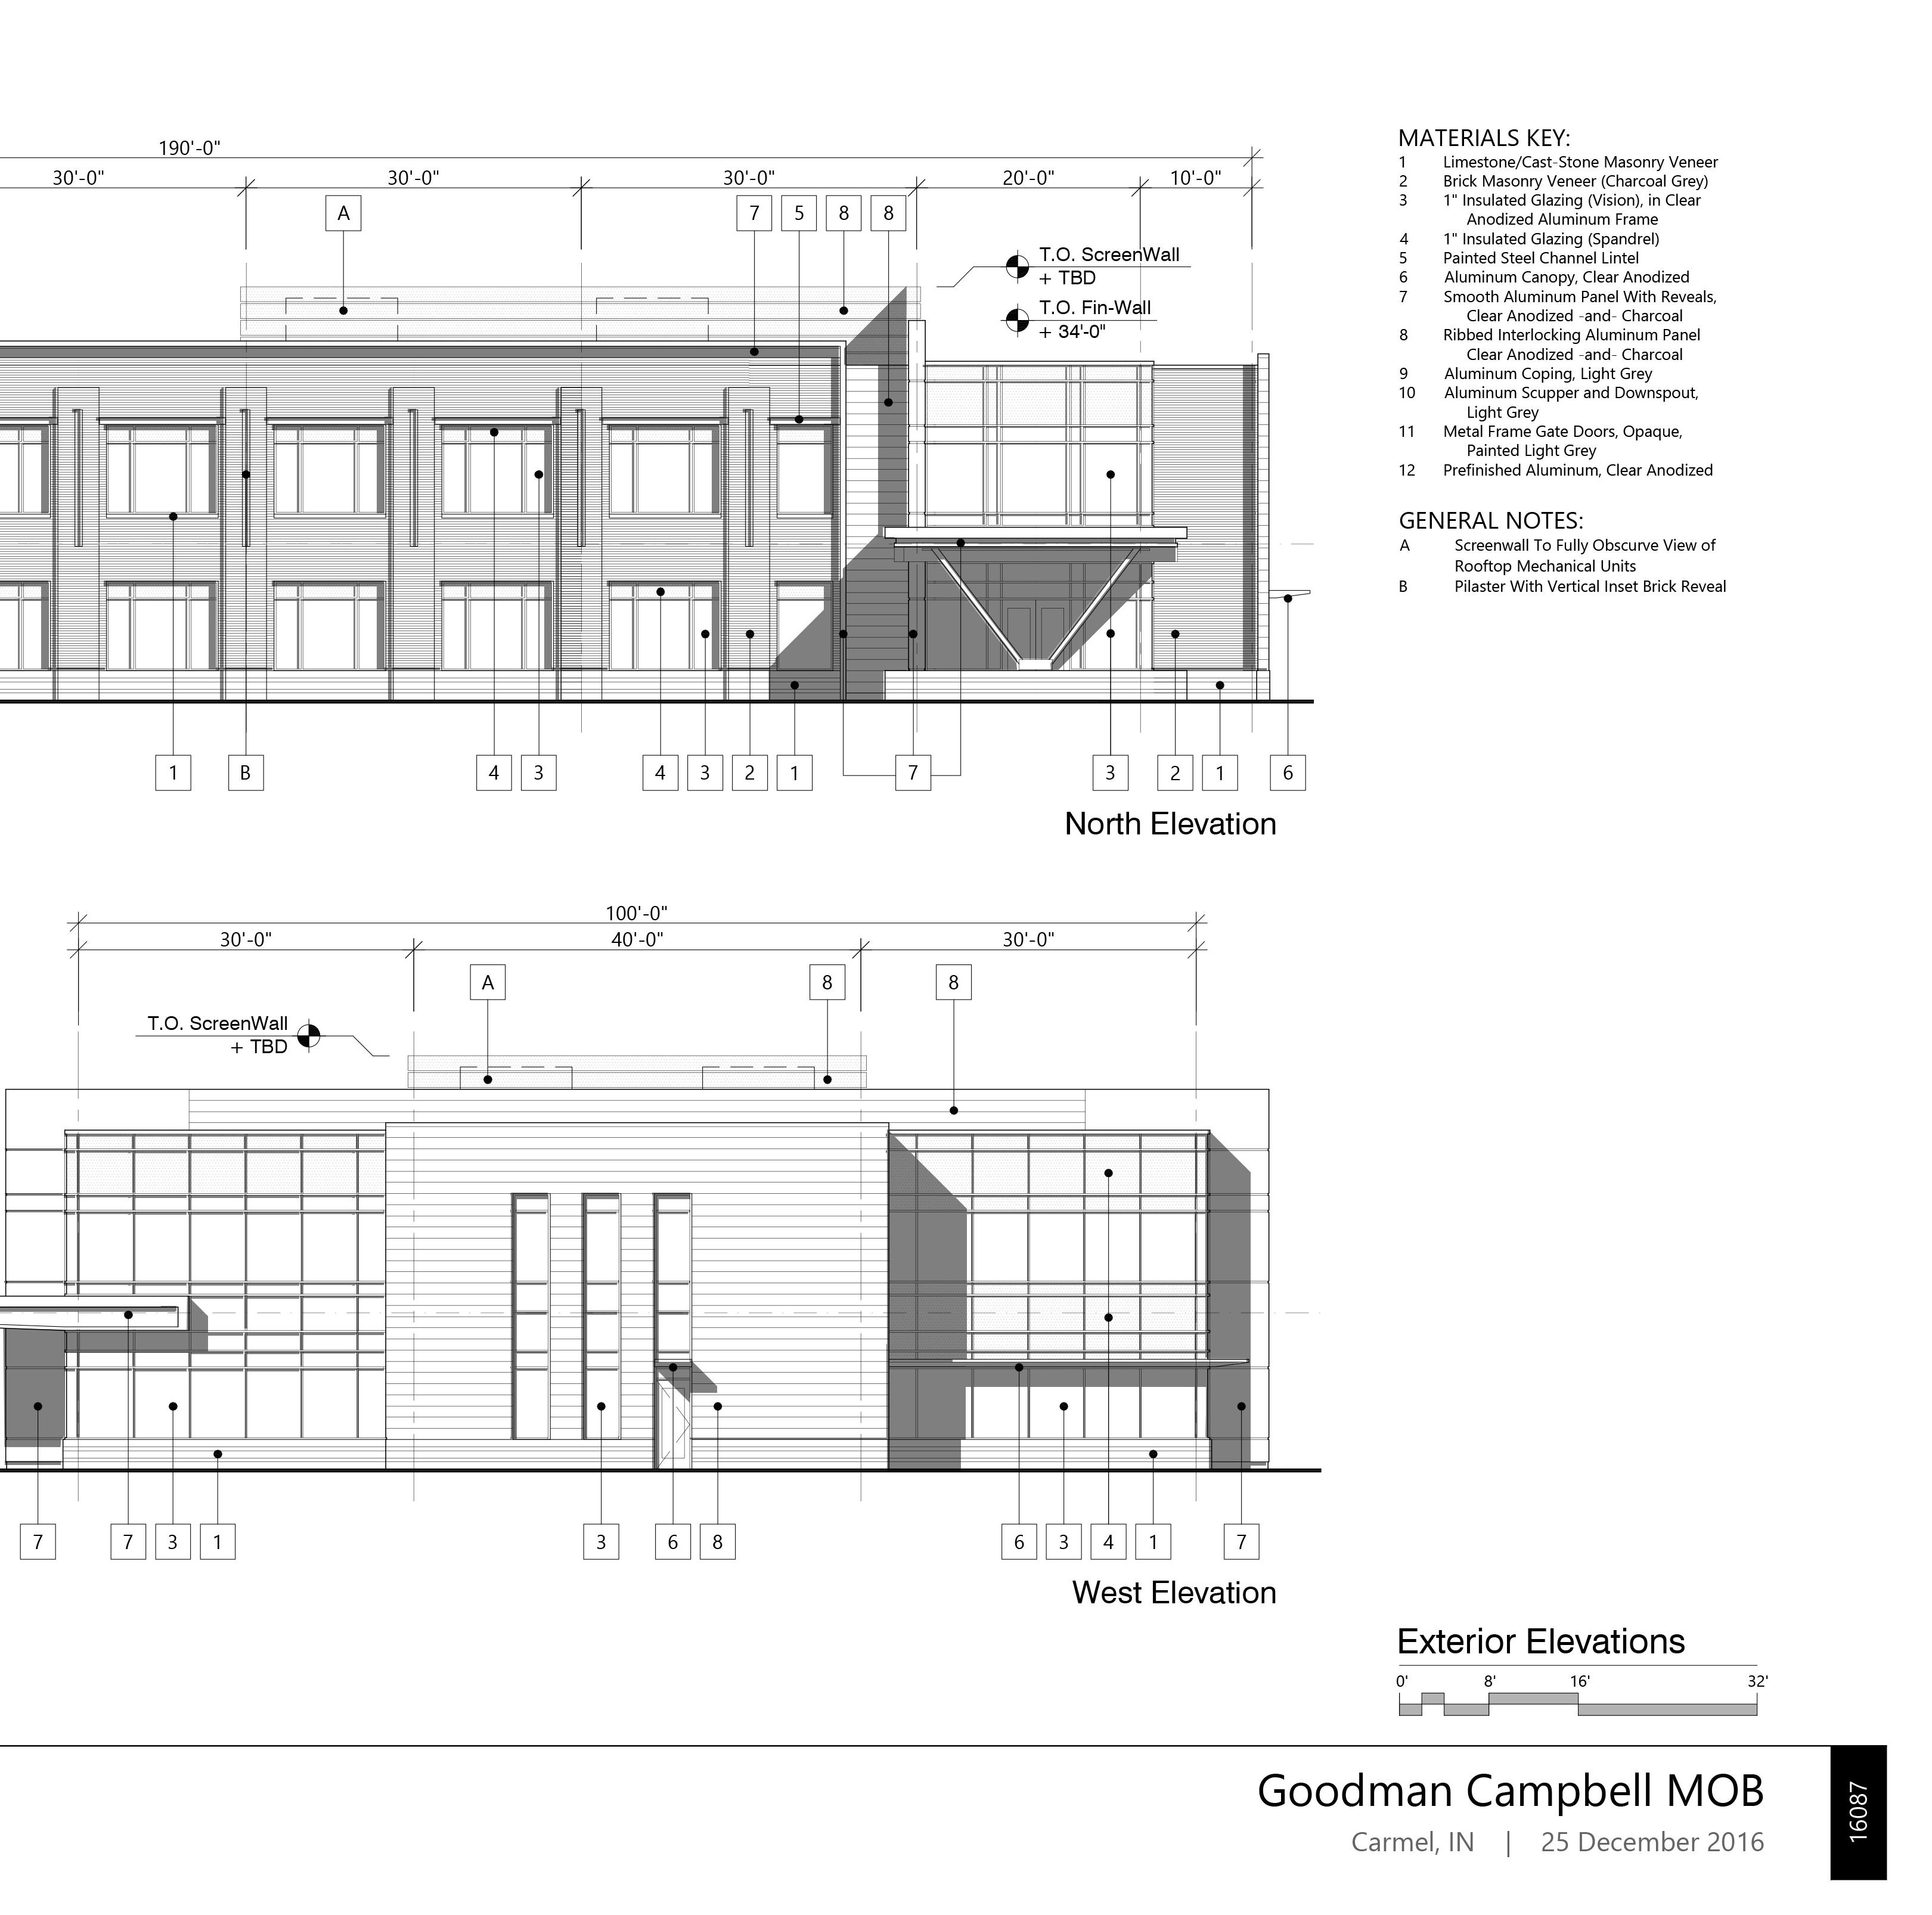
Colors:
This Includes:
- Building Fills, - Trees, Shrubs, - Building and Tree
Shadows, - Asphalt Textures, - Grass Textures,
- Side Walk Textures, - Road Wear effects
Sky Tree Preserve:
This includes:
- The SkyClouds Backdrop, - Tree Reflections
1 2 3
Begin by creating a series of 4 separate groups in the ‘Layers Tab’
You will name the groups the following: Adjustments, TB-Notes, Graphics, and Site-Aerial. Right Click on the ‘Eye Icon’ besides each group and select the appropriate color
It is important to situate the groups in the order listed in the ‘Layer Standards’ column. Additionally, this is visualized in the graphic below.
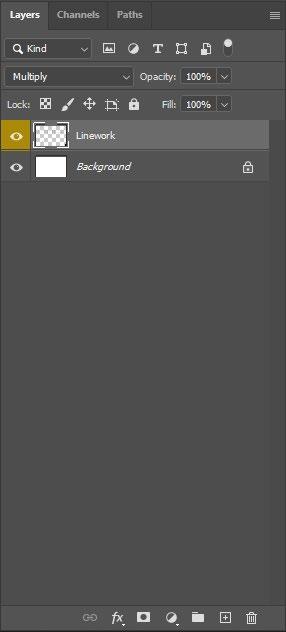
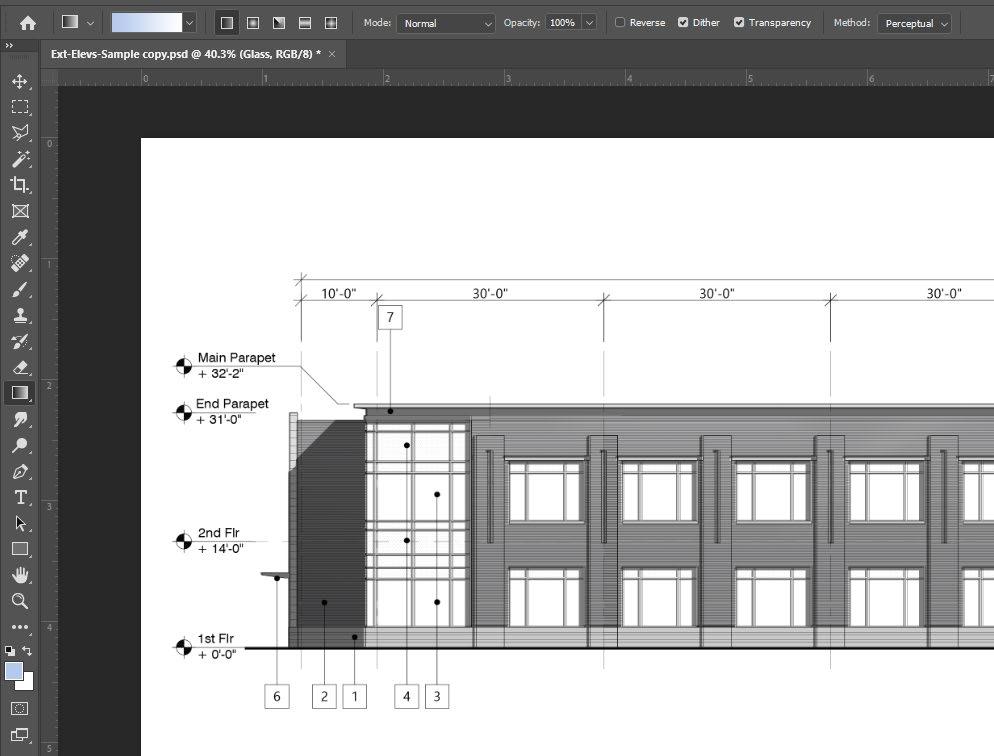
1. When yo ufirst open a .PDF it will appear as “Layer 1”.
2. Rename this as “Linework”
3. Set the Layer Mode to Multiply
5. Lock the layer to avoid coloring on it
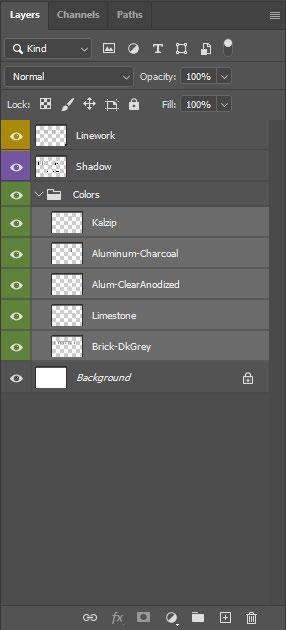
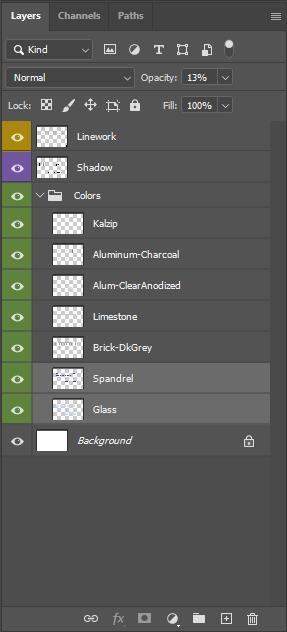
1. These should all contianed in a Group named “Colors”.
2. All of these layers should have short, logical, decipherable names.
3. Again, remember to keep the workflow AS SIMPLE AS POSSIBLE, and NO MORE COMPLEX than is necessary.


pt. 1 of 3
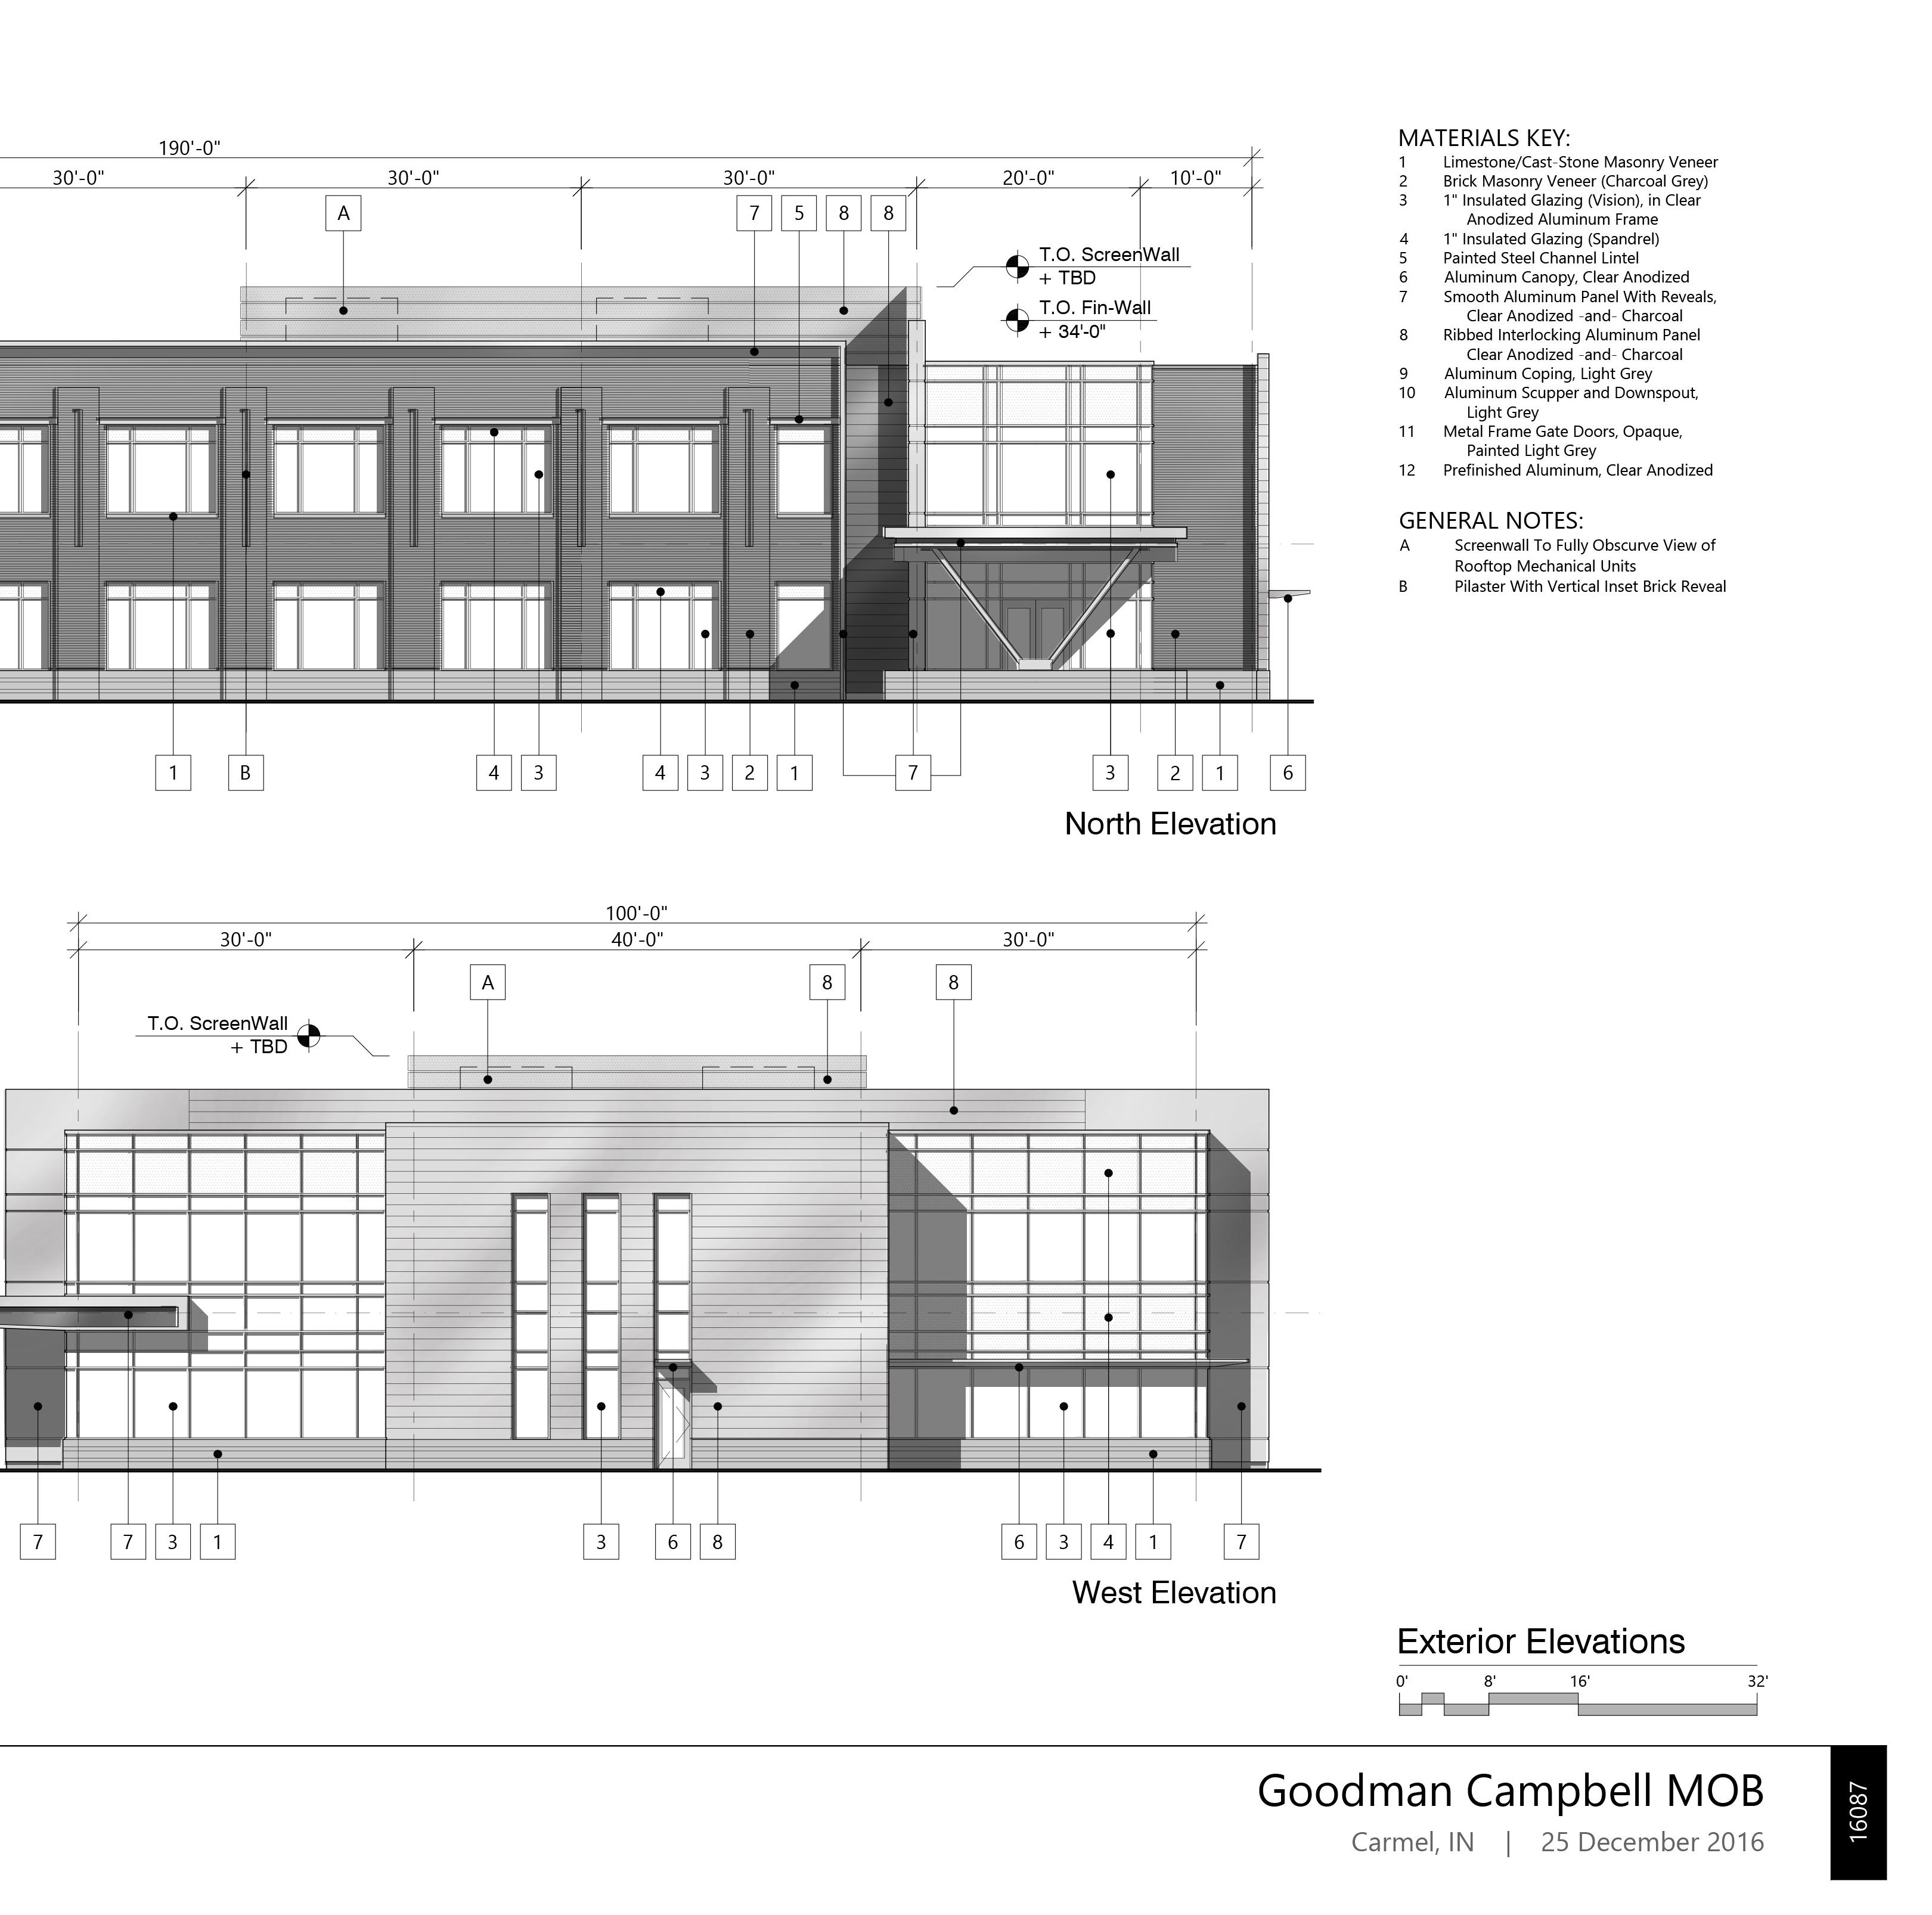
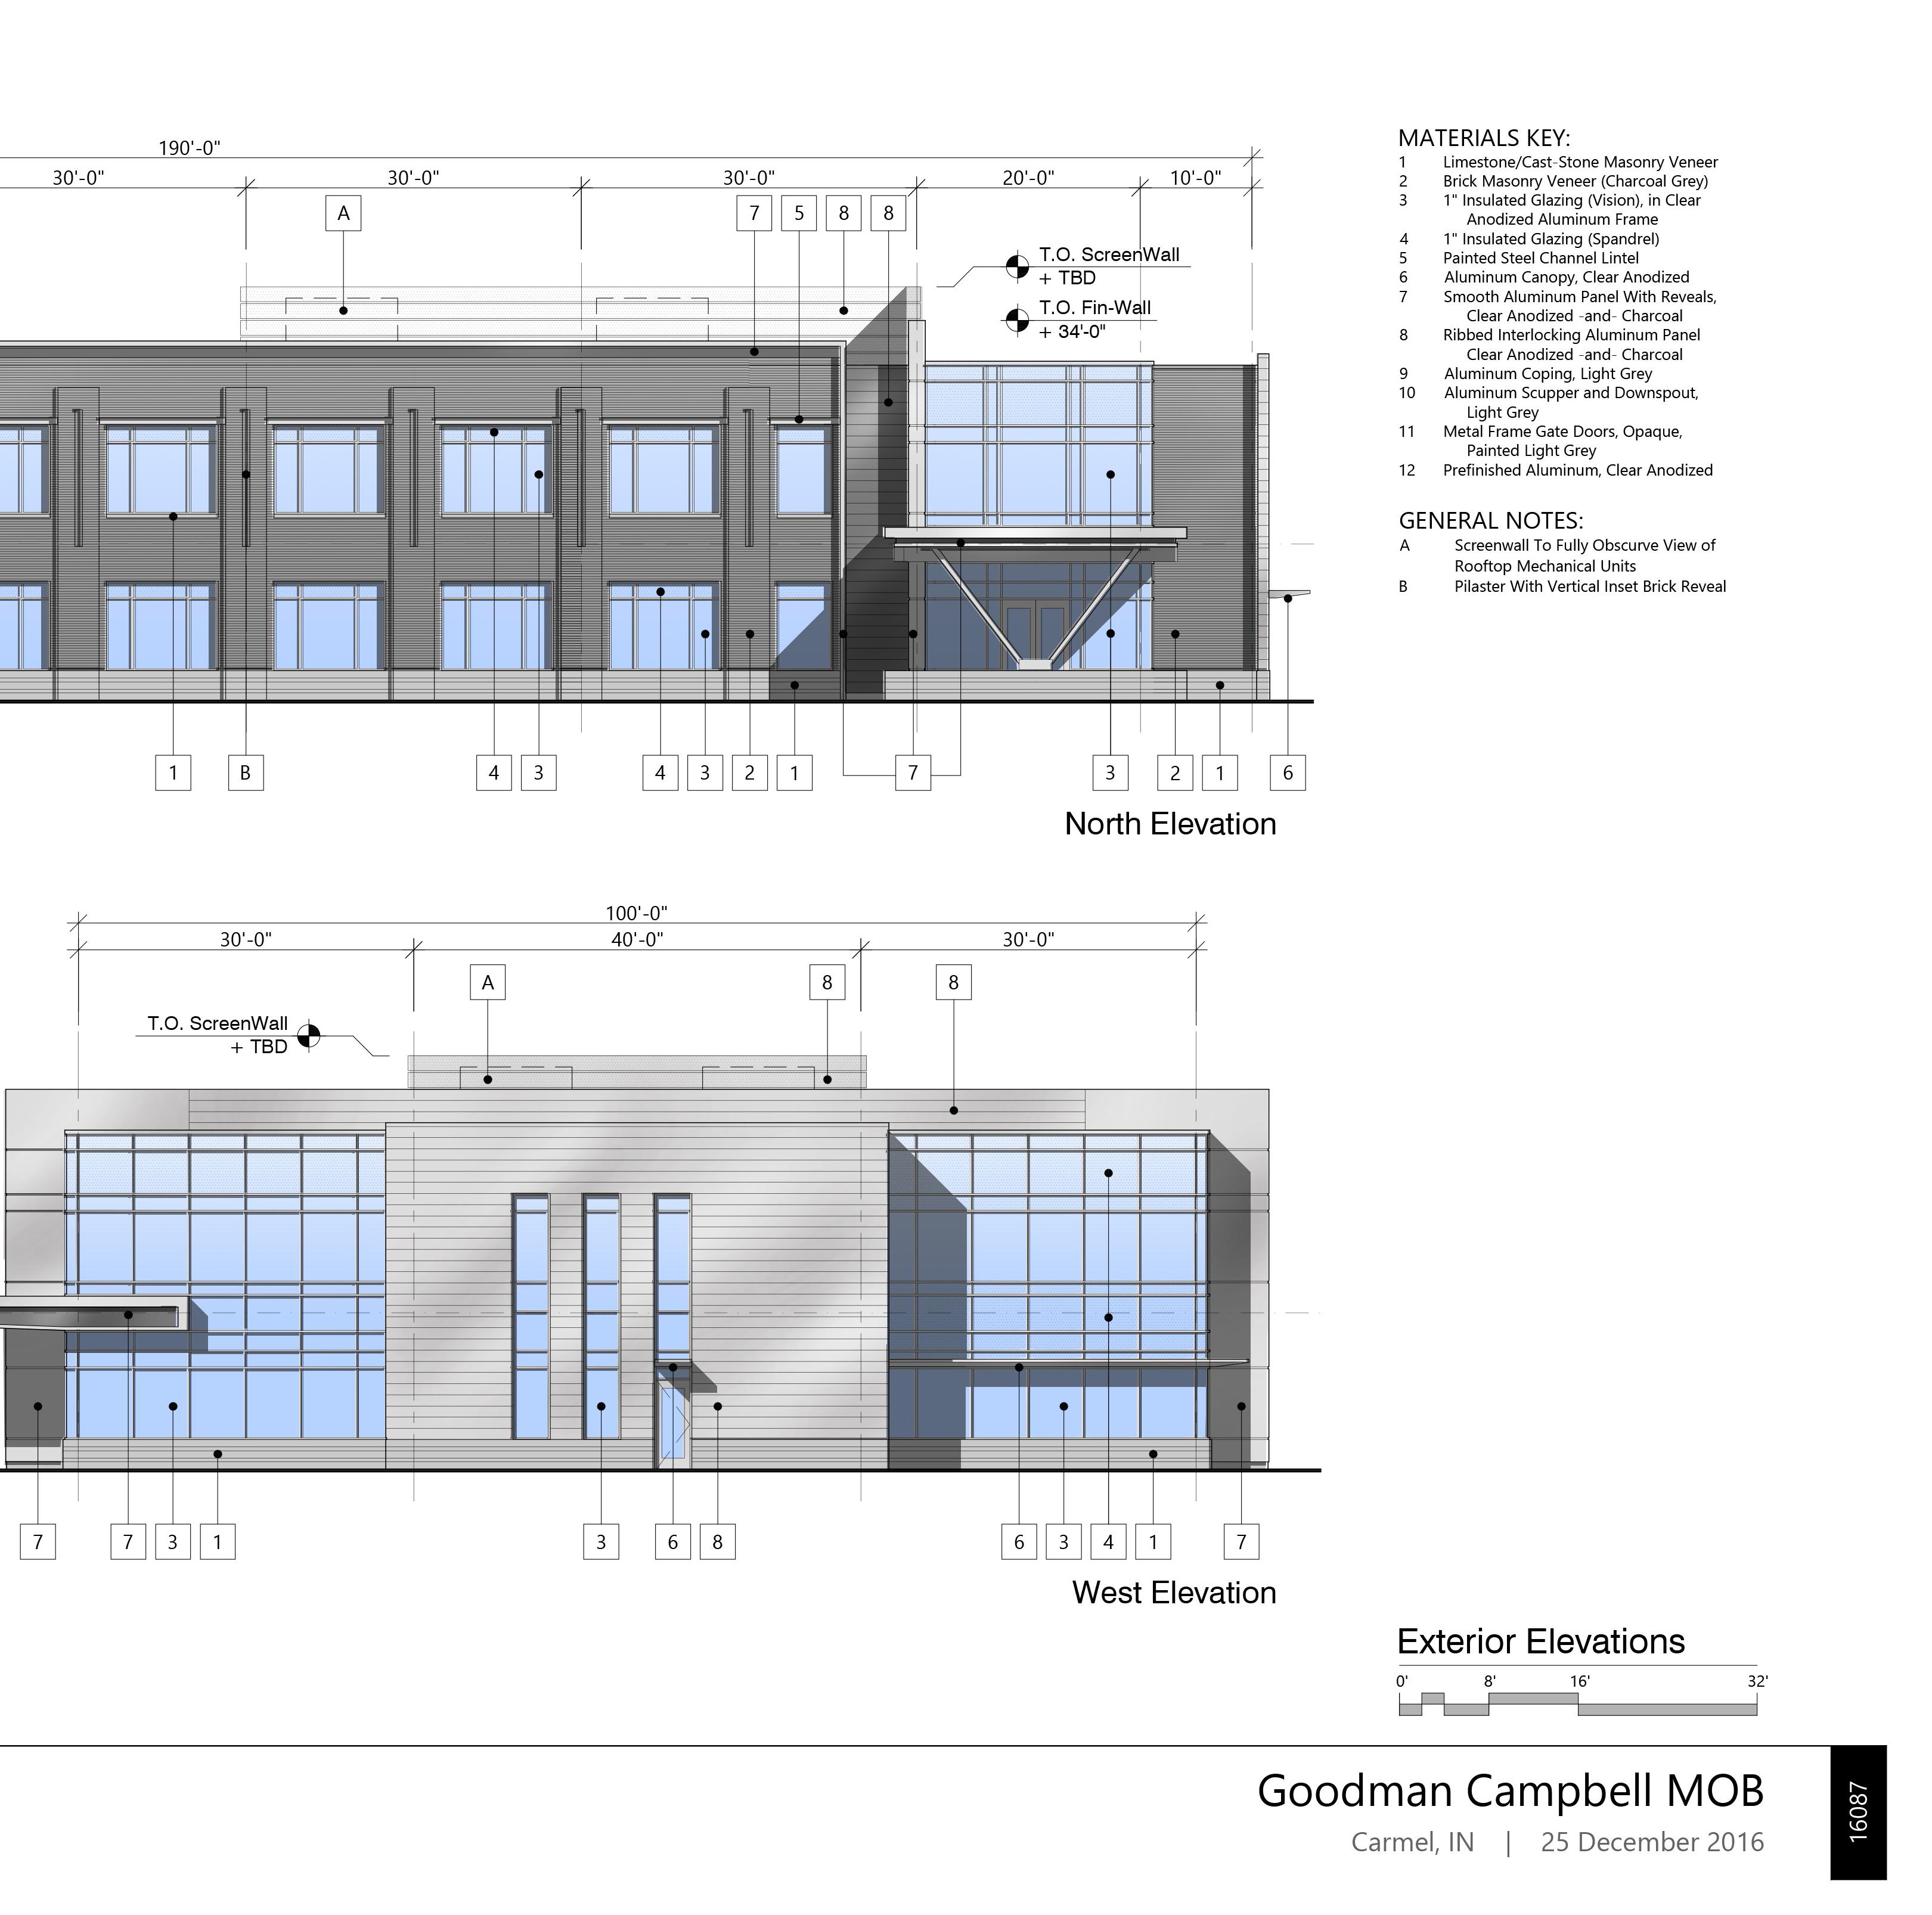
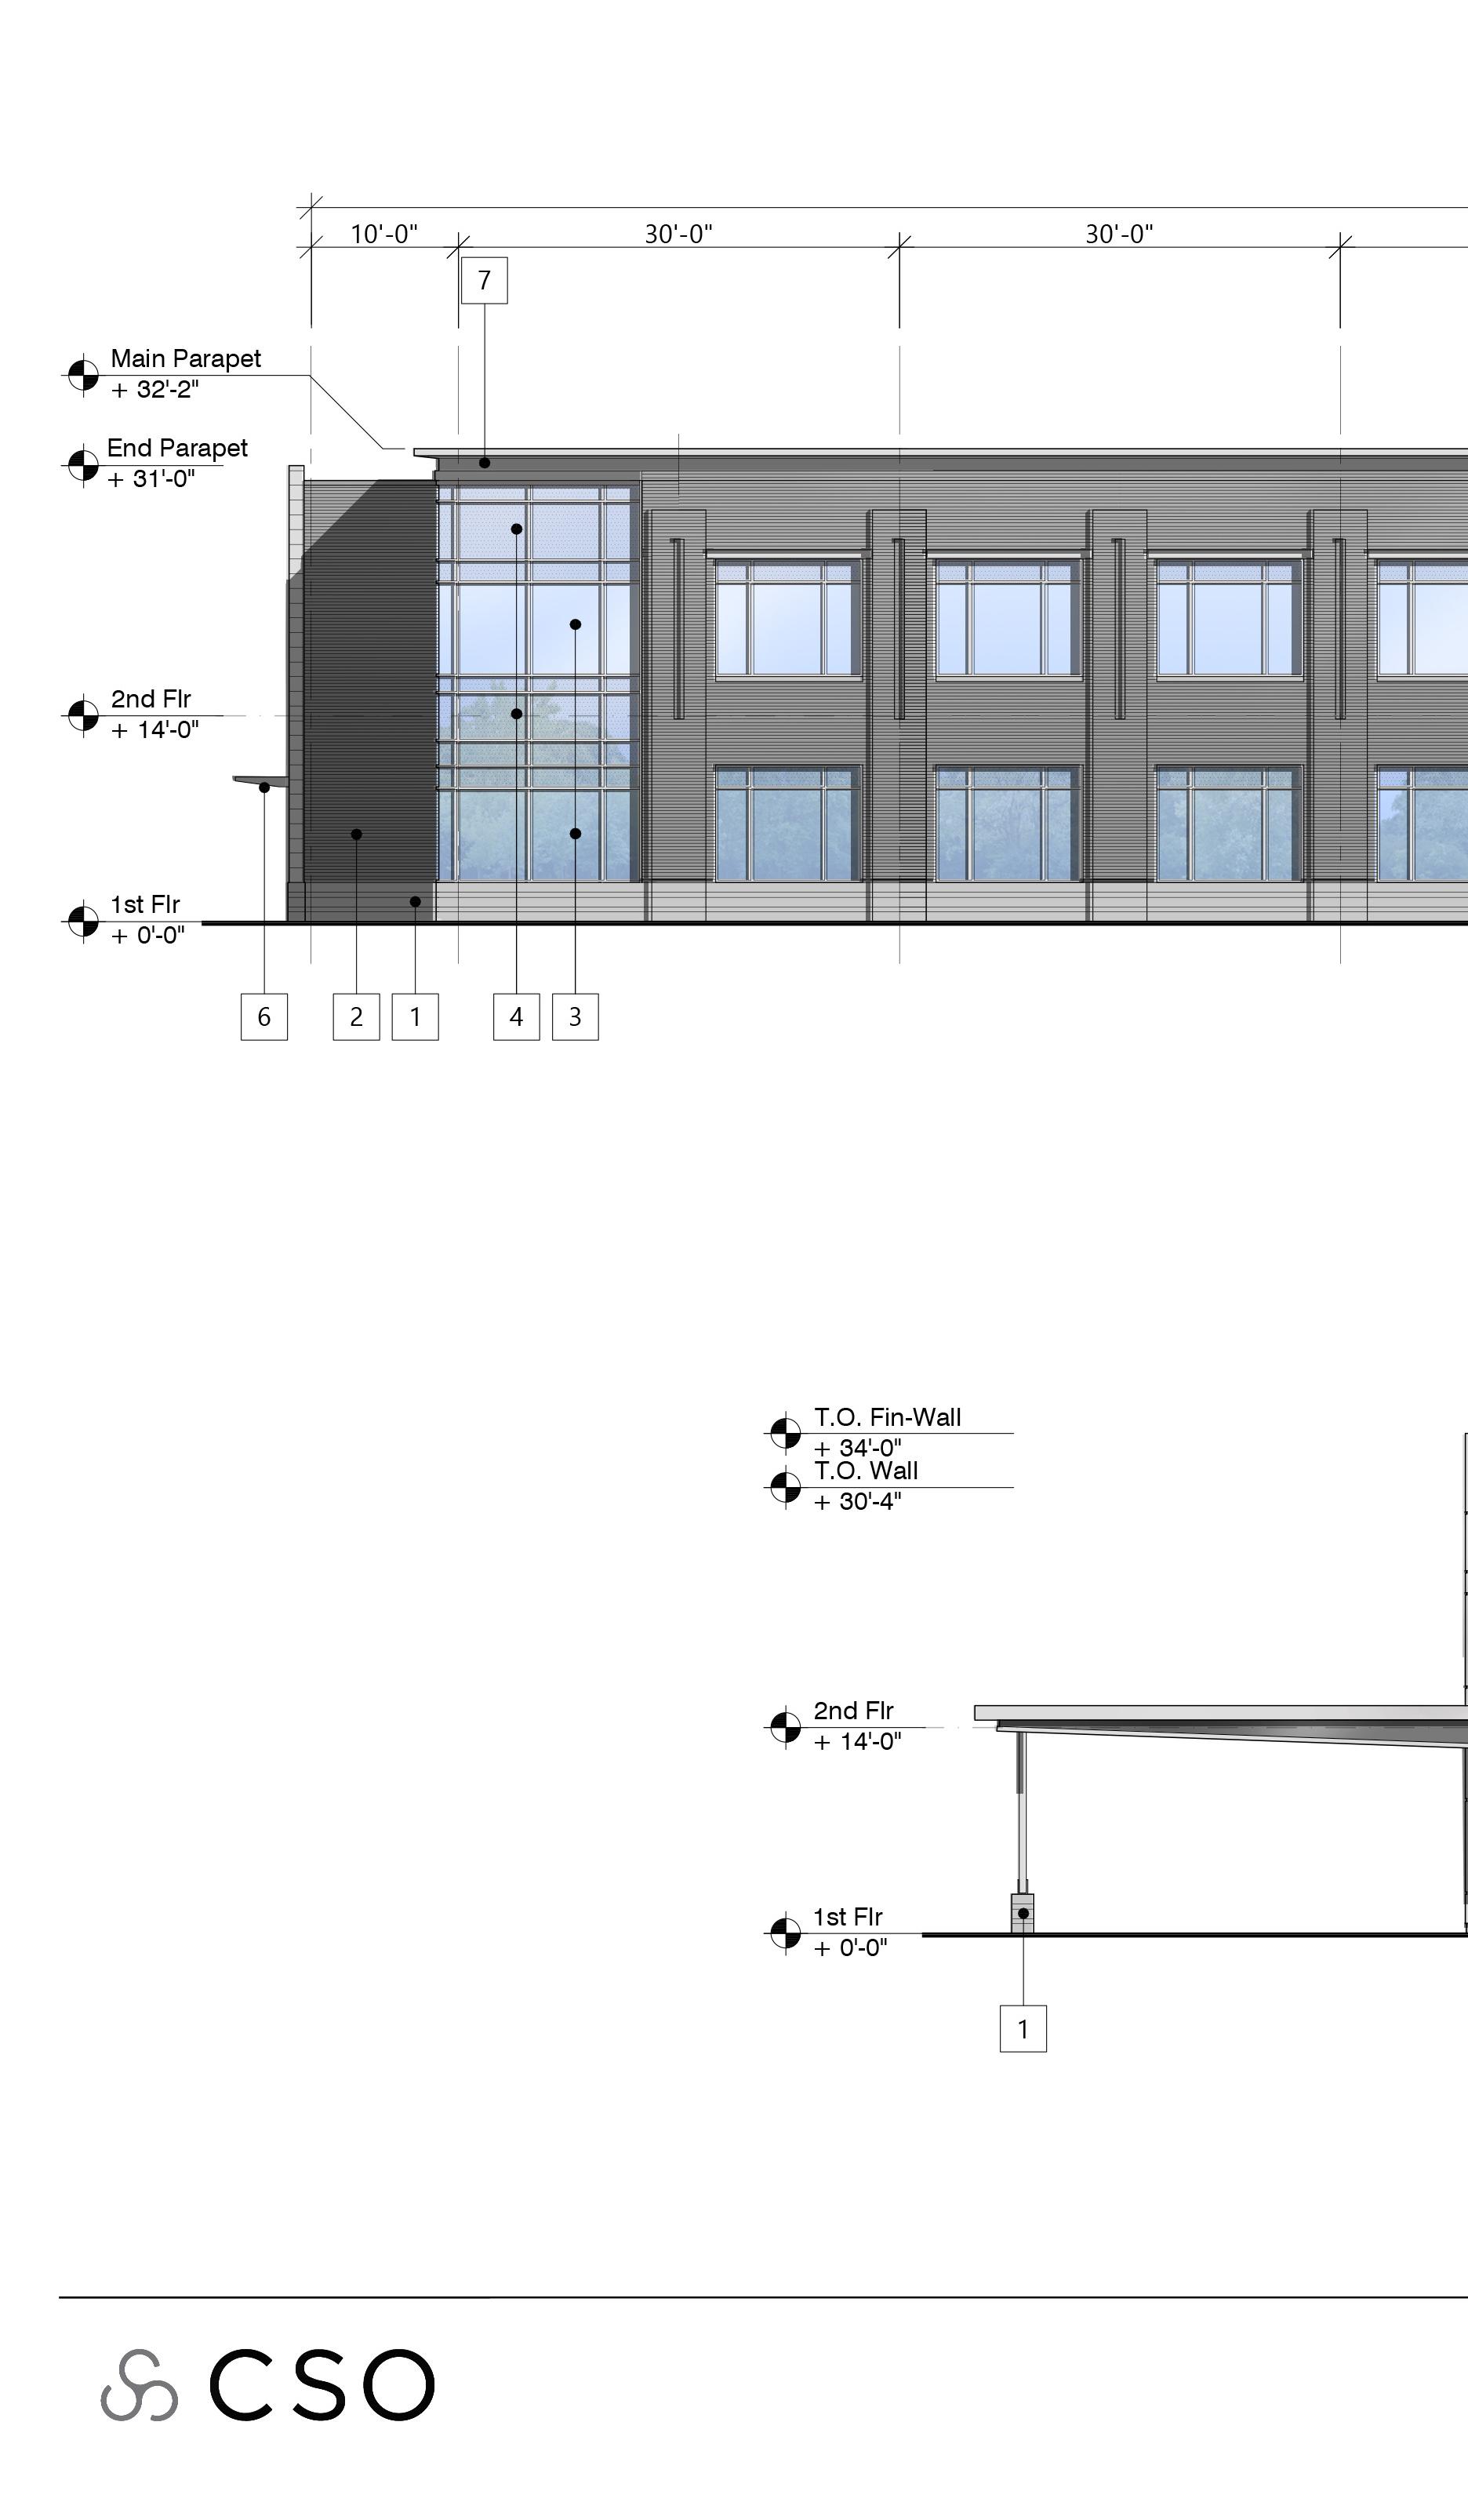
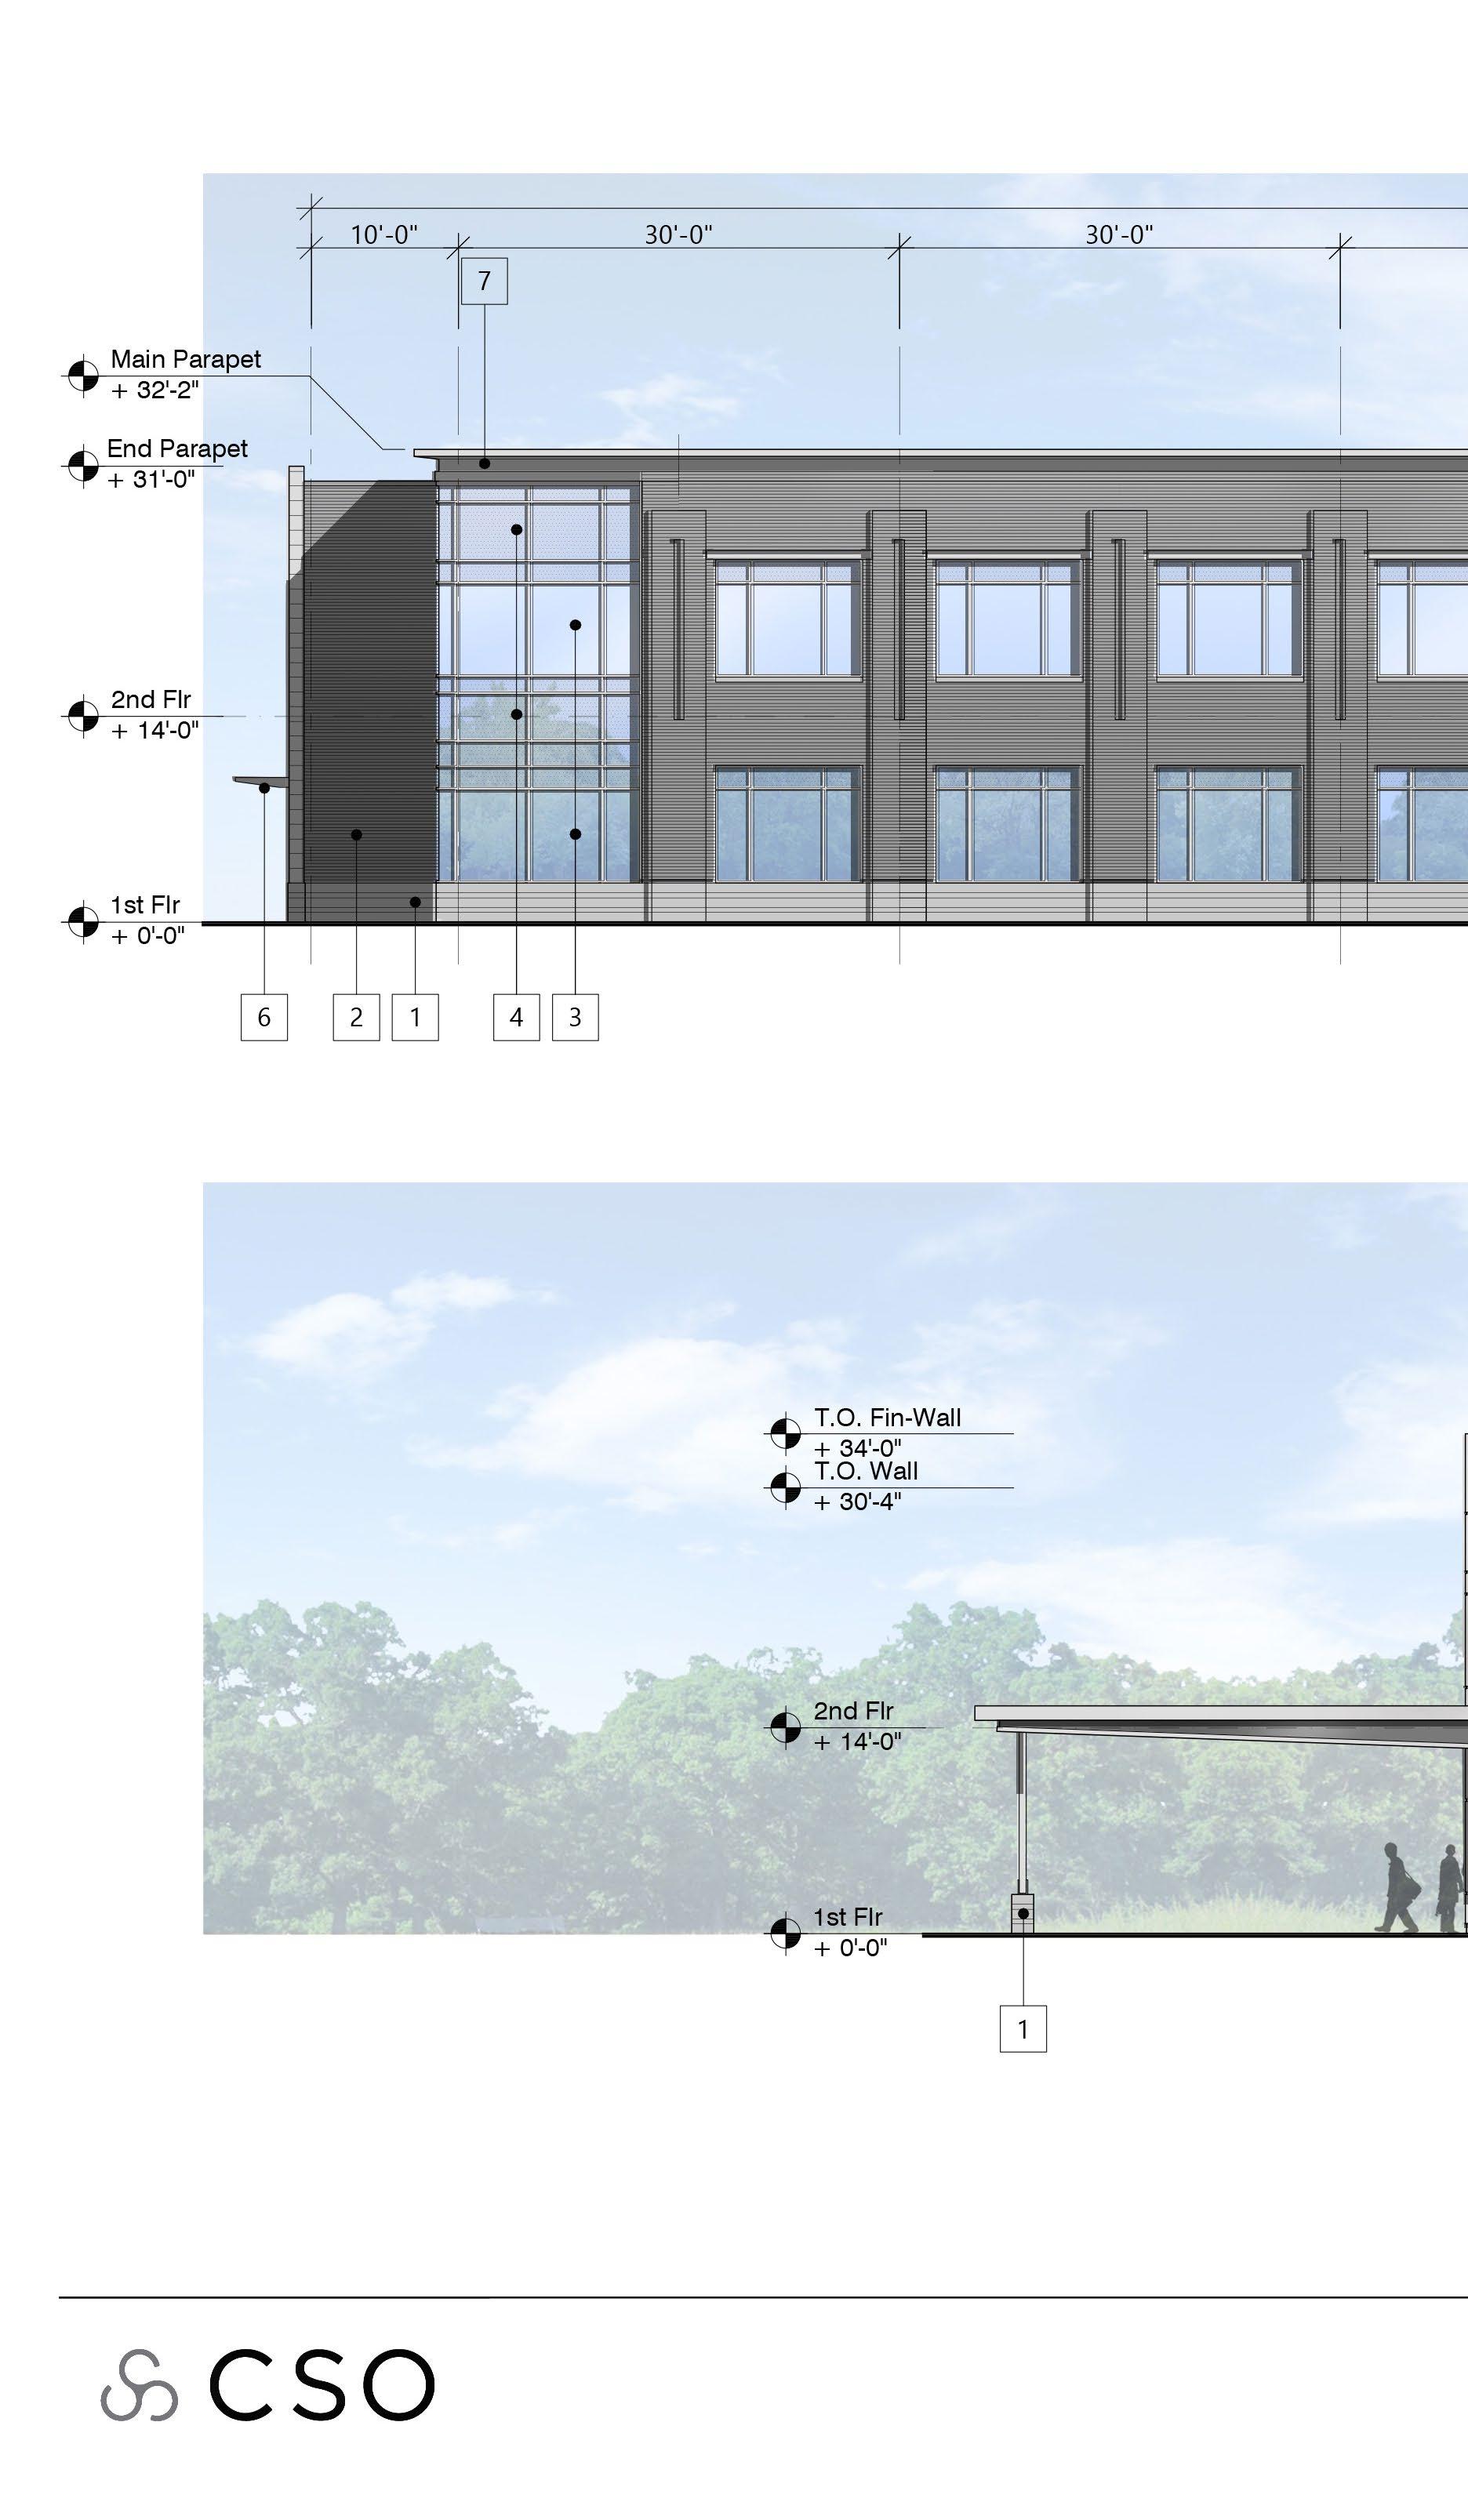
Glased elements will require just a small touch of finesse to acheive greater realism.
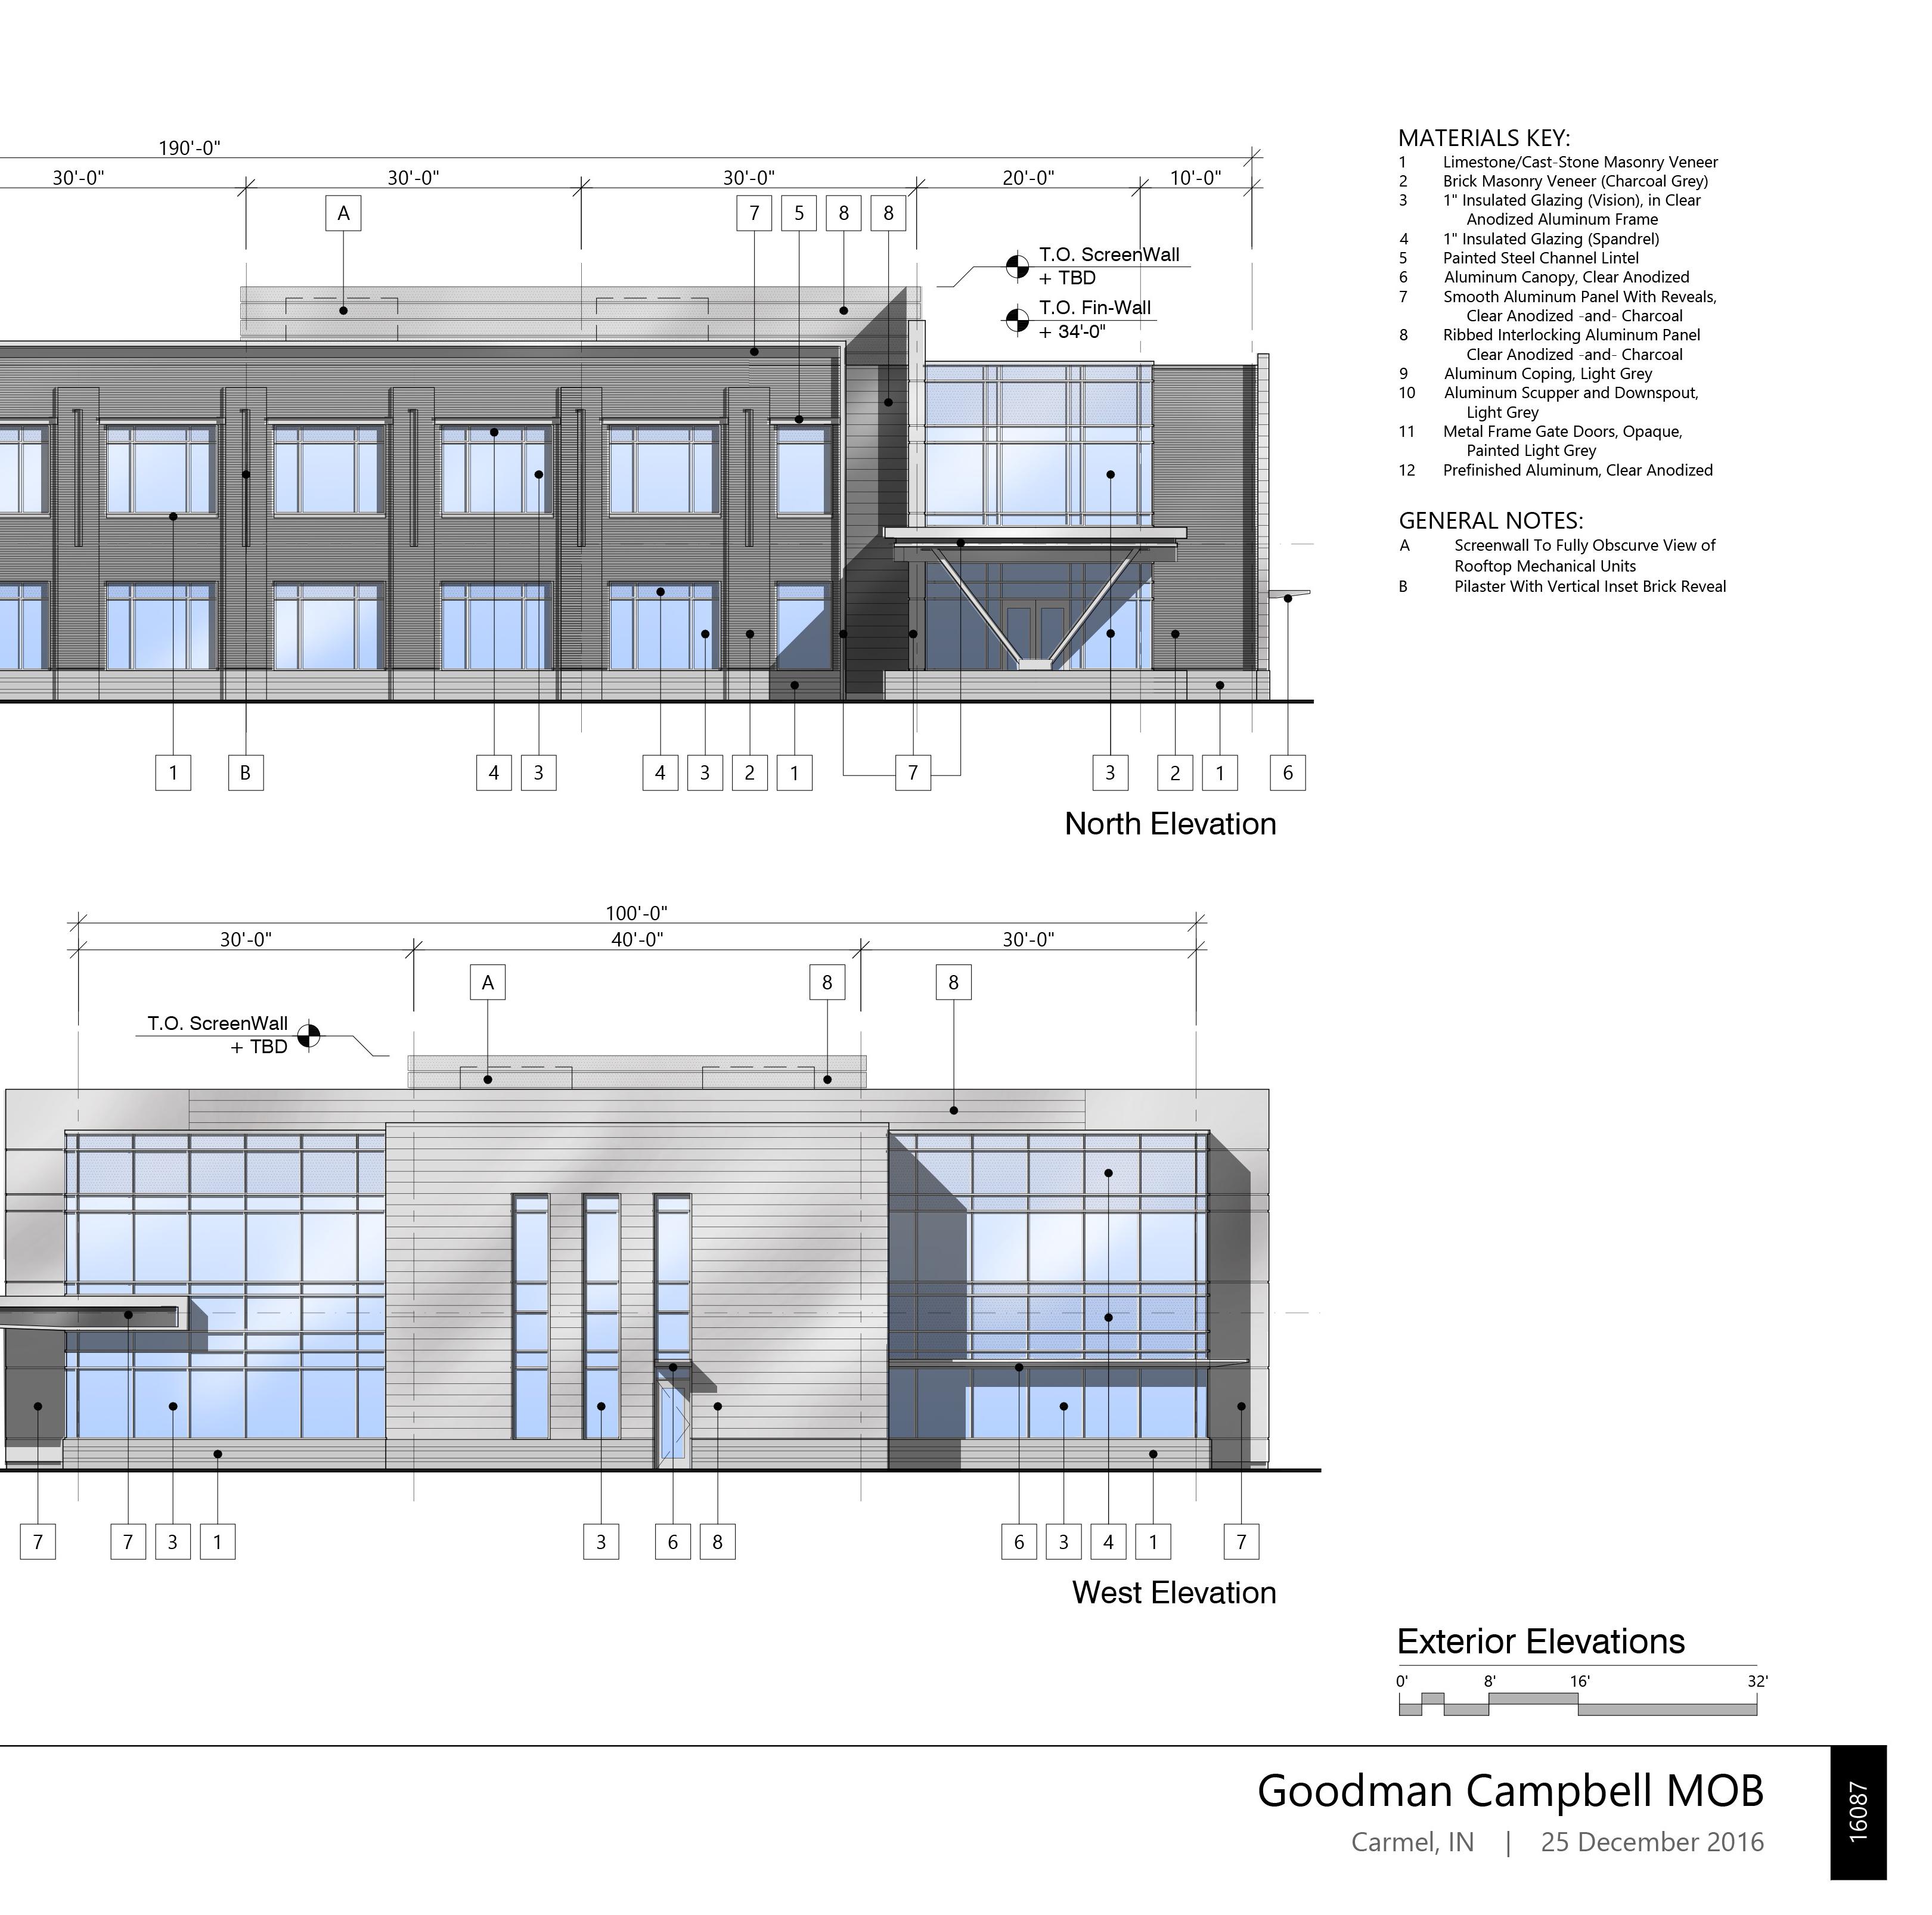

1. Fill in all glazing areas uniformly with a pale blue color.
2. Next, on each elevation, you will want to establish a gradient across the building from top to bottom, with a darker blue at the base, and a light blue at the top.
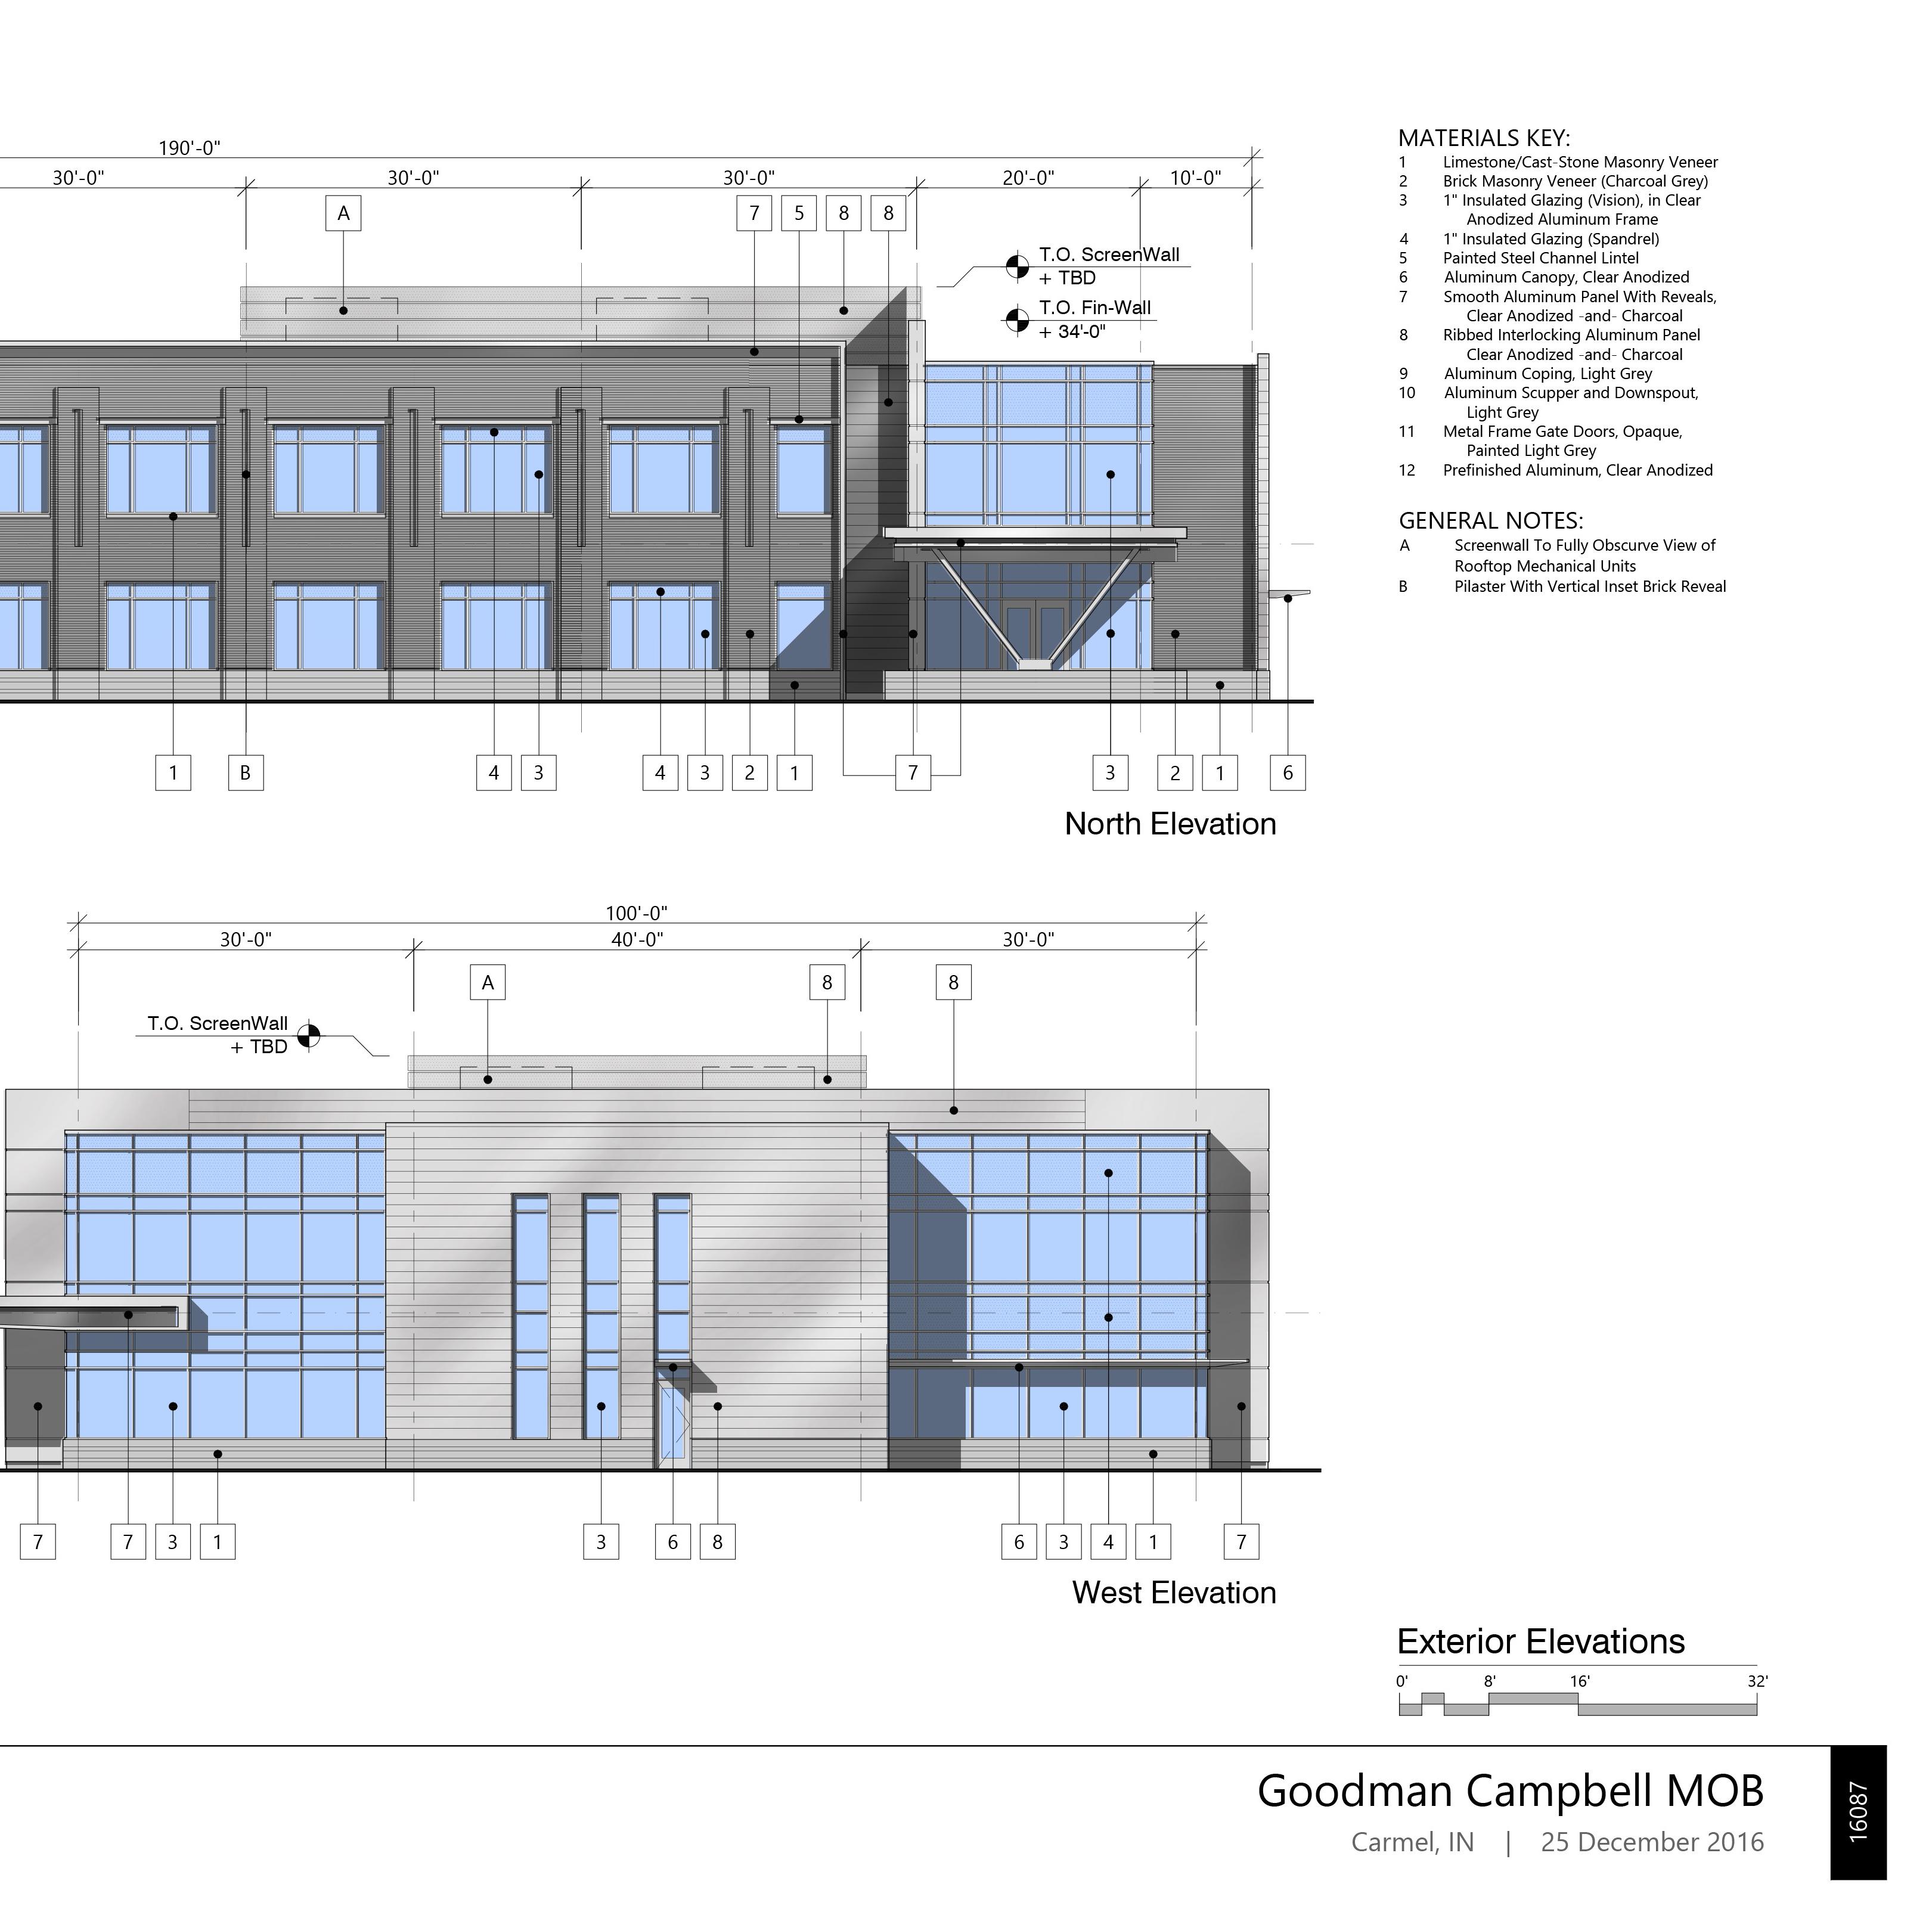

pt. 3 of 3
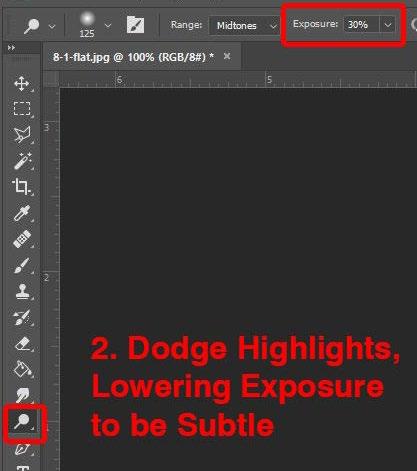
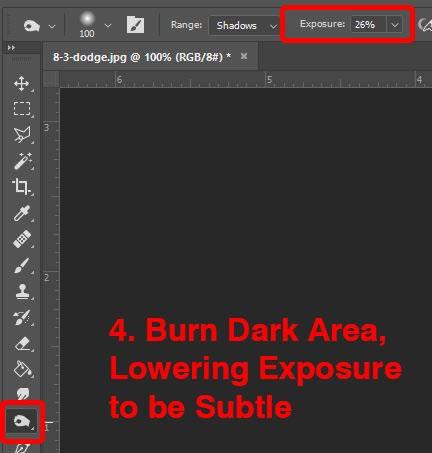
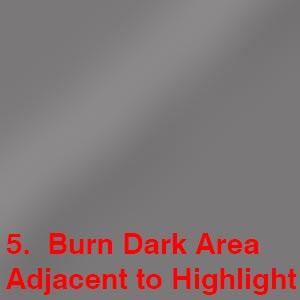
3. Finally, you will want to simulate variances in reflections across the glazing.
4. Use the Burn and Dodge tool. Adjust the exposure higher for more radical reflections.

pt. 1 of 2

pt. 2 of 2
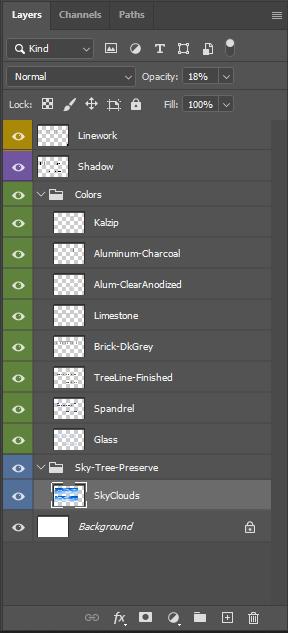
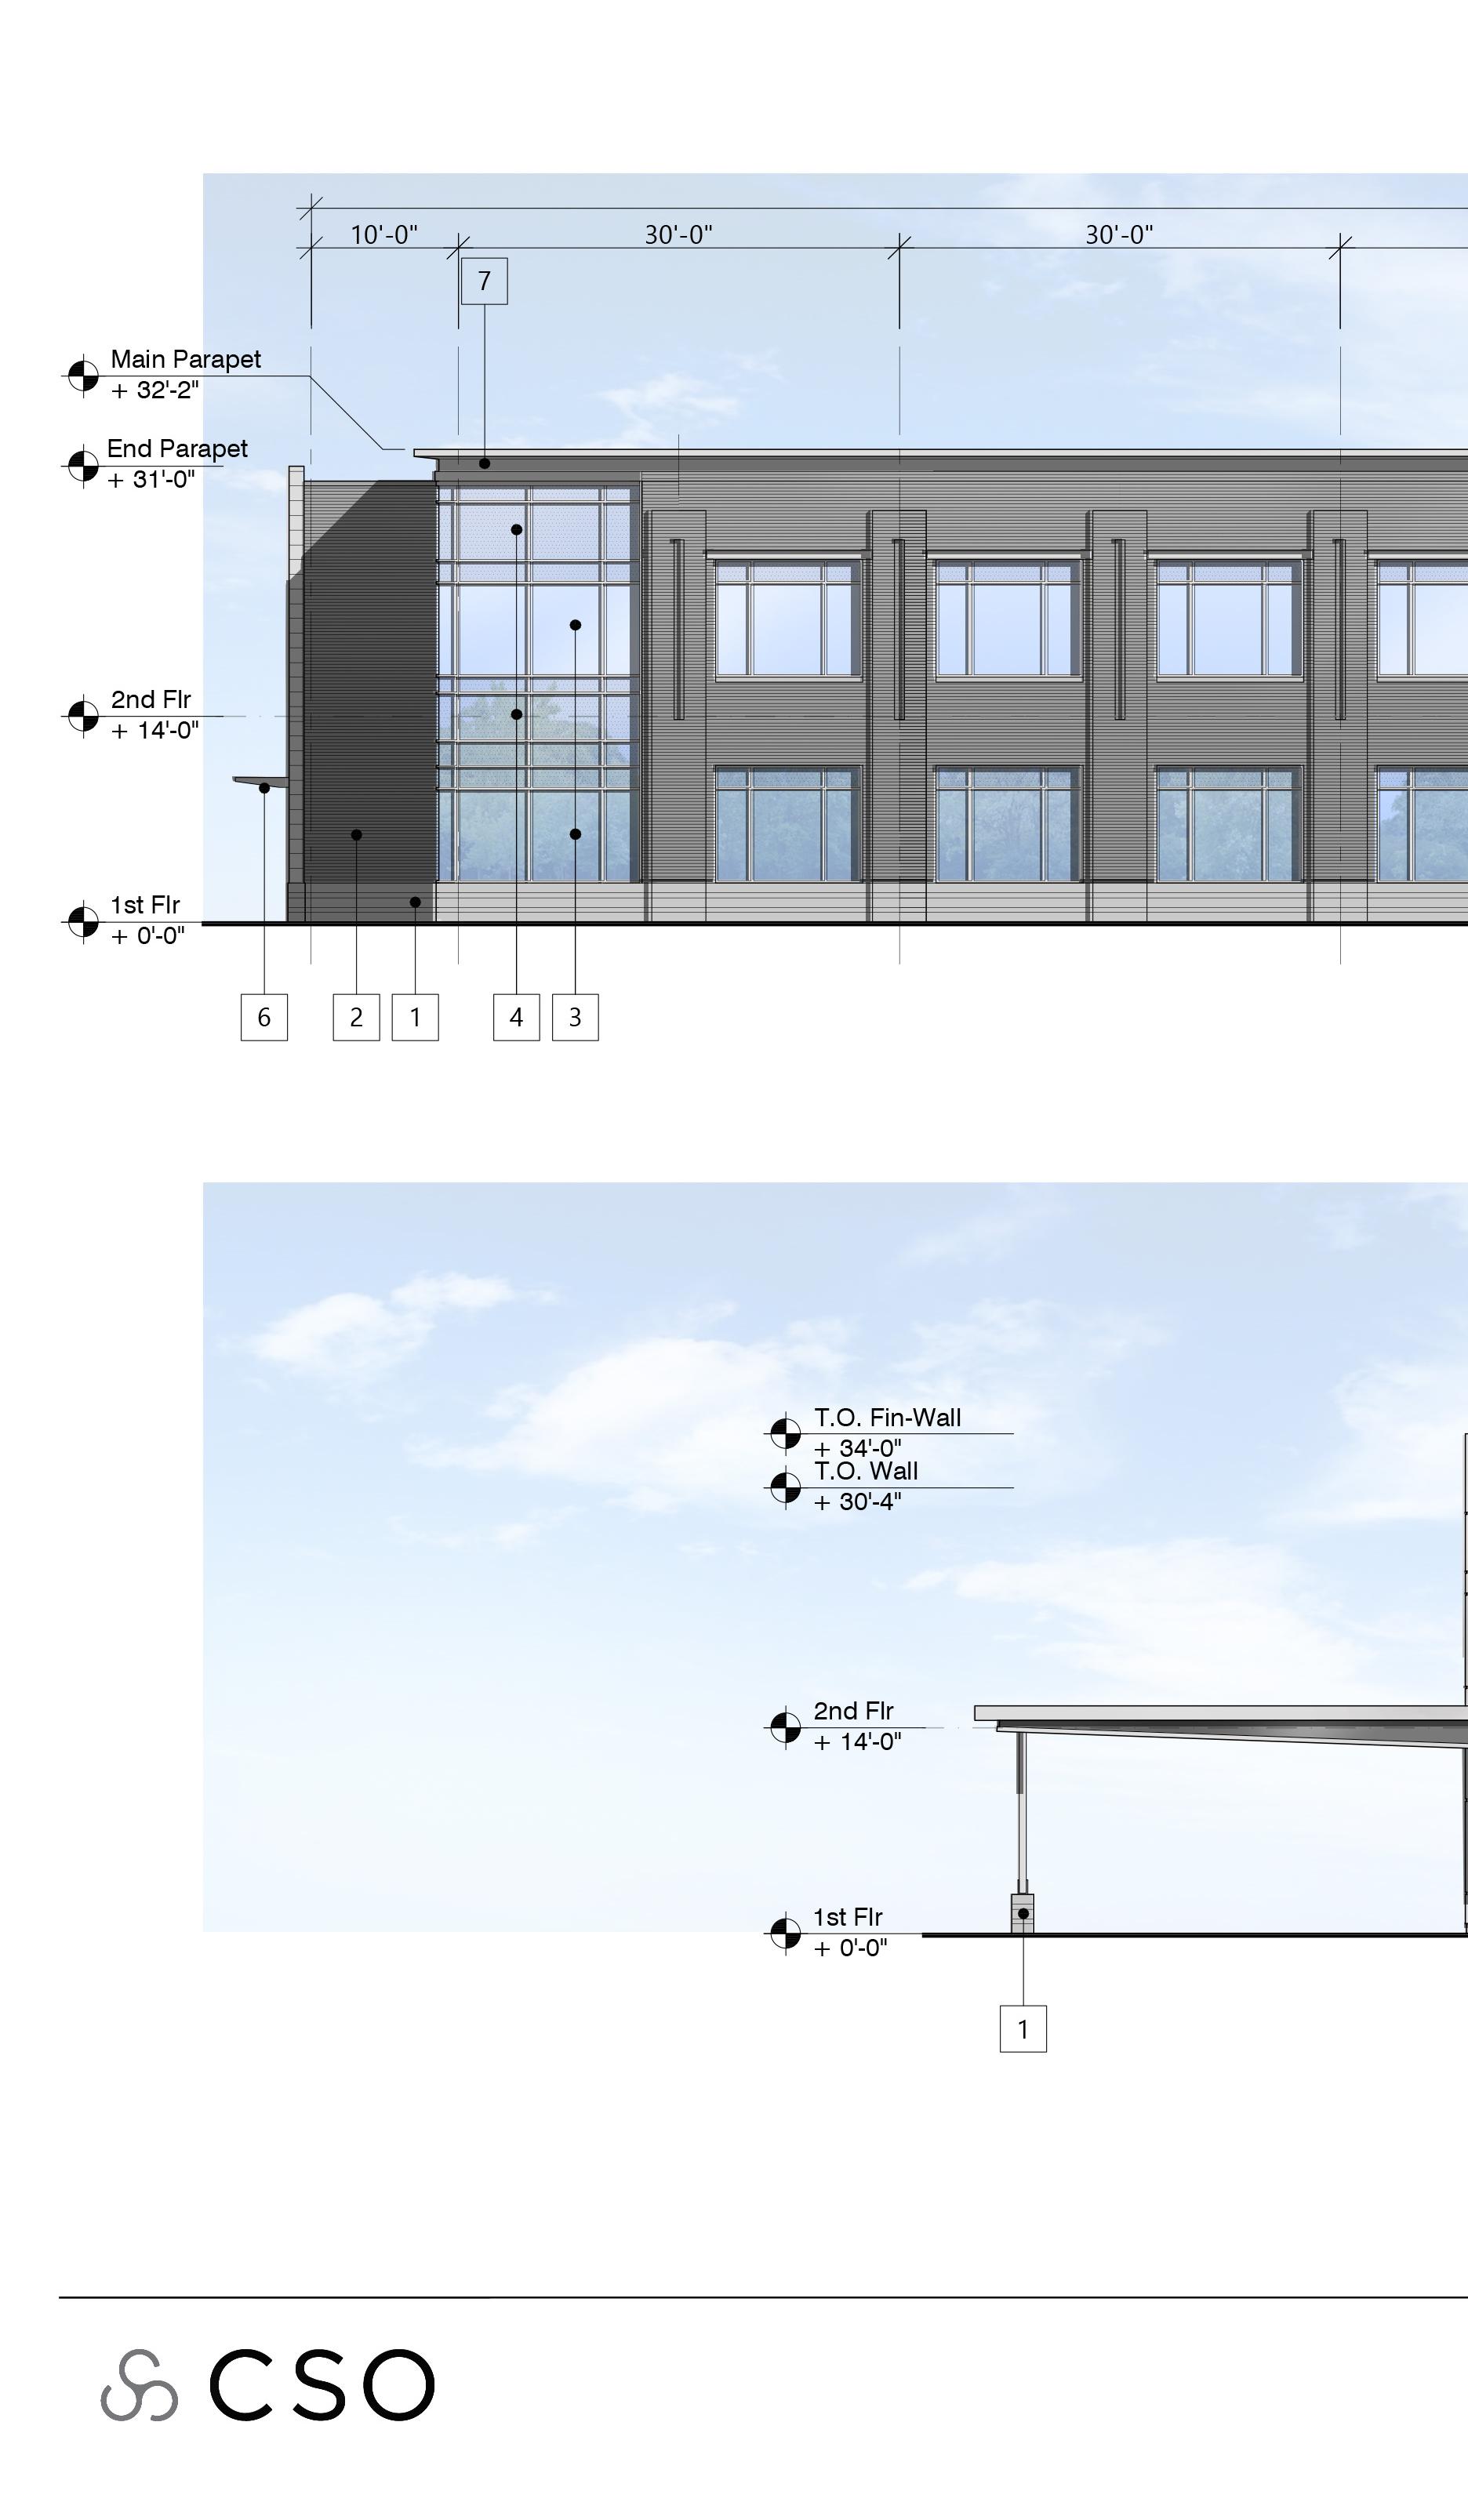
1. Add a Sky graphic to its own layer, named “Sky”
2. Dial back the Layer Opacity as desired

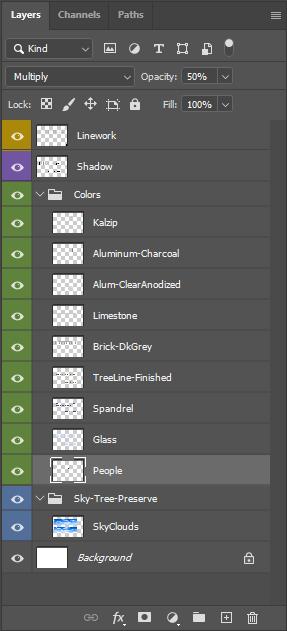
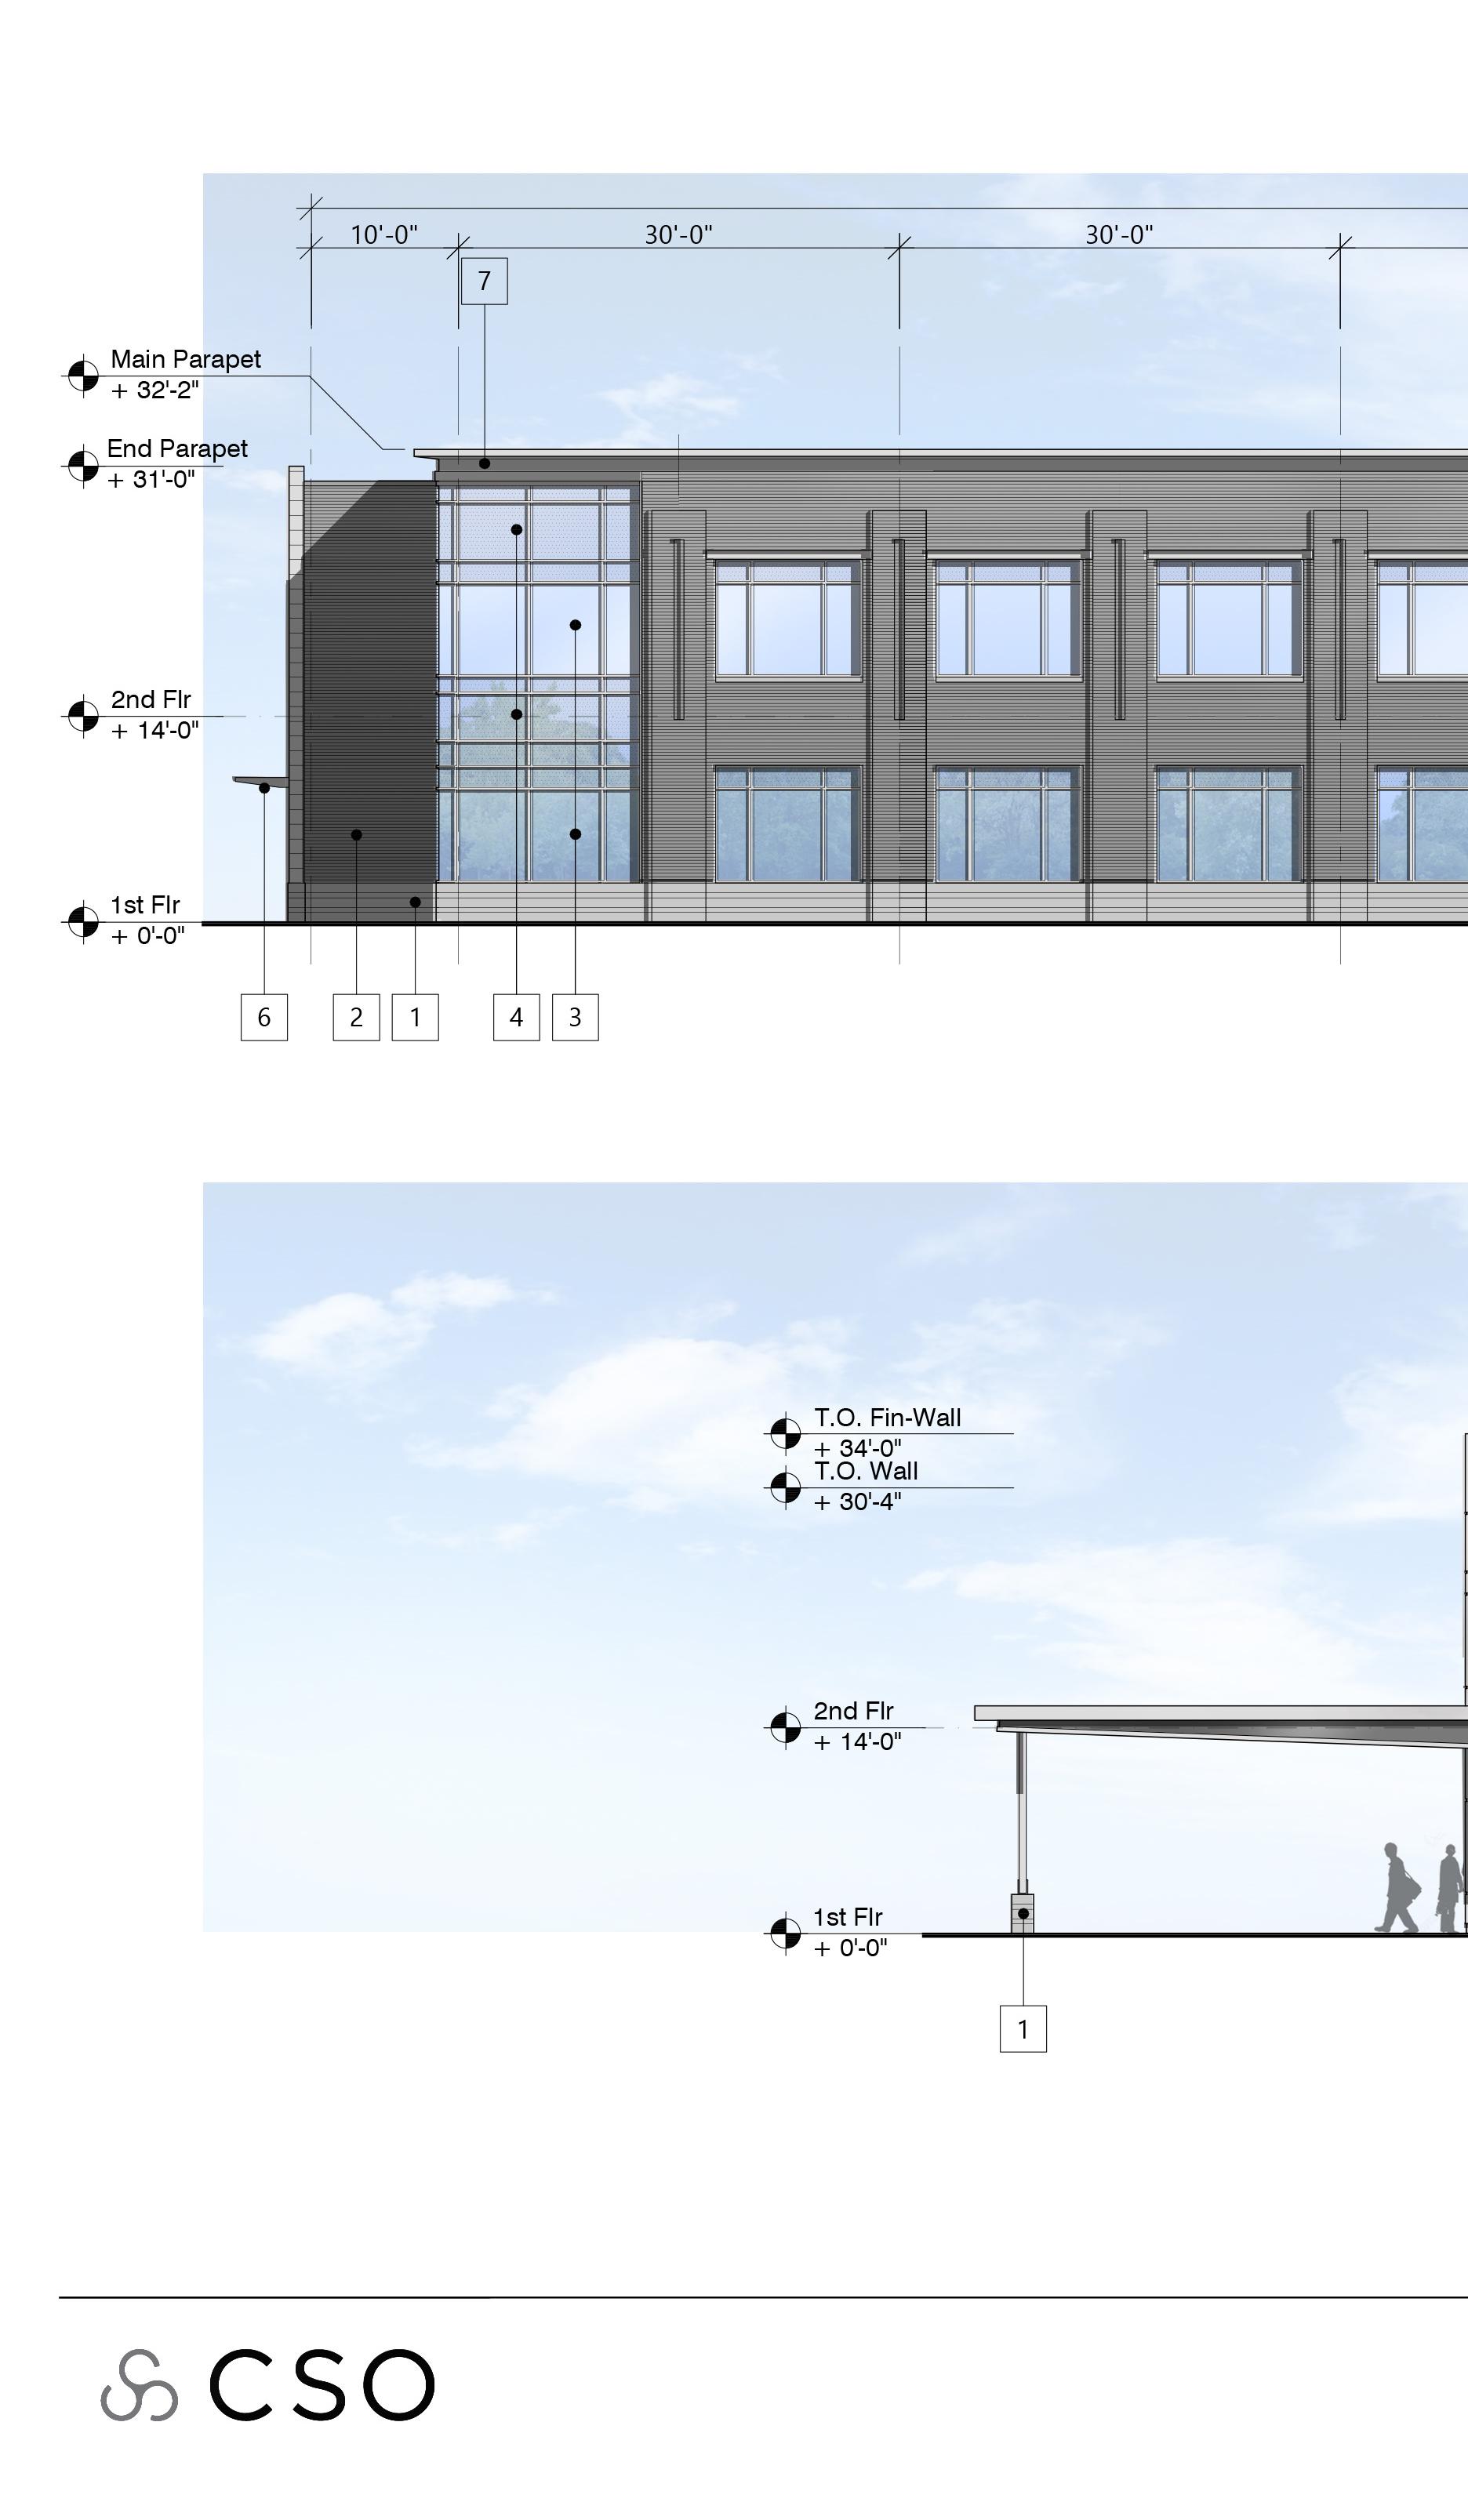
1. Begin inserting a series of different silhouetted people.
2. Reduce their opactiy to 60 - 80
3. Let the architecture shine through, don’t obscure the building with people.
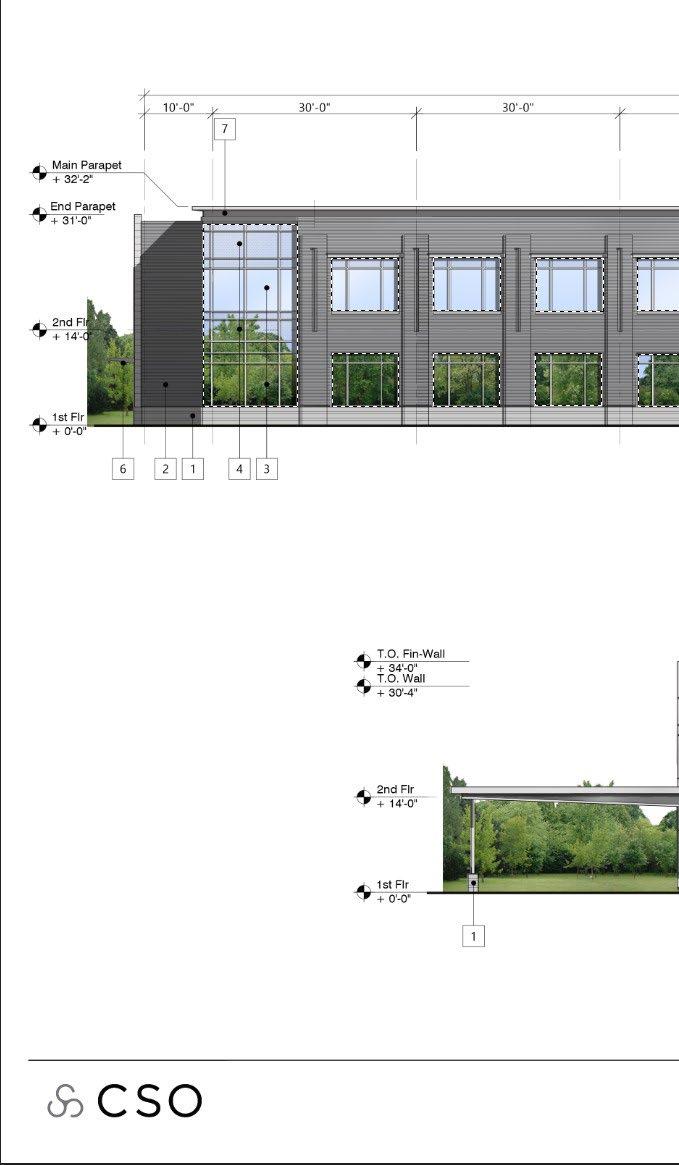
1. Add a Treeline graphic to its own layer, named “Treeline”
2. Similarly to the sky image, position behind the elevation.
3. Dial back the Layer Opacity as desired.


Disable Preserve Photoshop Editing Capabilities Option

1 2 3
Select: File > Save As... and save as a Photoshop (PDF). The following prompt will open up. On this first page, uncheck ‘Preserve Photoshop Editing Capabilities. This will reduce your file size drastically
Select the ‘Compression’ Tab and fill out the prompt as visualized below. We want to maintain a high resolution to ensure quality PDF images for our cohorts and clients.
Select: File > Export > Export As... and begin to fill out the Export JPG prompt. Select the JPG export file type option. Adjust the slider to a image quality value of 5-7.


1 2 3
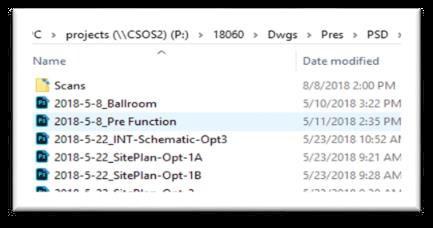
Select: File > Save As... and begin to fill out the prompt for a Photoshop (PSD) file. Each job number will have a designated PSD folder inside Dwgs\Pres\. Save your file here
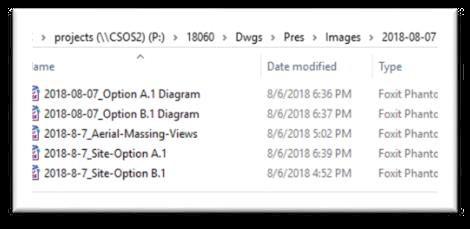
Select: File > Save As... and begin to fill out the prompt for a Photoshop (PDF) file. You will need to create your designated PDF folder inside Dwgs\Pres\Images. Save your file here
Select: File > Export > Export As... and begin to fill out the prompt for a Photoshop (JPG) file. You will need to create your designated Image folder inside Dwgs\Pres\Images. Save your file here

“Today’s date_ Siteplan”
CSO Standards/Quality Control
Version 2019.1.17
Quality Control: Check each item below after completion of every file.
Image Size:
1
-11"x17" (or smaller physical size) at 300 dpi, 22"x34" (or larger physical size) at 150 dpi.
-Avoid uneven sizes, 10.988” x 16.994”, etc.
2


Layer Naming:
-Every single layer used in the file shall have a short, logical name.
-Avoid “Layer 1”, “Layer 76”, “bbbbbbb”, etc.
3
Special Layers:
-CAD Linework shall always be on a layer named “Linework”, at the top of the layer stack.
--Shadows shall be on (1) Layer, named “Shadows”, 50% Opacity, Black.
-Adjustment Layers, if used, shall be below the “Linework” layer to avoid graying out the title block.
PSD File Naming and Saving : 4
Naming:
-Format: “Year-Month-Day_Subject.psd”
-Examples: 2018-2-21_SitePlan.psd 2018-6-12_Elevations.psd
Saving:
-Do NOT need “Paper” or “Color” in name
-Location: Dwgs/Pres/PSD Dwgs/Pres/PSD/Scans for scans of manually produced work.
-Do NOT make subfolders in the PSD folder. Keep everything out in the open.
-Do NOT save .PSD files anywhere else in the job service. ALL PSD files in an entire job are stored here.
-Do NOT save anything BUT .PSD Files here. No .jpgs, no .pdfs, etc.
PDF Naming and Saving: 5
Naming:
-Format: PDF’s saved from .PSD’s should have exact same name as the .PSD.
-Examples: 2018-2-21_SitePlan.pdf
Saving:
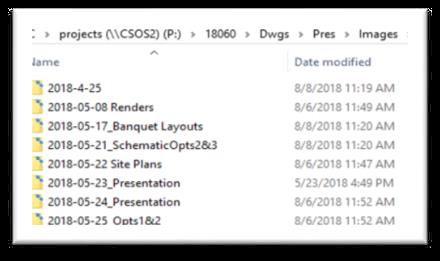
-Location: Dwgs/Pres/Images Dwgs/Pres/Images/Dated-Subfolder
-All Subfolder Names should following the naming format.
-All Items in Subfolder should follow the naming format.
-In theory, every file could be removed from the subfolders and placed directly back in Dwgs/Pres/Images, in the open, and still be sorted correctly.
END OF CHECKLIST
Photoshop Color Elevation Workflow
PDF Prep
PSD Setup - Export PDF / Starting Template / Import PDF / Layers Standards
Graphics Layers
Graphics Layers - Building Shadows
Graphics Layers - Flat Color Areas
Graphics Layers - Reflective Metals
Graphics Layers - Glazing
Graphics Layers - Tree Reflections
Graphics Layers - Sky
Graphics Layers - People
Graphics Layers - Tree Backdrop
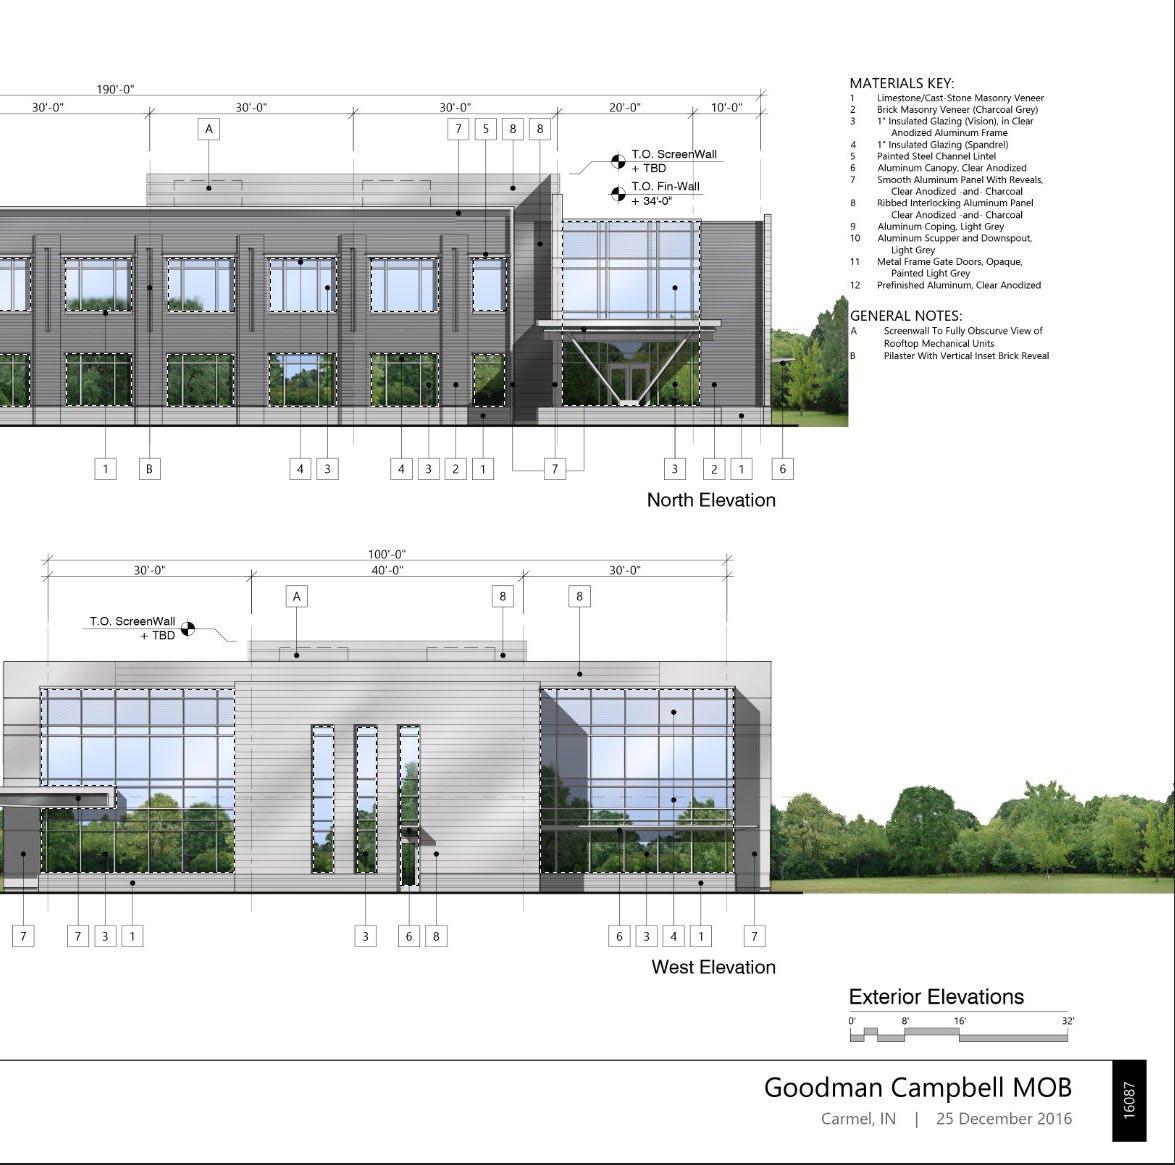
Graphics Layers - Image Overview
File Export
File Export - PDF / JPG
Save Locations - PSD/PDF/JPG
CSO Standards/Quality Control
Version 2019.1.17
Quality Control: Check each item below after completion of every file.
Image Size:
1
-11"x17" (or smaller physical size) at 300 dpi, 22"x34" (or larger physical size) at 150 dpi.
-Avoid uneven sizes, 10.988” x 16.994”, etc.
2
Layer Naming:
-Every single layer used in the file shall have a short, logical name.
-Avoid “Layer 1”, “Layer 76”, “bbbbbbb”, etc.
3
Special Layers:
-CAD Linework shall always be on a layer named “Linework”, at the top of the layer stack.
--Shadows shall be on (1) Layer, named “Shadows”, 50% Opacity, Black.
-Adjustment Layers, if used, shall be below the “Linework” layer to avoid graying out the title block.
PSD File Naming and Saving : 4
Naming:
-Format: “Year-Month-Day_Subject.psd”
-Examples: 2018-2-21_SitePlan.psd 2018-6-12_Elevations.psd
Saving:
-Do NOT need “Paper” or “Color” in name
-Location: Dwgs/Pres/PSD Dwgs/Pres/PSD/Scans for scans of manually produced work.
-Do NOT make subfolders in the PSD folder. Keep everything out in the open.
-Do NOT save .PSD files anywhere else in the job service. ALL PSD files in an entire job are stored here.
-Do NOT save anything BUT .PSD Files here. No .jpgs, no .pdfs, etc.
PDF Naming and Saving: 5
Naming:
-Format: PDF’s saved from .PSD’s should have exact same name as the .PSD.
-Examples: 2018-2-21_SitePlan.pdf
Saving:
-Location: Dwgs/Pres/Images Dwgs/Pres/Images/Dated-Subfolder
-All Subfolder Names should following the naming format.
-All Items in Subfolder should follow the naming format.
-In theory, every file could be removed from the subfolders and placed directly back in Dwgs/Pres/Images, in the open, and still be sorted correctly.
END OF CHECKLIST
Photoshop Color Elevation Workflow
PDF Prep
PSD Setup - Export PDF / Starting Template / Import PDF / Layers Standards
Graphics Layers
Graphics Layers - Building Shadows
Graphics Layers - Flat Color Areas
Graphics Layers - Reflective Metals
Graphics Layers - Glazing
Graphics Layers - Tree Reflections
Graphics Layers - Sky
Graphics Layers - People
Graphics Layers - Tree Backdrop
Graphics Layers - Image Overview
File Export
File Export - PDF / JPG
Save Locations - PSD/PDF/JPG