

Complete Ladder Barrel

Original copyright © 2004 by Merrithew International Inc., Toronto, Canada.
Reprinted 2024, 2023, 2022, 2021, 2020, 2019, 2017, 2016, 2015, 2014, 2012, 2010, 2008, 2006. All rights reserved. No part of this book, including photography, may be reproduced, stored in a retrieval system or transmitted in any form or by any means, without the prior written permission of the publisher.
STOTT PILATES; Intelligent Exercise. Profound Results.; CORE Athletic Conditioning & Performance Training; Fitness Circle; Flex-Band; Leaders in Mindful Movement; Merrithew; Merrithew Publishing; Stability Chair; The Professional’s Choice; Total Barre; and ZEN•GA are trademarks or registered trademarks of Merrithew International Inc. Halo® Training is a registered trademark of HALO Rehab and Fitness, LLC.
Pelvic Placement
PELVIC PLACEMENT PRINCIPLE EXPLAINED
STOTT PILATES emphasizes stabilization of the pelvis and lumbar spine in a variety of positions. Two positions most often used to achieve stability are neutral and imprint.
In neutral placement the normal curve, slightly convex anteriorly, of the lumbar spine is present. In most cases when supine, the triangle formed by the ASIS and the symphysis pubis should lie parallel to the mat. This is the most stable and optimal shock-absorbing position and a good place from which to promote efficient movement patterns. If the pubic bone is lower than the ASIS, an anterior pelvic tilt results; if the pubic bone is higher, a posterior pelvic tilt results.
Neutral alignment should not be achieved by forcibly arching the back, but rather by allowing the weight of the sacrum to rest on the mat resulting in a natural lordosis of the lumbar spine. While breathing and engaging abdominals in this position no strain should be felt through the spinal extensors in the lumbar area. If muscular tension occurs, shift the pelvis slightly toward an imprinted position. It is more important for the abdominal wall to be engaged and the lumbar area to be stable and unstrained than for the ASIS and pubis symphysis to lie in the same horizontal plane. For example, someone with large gluteal muscles might actually create an exaggerated lordosis in the lumbar spine by trying to have the ASIS and pubic bone lie in the same plane.
Imprinted placement refers to a slight posterior pelvic tilt with slight lumbar flexion. The normal curve of the lumbar spine lengthens toward flexion by engaging the oblique abdominals to approximate the pelvis toward the rib cage anteriorly.
When supine, the pubic bone will be slightly higher than the ASIS. The pelvis is not so tilted that the sacrum curls off or loses contact with the mat. It is not necessary to press the lower back all the way into the mat or to tuck under by overusing the rectus abdominis or gluteal muscles as this may decrease stability. The degree of contact between the lumbar spine and the mat will differ from person to person.
An imprinted position should be used to ensure stability of the pelvis and lumbar spine if neutral alignment cannot be stabilized. When the load is greater than the strength of the abdominals, placing them in a shortened position will provide the mechanical advantage to maintain engagement and stabilize the lumbo-pelvic region. This will often be useful when certain postural tendencies are present (for example, lordosis). When the lower limbs are secure on the mat or other apparatus in a closed kinetic chain, the pelvis and spine are ideally neutral. Performing an open kinetic chain exercise with the pelvis and lumbar spine in an imprinted position will increase stabilization. Once enough strength has been developed through the abdominals to stabilize, a neutral placement can be maintained in an open kinetic chain.
When describing the position and movement of the pelvis, we use neutral to refer to the spine or pelvis being neutral in the sagittal plane, i.e. no flexion or extension through the lumbar spine. Sometimes we may be laterally tilting the pelvis or laterally flexing or rotating the spine, but we still refer to the spine and pelvis as neutral as long as they are neutral in the sagittal plane.
When looking at pelvic placement, we need to consider the relationship of the pelvis to the lumbar spine and hip joints, as different starting positions and movements will affect its alignment.


neutral imprint
Pelvic Placement
Rib Cage Placement
RIB CAGE PLACEMENT PRINCIPLE EXPLAINED
As the abdominal muscles attach to the lower ribs, they must be recruited to maintain the rib cage and the thoracic spine in good alignment. Often the rib cage will tend to lift up from a supine position or deviate forward in a sitting position, extending the thoracic spine. Pay particular attention during inhalation or while performing arm gestures overhead.
Utilizing the patterns described in the breathing principle and maintaining abdominal engagement at all times, can help monitor thoracic alignment. When supine and neutral, maintain the sense of the weight of the ribs resting gently on the mat (i.e. maintain the normal, slightly posterior curve, of the thoracic spine). Neither allow the rib cage to lift away from the mat, nor push the rib cage into the mat. Emphasize breathing into the posterior, lateral and anterior aspects of the rib cage and the abdomen during each inhalation. Allow the two sides of the rib cage to close in toward each other during each exhalation. Avoid overly depressing the rib cage during exhalation, which may cause excessive flexion of the thoracic spine, hyperextension of the cervical spine and cause deactivation of the transversus abdominis.


As discussed earlier, the rib cage naturally depresses (closes in and down) while the spine flexes slightly during exhalation. For this reason, thoracic flexion is most often performed on an exhale.
Also discussed earlier, the rib cage naturally expands (opens out and up) while the spine extends slightly during inhalation. When performing spinal extension, it is necessary to allow the ribs to open anteriorly to facilitate a greater range of motion. Attempting to maintain the ribs in a closed position will hinder the amount of extension available. Performing extension on an inhale may allow a greater range, however, be sure not to sacrifice abdominal engagement and spinal stabilization. It is important not to completely relax the abdominal muscles; otherwise a loss of spinal stability will result. In order to maintain support, extensions may be performed on an exhale.


ribs popping
arms reach overhead
starting position
arms reach to ceiling
Rib Cage Placement
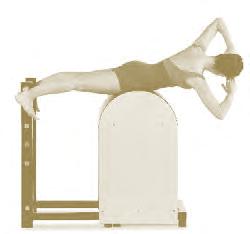
Rotation Prone
STARTING POSITION
Prone on barrel, pelvis at apex, head away from ladder.
Legs straight, parallel and abducted with feet hooked under handles.
Backs of hands on forehead, scapulae stabilized.
Body in one long line from feet to head.
EXERCISE
To prepare, inhale...
EXHALE keep pelvis stable and rotate upper torso to one side.
INHALE rotate back to center.
EXHALE keep pelvis stable and rotate upper torso to other side.
INHALE rotate back to center.
Complete 5 repetitions.
ESSENCE
TARGET MUSCLES: transversus abdominis to compress abdomen and stabilize lumbo-pelvic region; deep pelvic floor to aid in firing transversus; erector spinae to maintain torso lifted; obliques to prevent overextension of lumbar; gluteus maximus and hamstrings isometrically to stabilize pelvis on femurs; internal oblique on one side and external oblique on opposite side to rotate torso; scapular stabilizers
STABILITY: spine during rotation; pelvis on femurs; scapulae
MOBILITY: spinal rotation
SEQUENCING: initiating spinal rotation from lower spine and moving up like a spiral, not from shoulders
ENDURANCE: erector spinae to maintain height of torso throughout
FOCUS
w engage obliques, hamstrings and gluteus maximus throughout exercise
w maintain one long line; avoid lumbar or cervical extension
w maintain stabilization of scapulae to avoid tension in neck and shoulders
w rotate without laterally flexing, forward flexing or extending


2. rotate to one side
3. return to center
rotate to other side
return to center
1. starting position
Rotation Prone
STARTING POSITION
Prone on barrel, pelvis at apex, head toward ladder. Pelvis and spine neutral. Legs straight, parallel and adducted, legs as high as pelvic stability can be maintained. Ankles plantar flexed, toes gently pointed. Hands on appropriate ladder rung to keep upper body slightly lower than legs. Elbows may be flexed. Scapulae stabilized.
EXERCISE
INHALE lower legs slightly, flexing at hips.
EXHALE extend hips to raise legs only as far as pelvic stability can be maintained.
Complete 5 – 10 repetitions.
ESSENCE
TARGET MUSCLES: transversus abdominis to compress abdomen and stabilize lumbo-pelvic region; deep pelvic floor to aid in firing transversus; obliques isometrically to stabilize torso; gluteus maximus and hamstrings eccentrically as legs lower, concentrically to lift legs; latissimus dorsi and triceps to stabilize shoulders and arms; scapular stabilizers
STABILITY: torso; scapulae, shoulders and arms
MOBILITY: hip extension and flexion
ENDURANCE: stabilizers of torso, scapulae, shoulders and arms
FOCUS
w isolate movement at hips; avoid extending lumbar
w maintain scapular stabilization to avoid neck and shoulder tension
w maintain pelvic stabilization
MODIFICATIONS


1. LEGS SLIGHTLY ABDUCTED. Do not completely adduct if this causes pelvic stability to be lost.
2. LEGS LATERALLY ROTATED. To emphasize lateral rotators and lateral hamstrings more.


2. lower legs
3. lift legs
1. starting position
Lower & Lift
Straight Back
STARTING POSITION
Seated upright, close to apex, pelvis and spine neutral. Legs adducted with heels on appropriate rung to bring knees to hip height, and toes hooked under rung above. Arms straight, shoulder-distance apart, holding pole overhead. Scapulae stabilized.
EXERCISE
INHALE stay.
EXHALE hinge pelvis away from front of femurs, maintaining neutral spine. Allow cranio-vertebral flexion. Hinge as far as possible without changing spine.
INHALE maintain position.
EXHALE return to vertical sitting position, weight directly on sit-bones.
Complete 5 repetitions.
NOTE: If neutral spine cannot be stabilized during hinge backward, imprint slightly to maintain stability and return to neutral as torso returns to vertical.
ESSENCE
TARGET MUSCLES: transversus abdominis to compress abdomen and stabilize lumbo-pelvic region; deep pelvic floor to aid in firing transversus; rectus abdominis and obliques isometrically to stabilize torso, particularly obliques to prevent extension; scapular stabilizers
STABILITY: torso; scapulae
ENDURANCE: abdominals to maintain neutral spine in hinged position
FOCUS
w isolate hinge at hips and avoid extending or flexing spine w maintain scapular stabilization throughout


1. starting position
hinge back
return
Straight Back
Leg Circles
STARTING POSITION
Seated on apex of barrel, facing away from ladder. Arms straight, extended behind body, hands holding handles of top rung.
Weight back of sit-bones, lumbar spine slightly flexed, thoracic spine lengthened. Legs straight, adducted, parallel and flexed at hip to be as close to body as possible. Scapulae stabilized.
EXERCISE
Forward...
To prepare, inhale...
EXHALE maintain pelvic stability and abduct legs, circling as they lower and adducting at bottom of circle.
INHALE maintain adduction and flex hips to hinge legs toward torso.
Complete 5 repetitions.


1. starting position
1. starting position
Leg Circles , Forward
Leg Circles , Reverse
Lower & Lift
NOTE: Trained professional must spot for all Flat Back exercises.
STARTING POSITION
Supine, with lumbar extended on apex of barrel. Upper torso neutral, parallel with floor; cervical spine may be slightly flexed to prevent strain. Arms overhead, elbows flexed, holding handles of top rung of ladder. Palms up or down depending on ability to stabilize. Legs straight, parallel, adducted and reaching toward ceiling. Scapulae stabilized.
EXERCISE
To prepare, inhale...
EXHALE lower legs away from torso as far as pelvic stability can be maintained.
INHALE hinge legs toward torso.
Complete 6 repetitions.
ESSENCE
TARGET MUSCLES: transversus abdominis to compress abdomen and stabilize lumbo-pelvic region; deep pelvic floor to aid in firing transversus; rectus abdominis and obliques to stabilize upper torso position and prevent overextension of lumbar spine; hip flexors eccentrically as legs hinge away from torso, concentrically as legs hinge toward torso; biceps, pectoralis major and anterior deltoids to stabilize shoulders and arms; scapular stabilizers
STABILITY: torso; scapulae, shoulders and arms
MOBILITY: hip flexion and extension
ENDURANCE: stabilizers of torso, scapulae, shoulders and arms
FOCUS
w allow hip flexors to lengthen as legs lower; avoid gripping and losing pelvic stability
w keep transversus and obliques engaged to stabilize spine
w control range of motion of legs to maintain pelvic stability
w maintain support of arms and shoulders and slight cranio -vertebral flexion to avoid overly tensing neck


MODIFICATIONS
1. SPINE EXTENDED. Begin with spine in fully extended position, hands holding lower on ladder. Less strain on upper body, shoulders and neck; however, more difficult to stabilize pelvis and lumbar spine.
2. LATERALLY ROTATED. Complete exercise maintaining lateral rotation at hip joints throughout.
Modification 1


2. lower legs spine extended
Lower & Lift
Corkscrew
NOTE: Trained professional must spot for all Flat Back exercises.
STARTING POSITION
Supine, with lumbar extended on apex of barrel. Upper torso neutral, parallel with floor, cervical spine may be slightly flexed to prevent strain. Arms overhead, elbows flexed, holding handles of top rung of ladder. Palms up or down depending on ability to stabilize. Legs straight, parallel, adducted and reaching away from torso on diagonal as low as pelvic stability can be maintained. Scapulae stabilized.
EXERCISE
To begin...
INHALE hinge legs toward torso, then sequentially articulate spine through flexion off barrel one vertebra at a time, from tail to thoracic, and reach legs overhead, parallel to floor. Feel pressure of thoracic area on barrel to aid in flexion and security.
Then...
EXHALE reach legs to one side and begin to roll spine sequentially in a straight line onto barrel. Continue rolling down, allowing feet to draw outline of circle. Reach legs out on diagonal once tailbone rests on barrel. Maintaining pelvic stability, circle legs to opposite side and begin rolling up that side.
INHALE continue rolling spine off barrel, sequentially to thoracic, with legs returning to center overhead.
Complete 3 repetitions in each direction, alternating.
To finish...
EXHALE roll down center of spine, returning to starting position.


5. reach legs through center 6. reach legs to other side 7. roll over
reach legs overhead
1. starting position
2. roll over
3. reach legs to one side 4. roll down
Corkscrew
GETTING
INTO HANDSTAND POSITION
NOTE: Trained professional must spot getting into and during the exercise.
Stand facing barrel and place hands fairly close to frame on floor. Reach one leg up toward ceiling. Press up to vertical, resting upper spine against barrel and allow spotter to catch leg. Extend second leg up toward ceiling and rest lumbar spine against barrel. Maintain eyeline directly forward.
STARTING POSITION
In handstand, on outside of barrel, close enough so lumbar curve rests comfortably against barrel. Spine in some extension over barrel. Legs straight, parallel and adducted, reaching directly toward ceiling.
EXERCISE
To prepare, inhale...
EXHALE flex spine to bring pelvis away from barrel and directly over rib cage. Keep thoracic area in contact with barrel and legs reaching directly toward ceiling.
INHALE return to starting position with lumbar extended and pelvis resting on barrel.
Complete 3 – 5 repetitions.
Getting into Position


NOTE: This exercise may not be appropriate for an individual who is too small or tall for the barrel. Lumbar spine should rest in a comfortable, supported position against barrel to begin exercise.


3. press up to vertical 4. extend both legs
1. place hands on floor
2. reach one leg to ceiling
Complete Ladder Barrel
