All rights reserved. No part of this book, including photography, may be reproduced, stored in a retrieval system or transmitted in any form or by any means, without the prior written permission of the publisher.
STOTT PILATES; Intelligent Exercise. Profound Results.; CORE Athletic Conditioning & Performance Training; Fitness Circle; Flex-Band; Leaders in Mindful Movement; Merrithew; Merrithew Publishing; MPX; SPX; Stability Chair; The Professional’s Choice; Total Barre; V2 Max; and ZEN•GA are trademarks or registered trademarks of Merrithew International Inc. Halo Training is a registered trademark of HALO Rehab and Fitness, LLC.
Rib Cage Placement
RIB CAGE PLACEMENT PRINCIPLE EXPLAINED
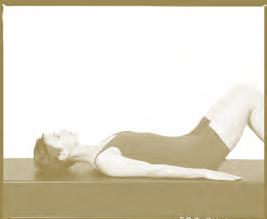
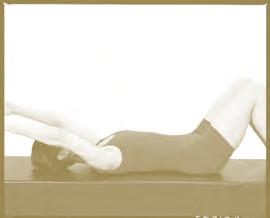
As the abdominal muscles attach to the lower ribs, they must be recruited to maintain the rib cage and the thoracic spine in good alignment. Often the rib cage will tend to lift up from a supine position or deviate forward in a sitting position, extending the thoracic spine. Pay particular attention during inhalation or while performing arm gestures overhead.
Utilizing the patterns described in the breathing principle and maintaining abdominal engagement at all times, can help monitor thoracic alignment. When supine and neutral, maintain the sense of the weight of the ribs resting gently on the mat (i.e. maintain the normal, slightly posterior curve, of the thoracic spine). Neither allow the rib cage to lift away from the mat, nor push the rib cage into the mat. Emphasize breathing into the posterior, lateral and anterior aspects of the rib cage and the abdomen during each inhalation. Allow the two sides of the rib cage to close in toward each other during each exhalation. Avoid overly depressing the rib cage during exhalation, which may cause excessive flexion of the thoracic spine, hyperextension of the cervical spine and cause deactivation of the transversus abdominis.
As discussed earlier, the rib cage naturally depresses (closes in and down) while the spine flexes slightly during exhalation. For this reason, thoracic flexion is most often performed on an exhale.
Also discussed earlier, the rib cage naturally expands (opens out and up) while the spine extends slightly during inhalation. When performing spinal extension, it is necessary to allow the ribs to open anteriorly to facilitate a greater range of motion. Attempting to maintain the ribs in a closed position will hinder the amount of extension available. Performing extension on an inhale may allow a greater range, however, be sure not to sacrifice abdominal engagement and spinal stabilization. It is important not to completely relax the abdominal muscles; otherwise a loss of spinal stability will result. In order to maintain support, extensions may be performed on an exhale.
ribs popping
arms reach overhead
starting position
arms reach to ceiling
Rib Cage Placement
RIB CAGE PLACEMENT PRINCIPLE EXERCISES
The following movements demonstrate the principle of rib cage placement.
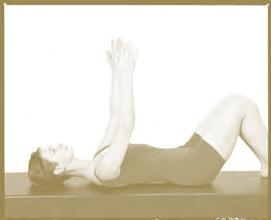
STARTING POSITION
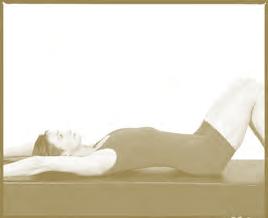
Supine, pelvis and spine neutral. Knees flexed, feet abducted hip - distance apart on mat. Arms long by sides, palms down.
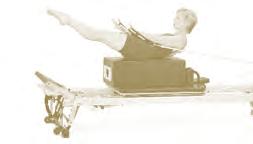
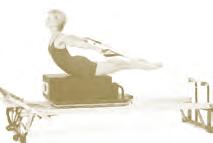
1. ARM RAISES
INHALE reach arms to ceiling.
EXHALE reach arms overhead only as far as abdominal connection can be maintained and rib cage can remain in contact with mat.
INHALE reach arms to ceiling.
EXHALE lower arms down by sides.
NOTE: Position box lengthwise on carriage up against shoulder rests for the entire First Long Box series.
footbar position #3, 2 springs
NOTE: The version of this exercise performed on the ladder barrel can aid in learning the exercise, before attempting it on the reformer.
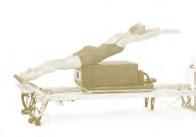
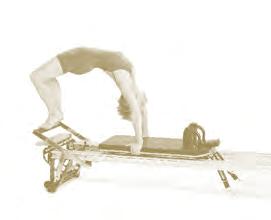
STARTING POSITION
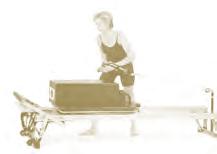
Prone on box, head toward pulleys. Upper thighs positioned at front edge of box (for comfort, avoid being directly on pubic bone).
Pelvis and spine neutral. Legs laterally rotated and flexed to bring carriage in as far as possible without shifting position on box. Balls of feet on footbar, heels together, toes apart. Scapulae stabilized. Arms rounded around sides of box and reformer.
EXERCISE
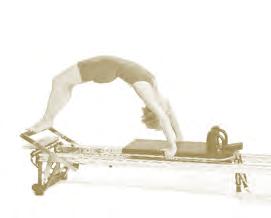
INHALE extend legs to move carriage out. Simultaneously, lengthen spine to neutral to form one line from feet to head (dart position), reaching arms to continue line, palms down.
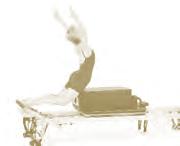
EXHALE extend spine, reaching chest toward ceiling, flex knees and extend hips. Simultaneously, reach arms up toward ceiling, opening them slightly and turning palms to face each other.
INHALE extend legs, lowering and lengthening torso to dart position, reaching arms to continue line, palms down.
Repeat extension of spine on exhale and lowering to dart on inhale.
EXHALE flex knees to return carriage and lower torso, rounding arms around sides of box to return to starting position.
Complete 3 full sets.
NOTE: Heels can come apart slightly as legs extend fully, but come together again as knees flex.
3. extend
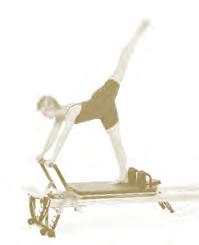
Swan Dive
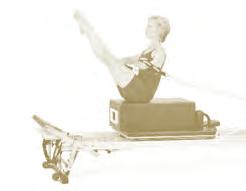
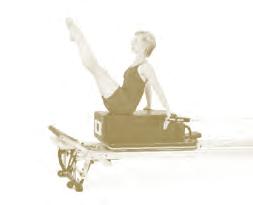
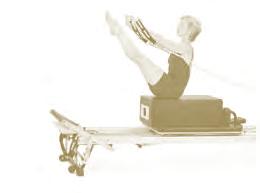
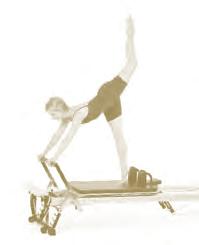
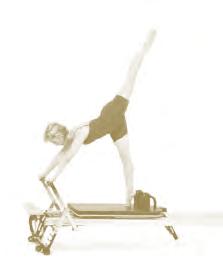
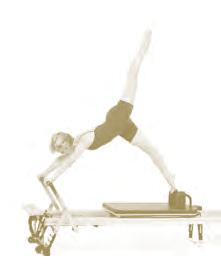
2. TEARDROPS OUTWARD
footbar position #3, 1 spring
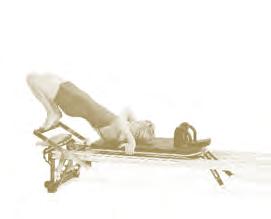
STARTING POSITION
Supine on box, head toward pulleys. Upper body (from about mid-scapulae up) extended off end of box. Lumbo-pelvic region neutral, upper thoracic and cervical spine extended. Legs straight, adducted, as low as neutral pelvis can be maintained. Arms straight reaching down by sides of box, hands in straps, palms facing up. Scapulae stabilized.
EXERCISE
To begin...
INHALE initiate from head and begin to flex upper body. Simultaneously, initiate arm movement by stabilizing scapulae, and reach arms forward and slightly in toward midline to begin moving carriage out.
EXHALE continue to sequentially articulate spine off box, rolling through imprint, then reach legs up and continue to roll spine off box to balance in V position. Simultaneously, continue to reach arms forward, directly in front of shoulders, as high as possible up to eye level, palms facing up.
4. circle arms outward
2. begin to flex
Teardrops Outward
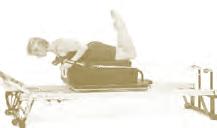
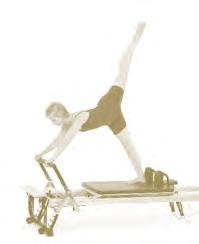
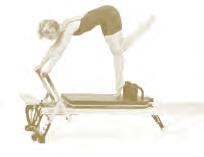
1. BREAST STROKE
footbar position #3, 1 spring
STARTING POSITION
Prone on box, head toward footbar, positioned so kneecaps are just off back end of box. Pelvis and spine neutral, upper body parallel to floor. Legs parallel and adducted, knees flexed with ankles plantar flexed and toes gently pointed. Hands in straps, elbows flexed by sides with hands next to shoulders, palms facing in. Scapulae stabilized.
EXERCISE
INHALE reach arms straight forward shoulder-distance apart, palms facing floor. Simultaneously, extend legs to form one long line from feet to hands.
EXHALE circle arms out to sides then back toward feet and extend spine as high as possible maintaining abdominal support. Draw back of pelvis toward back of femurs to extend hips and lift ASIS off box, bringing torso higher. Simultaneously, laterally rotate and abduct legs just wider than shoulders. Stabilize scapulae and use resistance of springs to help lift torso.
INHALE lengthen torso down onto box and flex elbows and knees, returning to starting position.
EXHALE remain in starting position ensuring neutral pelvis, engaged abdominals and stabilized scapulae.
3. extend spine
4. return
2. reach forward
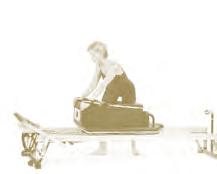
lunge forward and hold end of box
Getting onto the Box
1. starting position
place hands in straps
Breast Stroke
Arabesque / Attitude
footbar position #1, 1 to 2 springs
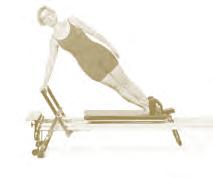
STARTING POSITION
Stand on carriage, one foot against shoulder rest, ankle dorsiflexed and hands holding footbar. Spine slightly extended. Pelvis over supporting leg, slightly rotated toward gesture leg but as square as possible. Gesture leg long reaching up directly behind hip, laterally rotated and extended (arabesque position). Shoulders completely square, heels of hands placed on footbar, shoulder-distance apart, scapulae stabilized. Arms long without locking elbows, elbows angled back.
EXERCISE
INHALE keep torso, arms and gesture leg stabilized and still in space and extend supporting hip to press carriage out only as far as stability can be maintained.
EXHALE keep reaching gesture leg up and flex supporting hip to pull foot back under pelvis and return carriage.
Complete 5 repetitions on each side.
ESSENCE
TARGET MUSCLES: transversus abdominis to compress abdomen and stabilize lumbo-pelvic region; deep pelvic floor to aid in firing transversus; erector spinae isometrically to maintain extended position; obliques to prevent overextension of lumbar spine; hip extensors of supporting leg concentrically to push carriage out, eccentrically on return; hip flexors of supporting leg concentrically to return carriage; hamstrings, gluteus maximus and lateral rotators of gesture leg isometrically to maintain height of leg; obliques and multifidus to resist over-rotation of pelvis; scapular stabilizers
STABILITY: scapulae and arms; spine and gesture hip in extension
MOBILITY: supporting hip flexion and extension
ENDURANCE: hip extensors to maintain gesture leg in extension during movement
FOCUS
w isolate movement at supporting hip joint to move carriage; avoid moving from shoulders
w maintain abdominal support to stabilize spine in extension during movement of hips
w maintain scapular stabilization throughout w keep shoulders square to footbar
w use obliques to stabilize pelvis in slightly rotated position
w keep weight over supporting foot as much as possible rather than on hands
w keep gesture leg reaching high and extended at hip as carriage is both pressed out and pulled in
MODIFICATIONS
1. PREP / FLAMINGO. To master action of moving carriage with supporting leg, stabilizing spine and pelvis, without bearing load of gesture leg in extension. Starting with gesture leg parallel, flexed at hip and knee. Spine as neutral as possible. Keep gesture leg still in space; do not allow it to move as carriage is pressed out.
2. ATTITUDE. Start with gesture leg laterally rotated and flexed slightly at knee. Works gluteus maximus to maintain hip in extended position, but not as challenging as full exercise.
3. HIGH HALF TOE. Can be used with Arabesque, Attitude or Flamingo. Foot of supporting leg on high half toe, with ball of foot on carriage and heel against shoulder rest. Challenges ankle stability more, but less hamstring and calf flexibility required.
4. HIGH HALF TOE ON TOP OF SHOULDER REST. Can be used with Arabesque, Attitude or Flamingo. Balancing on ball of foot on top of shoulder rest with heel raised. Challenges ankle stability further and balance in general; also more strength required from hip flexors to return carriage.
Modification 1
2
Modification
Modification 3
Modification 4
attitude (shown in high half toe)
high half toe on top of shoulder rest
prep (shown in high half toe)
High Bridge
NOTE: Trained professional must spot throughout exercise supporting lumbar area and helping individual get into and out of high bridge position.
1. FEET ON FOOTBAR
footbar position #3, 2 springs
STARTING POSITION
Body in a ‘bridge’ position, feet on footbar, hands on carriage. Spine in extension with front of torso facing ceiling. Hips fully extended, legs laterally rotated and knees flexed. Balls of feet on footbar, toes apart, heels together. Arms reaching overhead, holding around sides of carriage, elbows as extended as possible, pressing down against carriage to lift upper body and head off carriage without moving carriage out. Scapulae stabilized.
into Starting Position
EXERCISE
INHALE stabilize spine and hips in extension and extend knees somewhat to press carriage out as far as possible maintaining control and stabilized spine.
EXHALE stabilize spine and hips in extension, do not allow lumbar spine to extend further and flex knees to control return of carriage.
Complete 5 repetitions.
FOCUS
w support and protect spine in extended position with abdominal contraction
w isolate movement at knee joints
w maintain even extension throughout spine; avoid overextending lumbar and/or cervical spine
w keep heels gently squeezing together
w keep front of hips as open as possible by supporting with gluteus maximus and hamstrings
MODIFICATION
1. HANDS HOLDING TOP OF SHOULDER RESTS. Requires more strength to maintain position, but less flexibility because body is in a more lengthened extension.
Feet on Footbar
Getting
2. STAR
footbar position #1, 1 to 2 springs
STARTING POSITION
Lean on a diagonal, facing side. Pelvis and spine neutral, one line from feet to head. Legs straight with bottom foot pressed against front shoulder rest, top foot resting on bottom foot, ankle plantar flexed. Supporting arm straight holding footbar in line with shoulder, scapula stabilized. Top arm straight resting along top side, palm facing thigh.
EXERCISE
INHALE maintain long line from feet to head and scapular stabilization, and abduct supporting arm to press carriage out. Simultaneously, abduct free arm and leg.
EXHALE maintain long line from feet to head and scapular stabilization, and adduct supporting arm to control return of carriage. Simultaneously, adduct free arm and leg.
Complete 5 repetitions on each side.
ESSENCE
TARGET MUSCLES: transversus abdominis to compress abdominals and stabilize lumbo-pelvic region; deep pelvic floor to aid in firing transversus; obliques and erector spinae to stabilize torso as carriage is pressed out and in; supporting with obliques and hip abductors to prevent pelvis sinking toward floor; hip abductors of free leg concentrically to lift leg, eccentrically as leg lowers; scapular stabilizers of supporting side, especially serratus anterior; deltoids and supraspinatus of supporting arm concentrically to initiate press out; latissimus dorsi and teres major eccentrically to control shoulder abduction, concentrically to initiate shoulder adduction; deltoids eccentrically to control return of carriage; deltoids of top arm concentrically as arm lifts, eccentrically as arm lowers; gluteus maximus, hamstrings and abdominals to stabilize pelvis in neutral; obliques and multifidus to prevent rotation
STABILITY: scapula and arm of supporting side; torso; pelvis on supporting femur
MOBILITY: shoulder adduction and abduction; gesture hip abduction and adduction
ENDURANCE: supporting arm and scapular stabilizers; torso stabilizers