All rights reserved. No part of this book, including photography, may be reproduced, stored in a retrieval system or transmitted in any form or by any means, without the prior written permission of the publisher.
STOTT PILATES; Intelligent Exercise. Profound Results.; CORE Athletic Conditioning & Performance Training; Fitness Circle; Flex-Band; Leaders in Mindful Movement; Merrithew; Merrithew Publishing; Stability Chair; The Professional’s Choice; Total Barre; and ZEN•GA are trademarks or registered trademarks of Merrithew International Inc. Halo® Training is a registered trademark of HALO Rehab and Fitness, LLC.
Breathing
The STOTT PILATES method incorporates modern theories of exercise science and spinal rehabilitation through the Five Basic Principles. As the basis of the exercises in the technique, these biomechanical principles are related to body awareness and proper alignment. Rather than being separate entities, the five principles – breathing, pelvic placement, rib cage placement, scapular movement and stabilization, and head and cervical placement – work together to create Intelligent Exercise that is both safe and effective. Teaching clients the principles at an early stage in their program ensures that they will become aware of how the body moves and functions. This helps enhance skill level and mindfulness, and ensure focus and control, allowing them to reap the full benefits of this method.
BREATHING PRINCIPLE EXPLAINED
Incorporating proper breathing during exercise may help relax the muscles and avoid unnecessary tension. A relaxed and full breath pattern can encourage focus and allow concentration on each task. Proper inhalation and exhalation may also help achieve dynamic stability during exercise. In all exercises the initial breath and awareness of stabilization should occur before the actual movement.
The breath pattern used during STOTTPILATES exercises should contribute to the execution of the movements rather than hindering them. Breathing shallowly only into the upper portion of the rib cage may cause overuse of the accessory breathing muscles and create tension in the neck and shoulder area. We encourage a more threedimensional breath, expanding the rib cage posteriorly and laterally. There should be light engagement of the abdominal wall, and the diaphragm should depress, causing the abdomen to expand slightly. It is also important to breathe into the lower lobes of the lungs, because there is more efficient gas exchange.
The breath pattern used in STOTT PILATES should encourage the engagement of the deep stabilizers of the torso. This involves activation of the transversus abdominis first, followed by the oblique abdominals. Simultaneous engagement of the pelvic floor and the multifidus with the transversus is encouraged during both the inhale and exhale.
This will provide more complete stabilization through the pelvis and entire lumbo-pelvic region.
Anatomically, during exhalation, the rib cage closes in and down while the spine flexes slightly. For this reason, an exhale is suggested to encourage spinal flexion. During inhalation, the rib cage opens out and up while the spine extends. Therefore an inhale is suggested to encourage spinal extension. An exhale may be used during spinal extension in order to maintain abdominal recruitment to stabilize and support the lumbar spine.
Although this type of breath pattern is specifically useful while practicing STOTT PILATES, other types of breathing may be more practical when performing other activities. Developing an awareness of breath patterns will facilitate adaptation to any training necessary.
BREATHING PRINCIPLE EXERCISES
The following movements demonstrate the principle of breathing.
1. NOTICE NATURAL BREATH PATTERN
With body supine, breathe smoothly, noticing natural breath pattern. Is breath affecting one area more than others? Consider the abdominal cavity, upper chest, sides and back of rib cage.
2. BREATHING FLEXED FORWARD
This may encourage breathing into the sides and back of the rib cage. Start sitting in a neutral position, weight on top of sit-bones. Arms relaxed.
INHALE to prepare.
EXHALE initiate from top of head and sequentially articulate spine into forward flexion, relaxing over legs.
Then …
INHALE through nose, feeling sides and back of rib cage expand.
EXHALE through pursed lips, allowing rib cage to close.
Complete 3–5 repetitions
On last exhale, initiate from tail and sequentially articulate spine, rolling up to starting position. Repeat.
Breathing Flexed Forward
Scapular Movement & Stabilization
SCAPULAR MOVEMENT & STABILIZATION
PRINCIPLE EXPLAINED
Stabilizing the scapulae (shoulder blades) on the rib cage is extremely important as they serve as an anchor for the arms as well as support the cervical spine. When this is not done, there is a tendency to overwork the muscles around the neck and shoulders.
Be aware of scapular stabilization at all times: a) when the spine is neutral and the arms are resting; b) when the spine is flexing or extending; c) when the arms are moving in any direction. Due to the lack of direct bony attachment to the rib cage and spine, the scapulae have a great deal of mobility. In making a greater range of motion available to the arms, the scapulae can glide upward (elevation), downward (depression), inward (retraction) and outward (protraction), can rotate upward or downward, or perform any combination of the above.
Through the whole shoulder girdle, a sense of stability, not rigidity, should always be maintained. A sense of width should be maintained across the front and back of the shoulder girdle.
The shoulders should not be allowed to give in to excessive movements. The scapulae should lie flat on the rib cage and glide across it without winging markedly (this refers to the medial border of the scapulae coming away from the rib cage). Keep in mind that the scapulae will react to movements of the arms and thoracic spine. For example, the scapulae will naturally elevate and upwardly rotate during overhead movements and protract during thoracic flexion.
Be aware that a neutral placement of the scapulae may be slightly different from a particular individual’s natural resting position. An ideal working alignment must be established for each individual. Scapular stabilization should be part of the initiation of all exercises, and established before the movement of exercise begins. When flexing the torso off the mat from a supine position, scapular stabilization will discourage neck tension and excessive protraction of the scapulae and medial rotation of the humeri. Spinal extension should be initiated with stabilization of the scapulae while reaching the top of the head away from the tailbone. This limits the tendency to over-exaggerate movements and decrease dynamic stability through the whole upper kinetic chain.
Throughout this manual, when describing the exercises, we will refer to the scapular stabilizers collectively rather than naming individual muscles. The focus is on serratus anterior, trapezius, rhomboids, levator scapulae and pectoralis minor.
Cat Stretch
STARTING POSITION
On hands and knees with arms under shoulders and knees under hips, knees abducted hip-distance apart. Pelvis and spine neutral.
EXERCISE
INHALE maintain starting position.
EXHALE initiate by rolling ASIS away from front of femurs and sequentially articulate spine into flexion from tailbone to head. Allow scapulae to protract without tensing upper trapezius.
INHALE keep abdominals engaged and expand back of rib cage, keeping head and shoulders relaxed.
EXHALE sequentially articulate spine into slight extension from tailbone to head.
Complete 3 – 5 repetitions.
FOCUS
w achieve even flexion throughout spine
w maintain engagement of abdominals to support lumbar spine in extension
MODIFICATIONS
1. FEET OFF END OF RAISED MAT. For tightness through dorsal portion of foot.
2. REVERSE SEQUENCING. Articulate spine from head to tail on both flexion and extension.
3. SEQUENCE FROM CENTER OF SPINE.
4. TWO BREATHS. Use exhale on flexion, inhale on extension. To speed up exercise once engagement of abdominals on extension is familiar.
1. starting position
2. flexion
3. slight extension
Cat Stretch
STARTING POSITION
Supine, imprinted position. Legs parallel and adducted in air with knees flexed, ankles plantar flexed, toes gently pointed (tabletop position). Arms long by sides, palms down, scapulae stabilized.
EXERCISE
To begin…
INHALE stay.
EXHALE lengthen back of neck, then maintain length and stabilize scapulae, contract abdominals to slide rib cage toward pelvis, and flex thoracic spine, reaching arms off mat, level with shoulders. Simultaneously, extend legs as low as imprint can be maintained.
Then…
INHALE for five counts, maintaining spinal flexion, scapular and pelvic stability while doing small vertical pulses with arms.
EXHALE for five counts, continuing to pulse arms.
Complete 10 sets (total of 100 counts).
To finish…
INHALE remain in spinal flexion, flex knees, and continue to reach arms.
EXHALE return upper body to mat, legs in air.
NOTES
w builds on basic principles of Ab Prep
w may be done stabilizing lumbo-pelvic region in neutral once strength is gained and ability demonstrated
ESSENCE
TARGET MUSCLES: transversus abdominis to compress abdomen and stabilize lumbo-pelvic region; deep pelvic floor to aid in firing transversus; rectus abdominis and obliques to create and sustain thoracic flexion and imprint; scapular stabilizers against movement of arms; hip flexors, adductors and quadriceps isometrically
STABILITY: upper body in flexion; lumbo-pelvic region imprinted against weight of legs; scapulae against movement of arms
ENDURANCE: required from abdominals to maintain thoracic flexion and stabilize pelvis throughout
FOCUS
w stabilize scapulae throughout to avoid upper body tension
w maintain imprint throughout exercise
w avoid overly tucking pelvis
w initiate movement of arms at shoulder joint, not elbow; put emphasis on downward motion with arms
w avoid overworking rectus abdominis over flexing lumbar spine, coming too high, giving appearance of popping abdominals
w maintain thoracic flexion throughout exercise
3. remain in flexion, flex knees
end position
1. starting position
2. working position – legs as low as imprint can be maintained
Modification 2
MODIFICATIONS
1. HEAD AND FEET ON MAT. Pelvis neutral. Practice breath with arm movement. Focuses on scapular stabilization and full breath pattern.
2. FEET ON MAT IN NEUTRAL PELVIS. With upper body flexed. For those with vulnerable lower back or not enough strength in abdominals to stabilize pelvis with legs in air.
3. TABLETOP POSITION. Releases hip flexors. Intermediate stage for those not strong enough to stabilize pelvis with legs fully extended.
4. BREATHE IN STACCATO RHYTHM. Helps promote full breath pattern and avoid holding breath.
5. FITNESS CIRCLE RESISTANCE RING. Between knees or ankles. Adds lower-body resistance. Legs can be tabletop or diagonal.
6. FLEX HIPS AND KNEES. For five counts on inhale (to tabletop position), then extend legs for five counts on exhale. Challenges coordination.
7. HEAD AND SHOULDERS ON MAT. Legs tabletop. Alleviates neck tension due to weakness in cervical flexors or abdominals. Progress to one hand behind head with upper body flexed, pulsing with one arm for 50 counts then switching.
8. SHOULDERS ON ARC BARREL. Assists abdominals with thoracic flexion. Resting head on Barrel as well will eliminate neck tension while encouraging thoracic flexion (may need foam cushion under head).
9. SPINE SUPPORTER. Develops abdominal strength and/or alleviates neck tension due to weakness in cervical flexors or abdominals.
10. FLEX-BAND EXERCISER AROUND FEET. Holding both ends. Adds upper-body resistance to challenge latissimus dorsi and supports weight of legs thus making it easier to stabilize pelvis. Another option: keep legs tabletop and hold onto ends of Flex-Band exerciser stretched across shins.
11. SPONGE OR SMALL BALL. Between ankles or knees to aid adductor connection.
Modification 3
Modification 5 Fitness Circle resistance ring between ankles
9
Shoulder Bridge
STARTING POSITION
Supine, pelvis and spine neutral. Knees flexed, feet on mat slightly closer to seat than for Ab Preps. Legs parallel and abducted hip-distance apart. Arms long by sides, palms down, scapulae stabilized.
EXERCISE
To begin…
INHALE stay.
EXHALE stabilize pelvis and spine in neutral and extend hips to lift pelvis off mat, creating bridge position from shoulders to knees.
Then…
INHALE maintain level pelvis and lift one foot, flexing hip and plantar flexing ankle, then extend knee to reach toes to ceiling.
EXHALE dorsiflex ankle and extend leg at hip as low as neutral pelvis can be maintained.
INHALE plantar flex ankle, gently pointing toes, and flex leg at hip.
Repeat extension and flexion of hip twice more.
EXHALE flex knee and lower foot to mat, articulating through foot.
Repeat on other leg.
Complete 2–3 repetitions on each side.
To finish…
INHALE stay and lengthen spine in neutral position.
EXHALE stabilize pelvis and spine in neutral and flex hips to lower pelvis onto mat.
ESSENCE
TARGET MUSCLES: transversus abdominis to compress abdomen and stabilize lumbo-pelvic region; deep pelvic floor to aid in firing transversus; rectus abdominis and obliques help avoid anterior pelvic tilt; hip extensors concentrically to extend hips and lift pelvis; obliques, hip extensors of supporting leg and multifidus isometrically as one leg lifts to avoid pelvis rotating; hip flexors of gesture leg eccentrically as leg lowers and concentrically as leg lifts; scapular stabilizers
STABILITY: pelvis and spine in neutral avoiding rotation as one leg lifts; scapulae
MOBILITY: hip flexion and extension
ENDURANCE: stabilize pelvis and spine in neutral position throughout leg movement
COORDINATION: leg movements with breath, maintaining stability
FOCUS
w lift only as high as upper thoracic area, not onto cervical spine
w maintain contraction of obliques to prevent extension of lumbar spine
w ensure engagement of gluteus maximus and hamstrings to keep hips fully extended
w keep pelvis neutral and level during leg movement
5. lower leg 6. flex hip
4. extend leg to ceiling
1. starting position
2. lift pelvis
3. flex hip
Shoulder Bridge
MODIFICATIONS
1. • SHOULDER BRIDGE PREP / LIFT AND LOWER PELVIS. Develops core strength and stability in neutral.
INHALE stay.
EXHALE stabilize pelvis and spine in neutral and extend hips to lift pelvis off mat, creating bridge position from shoulders to knees.
INHALE stay.
EXHALE flex hips to lower pelvis to mat.
2. • SHOULDER BRIDGE PREP / LIFT AND LOWER ONE LEG. Works on pelvic stability without weight of fully extended leg.
To begin…
INHALE stay.
EXHALE stabilize pelvis and spine in neutral and extend hips to lift pelvis off mat, creating bridge position from shoulders to knees.
INHALE stay.
Then…
EXHALE lift one foot slightly off mat (two to three inches), articulating through foot while keeping spine and pelvis neutral.
INHALE articulate through foot to replace on mat.
EXHALE lift other foot slightly off mat.
INHALE articulate through foot to replace on mat.
Complete 3–6 repetitions.
To finish…
EXHALE flex hips to lower pelvis onto mat.
3. • FITNESS CIRCLE RESISTANCE RING BETWEEN KNEES. Increases lower-body resistance.
INHALE stay.
EXHALE stabilize in neutral and extend hips to lift pelvis off mat to bridge position, gently squeezing ring.
INHALE maintain bridge position and release tension on ring.
EXHALE with controlled pulses, squeeze ring three times, stabilizing spine in neutral.
INHALE release tension.
EXHALE stabilize in neutral and flex hips to lower pelvis to mat.
4. ARC BARREL. Start with pelvis near top of Barrel and perform leg movement as in full exercise, maintaining imprinted position. To assist stabilization while learning movement.
Modification 2
lift one foot slightly
7. flex knee
8. place foot down
9. place pelvis down
Scissors in Air
STARTING POSITION
Supine, imprinted position. Legs parallel and adducted, extended on diagonal as low as imprint can be maintained, ankles plantar flexed, toes gently pointed. Arms long by sides, palms down, scapulae stabilized.
EXERCISE
To begin…
INHALE flex at hips to hinge legs toward torso, then sequentially articulate spine off mat from tailbone to upper thoracic area and reach legs overhead, parallel to mat.
EXHALE extend hips and reach legs to ceiling, placing hands on back for support (weight remains on upper thoracic area, with whole spine somewhat flexed).
INHALE stay, continuing to reach legs to ceiling.
Then…
EXHALE for two counts. Stabilize pelvis and reach one leg into extension at hip, bringing other leg into flexion at hip. Reach further on second count.
INHALE start to switch legs by reaching them to the ceiling so they pass each other in mid-air.
EXHALE for two counts. Stabilize pelvis and reach other leg into extension at hip, bringing opposite leg into flexion at hip. Reach further on second count.
INHALE start to switch legs by reaching them to the ceiling so they pass each other in mid-air.
Complete 5–10 repetitions of scissoring legs. On last inhale, bring legs together and reach toward ceiling.
To finish…
EXHALE place palms down on mat, then sequentially articulate spine down to mat, one vertebra at a time, and maintain imprint as legs return to diagonal.
4. scissor legs 5. switch legs
bring legs together
1. starting position
2. reach legs overhead
3. reach legs to ceiling
Scissors in Air
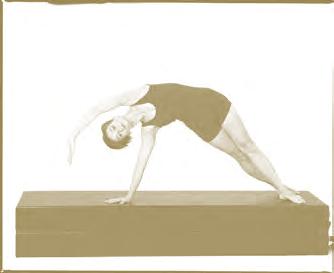
Side Bend
STARTING POSITION
Seated on one hip, facing side, pelvis and spine neutral. Knees flexed with top leg laterally rotated, foot flat on mat slightly forward of sit-bones. Bottom leg resting on mat with foot behind top foot. Torso supported on one hand in line with hip, arm extended. Top arm extended, resting on knee, palm up.
EXERCISE
INHALE stabilize supporting shoulder, and lift pelvis toward ceiling, laterally flexing torso, extending knees and connecting inner thighs to create bow shape between hand and feet. Simultaneously, reach free arm overhead; eye-focus straight ahead.
EXHALE flex knees and lower pelvis to mat, returning to starting position. Lower free arm to knee.
Repeat 3–5 times on each side.
ESSENCE
TARGET MUSCLES: transversus abdominis to compress abdomen and stabilize lumbo-pelvic region; deep pelvic floor to aid in firing transversus; obliques and hip extensors to avoid spinal extension and hip flexion; obliques and multifidus to avoid rotation; ipsilateral internal and external obliques concentrically to laterally flex torso, eccentrically on lowering; scapular stabilizers, particularly serratus anterior; hip adductors of top leg and hip abductors of bottom leg concentrically to help lift pelvis; hip adductors to help stabilize pelvis
STABILITY: supporting scapulae, shoulder and arm; spine during articulation; pelvis on femurs in up position
MOBILITY: spinal articulation; pelvis on femurs
SEQUENCING: initiate by stabilizing scapula on supporting side before lifting
BALANCE: on both feet and one hand
FOCUS
w maintain contraction of abdominals to prevent rib cage from rotating or popping
w engage gluteus maximus, hamstrings and abdominals to prevent pelvis from moving into anterior tilt and flexing hip joints
w laterally flex avoiding notable forward flexion, extension or rotation
w avoid sinking into shoulder
w laterally flex cervical spine relative to thoracic spine
1. starting position
2. lift pelvis toward ceiling
Side Bend
MODIFICATIONS
1. • SIDE BEND PREP. Supporting knee on mat. Hand in line with knee. Develops strength and initiation through arm, shoulder and scapular stabilizers.
To prepare, inhale…
EXHALE stabilize supporting shoulder and lift pelvis toward ceiling, keeping bottom knee on mat and creating bow shape from hand to knee. Reach arm overhead.
INHALE lower pelvis to mat and return to starting position.
2. • SIDE BEND PREP. Start both knees together, sitting on one hip. Perform exercise same as prep above.
3. FOUR BREATHS. To slow down pace.
4. POSITION OF FEET. Starting with feet closer to body requires more lateral flexion; further from body, less lateral flexion.